
C H A P T E R 3
![]()
The BCL and the CLR
Generics, LINQ, the Task Parallel Library (TPL) … these are some of the big-ticket items that have been introduced in previous versions of the .NET Framework. With this release of the framework, it is not so much about game changers or new features but rather about consolidation for the future.
Support for asynchrony has seen the biggest change in the Base Class Library (BCL) with more classes and interfaces, especially in the System.IO namespace, exposing new methods that utilize the TPL to facilitate a more robust asynchronous programming model. Improving performance has also been the focus of the BCL team, especially around the TPL and PLINQ, with a key goal that just by upgrading to .NET 4.5 will, without any other changes, improve code performance.
This chapter is going to be a bit of a mixed bag. In the first section, we will do a quick review of some of the changes that have been made to existing features in the BCL. Next, we will dive into the TPL to look at some of the changes there with a focus on the new dataflow feature. We will look at the portable class library feature, which has come in from the CTP cold to be a full-fledged member of the .NET 4.5 Framework. To finish off the chapter, we will review some of the changes in the Common Language Runtime (CLR).
Changes and Improvements in the BCL
In this section, we are going to review some of the changes and improvements that have been made to the BCL. This won’t be a comprehensive review, but it will include a selection of features that we think are of particular interest.
Console Support for UTF-16
It is now possible to use UTF-16 encoding in console applications, but don’t be fooled, as I was, into thinking I could now write console apps that display Japanese kanji. There are a number of caveats around implementing this, so if you are interested, my recommendation is to read the section on Unicode support for the console on MSDN (http://msdn.microsoft.com/en-us/library/system.console(v=vs.110).aspx).
Timeout Support for Regular Expressions
It is now possible to define a timeout interval for regular expression matches. This value can be set either via the Regex constructor or, if you are using the static methods, by using one of the matching overloads that has a matchTimeout parameter. If a match cannot be identified within the specified interval, then the matching operation throws a RegexMatchTimeoutException. The following code shows this in action:
using System;

using System.Text.RegularExpressions;


namespace TimeoutSupportForRegularExpressions

{

   class Program

   {

      static void Main(string[] args)

      {

         try

         {

            var regEx = new Regex("(a+)+$", RegexOptions.Singleline, TimeSpan.FromSeconds(2));

            var match = regEx.Match("aaaaaaaaaaaaaaaaaaaaaaaaaaaaaaaaaaaaaaaaaaaaa>");

            if (match.Success)

               Console.WriteLine("Match found");

            else

               Console.WriteLine("Not matched");

         }

         catch (RegexMatchTimeoutException ex)

         {

            Console.WriteLine("Failed to find a match for {0} after {1} seconds.",

                            ex.Pattern,ex.MatchTimeout.Seconds);

         }

         finally

         {

            Console.Read();

         }

      }

   }

}
System.IO.Compression
Within the System.IO.Compression namespace, there are a couple things of interest. The first one is that DeflateStream now uses the zlib library for compression, which provides an improved compression algorithm compared with previous versions. The second item of interest is support for zip archives through the introduction of two new assemblies:
System.IO.Compression,which contains the classesZipArchiveandZipArchiveEntrySystem.IO.Compression.FileSystem,which contains the classZipFileandZipFileExtensions(This class contains extension methods for theZipArchiveandZipArchiveEntryclasses.)
The ZipFile Class
The ZipFile is a static class that exposes four methods that allow you to create zip files from and extract them to a directory as well as two methods that allow you to open an archive. In the following code example, we will use the CreateFromDirectory() method to create a new zip file and then add another file using the Open() method. Finally, we will extract the zipped files into a new directory using the ExtractToDirectory() method. To run this example, you will need to add a reference to System.IO.Compression and System.IO.Compression.FileSystem as well as to add a using statement for the System.IO.Compression namespace.
static void Main(string[] args)

{

  var directoryToArchive = @"c:	empPresentations and materials";

  var archiveFileLocation = @"c:	emppresentations.zip";

  var readMeFile = @"c:	emp
eadme.txt";


  if (File.Exists(archiveFileLocation))

    File.Delete(archiveFileLocation);


  Console.WriteLine("starting zip");


  ZipFile.CreateFromDirectory(directoryToArchive, archiveFileLocation);


  Console.WriteLine("Zip completed");

  Console.WriteLine("Add readme file");


  using (var archive = ZipFile.Open(archiveFileLocation,ZipArchiveMode.Update))

  {

    archive.CreateEntryFromFile(readMeFile, "ReadMe.txt");

  }


  Console.WriteLine("Start Extraction");


  if (Directory.Exists(@"c:	emppresentations"))

    Directory.Delete(@"c:	emppresentations", true);


  ZipFile.ExtractToDirectory(archiveFileLocation, @"c:	emppresentations");

  Console.WriteLine("Extraction completed");

  Console.Read();

}
As you can see, the ZipFile class provides a simple and succinct way for creating and extracting zip files.
![]() Caution It is worth noting at this point that the
Caution It is worth noting at this point that the System.IO.Compression.FileSystem is not available in the .NET Framework subset provided for developing Windows 8-style applications. This is due to the fact that underneath the covers, it uses FileStream, which is not included in the framework subset. The ZipArchive class can be used in Windows 8 apps and an example is given in the next section.
The ZipArchive Class
If you want more control over your archiving process, then the ZipArchive class is what you are looking for. To use it, create an instance of the ZipArchive class and then for each file you wish to archive, create an instance of ZipArchiveEntry and add it to the ZipArchive instance.
For example, let’s say that we just wanted to archive all of the PowerPoint slides in our source directory. The code would look something like this:
var filesToArchive = Directory.EnumerateFiles(directoryToArchive, "*.ppt*", SearchOption.AllDirectories);


using (var fs = new FileStream(archiveFileLocation, FileMode.Create, FileAccess.ReadWrite))

{

  using (var archive = new ZipArchive(fs, ZipArchiveMode.Create))

  {

    foreach (var filename in filesToArchive)

    {

      //The following is for working explicitly with file streams.

      var archiveEntry = archive.CreateEntry(Path.GetFileName(filename));

      using (var filestream = new FileStream(filename,FileMode.Open,FileAccess.Read))

      {

        using (var archiveStream = archiveEntry.Open())

       {

          filestream.CopyTo(archiveStream);

       }

      }


      //Note: The following line of code does the same thing.

      //archive.CreateEntryFromFile(filename, Path.GetFileName(filename));

    }

  }

}
Not only can you create an archive file, but you can also update an existing one by changing the ZipArchiveMode value to Update in the ZipArchive constructor. Building on the previous example, if you wanted to add all the images associated with the presentations to the archive file, you could do the following:
var imagesToArchive = Directory.EnumerateFiles(directoryToArchive, "*.*", SearchOption.AllDirectories)

                               .Where(fn => fn.EndsWith(".jpg", true, null) || fn.EndsWith(".png", true, null));


using (var fs = new FileStream(archiveLocation, FileMode.Open, FileAccess.ReadWrite))

{

  using (var archive = new ZipArchive(fs, ZipArchiveMode.Update))

  {

    foreach (var filename in imagesToArchive)

    {

      archive.CreateEntryFromFile(filename, Path.Combine(archiveSubDirectory, Path.GetFileName(filename)));

    }

  }

}
It is worth noting that unlike ZipFile.CreateFromDirectory(), adding individual files does not automatically preserve the file’s path in relation to the root directory. Therefore, if you want to preserve a file’s relative path, you will need to add some code to extract or, as in the above example, append a folder name that suits your archiving requirements.
![]() Caution Since
Caution Since ZipArchive uses streams, you need to ensure that when using file streams, the file mode and file access correspond to the action you are performing with the zip archive. For instance, if you created a new FileStream object with file mode set to Create and a new instance of ZipArchive with zip archive mode set to Update, your code would fail because updating an archive requires read, write, and seek capabilities.
You are not limited to archiving files in the file system. Zip archives can also be created on the fly. If, for example, you wanted to add a read me file to the archive, you can do the following:
using (var fs = new FileStream(archiveFileLocation, FileMode.Open, FileAccess.ReadWrite))

{

  using (var updateArchive = new ZipArchive(fs, ZipArchiveMode.Update))

  {

    var readmeEntry = updateArchive.CreateEntry("Readme.txt");

    using (var writer = new StreamWriter(readmeEntry.Open()))

    {

      writer.WriteLine("This zip file contains presentations and resources");

      writer.WriteLine("from 2011.");

    }

  }

}
Finally, the ZipArchive allows you to open an existing archive to query the individual zip archive entries and extract files:
using (var fs = File.OpenRead(archiveFileLocation))

{

  using (var archive = new ZipArchive(fs, ZipArchiveMode.Read))

  {

    foreach (var zipArchiveEntry in archive.Entries)

    {

      decimal originalSize = (decimal)zipArchiveEntry.Length;

      decimal compressedSize = (decimal)zipArchiveEntry.CompressedLength;

      decimal compressionRatio;

      if (originalSize == 0)

        compressionRatio = 0;

      else

        compressionRatio = Math.Round((1 - (compressedSize / originalSize)) * 100, 0);


      Console.WriteLine("Entry Name: {0}", zipArchiveEntry.Name);

      Console.WriteLine("Full Name: {0}", zipArchiveEntry.FullName);

      Console.WriteLine("Compression Ratio: {0}%", compressionRatio);


      Console.WriteLine();

    }


    archive.Entries.Where(zae => zae.Name.EndsWith(".pptx", true, null))

      .ToList()

      .ForEach(zae => zae.ExtractToFile(Path.Combine(@"d:	emp", zae.FullName), true));

  }

}
The ZipArchive class can be also be used in Windows 8 applications. The following example showing how to archive files should give you a good starting point for adding this functionality to your Windows 8 app:
private async Task ZipUpFiles(IProgress<Tuple<string, double>> progress)

{

  var files = await SelectFiletsoZip();

  var totalFiles = files.Count;


  var zipFile = await GetZipFile();


  using (var zipFileStream = await zipFile.OpenStreamForWriteAsync())

  {

    using (var zipArchive = new ZipArchive(zipFileStream, ZipArchiveMode.Create))

    {

      var counter = 0;

      foreach (StorageFile fileToCompress in files)

      {

        var entry = zipArchive.CreateEntry(fileToCompress.Name);

        using (var entryStream = entry.Open())

        {

          using (var fileStream = await fileToCompress.OpenStreamForReadAsync())

          {

            await fileStream.CopyToAsync(entryStream);

          }

        }

        counter++;

        double percentageDone = Math.Round(((double)counter / (double)totalFiles) * 100, 2);

        progress.Report(new Tuple<string, double>(fileToCompress.Name, percentageDone));

      }

    }

  }

}


private static async Task<IReadOnlyList<StorageFile>> SelectFiletsoZip()

{

  var openPicker = new FileOpenPicker();

  openPicker.CommitButtonText = "Archive";

  openPicker.ViewMode = PickerViewMode.List;

  openPicker.SuggestedStartLocation = PickerLocationId.ComputerFolder;

  openPicker.FileTypeFilter.Add("*");


  var files = await openPicker.PickMultipleFilesAsync();

  return files;

}

private async Task<StorageFile> GetZipFile()

{

  var fileSaver = new FileSavePicker();

  fileSaver.SuggestedStartLocation = PickerLocationId.ComputerFolder;

  fileSaver.FileTypeChoices.Add("Zip Files", new List<string> { ".zip" });

  return await fileSaver.PickSaveFileAsync();

}
So, whether you just use the static methods in the ZipFile or go for more fine-grained control with ZipArchive, though not earth-shattering, these classes are a nice addition to the BCL.
WeakReference<T>
A weak reference provides the means to reference an object while still allowing it to be reclaimed by garbage collection. This is particularly useful for managing large objects that can be easily regenerated. Prior to .NET 4.5, in order to use a weak reference you would code something like this:
public class AClassWithNoPurpose

{

  private WeakReference wr = new WeakReference(new StringBuilder("A weakly referenced string builder"));


public StringBuilder AStringBuilder

{

     get

        {

            StringBuilder tempStringBuilder;

             if (wr.IsAlive)

             {

        tempStringBuilder = wr.Target as StringBuilder;

              }

              else

             {

                 tempStringBuilder = new StringBuilder("String builder reserected");

        wr = new WeakReference(tempStringBuilder);

               }

              return tempStringBuilder;

          }

   }

}
The thing to notice about the previous code is that the WeakReference constructor only takes a type of Object, which means you need to cast the target to the expected type before you can use it.
With .NET 4.5, we can now define the type exposed by the weak reference by using WeakReference<T>. Let’s modify the previous example to use this:
public class AClassWithNoPurpose

{

    private WeakReference<StringBuilder> wr = new WeakReference<StringBuilder>(
        new StringBuilder("A weakly referenced string builder"));


    public StringBuilder AStringBuilder

   {

      get

     {

          StringBuilder tempStringBuilder;

           if (!wr.TryGetTarget(out tempStringBuilder))

           {

               tempStringBuilder = new StringBuilder("String builder resurrected ");

               wr = new WeakReference<StringBuilder>(tempStringBuilder);

           }

          return tempStringBuilder;

      }

    }

}
Aside from the fact that we now have a strongly typed weak reference, the key thing to note is that WeakReference<T> no longer exposes an IsAlive or Target properties. Instead you now use the TryGetTarget() method, which takes an uninitialized parameter of type T and returns true or false depending on whether the weak reference still holds a valid instance of T. This small change negates the potential where the target gets garbage collected after the IsAlive property is queried but before the Target is accessed. (As an aside, the recommended practice, when using WeakReference, is to just cast the target to the expected type and test for null.)
Changes in Streams
As mentioned above, improving the asynchronous story for developers has been a key driver in many of the changes made to .NET 4.5. To this end, four new methods (excluding overrides) have been added to base Stream class that takes advantage of the Task Parallel Library. These methods include the following:
CopyToAsync()FlushAsync()ReadAsync()WriteAsync()
All of these methods return an instance of Task and can be called with the await keyword. So, for example, with FileStream you can now do the following:
private async static Task<string> GetFileAsync(string fileName)
{
var unicodeEncoding = new UnicodeEncoding();
byte[] result;
using (var stream = new FileStream(fileName, FileMode.Open))
{
result = new Byte[stream.Length];
var readTask = await stream.ReadAsync(result, 0, (int)stream.Length);
}
return unicodeEncoding.GetString(result);
}
Defining a Culture for an Application Domain
In previous versions of .NET, the culture of all threads was, by default, set to the Windows system culture. Using Thread.CurrentThread.CurrentCulture and Thread.CurrentThread.CurrentUICulture, you could change or set the culture on a thread, but any worker threads or tasks that you spun up would default to the current operating system’s culture. Therefore, if you ran the following code, the output in Figure 3-1 would be the result:
class Program

{

  static void Main(string[] args)

  {

    Console.OutputEncoding = Encoding.UTF8;


    var culture = CultureInfo.CreateSpecificCulture("ja-JP");

    Thread.CurrentThread.CurrentCulture = culture;

    Thread.CurrentThread.CurrentUICulture = culture;


    Action randomCurrency = () =>

    {

      Console.WriteLine();

      Console.WriteLine("Current Culture:	{0}",

        Thread.CurrentThread.CurrentCulture);

      Console.WriteLine("Current UI Culture:	{0}",

        Thread.CurrentThread.CurrentUICulture);


      Console.Write("Random currency: ");

      var rand = new Random();


      for (int i = 0; i <= 2; i++)

        Console.Write("	{0:C2}	", rand.NextDouble());


      Console.WriteLine();

    };

    //Call the randomCurrency action on the current thread

    randomCurrency();


    //now run the same action on another thread

    Task.Run(randomCurrency);


    Console.Read();

  }

}
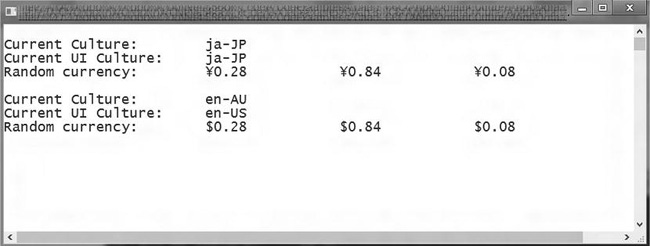
Figure 3-1. Output for current thread culture output
This behavior can be very frustrating. With .NET 4.5, though, the CultureInfo class now exposes two properties—DefaultThreadCurrentCulture and DefaultThreadCurrentUICulture—that allow you to define a culture to be applied to all threads within the app domain.
To do this, replace the lines:
    Thread.CurrentThread.CurrentCulture = culture;

    Thread.CurrentThread.CurrentUICulture = culture;
with:
CultureInfo.DefaultThreadCurrentCulture = culture;

CultureInfo.DefaultThreadCurrentUICulture = culture;
Running the code again, you would get the output as shown in Figure 3-2.
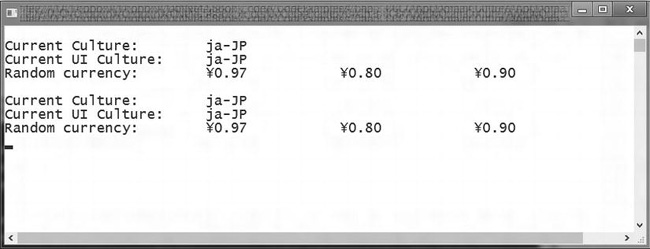
Figure 3-2. Output after setting a default culture
New Features in the Task Parallel Library
With the Task Parallel Library (TPL) becoming the primary player in parallelism, concurrency, and asynchrony, a lot of work has gone into this area to improve performance and functionality. In terms of performance, the BCL team asserts that just by updating to .NET 4.5 without making any other changes to your existing code, there is an immediate performance improvement.
With all of the improvements and additions to the TPL as well as the improved tooling in Visual Studio 11 to facilitate development of parallelized applications, there is no shortage of stuff to write about and explore. To keep things simple, we are going to limit the scope of this section to just a few of the new features. First, we will cover the new methods and functionality that are now part of the Task class as well as the new Progress<T> class. Next, we will look at the new TPL Dataflow (TDF) and, finally, we will finish with the new ConcurrentExclusiveScheduler.
New Task Methods
As part of the further development of the TPL, with .NET 4.5 the Task class exposes some new static methods. These methods are:
Run()Delay()WhenAny()WhenAll()FromResult()Yield()ConfigureAwait()
All of these, except for ConfigureAwait(), return an instance of Task and can be used with the await keyword.
In the next few sections, we will have a quick look at each of these methods to give you a feel for how they work with the intention of giving you a starting point from which to explore these methods further.
Task.Run()
In .NET 4, a common way to create and start a new Task was to call Task.Factory.StartNew(). Now with 4.5, especially if you want to quickly schedule a task, there is also Task.Run(). In essence, this is equivalent to Task.Factory.StartNew(someAction, CancellationToken.None, TaskCreationOptions.DenyChildAttach, TaskScheduler.Default).
At its simplest, Run() can be called by passing in an Action:
var firstTask = Task.Run(() =>

  {

    Thread.Sleep(1500);

    Console.WriteLine("the first task has completed.");

  });
If you want to define a return type, you can use Run<TResult>() which takes a Func<TResult> as a parameter.
var secondTask = Task.Run<string>(() =>

  {

    Thread.Sleep(1000);

    return "The second task has completed.";

  });


secondTask.ContinueWith(task => Console.WriteLine(task.Result));
It is possible to call Run() without specifying a return type and still return a value. Therefore, the following code is also valid since it interprets the parameter we are passing in as being of the type Func<Task>:
var thirdTask = Task.Run(() =>

  {

    Thread.Sleep(1000);

    return "The third task has completed.";

  });


thirdTask.ContinueWith(task => Console.WriteLine(task.Result));
One of the features of Run() is that it will automatically unwrap an inner task. So, what does this mean? Let’s say we were doing the following with the Task.Factory.StartNew() method:
var outerTask = Task.Factory.StartNew(async () =>

  {

    Thread.Sleep(1000);

    return await Task.Factory.StartNew(() =>"A result from an inner task");

  });
Though the result we want is the value being returned by the inner task, what we actually get, if we inspect the Result property of the outer task, is a type of Task<Task<TResult>>. To retrieve the inner task and ensure we handle any exceptions and cancellation requests, as well as the result we are expecting, we apply the extension method UnWrap() to the call:
var outerTask = Task.Factory.StartNew(async () =>

  {

    Thread.Sleep(1000);

    return await Task.Factory.StartNew(() =>"A result from an inner task");

  }).Unwrap();
With Run() this isn’t necessary since it will automatically unwrap the inner task.
var outerTask = Task.Run( () =>

  {

    Thread.Sleep(1000);

    return Task.Run(() => "A result from the inner task.");

  });

outerTask.ContinueWith(t => Console.WriteLine(t.Result));

//Finally Run() provides overloads which allow you to pass in a CancellationToken.

var cancellationTokenSource = new CancellationTokenSource();


Task.Run(() => Thread.Sleep(5000), cancellationTokenSource.Token)

  .ContinueWith(task =>

    {

      if (task.IsCanceled)

        Console.WriteLine("The fourth task was cancelled.");

      else

        Console.WriteLine("The forth task has completed.");

    });


Console.WriteLine("Just hanging around, waiting");

cancellationTokenSource.Cancel();

Console.Read();
Task.Delay()
Delay() is a static method that can be called from the Task type. It has four overloads, which are as follows:
Task.Delay(int millisecondsDelay)Task.Delay(int millisecondsDelay, CancellationToken cancellationToken)Task.Delay(TimeSpan delay)Task.Delay(TimeSpan delay, CancellationToken cancellationToken)
This method is analogous to Thread.Sleep(), but instead of blocking the thread, when coupled with the await keyword it releases the thread and then calls back into the method once the delay period has expired. To use it, you can code it as follows:
Task.Run( async () =>

 {

   var stopwatch = new Stopwatch();

   stopwatch.Start();

   await Task.Delay(3000);

   stopwatch.Stop();

   Console.WriteLine("Task  completed after {0} seconds", stopwatch.Elapsed.Seconds);

 });
Task.WhenAny()
The Task.WhenAny() method allows you to wait, asynchronously, on a set of Tasks for one of them to complete. An obvious case where this can be useful is when you want to query a number of services but only care about the first one to return completed:
class Program

{

  static void Main(string[] args)

  {

    ProcessSimpleTasks();

    Console.WriteLine("Waiting...");

    Console.Read();

  }


  private static async void ProcessSimpleTasks()

  {

    var tasks = new List<Task<string>>();


    tasks.Add(SimpleTask("Task 1", 2000));

    tasks.Add(SimpleTask("Task 2", 2000));

    var firstTaskBack  = await Task.WhenAny<string>(tasks);


    Console.WriteLine(t.Result);


}


  private static async Task<string> SimpleTask(string identitifer, int millisecondsDelay)

  {

    await Task.Delay(millisecondsDelay);

    return string.Format("{0} has completed", identitifer);

  }
Another more interesting use of the WhenAny() method is in the case where you have a number of actions that you want to run, but rather than wait for all of them to complete, you want to process each one as it is completed:
class Program

{

  static void Main(string[] args)

  {

    ProcessSimpleTasks();


    Console.WriteLine("Waiting...");

    Console.Read();

  }


  private static async void ProcessSimpleTasks()

  {

    var tasks = new List<Task<string>>();


    tasks.Add(SimpleTask("Task 1", 2000));

    tasks.Add(SimpleTask("Task 2", 3000));

    tasks.Add(SimpleTask("Task 3", 4000));

    tasks.Add(SimpleTask("Task 4", 2000));


    while (tasks.Count > 0)

    {

      Task<string> task = await Task.WhenAny<string>(tasks);


      tasks.Remove(task);

      Console.WriteLine(task.Result);

    }

  }

  private static async Task<string> SimpleTask(string identitifer, int millisecondsDelay)

  {

    await Task.Delay(millisecondsDelay);

    return string.Format("{0} has completed", identitifer);

  }

}
It would be easy to underestimate the usefulness of this method. Stephen Toub, in his paper “The Task-based Asynchrous Pattern” (www.microsoft.com/download/en/details.aspx?id=19957), covers a few other scenarios where WhenAny() can be applied.
Task.WhenAll()
Task.WhenAll() allows you to wait on a set of tasks until all of them have completed. This differs from the WaitAll() method in that it creates a Task that will complete once all of the tasks within the set have completed. If the tasks in the set return a result, then WhenAll() will return a task of Task<TResult[]>. The following code example demonstrates this case:
class Program

{

  static void Main(string[] args)

  {

    var taskNames = new string[] { "Task 1", "Task 2", "Task 3", "Task 4" };

    ProcessSimpleTasks(taskNames);


    Console.WriteLine("Waiting...");

    Console.Read();

}


  private static async void ProcessSimpleTasks(IEnumerable<string> taskIdentifiers)

  {

    var randomSecond = new Random();

    IEnumerable<Task<string>> tasks = taskIdentifiers.Select(s => SimpleTask(s, randomSecond.Next(1,5)));


    try

    {

      var completedTask = await Task.WhenAll<string>(tasks);

      Console.WriteLine("Tasks completed:");

      foreach (var taskName in completedTask)

      {

        Console.WriteLine("	{0}", taskName);

      }

    }

    catch (AggregateException ex)

    {

      foreach (var exception in aggregateException.InnerExceptions)

      {

        Console.WriteLine(exception.Message);

      }

    }

  }


  private static async Task<string> SimpleTask(string identitifer, int secondsDelay)

  {

    await Task.Delay(TimeSpan.FromSeconds(secondsDelay));

    if (identitifer.Contains("5"))

    {

      throw new Exception("Task 5 throw an exception");

    }

    Console.WriteLine("{0} has completed", identitifer);

    return identitifer;

  }

}
If you run this code, you will notice that results returned are in the order that the tasks were added to the set and not in the order that the individual tasks completed.
If any of the tasks in the set complete in a faulted or canceled state, then the returned task will also complete in a faulted or canceled state. To see this, modify the first line in the Main() method of the previous code as follows:
var taskNames = new string[] { "Task 1", "Task 2", "Task 3", "Task 4", “Task 5” };
Task.FromResult<TResult>()
The FromResult() method allows you to create a finished Task object whose Result property is provided from a pre-existing value. This is particularly useful in cases where the value has already been pre-computed and/or is cached. Let’s take an unrealistic example to see how this works:
class Program

{

  static void Main(string[] args)

  {

    var bookTitleToFind = "Ten Things I Forgot to Remember";

    Stopwatch stopwatch = new Stopwatch();


    Console.WriteLine("Looking for a book...");

    stopwatch.Start();


    BookStore.FindBookAsync(bookTitleToFind)

      .ContinueWith(t =>

      {

        stopwatch.Stop();

        Console.WriteLine("time taken to find "{0}": {1}", t.Result.Title, stopwatch.Elapsed);

      })

      .Wait();

    stopwatch.Restart();


    //Try again. This time it should be much quicker

    BookStore.FindBookAsync(bookTitleToFind)

      .ContinueWith(t =>

      {

        stopwatch.Stop();

        Console.WriteLine("time taken to find "{0}": {1}", t.Result.Title, stopwatch.Elapsed);

      })

      .Wait();


    Console.Read();

  }

}


public class Book

{
  public string Title { get; set; }

}


class BookStore

{

  static ConcurrentDictionary<string, Book> booksOnTheShelves =

        new ConcurrentDictionary<string, Book>();


  public static Task<Book> FindBookAsync(string bookTitle)

  {

    // First try to retrieve the content from cache.

    Book requestedBook;

    if (booksOnTheShelves.TryGetValue(bookTitle, out requestedBook))

    {

      return Task.FromResult<Book>(requestedBook);

    }


    return Task.Run<Book>(() =>

        {

          var newBook = Task.Run<Book>(async () =>

              {

                await Task.Delay(TimeSpan.FromSeconds(3));

                return new Book { Title = bookTitle };

              });

          booksOnTheShelves.TryAdd(bookTitle, newBook.Result);

          return newBook;

        });

  }

}
Task.Yield()
When you use the async/await keywords, you are telling the compiler to compile the method with a state machine so that the method can suspend and then resume at await points. By doing this, the TPL allows for single threaded aysnc. In cases where we have singled threaded aysnc, Task.Yield() provides you with the means to temporarily exit the current async method to permit other actions to be done on the current context. It is analogous to Application.DoEvents() though differs in that DoEvents() generates a new message loop and Yield() yields to the existing one. A common usage would be where a large amount of data is being processed in a foreach loop that could potentially block the UI thread for an unacceptable amount of time.
If you do a search on the web, you will more than likely stumble across this canonical example (or an approximation thereof):
private  async void  GetStuffButton_Click(object sender, RoutedEventArgs e)

{

  int counter = 0;

  for (int i = 0; i < 10000; i++)

  {

     var result = Process(i);

     ListOfThings.Items.Add(result);

     if ((++counter % 10) == 0) await Task.Yield();

  }

}

private  string Process(int i)

{

  Thread.Sleep(10);

  return string.Format("Thing {0}", i);

}
Regretfully, this doesn’t actually work as you would expect. The UI is completely unresponsive for the duration of the for loop. This is because Task.Yield() targets the current SynchronizationContext’s Post() method. In WPF, this is an instance of DispatcherSynchronizationContext, which implements Post() to use DispatcherPriority.Normal, a higher priority than the GUI events. The solution is to use the new method on the Dispatcher, InvokeAsync(), passing in the appropriate DispatchPriority. Therefore, the following example would provide the expected behavior (also the code has been modified to output the thread id to show that everything is running on the same thread):
private void GetStuffButton_Click(object sender, RoutedEventArgs e)

{

  Dispatcher.InvokeAsync(async () =>

  {

    for (int i = 0; i < 10000; i++)

    {

      Debug.WriteLine("Dispatcher Thread: {0}", Dispatcher.CurrentDispatcher.Thread.ManagedThreadId);

      var result =  Process(i);

      ListOfThings.Items.Add(result);


    await Task.Yield();

    }

  }, DispatcherPriority.Background);

}


private string Process(int i)

{

  Debug.WriteLine("Process() Thread: {0}",Thread.CurrentThread.ManagedThreadId);

  Thread.Sleep(10);

  return string.Format("Thing {0}", i);

}
Task.ConfigureAwait()
By default, when an async method is suspended, the current context is captured and used to invoke the method’s continuation upon resumption. There are cases where this isn’t important and performance can be improved by not posting back to the original context. To achieve this, the ConfigureAwait() method can be used to prevent an await operation from capturing and resuming on the context.
await theTask.ConfigureAwait(continueOnCapturedContext:false);
By passing false as the parameter to this method, the awaited operation will continue execution wherever it completed.
The Progress<T> Class
This class implements the interface IProgress<T> and provides a means for asynchronous methods to report back a progress update. It exposes a ProgressChanged event that is raised on the SynchonizationContext, which is captured when the class is instantiated or, if none is available, a default context on the ThreadPool. It has a default constructor and one overload that takes an Action<T> as a handler. Updates are handled asynchronously so do not block the asynchronous operation. The following example uses an instance of Progress to report back on reading files from a directory:
class Program

{

  static void Main(string[] args)

  {

    var directoryToReadFrom = @"c:	emp";

    Console.WriteLine("Start");

    var progress = new Progress<Tuple<string, decimal>>();

    progress.ProgressChanged += Progress_ProgressChanged;

    var result = GetFilesAsync(directoryToReadFrom,progress);


    result.ContinueWith(t =>

      {

        Console.WriteLine("Done!");

        progress.ProgressChanged -= Progress_ProgressChanged;

      });

    Console.ReadKey();

  }


  private async static Task GetFilesAsync(string startDirectory, IProgress<Tuple<string, decimal>> progress)

  {

    var files = Directory.GetFiles(startDirectory, "*.*", SearchOption.AllDirectories);

    var tasks = new List<Task<string>>();


    var counter = 0;

    foreach (var fileName in files)

    {

      var fileNameOnly = Path.GetFileName(fileName);

      await GetFileAsync(fileName);

      counter++;

      decimal percentageDone = Math.Round(((decimal)counter / (decimal)files.Length) * 100, 2);

      progress.Report(new Tuple<string, decimal>(fileNameOnly, percentageDone));

    }

  }


  private async static Task<string> GetFileAsync(string fileName)

  {

    var unicodeEncoding = new UnicodeEncoding();

    byte[] result;

    //Delay for demo purposes only

    await Task.Delay(50);

    using (var stream = new FileStream(fileName, FileMode.Open))

    {

      result = new Byte[stream.Length];

      var readTask = await stream.ReadAsync(result, 0, (int)stream.Length);

    }

    return unicodeEncoding.GetString(result);

  }


  static void Progress_ProgressChanged(object sender, Tuple<string, decimal> e)

  {

    Console.Clear();

    Console.WriteLine("percentage done: {0}%", e.Item2);

    Console.WriteLine(e.Item1);

  }

}
TPL DataFlow
TPL Dataflow (TDF) is a new .NET library that provides a set of primitives for in-process message passing, dataflow, and pipelining. Building on the TPL, the goal of the TDF is to provide higher-level constructs that address parallel problems that are better framed in terms of agent-based or message-passing models.
Though originally included in the beta version of the .NET 4.5 Framework, this library is now being delivered in the NuGet package Microsoft.Tpl.Dataflow. The simplest way to install it is to open the Package Manager Console and at the prompt type the following:
Install-Package Microsoft.Tpl.Dataflow
The TDF library defines a set of data structures known as dataflow blocks (approximately 11 at the time of writing) that are designed to buffer and/or process data. There are essentially three kinds of blocks:
- Target blocks, which act as a data receiver and can be written to
- Source blocks, which act as a source of data and can be read from
- Propagator blocks, which can be both a source and target block and can be both read from and written to
In simple terms, what a block does is wait to receive a message and when it does, it spins up a Task to process that message. If a block has a number of messages queued, then it reuses the Task to process all of the messages until the queue is empty.
To give you a feel for TDF and what this library offers, we will look at some simple examples. All of the following examples just use a console application. If you want to try the code out, you will first need to install the NuGet package and then add a reference to the assembly System.Threading.Tasks.Dataflow.
Using an ActionBlock
The first block we will look at is the ActionBlock. This is a target block that can receive and queue messages that are then processed. The code is as follows:
static void Main(string[] args)

{

  var names = new string[] { "alice", "bob", "chris", "david", "elizabeth", "francis", "gary", "harry", "ian" };


  SimpleActionBlockExample(names);


}


private static void SimpleActionBlockExample(IEnumerable<string> names)

{

  var actionBlock = new ActionBlock<string>(async s =>

    {

      await Task.Delay(500);

      Console.WriteLine(s.ToUpper());

    });


  foreach (var name in names)

  {

    actionBlock.Post(name);

  }


  Console.WriteLine("Data queued: {0}", actionBlock.InputCount);


  //meaningless loop so we can check the queue count

  while (actionBlock.InputCount > 0) { }


  Console.WriteLine("Data queued: {0}", actionBlock.InputCount);

 Console.Read();


}
In this example, we instantiate an instance of ActionBlock<T> where T is the type of the message that it will receive and pass it a delegate that will handle the message. Messages are then sent to the ActionBlock by calling the Post() method on the instance. If you run the code, the output should look something like Figure 3-3.
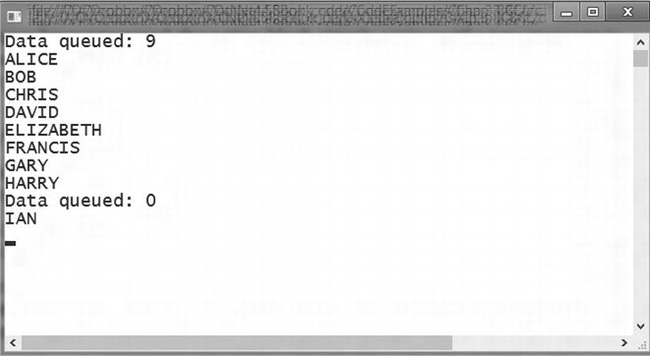
Figure 3-3. Output from simple ActionBlock example
Once all the messages have been processed, the action block simply waits until a new message is posted. So, for example, if we added the following lines of code just before the Console.Read() statement in the SimpleActionBlockExample() method, this message will also be processed:
Thread.Sleep(1000);

actionBlock.Post("Zac");
If you want to stop a block from processing any more messages, you can call its Complete() method, which in effect switches it off:
actionBlock.Complete();

actionBlock.Post("This message will never be processed");
By default, a block spins up only one Task and processes the messages one at a time. You can change this behavior by passing in an instance of ExecutionDataflowBlockOptions and setting its MaxDegreeOfParallelism property to define the maximum number of tasks it can run to process messages.
private static void SimpleActionBlockExampleWithIncreasedParallelism(IEnumerable<string> names)

{

  var dataflowBlockOptions = new ExecutionDataflowBlockOptions

  {

    TaskScheduler = TaskScheduler.Default,

    MaxDegreeOfParallelism = 4

  };


  var actionBlock = new ActionBlock<string>(async s =>

    {

      await Task.Delay(1000);

      Console.WriteLine(s.ToUpper());

    }, dataflowBlockOptions);


  foreach (var name in names)

  {

    actionBlock.Post(name);

  }


  Console.WriteLine("Waiting...");

  Console.Read();

}
In this example, we have set the maximum number of tasks the block can spin up to four, which would result in the output shown in Figure 3-4.
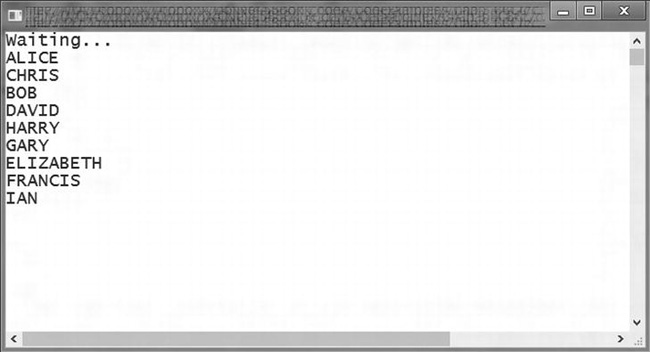
Figure 3-4. Output of action block using multiple tasks
Using a TransformBlock
Though the ActionBlock is interesting in itself, let’s extend the previous examples and introduce the TransformBlock. The TransformBlock is an example of a propagator block that takes a message and processes it; the output of that process can then be relayed to another block. In the next example, we will introduce a transform block that will handle the conversion of the string to uppercase and then pass the resulting string to the action block:
private static void TransformAndActionBlock(IEnumerable<string> names)

{

  var actionBlock = new ActionBlock<string>(async s =>

    {

      await Task.Delay(500);

      Console.WriteLine(s);

    });


  var toUpperTransformBlock = new TransformBlock<string, string>(s =>

    {

      return s.ToUpper(); ;

    });


    toUpperTransformBlock.LinkTo(actionBlock);


    foreach (var name in names)

    {

      toUpperTransformBlock.Post(name);

    }


    Console.WriteLine("Waiting...");

    Console.Read();

}
In this example, along with the ActionBlock, we also create an instance of TransformBlock<TInput,TOutput>, which takes a parameter of Func<TInput, TOutput>. Once we have created the transform block, we specify the target block by passing it in as parameter of the LinkTo() method. If you run this code, the output will be the same as the first action block example.
By using the LinkTo() method, you can chain a series of blocks together. Let’s modify the previous example to include another transform block. After the toUpperTransformBlock, remove the line toUpperTransformBlock.LinkTo(actionBlock); and add the following code:
var reverseStringBlock = new TransformBlock<string, string>(s =>

  {

    return new string(s.Reverse().ToArray());

  });


toUpperTransformBlock.LinkTo(reverseStringBlock);

reverseStringBlock.LinkTo(actionBlock);
With this additional code, we have added another transform block so that our message goes through two processes before being displayed on the screen. Again not a mind-blowing example, but it should give you a feel of how it is possible to build up a process flow using blocks.
Using a BufferBlock
The last example we are going to look at is the BufferBlock. This block is useful in scenarios where you have multiple processes running and want to queue messages through a central point so that each message is retrieved when a process is free:
private static void BufferBlockExample(IEnumerable<string> names)

{

  var ActionBlock1 = new ActionBlock<string>(s =>

    {

      Thread.Sleep(1000);

      Console.WriteLine("{0} from action block 1", s);

    }, new ExecutionDataflowBlockOptions { BoundedCapacity = 1 });


  var ActionBlock2 = new ActionBlock<string>(async s =>

    {

      await Task.Delay(800);

      Console.WriteLine("{0} from action block 2", s);

    }, new ExecutionDataflowBlockOptions { BoundedCapacity = 1 });


  var ActionBlock3 = new ActionBlock<string>(async s =>

    {

      await Task.Delay(500);

      Console.WriteLine("{0} from action block 3", s);

    }, new ExecutionDataflowBlockOptions { BoundedCapacity = 1 });


  var bufferblock = new BufferBlock<string>();

  bufferblock.LinkTo(ActionBlock1);

  bufferblock.LinkTo(ActionBlock2);

  bufferblock.LinkTo(ActionBlock3);


  foreach (var name in names)

  {

    bufferblock.Post(name);

  }


  Console.WriteLine("waiting...");

  Console.Read();

}
What we are doing in this example is first creating three action blocks that can accept one message at a time. We then create an instance of BufferBlock and link it to the three action blocks. As each action block completes processing, it retrieves another message from the buffer block. If you run the code, the output would be similar to Figure 3-5.
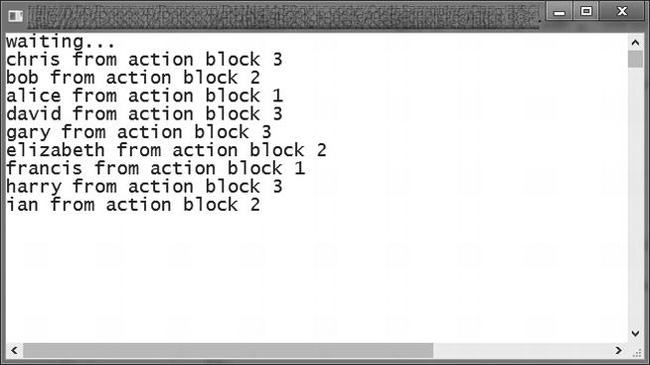
Figure 3-5. Output from BufferBlock example
In this section, we have really only dipped our toes into the TPL Dataflow water, but hopefully it has given you a sense of what it has to offer and inspires you to explore this new feature further.
The ConcurrentExclusiveSchedulerPair
The ConcurrentExclusiveSchedulerPair, in essence, provides the means to implement the equivalent of an asynchronous read/write lock. It provides two TaskScheduler instances through the properties ConcurrentScheduler and ExclusiveScheduler. Tasks assigned to the concurrent scheduler will run as long as there are no tasks assigned to the exclusive scheduler. Once a task has been assigned to the exclusive scheduler, no more concurrent tasks will be allowed to run until that task is completed. This functionality is useful when you have mutable data that can be shared among many tasks, but you also want to run tasks that can update that data.
In the following contrived example, we have two action blocks, one that can read a value and is assigned to the concurrent scheduler and another that can update the value and is assigned to the exclusive scheduler. If you run the example, anytime you post a message to the update action the concurrent scheduler will stop processing messages until the update is completed.
class Program

{

  static volatile int valueToChange;

  static void Main(string[] args)

  {

    var schedulerPair = new ConcurrentExclusiveSchedulerPair();

    var cts = new CancellationTokenSource();
    var readExecutionOptions = new ExecutionDataflowBlockOptions

    {

      TaskScheduler = schedulerPair.ConcurrentScheduler,

      CancellationToken = cts.Token,

      MaxDegreeOfParallelism = 3

    };


    var lockExecutionOptions = new ExecutionDataflowBlockOptions

    {

      TaskScheduler = schedulerPair.ExclusiveScheduler,

      CancellationToken = cts.Token

    };


    var readAction = new ActionBlock<string>(s => Console.WriteLine("{0}-{1}", s, valueToChange),

                      readExecutionOptions);


    var updateAction = new ActionBlock<int>(i =>

          {

            Console.WriteLine("Updating the value");

            Thread.Sleep(2000);

            valueToChange += i;

            Console.WriteLine("value has been changed");

          }, lockExecutionOptions);


    Console.WriteLine("Press any key to send an update message.
Press Enter to end processing");


    Task.Run(() => SendMessagesToReadActionBlock(readAction, "Reader1", 50), cts.Token);


    var hasPressedEnterKey = false;


    while (!hasPressedEnterKey)

    {

      var keyPressed = Console.ReadKey();

      if (keyPressed.Key == ConsoleKey.Enter)

      {

        cts.Cancel();

        hasPressedEnterKey = true;

      }

      else

        updateAction.Post(3);

    }


    Console.WriteLine("Test finished. Press any key to quit");

    Console.ReadKey();

  }


private static async void SendMessagesToReadActionBlock(ITargetBlock<string> actionBlock,

                                                                                                 string message, int counter)

  {

    for (int i = 0; i < counter; i++)

    {

      actionBlock.Post(string.Format("{0}:{1}", message, Thread.CurrentThread.ManagedThreadId));

      await Task.Delay(500);

    }

  }

}
Portable Class Library
The Portal Class Library, originally development by the BCL team as an add-in, has now been integrated into the .NET 4.5/Visual Studio 2012 release. The underlying idea behind this feature is to provide the means to write managed assemblies that can be used on multiple .NET Framework platforms without the use of #defines or complicated build scripts to target the individual platforms. In essence, what the team has done is to provide a new project template that targets a subset of .NET assemblies that are valid for the platforms you are targeting. Under the covers, the team has modified the runtime so that the appropriate assemblies are referenced depending on the target platform.
To create a portable class assembly in a solution, open the Add New Project dialog box and select the Portable Class Library project, as shown in Figure 3-6.
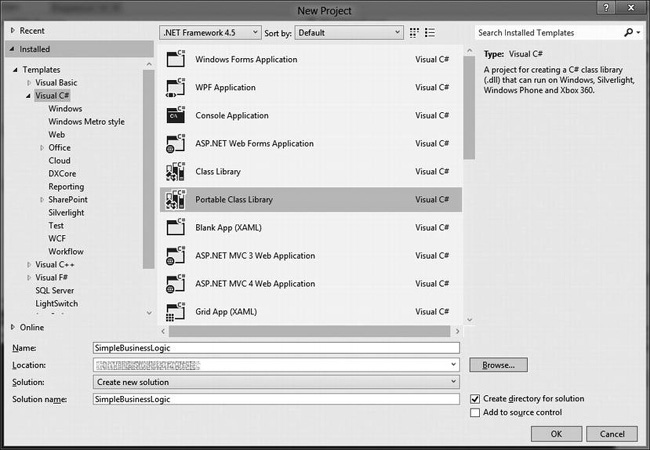
Figure 3-6. Add New Project dialog box
Once the project has been added, right-click on it and select Properties from the context menu. In the Target Frameworks section of the first page will be listed the default frameworks your new class can be used with, as shown in Figure 3-7.
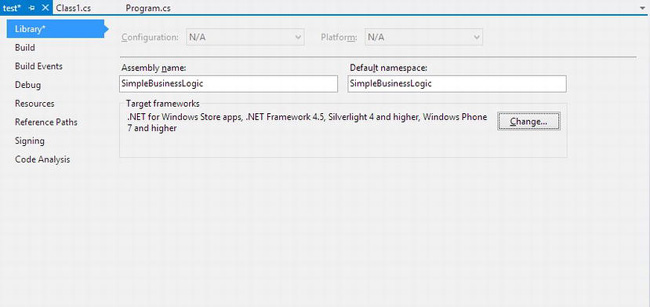
Figure 3-7. Project properties page with targeted frameworks listed
Clicking on the button labeled “Change…” will bring up the Change Target Frameworks dialog box. Here you can refine/change the frameworks you wish to target, as shown in Figure 3-8.
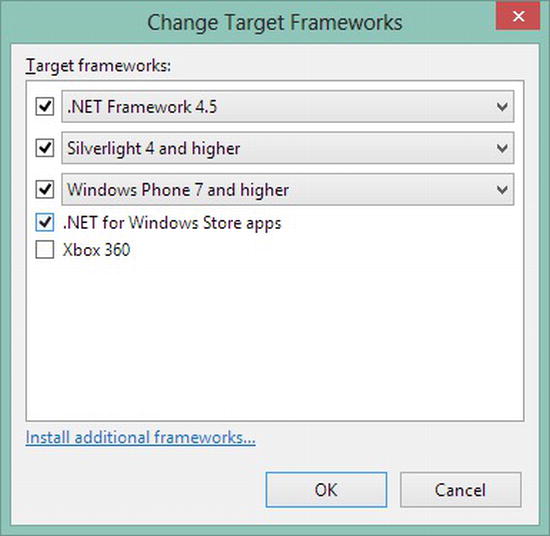
Figure 3-8. The Change Target Frameworks dialog box
Once you have set your target frameworks you are ready to go, but there are a couple of things you need to be aware of.
First, the subset of assemblies and functionality that can be accessed is determined by the frameworks that you target. For example, given the selection displayed in Figure 3-8, if you opened the solution in the Object Browser, you would see the list of available assemblies as shown in Figure 3-9.
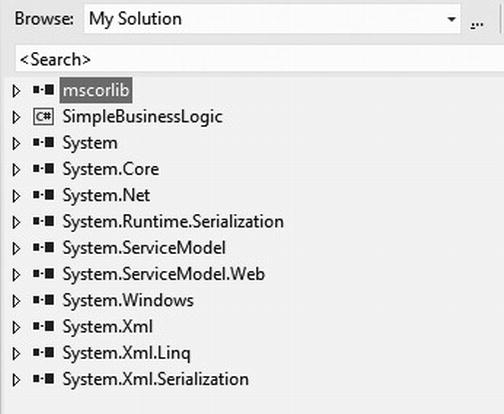
Figure 3-9. Available assemblies before adding Xbox 360
If you now modify your target frameworks to include Xbox 360, in the Object Browser you will see a reduced set of available assemblies as shown in Figure 3-10.
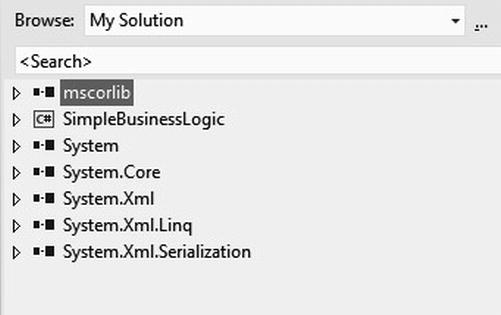
Figure 3-10. Available assemblies after adding Xbox 360 as a target
An aspect that is worth noting in this case is if you add a reference to an assembly that is not supported by one of your target platforms, the project will be retargeted to exclude that platform.
Another thing to keep in mind is that if you want to reference any other classes you have created, they will also need to be Portal Class Library projects.
And Then There Is the CLR Core
Unlike the BCL, there have been fewer changes in the CLR and these have mainly focused on internal improvements with a focus on performance.
ProfileOptimization and Multicore Just-in-Time (JIT)
Enabled by default in Silverlight 5 and ASP.NET, this is an opt-in feature that provides an optimized JIT that can use unused processing time to perform multi-threaded JIT compilation of frequently used methods. Multicore JIT works by first generating profile data that keeps track of the methods executed and then uses this data to determine which methods to compile on a background thread and on a multicore machine, on another core. By doing this in parallel, it means most methods are JIT compiled by the time they are needed.
To use this feature in your application, after adding a using statement for System.Runtime, you need to add only two lines of code—one to specify the folder in which to save the profile and another to start the process:
ProfileOptimization.SetProfileRoot(@"c:profiles");

ProfileOptimization.StartProfile("profile");
The first time you run your application there won’t be any difference in startup time since the profile needs to be generated, but after that, you should see an improvement. If, for some reason, your application is running a singe core machine, this code will have no affect.
Background Garbage Collection (GC) for the Server
Background GC, which was a feature that was introduced in CLR 4.0 for the workstation, is now supported on Server Garbage Collection. Basically what Background GC does is that while the GC is performing a full gen2 collection, it checks at specific points whether a gen0 or gen1 collection has been requested. If there is a request, the gen2 collection is paused while the request is executed and then resumes. This allows the code that initiated the low-generation collection to resume execution.
Re-JIT
On a day-to-day level, the new re-JIT feature will probably not be something that pops up on your radar, but if you are into writing profilers or injecting instrumentation into the IL, this feature could be for you. Currently, if you are running a profiler over, say, an ASP.Net application and an issue arises and you want to add additional instrumentation to track the problem down, the whole process needs to be restarted. The issue with doing this is you lose the state of the application in which the problem was occurring. What re-jitting allows is for the profiler to specify the method or methods it wants to modify and recompile at the IL level. The next time they are called they will be re-jitted and pushed back into the app domain without affecting the rest of the application.
If you are interested in this feature, David Broman from Microsoft has written a couple of blog posts on how to use it and some of its current limitations at http://blogs.msdn.com/b/davbr/. There is also a Channel 9 interview where he goes into depth on Re-JIT and this can be found at http://channel9.msdn.com/Shows/Going+Deep/CLR-45-David-Broman-Inside-Re-JIT.
Optimized Native Images
One of the options that has existed to improve application startup was to precompile code to a native image using the Native Image Generation (NGen) tool. Especially with large desktop applications, this provided a significant improvement in startup times compared with JIT compilation. With .NET 4.5, an additional tool has been added called Managed Profile Guided Optimization (MPGO), which is designed to optimize the layout of native images to further improve performance. Using optimization technology similar to that used for multi-core JIT, the MPGO tool creates profile data for an IL DLL and then adds the profile as a resource to the IL DLL. The NGEN tool can then use this data to perform additional optimization.
Large Object Heap (LOH)
In .NET 4.5, work has been done to make more efficient use of memory fragments in the LOH, in particular with how the free list is managed. With these changes being implemented in both workstation and server garbage collection, the lack of application responsiveness and out-of-memory exceptions that can occur with memory fragmentation in the LOH should be addressed.
Conclusion
Clearly the big story in this release is parallelization and asynchrony and the changes made within the BCL in this area that will echo through the rest of the .NET Framework. In this chapter, we have tried to cover some of the key features, but there is still much more both within the TPL and the rest of the BCL that will be worth getting your hands on. But that is not the only story in this release. Under the covers, core assemblies have been rethought and refactored to provide a solid base for future development and improved code portability. And, finally, there has been general performance tuning, such as improved resource loading, to ensure your applications run better.