Chapter 1
Application Development
This chapter covers some of the essentials involved with getting an Objective-C application set up from the command line and Xcode. You will see how to code command line Mac desktop apps and iOS apps for the iPhone and iPad.
The recipes in this chapter will show you how to:
- Compile an Objective-C program from the command line
- Code a custom class with properties and methods
- Implement both instance and class methods
- Extend existing classes using a category
- Code and compile a Mac command line application
- Use Xcode to set up a Mac application
- Use Xcode to set up an iOS application
- Add user controls to applications using Delegation and Target-Action patterns
NOTE: Most of this book assumes that you are using a Mac with Xcode 4.2, which you can obtain from the Mac App Store at www.apple.com/mac/app-store/.
1.1 Creating a Terminal Application
Problem
You want to use Terminal to build a simple Objective-C program that doesn’t depend on the extra features that come with Xcode. Your program will use Objective-C to write out a message to the terminal console window on your Mac.
Solution
Use your favorite text editor to create a file in your home directory, which is at /Users/[yourusername]/. You can use the text editor vi from your terminal or the GUI-based TextEdit program that comes with your Mac. If you use TextEdit, make sure to save the file that you create as plain text.
In this file, you will add a main function (which, incidentally, would look the same if written in C), import the Foundation framework, and add Objective-C code to write out a Hello World message to the console.
To compile this program, you will use a tool called clang to create an executable file that you can run from your terminal screen.
How It Works
The code that Objective-C needs to start is always located in a function called main, which takes some arguments and returns an integer value. In the first line of code, you import Foundation, which is a framework necessary for working with Objective-C objects.
Inside of your main function you must set up an autorelease pool, which is used by Objective-C to manage memory. Once you do that, you can use the NSString class to build a Hello World string and NSLog to write this string to the console screen.
The terminal command that is used to compile code is called clang and it compiles Objective-C programs. Here are some options that you may set when using clang to compile your Objective-C programs:
- -
fobjmeans that Objective-C is the programming language. -arcspecifies Automatic Reference Counting.-frameworkis used to link to the Foundation framework.-ospecifies the name of the executable file that will be created.
NOTE: If your Mac is running OSX 10.7 or greater, then you can use Automatic Reference Counting (ARC). ARC is a new feature available in OSX 10.7 used for memory management and you can get it by adding –arc to the statement that you use to compile your program. If you aren’t sure what version of OSX you are using just omit –arc for now. See Chapter 8 for more details on ARC and memory management in general.
The Code
This is what the code in your plain text file should look like:
#import <Foundation/Foundation.h>

int main (int argc, const char * argv[]){

        @autoreleasepool {

                NSString *helloString = @"Hello World";

                NSLog(@"%@", helloString);

        }

        return 0;

}
Usage
Open up your terminal and type in the following commands to compile your code. Make sure to navigate to the location where you placed your code file before compiling.
clang -fobjc -framework Foundation main.m -o maccommandlineapp
For this example, I’m assuming that the code was placed in a file named main.m and that the output file will be called maccommandlineapp.
Hit return to compile the code. Once the program is compiled, type in open maccommandlineapp and press return to run and test your work.
Another window should open up with output that looks like this:
1.2 Writing to the Console
Problem
As you’re testing code, you would like to be able to write out values to the console window. Objects and primitive type values can be reported but each requires specific string formatters to work with NSLog.
Solution
Substitute object and primitives values into NSLog to report the values of these variables to the console screen.
How It Works
Object and primitive type values may be reported to the console using NSLog. Each type has a different specifier that must be used as a placeholder for the value. You type out the string that you would like to appear in the console while putting in specifiers into the string where you would like to see values reported. You can put as many specifiers into the string as you like, but you must make sure to include each value in the call to NSLog.
For example, if you had an integer variable named myInteger and a character variable named myCharacter and you wanted to report each of these values to the console, you would do something like this:
NSLog(@"myCharacter = %c and myInteger = %i", myCharacter, myInteger);
WARNING: Each specifier that you include in the NSLog string must have a corresponding value in the comma-separated list to the right or the compiler will throw an error more '%' conversions than data arguments at compile time.
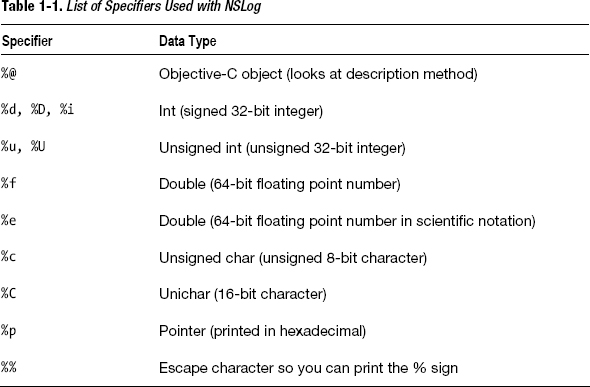
There are a few more specifiers that you may use. See Table 1-1 for a list of commonly used format specifiers.
The Code
Here is how you report the values of various variables to the console using NSLog:
#import <Foundation/Foundation.h>
int main (int argc, const char * argv[]){
@autoreleasepool {
//To print out primitive types:
int myInteger = 1;
NSLog(@"myInteger = %i", myInteger);
float myFloatingPointNumber = 2;
NSLog(@"myFloatingPointNumber = %f", myFloatingPointNumber);
NSLog(@"myFloatingPointNumber in scientific notation = %e", 
myFloatingPointNumber);
char myCharacter = 'A';
NSLog(@"myCharacter = %c", myCharacter);
//To print out the % symbol
NSLog(@"Percent Sign looks like %%");
//To print out Objective-C objects:
NSString *myString = @"My String";
NSLog(@"myString = %@", myString);
NSLog(@"myString's pointer = %p", myString);
//To print out a series of values
NSLog(@"myCharacter = %c and myInteger = %i", myCharacter, myInteger);
}
return 0;
}Usage
To test this code, compile the files with clang as you did in Recipe 1-1.
clang -fobjc -framework Foundation main.m -o maccommandlineapp
Run the app by typing open maccommandlineapp in your terminal window and you should see output that looks like this:
myInteger = 1
myFloatingPointNumber = 2.000000
myFloatingPointNumber in scientific notation = 2.000000e+00
myCharacter = A
Percent Sign looks like %
myString = My String
myString's pointer = 0x105880110
myCharacter = A and myInteger = 1
logout


[Process completed]
NOTE: In your output, the pointer for myString will have a different value than mine.
1.3 Creating a New Custom Class
Problem
Object-oriented programmers like to be able to encapsulate functionality in objects. To do this, you must be able to define a custom class with attributes and behaviors.
Solution
Classes in Objective-C need interface and implementation definitions. Although it’s not absolutely required, you typically keep the interface and implementations in separate files. The file with the interface is named as same as the class itself but with the .h file extension. The file with the implementation also has the class name but with the .m file extension.
To use a custom class, you must import the class header file into the code file where you intend on using the class. Then you can instantiate an object from the class to use the functionality encapsulated in the class.
How It Works
The first step is to add two files where you will write your custom class code. You can use your text editor of choice to do this. Let’s assume that you want a class to represent a car. In this case, you simply add two new files: Car.h and Car.m. Put these files in the same directory as your main.m file to make it easier later on to compile these together (see Listings 1-1 through 1-3 for the code).
In the Car.h file, you locate the interface for the Car class. A class interface must begin with the @interface keyword and end with the @end keyword. Everything in between these two keywords defines the properties and methods of the class. The following is the essential code needed to define a Car class:
#import <Foundation/Foundation.h>


@interface Car : NSObject


@end
Notice that in the Car class definition you are importing Foundation again and right after the name car you have : NSObject. This means that your car is a subclass of NSObject. In fact, NSObject is the root object in Objective-C and all other objects are either a subclass of NSObject or a subclass of another class that is a subclass of NSObject.
The Car.m file looks similar to the Car.h file. Here you first import the Car.h file and then use the @implementation keyword to declare that you are implementing your custom class. All the code you use to implement comes after the line of code where you declare that you are implementing Car. This is what the Car class implementation looks like so far:
#import "Car.h"


@implementation Car


@end
In order to use your class, you need to import Car.h and then instantiate an object from the class. To instantiate an object, you send two messages: alloc and init. Both of these messages come from the NSObject superclass.
Car *car = [[Car alloc] init];
The Code
Listing 1-1. Car.h
#import <Foundation/Foundation.h>


@interface Car : NSObject


@end
Listing 1-2. Car.m
#import "Car.h"


@implementation Car


@end
Listing 1-3. main.m
#import "Car.h"


int main (int argc, const char * argv[]){

        @autoreleasepool {

                Car *car = [[Car alloc] init];

                NSLog(@"car is %@", car);
        }

        return 0;

}
Usage
To use this code, compile your files as you did before, except that you need to include the code file for the Car class in addition to the main.m code file.
clang -fobjc -framework Foundation Car.m main.m -o maccommandlineapp
It may be included right before the main.m file in the command text. When you open the maccommandlineapp, you will see output that looks something like this:
car is <Car: 0x10c411cd0>

logout


[Process completed]
Of course, Car doesn’t do much until you add your own custom properties and methods, which you’ll see in the upcoming recipes.
1.4 Code Property Assessors
Problem
Custom classes need to represent the attributes of the entities they are modeling. You need to know how to define and implement properties in Objective-C to do this.
Solution
To implement properties for custom classes, you must declare properties in the class interface and implement these properties in the class implementation. Once you implement these properties, you can use them in your other code files by accessing these properties when you need them.
How It Works
The first place you go when adding properties to classes is the custom class header file. You need two things here: a local instance variable to hold the value of your property and a property declaration. Here is what an interface looks like:
#import <Foundation/Foundation.h>


@interface Car : NSObject{

@private

    NSString *name_;

}


@property(strong) NSString *name;


@end
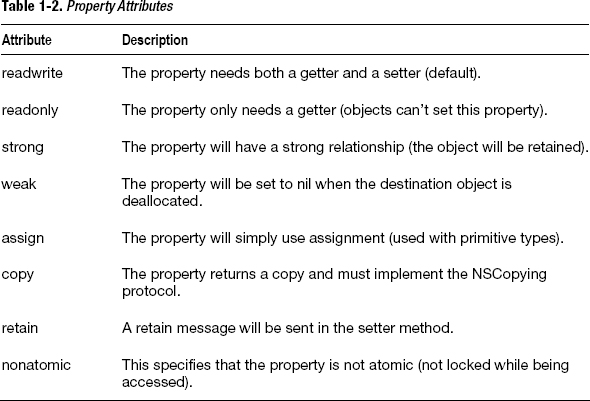
Here the local instance is named name_ and the property declaration starts with the keyword @property. Notice that the property declaration has the word strong in parentheses right before the class name. This word is called a property attribute, and strong is only one of many property descriptors available to you. See Table 1-2 for a list of property attributes.
The second place you need to go to implement a property is the implementation, which in your example would be located in Car.m. Here you need to code your so-called getters and setters.
#import "Car.h"


@implementation Car
-(void)setName:(NSString *)name{

    name_ = name;

}


-(NSString *) name{

    return name_;

}


@end
You can use properties like this with dot notation to set and get properties values:
car.name = @"Sports Car";

NSLog(@"car is %@", car.name);
Or you can use properties with standard Objective-C messaging:
[car setName:@"New Car Name"];

NSLog(@"car.name is %@", [car name]);
You will see both examples of accessing properties as you look at more Objective-C code. Dot notation (the first example) is a relatively new Objective-C feature that was added with Objective-C 2.0. Note that dot notation has the advantage of being more familiar to programmers who are used to other programming languages where dot notation is the standard practice. The second example, regular Objective-C messaging, is still used often. Choosing one method over another is mostly a matter of personal preference. See Listings 1-4 through 1-6 for the code.
The Code
Listing 1-4. Car.h
#import <Foundation/Foundation.h>


@interface Car : NSObject{

@private

    NSString *name_;

}


@property(strong) NSString *name;


@end
#import "Car.h"


@implementation Car


-(void)setName:(NSString *)name{

    name_ = name;

}


-(NSString *) name{

    return name_;

}


@end
Listing 1-6. main.m
#import "Car.h"

int main (int argc, const char * argv[]){

        @autoreleasepool {

                Car *car = [[Car alloc] init];

                car.name = @"Sports Car";

                NSLog(@"car.name is %@", car.name);


                [car setName:@"New Car Name"];

                NSLog(@"car.name is %@", [car name]);


        }

        return 0;

}
Usage
To use this code, compile your files as you did before.
clang -fobjc-arc -framework Foundation Car.m main.m -o maccommandlineapp
When you open the maccommandlineapp, you will see output that looks something like this:
car.name is Sports Car

car.name is New Car Name

logout


[Process completed]
1.5 Code Property Assessors with @synthesize
Problem
Custom classes need to represent the attributes of the entities they are modeling. You need to know how to define and implement properties in Objective-C to do this. If you don’t want to code your own getter and setter methods, you can use the @synthesize as an alternative.
Solution
To implement properties with @synthesize, you still need to declare properties in the class interface as you did in Recipe 1.4 and implement these properties in the class implementation. However, instead of writing your own assessor code, you can use the @synthesize keyword to direct the complier to fill in the code for you in the background during the compilation process.
How It Works
The first place you go when adding properties to classes is the custom class header file. All you need to do with this method is to declare a property. Here is what an interface looks like:
#import <Foundation/Foundation.h>


@interface Car : NSObject


@property(strong) NSString *name;


@end
The second file you need to go to implement a property is the implementation, which in your example is located in Car.m. All you need to do here is use the @synthesize keyword and include the property that you want to generate getters and setters for (after the @implementation keyword).
#import "Car.h"


@implementation Car

@synthesize name;


@end
You can use properties like this with dot notation to set and get properties values:
car.name = @"Sports Car";

NSLog(@"car is %@", car.name);
Or you can use properties with standard Objective-C messaging, like so:
[car setName:@"New Car Name"];

NSLog(@"car.name is %@", [car name]);
See Listings 1-7 through 1-9 for the code.
The Code
Listing 1-7. Car.h
#import <Foundation/Foundation.h>


@interface Car : NSObject


@property(strong) NSString *name;


@end
Listing 1-8. Car.m
#import "Car.h"


@implementation Car

@synthesize name;


@end
Listing 1-9. main.m
#import "Car.h"

int main (int argc, const char * argv[]){

        @autoreleasepool {

                Car *car = [[Car alloc] init];

                car.name = @"Sports Car";

                NSLog(@"car.name is %@", car.name);


                [car setName:@"New Car Name"];

                NSLog(@"car.name is %@", [car name]);


        }

        return 0;

}
Usage
To use this code, compile your files as you did before.
clang -fobjc -framework Foundation Car.m main.m -o maccommandlineapp
When you open the maccommandlineapp, you will see output that looks something like this:
car.name is Sports Car

car.name is New Car Name

logout


[Process completed]
1.6 Adding a Class Method to a Custom Class
Problem
In Objective-C, you can send messages to either classes or objects to get things done. If you want your custom class to be able to respond to a message, you must first code a class method.
Solution
To add a class method, you need to add forward declaration in your header file. Class methods start with + and a return type like (void), followed by a set of parameter descriptors (descriptive text that appears before a parameter), data types, and parameter names. Class methods are implemented in the implementation file after the @implementation keyword.
How It Works
The first place you go when adding class methods to a class is the custom class header file. Class methods have a + sign in front of the return type. Here is a forward declaration for a class method that prints out a description to the console that includes a date:
+(void)writeDescriptionToLogWithThisDate:(NSDate *)date;
To implement a class method, go to the implementation file for the class, and after the @implementation keyword, write out the code for the class method.
+(void)writeDescriptionToLogWithThisDate:(NSDate *)date{

        NSLog(@"Today's date is %@ and this class represents a car", date);

}
To use this method, you simply send a message to the Car class without worrying about instantiating an object first.
[Car writeDescriptionToLogWithThisDate:[NSDate date]];
See Listings 1-10 through 1-12 for the code.
The Code
Listing 1-10. Car.h
#import <Foundation/Foundation.h>

@interface Car : NSObject


@property(strong) NSString *name;


+(void)writeDescriptionToLogWithThisDate:(NSDate *)date;


@end
Listing 1-11. Car.m
#import "Car.h"


@implementation Car


@synthesize name;


+(void)writeDescriptionToLogWithThisDate:(NSDate *)date{

        NSLog(@"Today's date is %@ and this class represents a car", date);

}


@end
Listing 1-12. main.m
#import "Car.h"

int main (int argc, const char * argv[]){

        @autoreleasepool {

                [Car writeDescriptionToLogWithThisDate:[NSDate date]];

        }

        return 0;

}
Usage
When you work with class methods, you don’t need to instantiate an object first. You simply send a message to the class to execute the code in the class method. To use this code, compile your files as you did before.
clang -fobjc -framework Foundation Car.m main.m -o maccommandlineapp
When you open the maccommandlineapp, you will see output that looks something like this:
Today's date is 2011-12-19 14:23:11 +0000 and this class represents a car

logout


[Process completed]
1.7 Adding an Instance Method to a Custom Class
Problem
In Objective-C, you can send messages to either classes or objects to get things done. If you want objects that have been instantiated from your custom class to be able to respond to a message, you must first code an instance method.
Solution
To add an instance method, you need to add forward declaration in your header file. Instance methods start with – and a return type like (void), followed by a set of parameter descriptors (descriptive text that appears before a parameter), data types, and parameter names. Instance methods are implemented in the implementation file after the @implementation keyword.
How It Works
The first place you go when adding instance methods to a class is the custom class header file. Instance methods have a - sign in front of the return type. Here is a forward declaration for a class method that prints out a description to the console that includes a date:
-(void)writeOutThisCarsState;
To implement a class method, go to the implementation file for the class, and after the @implementation keyword, write out the code for the class method.
-(void)writeOutThisCarsState{

        NSLog(@"This car is a %@", self.name);

}
Usage
To use this method, you need to first instantiate an object from your Car class and then set the name property. Then you can send the writeOutThisCarsState message to execute the code in the instance method.
Car *newCar = [[Car alloc] init];

newCar.name = @"My New Car";

[newCar writeOutThisCarsState];
To test this code, compile your files as you did before from Terminal.
clang -fobjc -framework Foundation Car.m main.m -o maccommandlineapp
When you open the maccommandlineapp, you will see output that looks something like this:
Today's date is 2011-12-19 14:23:11 +0000 and this car is a My New Car

logout


[Process completed]
1.8 Extending a Class with a Category
Problem
You would like to add methods and behavior to a class, but you would rather not create an entire new subclass.
Solution
In Objective-C, you can use categories to define and implement properties and methods that can later be attached to a class. To do this, you need two files: a header file to list your interface and an implementation file to list your implementation. When you are ready to use your category, you can import the category header file; any class that has the category applied to it will have those properties and methods available for use.
How It Works
The first thing you need is a header file. Let’s assume that you want to extend the NSString class to add methods to help you create HTML text. A category header file has an interface that looks like this:
@interface NSString (HTMLTags)
The class name that comes right after the @interface keyword is the class that you are extending. This means that the category may only be applied to NSString (or a subclass of NSString). In the parentheses that come after the class name you put the name that you are giving to the category.
You locate all the properties and methods for this category after the interface but before the @end keyword (just like in a regular class interface).
The implementation follows a similar pattern.
@implementation NSString (HTMLTags)
When you want to apply this extended functionality that you define in the category, you simply import the category header file, and you will be able to use the additional properties and methods that you have coded. See Listings 1-13 through 1-15 for the code.
The Code
Listing 1-13. HTMLTags.h
#import <Foundation/Foundation.h>


@interface NSString (HTMLTags)


-(NSString *) encloseWithParagraphTags;


@end
Listing 1-14. HTMLTags.m
#import "HTMLTags.h"


@implementation NSString (HTMLTags)


-(NSString *) encloseWithParagraphTags{

        return [NSString stringWithFormat:@"<p>%@</p>",self];

}


@end
#import "HTMLTags.h"


int main (int argc, const char * argv[]){

        @autoreleasepool {

                NSString *webText = @"This is the first line of my blog post";


                //Print out the string like normal:

                NSLog(@"%@", webText);


                //Print out the string using the category function:

                NSLog(@"%@", [webText encloseWithParagraphTags]);

        }

        return 0;

}
Usage
Categories are typically used in situations where you want to avoid creating a complex inheritance hierarchy. That is, you would rather not have to rely on using custom classes that are more than three or four levels removed from the root class because you don’t want to end up in a situation where making a change to a class has unintended implications in a class farther down in the inheritance hierarchy.
Categories also help your code remain readable. For instance, if you use a category to extend NSString in your projects, most of your code will be familiar to anyone who has used NSString. The alternative method of subclassing NSString (with something like NSHTMLString) could cause confusion.
To compile the code in the listings from the command line, make sure to compile the file with the category in addition to the main.m file.
clang -fobjc-arc -framework Foundation HTMLTags.m main.m -o maccommandlineapp
When you open the maccommandlineapp, you will see output that looks something like this:
This is the first line of my blog post

<p>This is the first line of my blog post</p>

logout


[Process completed]
1.9 Creating a Mac Window-Based Application from Terminal
Problem
You want to create a Mac application that has a user interface from the terminal. While Xcode is generally used to develop rich window-based applications on Mac, sometimes it’s easier to see what is happening when you set up an application without the extra help that Xcode project templates insert into your code.
Solution
Mac apps need some key components to work. Namely, you need to use the NSApplication and NSWindow classes to manage the application itself and the initial user interface. You also need an app delegate class, which you can code in a separate file. The app delegate acts as a helper for the application by implementing key methods that the application needs to work.
How It Works
There are two steps to this solution.
App Delegate
Mac apps make use of a design pattern called Delegatation. When you want to implement Delegation, you designate one object (called the delegate) to act on behalf of another object. Your Mac application is going to need a helper object called the app delegate to work.
The app delegate is a class that needs it’s own header and implementation file. Mac app delegates must import the Cocoa framework and implement the NSApplicationDelegate protocol. Protocols are a set of properties and methods that a class must implement in order to act as a delegate. The NSApplicationDelegate protocol is required for your class to be an app delegate.
Here is a an example of how you start to define an app delegate:
@interface AppDelegate : NSObject <NSApplicationDelegate>
You can see you are adopting the NSApplicationDelegate protocol here because you have this specified between the < and > symbols. The app delegate should have an NSWindow property and implement the delegate method - (void)applicationDidFinishLaunching:(NSNotification *)aNotification;.
The NSWindow property is the UI element where you put your user content. The delegate method is a notification that executes when the application is done launching to the desktop, which makes it a good place to set up the rest of the application.
Application
The Mac application itself is set up and launched from the main function as before. You will need to first get a reference to the NSApplication instance. NSApplication is a Cocoa class that is implemented using the Singleton design pattern. This means that you can only have once instance of NSApplication per application and that you must use a particular procedure to get a reference to the NSApplication object.
NSApplication *macApp = [NSApplication sharedApplication];
The sharedApplication function is a class method that will either instantiate and return an instance of NSApplication or simply return the instance that has already been created. Once you have a reference to the Mac application, you can create an app delegate and set this as macApp’s delegate.
AppDelegate *appDelegate = [[AppDelegate alloc] init];

macApp.delegate = appDelegate;
This has the effect of saying that the app delegate will now act on behalf of your Mac application. Next, your application must have a window, so use the NSWindow class to instantiate a window and set this to the app delegate’s NSWindow property.
int style = NSClosableWindowMask | NSResizableWindowMask |

 NSTexturedBackgroundWindowMask | NSTitledWindowMask |

NSMiniaturizableWindowMask;


 NSWindow *appWindow = [[NSWindow alloc] initWithContentRect:NSMakeRect(50, 50, 600, 400)

                                                  styleMask:style

                                                    backing:NSBackingStoreBuffered

                                                      defer:NO];

appDelegate.window = appWindow;
Now that you are all set up and connected, you can present the window to the user and run the Mac application.
See Listings 1-16 through 1-18 for the code.
The Code
Listing 1-16. AppDelegate.h
#import <Cocoa/Cocoa.h>
@interface AppDelegate : NSObject <NSApplicationDelegate>
@property (assign) NSWindow *window;
@end
Listing 1-17. AppDelegate.m
#import "AppDelegate.h"
@implementation AppDelegate
@synthesize window = _window;
- (void)applicationDidFinishLaunching:(NSNotification *)aNotification{
NSLog(@"Mac app finished launching");
}
@end
Listing 1-18. main.m
#import "AppDelegate.h"
int main (int argc, char *argv[]){
NSApplication *macApp = [NSApplication sharedApplication];
AppDelegate *appDelegate = [[AppDelegate alloc] init];
macApp.delegate = appDelegate;
int style = NSClosableWindowMask | NSResizableWindowMask |
NSTexturedBackgroundWindowMask | NSTitledWindowMask |
NSMiniaturizableWindowMask;
NSWindow *appWindow = [[NSWindow alloc] initWithContentRect:NSMakeRect(50, 50, 600, 400)
styleMask:style
backing:NSBackingStoreBuffered
defer:NO];
appDelegate.window = appWindow;
[appWindow makeKeyAndOrderFront:appWindow];

[macApp run];
}
Usage
To compile the code from the command line, make sure to compile the file with the AppDelegate in addition to the main.m file. For this program, you must also link to the Cocoa framework since you are using Cocoa to manage your UI elements for your Mac app.
clang -fobjc -framework Cocoa AppDelegate.m main.m -o macwindowapp
When you open the macwindowapp file, you will see a blank window appear. It should look like Figure 1-1.
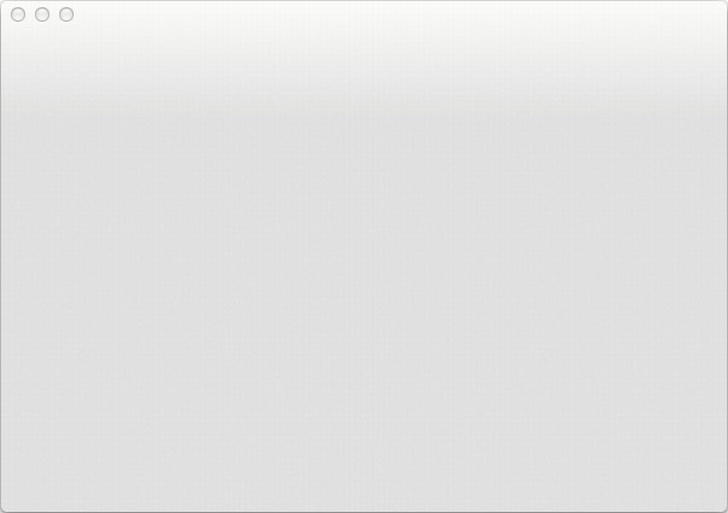
Figure 1-1. Mac application window
1.10 Adding a User Control to a Mac Application
Problem
Mac applications need to be able to receive and interpret user intentions. This is done with user controls like buttons and text fields that you make available for user input so you can take some action based on what the user wants. You want to add a button to your app and have something happen when the user clicks the button.
Solution
To add a button to a Mac app, simply add code to the applicationDidFinishLaunching delegate method to create the button, set the necessary button properties, set the action method (the code that executes in response to a user click), and then add the button to the window. You also want to code the action method that does something in response to a user click.
How It Works
In a simple Mac application like you coded in Recipe 1.9, you can add a button to the window to present this control to the user:
button = [[NSButton alloc] initWithFrame:NSMakeRect(230,200,140,40)];
[[self.window contentView] addSubview: button];
This is something that you would do in the app delegate’s didFinishLaunching delegate method. You can also set up the button UI by setting properties in this method:
[button setTitle: @"Change Color"];
[button setButtonType:NSMomentaryLightButton];
[button setBezelStyle:NSTexturedSquareBezelStyle];
Buttons use the Target-Action design pattern to respond to user actions like a button click. Target-Action is a design pattern where the object has the information necessary to execute an action (a special sort of method). You need to tell the object which method contains the code that will execute in response to an action and where the method is located (the target).
[button setTarget:self];
[button setAction:@selector(changeBackgroundColor)];
Here the target is self (the app delegate) and the method is called changeBackgroundColor. In the action method where you located the code, you need to change the background color of the window.
-(void)changeBackgroundColor{
self.window.backgroundColor = [NSColor blackColor];
}
See Listings 1-19 through 1-21 for the code.
The Code
Listing 1-19. AppDelegate.h
#import <Cocoa/Cocoa.h>


@interface AppDelegate : NSObject <NSApplicationDelegate>


@property (assign) NSWindow *window;


@end
Listing 1-20. AppDelegate.m
#import "AppDelegate.h"
@implementation AppDelegate
@synthesize window = _window;
NSButton *button;
-(void)changeBackgroundColor{
self.window.backgroundColor = [NSColor blackColor];
}
- (void)applicationDidFinishLaunching:(NSNotification *)aNotification{
NSLog(@"Mac app finished launching");
button = [[NSButton alloc] initWithFrame:NSMakeRect(230,200,140,40)];
[[self.window contentView] addSubview: button];
[button setTitle: @"Change Color"];
[button setButtonType:NSMomentaryLightButton];
[button setBezelStyle:NSTexturedSquareBezelStyle];
[button setTarget:self];
[button setAction:@selector(changeBackgroundColor)];
}
@end
#import "AppDelegate.h"
int main(int argc, char *argv[]){
NSApplication *macApp = [NSApplication sharedApplication];
AppDelegate *appDelegate = [[AppDelegate alloc] init];
macApp.delegate = appDelegate;
int style = NSClosableWindowMask | NSResizableWindowMask |
NSTexturedBackgroundWindowMask | NSTitledWindowMask | NSMiniaturizableWindowMask;
NSWindow *appWindow = [[NSWindow alloc] initWithContentRect:NSMakeRect(50, 50, 600, 400)
styleMask:style
backing:NSBackingStoreBuffered
defer:NO];
appDelegate.window = appWindow;
                               [appWindow makeKeyAndOrderFront:appWindow];

    [macApp run];

}
Usage
To compile this code from the command line, make sure to compile the file with the AppDelegate in addition to the main.m file. For this program, you must also link to the Cocoa framework since you are using Cocoa to manage your UI elements for your Mac app.
clang -fobjc -framework Cocoa AppDelegate.m main.m -o macwindowapp
When you open the macwindowapp file, you will see a window like the one in Figure 1-2.
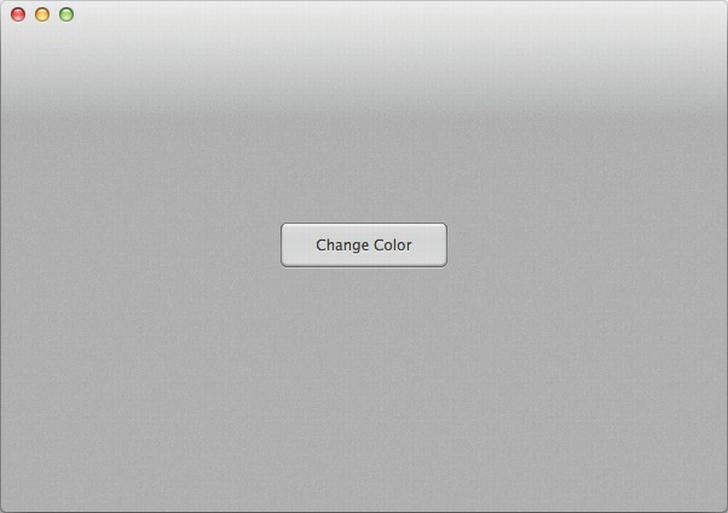
Figure 1-2. Mac application window with button
When you click the button, the action method will execute and turn the window’s background color to black, as you can see in Figure 1-3.
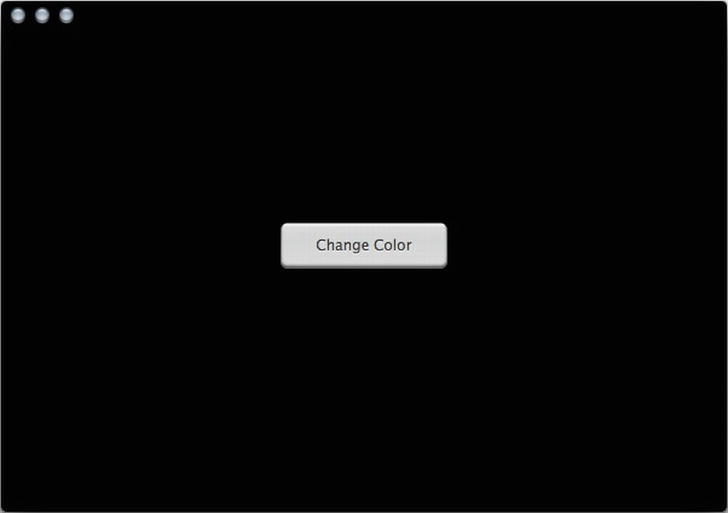
Figure 1-3. Window after action method executed
1.11 Creating a Mac Window-Based Application From Xcode
Problem
The recipes so far have simply been using the compiler from the command line to create Objective-C programs. However, if you want to develop a rich Mac application, you need to use Xcode to get it ready for the App Store.
NOTE: The Mac App Store is a marketplace where developers can sell their software directly to users. You can see applications for sale by other developers by visiting www.apple.com/mac/app-store/.
Solution
Use Xcode to set up your Mac application. You can use Xcode to create command line apps or Cocoa apps; there are also other options.
NOTE: Cocoa Mac applications have the user interface that consumers expect (the top menu items, familiar controls, and layouts). These types of applications require more frameworks, namely Cocoa, to work as expected. Command-line apps are simplier programs that are run from the Terminal application. Mac apps that you purchase from the Mac App Store are always Cocoa apps.
How It Works
Open Xcode and go to File ![]() New
New ![]() New Project. A dialog box will appear similar to the one in Figure 1-4.
New Project. A dialog box will appear similar to the one in Figure 1-4.
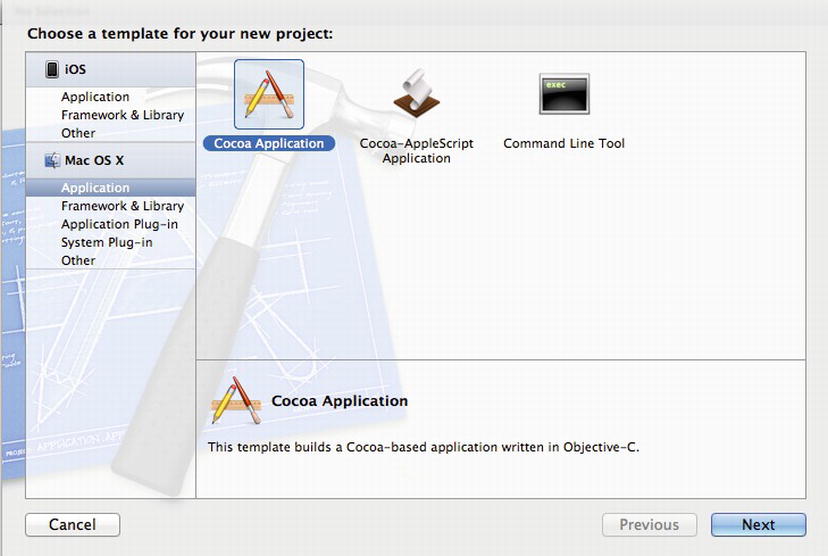
Figure 1-4. Mac application templates
Choose Mac OS X ![]() Application
Application ![]() Cocoa Application to set up a Mac application. Click Next and you will be directed to another dialog box where you can specify some initial settings (see Figure 1-5).
Cocoa Application to set up a Mac application. Click Next and you will be directed to another dialog box where you can specify some initial settings (see Figure 1-5).
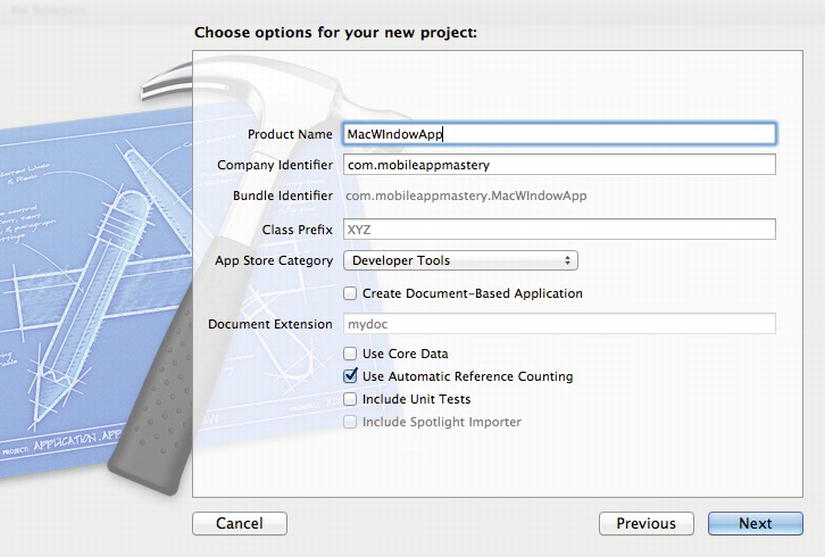
Figure 1-5. Application settings
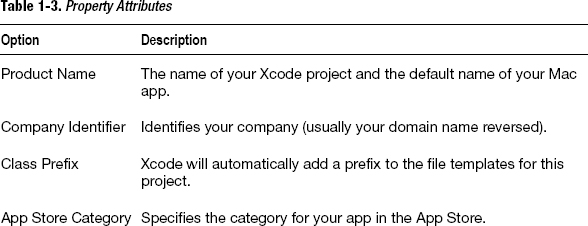
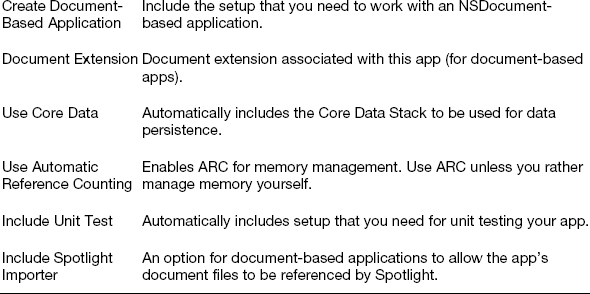
See Table 1-3 for some more detail about all the options on this screen.
After you choose your initial settings, click Next to choose your project location. Here you may choose to use the version control system Git locally.
Once you do all this, Xcode will automatically open with the files that you need all ready to go. Your code files and other resources will be located on the left. Click on any code file to see the code in the editor: the key code files will look similar to what you have worked on in previous recipes: AppDelegate.h, AppDelegate.m, and main.m (you can see that one by expanding the Supporting Files folder).
You will also find other resources used for application development like the MainMenu.xib file (used with Interface Builder), the Frameworks folder (linked frameworks), and your InfoPlist file (a keyed list of your app settings). See Listings 1-22 through 1-24 for the code.
The Code
Listing 1-22. AppDelegate.h
#import <Cocoa/Cocoa.h>


@interface AppDelegate : NSObject <NSApplicationDelegate>


@property (assign) IBOutlet NSWindow *window;


@end
#import "AppDelegate.h"


@implementation AppDelegate


@synthesize window = _window;


- (void)applicationDidFinishLaunching:(NSNotification *)aNotification{

    // Insert code here to initialize your application

}


@end
Listing 1-24. main.m
#import <Cocoa/Cocoa.h>


int main(int argc, char *argv[]){

    return NSApplicationMain(argc, (const char **)argv);

}
Usage
You can test this initial setup by clicking the Run button in the top left hand corner of Xcode. Xcode will gather all your code and other resources, link them to the frameworks that you need, and then launch the application. The Mac app window will appear with a menu aready set up and ready for use.
You can add controls and other UI with Objective-C to a Mac app by following the example from Recipe 1.10 or you can use the tools that Xcode provides for creating the UI.
1.12 Creating an iOS Application from Xcode
Problem
You want to build an application that can run on the iPhone, the iPad, or both. These applications follow similar patterns as Mac apps but they require different frameworks for the user interface.
Solution
Use Xcode to set up your iOS application. You can use Xcode to create simple iOS apps with only one screen or richer applications with navigation, tabs, and page views. You can also specify whether your app will run on the iPhone, the iPad, or both. Xcode comes with templates for most of the situtations you will find.
How It Works
Open Xcode and go File ![]() New
New ![]() New Project. A dialog box will appear similar to the one in Figure 1-6.
New Project. A dialog box will appear similar to the one in Figure 1-6.
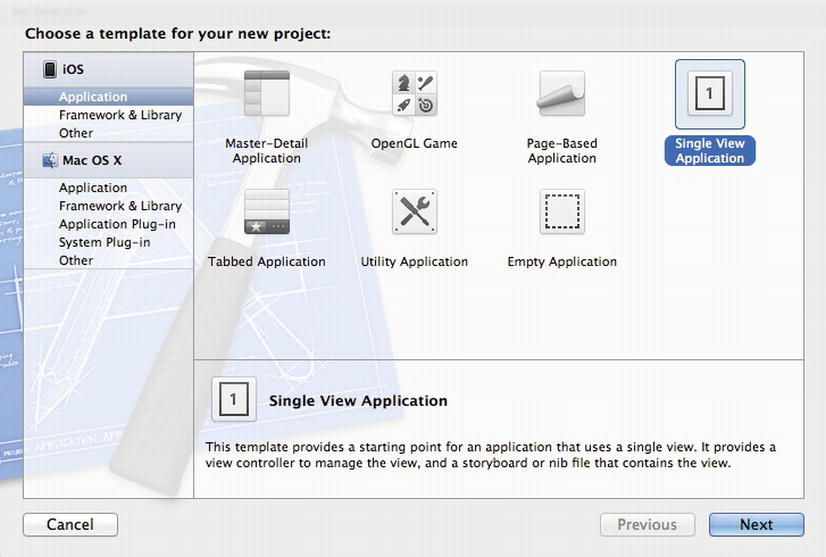
Figure 1-6. iOS application templates
Choose iOS ![]() Application
Application ![]() Single View Application to set up an iOS application. Click Next and you will be directed to another dialog box where you can specify some initial settings (see Figure 1-7).
Single View Application to set up an iOS application. Click Next and you will be directed to another dialog box where you can specify some initial settings (see Figure 1-7).

Figure 1-7. iOS application settings
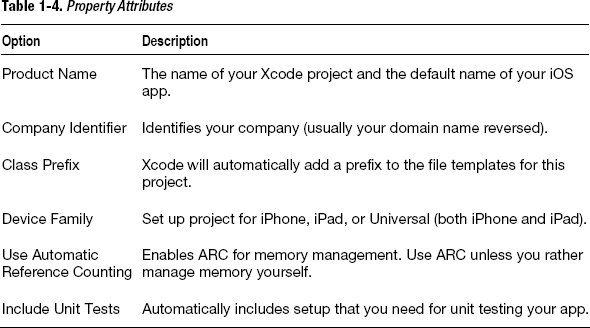
See Table 1-4 for some more detail about all the options on this screen.
After you choose your initial settings, click Next to choose your project location. Here you may choose to use the version control system Git locally.
NOTE: Git is a version control system that is now integrated with Xcode. If you choose to use version control, all the changes will be tracked and you will be able to compare all the versions of the code files that you create. Using Git version control is out of the scope of this book, but it can be a useful tool as you start to create production apps.
Once you do all this, you Xcode will automatically open up with the files that you need all ready to go. Your code files and other resources will be located on the left. Click on any code file to see the code in the editor. The key code files will look similar to what you have worked on in previous recipes: AppDelegate.h, AppDelegate.m, and main.m (you can see that one by expanding the Supporting Files folder). Since this is a single view application, you will also have code files for ViewController.h, ViewController.m, and ViewController.xib (an Interface Builder file).
iOS applications are set up in much the same way as Mac applications: they have an application class (called UIApplication for iOS) and an app delegate. The app delegate must adopt the UIApplicationDelegate protocol and have a window (called UIWindow for iOS). App delegates also have some delegate method that act as notifications for key events in the app lifecycle such as applicationDidFinishingLauchingWithOptions.
In the Single View Application template, the window and other user interface elements are set up in the app delegate’s applicationDidFinishingLauchingWithOptions delegate method.
- (BOOL)application:(UIApplication *)application

 didFinishLaunchingWithOptions:(NSDictionary *)launchOptions{

    self.window = [[UIWindow alloc] initWithFrame:[[UIScreen mainScreen] bounds]];

    self.viewController = [[ViewController alloc] initWithNibName:@"ViewController"

 bundle:nil];

    self.window.rootViewController = self.viewController;

    [self.window makeKeyAndVisible];

    return YES;

}
This template is a little bit different than what you might remember from the Mac Cocoa Application template (Recipe 1.11). Namely, here you are using a class called ViewController (a subclass of UIViewController) and adding this to the window’s rootViewController property.
This means that the screen that users see first is managed by this view controller. If you want to make changes to the app’s user interface, you must do so in this view controller.
You will find other resources used for application development like the Frameworks folder (linked frameworks) and your InfoPlist file (a keyed list of your app settings). See Listings 1-25 through 1-29 for the code.
The Code
Listing 1-25. AppDelegate.h
#import <UIKit/UIKit.h>


@class ViewController;


@interface AppDelegate : UIResponder <UIApplicationDelegate>


@property (strong, nonatomic) UIWindow *window;

@property (strong, nonatomic) ViewController *viewController;


@end
Listing 1-26. AppDelegate.m
#import "AppDelegate.h"

#import "ViewController.h"


@implementation AppDelegate


@synthesize window = _window;

@synthesize viewController = _viewController;


- (BOOL)application:(UIApplication *)application

 didFinishLaunchingWithOptions:(NSDictionary *)launchOptions{

    self.window = [[UIWindow alloc] initWithFrame:[[UIScreen mainScreen]

bounds]];

    self.viewController = [[ViewController alloc]

initWithNibName:@"ViewController" bundle:nil];

    self.window.rootViewController = self.viewController;

    [self.window makeKeyAndVisible];

    return YES;

}


@end
#import <UIKit/UIKit.h>

#import "AppDelegate.h"


int main(int argc, char *argv[]){

    @autoreleasepool {

        return UIApplicationMain(argc, argv, nil, NSStringFromClass([AppDelegate

 class]));

    }

}
Listing 1-28. ViewController.h
#import <UIKit/UIKit.h>


@interface ViewController : UIViewController


@end
Listing 1-29. ViewController.h
#import "ViewController.h"


@implementation ViewController


-(void)viewDidLoad{

    [super viewDidLoad];

}


@end
Usage
You can test this initial setup by clicking the Run button in the top left hand corner of Xcode. Xcode will gather all your code and other resources, link them to the frameworks that you need, and then launch the application. The iOS app will appear in the iOS Simulator (a special program to test iOS apps on the Mac), as shown in Figure 1-8.
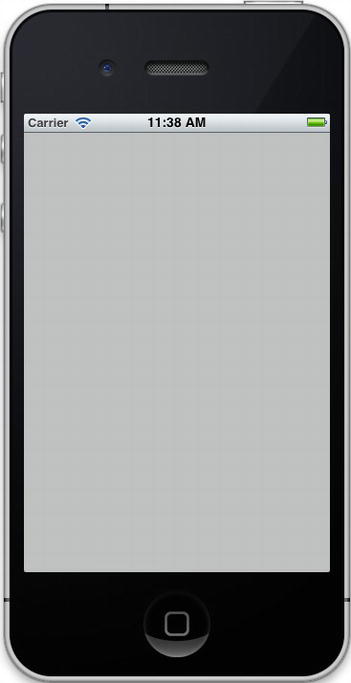
Figure 1-8. iOS Simulator with single view application
You can add controls and other UI with Objective-C to an iOS app (see recipes 1.13 and 1.14) or you can use the tools that Xcode provides for creating the UI.
1.13 Adding User Controls to an iOS Application with Target-Action
Problem
Now that you have an iOS application set up, you would like to add some user controls.
Solution
While you can add controls like buttons and labels to the window like you did with the Mac application in Recipe 1.11, it’s more common to add controls to views, which are in turn presented in the application window. In this recipe, you are going to add a label and a button to the single view application from Recipe 1.12.
How It Works
Typically, you can think of the controls you want to use on a view controller as properties and follow the same rules as in Recipe 1.4. Then you instantiate these properties in the viewDidLoad view controller delegate method. Finally, you code any necessary action methods and then associated these action methods with the user controls using the Target-Action design pattern.
In this Recipe, you are going to add a UILabel and UIButton to the view controller that came with the Xcode template. This is what these property forward declarations look like:
#import <UIKit/UIKit.h>


@interface ViewController : UIViewController


@property(strong) UILabel *myLabel;

@property(strong) UIButton *myButton;


@end
In the implemenation, you use @synthesize to generate the getters and setters and set these controls to nil when the view is unloaded.
#import "ViewController.h"


@implementation ViewController

@synthesize myLabel, myButton;


- (void)viewDidLoad{

    [super viewDidLoad];


}


@end
The action method needs a forward declaration in the view controller header file.
#import <UIKit/UIKit.h>


@interface ViewController : UIViewController


@property(strong) UILabel *myLabel;

@property(strong) UIButton *myButton;


-(void)updateLabel;


@end
This action method can be implemented like this to update the label:
This is what you want to happen when the user presses the button. Finish the label and button by instantiating them, setting their properties, and adding them to the view. The button also needs to use Target-Action, so hook up the updateLabel action method to the button’s touch up event. All of this happens in the view controllers viewDidLoad event.
- (void)viewDidLoad{
[super viewDidLoad];
//Create label
self.myLabel = [[UILabel alloc] init];
self.myLabel.frame = CGRectMake(20, 20, 280, 40);
self.myLabel.textAlignment = UITextAlignmentCenter;
self.myLabel.backgroundColor =[UIColor clearColor];
self.myLabel.text = @"Press the button";
[self.view addSubview:self.myLabel];
//Create button
self.myButton = [UIButton buttonWithType:UIButtonTypeRoundedRect];
self.myButton.frame = CGRectMake(110, 200, 100, 50);
//Add the pressButton action method
[self.myButton addTarget:self
action:@selector(updateLabel)
forControlEvents:UIControlEventTouchUpInside];
[self.myButton setTitle:@"Press" forState:UIControlStateNormal];
[self.view addSubview:self.myButton];
}
See Listings 1-30 and 1-31 for the code.
The Code
Listing 1-30. ViewController.h
#import <UIKit/UIKit.h>
@interface ViewController : UIViewController
@property(strong) UILabel *myLabel;
@property(strong) UIButton *myButton;
-(void)updateLabel;
@endListing 1-31. ViewController.m
#import "ViewController.h"
@implementation ViewController
@synthesize myLabel, myButton;
- (void)viewDidLoad{
[super viewDidLoad];
//Create label
self.myLabel = [[UILabel alloc] init];
self.myLabel.frame = CGRectMake(20, 20, 280, 40);
self.myLabel.textAlignment = UITextAlignmentCenter;
self.myLabel.backgroundColor =[UIColor clearColor];
self.myLabel.text = @"Press the button";
[self.view addSubview:self.myLabel];
//Create button
self.myButton = [UIButton buttonWithType:UIButtonTypeRoundedRect];
self.myButton.frame = CGRectMake(110, 200, 100, 50);
//Add the pressButton action method
[self.myButton addTarget:self
action:@selector(updateLabel)
forControlEvents:UIControlEventTouchUpInside];
[self.myButton setTitle:@"Press" forState:UIControlStateNormal];
[self.view addSubview:self.myButton];
}
-(void)updateLabel{

    self.myLabel.text = @"The button was pressed...";

}
@end
Usage
You can test this initial setup by clicking the Run button in the top left hand corner of Xcode. Xcode will gather all your code and other resources, link them to the frameworks that you need, and then launch the application. The iOS app will appear in the iOS Simulator (a special program to test iOS apps on the Mac), as shown in Figure 1-9.
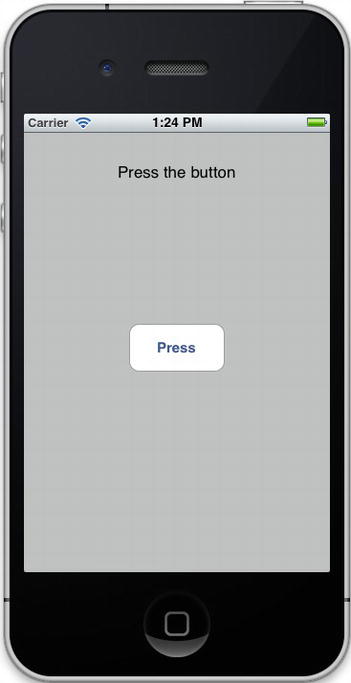
Figure 1-9. iOS Simulator with single view application with user controls
When you touch the button, the action method will execute and update the label with the text “The button was pressed…”.
1.14 Adding User Controls to an iOS Application with Delegation
Problem
While many user controls follow the Target-Action pattern in the same way as the button did in Recipe 1.13, other user controls use the Delegation design pattern. The procedure with working with controls like this is very different, so you would like to know how to do it.
Solution
Controls that use Delegation are added to the view controller just like the button and label, so you need properties to reference these controls. The control in this recipe that uses Delegation is the UIPickerView. This control presents a list of selections to users and requires a delegate, which is usually the view controller. The delegate is responsible for providing the content that appears on the picker view and taking action when the user makes a selection.
How It Works
Typically, you can think of the controls you want to use on a view controller as properties and follow the same rules as in Recipe 1.4. Then you instantiate these properties in the viewDidLoad view controller method.
Controls that use Delegation must use a delegate to adopt the required protocols. For this Recipe, you are using a UIPickerView, so your view controller needs to adopt two protocols: UIPickerViewDelegate and UIPickerViewDataSource.
The view controller needs to implement two required delegate methods that let the picker view know how many components (another name for columns) and rows to present.
- (NSInteger)numberOfComponentsInPickerView:(UIPickerView *)pickerView{

    return 1;

}


- (NSInteger)pickerView:(UIPickerView *)pickerView

numberOfRowsInComponent:(NSInteger)component{

    return 3;

}
These two methods configure your picker view to present one component and three rows. When the picker view needs to know what content to put in each row, it aska its delegate for that information as well. Your view controller, as the delegate, answers with the delegate method titleForRow, like this:
-(NSString *)pickerView:(UIPickerView *)pickerView titleForRow:(NSInteger)row

forComponent:(NSInteger)component{

    return [NSString stringWithFormat:@"row number %i", row];

}
This delegate method populates each row with text that differs slightly depending on the row. Finally, the delegate helps you out when a user makes a selection with the picker view via the didSelectRow delegate method.
- (void)pickerView:(UIPickerView *)pickerView didSelectRow:(NSInteger)row

inComponent:(NSInteger)component{

    self.myLabel.text = [NSString stringWithFormat:@"row number %i", row];

}
Once these delegate methods are set up, you can instantiate the picker view, set the picker view’ delegate property to the view controller, and then add the picker view to the view. This is the code where you do this:
self.myPickerView = [[UIPickerView alloc]initWithFrame:CGRectMake(0, 250, 325, 250)];


self.myPickerView.showsSelectionIndicator = YES;

self.myPickerView.delegate = self;


[self.view addSubview:self.myPickerView];
See Listings 1-32 and 1-33 for the code.
The Code
Listing 1-32. ViewController.h
#import <UIKit/UIKit.h>


@interface ViewController : UIViewController<UIPickerViewDelegate,

 UIPickerViewDataSource>


@property(strong) UILabel *myLabel;

@property(strong) UIPickerView *myPickerView;


@end
Listing 1-33. ViewController.m
#import "ViewController.h"


@implementation ViewController

@synthesize myLabel, myPickerView;


- (void)viewDidLoad{

    [super viewDidLoad];


    //Create label

    self.myLabel = [[UILabel alloc] init];

    self.myLabel.frame = CGRectMake(20, 20, 280, 40);

    self.myLabel.textAlignment = UITextAlignmentCenter;

    self.myLabel.backgroundColor =[UIColor clearColor];

    self.myLabel.text = @"Make a selection";

    [self.view addSubview:self.myLabel];
    //Create picker view

    self.myPickerView = [[UIPickerView alloc]initWithFrame:CGRectMake(0, 250, 325, 250)];


    self.myPickerView.showsSelectionIndicator = YES;

    self.myPickerView.delegate = self;


    [self.view addSubview:self.myPickerView];


}


- (NSInteger)numberOfComponentsInPickerView:(UIPickerView *)pickerView{

    return 1;

}


- (NSInteger)pickerView:(UIPickerView *)pickerView

numberOfRowsInComponent:(NSInteger)component{

    return 3;

}


-(NSString *)pickerView:(UIPickerView *)pickerView titleForRow:(NSInteger)row

forComponent:(NSInteger)component{

    return [NSString stringWithFormat:@"row number %i", row];

}


- (void)pickerView:(UIPickerView *)pickerView didSelectRow:(NSInteger)row

inComponent:(NSInteger)component{

    self.myLabel.text = [NSString stringWithFormat:@"row number %i", row];

}


@end
Usage
You can test this initial setup by clicking the Run button in the top left hand corner of Xcode. Xcode will gather all your code and other resources, link them to the frameworks that you need, and then launch the application. The iOS app will appear in the iOS Simulator (a special program to test iOS apps on the Mac), as shown in Figure 1-10.
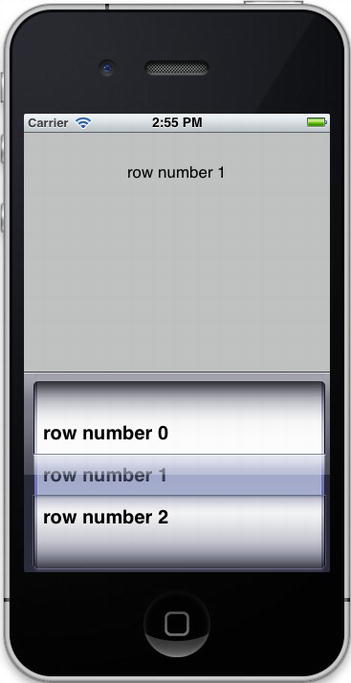
Figure 1-10. iOS Simulator with single view application with a picker view
All the content in the picker view comes from the delegate view controller. When you make a selection, the delegate is responsible for updating the view.