
Chapter 2
Working With Strings and Numbers
This chapter covers how to work with strings and numbers using the Foundation framework with Objective-C.
The recipes in this chapter will show you how to:
- Create a string object using NSString
- Read strings from text files on Mac and iOS
- Write strings to text files on Mac and iOS
- Compare strings
- Manipulate strings
- Search through strings
- Create localized strings
- Convert between numbers and strings
- Format numbers for currency and other presentations
NOTE: The recipes in this chapter may be used with any Mac or iOS app that links to the Foundation framework. Follow one of the recipes from Chapter 1, such as 1.1, to set up an app to test out the code in this chapter. Be sure to locate the code in the main function unless the recipe specifies another location for the code.
2.1 Creating a String Object
Problem
Most of your programs will need to represent strings, or arrays of characters. It’s possible to use the C method of representing strings, but it’s much easier to use an object-oriented approach to manage them. To get started using strings with Objective-C, you must first instantiate string objects.
Solution
Use the Foundation NSString class constructors to create string objects that you can use in your program. NSString comes with a set of constructors that starts with init and a set of functions that start with string and return string objects. You may use any of these to create string objects.
How It Works
Typically, you create strings by simply assigning an NSString object to a string that you typed out, preceded by the @ symbol. The @ symbol tells the compiler that this is an Objective-C entity; when the @ symbol is in front of quotes, the complier knows that this is an Objective-C NSString.
Here’s an example of creating a string object:
NSString *myString1 = @"My String One";
At times you may need to instantiate a string object from a C array of UTF8-encoded bytes. NSString has a function that will return an instance of NSString given a string encoded in this way.
NSString *myString2 = [NSString stringWithUTF8String:"My String Two"];
As you work more with NSString, you will see that there are many functions that begin with the word string that return an NSString instance. There are also many NSString constructors that begin with init that have similar names to the string functions and basically do the same thing. For instance, you could get an NSString instance similar to the previous one using alloc and initWithUTF8String, like this:
NSString *myString3 = [[NSString alloc] initWithUTF8String:"My String Three"];
These two ways of returning NSString instances are helpful when you are managing memory manually. The functions that begin with the word string all return autoreleased objects, which means they should be treated as temporary. NSString objects return with alloc and init are retained; they must be released manually when you are finished with them. If you are using automatic reference counting (ARC), you don’t need to worry about this; you may use these two methods interchangeably.
There are a few more constructors and functions that return string instances. One of the most useful is the stringWithFormat function. This function makes it really easy to compose a new string by substituting values into placeholders. You may use the same placeholders that you used in Recipe 1.2 to substitute values into the strings that were written to the console window. Here is an example of stringWithFormat:
int number = 4;

NSString *myString4 = [NSString stringWithFormat:@"My String %i", number];
The Code
Here are some examples of how you may experiment with NSString constructors in a simple Mac application:
#import <Foundation/Foundation.h>


int main (int argc, const char * argv[])

{


    @autoreleasepool {


        NSString *myString1 = @"My String One";

        NSLog(@"myString1 = %@", myString1);


        NSString *myString2 = [NSString stringWithUTF8String:"My String Two"];

        NSLog(@"myString2 = %@", myString2);


        NSString *myString3 = [[NSString alloc] initWithUTF8String:"My String Three"];

        NSLog(@"myString3 = %@", myString3);


        int number = 4;

        NSString *myString4 = [NSString stringWithFormat:@"My String %i", number];

        NSLog(@"myString4 = %@", myString4);


    }

    return 0;

}
Usage
To use this code, build and run your Mac app from Xcode. You can view the results of the strings in the console window.
myString1 = My String One

myString2 = My String Two

myString3 = My String Three

myString4 = My String 4
2.2 Reading Strings from Files on a Mac
Problem
You would like to use content stored on your file system to create and use string objects in your app.
Solution
To create string objects from text files, you need two things: an error object and the complete file path name of the text file. Once you have these in place, you may use the NSString function stringWithContentsOfFile:encoding:error: to return an NSString object filled with the contents of the text file.
How It Works
The NSString class will attempt to read the text file that you specify. If the operation is successful, a string object with the contents of the text file will be returned. If the operation is not successful, nil will be returned and an error object will be generated that you can inspect to find the problem.
The first thing you need is a reference to the file path name. This file path name is referencing a file named textfile.txt in the Shared folder on my Mac.
NSString *filePathName = @"/Users/Shared/textfile.txt";
NOTE: Mac applications can work with the hardcoded file path names to access any file on your Mac. However, iOS applications are sandboxed and so only have access to files that come with their app bundle or are in the iOS app’s documents directory (see Recipe 2.3).
Next, you want an error object to hold error reporting data that you’ll need if the operation to read the file fails.
NSError *fileError;
The error object doesn’t need to be instantiated here because you pass the error object to the function by reference, and the function will do all the necessary setup work on the error object for you.
Finally, you use the NSString function to return the string object to use, like so:
NSString *textFileContents = [NSString stringWithContentsOfFile:filePathName

                                                       encoding:NSASCIIStringEncoding

                                                          error:&fileError];
The string object will be either empty or filled with the contents of the text file. The first parameter is the file path name and the second requires you to specify how the file was encoded. The last parameter takes the error object. The & in front of fileError means that the object is being passed by reference so you can test the error object to make sure everything worked as expected.
Before you use the string, you should query the error object to make sure that an error did not occur. Test the error object’s code property to see that the error code is 0. If it is, go ahead and use the string; otherwise you might want to report the error in some way or try an alternate file.
if(fileError.code == 0)

    NSLog(@"textfile.txt contents: %@", textFileContents);

else

    NSLog(@"error(%ld): %@", fileError.code, fileError.description);
The Code
#import <Foundation/Foundation.h>


int main (int argc, const char * argv[])

{


    @autoreleasepool {

        NSString *filePathName = @"/Users/Shared/textfile.txt";

        NSError *fileError;
        NSString *textFileContents = [NSString stringWithContentsOfFile:filePathName

                                                               encoding:NSASCIIStringEncoding

                                                                  error:&fileError];

        if(fileError.code == 0)

            NSLog(@"textfile.txt contents: %@", textFileContents);

        else

            NSLog(@"error(%ld): %@", fileError.code, fileError.description);


    }


    return 0;

}
Usage
To use this code, build and run your Mac app from Xcode. You can view the text file content or the error object contents in the console window.
textfile.txt contents: This string comes from a local text file.
2.3 Reading Strings from Files on iOS
Problem
You would like to use content packaged with your iOS app to create and use string objects in your app.
Solution
iOS apps can’t read text files from your Mac like Mac command line apps can. However, you can include text files in your iOS app bundle to make them available for use when your app runs. You can get references to any text files that you want in your app bundle or your app’s documents directory.
How It Works
To include text files in iOS apps, you need to drag the text file into the Supporting Files folder in Xcode. When the dialog box pops up, check the box that says Copy items into destination group’s folder (if needed). Doing this ensures that the text file will be included with the bundle that will be installed in the iOS Simulator and included in the App Store app.
The NSString class will attempt to read in the text file that you specify. If the operation is successful, a string object with the contents of the text file will be returned. If the operation is not successful, nil will be returned and an error object will be generated that you can inspect to locate the problem.
The first thing you need is a reference to the file path name. In iOS, you need to get a reference to the bundle folder. Since this is a dynamic folder path, you can’t hardcode the folder pathname in advance. However, you can use [[NSBundle mainBundle] resourcePath] to get a reference to the folder where all the resources are included. Once you have that, you can use the stringWithFormat method to build a reference to your text file.
NSString *bundlePathName = [[NSBundle mainBundle] resourcePath];

NSString *filePathName = [NSString stringWithFormat:@"%@/textfile.txt",

bundlePathName];
The file path name here is referencing a file named textfile.txt in the bundle’s resource folder in the iOS app.
You also need an error object to hold all error reporting data in case the operation to read the file fails.
NSError *fileError;
The error object doesn’t need to be instantiated here because you pass the error object to the function by reference and the function does all the necessary setup work on the error object for you.
Finally, use the NSString function to return the string object to use, like so:
NSString *textFileContents = [NSString stringWithContentsOfFile:filePathName

                                                       encoding:NSASCIIStringEncoding

                                                          error:&fileError];
The string object will be either empty or filled with the contents of the text file. The first parameter is the file path name and the second requires you to specify how the file was encoded. The last parameter takes the error object. The & in front of fileError means that the object is being passed by reference so you can test the error object to make sure everything worked as expected.
Before you use the string, you should query the error object to find out if an error occurred. If the code property is 0, you are ok. If everything looks good, go ahead and use the string; otherwise, you might want to report the error in some way or try an alternate file.
if(fileError.code == 0)

    NSLog(@"textfile.txt contents: %@", textFileContents);

else

    NSLog(@"error(%ld): %@", fileError.code, fileError.description);
See Listing 2-1 for the code.
The Code
Listing 2-1. AppDelegate.m
#import "AppDelegate.h"


@implementation AppDelegate

@synthesize window = _window;


- (BOOL)application:(UIApplication *)application

 didFinishLaunchingWithOptions:(NSDictionary *)launchOptions{


    NSString *bundlePathName = [[NSBundle mainBundle] resourcePath];


    NSString *filePathName = [NSString stringWithFormat:@"%@/textfile.txt",

 bundlePathName];


    NSError *fileError;


    NSString *textFileContents = [NSString stringWithContentsOfFile:filePathName

                                                           encoding:NSASCIIStringEncoding

                                                              error:&fileError];


    if(fileError.code == 0)

       NSLog(@"textfile.txt contents: %@", textFileContents);

    else

       NSLog(@"error(%d): %@", fileError.code, fileError.description);


    self.window = [[UIWindow alloc] initWithFrame:[[UIScreen mainScreen]

bounds]];

    self.window.backgroundColor = [UIColor whiteColor];

    [self.window makeKeyAndVisible];

    return YES;

}


@end
Usage
To try this code out for yourself, you will need an iOS app; see Recipe 1.12 for instructions. The code in Listing 2-1 is what you should have in your app delegate code file. The applicationDidFinishLaunchingWithOptions delegate method is where the significant code is located for the purposes of this recipe. Build and run your app with Xcode and view the console to see the contents of the text file printed to the log.
textfile.txt contents: This string comes from a local text file.
2.4 Writing Strings to Files on a Mac
Problem
You would like to be able to store text content generated from your Mac app on the file system to be used later or by other programs.
Solution
NSString comes with built-in methods to write the contents of string objects to your Mac’s filesystem. Simply send the message writeToFile:atomically:encoding:error: to a string object and the file pathname to store the contents in the string object.
How It Works
You can send the message writeToFile:atomically:encoding:error: to save the contents of a string to the filesystem. If the operation isn’t successful, an error object will be generated that you can inspect to locate the problem.
The first thing you need is a reference to the file path name. This file path name is referencing a file named textfile.txt in the Shared folder on my Mac.
NSString *filePathName = @"/Users/Shared/textfile.txt";
NOTE: Mac applications can work with the hardcoded file path names to access any file on your Mac. However, iOS applications are sandboxed and so only have access to files that come with their app bundle or are in the iOS app’s documents directory (see Recipe 2.3).
You also want an error object to hold all error reporting data that you’ll need if the operation to read the file fails.
NSError *fileError;
The error object doesn’t need to be instantiated here because you pass the error object to the function by reference and the function does all the necessary setup work on the error object for you.
You need some content in the string to save to the file that will look something like this:
NSString *textFileContents = @"Content generated from a Mac program.";
Finally, send the message writeToFile:atomically:encoding:error: to save the contents of a textFileContents to the filesystem.
[textFileContents writeToFile:filePathName

                   atomically:YES

                     encoding:NSStringEncodingConversionAllowLossy

                        error:&fileError];
The first parameter in this message is the full name of the file where you want to store your string contents. The second parameter, atomically, refers to whether you would like to write out the contents to an auxiliary file first. When you pass YES, this auxiliary file is used and you’re guaranteed that the data will not be corrupted even if the system crashes. The encoding parameter gives you some control over how the string is stored on the system and the error parameter is used to report back any errors that happen during the write.
Before you move on in your program, you should query the error object to make sure everything looks good. If its code is 0, the operation was successful. If so, go ahead and use the string; if not, you might want to report the error in some way or try an alternate file.
if(fileError.code == 0)

    NSLog(@"textfile.txt contents: %@", textFileContents);

else

    NSLog(@"error(%ld): %@", fileError.code, fileError.description);
See Listing 2-2 for the code.
The Code
Listing 2-2. main.m
#import <Foundation/Foundation.h>


int main (int argc, const char * argv[]){


    @autoreleasepool {

        NSString *filePathName = @"/Users/Shared/textfile.txt";

        NSError *fileError;

        NSString *textFileContents = @"Content generated from a Mac program.";


        [textFileContents writeToFile:filePathName

                           atomically:YES

                             encoding:NSStringEncodingConversionAllowLossy

                                error:&fileError];


        if(fileError.code == 0)

            NSLog(@"textfile.txt was written successfully with these contents: %@",

 textFileContents);

        else

            NSLog(@"error(%ld): %@", fileError.code, fileError.description);


    }

    return 0;

}
Usage
To use this code, build and run your Mac app from Xcode. You can view the text file contents or the error object contents in the console window. You should also be able to open the text file with any text editor to see the contents of the string object that you wrote out to the file system.
2.5 Writing Strings To Files On iOS
Problem
You would like to be able to store text content generated from your iOS app in the app’s documents directory to be used later or by other programs.
Solution
iOS apps can’t write text files to your Mac like Mac command line apps can. However, you don’t get a sandboxed area in your iOS application where you can write to when needed. The place where you store your own content in iOS is called the documents directory, and you will need a reference to this dynamic directory to store your string objects.
NOTE: While you may read text files from the bundle resource directory as discussed in Recipe 2.3, you can’t write to any files in that directory. If you need to work on a file in your app, you must either copy the file to your documents directory or simply save the updated version in the documents directory.
How It Works
You may send the message writeToFile:atomically:encoding:error: to save the contents of a string to the documents directory. If the operation is not successful, an error object will be generated that you can inspect to locate the problem.
The first thing you need is the documents directory. It is dynamically generated for each app install so you can’t hardcode it. However, you can use this function to get a reference to the documents directory:
NSString *documentsDirectory = [NSSearchPathForDirectoriesInDomains

(NSDocumentDirectory, NSUserDomainMask, YES) lastObject];
Next, you need to construct a reference to the file path name that you would like in the documents directory.
NSString *filePathName = [NSString stringWithFormat:@"%@/textfile.txt",

 documentsDirectory];
This file path name is referencing a file named textfile.txt in the iOS app’s document directory.
You also want an error object to hold any error reporting data that you’ll need in case the operation to read the file fails.
NSError *fileError;
The error object doesn’t need to be instantiated here because you pass the error object to the function by reference and the function does all the necessary setup work on the error object for you.
You need some content in the string to save to the file that will look something like this:
NSString *textFileContents = @"Content generated from an iOS app.";
Finally, send the message writeToFile:atomically:encoding:error: to save the contents of a textFileContents to the filesystem.
[textFileContents writeToFile:filePathName

                   atomically:YES

                     encoding:NSStringEncodingConversionAllowLossy

                        error:&fileError];
The first parameter in this message is the full name of the file where you want to store your string contents. The second parameter, atomically, refers to whether you would like to write out the contents to an auxiliary file first. When you pass YES, this auxiliary file is used and you’re guaranteed that the data will not be corrupted even if the system crashes. The encoding parameter gives you some control over how the string is stored on the system and the error parameter is used to report back any errors that happen during the write.
Before you move on in your program, you should query the error object. If its code is 0, the operation was successful. If everything looks good, go ahead and use the string; otherwise you might want to report the error in some way or try an alternate file.
if(fileError.code == 0)

    NSLog(@"textfile.txt was written successfully with these contents: %@",

 textFileContents);

else

    NSLog(@"error(%d): %@", fileError.code, fileError.description);
See Listing 2-3 for the code.
The Code
Listing 2-3. AppDelegate.m
#import "AppDelegate.h"


@implementation AppDelegate


@synthesize window = _window;
- (BOOL)application:(UIApplication *)application

 didFinishLaunchingWithOptions:(NSDictionary *)launchOptions{


    NSString *documentsDirectory = [NSSearchPathForDirectoriesInDomains

(NSDocumentDirectory, NSUserDomainMask, YES) lastObject];


    NSString *filePathName = [NSString stringWithFormat:@"%@/textfile.txt",

 documentsDirectory];


    NSError *fileError;


    NSString *textFileContents = @"Content generated from an iOS app.";


    [textFileContents writeToFile:filePathName

                       atomically:YES

                         encoding:NSStringEncodingConversionAllowLossy

                            error:&fileError];


    if(fileError.code == 0)

        NSLog(@"textfile.txt was written successfully with these contents: %@",

 textFileContents);

    else

        NSLog(@"error(%d): %@", fileError.code, fileError.description);


    self.window = [[UIWindow alloc] initWithFrame:[[UIScreen mainScreen] bounds]];

    self.window.backgroundColor = [UIColor whiteColor];

    [self.window makeKeyAndVisible];

    return YES;

}


@end
Usage
Locate this code in your iOS app delegate in the applicationDidFinishLaunchingWithOptions delegate method. Build and run your app with Xcode and view the console to see the contents of the text file printed to the log. If a problem occurred during the writing process, you will see the details of the error reported to the log.
Your app now has the contents of the string object stored in the documents directory and may be used later on by referencing the new text file in documents directory.
2.6 Comparing Strings
Problem
You would like to be able to see if two strings have the same value, but you can’t simply use the == comparison operator because strings are objects.
Solution
Use the NSString method isEqualToString: to get a Boolean value that indicates whether the string is the same as the string that you pass as a parameter. You may use this in if statements as needed.
How It Works
When you have two strings that you want to compare, send the isEqualToString: message to the first string and pass the second string as a parameter. A Boolean value will be returned that you can use to evaluate statements.
BOOL isEqual = [myString1 isEqualToString:myString2];
You can also find out if a string has a matching suffix or prefix. For instance, if you had a string “Mr. John Smith, MD” you could find out whether the string had the prefix “Mr” by sending the hasPrefix message to the string.
NSString *name = @"Mr. John Smith, MD";


BOOL hasMrPrefix = [name hasPrefix:@"Mr"];
Similarly, you can find out if the same string has the suffix “MD” by sending the hasSuffix message.
BOOL hasMDSuffix = [name hasSuffix:@"MD"];
Finally, you can compare a substring by using the NSRange composite type to define the starting point and length of the substring in question. You first use the NSRange information to return the substring and then use that to test if the strings are the same.
NSString *alphabet = @"ABCDEFGHIJKLMONPQRSTUVWXYZ";


NSRange range = NSMakeRange(2, 3);


BOOL lettersInRange = [[alphabet substringWithRange:range] isEqualToString:@"CDE"];
See Listing 2-4 for the code.
The Code
Listing 2-4. main.m
#import <Foundation/Foundation.h>


int main (int argc, const char * argv[]){


    @autoreleasepool {


        NSString *myString1 = @"A";

        NSString *myString2 = @"B";

        NSString *myString3 = @"A";


        BOOL isEqual = [myString1 isEqualToString:myString2];


        if(isEqual)

            NSLog(@"%@ is equal to %@", myString1, myString2);

        else

            NSLog(@"%@ is not equal to %@", myString1, myString2);


        if([myString1 isEqualToString:myString2])

            NSLog(@"%@ is equal to %@", myString1, myString2);

        else

            NSLog(@"%@ is not equal to %@", myString1, myString2);


        if([myString1 isEqualToString:myString3])

            NSLog(@"%@ is equal to %@", myString1, myString3);

        else

            NSLog(@"%@ is not equal to %@", myString1, myString3);


        NSString *name = @"Mr. John Smith, MD";


        BOOL hasMrPrefix = [name hasPrefix:@"Mr"];


        if(hasMrPrefix)

           NSLog(@"%@ has the Mr prefix", name);

        else

       NSLog(@"%@ doesn't have the Mr prefix", name);


       BOOL hasMDSuffix = [name hasSuffix:@"MD"];


       if(hasMDSuffix)

          NSLog(@"%@ has the MD suffix", name);

       else

          NSLog(@"%@ doesn't have the MD suffix", name);
       NSString *alphabet = @"ABCDEFGHIJKLMONPQRSTUVWXYZ";


       NSRange range = NSMakeRange(2, 3);


       BOOL lettersInRange = [[alphabet substringWithRange:range]

isEqualToString:@"CDE"];


       if(lettersInRange)

          NSLog(@"The letters CDE are in alphabet starting at position 2");

       else

          NSLog(@"The letters CDE aren't in alphabet starting at position 2");


    }

    return 0;

}
Usage
To use this code, build and run your Mac app from Xcode. Check the console to see the results of the various comparisons. Your output should look like this:
A is not equal to B

A is not equal to B

A is equal to A

Mr. John Smith, MD has the Mr prefix

Mr. John Smith, MD has the MD suffix

The letters CDE are in alphabet starting at position 2
Change the various strings to see how these comparisons work. See if you can test correctly in the cases when the strings are not equal as well as equal.
2.7 Manipulating Strings
Problem
You would like your app to be able to make changes to your string content, but NSString objects are immutable and thus can’t be altered in any way.
Solution
Use the NSMutableString class when you want to be able to change the contents of your string. NSMutableString is a subclass of NSString and so you can use it in the same way as NSString. However, when you work with NSMutableString you can append, insert, replace, and remove substrings.
How It Works
You can create an NSMutableString with the same constructors that you use for strings, but make sure to send the message to the NSMutableString class and not the NSString class. NSMutableString does come with one unique constructor that lets you set the initial capacity of the string.
NSMutableString *myString = [[NSMutableString alloc] initWithCapacity:26];
You are not limited to the number of characters based on this constructor; you are simply passing a hint to the compiler to help manage the string more efficiently. Once you have a mutable string, you can set the string content by sending the setString message to the mutable string.
[myString setString:@"ABCDEFGHIJKLMONPQRSTUVWXYZ"];
To append a string to your mutable string, send the appendString message.
[myString appendString:@", 0123456789"];
This will append the string to the end of your mutable string. However, if you want to insert characters into another location of your mutable string, you need to specify the location where the string will be inserted and use the insertString message.
[myString insertString:@"abcdefg, "

               atIndex:0];
You can also delete characters from your mutable string by sending the deleteCharactersInRange message with the range you would like to delete as a parameter. Use the NSMakeRange function to define a range with the starting location and length of the range of characters that you would like to delete.
NSRange range = NSMakeRange(9, 3);


[myString deleteCharactersInRange:range];
NSMutableString also comes with a built-in method to replace all the characters in a range with a different character. So, if you’d rather have the character “|” instead of “,” appear in your string, you could replace all instances of “,” with “|” by using the replaceOccurrencesOfString:withString:options:range: method.
NSRange rangeOfString = [myString rangeOfString:myString];
[myString replaceOccurrencesOfString:@", "

                          withString:@"|"

                             options:NSCaseInsensitiveSearch

                               range:rangeOfString];
Here the rangeOfString message was used to specify the entire string, but you can define any range that you would like to perform this action.
Another common type of string manipulation is replacing ranges of characters with other characters. To do this, use the replaceCharactersInRange:withString: method.
NSRange rangeToReplace = NSMakeRange(0, 4);


[myString replaceCharactersInRange:rangeToReplace

                        withString:@"MORE"];
This replaces the first four characters in the string with the word “MORE.” See Listing 2-5 for the code.
The Code
Listing 2-5. main.m
#import <Foundation/Foundation.h>


int main (int argc, const char * argv[])

{


    @autoreleasepool {


        NSMutableString *myString = [[NSMutableString alloc] initWithCapacity:26];


        [myString setString:@"ABCDEFGHIJKLMONPQRSTUVWXYZ"];


        NSLog(@"%@", myString);


        [myString appendString:@", 0123456789"];


        NSLog(@"%@", myString);


        [myString insertString:@"abcdefg, "

                       atIndex:0];


        NSLog(@"%@", myString);


        NSRange range = NSMakeRange(9, 3);


        [myString deleteCharactersInRange:range];
        NSLog(@"%@", myString);

        NSRange rangeOfString = [myString rangeOfString:myString];


        [myString replaceOccurrencesOfString:@", "

                                  withString:@"|"

                                     options:NSCaseInsensitiveSearch

                                       range:rangeOfString];


        NSLog(@"%@", myString);


        NSRange rangeToReplace = NSMakeRange(0, 4);


        [myString replaceCharactersInRange:rangeToReplace

                                withString:@"MORE"];


        NSLog(@"%@", myString);

    }


    return 0;

}
Usage
To use this code, build and run your Mac app from Xcode. Check the console to see the how the string is manipulated.
ABCDEFGHIJKLMONPQRSTUVWXYZ

ABCDEFGHIJKLMONPQRSTUVWXYZ, 0123456789

abcdefg, ABCDEFGHIJKLMONPQRSTUVWXYZ, 0123456789

abcdefg, DEFGHIJKLMONPQRSTUVWXYZ, 0123456789

abcdefg|DEFGHIJKLMONPQRSTUVWXYZ|0123456789

MOREefg|DEFGHIJKLMONPQRSTUVWXYZ|0123456789
2.8 Searching Through Strings
Problem
You want know if the strings that you are working with contain key phrases that your app needs to know about.
Solution
To search a string for another string you can send the message rangeOfString:options:range: to the string that you want to search. You must specify the range where you will look along with a search option. This method will return either NSNotFound and a length of 0 if nothing is found, or it will return a range with the information you need to locate the string.
How It Works
To search through a string you can simply send the rangeOfString:options:range: message. You need to specify the search options that you would like to use and the range of the string that you would like to search.
NSString *stringToSearch = @"This string is something that you can search.";


NSRange rangeToSearch = [stringToSearch rangeOfString:stringToSearch];
NSRange resultsRange = [stringToSearch rangeOfString:@"something"

                                             options:NSCaseInsensitiveSearch

                                               range:rangeToSearch];
When the search is complete you will have the information that you need contained in the NSRange object that is returned to you. If the NSRange location property is equal to NSNotFound, the search didn’t turn up any results. Otherwise, the NSRange object will have the location and length of the string that you are looking for. You can later use this information as needed. See Listing 2-6 for the code.
The Code
Listing 2-6. main.m
#import <Foundation/Foundation.h>


int main (int argc, const char * argv[])

{


    @autoreleasepool {


        NSString *stringToSearch = @"This string is something that you can search.";


        NSRange rangeToSearch = [stringToSearch rangeOfString:stringToSearch];


        NSRange resultsRange = [stringToSearch rangeOfString:@"something"

                                                     options:NSCaseInsensitiveSearch

                                                       range:rangeToSearch];


        if(resultsRange.location != NSNotFound){


            NSLog(@"String found starting at location %lu with a length of %lu",

                  resultsRange.location, resultsRange.length);


            NSLog(@"%@", [stringToSearch substringWithRange:resultsRange]);

        }

        else

            NSLog(@"The search didn't turn up any results");


    }

    return 0;

}
Usage
To use this code, build and run your Mac app from Xcode. Check the console to see if the search string was found. Test this code further by searching for different strings and strings that you know are not there.
Here is the output that you would get after running the code as-is:
String found starting at location 15 with a length of 9

something
2.9 Localizing Strings
Problem
You would like to include string content that is appropriate for your audience language preferences. Hardcoding the string doesn’t work because you can only include one language.
Solution
To include localized strings in your apps you must add a strings file for each language that you would like to support. A strings file contains keyed data, and the system picks which strings file to use depending on the language your user prefers. To include these localized strings you must use the NSFoundation function NSLocalizedString.
NOTE: This method only works with iOS or Mac apps (not command line apps) since localizing strings requires the strings files to be located in an app’s application bundle.
How It Works
Make sure that you have an iOS app (Recipe 1.12) or Mac app (Recipe 1.11) set up if you intend on following along with this recipe. The code is located in your app delegate.
First, add a strings file to your application. From Xcode go to File ![]() New
New ![]() New File. In the dialog box that appears, choose Mac OS X
New File. In the dialog box that appears, choose Mac OS X ![]() Resource
Resource ![]() Strings File. Name your strings file Localizable.strings.
Strings File. Name your strings file Localizable.strings.
Now you need to add localization to this file, so select the file and make sure that the identity tab is selected. To add localization to this file, click the + button in the localization pane and choose a language from the drop-down that appears (see Figure 2-1).
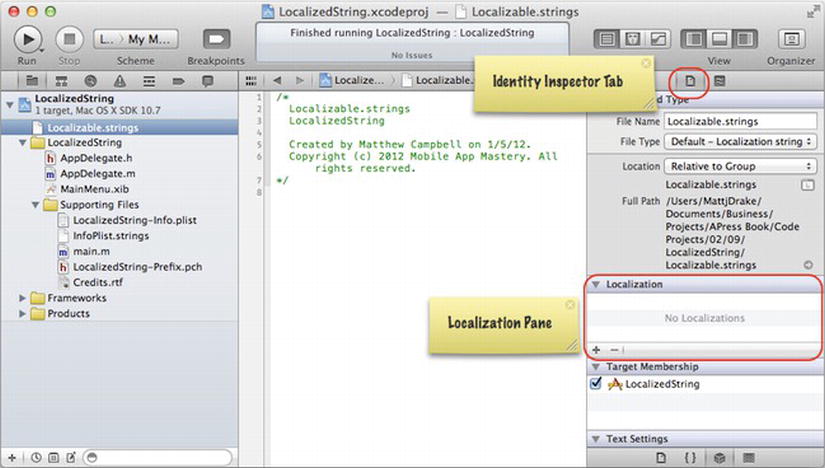
Figure 2-1. Strings file identity options
NOTE: In Xcode 4.2, the first time you click the button, the Identity Inspector may automatically advance to the next file without giving you the option to choose a language first. If this happens, go back to the strings file in the Identity Inspector and add the remaining language support.
Each language that you intend on supporting will appear in the localization pane (see Figure 2-2). If you look closely at your strings file in Xcode, you will notice that you have a strings file for each language that you want to support (you may need to expand the group folder to see the files).
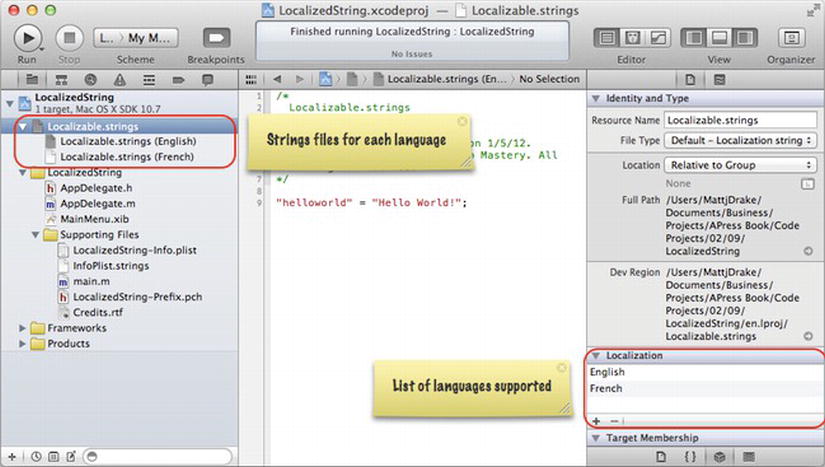
Figure 2-2. Localized strings files
To add content to each file, you need to specify a key (that you can use later to look up the content) and the string content itself. For instance, if you want to add a Hello World! string in French and English, you add this keyed data starting in the strings file for English (Localizable.strings (English)).
"helloworld" = "Hello World!";
Here helloworld is the key and the string content is included between the quotes. The line ends with a semicolon.
Next, add the same for the French strings file (Localizable.strings (French)).
To get this string into your app, use the NSLocalizedString function to return the localized string based on the key that you provide.
NSString *localizedString = NSLocalizedString(@"helloworld", @"Hello world in

localized languages");
In this example, English users will get “Hello World!” and French users will get “Bonjour tout le monde!” See Listing 2-7 for the code.
The Code
Listing 2-7. AppDelegate.m
#import "AppDelegate.h"


@implementation AppDelegate


@synthesize window = _window;


- (void)applicationDidFinishLaunching:(NSNotification *)aNotification{


    NSString *localizedString = NSLocalizedString(@"helloworld", @"Hello world

in localized languages");


    NSLog(@"%@", localizedString);


}


@end
Usage
To use this code, build and run your Mac or iOS app from Xcode. Check the console to see what string was written out to the log. If you have your system preferences set to English, you will see “Hello World!” in your console.
If you are working with a Mac app and want to see the localized string for French, go to your Mac’s system preferences, click on “Language and Text,” and drag the word “Français” to the top of the list of languages. If you are working with an iOS app, use the iOS Simulator’s or device’s Settings app and then choose General ![]() International
International ![]() Language
Language ![]() Francais. Then go back to Xcode, run your app, and look at the console to see the localized string appear.
Francais. Then go back to Xcode, run your app, and look at the console to see the localized string appear.
2.10 Converting Numbers to Strings
Problem
You have numbers (either primitive types or NSNumber objects) that you would like to use as strings.
Solution
You work with numbers in two ways: as primitive types and NSNumber objects. To use a primitive type as a string, you need to create a new string using the stringWithFormat constructor and insert the value of the primitive type. Here you can use the same string formatters as you did in Recipe 1.2.
NSNumber objects can be inserted into new strings in the same way or you can use NSNumber’s stringValue function to return the string version of a number directly.
How It Works
If you have a primitive type like a float that you would like to turn into a string, you need to create a new string with the stringWithFormat constructor.
float fNumber = 12;


NSString *floatToString = [NSString stringWithFormat:@"%f", fNumber];
If the number you want to convert is an NSNumber object, you can simply use the NSNumber object’s stringValue function.
NSNumber *number = [NSNumber numberWithFloat:30];


NSString *numberToString = [number stringValue];
See Listing 2-8 for the code.
The Code
Listing 2-8. main.m
#import <Foundation/Foundation.h>


int main (int argc, const char * argv[])

{
    @autoreleasepool {


        float fNumber = 12;


        NSString *floatToString = [NSString stringWithFormat:@"%f", fNumber];


        NSLog(@"floatToString = %@", floatToString);


        NSNumber *number = [NSNumber numberWithFloat:30];


        NSString *numberToString = [number stringValue];


        NSLog(@"numberToString = %@", numberToString);


    }

    return 0;

}
Usage
To use this code, build and run your Mac app from Xcode. You can see that the new strings have been created and used based on the numbers that are present.
floatToString = 12.000000

numberToString = 30
2.11 Converting Strings to Numbers
Problem
In your app you have numbers that are stored as strings, but you need to use these numbers for math functions or to apply special formatting using NSNumber.
Solution
If you need to do any math functions like addition or subtraction, you need to convert any numbers stored as strings into primitive types like float or int. Happily, NSString comes with built-in functions that make this type of conversion really easy.
But, if you want to use the object-oriented features of NSNumber, then you need to use NSNumber. Using NSNumber requires that you construct new NSNumber objects for each number. Do this if you need to store these numbers in an array or if you want to use the other features built into NSNumber.
How It Works
If you have a number stored in a string that you want to use as a float primitive type, use the strings floatValue function to get this value.
NSString *aFloatValue = @"12.50";

float f = [aFloatValue floatValue];
If you prefer to convert this string to an NSNumber object, you need to use the floatValue function in the NSNumber constructer.
NSNumber *aFloatNumber = [NSNumber numberWithFloat:[aFloatValue floatValue]];
See Listing 2-9 for the code.
The Code
Listing 2-9. main.m
#import <Foundation/Foundation.h>


int main (int argc, const char * argv[])

{


    @autoreleasepool {


        NSString *aFloatValue = @"12.50";


        float f = [aFloatValue floatValue];


        float result = f * 2 + 45;


        NSLog(@"f = %f and result = %f", f, result);


        NSNumber *aFloatNumber = [NSNumber numberWithFloat:[aFloatValue floatValue]];


        NSLog(@"aFloatNumber = %@", aFloatNumber);


    }

    return 0;

}
Usage
To use this code, build and run your Mac app from Xcode. You can write the numbers out to the log, but you must use the correct string formatters for the primitive types and %@ for the NSNumber objects.
f = 12.500000 and result = 70.000000

aFloatNumber = 12.5
2.12 Formatting Numbers
Problem
You would like to present numbers to your users that are formatted in the way they expect. This includes situations when you want to present the number as currency, scientific notation, or spelled out.
Solution
Use the NSNumberFormatter class to format numbers. You need to instantiate an NSNumberFormatter object and set some properties to instruct it to display your number in the way that you would like.
How It Works
Let’s assume that you have a number that you would like to display as currency.
NSNumber *numberToFormat = [NSNumber numberWithFloat:9.99];
First, instantiate a NSNumberFormatter object and set the object’s numberStyle to present the currency style.
NSNumberFormatter *numberFormatter = [[NSNumberFormatter alloc] init];


numberFormatter.numberStyle = NSNumberFormatterCurrencyStyle;
When you are ready to present the number as a string formatted for currency, use the stringFromNumber function.
NSLog(@"Formatted for currency: %@", [numberFormatter

stringFromNumber:numberToFormat]);
This will present the number as currency for the system’s set locale. In the United States you will see the dollar sign, and in the United Kingdom you will see the pound sign.
Currency is one of many possible number styles that you may apply to your numbers. See Table 2-1 for a complete list of number styles. See Listing 2-10 for the code.

The Code
Listing 2-10. main.m
#import <Foundation/Foundation.h>


int main (int argc, const char * argv[])

{


    @autoreleasepool {


        NSNumber *numberToFormat = [NSNumber numberWithFloat:9.99];


        NSLog(@"numberToFormat = %@", numberToFormat);


        NSNumberFormatter *numberFormatter = [[NSNumberFormatter alloc] init];


        numberFormatter.numberStyle = NSNumberFormatterCurrencyStyle;


        NSLog(@"Formatted for currency: %@", [numberFormatter

stringFromNumber:numberToFormat]);
    }

    return 0;

}
Usage
To use this code, build and run your Mac app from Xcode. You can see the formats applied in the console window.
numberToFormat = 9.99

Formatted for currency: $9.99