
![]()
When building an HTTP Application using ASP.NET Web API, you might face scenarios where the possibilities for processing and influencing the handling of requests and responses using the Routing module and the ApiController might not be enough. Furthermore there might be operations that you want to apply to more than one controller.
This chapter will give you an overview of how both—requests sent from the client and responses sent to the client—are processed in ASP.NET Web API on the server side. You’ll also learn how to modify requests before they’re routed to the controller and modify responses after they’ve left it.
Overview and Message Handler Mechanism
In ASP.NET Web API, HTTP requests and responses are processed in a pipeline on the server (to be honest, they’re also processed on the way back to the client, as you’ll see in the “Message Handlers and the Russian Doll Model” section). As mentioned in earlier chapters, requests in ASP.NET Web API are represented by the HttpRequestMessage class. Similarly, the code representation for responses is the HttpResponseMessage class.
HttpMessageHandler
As both HttpRequestMessage and HttpResponseMessage don’t appear out of the blue, there must be something in the ASP.NET Web API framework that creates and handles them. That’s where the HttpMessageHandler class enters the room. The HttpMessageHandler class is an abstract base class for HTTP message handlers that allow the processing of requests and sending of responses in an asynchronous manner.
HttpMessageHandler resides in the System.Net.Http namespace. The corresponding DLL is not part of the core ASP.NET Web API NuGet packages, but it is also available as a NuGet package (which, of course, is resolved as a dependency for ASP.NET Web API by NuGet): System.Net.Http.
The HttpMessageHandler implementation is pretty simple and straightforward, as shown in Listing 10-1.
Listing 10-1. HttpMessageHandler Abstract Base Class Implementation
namespace System.Net.Http
{
  public abstract class HttpMessageHandler : IDisposable
  {
    protected HttpMessageHandler()
    {
      if (Logging.On)
        Logging.Enter(Logging.Http, (object) this, ".ctor", (string) null);
      if (!Logging.On)
        return;
      Logging.Exit(Logging.Http, (object) this, ".ctor", (string) null);
    }

    protected internal abstract Task<HttpResponseMessage>
SendAsync(HttpRequestMessage request, CancellationToken cancellationToken);

    protected virtual void Dispose(bool disposing)
    {
    }

    public void Dispose()
    {
      this.Dispose(true);
      GC.SuppressFinalize((object) this);
    }
  }
}
The protected default constructor of HttpMessageHandler handles some Logging settings, which will be covered in Chapter 18. The Dispose methods implement a typical disposing behavior. The only method specific to HTTP message (that is to say, request and response) handling is the SendAsync method. It returns a Task<HttpResponseMessage> for an asynchronously created HttpResponseMessage. The first parameter being assigned to the SendAsync method is a HttpRequestMessage, which represents the request from the client. The second parameter is a CancellationToken, which propagates notification that operations should be aborted.
As we cannot process an HttpRequestMessage instance nor create an HttpResponseMessage instance without a concrete implementation of the SendAsync method, we need a class that derives from the base class. Of course, there’s an implementation for that in the ASP.NET Web API framework. This is the DelegatingHandler class, which is explored in detail in the next section.
DelegatingHandler Class
The main purpose of the DelegatingHandler is to process the HttpRequestMessage or HttpResponseMessage and pass the work over to another DelegatingHandler. This creates a processing pipeline of DelegatingHandler instances. It is also possible for a DelegatingHandler implementation to stop the processing of the whole processing pipeline by creating an HttpResponseMessage and returning it instead of passing it to the next DelegatingHandler.
The abstract DelegatingHandler class is also located in the System.Net.Http namespace and its SendAsync method implementation is shown in Listing 10-2.
Listing 10-2. DelegatingHandler SendAsync Method Implemenation
protected internal override Task<HttpResponseMessage> SendAsync(HttpRequestMessage request, CancellationToken cancellationToken)
{
  if (request == null)
       throw new ArgumentNullException("request", SR.net_http_handler_norequest);
  this.SetOperationStarted();
  return this.innerHandler.SendAsync(request, cancellationToken);
}
As you can see, the SendAsync method implementation of the DelegatingHandler is pretty simple; it mainly passes the incoming HttpRequestMessage and the CancellationToken to the SendAsync method of InnerHandler, which is a private field of the DelegatingHandler itself. The InnerHandler gets populated from an overloaded constructor of DelegatingHandler, as shown in Listing 10-3.
Listing 10-3. DelegatingHandler Constructor Populating the InnerHandler Field
protected DelegatingHandler(HttpMessageHandler innerHandler)
{
  this.InnerHandler = innerHandler;
}

public HttpMessageHandler InnerHandler
{
  get
  {
       return this.innerHandler;
  }
  set
  {
       if (value == null)
         throw new ArgumentNullException("value");
       this.CheckDisposedOrStarted();
       if (Logging.On)
         Logging.Associate(Logging.Http, (object) this, (object) value);
       this.innerHandler = value;
  }
}
The just-shown mechanism of passing the work to a child DelegatingHandler (or even HttpMessageHandler) is also known as the delegator pattern, or Russian Doll Model; that’s what will be explored inside the next section.
Message Handlers and the Russian Doll Model
The name Russian Doll Model comes from a Russian doll, a toy made of wood, wherein several hollow dolls of progressively smaller sizes are constructed so that the smallest nests inside the next smallest one and so on, till in the end what is seen is one big doll that contains all the others.
With the Russian Doll Model, the structure of the DelegatingHandler pipeline looks like Figure 10-1.
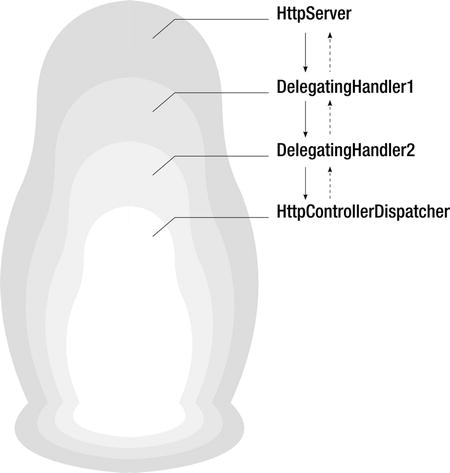
Figure 10-1. Russian Doll Model of the DelegatingHandler pipeline
As can be seen in Figure 10-1, the outermost doll (DelegatingHandler) is the HttpServer class, which itself just derives from DelegatingHandler.
The next DelegatingHandler implementation to be invoked is the DelegatingHandler1, which is a custom implementation of our own. It is assigned to the InnerHandler property of the HttpServer, which has been set up by the HttpControllerHandler if web hosting via Internet Information Services (IIS) is being used. If your ASP.NET Web API application is self-hosted, the plumbing gets done by the HttpSelfHostServer itself, which derives from HttpServer.
Regardless of the type of hosting chosen, the Innerhandler property of HttpServer is created by the HttpClientFactory, which creates the DelegatingHandler pipeline of your ASP.NET Web API application based on the collection of HttpMessageHandler instances in the configuration where your custom message handlers are registered (that’ll be covered later in this chapter).
The next DelegatingHandler that gets to work in the pipeline shown in Figure 10-1 is the DelegatingHandler2, which just represents an arbitrary number of DelegatingHandler implementations that could be registered for your application.
The very last handler in the pipeline is always the HttpControllerDispatcher, which is passed as a parameter to the HttpServer constructor by the HttpControllerHandler based on the Dispatcher property of the GlobalConfiguration object of the ASP.NET Web API application.
As can also be seen in Figure 10-1 (by means of the dashed arrows) and as was mentioned earlier in this chapter, the pipeline not only runs from the outermost DelegatingHandler to the innermost one but also can run back from the formerly innermost DelegatingHandler to the formerly outermost one. These handlers are accessed again in reverse order if you defined a so-called continuation on the SendAsync method of the handlers’ implementation, which is something you’ll see later in this chapter, in the “Custom Message Handlers” section.
The following section shows an implementation of DelegatingHandler (see Listing 10-4) that allows you to inspect or even modify the request. Within the continuation, which is defined inside the ContinueWith method run on the result of the base.SendAsync method, you can do the same with the response when coming back from the controller.
When the response is inspected or modified, it is handled over to the next DelegatingHandler in the client’s direction by returning it.
Now you know what HttpMessageHandler implementations are and what their purpose is in the context of an ASP.NET Web API application. Furthermore, you know how they are chained together in a pipeline that processes the instances of HttpRequestMessage and HttpResponseMessage. Now it’s time to create your own custom message handlers and learn how to register them in the application configuration.
Custom Message Handlers
ASP.NET Web API is a powerful and well-designed framework with regard to the HTTP protocol. Nevertheless, it cannot cover all real-world HTTP application scenarios out of the box. Thanks to its sophisticated extensibility model, this is no problem, as it allows the tweaking of ASP.NET Web API if necessary.
One of the extensibility points of ASP.NET Web API is the HttpMessageHandler concept introduced earlier in this chapter. It allows not only modification of instances of HttpRequestMessage and HttpResponseMessage but also cancellation of the processing of the whole pipeline so that a request will be terminated and thus won’t go to a higher level inside the pipeline.
In order to implement your own message handlers, you need to derive them from DelegatingHandler, as shown in Listing 10-4.
Listing 10-4. Basic Implementation of a Custom Message Handler
public class CustomMessageHandler : DelegatingHandler {

    protected override Task<HttpResponseMessage> SendAsync(HttpRequestMessage request, System.Threading.CancellationToken cancellationToken) {

        // inspect or modify the request here

        return base.SendAsync(request, cancellationToken);
        }
}
As the implementation shown in Listing 10-4 does nothing with the request (or even the response), it is pretty useless. So let’s head over to an implementation of DelegatingHandler that modifies the incoming request before it is passed to the controller.
As explained in Chapter 3, in a RESTful application you make heavy use of different HTTP verbs like GET, POST, PUT, and DELETE among others. While that is no issue for the client if it is one that conforms to and implements the complete HTTP specification (like HttpClient, discussed in detail in Chapter 4), accessing all RESTful capabilities of a Web API via browsers often is problematic, as many (if not all) browsers only allow the sending of a form using the GET or POST verb. They don’t allow for such other aforementioned HTTP methods as HEAD, PUT, and DELETE.
Google came up with a workaround for that problem. It involves adding a header to the HTTP request named X-HTTP-Method-Override, which has to be interpreted by the Web API, and to ignore the HTTP method (mostly GET or POST) being initially used by the web browser.
For example, to override the web browser’s current method (more generally the client’s), with the PUT method to be used instead, provide the header shown in Listing 10-5.
Listing 10-5. Custom X-HTTP-Method-Override Header to Enforce the PUT HTTP Method
X-HTTP-Method-Override: PUT
When it comes to the implementation of the requirements shown in Listing 10-6 and explained above, what actually has to be done is inspect the current request and check whether it contains an X-HTTP-Method-Override header. If that is the case, get the value of that header and replace the HTTP method of the request with the value of the X-HTTP-Method-Override header. That’s pretty easy, thanks to the ASP.NET Web API HTTP abstraction implementation, as can be seen in Listing 10-6.
Listing 10-6. DelegatingHandler That Overrides the HTTP Method from the Client Request
public class XHttpMethodOverrideHandler : DelegatingHandler
{
    readonly string[] _methods = { "DELETE", "HEAD", "PUT" };
    const string XOVERRIDEHEADER = "X-HTTP-Method-Override";

    protected override Task<HttpResponseMessage> SendAsync(
        HttpRequestMessage request, CancellationToken cancellationToken)
    {
        // Check for HTTP POST with the X-HTTP-Method-Override header.
        if (HttpMethod.Post == request.Method && request.Headers.Contains(XOVERRIDEHEADER))
        {
            // Check if the header value is in our methods list.
            var overrideMethod = request.Headers.GetValues(XOVERRIDEHEADER).FirstOrDefault();
            if (_methods.Contains(overrideMethod, StringComparer.InvariantCultureIgnoreCase))
            {
                // Change the request method.
                request.Method = new HttpMethod(overrideMethod);
            }
        }
        return base.SendAsync(request, cancellationToken);
    }
}
Now, using Fiddler, let’s issue a POST request to the API and override it to PUT by setting the X-HTTP-Method-Override header inside the request, as shown in Figure 10-2, and debug it. The breakpoint inside the PUT method of the controller is getting hit, as shown in Figure 10-3.
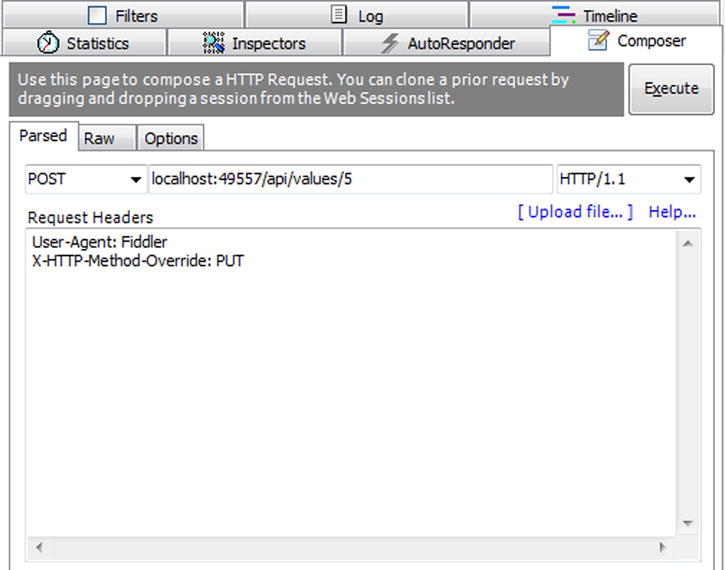
Figure 10-2. Issuing a new POST request with X-HTTP-Method-Override header set to PUT
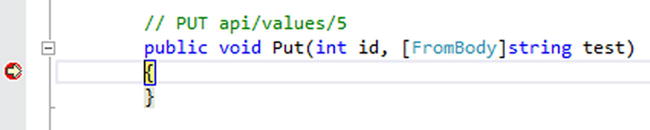
Figure 10-3. Breakpoint being hit in the PUT method after rewriting the HTTP method
Listing 10-6 shows how easy it is to access and modify information contained in the HTTP request from your clients, so you should be prepared for a slightly more difficult scenario, one where you’re going to modify the outgoing response instead of the incoming request.
Now let’s consider the opposite problem to the previous section’s: adding your own custom response header instead of inspecting or modifying an existing one inside a request or response.
To do this, you have to access the response coming back from the controller. As was explained in the Russian Doll Model section earlier, this is done by using a continuation on the Task<HttpResponseMessage> return value of the base.SendAsync method inside the custom DelegatingHandler implementation, as shown in Listing 10-7.
Listing 10-7. Custom DelegatingHandler with Continuation
public class CustomMessageHandler : DelegatingHandler {

    protected override Task<HttpResponseMessage> SendAsync(HttpRequestMessage request, System.Threading.CancellationToken cancellationToken) {

        //inspect request here

        return base.SendAsync(request, cancellationToken).ContinueWith(task => {

            //inspect the generated response
            var response = task.Result;

            return response;
        });
    }
}
Custom headers can be used to send some kinds of application- or server-wide information, as ASP.NET does with the X-Powered-By response header.
So let’s add that X-Powered-By header to the response and set it to ASP.NET Web API. Listing 10-8 shows that implementation.
Listing 10-8. Adding a Custom Response Header
public class XPoweredByHeaderHandler : DelegatingHandler
{
    const string XPOWEREDBYHEADER = "X-Powered-By";
    const string XPOWEREDBYVALUE = "ASP.NET Web API";

    protected override Task<HttpResponseMessage> SendAsync(
        HttpRequestMessage request, CancellationToken cancellationToken)
    {
        return base.SendAsync(request, cancellationToken).ContinueWith(
            (task) =>
            {
                HttpResponseMessage response = task.Result;
                response.Headers.Add(XPOWEREDBYHEADER, XPOWEREDBYVALUE);
                return response;
            }
        );
    }
}
The response is the result of the Task<HttpResponseMessage> of the base DelegatingHandler class’s SendAsync method from which the deriving is being done. By accessing that result inside the continuation of that SendAsync method, you can access the response on its way back from the controller and assign the new header and its value to the response.
When you’re issuing a new request using Fiddler, your response now looks like that shown in Figure 10-4.
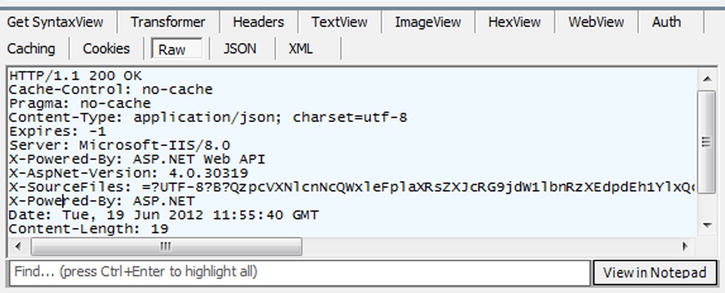
Figure 10-4. X-Power-By header in Web API response
As mentioned earlier in this chapter, the concept of the message handlers in ASP.NET Web API also allows you to cancel a request inside a DelegatingHandler so that the pipeline is not processed any longer and a response is sent immediately from within the current message handler. That’s what will be implemented in the next section.
For the next implementation of a DelegatingHandler, please consider the following scenario: if a client is sending you a POST request, you would expect that the request also has a body containing data you should create a new entity from or start a new process on the server with. If you’re assuming that this is true for all the controllers in your application, you could block all POST requests having an empty body by implementing a message handler that checks the body for its length. If it is empty, just cancel further processing of the request pipeline by returning a Bad Request status code. Listing 10-9 shows that implementation.
Listing 10-9. Aborting the Request Processing in a DelegatingHandler Implementation
public class EmptyPostBodyMessageHandler : DelegatingHandler
{
    protected override Task<HttpResponseMessage> SendAsync(
        HttpRequestMessage request, CancellationToken cancellationToken)
    {
        // Check for POST request and empty body.
        var content = request.Content.ReadAsStringAsync().Result;
        if (HttpMethod.Post == request.Method && 0 == content.Length)
        {
            TaskCompletionSource<HttpResponseMessage> tcs = new
TaskCompletionSource<HttpResponseMessage>();
            tcs.SetResult(new HttpResponseMessage(HttpStatusCode.BadRequest)
                { ReasonPhrase = "Empty body not allowed for POST."});
            return tcs.Task;
        }
        return base.SendAsync(request, cancellationToken);
    }
}
In ASP.NET Web API, the request body is contained in the Content property of the HttpRequestMessage; the framework provides some useful extensions methods that make it easy to handle that content in an asynchronous manner. To get the raw body of a request, you have to read the content as a string. The result of the asynchronous method ReadAsStringAsync contains that raw string representation of the request body.
If the check for a POST request is positive and the length of the raw body string is zero, a TaskCompletionSource of type HttpResponseMessage is created with a Bad Request status code. Furthermore, there is a reason phrase provided that tells the client why the request failed. The Task property of the TaskCompletionSource then contains the instantiated HttpResponseMessage, which will be returned to the client without further processing of the request.
Now that three custom message handlers have been implemented, you should have a rough overview of what’s possible with message handlers. Of course, there are more complex operations possible, but you should be aware that they may slow down your Web API, as they eventually run on every request or response. Further HttpMessageHandler implementations are shown in Chapters 5-7, which cover the sample application .
You might have already asked yourself how ASP.NET Web API gets knowledge of the custom HttpMessageHandler implementations and runs them. That’s part of the next and last section of this chapter.
Registering Custom Message Handlers
In the last two sections we’ve implemented custom message handlers, and you’ve seen the results of their work. But of course, to get a custom handler working, not only does it need to be implemented properly, but also ASP.NET Web API needs to get information that the handler(s) should be executed inside the request and response pipelines.
That mandatory registration process of custom message handlers is done using the code-based ASP.NET Web API configuration inside the Global.asax.cs (when choosing hosting in IIS). The GlobalConfiguration object, which encapsulates the whole ASP.NET application configuration, has a property Configuration type of HttpConfiguration, which itself represents the ASP.NET Web API configuration for the current application. The HttpConfiguration itself owns a property, MessageHandlers, which is a collection type of Collection<MessageHandler> from the System.Collections.ObjectModel namespace. Within this collection all custom message handlers can be added, removed or configured, as shown in Listing 10-10.
Listing 10-10. Registration of Two Custom Message Handlers in Global.asax.cs
public class WebApiApplication : System.Web.HttpApplication
{
    protected void Application_Start()
    {
        RouteConfig.RegisterRoutes(RouteTable.Routes);

        var config = GlobalConfiguration.Configuration;
        config.MessageHandlers.Add(new XHttpMethodOverrideHandler());
        config.MessageHandlers.Add(new XPoweredByHeaderHandler());
    }
}
Looking back at the Russian Doll Model is a reminder that there is one implicit question that’s still not been covered: in which order does ASP.NET Web API process the HttpMessageHandler pipeline? You’ve learned that the pipeline is constructed by assigning one HttpMessageHandler to the InnerHandler property of the parent DelegatingHandler. That wiring must be done, not by hand, but by the HttpClientFactory when the HttpServer is initialized, as was discovered earlier.
In order to see how the HttpMessageHandler implementations are ordered, it’s necessary to create two DelegatingHandler implementations that write some information to the Visual Studio Output Windows when debugging them. The information is split into two parts for each handler. The first part is the information that the request has just arrived at the handler; the second part goes for the response on the way back. The implementations are shown in Listings 10-11 and 10-12.
Listing 10-11. First Message Handler Logging Information About Request and Response
public class CustomMessageHandler1 : DelegatingHandler
{
    protected override System.Threading.Tasks.Task<HttpResponseMessage> SendAsync(HttpRequestMessage request, System.Threading.CancellationToken cancellationToken)
    {
        Debug.WriteLine("CustomMessageHandler1 request invoked");
        return base.SendAsync(request, cancellationToken).ContinueWith((task) =>
        {
            Debug.WriteLine("CustomMessageHandler1 response invoked");
            var response = task.Result;
            return response;
        }
            );
    }
}
Listing 10-12. Second Message Handler Logging Information About Request and Response
public class CustomMessageHandler2 : DelegatingHandler
{
    protected override System.Threading.Tasks.Task<HttpResponseMessage> SendAsync(HttpRequestMessage request, System.Threading.CancellationToken cancellationToken)
    {
        Debug.WriteLine("CustomMessageHandler2 request invoked");
        return base.SendAsync(request, cancellationToken).ContinueWith((task) =>
        {
            Debug.WriteLine("CustomMessageHandler2 response invoked");
            var response = task.Result;
            return response;
        });
    }
}
For consistency, both are registered in the order of their naming at the Global.asax.cs, as shown in Listing 10-13.
Listing 10-13. Registering Debugging Handlers in Order of Their Names
public class WebApiApplication : System.Web.HttpApplication
{
    protected void Application_Start()
    {
        RouteConfig.RegisterRoutes(RouteTable.Routes);

        var config = GlobalConfiguration.Configuration;
        config.MessageHandlers.Add(new CustomMessageHandler1());
        config.MessageHandlers.Add(new CustomMessageHandler2());
    }
}
When debugging the code from Listings 10-11 to 10-13 and looking at the output windows in Visual Studio, you get confirmation of the request and response pipeline processing order that you saw in the earlier “Message Handlers and the Russian Doll Model” section, as can be seen in Figure 10-5.
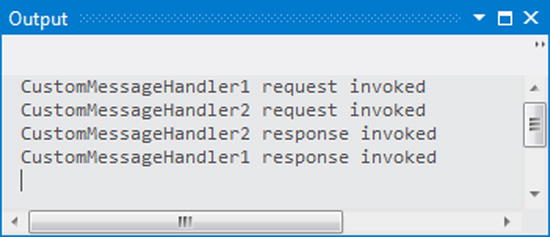
Figure 10-5. Output of the request and response pipeline order
So the understanding from Figure 10-5 is that the order of the registration of message handlers matters if there is a need to chain two custom message handlers, whereas one message handler depends on the result of another one.
As of now, we haven’t covered self-hosting ASP.NET Web API with regard to message handlers. That’s not a problem, as anything said in this chapter, except for the registration of the custom handler implementations, applies not only to web hosting ASP.NET Web API using IIS but also to self-hosting it—that’s pretty nice, as you don’t have to write different implementations of the handlers when your hosting environment changes. As was said, the only thing that’s self-hosting specific is the registration of the handlers—or to be more specific, the creation of your configuration instance differs, whereas the registration of the handlers is almost the same, as you can see in Listing 10-14.
Listing 10-14. Registration of Custom Message Handlers in a Self-Hosting Scenario
class Program
{
    static void Main(string[] args)
    {
        var config = new HttpSelfHostConfiguration(new Uri("http://localhost:5478"));
        config.MessageHandlers.Add(new CustomMessageHandler1());
        config.MessageHandlers.Add(new CustomMessageHandler2());

        // routing code omitted for brevity
        using (var server = new HttpSelfHostServer(config))
        {
            server.OpenAsync().Wait();
            Console.ReadLine();
        }
    }
}
When debugging Listing 10-13 in your console, the output window will show the same result as it does for web hosting, as has already been shown in Figure 10-5.
The message handlers we registered in the samples in the previous sections were registered at application level. That means that every request gets handled by the registered message handlers. That might be good for a lot of scenarios, but there might also be other scenarios where it would be better to have message handlers that are invoked only for requests to specific routes. Such a scenario could be a protected part of a Web API application. Listing 10-15 shows an implementation of a message handler that checks for an API key by which access to the protected section of the application is allowed.
Listing 10-15. API Key Message Handler Implementation
public class ApiKeyProtectionMessageHandler : DelegatingHandler {
    protected override Task<HttpResponseMessage> SendAsync(HttpRequestMessage request, CancellationToken cancellationToken) {
        IEnumerable<string> values;
        request.Headers.TryGetValues("apikey", out values);
        if (null != values && values.Count() == 1) {
            return base.SendAsync(request, cancellationToken);
        }

        var tcs = new TaskCompletionSource<HttpResponseMessage>();
        tcs.SetResult(new HttpResponseMessage(HttpStatusCode.Unauthorized) {
            ReasonPhrase = "API Key required."
        });
        return tcs.Task;
    }
}
In the overridden SendAsync method of the ApikeyProtectionMessageHandler, we’re checking for a request header named "apikey". If that key has an arbitrary value (which you won’t accept in a real-world application, of course), the request is redirected to the appropriate route by calling the SendAsync method of the DelegatingHandler from which we’re deriving the ApikeyProtectionMessageHandler class.
If the "apikey" header is not set, we’re returning a response with an HTTP status code 401 (i.e., unauthorized). In addition to that, we’re providing a plain-text reason phrase indicating that the API key has been missing inside the request.
To get the ApiKeyProtectionMessageHandler working as a per-route message handler, it needs to be assigned to a route definition in the Web API application’s route configuration. In addition to our existing Default API Route, we’re defining a new route, one that will protect all resources behind the URI http://localhost:49557/secretapi/ using the API key. Listing 10-16 shows the definition of the route.
Listing 10-16. Route Definition for a Per-Route Message Handler
routes.MapHttpRoute(
    name: "Secret Api",
    routeTemplate: "secretapi/{controller}/{id}",
    defaults: new {id = RouteParameter.Optional},
    constraints: null,
    handler: new ApiKeyProtectionMessageHandler() {
        InnerHandler =
            new HttpControllerDispatcher(GlobalConfiguration.Configuration)
});
As Listing 10-16 shows, the new route definition is akin to the Default API Route definition. The only differences are two parameters added to the new route. The first one is the constraints parameter, which is set to null. The second is the handler parameter, which expects a message handler implementation to be used for that particular route definition. We’re creating a new instance of our ApiKeyProtectionMessageHandler class. Furthermore, we’re assigning an instance of HttpControllerDispatcher (with the GlobalConfiguration as a parameter) to it. The reason for this assignment is that the per-route message handlers are invoked after the routing has been done.
As was seen earlier in the chapter, the message handler pipeline is built by assigning an inner message handler to the one external to it. As was also seen, the last message handler in the pipeline always has to be the HttpControllerDispatcher, in order to create an instance of the appropriate ApiController. If we didn’t assign the HttpControllerDispatcher instance to the InnerHandler property of our ApiKeyProtectionMessageHandler instance, the pipeline would be broken, and an exception indicating that the InnerHandler property had not been set would be received.
If we explicitly want to stop the request from processing in our per-route message handler, we have to derive our implementation from the HttpMessageHandler base class. As we learned at the beginning of this chapter, in contrast to the more frequently used DelegatingHandler class, the HttpMessageHandler class has no InnerHandler property. The requests to that specific route never hit a controller.
With per-route message handlers, ASP.NET Web API allows you both to elegantly handle requests to particular routes in a way different from the usual one and to avoid executing code that’s not necessary for certain requests.
Summary
ASP.NET Web API offers great and well-thought-out functionality out of the box. Nevertheless, there may occur requirements in your Web API implementation that are not covered by ASP.NET Web API features by default. As we’ve shown in this chapter, custom HttpMessageHandler implementations are an important extensibility point of ASP.NET Web API when it comes to inspecting or even modifying requests or responses.
Because of the Russian Doll Model, also explained in this chapter, it is possible to build a chain of dependent message handlers while still respecting the Separation of Concerns principle by having each handler’s logic in its own class. With a consistent registration model for web hosting and self-hosting, you’re able to switch from one to the other by simply changing the configuration without the need to reimplement the handlers themselves. Furthermore, you can register message handlers per route, which allows you to refine the usage of your message handlers.