
![]()
ASP.NET applications have historically used Internet Information Services (IIS) for their hosting, but during development, developers have used Visual Studio Development Server (also known as Cassini) or IIS Express. All in all, ASP.NET has been a web stack all the way and ASP.NET MVC did not change this.
However, with ASP.NET Web API, this pattern changed: there are now more options. ASP.NET Web API has been designed to support other hosting scenarios, because, as explained in Chapter 1, ASP.NET Web API comes from a line of server technologies, such as WCF, that can be hosted in IIS as well as other processes. Also the ability to host an HTTP service is really useful for non-web services and applications. The future of computing technologies is going to be heterogeneous and interconnected, so having the option to support alternative scenarios is crucial.
There are three main hosting options: web hosting (IIS, IIS Express, and Cassini), self-hosting, and OWIN (Open Web Interface for .NET). There are advantages and disadvantages with each of these, so you need to understand them and carefully weigh them against the requirements before deciding on any option.
Before we go into the details of each hosting scenario, we will explain the fundamentals of HTTP hosting under Windows and how it interacts with the ASP.NET Web API hosting model. The first section will explain HTTP.SYS, which sits at the core of Windows HTTP hosting. This section is designed to provide practical information about HTTP.SYS and its benefits. After this, we’ll explain the hosting model in ASP.NET Web API and then cover the three hosting scenarios.
At the end of the day, it will be important for you to develop your API in a hosting-agnostic fashion. Most of your code can stay completely abstracted from your hosting, and you will need to try to achieve this separation whenever you can. Requirements of your application can change as well as your hosting needs, so bear in mind the advantage of ASP.NET Web API’s hosting-agnostic programming model.
![]() Caution One of the areas you need to be extremely careful about is the use of classic ASP.NET HttpContext object. Although use of HttpContext.Current provides an easy and convenient way to access the current request/response pair, it can lead to untestable and brittle code because there is no easy way to replace existing context. What’s even worse, context might not be available during asynchronous task continuations. On the other hand, in the case of OWIN or self-hosting, HttpContext.Current will be null.
Caution One of the areas you need to be extremely careful about is the use of classic ASP.NET HttpContext object. Although use of HttpContext.Current provides an easy and convenient way to access the current request/response pair, it can lead to untestable and brittle code because there is no easy way to replace existing context. What’s even worse, context might not be available during asynchronous task continuations. On the other hand, in the case of OWIN or self-hosting, HttpContext.Current will be null.
Hypertext Transfer Protocol Stack
HTTP hosting under Windows has been completely rearchitectured and improved since IIS 6.0. Instead of using Windows Sockets, which runs in user mode, Windows now uses a kernel-mode device driver to listen to HTTP requests. This kernel-mode driver is known as the Hypertext Transfer Protocol Stack or more commonly HTTP.SYS.
![]() Note Kernel mode and user mode are operating system concepts that basically refer to the priority and privilege of an operation in the runtime. Kernel-mode operations, which are normally operating system operations, have a higher priority and unrestricted access to system resources (such as memory or CPU), while all processes (except system) run in user mode. A bug in an application running in user mode will result in crashing the process but the operating system will continue. A bug or disruption in kernel-mode operations results in an operating system crash or “blue screen.”
Note Kernel mode and user mode are operating system concepts that basically refer to the priority and privilege of an operation in the runtime. Kernel-mode operations, which are normally operating system operations, have a higher priority and unrestricted access to system resources (such as memory or CPU), while all processes (except system) run in user mode. A bug in an application running in user mode will result in crashing the process but the operating system will continue. A bug or disruption in kernel-mode operations results in an operating system crash or “blue screen.”
This change in architecture has made HTTP hosting in Windows very robust and secure because the HTTP.SYS is a hardened process and its security aspect has been carefully considered. As we’ll explain later, in ASP.NET Web API, both web hosting and self-hosting take advantage of HTTP.SYS. Now let’s look at how HTTP.SYS works.
HTTP.SYS Queuing
HTTP.SYS receives all HTTP requests and queues the requests. The requests are then picked up by the relevant application pool and are processed. After processing of the requests by the application pool, HTTP.SYS returns the response back to the client. If the application pool is unavailable or has been stopped, HTTP.SYS returns the 503 error stating “Service Unavailable” (see Figure 17-1).
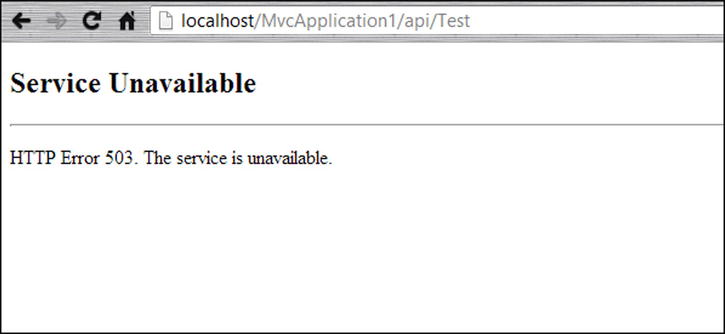
Figure 17-1. A typical “service unavailable” 503 HTTP error is returned from the HTTP.SYS when the application pool is stopped or is busy
How Queuing Works
HTTP.SYS sets up a queue for each application pool. The queue length is defined by the application pool itself, and it is normally set to 1000 in IIS. This number can be set to a value in the range of 10 to 65,535. You can change this value in IIS using the Advanced Settings dialog of the application pool in IIS Manager (see Figure 17-2). If this queue gets full, HTTP.SYS will return an HTTP error 503 (service unavailable), similar to when the application pool is stopped.
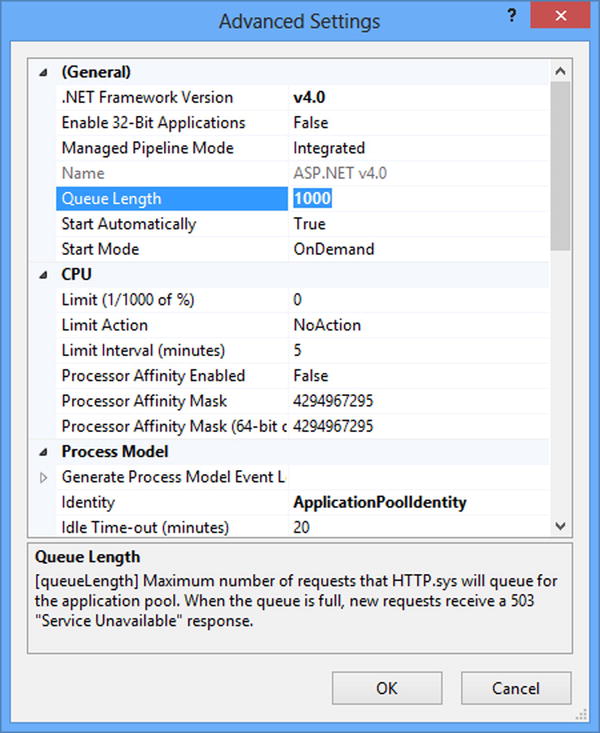
Figure 17-2. Setting the HTTP.SYS queue length for an application pool using the Advanced Settings dialog in IIS Manager; the default value is 1000
Demonstrating the Effect of HTTP.SYS Queuing
In this section, we’ll explain how HTTP.SYS protects your service by providing request queueing. We’ll reduce the queue length to remove the protective effect and, as a result, any request above the capacity of the queue will get rejected with a 503 error.
For the purposes of the test, you can use the ASP.NET Web API project templates that are registered in Visual Studio by installing ASP.NET MVC 4. This template contains a sample that will get you started quickly. To follow the example, first perform the steps to set up a new project and then to reduce the queue size.
Follow these steps to set up the project:
- Open Visual Studio (we used Visual Studio 2012 here) and choose New Project.
- From the center pane, choose Web
 ASP.NET MVC 4 Web Application (see Figure 17-3). For the name of the project, use HttpSysQueueing and click OK.
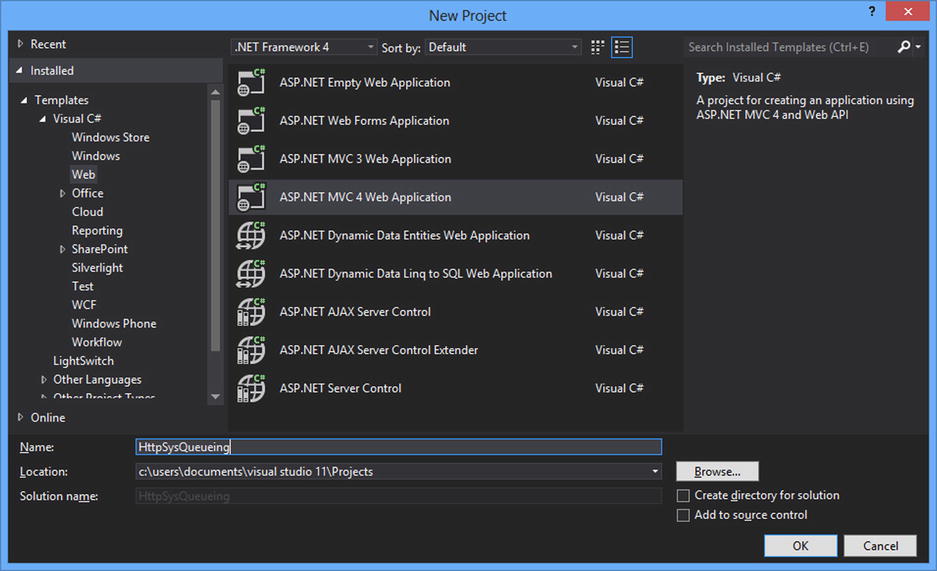
Figure 17-3. From the New Project dialog, choose an ASP.NET MVC 4 Web Application
- After clicking OK, another dialog is shown for you to choose the type of the application. Choose “Web API” and let Visual Studio download the necessary NuGet packages, which will take a few seconds to finish.
- Locate ValuesController class in the project and open it. This is the sample Web API controller in the project and you’ll modify and use it to demonstrate queueing.
- Now you need to add a delay to the action so that you get a chance to see the queue getting full and see the error 503 results. In order to achieve the delay, use Thread.Sleep. So modify this with this code:
// GET api/values/5
public string Get(int id)
{
    return "value";
}
to:
// GET api/values/5
public string Get(int id)
{
    Thread.Sleep(5 * 1000);
    return "value";
} - You have added a five-second delay to the GET action. Now you’ll need to host the application in IIS. This is done by going to the project property and then the Web tab and changing the settings to match those in Figure 17-4.
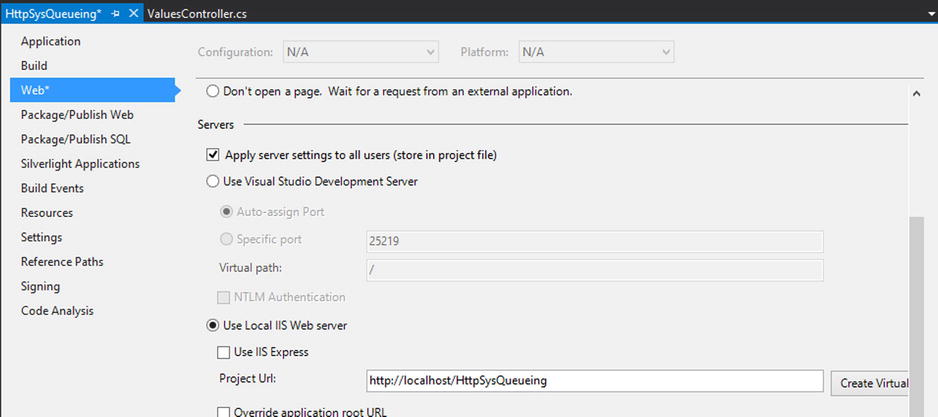
Figure 17-4. Changing project properties to host the application in IIS
- Build the project and it should be ready.
- Next, you need to reduce the queue size in IIS Manager: Open IIS Manager, locate the application pool running your application (normally “ASP.NET v4.0” application pool), and change the Queue Length from 1000 to 10 (refer to Figure 17-2).
- Now you need to fire up more than ten concurrent requests. You can expect to see any request above ten to fail immediately with a 503 error. Fiddler is the right tool to fix this, so let’s use it. Open Fiddler and in the composer dialog, type http://localhost/HttpSysQueueing/api/values/1 in the URL with a GET verb and click Execute to run the action, which has a five-second delay. You should see a longer than five-second delay before the response is returned. Run an iisreset in an administrative command window to ensure the application is cold again.
- Now in the left pane, select the request that you just executed and while pressing the Shift key, click the Replay button. You should now see Repeat Count dialog asking you for the number of times to repeat the replay (see Figure 17-5).

Figure 17-5. Fiddler showing Repeat Count dialog for Replay. By holding the Shift key and clicking the Replay button, you can define the number of concurrent requests to be replayed
- Enter 12 and click OK. Now you should see 12 new concurrent requests, two of which immediately fail (see Figure 17-6).

Figure 17-6. Running 12 concurrent requests in Fiddler when the HTTP.SYS has been set to 10. As can be seen, the last two requests immediately fail with the 503 error because the HTTP.SYS queue gets full
This simple test demonstrates the importance of HTTP.SYS queueing in application scalability. By queueing requests, HTTP.SYS acts as a buffer and allows temporary glitches and delays due to external web services to be absorbed without affecting the end user.
HTTP.SYS Caching
Another important feature of HTTP.SYS is the kernel-level caching of the static and dynamic content. This feature helps cached content to be served directly from HTTP.SYS without even hitting the application pool, which leads to improved scalability of the system. The HTTP.SYS cache is ON by default and all cacheable responses get cached by this highly performant kernel-mode cache.
As for static content (e.g., JavaScript, CSS, image and view files), all GET requests can be cached. However, by default, not all responses are cached. If static content is requested twice within ten seconds, it will be cached for 120 seconds. These interval values are stored in the registry and can be configured (see http://support.microsoft.com/kb/820129).
As for dynamic content, it is the responsibility of the application to tell HTTP.SYS whether a response is cacheable, but due to differences in integration, it might not always work. The application will mark the response as cacheable by setting these HTTP response headers:
- Cache-Control: public
- Last-Modified: <date>
- Expires: <date> (optional)
Kernel caching is very important for the scalability of your application, so make sure you take advantage of this feature. Under certain circumstances, the response cannot be cached, including the following situations (for the full list visit http://support.microsoft.com/kb/817445):
- Requests a URL that contains any query string
- Request is not anonymous or requires authentication
- Dynamic compression is enabled (make sure you enable only static compression)
- Response is too large; default limit is 256KB
- Cache is full
- If-Range or Range header is present in the request
The best way to test the HTTP.SYS caching is to use Windows performance counters. The HTTP.SYS cache entrees are under the “Web Service Cache” category and they all start with “Kernel:” (see Figure 17-7).
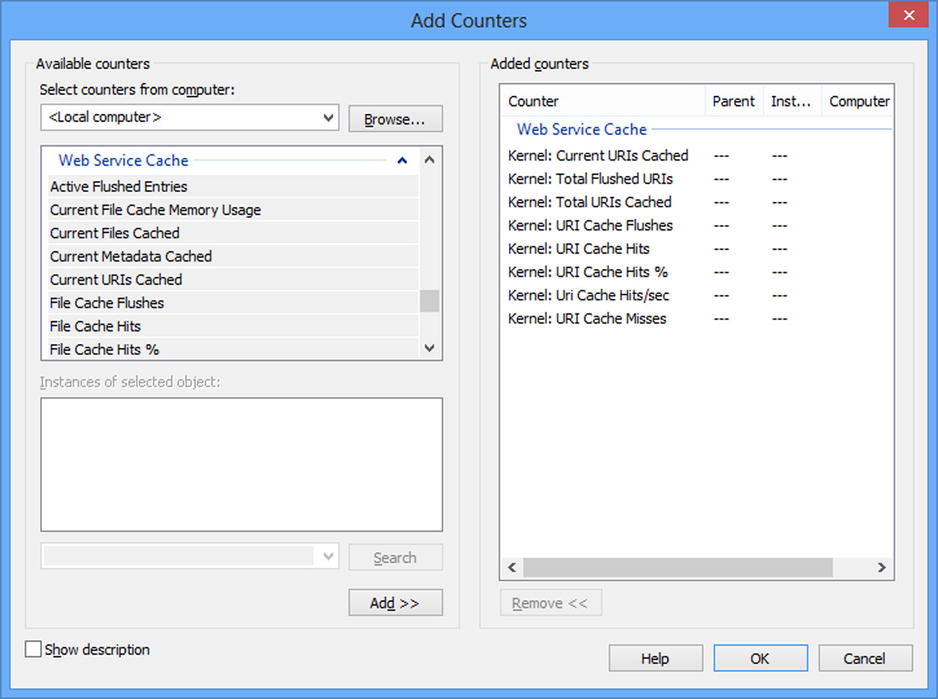
Figure 17-7. Performance counters for HTTP.SYS kernel-level caching
HTTP.SYS kernel-mode caching is by default enabled for static files. You can see the content of the kernel-mode cache by running the following command in the administrative command prompt:
C:> netsh http show cachestate
The hosting model in ASP.NET Web API has two main concepts: runtime configuration and runtime execution. Runtime configuration is built on top of the HttpConfiguration class. Runtime execution, on the other hand, is based on the HttpServer class. In fact HttpServer constructors take an HttpConfiguration instance to configure their runtime. HttpConfiguration also usually sits inside HttpRequestMessage’s Properties property so that the downstream components in the pipeline do not have to know about the execution runtime other than from the request they are processing.
Let’s look at each in more detail.
HttpConfiguration
HttpConfiguration, as the name implies, is responsible for holding HTTP runtime configuration in ASP.NET Web API. These configuration elements are listed in Table 17-1.
Table 17-1. Properties of HttpConfiguration Class
| Property | Type | Description |
|---|---|---|
| DependencyResolver | IDependencyResolver | Dependency resolver of the runtime providing service location resolution of dependencies. |
| Filters | HttpFilterCollection | A collection of global filters. |
| Formatters | MediaTypeFormatterCollection | This collection is also responsible for finding the correct formatter as part of content negotiation. |
| IncludeErrorDetailPolicy | IncludeErrorDetailPolicy | Sets the policy on error reporting because it could contain sensitive information. Possible values are Default, LocalOnly, Always, and Never. |
| Initializer | Action<HttpConfiguration> | Last step of the HttpConfiguration initialization and after being called, HttpConfiguration will be considered immutable. |
| MessageHandlers | Collection<DelegatingHandler> | Ordered list of message handlers. The first in the list will be triggered first for request and last for response. |
| ParameterBindingRules | ParameterBindingRulesCollection | Contains a list of HttpParameterBinding and implements a chain of responsibility pattern in LookupBinding method. |
| Properties | ConcurrentDictionary<Object, Object> | Can contain custom context. It is normally empty. |
| Routes | HttpRouteCollection | Contains Web API routes. |
| Services | ServicesContainer | Contains default services. |
| VirtualPathRoot | string | Root virtual path of the runtime. This is read-only and is set up in the constructors. |
HttpConfiguration only needs to be set up at the startup and your request or responses are only meant to use the runtime configuration and not make any changes to it.
HttpServer
HttpServer is the head of the ASP.NET Web API HTTP processing pipeline and is designed to receive a request from the hosting platform and pass it to the pipeline and return the response it receives back. The tail of this pipeline is normally the ApiController’s action.
HttpServer is designed to be hosting agnostic. It inherits from DelegatingHandler and, similar to all delegating handlers, has the important SendAsync method, which is called as a chain across the whole pipeline. Listing 17-1 is a snippet of the HttpServer’s class.
Listing 17-1. HttpServer Class Constructors and SendAsync
public class HttpServer : DelegatingHandler
{
    public HttpServer()
            : this(new HttpConfiguration())
    {
    }

    public HttpServer(HttpConfiguration configuration)
            : this(configuration, new HttpRoutingDispatcher(configuration))
    {
    }

    public HttpServer(HttpMessageHandler dispatcher)
            : this(new HttpConfiguration(), dispatcher)
    {
    }

    public HttpServer(HttpConfiguration configuration, HttpMessageHandler dispatcher)
    {
            ...
    }
    protected override Task<HttpResponseMessage> SendAsync( _
            HttpRequestMessage request, CancellationToken cancellationToken)
            {
            ...
    }

    ...

}
As you can see in Listing 17-1, HttpServer is created by passing an instance of HttpConfiguration and a dispatcher of type HttpMessageHandler. The dispatcher represents the rest of the HTTP pipeline after the message handlers and by default is set to an instance of HttpRoutingDispatcher. In other words, HttpServer will be passing the request to the first handler in the MessageHandlers list on the HttpConfiguration. Each handler will pass the execution to the next until the last one, which passes the request to the HttpRoutingDispatcher.
HttpRoutingDispatcher is responsible for:
- 1. Calling GetRouteData to trigger the route selection:
- If a route is not found, it returns a resource not found error (HTTP error 404).
- If a route is found, it stores the IHttpRouteData returned in the request properties.
- 2. Passing the execution to the next handler:
- If the per-route message handlers are used, this will be the Handler property of IHttpRouteData, which will be non-null. In this case, handlers will be called in the same order they were defined. After these, an instance of HttpControllerDispatcher will be triggered.
- In a case where there are no per-route handlers (which is usually the case), execution will be passed to an instance of HttpControllerDispatcher.
You can provide an alternative dispatcher instead of the default HttpRoutingDispatcher. This will bypass the routing and execution of requests by the controller actions and can be useful in testing scenarios where you need to test the succession of MessageHandlers and their interaction as a whole. The pipeline is shown in Figure 17-8.

Figure 17-8. HTTP procesing pipeline in ASP.NET
Hosting is connected to controllers and actions via intermediaries, including HttpServer, delegating handlers, HttpRoutingDispatcher, and HttpRoutingDispatcher. Figure 17-8 does not show per-route message handlers. In the case of per-route handlers, they would be called between HttpRoutingDispatcher and HttpControllerDispatcher.
Web Hosting
Web hosting is where ASP.NET’s web abstractions are implemented in the system.web.dll to host the API. The web server would normally be IIS, although using IIS Express or Visual Studio Development Server (Cassini) would also fall into this category.
Web hosting is the standard approach and arguably the most important hosting scenario of all. Taking advantage of the full power of IIS, web hosting should be your default approach to ASP.NET Web API hosting whenever possible. You get the full benefit of HTTP.SYS kernel-mode features, and it is the HTTP hosting platform most explored and best understood under Windows.
The next section will cover configuration and runtime features specific to web hosting.
Runtime Configuration
Runtime configuration in web hosting is based on the familiar class HttpConfiguration. But in order to set up a Web Host API, you need to configure the static instance sitting on GlobalConfiguration. As you’ve seen in different examples over the course of this book as well as in the ASP.NET Web API project template, configuration takes place in the Global.asax (see Listing 17-2).
Listing 17-2. Standard Approach to Configuring a Web Host API
public class WebApiApplication : System.Web.HttpApplication
{
    protected void Application_Start()
    {
        ...
        WebApiConfig.Register(GlobalConfiguration.Configuration);
        ...
    }
}

public static class WebApiConfig
{
    public static void Register(HttpConfiguration config)
    {
        config.Routes.MapHttpRoute(
            name: "DefaultApi",
            routeTemplate: "api/{controller}/{id}",
            defaults: new { id = RouteParameter.Optional }
        );
         ...
    }
}
As can be seen in Listing 17-2, GlobalConfiguration.Configuration is being used to configure the API. On the other hand, this static object is passed as the parameter to the WebApiConfig class. This simple separation has the benefit of allowing the configuration to be unit tested with no dependency to a global object. Not surprisingly, GlobalConfiguration.Configuration is the configuration used by HttpControllerHandler, which we’ll look at next.
Runtime Execution
As mentioned earlier, in each scenario ASP.NET Web API’s HTTP pipeline is triggered via a call to the HttpServer’s SendAsync method. In the web host scenario, this is the responsibility of HttpControllerHandler. This class is the bridge between ASP.NET HTTP abstractions and ASP.NET Web API (HttpServer). HttpControllerHandler implements IHttpAsyncHandler, which was derived from IHttpHandler (see Listing 17-3).
Listing 17-3. HttpControllerHandler Implementing IHttpAsyncHandler and IHttpHandler
public class HttpControllerHandler : IHttpAsyncHandler
{
    ...
}

public interface IHttpAsyncHandler : IHttpHandler
{
    IAsyncResult BeginProcessRequest(HttpContext context, AsyncCallback cb, object extraData);
    void EndProcessRequest(IAsyncResult result);
}

public interface IHttpHandler
{
    bool IsReusable { get; }

    void ProcessRequest(HttpContext context);
}
As you can see from the signature of ProcessRequest in IHttpHandler, the HTTP processing model in ASP.NET is built on top of HttpContext. IHttpHandler and its async counterpart IHttpAsyncHandler are the components responsible for handling a request. Unlike modules that sit in the stream of incoming requests and outgoing responses and observe, intercept, or alter them, handlers are the endpoints capable of processing the request. Other examples of handlers are the Page class in Webforms, the MvcHandler class in MVC, and generic handlers (normally created as .ashx files).
HttpControllerHandler is responsible for converting the incoming HttpRequest (Request property of HttpContext) to an instance of ASP.NET Web API’s HttpResponseMessage, and on the return of an instance of HttpResponseMessage, converting it into an instance of HttpResponse, which sits at the Response property of HttpContext. HttpControllerHandler is also responsible for extracting some hosting-related context and storing it in the Properties property of HttpRequestMessage. These include:
- Storing the HttpContext itself with the string key "MS_HttpContext". This is very important because using this stored context in the request properties is the only way to get to the current HttpContext if the context is not available in the asynchronous task continuations.
- Storing the current client certificate with the key HttpPropertyKeys.RetrieveClientCertificateDelegateKey. This entry’s value will be null if there is no client certificate.
- Storing whether the request is local as a Boolean with the key HttpPropertyKeys.IsLocalKey.
- Storing whether a detailed error must be returned as a Boolean against the key HttpPropertyKeys.IncludeErrorDetailKey.
Web API web host shares many aspects of hosting ASP.NET Webforms or MVC, so it is important to have a solid understanding of IIS hosting (integrated vs. classic pipeline, HTTP modules, etc.), which is beyond the scope of this book.
Hosting PingYourPackage Sample
In Chapters 5 through 7, you developed a sample web application called PingYourPackage, and in Chapter 7, you chose web hosting to host it. To run the application successfully on your local environment, you need to perform a few steps first. This project requires Visual Studio 2012 or Visual Web Express 2012.
- Open an elevated PowerShell command prompt.
- Make sure that your ExecutionPolicy is set to Unrestricted. You can run the Get-ExecutionPolicy PowerShell command to see your execution policy. If it’s not set to Unrestricted, run the following command:
Set-ExecutionPolicy Unrestricted - After setting your execution policy properly, navigate to PingYourPackage solution’s root folder and run the following command:
.AddIISExpressCertToTrustedStore.ps1 - This will add the IIS Express’s development SSL (Secure Socket Layer) certificate into the Trusted Root Certificates store.
- After these steps, open the solution on Visual Studio or Visual Web Developer Express. Click the solution and press ALT+ENTER to bring up the Solution Property Pages dialog window. From there, navigate to the Startup Project tab and set the following projects as the startup project (put them in the same order):
PingYourPackage.API.WebHost
PingYourPackage.API.Client.Web
You’re done! Press F5 (or CTRL+F5) to get the application up and running.
Self-Hosting
As we covered in Chapter 1, self-hosting is a valuable scenario when you host an HTTP API inside a non-web server process. Some common use cases include:
- Providing an API to administer a Windows service
- Providing a web-based documentation, help, or administration console for a Windows application
- As a lightweight server for integration testing scenarios and development spikes
The option to host a service in an arbitrary process is not new. In fact, this could be done back in the days of WCF or even remoting. But what is new is the ability to serve a full-featured HTTP API with its extensible and reusable pipeline. Also self-hosting does not rely on user-mode socket programming, but as we’ll explain, it takes advantage of kernel-mode HTTP.SYS, which offers better features and superior performance.
Let’s look at two familiar aspects of hosting: configuration and execution. As you’ll see, self-hosting uses HTTP.SYS through WCF; hence, you will notice the WCF-related configuration and set up.
Runtime Configuration
Self-host configuration is based on the HttpSelfHostConfiguration class, which inherits from HttpConfiguration. Extra properties are listed in Table 17-2.
Table 17-2. Additional Properties of HttpSelfHostConfiguration (see Table 17-1 for Inherited Properties)
| Property | Type | Description |
|---|---|---|
| BaseAddress | Uri | Server’s base address, a read-only property that gets initialized in the constructor |
| ClientCredentialType | HttpClientCredentialType | A WCF enumeration, used to define transport-level credentials the client must provide |
| HostNameComparisonMode | HostNameComparisonMode | A WCF enumeration; possible values are Exact, StrongWildcard, and WeakWildcard |
| MaxBufferSize | int | Maximum number of bytes in the buffer; default is 64KB |
| MaxConcurrentRequests | int | Maximum number of requests that can be processed concurrently; default is 100 |
| MaxReceivedMessageSize | long | Maximum size of the message that is accepted by the host; default is 64KB |
| ReceiveTimeout | TimeSpan | WCF HttpBinding’s receive timeout; default is ten minutes |
| SendTimeout | TimeSpan | WCF HttpBinding’s send timeout; default is one minute |
| TransferMode | TransferMode | Another WCF enumeration; possible values are Buffered, Streamed, StreamedRequest, and StreamedResponse |
| UserNamePasswordValidator | UserNamePasswordValidator | A WCF identity concept responsible for validating a username and password in case of basic authentication |
| X509CertificateValidator | X509CertificateValidator | Verifies client X509 certificates; yet another WCF implementation |
As you can see, self-host configuration “leaks” out many WCF-related properties. Properties of HttpSelfHostConfiguration will be used by HttpSelfHostServer to set up an HttpBinding, which can be modified by inheriting from HttpSelfHostConfiguration and overriding the protected OnConfigureBinding method. Let’s look further into HttpSelfHostConfiguration properties in some code samples.
![]() Note HttpBinding is not a standard WCF binding, but it is a custom binding (inherited from WCF’s abstract Binding class) created purely for the self-host scenarios and it resides in System.Web.Http.SelfHost.dll.
Note HttpBinding is not a standard WCF binding, but it is a custom binding (inherited from WCF’s abstract Binding class) created purely for the self-host scenarios and it resides in System.Web.Http.SelfHost.dll.
Runtime Execution
HttpSelfHostServer is responsible for using the configuration and directs the incoming messages from HTTP.SYS to the ASP.NET Web API HTTP pipeline. HttpSelfHostServer is inherited from HttpServer and has two additional asynchronous methods—OpenAsync and CloseAsync—for starting and stopping accepting messages.
HttpSelfHostServer sets up an HttpBinding object and configures it via calling the internal method with ConfigureBinding on HttpSelfHostConfiguration and uses its properties to further configure the binding. This binding will then be used to create a WCF channel, which in turn communicates with HTTP.SYS.
Self-Hosting Example Scenarios
Let’s look at several practical scenarios in self-hosting. These will be the scenarios you will most often come across in your projects, so this will help you gain a deeper understanding of ASP.NET Web API self-host.
Creating a Basic Self-Host Web API Application
Creating a self-host Web API server is very easy: create an instance of HttpSelfHostConfiguration, set up its properties, create an instance of HttpSelfHostServer by passing the configuration, and then call OpenAsync.
- Open Visual Studio (make sure you open this in Administrative mode) and choose New Project Console Application. You can use .NET 4.0 or 4.5, although using .NET 4.5 has the benefit of using the async/await keywords.
- Use the NuGet Package Manager Console to add the Web API self-host package:
PM> Install-Package Microsoft.AspNet.WebApi.SelfHost - Change the static Main method:
class Program
{
    static void Main(string[] args)
    {
        var config = new HttpSelfHostConfiguration("http://localhost:18081");

        config.Routes.MapHttpRoute(
            "API Default", "api/{controller}/{id}",
            new { id = RouteParameter.Optional });

        using (var server = new HttpSelfHostServer(config))
        {
            server.OpenAsync().Wait();
            Console.WriteLine("Press Enter to quit.");
            Console.ReadLine();
        }
    }
} - Now you can add a simple controller to test the application. This class does not have to reside in the Controllers namespace:
public class TestController : ApiController
{
    public string Get()
    {
        return DateTime.Now.ToString();
    }
} - Next, run the application. In your browser, point to http://localhost:18081/api/Test, and you should see the current date and time.
Although running Visual Studio in Administrative mode is useful, you cannot assume your Web API service will be running with administrative rights. In fact if you close Visual Studio and open it in nonadministrative mode and try to run it, you will get this error:
System.ServiceModel.AddressAccessDeniedException: HTTP could not register URL http://+:18081/. Your process does not have access rights to this namespace (see http://go.microsoft.com/fwlink/?LinkId=70353 for details).
This is because HTTP.SYS has been hardened so that every application that needs to listen to a port via HTTP.SYS either needs to have administrative rights or the URL would have to had been registered under a username. In order to register the URL, you would need to use the netsh Windows command line utility. The netsh command with the http parameter is used to view or modify HTTP.SYS configuration. To see all of the available parameter options, open a command prompt in administrative mode and enter this command:
netsh http
To register the URL, you’ll need to use netsh http add aclurl:
netsh http add urlacl url=https://<ip address>:<port number>/ user=<username>
You need to provide values for these parameters:
- ip address: The IP address that you want to listen on. Provide the plus sign (+) to register against all addresses.
- port number: Port number you are listening on, in this case 18081.
- username: Username or the group name of the account that will be associated with this URL. This user (or group) will be allowed to create services that listen on this port.
There are other parameters that you do not need here, and you can learn about these by running the netsh http add urlacl command. So in order to register the URL against a users group, you need to enter the following command:
netsh http add urlacl url=http://+:18081/ user=users
After running this command, you should be able to run the application without a need to run with administrative privileges.
Secure a Self-Hosted Web API with an SSL Certificate
Let’s look at what is needed to run our simple API with SSL security. The code we will use is the code in the previous sample and we will modify it to support SSL. As explained previously, the self-host model is based on HttpBinding. In order to host the API under the HTTPS scheme, you need to do the following:
- Change the server’s base address to https:// instead of http://.
- Inherit from HttpSelfHostConfiguration and override OnConfigureBinding to set the security property of the binding. Create and pass an instance of this class to your HttpSelfHostServer instead of the standard HttpSelfHostConfiguration.
- Register the URL using netsh http add urlacl and this time provide the new URL (which starts with https).
- Register the SSL certificate using the netsh command line utility.
Step 1 is easy enough. In order to accomplish Step 2, you create the HttpsSelfHostConfiguration class (remember to add a reference to System.ServiceModel.dll):
public class HttpsSelfHostConfiguration : HttpSelfHostConfiguration
{
    public HttpsSelfHostConfiguration(string baseAddress) : base(baseAddress)
    {
    }

    public HttpsSelfHostConfiguration(Uri baseAddress) : base(baseAddress)
    {
    }

    protected override BindingParameterCollection OnConfigureBinding(HttpBinding httpBinding)
    {
        httpBinding.Security.Mode = HttpBindingSecurityMode.Transport;
        return base.OnConfigureBinding(httpBinding);
    }
}
Step 3 is very similar to what you did for the http scheme, but this time you change the URL to start with https.
To achieve Step 4, you need to choose an SSL certificate. You can either create a self-signed certificate using makecert.exe (see http://msdn.microsoft.com/en-us/library/bfsktky3.aspx) or use an existing one. Here you will use the second approach. So in order to choose an existing certificate:
- In the Run window, enter mmc.
- From the File menu, choose Add or Remove Snap-ins.
- Choose Certificates and click Add.
- On the next dialog choose Computer Account and click Next.
- On the next dialog keep the Local Computer selected and click Finish.
- Click OK to close the dialog.
- Now on the left pane, under Console Root, you’ll see Certificates and under it a number of folders.
- Expand the Personal folder and on the right pane choose a valid certificate that has not expired. Choose localhost certificate and double-click to open it.
Now on the Details tab find the Thumbprint, and you should see a screen similar to the one in Figure 17-9.
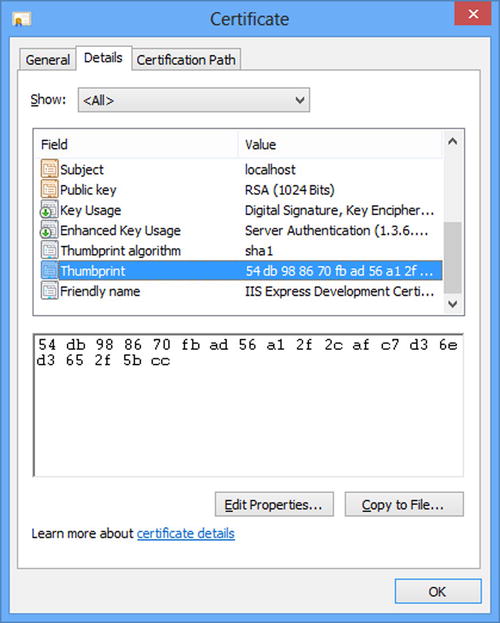
Figure 17-9. Obtaining the thumbprint for an SSL certificate
The hexadecimal code in the bottom pane is the thumbprint of the certificate. You need the thumbprint to register the SSL certificate. The command line for registering is:
netsh http add sslcert ipport=<ip>:<port> certhash=<thumbprint> appid=<guid>
The parameters are:
- ip: IP address of the server. Use 0.0.0.0 to register against all addresses.
- port: Port to be used by the service.
- thumbprint: 20-byte SHA1 hash of the certificate represented as hexadecimal code (as displayed above).
- appid: A guid representing the id of the application. It can be any guid.
So in this case, the command looks like:
netsh http add sslcert ipport=0.0.0.0:18081 certhash=1b7644dd
4ab5e5794f5696d9792d284d210e55dd appid={54F62034-D508-4738-88C0-3BA1C1617FA3}
After finishing these steps and rerunning the API, you should be able to browse to https://localhost:18081/api/Test.
Adding Windows Authentication to a Self-Host API
A Web API usually needs an authentication and authorization mechanism. Although it is preferable to use web-friendly protocols such as basic authentication or OAuth to secure your Web API, you might be asked to provide Windows authentication in addition or instead of those protocols. This is more likely for an internal or hybrid API where single sign-on is a requirement.
In any case, providing this in a self-host Web API is simple. All you need to do is configure the HttpSelfHostConfiguration internal binding by inheriting and overriding it in a manner similar to the SSL case discussed previously. (Remember to add a reference to System.ServiceModel.dll.)
public class NtlmHttpSelfHostConfiguration : HttpSelfHostConfiguration
{
    public NtlmHttpSelfHostConfiguration(string baseAddress)
        : base(baseAddress)
    {
        this.ClientCredentialType = HttpClientCredentialType.Ntlm;
    }

    public NtlmHttpSelfHostConfiguration(Uri baseAddress)
        : base(baseAddress)
    {
        this.ClientCredentialType = HttpClientCredentialType.Ntlm;
    }

    protected override BindingParameterCollection OnConfigureBinding(HttpBinding httpBinding)
    {
        httpBinding.Security.Mode = HttpBindingSecurityMode.TransportCredentialOnly;
        return base.OnConfigureBinding(httpBinding);
    }
}
So if you use this configuration instead of HttpSelfHostConfiguration and then call the API using a browser such as Internet Explorer, there will be two requests. The first one is known as a 401 challenge, which sends NTLM (NT LAN Manager, the legacy Windows authentication) as the authentication method by the server (note the WWW-Authenticate header in the response in Figure 17-10).
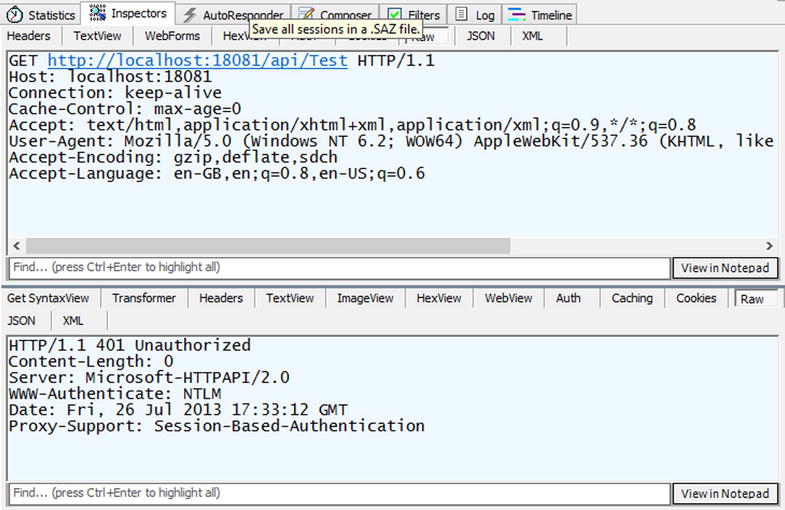
Figure 17-10. A “401 challenge” response requiring NTLM authentication
And the browser sends an NTLM token to the server, which results in a successful response, as can be seen below (note the Authorization header in the request in Figure 17-11).

Figure 17-11. After a “401 challenge,” the client contains an NTLM token and sends it in the Authorization header
Adding Basic Authentication to a Self-Host API
Basic authentication support can be added to your Web API by implementing a DelegatingHandler and adding it to the HTTP pipeline, but you can also use self-host’s WCF features to implement basic authentication.
In order to add basic authentication for your self-host Web API, you first need to create another inherited configuration (similar to the example in preceding section) and then set the UserNamePasswordValidator property. We have combined these two in a single class as shown in the following code. (Remember to add a reference to System.ServiceModel.dll and System.IdentityModel.dll.)
public class BasicAuthenticationSelfHostConfiguration: HttpSelfHostConfiguration
{
    private readonly FunctionalUserNamePasswordValidator _functionalUserNamePasswordValidator;

    private class FunctionalUserNamePasswordValidator : UserNamePasswordValidator
    {
        private readonly Func<string, string, bool> _userNamePasswordValidator;

        public FunctionalUserNamePasswordValidator(Func<string, string, bool> _
            userNamePasswordValidator)
        {
            if(userNamePasswordValidator==null)
                throw new ArgumentNullException("userNamePasswordValidator");

            _userNamePasswordValidator = userNamePasswordValidator;
        }

        public override void Validate(string userName, string password)
        {
            if(!_userNamePasswordValidator(userName, password))
                throw new SecurityException("Invalid username/password pair.");
        }
    }

    public BasicAuthenticationSelfHostConfiguration(string baseAddress, Func<string, string,
        bool> userNamePasswordValidator) : base(baseAddress)
    {
        _functionalUserNamePasswordValidator = new  _
            FunctionalUserNamePasswordValidator(userNamePasswordValidator);
    }

    public BasicAuthenticationSelfHostConfiguration(Uri baseAddress, Func<string, string, bool>
        userNamePasswordValidator)
        : base(baseAddress)
    {
        _functionalUserNamePasswordValidator = new _
            FunctionalUserNamePasswordValidator(userNamePasswordValidator);
    }

    protected override BindingParameterCollection OnConfigureBinding(HttpBinding httpBinding)
    {
        httpBinding.Security.Mode = HttpBindingSecurityMode.TransportCredentialOnly;
        httpBinding.Security.Transport.ClientCredentialType = HttpClientCredentialType.Basic;
        this.UserNamePasswordValidator = _functionalUserNamePasswordValidator;
        return base.OnConfigureBinding(httpBinding);
    }
}
In order to use this class, you must create an instance by passing a username/password validator. For demonstration purposes, let’s assume validation only checks whether username is “johndoe” and the password is “123456”:
var config = new BasicAUthenticationSelfHostConfiguration("http://localhost:18081",
    (un, pwd) => un=="johndoe" && pwd=="123456");
Now upon starting the service, you can see that you get a 401 challenge requesting basic authentication, and then after entering the username and password, you see the response from the API (note the WWW-Authenticate header in the response in Figure 17-12).
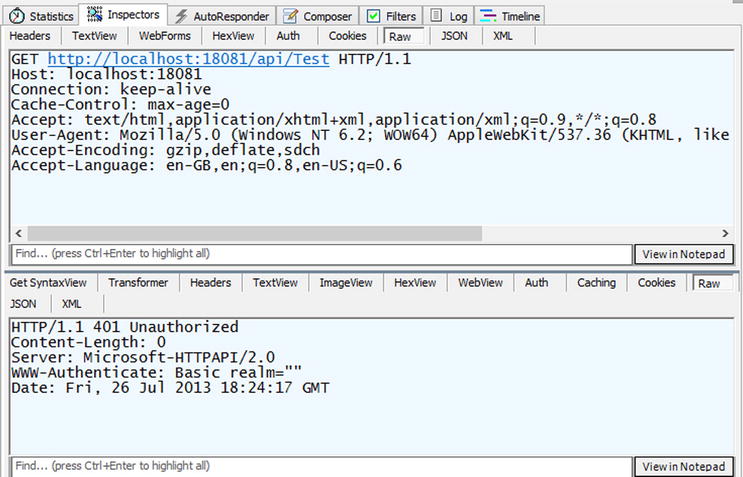
Figure 17-12. A “401 challenge” response requiring basic authentication
Then after entering the correct username and password, you get the resource in the response from the API (note the Authorization header in the request in Figure 17-13).
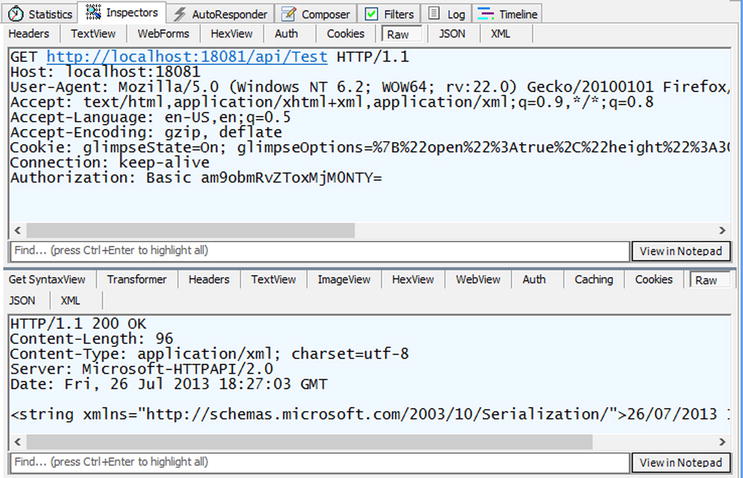
Figure 17-13. Client is sending a request with basic authentication (note Authorization header)
OWIN
OWIN is a published specification (http://owin.org/spec/owin-1.0.0.html) that abstracts communication between web servers and web applications and provides plumbing and pipeline for plugging various .NET web frameworks to .NET web servers. This abstraction allows application developers to focus on implementing the functionality without having to take a dependency on their hosting framework. Such a generic interface had been specified in other web platforms such as Ruby, Node.js, or Python but has been lacking in the .NET space.
The OWIN specification is the combined effort of Benjamin Vanderveen and Louis Dejardin and now has been widely implemented in the open source community. ASP.NET Web API implementations have not yet been finalized at the time of this writing, so our coverage of OWIN hosting will focus mainly on the concepts with some practical use cases.
Why Should I Learn About OWIN?
In late 2012, Microsoft announced that supporting OWIN will be a strategic goal and it has set up the Katana project to implement the interface for a variety of ASP.NET web frameworks. Future developments in the .NET space are likely to have OWIN-specific implementations and sooner or later you will be working on a project that has OWIN dependency. In fact, version 2.0 of the ASP.NET Web API, which is in development at the time of this writing, has been focused on delivering OWIN interoperability.
OWIN provides interoperability between web frameworks and makes it easy to write a single piece of code that can be reused in each and every framework. This is something that has been impossible so far.
The future of the .NET web technologies is going to be heterogenous with a heavy open source software presence. As such, it is important to be prepared for a shift in the .NET horizon.
OWIN Concepts and Runtime
OWIN is a web runtime that acts as a bridge (abstraction) between web hosts and web frameworks (see Figure 17-14). On the one hand, OWIN has defined interfaces for interaction of hosts and frameworks. On the other hand, each host or framework is connected to the OWIN runtime using its OWIN adapter.
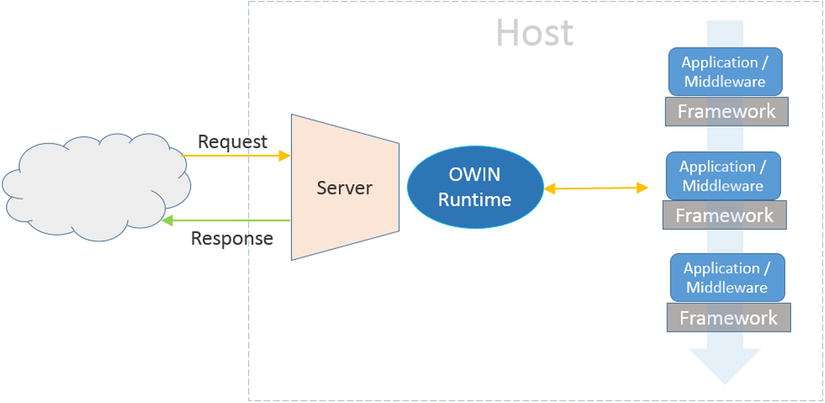
Figure 17-14. OWIN components
Concepts defined for an OWIN system are: Host, Server, Framework, Application, and Middleware (see http://owin.org/spec/owin-1.0.0.html#Definition for further information). Host in OWIN terms is a process that runs the initial set up and provides a runtime platform for incoming requests. Server is a linked concept and its responsibility is to route the incoming requests to the OWIN runtime. In the case of ASP.NET hosting, these two concepts are the same, while in self-host they could be different. OWIN runtime then passes a request to the Application stack and returns the response. The request processing system is composed of an ordered set of Middleware/Applications capable of handling the request. Applications are normally implemented in a Framework such as ASP.NET Web API, NancyFx, among others, and are responsible for the functionality of the web applications. Middlewares are normally pass-through components that enhance the functionality of the application and look after cross-cutting concerns such as security, tracing, caching, monitoring, and so forth. All communications are completely asynchronous (represented by TPL’s Task) and requests and responses flow as part of a dictionary called Environment. Setup work at the startup is the responsibility of AppBuilder, which is represented by the IAppBuilder interface (see Listing 17-4). AppBuilder contains a dictionary called Properties, which represents Host’s properties.
Listing 17-4. OWIN’s IAppBuilder Interface
public interface IAppBuilder
{
  IDictionary<string, object> Properties { get; }

  IAppBuilder Use(object middleware, params object[] args);

  object Build(Type returnType);

  IAppBuilder New();
}
IAppBuilder is normally constructed by the Host and is passed to the startup code so that the application can configure itself. Middlewares are added by calling the Use method. These components are ordered and will be called in the order they are added.
A common interface within OWIN is a delegate called AppFunc, which is the entry point for the applications:
Func<IDictionary<string, object>, Task>
In this delegate, Application receives an Environment dictionary containing the request and response and returns a Task. Application is meant to complete the Task either by successfully processing the request or by faulting the Task (by throwing an exception).
OWIN projects are composed of the OWIN runtime core (which is in fact relatively small) and a set of adapter projects (see Figure 17-15). Each server or web framework requires an adapter to be able to communicate with OWIN components.
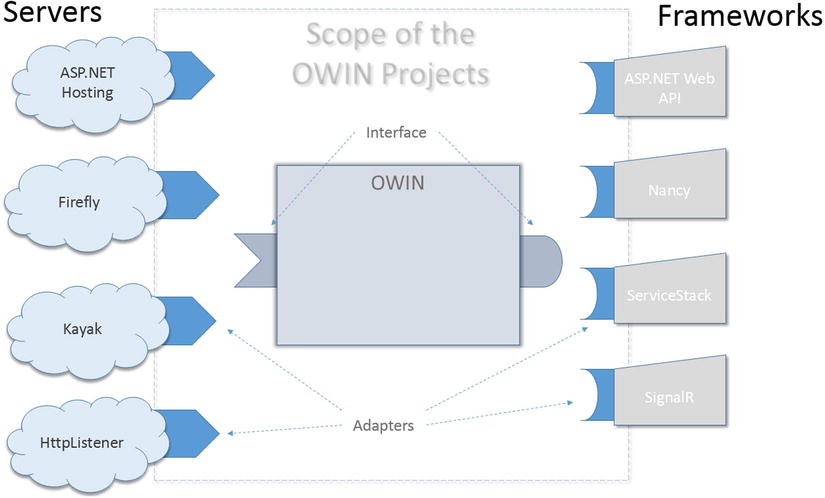
Figure 17-15. OWIN working as a bridge between web hosting and web frameworks. Each framework or host needs to be plugged into OWIN using an adapter. OWIN runtime has a stack of middleware, which are in fact adapters connected to frameworks
Example: Web Hosting ASP.NET Web API in OWIN
ASP.NET Web API in OWIN as a web host is pretty straightforward and that’s what we’ll show you now.
- Open Visual Studio and create an empty Web Application. Install two NuGet packages by running the commands below in the Package Manager Console:
PM> Install-Package microsoft.owin.host.systemweb
PM> Install-Package Microsoft.AspNet.WebApi.Owin -pre -Version 0.21.0-pre - Add a simple controller:
public class TestController : ApiController
{
    public string Get()
    {
        return DateTime.Now.ToString();
    }
} - Create a class called Startup and add the following code:
public class Startup
{
    public void Configuration(IAppBuilder app)
    {
        var config = new HttpConfiguration();
        config.Routes.MapHttpRoute(
            name: "DefaultApi",
            routeTemplate: "api/{controller}/{id}",
            defaults: new { id = RouteParameter.Optional }
        );
        app.UseWebApi(config);
    }
}
As you can guess, the magic happens when you call .UseWebApi.
- The last step is to add some appSetting configuration to your web.config to send all requests toward your OWIN application:
<appSettings>
    <!--Makes the OWIN module the default request handler-->
    <add key="owin:HandleAllRequests" value="true" />
    <!--Maps the current directory to the application’s path-->
    <add key="owin:SetCurrentDirectory" value="true" />
</appSettings> - Now run the application and browse to http://localhost:<yourport>/api/Test. You should see the current date being returned.
Future of OWIN
As explained previously, ASP.NET Web API version 2.0, which is at the beta stage at the time of this writing, can work with OWIN. As far as the future of OWIN is concerned, you’ll see more and more decoupling of the frameworks from hostings and further integration into abstractions of OWIN.
So it will be important to watch the developments of the Katana project and take advantage of its interoperability when it goes live.
Summary
This chapter reviewed three hosting options: web hosting, self-hosting, and OWIN. We started by talking about the benefits of using HTTP.SYS and described how its queuing and kernel-mode caching can improve the performance and scalability of your project.
Then we moved to ASP.NET Web API’s hosting model and how it is based on a runtime configuration and a runtime execution, and provided explanation of these concepts’ implementation in web hosting. We briefly looked at hosting the PingYourPackage sample in IIS Express.
We then looked at self-hosting and how it is based on WCF and looked at a few important practical use cases such as securing an API with SSL, supporting Windows authentication, and basic authentication. We also looked at the OWIN hosting concepts and explained how this can help you write applications decoupled from hosting scenarios.
The next chapter will explain additional features of ASP.NET Web API.