
![]()
Implementing the Model
When I started writing this book, I took some time before determining the current order of chapters 2, 3 and 4. There is always a great debate for MVVM implementation about what you design and implement first; Model, View or ViewModel? Theoretically if you look at the core of the Model-View-ViewModel design pattern, ViewModel is at the heart of the design implementation. It ties one or more Views (user interface) with the Model (your data source) by exposing properties on the Model objects and binding it to the Views. This would enable displaying the data as information as part of the application user interface. After giving it a lot of thought, I settled on the current sequence of the chapters, in which we first defined Views in the previous chapter, giving you a visual context; now we will define a lightweight model that determines the data source and required properties; and finally, in next chapter, we will implement ViewModels which will bind the model objects to the Views.
By definition, the model classes provide encapsulation of the application data and related business logic, providing maximum data integrity and data consistency. Basically it would implement application data model, integrate with the data sources, and implement required business logic for data retrievaland validation in order to provide data integrity and data consistency.
In this chapter we will create lightweight Model classes that essentially will implement the following items:
- Define serializable and deserializable stocks data model
- Define enum to support Add and Remove stocks actions
- Define a class for event arguments that will be passed as part of the Add and Remove stocks actions
- Create a helper class to store and retrieve stock watchlist in the local data storage
- Add stock details data file that would be used to simulate the “live” data update as you are integrating with live stock information service providers such as Microsoft Bing or Google or Yahoo
Define Serializable and Deserializable Stocks Data Model
In Chapter 2, we built a stocks details view in which you display all stock related information, as shown in Figure 3-1.
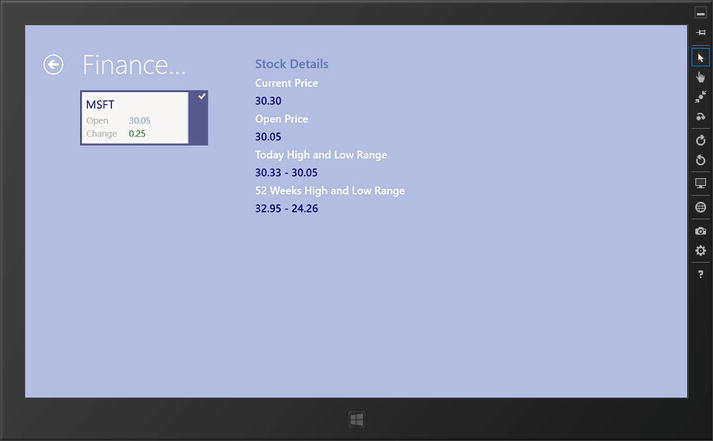
Figure 3-1. StockDetails Page View Detailing Required Stocks Data Properties
The stocks data model requires a data model that, at minimum, implements a class supporting the properties to support above displayed stock details (in Figure 3-1). To achieve this, we will create a Stock class with the required data properties as class members.
Open the project you finished in Chapter 2, and select the Model folder that we created as part of the creating of a skeleton of MVVM-based implementation in Chapter 1. Right click on the selected Model folder, and select Add Item option to add a new class. In the opened Add New Item window, select Class option, and name the class to Stock.cs, as shown in Figure 3-2, Click Add button to add a blank Stock.cs class under Model folder.
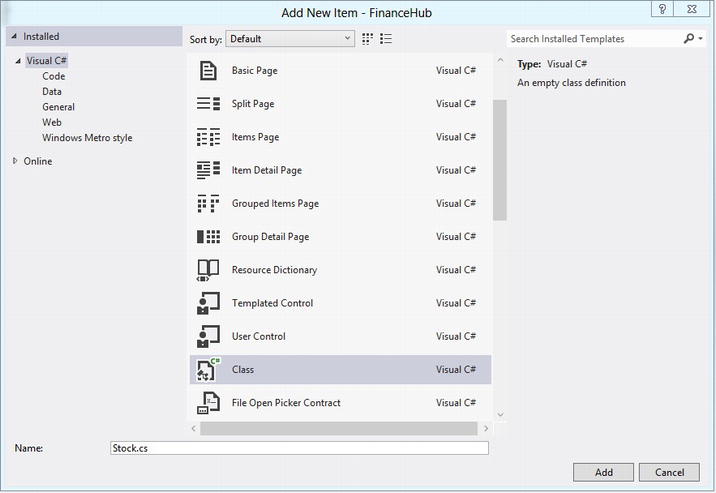
Figure 3-2. Adding Stock.cs File
Revisit Figure 3-1 and you will notice that you would need at least the following six information about the stock:
- Stock symbol (e.g. MSFT)
- Stock current price (e.g. 30.30)
- Stock open price (e.g. 30.05)
- Today’s change in the stock prices - positive or negative value (e.g. +0.25)
- Range - Today’s High and Low Price (e.g. 30.33 - 30.05)
- Range - 52 weeks High and Low Price (e.g. 32.95 - 24.26)
If you recall, in Chapter 2 we created a Stock class within the StocksPage.xaml.cs file that helped us to display the above mentioned stock-related information. We need to create a similar class as part of the Model to integrate it with the ViewModel in the next chapter. Create a new Stock class object containing these properties—Symbol, CurrentPrice, OpenPrice, Change, DaysRange and Range52Week—incorporating the above mentioned information as shown below:
namespace FinanceHub.Model
{
    public class Stock
    {
        public string Symbol { get; set; }
        public decimal CurrentPrice { get; set; }
        public decimal OpenPrice { get; set; }
        public double Change { get; set; }
        public string DaysRange { get; set; }
        public string Range52Week { get; set; }
    }
}
Note that we are still going to keep the existing Stock class definition within the StocksPage.xaml.cs file to keep the current version of the application functional. We will remove it and start using the above implemented class when we develop ViewModel in the next chapter.
We will be saving the application stocks information to local storage as an offline state by using serialization and deserialization of the Stock class object. Let’s update the above class so that it can be serialized/deserialized.
First add a reference to the System.Runtime.Serialization namespace (as shown below) that contains classes that can be used for the serialization and deserialization of the objects.
using System.Runtime.Serialization ;
Next we will use the KnownTypeAttributeClass to specify the Stock class object type to be recognized by the DataContractSerializer class for the serialization and deserialization.
[KnownType(typeof(FinanceHub.Model.Stock))]
Finally, decoreate the Stock class with the DataContractAttribute class to make the class serializable, and deserializable as well, and decorate each Stock class members with the DataMember class to make every attribute as part of the data contract during serializing and deserializing.
The full revised code snippet of the Stock class is shown below:
using System.Runtime.Serialization;

namespace FinanceHub.Model
{
    [KnownType(typeof(FinanceHub.Model.Stock))]
    [DataContractAttribute]
    public class Stock
    {
        [DataMember()]
        public string Symbol { get; set; }
        [DataMember()]
        public decimal CurrentPrice { get; set; }
        [DataMember()]
        public decimal OpenPrice { get; set; }
        [DataMember()]
        public double Change { get; set; }
        [DataMember()]
        public string DaysRange { get; set; }
        [DataMember()]
        public string Range52Week { get; set; }
    }
}
Define enum to support Add and Remove Stocks Actions
This application contains two actions—Add stock and Remove stock—that will be implemented using the pub-sub model by implementing EventAggregator class during the implementation of ViewModel in the next chapter, Chapter 4. To support that, we will be declaring StockAction enumeration as part of the Model implementation in this section.
Again select and right click on the Model folder, and select Add Item option to add a new class. In the opened Add New Item window, select Class option, name the class to Enum.cs, and click Add button to add a blank Enum.cs class under Model folder.
Now add StockAction enumeration with the enumerators None, Add and Remove, as shown below:
namespace FinanceHub.Model
{
    public enum StockAction
    {
        None,
        Add,
        Remove
    }
}
Define a Class for Event Arguments of Add and Remove Stocks Actions
Later in Chapter 4 we will be passing the above defined StockAction enum as an argument to implement stock add and remove actions. Add an additional class named ActionEventArgs for event arguments, which will be passed as part of the Add and Remove stocks actions.
Again select and right click on the Model folder and select Add Item option to add a new class. In the opened Add New Item window, select Class option and name the class to ActionEventArgs.cs. Click Add button to add a blank ActionEventArgs.cs class under Model folder.
Add the following members to the ActionEventArgs class so when we publish message using EventAggregator.Publish method (to be defined in the next chapter 4), we will be passing an instance of the ActionEventArgs class with proper value for Data (new stock in the case of Add Stock action or stocks to be deleted in the case of Remove Stock action), with StockAction set to proper value.
namespace FinanceHub.Model
{
    public class ActionEventArgs
    {
        public StockAction Action { get; set; }
        public object Data { get; set; }
    }
}
Create a Helper Class to Store and Retrieve Stocks Watchlist in the Local Data Storage
Now let’s prepare our application with offline capabilities, which we will be using to save the application state upon its suspension. For that we will store stocks information to the local storage using asynchronized serialization and deserialization process.
Before we actually implement this helper class, first let’s get a quick overview of some of the new features related to handling asynchronous operations introduced in .NET Framework 4.5 and new class and APIs introduced with WinRT to support local storage capabilities.
Asynchronous Operations and Local Storage Capabilities for Windows 8 Applications
Microsoft .NET Framework 4.5 version established a very simplified, brand-new way of implementing the asynchronous operations, compared to the traditional legacy approach that uses callbacks.
The async Modifier and await Operator
Now, to define an asynchronous method to perform asynchronous operation, you need to define a method that ends with “Async” keyword, and you decorate the method with the async modifier. This method must contain at least one statement/expression that starts with the await operator. This method runs synchronously until it reaches to one of the statement/expression that starts with the await operator. At this point the code executes asynchronously until the await statement/expression execution is complete. It’s that simple!
![]() Note If the method you defined with async modifier did not contain at least one statement/expression with the await operator, complete method will run synchronously. Note that Visual Studio 2012 will give you a warning related to that to make sure you did not miss adding await!
Note If the method you defined with async modifier did not contain at least one statement/expression with the await operator, complete method will run synchronously. Note that Visual Studio 2012 will give you a warning related to that to make sure you did not miss adding await!
The following code snippet shows the structure of defining an asynchronous method with an asynchronous operation using async and await.
public async Task<int> AsynchronousMethodAsync()
{
    //... code goes here that would run synchronously
    //...

    // use await operator to start the asynchronous execution
    int variablename = await CallAsynchronousOperation();

    //... code executes after the asynchronous operation is over
    //... you can also use the returned variablename value

    // write return statement returning an integer value
}
Windows 8 Local Folders and Files Management
Windows 8 introduced the Windows.Storage class that manages folders, files, and application settings.
- The Windows.Storage.StorageFile class represents a file, provides information about the file and access to its content, and even updates them.
- The Windows.Storage.ApplicationData class provides access to the application data storage that can be local, roaming or temporary data storage.
- The Windows.Storage.Streams class provides capabilities to read and write from sequential or random streams.
In the next section we will be using some of the methods and interfaces introduced in the above-mentioned classes to perform asynchronous reading and writing from the local storage.
![]() Note Visit Microsoft MSDN site to get more details on the Windows.Storage class - http://msdn.microsoft.com/en-us/library/windows/apps/br227346.aspx.
Note Visit Microsoft MSDN site to get more details on the Windows.Storage class - http://msdn.microsoft.com/en-us/library/windows/apps/br227346.aspx.
Implementing Local Storage Helper Class
First, select and right click on the Common folder and select Add Item option to add a new class. In the opened Add New Item window, select Class option, name the class to LocalStorageHelper.cs, and click Add button to add a blank LocalStorageHelper.cs class under Common folder.
Before we start adding required methods, add the reference to the following additional namespaces to support access to local file storage and to perform read and write operations asynchronously.
using Windows.Storage;
using System.IO;
using System.Runtime.Serialization;
using Windows.Storage.Streams;
Next, define the following generic list objects within the LocalStorageHelper class, which will store data in the memory temporarily before saving it to the WatchList.xml file or store data retrieved from WatchList.xml file.
private static List<object> _data = new List<object>();

public static List<object> Data
{
    get { return _data; }
    set { _data = value; }
}

private const string filename = "WatchList.xml";
Next we will implement two static generic asynchronous methods of names Save and Restore with async public signature. Both methods use the Windows.System.Threading.ThreadPool.RunAsync method to create work item with Normal WorkItemPriority (a default value) relative to other work items. Here we will call private implementation of SaveAsync and RestoreAsync to do actual local file save and retrieval. The following code snippet demonstrates these two asynchronous methods. Specially note the use of the await operator!
//Save asynchronous method implementation
static async public Task Save<T>()
{
    await Windows.System.Threading.ThreadPool.RunAsync((sender) =>
        SaveAsync<T>().Wait(), Windows.System.Threading.WorkItemPriority.Normal);
}

//Restore asynchronous method implementation
static async public Task Restore<T>()
{
    await Windows.System.Threading.ThreadPool.RunAsync((sender) =>
         RestoreAsync<T>().Wait(), Windows.System.Threading.WorkItemPriority.Normal);
}
Now let’s implement two private asynchronous SaveAsync and RestoreAsync methods that would actually implement the logic of saving and retrieving files using Windows.Storage class methods and interfaces and using serialization and deserialization.
- In both methods, first we will define a file object of Windows.Storage.StorageFile file to create a file of name WatchList.xml in the local folder using the ApplicationData.Current.LocalFolder.CreateFileAsync method.
- In the SaveAsync method, create file as random-access output stream in the ReadWrite mode, and write the stream related to the stock data using serialization (refer the earlier section in this chapter where we decorated the stock class as data contrace).
- For the RestoreAsync method, now open the existing file (if it exists) as random-access input stream read, and store the stock data in memory using serialization.
The following code snippet demonstrates the SaveAsync asynchronous static private method. Specially note the use of the await operator multiple times!
static async private Task SaveAsync<T>()
{
    StorageFile sessionFile = await ApplicationData.Current.LocalFolder.CreateFileAsync
        (filename, CreationCollisionOption.ReplaceExisting);
    IRandomAccessStream sessionRandomAccess =
        await sessionFile.OpenAsync(FileAccessMode.ReadWrite);
    IOutputStream sessionOutputStream = sessionRandomAccess.GetOutputStreamAt(0);

    var sessionSerializer = new DataContractSerializer
        (typeof(List<object>), new Type[] { typeof(T) });
    sessionSerializer.WriteObject(sessionOutputStream.AsStreamForWrite(), _data);

    await sessionOutputStream.FlushAsync();
}
The following code snippet demonstrates the RestoreAsync asynchronous static private method. Specially note the use of the await operator multiple times!
static async private Task RestoreAsync<T>()
{
    StorageFile sessionFile = await ApplicationData.Current.LocalFolder.CreateFileAsync
        (filename, CreationCollisionOption.OpenIfExists);

    if (sessionFile == null)
    {
        return;
    }

    IInputStream sessionInputStream = await sessionFile.OpenReadAsync();
    var sessionSerializer = new DataContractSerializer
        (typeof(List<object>), new Type[] { typeof(T) });
    _data = (List<object>)sessionSerializer.ReadObject(sessionInputStream.AsStreamForRead());
}
Add SimulatedRandomStocksDetail.csv File
If you want to convert this application in a commercial Windows Store application, you would like to have live updates of the stocks (that are added in the watch list). For that you can potentially use one of stock update services (APIs) provided by the service providers, such as Microsoft Bing, Yahoo, or Google. For the simplicity and focusing on the core subject—implementing MVVM pattern for Windows 8 application—we will not perform integration with such services for the “live update”; however, we will simulate the “live update” scenario by adding a few values of stock details in a comma separated file stored as part of the project and randomly picking values from this file for each added stocks in the watch list.
Create an empty text file with the name SimulatedRandomStocksDetail.csv under the Model folder. Now you need to add multiple comma separated rows, with each row containing comma separated values for the following fields in the following mention order (first mentioned comes first, and last comes last):
- Stock current price (e.g. 30.30)
- Stock open price (e.g. 30.05)
- Today’s change in the stock prices - positive or negative value (e.g. +0.25)
- Range - Today’s High and Low Price (e.g. 30.33 - 30.05)
- Range - 52 weeks High and Low Price (e.g. 32.95 - 24.26)
As a sample I have added the following values in the files.
15.02,14.99,0.04,14.85 - 15.07,12.45 - 16.79
675,672.87,4.27,671.70 - 677.25,480.60 - 677.25
21.07,21.05,-0.05,20.94 - 21.10,14.02 - 21.19
30.30,30.05,0.25,30.33 - 30.05,32.95 - 24.26
640,636.34,11.77,638.81 - 648.19,354.24 - 648.19
In the next chapter we will implement code to retrieve and display these values.
With this maneuver, we have completed the lightweight model classes implementation for our FinanceHub application. As you have noticed, we did all back-end coding in this chapter so there is no visual outcome from this chapter. However, it’s a best practice to rebuild the solution (by pressing F6) and make sure you are not getting any errors!
Summary
In MVVM model classes, provide encapsulation of the application data and related business logic, providing maximum data integrity and data consistency. This chapter implemented a lightweight model classes that defined the serializable and deserializable stocks data model and implemented pre-requisites to implement features of Add and Remove stock actions. We also learned some of the new features introduced in .NET Framework 4.5, such as how to implement asynchronous functions and WinRT classes, and methods and interfaces related to the Windows.Storage class supporting local data storage and data access features.
The next chapter is the heart of the book and will implement the ViewModel that will tie together Views (implemented in Chapter 2) and Model classes (implemented in this chapter), completing the development of XAML-based FinaceHub Windows 8 application following MVVM pattern.
Do not forget to download the source code. Visit the Chapter 3 folder to look at the source code that we developed in this chapter.