
![]()
View, Model, and ViewModel Structures in HTML5 and JavaScript
I am finishing the final chapter of this book exactly as Windows 8 is released! I am very excited to see that the new operating system from Microsoft is getting delivered, which promises to bring the next generation of touch-optimized Windows store applications.
Without wasting further time, let’s implement the FinanceHub Windows 8 application using HTML5 and JavaScript following the MVVM design pattern. In this chapter we will develop this application by covering the following main steps:
- Initial project set up by using a Navigation Windows 8 JavaScript application project template
- Implement the View
- Implement the Model
- Implement the ViewModel
- Implement offline storage using the state persistence
Setting up FinanceHub JavaScript Windows 8 Application Project
Similar to Windows 8 XAML application project templates (for Visual C#, Visual Basic .NET, and Visual C++), Visual Studio 2012 provides a few default Windows 8 application project templates for JavaScript such as Blank App, Grid App, Split App, Fixed Layout App, and Navigation App templates.
Let’s create a FinanceHub Windows 8 application using JavaScript Navigation JavaScript Windows 8 application project template. Click on the New Project option in Visual Studio 2012; if you have default language selection Visual C#, then you will find Windows 8 application project templates for JavaScript under the Other Languages section of the New Project windows of Visual Studio 2012. Select the Navigation App Windows 8 application project template, browse to your desired folder, and name the project to FinanceHub. Now click OK to create a new project. You will notice that a new folder FinanceHub is created, and the Windows 8 JavaScript Navigation application project is created under your selected folder.
Exploring and Setting up FinanceHub Project
If you open the FinanceHub project and look at the Solution Explorer window, you will find Navigation JavaScript Windows 8 application project structure that is somewhat similar to what you saw during creating FinanceHub application using XAML Windows 8 application project.
The base of the JavaScript navigation template-based project structure is somewhat similar to the base of the blank XAML-based Windows 8 application structure that we went through in Chapter 1. Let’s quickly look at key files/folders of the project:
- The default.html file available under the root project folder is a main HTML page, which defines the structure of the pagelayout and is a default startup page and will be loaded first while you run the application. Please note that you can change the default start-up page through the package.appxmanifest file.
- Under js folder, default.js file is available, which is a startup, page-related, code-behind JavaScript file that would essentially run at the start of the project and is a key file managing data and user interactions. It also contains navigator.js file, which is added by default as part of the Navigation project template and is used to support navigation and provide required container to navigate from one page to other.
- Under css folder, default.css file is available, which provides a set of default styles that would be applied to the HTML page.
- The References folder contains a set of JavaScript and CSS files that get used to develop and run Windows 8 application and provide default themes of the application.
- Under images folder, (Assets folder for XAML-based Windows 8 application project) a set of 4 PNG icon images are present that are used by the application manifest defining default application logos (large and small application logos to display on the start screen and application logo to be displayed on the Windows Store) and splash screen (to display when the application starts).
- Similar to the XAML-based Windows 8 application project, the package.appxmanifest file is an important file that defines the runtime configuration properties, such as name, start page, description, tile-related information, notification, and splash screen, and that enables the capabilities of the Windows 8 application deployment package. Open the Application UI tab and set the Background color for splash screen to #9ea7b1.
- An additional folder pages is also added containing default home page of the navigation project. We do not need this since we are going to create our own views. Go ahead and delete the entire folder.
Setting MVVM Architecture in FinanceHub Project
So far, we looked at the default JavaScript Windows 8 application structure. Next we will add some additional folders to support the design and development of the FinanceHub project using MVVM design pattern.
Please add the following four folders as placeholders to support the MVVM design pattern:
- Common – This folder will contain required common JavaScript files.
- Model – This folder will contain JavaScript file to implement the model of the application.
- View – This folder will contain the user interface definition made up of different HTML pages and related JavaScript files and related style sheets.
- ViewModel – This folder will contain JavaScript files implementing the ViewModel of the pages/usercontrols.
Adding Application Logo Files and Splash Screen
To provide custom branding to the FinanceHub application, next define the custom application logos and the splash screen. For that, first replace the default splashscreen and storelogo file with the splashscreen.png and storelogo.png files provided with the Chapter 6 source code. Then add the additional images (available into the Chapter 6 source code) AppLogo.png, up.png, and down.png by dragging and dropping to the images folder of the project.
Implementing the View
As part of implementing a View—the user interface—of the FinanceHub application, we need to add custom HTML pages to define StockPage and StockDetails pages and will update the startup default HTML page to incorporate these newly added pages, as well as defining the add and remove stock flyouts. Let’s get started.
Adding StockPages.html Page Control
Select the View folder and click on Add New Item to add a new Page Control with the name StocksPage.html. You will notice that three files—StocksPage.html, StocksPage.css, and StocksPage.js—are added under the View folder. When you add any JavaScript type Page Control a new HTML file along with corresponding CSS and JavaScript file will be added to the project.
Open the StocksPage.html file, locate the header tag with aria-label set to Header Content, and update the following highlighted items to add a new application logo and change the page title to Finance Hub.
<header aria-label="Header content" role="banner">
    <button class="win-backbutton" aria-label="Back" disabled></button>
    <img src="..\imagesAppLogo.png"
        style="height:80px;width:80px;margin-left:110px;margin-top:40px" />
    <h1 class="titlearea win-type-ellipsis"
style="margin-left:90px" >
        <span class="pagetitle">
Finance Hub </span>
    </h1>
</header>
Next let’s define the key styles required to display the stock items and item text. Open the StocksPage.css file and first delete the existing style mentioned below:
.StocksPage p {
    margin-left: 120px;
}
And now add the following new styles:
.StocksPage .itemslist .win-horizontal.win-viewport .win-surface {
    margin-bottom: 60px;
    margin-left: 115px;
    margin-top: 7px;
}

.StocksPage .itemslist {
    height: 100%;
    position: relative;
    width: 100%;
    z-index: 0;
}

.StocksPage .itemslist .win-item {
    background-color:#fff;
    padding:15px;
    height: 130px;
    width: 180px;
}

.StocksPage .itemtext {
 font-size:15pt;
 float: left;
 color:#808080;
}
We are all set to start adding new WinJS user controls to start defining the user interface (View) of the FinanceHub application.
Revisit the StocksPage.html file and look for the section tag, which is just located below the header tag. First delete the existing following content:
<p>Content goes here.</p>
Now add a new WinJS.UI.ListView control, as shown following under the section tag:
<section aria-label="Main content" role="main">
    <div class="itemslist"
            data-win-control="WinJS.UI.ListView"
            data-win-options="{ selectionMode: 'none'}"></div>
</section>
Next let’s define an item template for the above-added WinJS.UI.ListView control within the body tag as shown below, which will be used to display each item in the ListView control:
<body>
<!-- This template is used to display each item in the ListView declared below. -->
    <div class="itemtemplate" data-win-control="WinJS.Binding.Template">
       <div >
           <h2 style="color:#4E6485"></h2>
           <div class="itemtext">Open</div>
           <div style="margin-left:85px;font-size:15pt;color:#6a7bba"></div>
           <div class="itemtext" >Change</div>
           <div style="margin-left:85px;font-size:15pt;" >
           <div></div></div>
           <div style="float: left;margin-left:15px;margin-top:15px">
               <img style="height:25px" />
           </div>
           <div style="margin-left:85px;margin-top:10px;font-size:20pt;color:#759CC8">
           </div>
       </div>
    </div>
    ....
</body>
Note that this template is still not completely defined. The big missing portion is binding the template, which we will do at later stage in this chapter, when we will implement the ViewModel of the application.
Next jump to the StocksPage.js file, and we will apply the above defined item template to the ListView within the ready event handler, as shown below:
ready: function (element, options) {
    // TODO: Initialize the page here.
    var listView = element.querySelector(".itemslist").winControl;
    listView.itemTemplate = element.querySelector(".itemtemplate");
    listView.element.focus();
},
Finally set the StocksPage.html as home page by opening the Default.html file, and under a body tag, update the existing ContentHost data-win-control of Application.PageControlNavigator to point home page to StocksPage.html by setting data-win-options as shown below.
<body>
    <div id="contenthost"
            data-win-control="Application.PageControlNavigator"
            data-win-options="{home:'/View/StocksPage.html' }"></div>
</body>
At this point, if you compile the project and run it in the Simulator mode, you should see a custom FinanceHub splash screen and a main application startup page with FinanceHub application logo and application title but no content. Believe me, it’s a good start!
We will revisit this page later in this chapter to finish the data-binding implementation.
Adding StockDetails.html Page Control
Select the View folder and click on Add New Item to add a new Page Control with the name StockDetails.html, which is available under the JavaScript tab. You will notice that three files—StockDetails.html, StocksDetails.css, and StocksDetails.js—are added under the View folder (when you add any JavaScript type Page Control).
Open the StockDetails.html file and locate the header tag with aria-label set to Header Content. Now change the page title to Finance Hub.
<header aria-label="Header content" role="banner">
    <button class="win-backbutton" aria-label="Back" disabled></button>
    <h1 class="titlearea win-type-ellipsis">
        <span class="pagetitle">Finance Hub </span>
    </h1>
</header>
To define the key styles required to display the stock details and header information, open the StockDetails.css file and first delete the existing style mentioned below:
.StockDetails p {
    margin-left: 120px;
}
And next add the following new styles:
.StockDetails {
    -ms-grid-columns: 350px 1fr;
    display: -ms-grid;
    height: 100%;
    width: 100%;
}

    .StockDetails .itemlistsection {
        -ms-grid-row: 2;
        margin-left: 106px;
    }

        .StockDetails .itemlistsection .itemlist {
            height: 100%;
            position: relative;
            width: 100%;
            z-index: 0;
        }

    .StockDetails .itemlistsection .itemlist .win-item {
        background-color:#fff;
        -ms-grid-columns: 110px 1fr;
        -ms-grid-rows: 1fr;
        display: -ms-grid;
        height: 90px;
        width: 180px;
        padding:10px;
    }

    .StockDetails .detailsection {
        -ms-grid-column: 2;
        -ms-grid-row-span: 2;
        -ms-grid-row: 1;
        margin-left: 70px;
        margin-top: 120px;
        overflow-y: auto;
        padding-right: 120px;
        position: relative;
        z-index: 0;
    }

.captionStyle {
        color:#fff;
        font-weight:500;
        font-size:16pt;

}

.detailStyle {
        color:#0026ff;
        font-weight:500;
        font-size:16pt;
        margin-bottom:10px;
}

.headerStyle {
        color:#6a7bba;
        font-weight:600;
}
We are all set to start adding new WinJS user controls to start defining the user interface (View) of Stock Details of the FinanceHub application.
Revisit the StockDetails.html file and look for the section tag, which is just located below the header tag. First delete the existing following content:
<section aria-label="Main content" role="main">
    <p>Content goes here.</p>
</section>
Now add a new WinJS.UI.ListView control, as shown below:
<div class="itemlistsection">
    <div class="itemlist" id="itemlistView"
             data-win-control="WinJS.UI.ListView"
             data-win-options="{ selectionMode: 'single', tapBehavior: 'toggleSelect'}">
    </div>
</div>
<div class="detailsection" id="stockInfoView" aria-atomic="true"
         aria-live="assertive">
    <h2 class="headerStyle" >Stock Details</h2>
    <div class="captionStyle">Current Price</div>
    <div class="detailStyle" ></div>
    <div class="captionStyle">Open Price</div>
    <div class="detailStyle" ></div>
    <div class="captionStyle">Today High and Low Range</div>
    <div class="detailStyle" ></div>
    <div class="captionStyle">52 Weeks High and Low Range</div>
    <div class="detailStyle" ></div>
</div>
Next define an item template for the above-added WinJS.UI.ListView control within the body tag as shown below, which will be used to display each item in the ListView control:
<body>
    <div class="itemtemplate" data-win-control="WinJS.Binding.Template">
         <div>
           <h2 style="color:#4E6485"></h2>
           <div style="font-size:15pt;float: left; color:#808080">Open</div>
           <div style="margin-left:85px;font-size:15pt;color:#6a7bba" ></div>
           <div style="font-size:15pt;float: left; color:#808080">Change</div>
            <div style="margin-left:85px;font-size:15pt;"><div></div></div>
         </div>
    </div>
    ....
</body>
Next jump to the StockDetails.js file, and we will apply the above-defined item template to the ListView within the ready event handler, as shown below:
(function () {
    "use strict";
    var ui = WinJS.UI;

    WinJS.UI.Pages.define("/View/StockDetails.html", {
        // This function is called whenever a user navigates to this page. It
        // populates the page elements with the app's data.
        ready: function (element, options) {
            // TODO: Initialize the page here.
            var listView = element.querySelector(".itemlist").winControl;
            listView.itemTemplate = element.querySelector(".itemtemplate");
            listView.layout = new ui.ListLayout();
        },
    ....
At this point, if you compile the project and run it in the Simulator mode, you should see the same output, a custom FinanceHub splash screen and main application startup page with FinanceHub application logo and application title but no content, as shown in Figure 6-1 below.
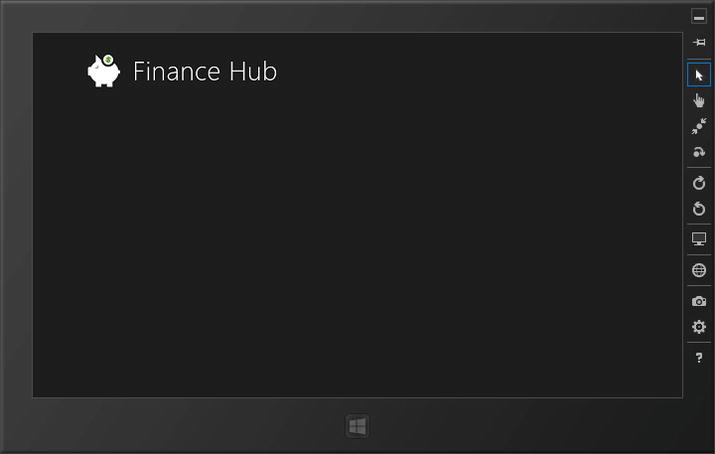
Figure 6-1. Finance Hub application with partial views implemented
We will revisit this page later in this chapter to finish the data binding implementation.
The default.html page will serve as the master page and will contain additional <div> markups for hosting Windows 8 app bar for the FinanceHub application containing Add stock and Remove stock buttons. This page will also contain markups for Add and Remove stock flyouts.
Open the default.html page and add the application bar by adding the WinJS.UI.AppBar control with two buttons for add and remove stocks actions just below contenthost in the body tag.
<div id="appbar" data-win-control="WinJS.UI.AppBar" style="background-color:#9EA7B1">
    <button data-win-control="WinJS.UI.AppBarCommand"
        data-win-options=
            "{id:'cmdAdd',label:'Add',icon:'add',section:'global',tooltip:'Add',
                type:'flyout', flyout:'addStockFlyout'}">
    </button>
    <button data-win-control="WinJS.UI.AppBarCommand"
        data-win-options=
            "{id:'cmdDelete',label:'Remove',icon:'remove',section:'global',tooltip:'Delete',
                type:'flyout', flyout:'removeStockFlyout'}" >
    </button>
</div>
As you noticed above, we have used addStockFlyout and removeStockFlyout as type value for add and remove stocks buttons. Let’s define these flyouts right below the added appbar code.
Adding Add Stock Flyout
For the addStockFlyout we will use the WinJS.UI.Flyout control and will allow the user to input the new stock information and add it, as shown below, immediately after appbar code:
<div id="addStockFlyout" data-win-control="WinJS.UI.Flyout" >
    <div id="addStockFlyoutMessage"></div>
    <input id="addStockText" placeholder="Enter a symbol (e.g., MSFT)" />
    <br /><br />
    <button id="addStockButton" style="color:#fff">Add</button>
    <br /><br />
</div>
Adding Remove Stock Flyout
And for the removeStockFlyout we will also use the WinJS.UI.Flyout control and will allow the user to select one or more stocks from the existing stock list through check box and then remove the selected ones. For that we define a table with input control as checkbox and span tag within the flyout, which is our item template for showing the list of stocks to remove with checkbox. Add the following code to achieve this immediately after the add stock flyout code.
<div id="removeStockFlyout" data-win-control="WinJS.UI.Flyout"
    data-win-options="{width:'wide'}" >
        <table>
            <tbody>
                <tr>
                    <td >
                        <input type="checkbox"/>
                         <span></span>
                    </td>
                </tr>
            </tbody>
        </table>
        <button id="Button1" style="color:#fff">Remove Selected</button>
        <br /><br />
</div>
Later in this chapter, when we will implement the ViewModel, we will be using the KnockoutJS framework for binding the data to these flyouts.
At this point if you compile the project and run it in the Simulator mode, you should see the same output, a custom FinanceHub splash screen and then main application page with application logo and application with no content. However, this time if you right click or slide from bottom on your touch screen mode, you should see the appbar with add and remove stocks buttons, as shown in Figure 6-2.
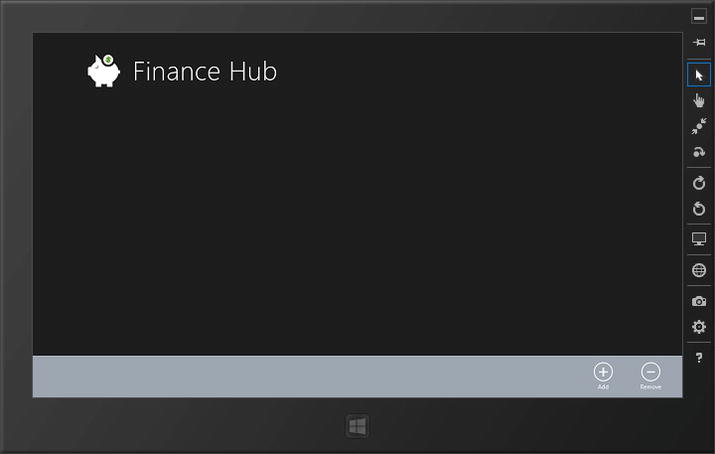
Figure 6-2. Finance Hub application with partial views implemented
Click on the Add and Remove buttons and you should see related flyouts displayed (with no content yet, though)!
Implementing Converters
We need to develop two WinJS.Binding.converter functions: one for showing the up and down arrow (using the up.png and down.png images added under the images folder) and second for showing current stock value as red or green font, based on value of the change as positive (final outcome would be up arrow and green font) or negative (final outcome would be down arrow and red font).
For this, add a new JavaScript file name Converters.js under the Common folder and add the following lines of code that define these two converters using WinJS.Binding.converter and exposed them in the FinanceHub.Converters namespace:
 (function () {
    "use strict";

    WinJS.Namespace.define("FinanceHub.Converters", {
        ChangeArrowConverter: WinJS.Binding.converter(function (value) {
            return value >= 0 ? "..\images\up.png" : "..\images\down.png";
        }),

        ChangeColorConverter: WinJS.Binding.converter(function (value) {
            return value >= 0 ? "#108104" : "#C02C01";
        })
    });
})();
Create FinanceHub Application Branding
You may decide to apply your unique and custom application that is different from the default Windows library for styles, which you can achieve by overriding the Windows Library for styles. In our case we need to apply background color and page title color of our choice. For that add new Style Sheet named styles.css under css folder and add the following code:
body
{
  background-color:#B3BDE1;
}

.pagetitle
{
 color:#585A8E;
}
Now open default.html and add reference to the newly added style sheet styles.css just under the existing default.css reference, as following:
<link href="/css/styles.css" rel="stylesheet" />
Now run the application and you will see that background color and title text foreground color is applied as defined in the custom style sheet, which you can see in Figure 6-3.
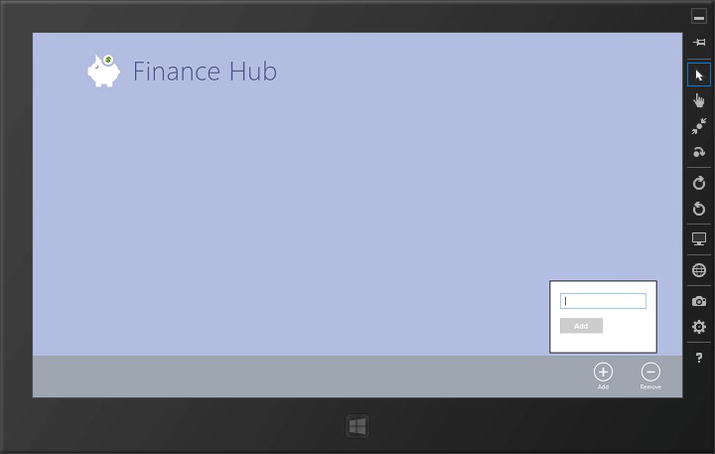
Figure 6-3. Finance Hub application with custom styles
Implementing the Model
We successfully implemented the foundation of the View building key user interface of the application in the previous section. Now it’s time to implement the model of the application. While we implemented the Model for the XAML-based project in Chapter 3, you noticed that the implementation is pretty straightforward. It includes definition of the stock information (as a class) and also defining a local data source that would help to provide simulated price of the added stocks to your application in random manners.
Define Stock Class
The stocks data model requires a data model that at minimum implements a class supporting the properties to support the following six information pieces about the stock:
- Stock symbol (e.g. MSFT)
- Stock current price (e.g. 30.30)
- Stock open price (e.g. 30.05)
- Today’s change in the stock prices - positive or negative value (e.g. +0.25)
- Range - Today’s High and Low Price (e.g. 30.33 - 30.05)
- Range - 52 weeks High and Low Price (e.g. 32.95 - 24.26)
To incorporate the above mentioned information, create the Stock class object containing the properties—Symbol, PercentChange, OpenPrice, ClosePrice, Change, and DaysRange.
In JavaScript world, we will define single model class Stock following the JavaScript Module pattern. Hence the class definition format would typically look like as shown below:
(function () {
    "use strict";

    WinJS.Namespace.define("NameSpaceGoesHere ", {
        ClassName : WinJS.Class.define(
            function () {
            var self = this;
            //members initialization
            }
            //private members, methods and properties
    )}
    )
})();
To follow that, first go and select the Model folder and add a new JavaScript file with the name Stock.js. Open the blank Stock.js file and add the following code to define a stock class with the above mentioned properties:
(function () {
    "use strict";

    WinJS.Namespace.define("FinanceHub.Model", {
        Stock: WinJS.Class.define(
            function (symbol, currentPrice, openPrice, change, daysRange, range52Week) {

                this.Symbol = symbol;
                this.OpenPrice = openPrice;
                this.CurrentPrice = currentPrice;
                this.Change = change;
                this.DaysRange = daysRange;
                this.Range52Week = range52Week;
            }
            , {

                Symbol: undefined,
                OpenPrice: undefined,
                CurrentPrice: undefined,
                Change: undefined,
                DaysRange: undefined,
                Range52Week: undefined
            }),
    });
})();
Note that here we have defined Stock model class in FinanceHub.Model namespace.
Add SimulatedRandomStocksDetail.csv File
If you want to convert this application in a commercial Windows Store application, you would like to have live updates of the stocks (that are added in the watch list). For that you can potentially use one of stock update services (APIs) provided by the service providers, such as Microsoft Bing, Yahoo, or Google. For the simplicity and focusing on the core subject—implementing MVVM pattern for Windows 8 application—we will not perform integration with such services for the “live update.” However, we will simulate the “live update” scenario by adding a few values of stock details in a comma-separated file stored as part of the project and randomly picking values from this file for each added stock in the watch list.
As we did in Chapter 3, create an empty text file with the name SimulatedRandomStocksDetail.csv under the Model folder. Now you need to add multiple comma-separated rows, with each row containing comma-separated values for the following fields in the following mention order (first mentioned comes first, and last comes last):
- Stock current price (e.g. 30.30)
- Stock open price (e.g. 30.05)
- Today’s change in the stock prices - positive or negative value (e.g. +0.25)
- Range - Today’s High and Low Price (e.g. 30.33 - 30.05)
- Range - 52 weeks High and Low Price (e.g. 32.95 - 24.26)
As a sample, I have added the following values in the files:
15.02,14.99,0.04,14.85 - 15.07,12.45 - 16.79
675,672.87,4.27,671.70 - 677.25,480.60 - 677.25
21.07,21.05,-0.05,20.94 - 21.10,14.02 - 21.19
30.30,30.05,0.25,30.33 - 30.05,32.95 - 24.26
640,636.34,11.77,638.81 - 648.19,354.24 - 648.19
With this we have completed the lightweight model classes’ implementation for our FinanceHub application. As you have noticed, we did all back-end coding in this section, so there is no visual outcome compared to what we implemented as part of the View implementation. However, it’s a best practice to rebuild the solution (by pressing F6) and make sure you are not getting any errors!
Implementing the ViewModel
So far we have successfully implemented the foundation of the View by building key user interface of the application and the Model by implementing data model and simulated data source definition in the previous sections. Now it’s time to implement the ViewModel of the application.
As part of the ViewModel implementation, we will implement key ViewModel classes that would support binding of stocks-related information to the defined views as well as supporting add and remove stock actions (using KnockoutJS framework). During this implementation we will revisit the existing Views and update them to apply data biding.
In addition, we will also develop helper classes to implement local storage supporting CRUD operations on the stored stocks in the CSV format.
Define StocksPageViewModel Class and Bind to the Views
The StocksPageViewModel class is a key class and would mainly bind all stocks-related views—StocksPage view and StockDetails view—to display the stocks and related information.
Adding StocksPageViewModel Class
Select the ViewModel folder and add a new JavaScript file with the name StocksPageViewModel.js. To start, first open the blank StocksPageViewModel.js file and add the following code that will define a bindable List named Stocks. Later on, we will populate it with the objects of the Stock model that we already defined earlier in Model folder:
(function () {
    "use strict";

    WinJS.Namespace.define("FinanceHub.ViewModel", {
        StocksPageViewModel: WinJS.Class.define(
            function () {
                var self = this;
                self.stocks = new WinJS.Binding.List();
                self.stocks.push(new FinanceHub.Model.Stock
                    ("MSFT", 25, 24, 2, "24.59 - 25.92", "23.22 - 25.76"));

                //Expose the data source
                WinJS.Namespace.define("FinanceHub.Data", {
                    Stocks: self.stocks
                });
            }
            , {
                stocks: undefined,
            }),
    });
})();
As you see, the WinJS.Binding.List of stocks is defined and is exposed in namespace FinanceHub.Data so that you can bind with StocksPage.html’s ListView control. Note that I have also added a sample stock MSFT so that we can see a single tile once we are done binding to the view.
Now we need to bind the earlier defined StocksPage and StockDetails views so that we can see the sample MSFT stock.
For that, first you need to open all their HTML files, default.html, StocksPage.html, and StockDetails.html, and add the following added JavaScript files references under the head tag.
<!--Reference to model and view model js files -->
<script src="/Common/Converters.js"></script>
<script src="/Model/Stock.js"></script>
<script src="/ViewModel/StocksPageViewModel.js"></script>
Please note that here the above order of adding JavaScript file as a reference is important because StocksPageViewModel.js is referring the Stock class defined in Stock.js, so it should be referenced before you reference to the ViewModel.
Binding StocksPage View
Open the StocksPage.html from the View folder and apply binding for the existing itemtemplate, as highlighted in bold below:
<div class="itemtemplate" data-win-control="WinJS.Binding.Template">
   <div >
       <h2
data-win-bind="textContent:Symbol" style="color:#4E6485"></h2>
       <div class="itemtext">Open</div>
       <div style="margin-left:85px;font-size:15pt;color:#6a7bba"
            data-win-bind="innerText:OpenPrice" ></div>
       <div class="itemtext" >Change</div>
       <div style="margin-left:85px;font-size:15pt;"
             data-win-bind=
                 "style.color:Change FinanceHub.Converters.ChangeColorConverter" >
       <div
data-win-bind="innerText:Change" ></div></div>
       <div style="float: left;margin-left:15px;margin-top:15px">
       <img
data-win-bind="src:Change FinanceHub.Converters.ChangeArrowConverter"
           style="height:25px" /></div>
       <div style="margin-left:85px;margin-top:10px;font-size:20pt;color:#759CC8"
           data-win-bind="innerText:CurrentPrice" ></div>
   </div>
</div>
You will notice that we are using data-win-bind attribute/property of the WinJS control to bind the element with the defined data source in the ViewModel. Note that we have also used two previously developed converter functions in binding elements.
Next look for the section tag and apply binding for the itemDataSource property of the WinJS.UI.ListView control, as following (in bold):
<div class="itemslist"
        data-win-control="WinJS.UI.ListView"
        data-win-options=
            "{ selectionMode: 'none'
, itemDataSource: FinanceHub.Data.Stocks.dataSource }">
</div>
Updating default.js File
Next open the default.js file available under the js folder, and in the activated event handler, look for the following comment text:
// TODO: This application has been newly launched. Initialize
// your application here.
Add the following lines of code:
var vm = new FinanceHub.ViewModel.StocksPageViewModel();
var pageVM = WinJS.Binding.as(vm);
WinJS.Binding.processAll(document.body, pageVM);
In the above code, the first line initializes the new instance of the StocksPageViewModel class. The second line creates an observable object named pageVM from the existing JavaScript object vm. This new object also has all the properties of the original object vm. In addition to that, the properties of the observable pageVM object triggers notification when the properties are changed. In the third line the WinJS.Binding.processAll() method is called to perform the actual binding. The first parameter passed to the processAll() method represents the root element for the binding. So binding will happen on this element and its child elements. If a null value is provided, then the binding happens on the entire body of the document, i.e., document.body. The second parameter represents the data context. This is the object that has the properties, which are displayed with the data-win-bind attributes.
Now run the application, and you should get a default MSFT stock on the home page with the related stock information, as shown in Figure 6-4, but no navigation to the StockDetails view when you click on that.
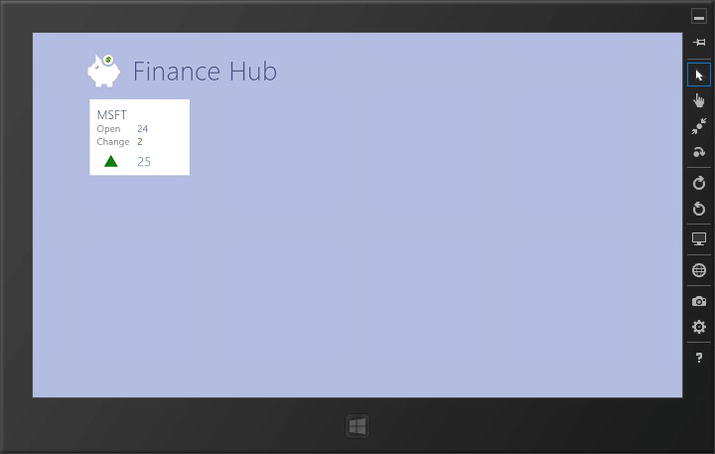
Figure 6-4. Binding Stock Information to the StocksPage View
Wiring Up Navigation – StocksPage View to StockDetails View
Now wire up navigation to the StockDetails.html page from the StocksPage.html, when you click/select one of the stocks from the home page. For this, open the StocksPageViewModel.js from the ViewModel, and add following highlighted code:
 (function () {
    "use strict";

    WinJS.Namespace.define("FinanceHub.ViewModel", {
        StocksPageViewModel: WinJS.Class.define(
            function () {
                var self = this;
                self.stocks = new WinJS.Binding.List();
                self.stocks.push(new FinanceHub.Model.Stock
                    ("MSFT", 25, 24, 2, "24.59 - 25.92", "23.22 - 25.76"));
                WinJS.Utilities.markSupportedForProcessing(this.stockClicked);
WinJS.Utilities.markSupportedForProcessing(this.stockSelectionChanged);

                //Expose the data source
                WinJS.Namespace.define("FinanceHub.Data", {
                    Stocks: self.stocks

                });

                //Expose the events and methods
                WinJS.Namespace.define("FinanceHub.Command", {
                    StockClicked: self.stockClicked,
                    StockSelectionChanged: self.stockSelectionChanged,
                });
            }
            , {
                stocks: undefined,
                stockClicked: function (e) {
WinJS.Navigation.navigate("/View/StockDetails.html").then(function () {

                        FinanceHub.Command.StockSelectionChanged(e);

                    });
                },

                stockSelectionChanged: function (e) {
                    var ele = document.getElementById('stockInfoView'),
                    WinJS.Binding.processAll(ele,
                        FinanceHub.Data.Stocks.getAt(e.detail.itemIndex));
                },
            }),
    });
})();
Here, we have used the WinJS.Navigation.navigate method to navigate to the StockDetails.html page. We used the promise object and called the StockSelectionChanged function residing in the FinanceHub.Command namespace. The StockSelectionChanged function is set to the currently clicked stock (e.detail.itemIndex) as data context of the stockInfoView element in StockDetails page. So whenever user clicks any stock on StocksPage, the stockClicked event will fire, it will navigate to the stock details page, and stockSelectionChanged event will set the clicked stock information. The important piece of this code is WinJS.Utilities.markSupportedForProcessing, which actually marks a function as being compatible with declarative processing. Declarative processing is performed by WinJS.Binding.processAll.
Next you need to bind the StockClicked event to the StocksPage.html file. For that, open the StocksPage.html page, locate the section tag, and modify the data-win-options attribute for WinJS.UI.ListView, as following (highlighted text), to add binding for oniteminvoked event.
<section aria-label="Main content" role="main">
    <div class="itemslist"
            data-win-control="WinJS.UI.ListView"
            data-win-options="{ selectionMode: 'none',
                                              itemDataSource:
FinanceHub.Data.Stocks.dataSource,

oniteminvoked:FinanceHub.Command.StockClicked }">
    </div>
</section>
Binding StockDetails View
At this point, the clicking to the MSFT stock from the StocksPage should work but still no details will display on the StockDetails page. To bind the StockDetails view, we need to apply binding in the StockDetails.html page. Open the StockDetails.html page and follow the below steps:
Modify the itemtemplate, as highlighted below, to add binding:
<div class="itemtemplate" data-win-control="WinJS.Binding.Template">
     <div>
           <h2
data-win-bind="textContent:Symbol" style="color:#4E6485"></h2>
           <div style="font-size:15pt;float: left; color:#808080">Open</div>
           <div style="margin-left:85px;font-size:15pt;color:#6a7bba"
               data-win-bind="innerText:OpenPrice" ></div>
           <div style="font-size:15pt;float: left; color:#808080">Change</div>
           <div style="margin-left:85px;font-size:15pt;"
              data-win-bind=
                  "style.color:Change FinanceHub.Converters.ChangeColorConverter" >
              <div
data-win-bind="innerText:Change" ></div>
           </div>
    </div>
</div>
Modify the binding for the WinJS.UI.ListView control itemlistview, as following:
<div class="itemlistsection">
    <div class="itemlist" id="itemlistView"
             data-win-control="WinJS.UI.ListView"
             data-win-options="{ selectionMode: 'single', tapBehavior: 'toggleSelect',
                 itemDataSource: FinanceHub.Data.Stocks.dataSource,
                 oniteminvoked:FinanceHub.Command.StockSelectionChanged }">
    </div>
</div>
Modify the detailsection div tag, as highlighted below, to add the stock information binding:
<div class="detailsection" id="stockInfoView" aria-atomic="true" aria-live="assertive">
    <h2 class="headerStyle" >Stock Details</h2>
    <div class="captionStyle">Current Price</div>
    <div class="detailStyle"data-win-bind="innerText:CurrentPrice" ></div>
    <div class="captionStyle">Open Price</div>
    <div class="detailStyle"data-win-bind="innerText:OpenPrice" ></div>
    <div class="captionStyle">Today High and Low Range</div>
    <div class="detailStyle"data-win-bind="innerText:DaysRange" ></div>
    <div class="captionStyle">52 Weeks High and Low Range</div>
    <div class="detailStyle"
data-win-bind="innerText:Range52Week" ></div>
</div>
Now run the application, and you should get a default MSFT stock on the home page with the related stock information. This time, if you click/select the stock, you will get to the StockDetails page with the MSFT (selected) stock information, as shown Figure 6-5.
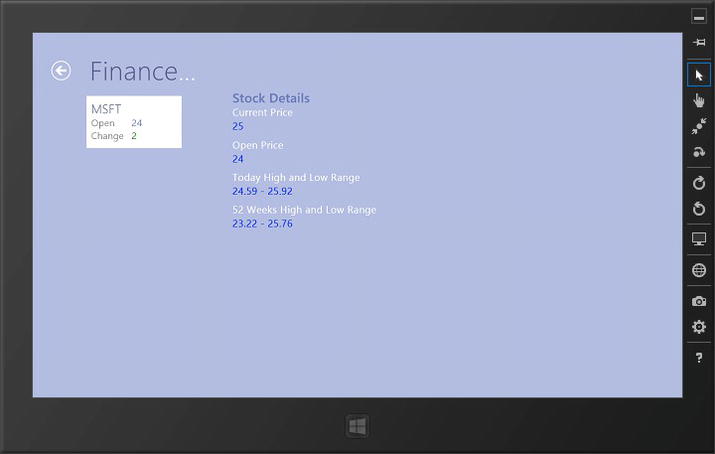
Figure 6-5. Binding Stock Information with the StocksDetails View
Implementing Local Storage Helper Class
So far we have made pretty good progress. The application is functioning as desired, but with only the default MSFT stock. Now let’s implement the foundation of the feature so that you can add additional stocks and can retrieve the stock values from the simulated sample CSV file containing random stock information.
This section will implement a local storage helper class within the Common folder, which would allow us to read and parse the CSV—SimulatedRandomStocksDetail.csv—available under the Model folder.
To create this class, select the Common folder, add a JavaScript file as a new item with the name LocalStorageHelper.js, and add the following code, creating the class under FinanceHub.LocalStorageHelper namespace.
(function () {
    "use strict";

    WinJS.Namespace.define("FinanceHub.LocalStorageHelper", {

        ParseCSV: function (data) {
            var allTextLines = data.split(/
|
/);
            var rows = [];

            for (var i = 0; i < allTextLines.length; i++) {
                var data = allTextLines[i].split(','),
                var temp = [];
                for (var j = 0; j < data.length; j++) {
                    temp.push(data[j]);
                }
                rows.push(temp);
            }
            return rows;
        },
    });
})();
Here we have created a function ParseCSV, which will accept the string as an argument and then will split the data and return a resultant array of string.
Next add an additional GetRandomStockData function right below the ParseCSV function that would read the SimulatedRandomStocksDetail.csv file available under the Model folder and call the ParseCSV function to parse each record of the file. The following is the related code:
GetRandomStockData: function () {
    var url = "/Model/SimulatedRandomStocksDetail.csv";
        return WinJS.xhr({ url: url }).then(function (response) {
    return FinanceHub.LocalStorageHelper.ParseCSV(response.responseText);
    });
},
Here we have used WinJS.xhr function to get the file. This function wraps call to XMLHttpRequest in a promise object. This function can be used to call web service, uploading and downloading files.
![]() Note You can get more information on the WinJS.xhr function by visiting Microsoft MSDN site at http://msdn.microsoft.com/en-us/library/windows/apps/br229787.aspx.
Note You can get more information on the WinJS.xhr function by visiting Microsoft MSDN site at http://msdn.microsoft.com/en-us/library/windows/apps/br229787.aspx.
The final step is to add a reference to this JavaScript file to your project. For that, open the default.html file and use the script tag to add a reference to the LocalStorageHelper.js file, available under the Common folder, under the Reference to model and view model js files section.
<script src="/Common/LocalStorageHelper.js"></script>
Define AddandRemoveStockViewModel Class and Bind to the Views
After adding a local storage helper class, now build a ViewModel for the Add and Remove flyouts, which would enable us to add and remove stocks. As mentioned in Chapter 5, we will be using the KnockoutJS framework to implement this ViewModel. Let’s get started.
Setting up Project to Use KnockoutJS Library
Get the latest KnockoutJS library by visiting a documentation section of the KnockoutJS website at http://knockoutjs.com/documentation/installation.html and download the latest JavaScript library file to your local folder. At the time of the writing of this chapter, the latest library version is 2.0.0, and the file name is knockout-2.0.0.js.
Now visit the js folder of the FinanceHub project, and add the downloaded KnockoutJS JavaScript library file by using the Add Existing Item option and browsing to the local folder where you have downloaded the file.
The final step is to add a reference to this JavaScript file to your project. For that, open the default.html file and use the script tag to add a reference to the knockout-2.0.0.js file, available under the js folder, under the Reference to model and view model js files section.
<script src="/js/knockout-2.0.0.js"></script>
Adding AddRemoveStockViewModel Class
Select the ViewModel folder and add a new JavaScript file with the name AddRemoveStockViewModel.js. Next we will be adding two functions to this class, which would help us to add stocks and remove stocks; That is where we will be using the KnockoutJS JavaScript library.
Now open the default.html file and use the script tag to add a reference to the AddRemoveStockViewModel.js file, available under the ViewModel folder, under the Reference to model and view model js files section.
<script src="/ViewModel/AddRemoveStockViewModel.js"></script>
Adding Add Stock Function to the ViewModel
Open the blank AddRemoveStockViewModel.js file and add the following code that defines add stock functionality:
 (function () {
    "use strict";

    WinJS.Namespace.define("FinanceHub.ViewModel", {
        AddRemoveStockViewModel: WinJS.Class.define(
            function () {

                var self = this;
                self.symbol = ko.observable();
                self.randomStockData = [];

                //Function for Adding new stock
                self.addStock = function () {
                    if (self.symbol() != undefined) {

                        //check for duplicate
                        for (var i = 0; i < FinanceHub.Data.Stocks.length; i++) {
                            if (FinanceHub.Data.Stocks.getAt(i).Symbol.toUpperCase() ==
                                self.symbol().toUpperCase())
                                return;
                        }

                        FinanceHub.Data.Stocks.push
                           (self.getNewStock(self.symbol().toUpperCase()));
                        self.stocksVM.push(new StockViewModel(self.symbol().toUpperCase()));
                        self.symbol("");
                    }
                }

                self.getNewStock = function (symbol) {
                    var num = Math.floor((Math.random() * 3) + 1);
                    var newStock = self.randomStockData[num];
                    newStock.Symbol = symbol;
                    return newStock;
                }

                //Parse SimulatedRandomStocksDetail.csv for sample data
                FinanceHub.LocalStorageHelper.
                    GetRandomStockData().then(function (csvData) {
                    csvData.forEach(showIteration);

                    function showIteration(value, index, array) {
                        self.randomStockData.push(new FinanceHub.Model.Stock
                            ("", value[0], value[1], value[2], value[3], value[4]));
                    }
                });
            })
    })
})();
The above code basically defines addStock function. The function first checks for the duplicate and then assigns stock attributes values randomly, which are retrieved and parsed from the SimulatedRandomStocksDetail.csv file, where we use the GetRandomStockData function defined in the LocalStorageHelper class.
The most important part in the above code is the use of self.symbol = ko.observable(); statement. It defines the knockoutJS observable object. Observables are the special JavaScript objects that can notify subscribers about changes and can automatically update UI; in our case, as soon as you add the stock, it will be updated in the view automatically.
Next select and open the default.html file, locate the addStockFlyout div , and apply binding as highlighted following:
<div id="addStockFlyout" data-win-control="WinJS.UI.Flyout" >
        <div id="addStockFlyoutMessage"></div>
        <input id="addStockText"data-bind="value: symbol"
                   placeholder="Enter a symbol (e.g., MSFT)" />
        <br /><br />
        <button id="addStockButton"
                     data-bind="click:addStock" style="color:#fff">Add</button>
        <br /><br />
</div>
Notice that similarly to WinJS’s data-win-bind, KnockoutJS library also uses the data-bind attribute to define the binding. Here we bound the value and button click property of the respective control to the properties symbol and addStock that we created in the ViewModel earlier.
The final step is to instantiate the ViewModel in default.js. For this, open the default.js file available under the js folder, locate the activated event handler, and modify the code, as highlighted below:
WinJS.Binding.processAll(document.body, pageVM)
.then(function () {
    // Activates knockout.js
    ko.applyBindings(new FinanceHub.ViewModel.AddRemoveStockViewModel());
});
Here the ko.applyBindings method activates knockoutJS and process bindings.
If you run the application at this point, then you should get a default MSFT stock on the home page with the related stock information. Right click or swipe your figure at the bottom of the screen to get the Windows app bar. Click on the Plus Sign (Add) button and add stocks of your choice, using the Add Stock flyout.
You will notice that as soon as you enter a stock symbol and click on the add button, the stock will be added and the values will be assigned from the CSV file and will be displayed on the StocksPage view. Figure 6-6 shows the same, with two stocks added to the home page.
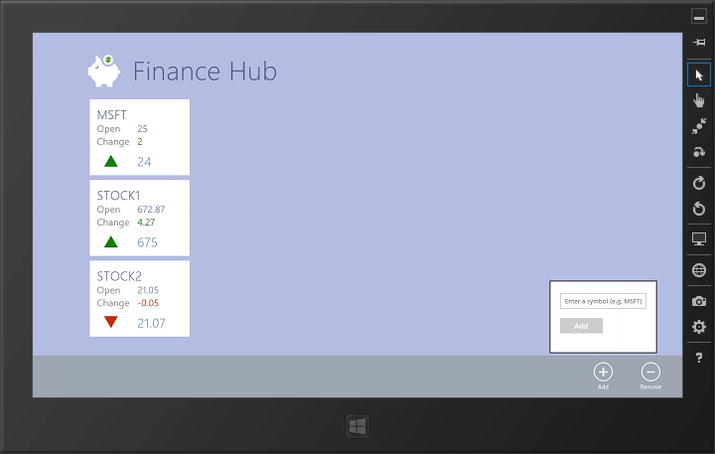
Figure 6-6. Demonstrating Add Stock Functionality
Figure 6-7 shows StockDetails view with the added stocks and displays the Stock1 information.
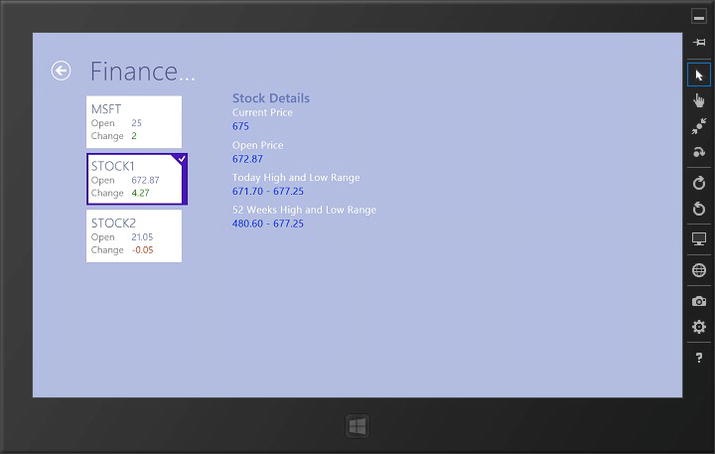
Figure 6-7. StockDetails View With Additional Added Stocks
Adding Remove Stock Function to the ViewModel
Open the AddRemoveStockViewModel.js file, locate self.symbol = ko.observable(); statement, and add the following statement just after that to define an observableArray.
self.stocksVM = ko.observableArray();
Now add the following highlighted code just after the FinanceHub.LocalStorageHelper.GetRandomStockData() call in the AddRemoveStockViewModel file.
WinJS.Namespace.define("FinanceHub.ViewModel", {
    AddRemoveStockViewModel: WinJS.Class.define(
        function () {

            var self = this;
            self.symbol = ko.observable();
            self.stocksVM = ko.observableArray();
            self.randomStockData = [];

            //Function for Adding new stock
            self.addStock = function () {
                if (self.symbol() != undefined) {

                    //check for duplicate
                    for (var i = 0; i < FinanceHub.Data.Stocks.length; i++) {
                        if (FinanceHub.Data.Stocks.getAt(i).Symbol.toUpperCase() ==
                            self.symbol().toUpperCase())
                            return;
                        }

                    FinanceHub.Data.Stocks.push(self.getNewStock(self.symbol().toUpperCase()));
                    self.stocksVM.push(new StockViewModel(self.symbol().toUpperCase()));
                    self.symbol("");
                }
            }

            self.getNewStock = function (symbol) {
                var num = Math.floor((Math.random() * 3) + 1);
                var newStock = self.randomStockData[num];
                newStock.Symbol = symbol;
                return newStock;
            }

            //Parse SimulatedRandomStocksDetail.csv for sample data
            FinanceHub.LocalStorageHelper.GetRandomStockData().then(function (csvData) {
                csvData.forEach(showIteration);

                function showIteration(value, index, array) {
                    self.randomStockData.push(new FinanceHub.Model.Stock
                        ("", value[0], value[1], value[2], value[3], value[4]));
                }
            });

            FinanceHub.Data.Stocks.forEach(showIteration);
            function showIteration(value, index, array) {

                self.stocksVM.push(new StockViewModel(value.Symbol));

            }

            //Function for removing the stock
            self.removeStock = function () {

                for (var i = this.stocksVM().length - 1; i >= 0; i--) {
                    if (self.stocksVM()[i].isSelected() == true) {
                        FinanceHub.Data.Stocks.splice(i, 1);
                        self.stocksVM.remove(self.stocksVM()[i]);
                    };

document.getElementById("removeStockFlyout").winControl.hide();
                }
            };

            function StockViewModel(data) {

                this.stock = ko.observable(data);
                this.isSelected = ko.observable(false);
            };
        })
})
Here, the forEach loop on FinanceHub.Data.Stocks is to populate the stocksVM array that is a type of StockViewModel. The StockViewModel is having isSelected property, which will tell us about the stock symbols selected by the user in Remove stock flyout.
The removeStock method removes the selected stocks from FinanceHub.Data.Stocks as well as self.stocksVM. Note that we are removing stock based on the retrieved index of the item and using the splice method. This is because, as of now, there is no method such as removeAt in WinJS.Binding.List available that enables removing item by an index.
Next select and open the default.html file, locate the removeStockFlyout div, and apply binding as highlighted following:
<div id="removeStockFlyout" data-win-control="WinJS.UI.Flyout"
        data-win-options="{width:'wide'}" >
        <table>
            <tbodydata-bind="foreach: stocksVM" >
                <tr>
                    <td >
                        <input type="checkbox"data-
bind="checked:isSelected" />
                         <spandata-bind="text: stock" ></span>
                    </td>
                </tr>
            </tbody>
        </table>
        <button id="Button1"
data-bind="click:removeStock" style="color:#fff">
                     Remove Selected</button>
        <br /><br />
</div>
Here we bound the required control properties and button click property to populate the existing stocks and enable remove stock functionality.
If you run the application at this point, then you should get a default MSFT stock (notice that the stocks you have entered are not saved yet!) on the home page with the related stock information. Right click or swipe your figure at the bottom of the screen to get the Windows app bar. Click on the Plus Sign (Add) button and add couple of stocks of your choice, using the Add Stock flyout.
Next, click on the Minus Sign (Remove) button on the app bar. This time you should see a list of stocks that exists as part of your application; you can select one or more by clicking the checkbox and then click Remove button to delete them. Figure 6-8 demonstrates the same.
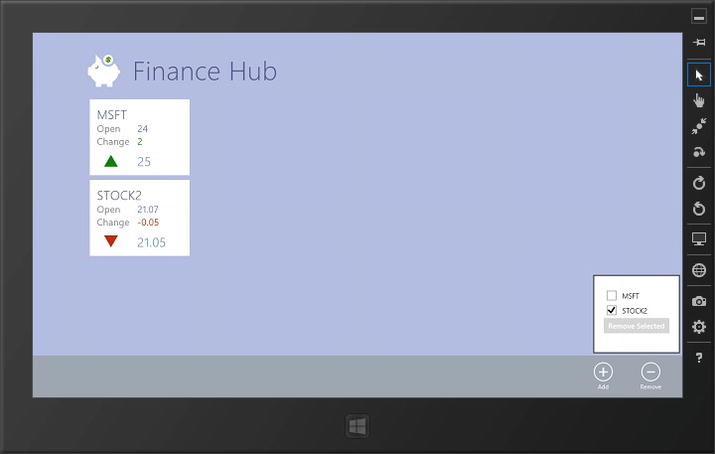
Figure 6-8. Demonstrating Remove Stock Functionality
Please note that Add and Remove stocks functionality will be functional on both views – StocksPage and StockDetails views.
Implementing the State Persistence
So far, you can add and remove the stocks at run time while you are running the application. As soon as you come out of the application and rerun it, the added stocks information is not saved, and you will go back to the default application state with MSFT stock available as a default stock.
As a part of state persistence, we will persist the stock details to CSV file in the application local storage. For this we will use WinJS.Application.local object to store and retrieve the file. We will develop two additional functions, SaveStocks and LoadStocks function, in the existing JavaScript LocalStorageHelper class to implement such functionality.
The SaveStocks Function
The SaveStocks function will convert the Stock list into CSV string and then uses the WinJS.Application.local.WriteText function to write file to the application local storage saved with the name StocksFile.csv file.
The following is a complete code of this function, which you need to add just after the GetRandomStockData function exists in the LocalStorageHelper.js file, which is available under the Common folder.
stockFile: "StocksFile.csv",
csvString: "",
SaveStocks: function () {
    var app = WinJS.Application;
    FinanceHub.Data.Stocks.forEach(showIteration);
    function showIteration(value, index, array) {
        var temp = [];
        temp.push(value.Symbol);
        temp.push(value.OpenPrice);
        temp.push(value.CurrentPrice);
        temp.push(value.Change);
        temp.push(value.DaysRange);
        temp.push(value.Range52Week);
        FinanceHub.LocalStorageHelper.csvString =
            FinanceHub.LocalStorageHelper.csvString.concat(temp.join(), "
");
    }

    app.local.writeText(FinanceHub.LocalStorageHelper.stockFile,
        FinanceHub.LocalStorageHelper.csvString);
},
The LoadStocks Function
The LoadStocks function will read the StocksFile.csv created by SaveStocks function.
The following is a complete code of this function, which you need to add just after the SaveStocks function exists in the LocalStorageHelper.js file, which is available under the Common folder.
LoadStocks: function () {
    var app = WinJS.Application;

    return app.local.exists(FinanceHub.LocalStorageHelper.stockFile).then(function (exists)
   {
        if (exists)
            return app.local.readText(FinanceHub.LocalStorageHelper.stockFile).then(function (data)
           {
                return FinanceHub.LocalStorageHelper.ParseCSV(data);
            });
        else return null;
    });
},
Check State Persistence
You will save the added/removed stocks when application is suspended or shut down by placing the following code within the app.oncheckpoint event handler that exists in the default.js file, which is available under the js folder:
app.oncheckpoint = function (args) {
    // TODO: This application is about to be suspended. Save any state
    // that needs to persist across suspensions here. If you need to
    // complete an asynchronous operation before your application is
    // suspended, call args.setPromise().
    app.sessionState.history = nav.history;

    FinanceHub.LocalStorageHelper.SaveStocks();
};
![]() Note The Suspend and Shutdown option from the Debug Control menu appears only while you are running the project. For some reason, if you do not find this option while you are debugging the project, go to Tools/Customize option and select the Debug Location Toolbar item.
Note The Suspend and Shutdown option from the Debug Control menu appears only while you are running the project. For some reason, if you do not find this option while you are debugging the project, go to Tools/Customize option and select the Debug Location Toolbar item.
To restore the stocks back, we need to modify the function for WinJS.Binding.processAll in the default.js, as following highlighted code:
WinJS.Binding.processAll(document.body, pageVM).then(function () {

    //Load previous state
    FinanceHub.LocalStorageHelper.LoadStocks().then(function (csvData) {
        if (csvData != null && csvData.length > 0) {
            csvData.forEach(showIteration);
        }
        else {
            FinanceHub.Data.Stocks.push(FinanceHub.Command.GetNewStock("MSFT"));
        }

        function showIteration(value, index, array) {
            if (value != "") {
                FinanceHub.Data.Stocks.push(new FinanceHub.Model.Stock
                   (value[0], value[1], value[2], value[3], value[4], value[5]));
            }
        }
    }).then(function () {

        // Activates knockout.js
        ko.applyBindings(new FinanceHub.ViewModel.AddRemoveStockViewModel());
    });
});
![]() Note At this point, for the first time when you compile and run the project, you may get an error while application tries to first load previous state. This is potentially a defect with the current WinRT RC release. The solution I have found is first to comment out the code that you just wrote within the WinJS.Binding.processAll function to restore the stocks back in the default.js file; then line and run the project. At this time you should not get any error. Now, select the Suspend and Shutdown option from the Debug Control menu (which appears only while you are running the project), which will suspend and then shut down the application. Revisit the commented code and uncomment, and from this time onward, you should not be getting any error.
Note At this point, for the first time when you compile and run the project, you may get an error while application tries to first load previous state. This is potentially a defect with the current WinRT RC release. The solution I have found is first to comment out the code that you just wrote within the WinJS.Binding.processAll function to restore the stocks back in the default.js file; then line and run the project. At this time you should not get any error. Now, select the Suspend and Shutdown option from the Debug Control menu (which appears only while you are running the project), which will suspend and then shut down the application. Revisit the commented code and uncomment, and from this time onward, you should not be getting any error.
Congratulations! You have finished the development of Windows8 FinanceHub application using the JavaScript and HTML5 and following the MVVM design pattern! Run the project (follow the above note if you are getting an error), and you should see all implemented functionalities working, including the added/removed stocks saved into the local storage. Then upon application startup, the stored stocks will be retrieved and will get assigned random values.
Summary
This is the final chapter of the book. In this chapter you created a navigation template-based Windows 8 JavaScript application project and set up the structure to support MVVM-based implementation. Later we developed the View, Model, and ViewModel of the FinanceHub application with all features that were also implemented using XAML and C# in the earlier chapters of this book.
This chapter demonstrates that Windows 8 application platform is versatile, supporting different development platforms, including JavaScript and HTML5, and can follow the best and recommended design patterns such as MVVM.
Do not forget to download the source code. Visit the Chapter 6 folder to look at the source code that we developed in this chapter. This chapter has a special source code structure. You will find the code for only View, ViewModel, and Model implementation and then for the complete project in related folders.
You have started an exciting journey of Windows 8 application development, and I hope this book successfully guides you along it. I wish you good luck.