Classes are the building block for object-oriented programming (OOP). In fact, programs created using OOP consist primarily of a network of interacting class instances (i.e., objects). The Objective-C language provides full support for OOP, including language features that enable design-time specification of classes and the runtime creation of class instances, along with multiple mechanisms to support object interaction.
This chapter focuses on Objective-C’s key elements and unique features for developing classes. It covers key areas such as Objective-C class structure, class design and implementation, and some additional language features that support class development and OOP. The chapter also includes plenty of examples (along with a program that you will develop) to reinforce your understanding of the concepts. Sounds like fun, right? OK, so let’s get started!
Developing Your First Class
Object-oriented programming is a style of computer programming that emphasizes the creation and use of software objects to write programs. A software object provides a representation of the characteristics or attributes of the thing/concept being modeled (its state) along with a definition of the things it can do (its methods). With Objective-C, you create the specification or blueprint for an object with a class interface and a corresponding implementation. In the interface, you specify the structure of the class (i.e., its properties and methods). In the implementation, you specify the variables that store the classes’ internal state, and implement its logic by defining its properties and methods. The Objective-C language also provides several additional features for developing classes, specifically protocols and categories, which you’ll learn about later in this chapter. For now, let’s start with the basics by adding a class to the Elements project.
From Xcode, select the Elements folder in the navigator area and then create a new file by selecting New ![]() File . . . from the Xcode File menu. The New File template will be displayed. Next, select Cocoa under OS X; this reveals templates for Objective-C class elements. Select the Objective-C class icon to create an Objective-C class with implementation and header files, and then click the Next button (as shown in Figure 2-1).
File . . . from the Xcode File menu. The New File template will be displayed. Next, select Cocoa under OS X; this reveals templates for Objective-C class elements. Select the Objective-C class icon to create an Objective-C class with implementation and header files, and then click the Next button (as shown in Figure 2-1).
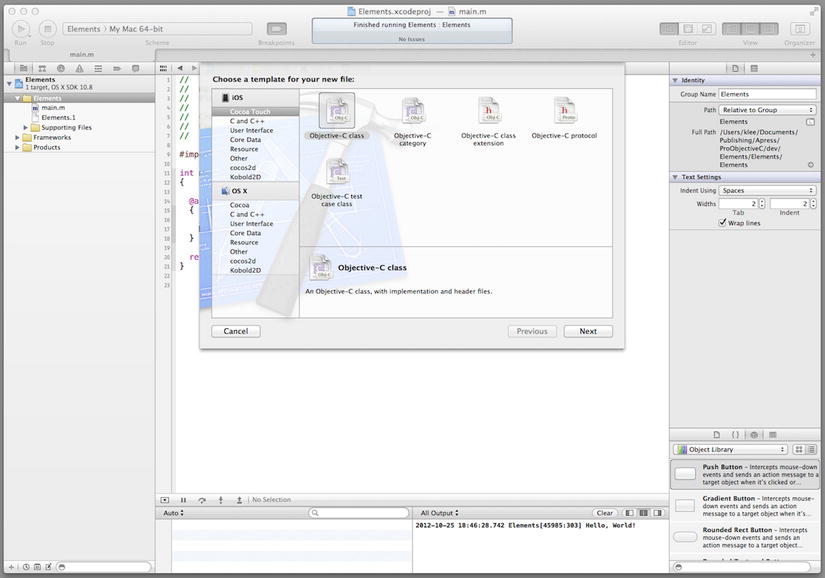
Figure 2-1. Creating an Objective-C class
A window for choosing the options for your class, specifically its name and the name of its subclass, is displayed. As shown in Figure 2-2, enter Atom for the class name, select NSObject (or type the name of the subclass in the list) from the subclass drop-down list, and then click Next.
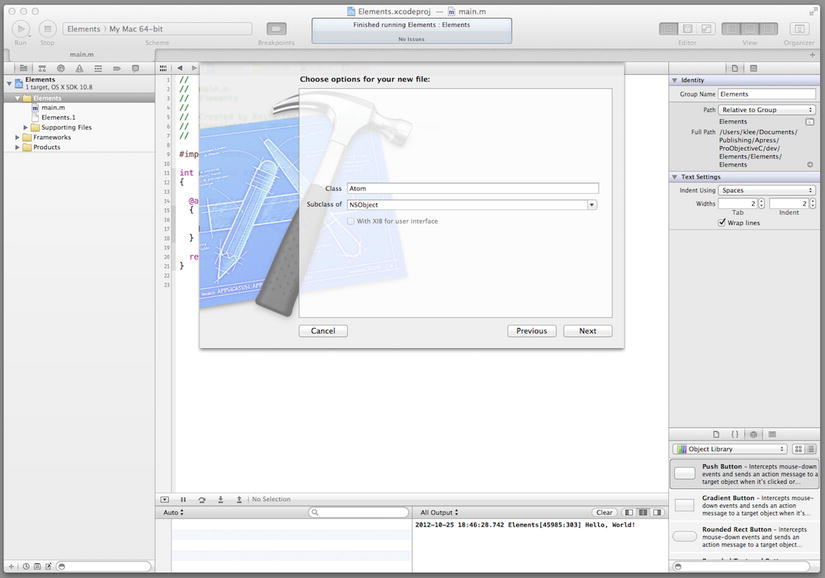
Figure 2-2. Specifying Atom class options
Next, you’ll be prompted to specify the project target for the class and where in your file system to save the class files. Leave the location as the Elements folder and the project target as the Elements project, and then click the Create button (see Figure 2-3).

Figure 2-3. Class files folder and project target
You have created a class using Xcode! In the Xcode project navigator pane, you will see that the Atom class is split into two files (Atom.h and Atom.m) that have been added to the project under the Elements folder. Next, you’ll develop the Atom class in these files.
Coding the Atom Class Interface
The interface for the Atom class is specified in the Atom.h header file, and the implementation in the Atom.m file. The names of these files reflect the Objective-C convention whereby header files are suffixed with .h and implementation files are suffixed with .m. Let’s examine the Atom.h interface file created by Xcode. In the project navigator pane, select Atom.h and view the Atom interface in the editor pane (see Listing 2-1).
Listing 2-1. Atom Class Base Interface
#import <Foundation/Foundation.h>

@interface Atom : NSObject
@end
The #import <Foundation/Foundation.h> line is an Objective-C preprocessor directive to include the header file for the Foundation Framework in this (the Atom) header file. The preprocessor is used to transform Objective-C code prior to compilation (you’ll learn more about the preprocessor in Chapter 5 of this book). The Foundation Framework provides a base layer of APIs that can be used for any type of Objective-C program (Part 3 of this book explores the Foundation Framework APIs in depth). The remainder of the header file declares the interface for the Atom class.
A class interface declaration begins with the @interface directive and the name of the class; it ends with the @end directive. The formal syntax for declaring a class interface is shown in Listing 2-2.
Listing 2-2. Class Interface Syntax
@interface ClassName : SuperclassName
// Property and method declarations
@end
So, you can see from Listing 2-1 that the Atom class has a superclass named NSObject. A superclass establishes a common interface and implementation, which specialized subclasses can inherit, modify, and supplement. Hence, the Atom class inherits the functionality of the NSObject class. NSObject is the root (i.e., base) class of most Foundation Framework class hierarchies and it provides a basic interface to the Objective-C runtime. Thus, the vast majority of the classes you implement here will descend from the NSObject class hierarchy. Now let’s declare the custom properties and methods for the Atom class (i.e., those that aren’t inherited from NSObject). In the editor pane, update the Atom.h file as shown in Listing 2-3 (the code updates are shown in bold).
Listing 2-3. Atom Interface
@interface Atom : NSObject
@property (readonly) NSUInteger protons;
@property (readonly) NSUInteger neutrons;
@property (readonly) NSUInteger electrons;
@property (readonly) NSString *chemicalElement;

- (NSUInteger) massNumber;
@end
This code adds several properties and an instance method to the class declaration. The property chemicalElement is of type NSString * (i.e., a pointer to a text string) and has a readonly attribute, meaning that you can retrieve its value but cannot set it. The properties protons , neutrons, and electrons are each of type NSUInteger (i.e., non-negative integer values) and are read-only. The instance method, named massNumber, returns a non-negative integer value. You’ll learn the specifics on declaring class properties and methods later in this chapter. In the meantime, let’s complete this example by coding the class implementation.
Coding the Atom Class Implementation
The implementation for the Atom class is provided in the Atom.m file. In the project navigator pane, select the Atom.m file and view the base Atom implementation in the editor pane, as shown in Listing 2-4.
Listing 2-4. Atom Class Base Implementation
#import "Atom.h"

@implementation Atom
@end
The import directive includes the contents of the Atom.h header file (i.e., its preprocessor directives, interface declarations, and other included header files). Now let’s define the custom properties and methods for the Atom class that were declared in the Atom interface. In the editor pane, update the Atom.m file as shown in Listing 2-5 (the code updates are displayed in bold).
Listing 2-5. Atom Class Implementation
@implementation Atom

- (id) init
{
  if ((self = [super init]))
  {
    _chemicalElement = @"None";
  }

  return self;
}

- (NSUInteger) massNumber
{
  return 0;
}

@end
All methods declared in a class interface must be defined in its class implementation. Hence, the Atom implementation in Listing 2-5 defines two methods: init() and atomicMass(). The massNumber() method is declared in the Atom interface, so the actual program logic for the method is defined here; it just returns the value 0 for the atomic mass number. The init() method is also defined here, but why? After all, this method isn’t declared in the Atom interface. Well, the init() method is declared in NSObject, which is a subclass (i.e., parent) of the Atom class. The NSObject init() method is used to initialize a new object immediately after memory has been allocated for it; hence if you have any custom initialization functionality to perform (set instance variables to known values, etc.), it should be performed here. In this implementation, the init() method initializes the instance variable backed by the chemicalElement property to the text string None.
Once you finish making the updates to the Atom class implementation, you should test your class. First, go back to the main() method and edit it as shown in Listing 2-6.
Listing 2-6. Atom Project main() Method
#import <Foundation/Foundation.h>
#import "Atom.h"

int main(int argc, const char * argv[])
{
  @autoreleasepool
  {
    Atom *atom = [[Atom alloc] init];
    NSLog(@"Atom chemical element name: %@", atom.chemicalElement);
  }

  return 0;
}
In the main() method, create an Atom object and then use the Foundation Framework NSLog function to display the object’s chemical element name to the output pane. Save all the files of the project by selecting Save from the Xcode File menu, and then compile and run the program by clicking the Run button in the toolbar. (You can also simply compile and run the program, and it will automatically save any changes to its files). The output pane (see Figure 2-4) displays the message “Atom chemical element name: None”.
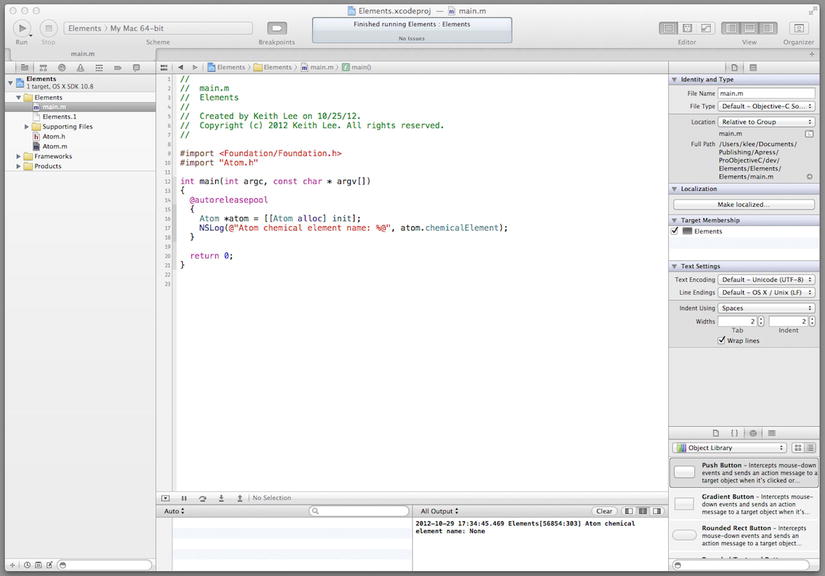
Figure 2-4. Testing the Atom class
Great. You have just implemented and tested your first Objective-C class. With this introduction, you are now ready to “look under the hood” to learn about classes in depth—so let’s begin!
Instance variables, sometimes referred to as ivars, are variables declared for a class that exist and hold their value throughout the life of a corresponding class instance (i.e., object). The memory used for instance variables is allocated when an object is first created, and freed when the object is deallocated. Instance variables have an implicit scope and namespace corresponding to the object. Objective-C provides features to control direct access to instance variables, as well as a convenient mechanism for getting/setting their values.
Access to an object’s instance variables is a function of its scope. Within an object, its instance variables can be accessed directly from any of its instance methods. Direct access to an object’s instance variables from an external class instance is a function of the variable’s scope. Objective-C provides several compiler directives used to explicitly specify the scope of (i.e., control access to) instance variables:
- @private: The instance variable is only accessible within the class that declares it and other instances of this class type.
- @protected: The instance variable is accessible within the class that declares it and the instance methods of any of its subclasses. This is the default scope if a protection level is not specified for an instance variable.
- @public: The instance variable is accessible from everywhere.
- @package: The instance variable is accessible from any other class instance or function, but outside the package, it is treated as private. This scope can be useful for libraries or framework classes.
Instance variables can be declared in a class interface or implementation; however, declaring them in the public interface of a class would violate one of the key tenets of OOP—encapsulation. Therefore, the recommended practice is to declare instance variables in the class implementation; specifically, within a statement block placed immediately after the class @implementation directive. The declaration syntax is shown in Listing 2-7.
Listing 2-7. Instance Variable Declaration Syntax
@implementation ClassName
{
  // Instance variable declarations
}
...
@end
If the access control compiler directives are used, the syntax for declaring each instance variable within the statement block is updated as shown in Listing 2-8.
Listing 2-8. Instance Variable Declaration with Access Control Directives
{
  protection_directive ivar_declaration_list
  protection_directive ivar_declaration_list
  ...
}
An example class that declares instance variables with access control compiler directives is shown in Listing 2-9.
Listing 2-9. Example Class with Instance Variable Declarations
@implementation MyTestClass
{
  @protected
    int myInt1;
    int myInt2;
  @private
    float myFloat;
  @package
    double myDouble;
}
...
@end
This class declares two protected variables named myInt1 and myInt2; a private variable named myFloat; and a package-protected variable named myDouble.
Instance variables are directly bound to and exist within the context of the corresponding object. As a consequence, an object’s instance methods can directly access its instance variables. For example, if the class MyTestClass shown in Listing 2-9 defines an instance method myTestMethod, the method can directly access the instance variable myInt1 (see Listing 2-10).
Listing 2-10. Instance Variable Access Declarations
-(void) myTestMethod
{
  myInt1 = 1;
  ...
}
Although instance variables provide convenient, direct access to an object’s state, they expose the internals of a class—and this violates the OOP principle of encapsulation. Therefore, instance variables should only be declared when necessary, and the declaration should be in the class implementation, not the public interface. The preferred approach for publicly exposing the internal state of an object is through declared properties. Let’s look at those next.
In many programming languages, methods that access an object’s internal state—often referred to as getter/setter methods—must be manually coded. Objective-C provides declared properties to both automate and simplify this task. A property differs from an instance variable in that it doesn’t directly access an object’s internal state, but rather provides a convenient mechanism (i.e., getter/setter methods) for accessing this data, and thus may include other logic. Objective-C declared properties enable the compiler to generate these methods automatically according to your provided specification. This reduces the amount of code you have to write and maintain, and increases program consistency and reliability.
A property is declared using the @property keyword followed by an optional set of attributes (enclosed within parentheses), the property type, and its name.
@property (attributes) type propertyName;
For example, the Atom class you developed earlier (see Listing 2-3) declares the properties chemicalElement , protons , neutrons, and electrons. Properties can be declared in a class interface, a category interface, or a protocol. The declaration sets the signature for the getter/setter methods associated with a property, but does not generate the actual method definitions.
Property declaration attributes are used to specify the storage semantics and other behaviors associated with a property. The most commonly-used property attributes are described in Table 2-1.
Table 2-1. Property Attributes
| Category | Attribute | Description |
|---|---|---|
| Atomicity | nonatomic | Accessors are not atomic and, consequently, could provide different results when accessed concurrently by multiple threads. If not specified, accessors are atomic; that is, their values are always fully set/retrieved. |
| Setter Semantics | assign | The setter method performs a simple assignment of the property value without using copy or retain. This is the default setting. |
| retain | On assignment, the input value will be sent a retain message and the previous value will be sent a release message. | |
| copy | A copy of the new message will be set on assignment and the previous value will be sent a release message. | |
| strong | This attribute (used when ARC memory management is applied on a property) is equivalent to the retain attribute. | |
| weak | This attribute (used when ARC memory management is applied on a property) is similar to the assign attribute except that if the affect property is released, its value is set to nil. | |
| Read/Write | readwrite | The property can be read or written to. Both getter and setter methods must be implemented. This is the default setting. |
| read-only | The property can be read but not written to. The getter method must be implemented. | |
| Method names | getter=getterName | Renames the getter to the specified getterName. |
| setter=setterName | Renames the setter to the specified setterName. |
A property definition is performed in the implementation section of a class. In most cases, a property is backed by an instance variable; hence, the property definition includes defining getter and setter methods for the property, declaring an instance variable, and using that variable in the getter/setter methods. Objective-C provides several methods for defining a property: explicit definition, synthesis via keyword, and autosynthesis.
For this method of defining a property, its methods are explicitly defined in the corresponding class implementation. As an example, the setter method for a property named myIntProperty can be defined as shown in Listing 2-11.
Listing 2-11. Property Setter Method Definition
-(void) setMyIntProperty:(int) value
{
  _myIntProperty = value;
{
The name of the variable corresponding to the property is prefaced with an underscore. This name reflects the Objective-C standard naming convention for property instance variables, whereby the name of the variable is that of the property name, prefaced with an underscore.
Through use of the @synthesize keyword, the compiler can autogenerate property definitions. A property is synthesized in the corresponding class implementation section. The syntax for synthesizing a property via keyword is
@synthesize propertyName [= instanceVariableName];
If the optional instanceVariableName assignment is not provided, the compiler will automatically generate the instance variable name following the standard naming convention for property-backed instance variables. If an instanceVariableName value is provided, the compiler will create the instance variable with the name provided. For a property named myIntProperty, the getter and setter methods will be autogenerated with the statement
@synthesize myIntProperty;
The compiler will create a corresponding instance variable named _myIntProperty.
The recommended Apple Objective-C compiler, Clang/LLVM (versions 4.2 and above) provides support for autosynthesis of declared properties. This means that the compiler will automatically synthesize declared properties that are neither: 1) synthesized by keyword (e.g., using @synthesis); 2) generated dynamically (via the @dynamic property directive); nor 3) having user-provided getter and setter methods. Thus, there is no need to include code to synthesize a declared property when using this feature. A declared property is automatically synthesized by the compiler, along with the corresponding instance variable. The Atom class implemented earlier (see Listing 2-3) uses autosynthesis of its declared properties.
Accessor methods for a property can be delegated or dynamically created at runtime. The @dynamic property directive can be used to prevent compiler autogeneration of accessor methods in these cases. The compiler will not generate a warning if it cannot find implementations of accessor methods associated with the properties whose names follow the @dynamic property. Instead, the developer is responsible for creating these methods by either writing the accessor method implementations directly, using some other means to derive them (such as dynamic code loading or dynamic method resolution), or leveraging a software library (e.g., the Apple Core Data framework) that dynamically generates these methods.
Property-Backed Instance Variables
Most properties are backed by an instance variable, hence the mechanism by which properties hide the internal state of an object. Unless specified otherwise, the instance variable should have the same name as the property, but with an underscore prefix. In the Atom class implementation shown in Listing 2-5, the init method accesses the instance variable for the chemicalElement property, which is named _chemicalElement.
Objective-C provides two mechanisms for accessing properties: accessor methods and dot notation. Accessor methods synthesized by the compiler follow standard naming conventions:
- The method used to access the value (the getter method) has the same name as the property.
- The method used to set the value (the setter method) starts with the word “set” prepended to the property name, with the first letter of the property name capitalized.
Using these conventions, the getter method for a property named color would be called color, and its setter method would be called setColor. So, for an object named myObject, the getter and setter accessor methods would be invoked as follows:
[myObject color];
[myObject setColor:value];
Objective-C provides a concise alternative to accessor methods: dot notation. The dot notation syntax for getting and setting a property of an object named myObject would be
myObject.propertyName;
myObject.propertyName = propertyValue;
The first statement invokes the getter accessor method to retrieve the value of the property and the second invokes the setter accessor method to set the property to the value of propertyValue.
In general, properties should be accessed using the two mechanisms mentioned. However, if the object associated with a property is not (or may not be) fully constructed, these mechanisms should not be used, and the property-backed instance variable should be used instead. This means that within a class init method or dealloc method, the instance variable should be accessed directly, as shown with the Atom class _chemicalElement instance variable in Listing 2-5.
Methods define the behavior exhibited by classes and class instances (objects) at runtime. They are directly associated with either an Objective-C class (class method) or object (instance method). Instance methods have direct access to an object’s instance variables. Methods can be declared in a class interface, a protocol, and/or a category. Methods thus declared are defined in a corresponding class implementation.
A method declaration consists of a method type, a return type, and one or more method segments that provide name, parameter, and parameter type information (see Figure 2-5).

Figure 2-5. Method declaration syntax
The method type identifier specifies whether the method is a class or an instance method. A class method is declared with a + (plus) sign and indicates that the method has class scope, meaning that it operates at the class level and does not have access to the instance variables of the class (unless they are passed as parameters to the method). An instance method is declared with a – (minus) sign and indicates that the method has object scope. It operates at the instance level and has direct access to the instance variables of the object and its parent objects (subject to the access controls on the instance variables).
The return type indicates the type of the returned variable from the method, if any. The return type is specified within parentheses, following the method type. If the method does not return anything, the return type is declared as void. Figure 2-5. declares a class method with two parameters whose names are np and nn, each of which takes a non-negative integer value, and returns a value of type id, a special Objective-C type that I will discuss in the next chapter.
The method definition syntax is identical to that of the declaration syntax, but instead of a terminating semicolon, it is followed by the implementation logic enclosed within curly braces. The Atom class declares an instance method named massNumber; the implementation of this method is shown in Listing 2-5.
In Objective-C, an object (the sender) interacts with another object (the receiver) by sending it a message, thus causing the receiver to invoke a specific method. The syntax for invoking a method on an object is
[receiver methodSegmentName:parameterValue ...];
Braces surround the message. If the method has multiple segments, its name and parameter values are listed consecutively, each separated by a space. An example method invocation with multiple name/parameter value pairs is
[Atom withProtons:6 neutrons:6 electrons:6];
This method invocation has three segments and thus takes three input parameters: an integer number of protons, neutrons, and electrons.
You have learned about the basic elements and structure of Objective-C classes, but the language provides several additional features for developing classes. In this section, you’ll learn about one of these: protocols.
A protocol declares methods and properties that can be implemented by any class. A class interface is directly associated with a specific class and, hence, a class hierarchy. On the other hand, a protocol is not associated with any particular class, thus it can be used to capture similarities among classes that are not hierarchically related. Protocols provide Objective-C with the capability to support the concept of multiple inheritance of specification (i.e., of method declarations). A protocol can also be used to define the messages that an object can send (by specifying properties that conform to a protocol).
Syntax
A protocol declaration begins with the @protocol directive followed by the name of the protocol. It ends with the @end directive. Protocols can have both required and optional methods; optional methods do not require that an implementation of the protocol implement these methods. The directives @required and @optional (followed by the method name(s)) are used to mark a method appropriately. If neither keyword is specified, the default behavior is required. The syntax of a protocol declaration is shown in Listing 2-12.
Listing 2-12. Protocol Declaration Syntax
@protocol ProtocolName
// Property declarations
@required
// Method declarations
@optional
// Method declarations
@end
One protocol can incorporate other protocols by specifying the name of each declared protocol within braces; this is referred to as adopting a protocol. Commas are used to separate multiple protocols (see Listing 2-13).
Listing 2-13. Incorporating Other Protocols
@protocol ProtocolName<ProtocolName(s)>
// Method declarations
@end
An interface can adopt other protocols using similar syntax (see Listing 2-14).
Listing 2-14. Interface Adopting a Protocol
@interface ClassName : Parent <ProtocolName(s)>
// Method declarations
@end
To put this theory into action, you are going to add a protocol to the Atom project and have the Atom implementation conform to (i.e., implement) the required methods of this protocol. From the Xcode workspace window, select the Elements folder in the navigator area and then create a new file (by selecting New ![]() File . . . from the Xcode File menu) just as you did earlier. The New File template will be displayed. As before, select Cocoa under OS X, but instead of creating an Objective-C class, select the Objective-C protocol icon to create a protocol that conforms to the NSObject protocol. Next, click the Next button (see Figure 2-6).
File . . . from the Xcode File menu) just as you did earlier. The New File template will be displayed. As before, select Cocoa under OS X, but instead of creating an Objective-C class, select the Objective-C protocol icon to create a protocol that conforms to the NSObject protocol. Next, click the Next button (see Figure 2-6).

Figure 2-6. Create a protocol using Xcode
In the next window that specifies options for your new file, enter Writer for the protocol name and click the Next button. Next, you’ll be prompted to specify where in your file system to save the class files and the project target for the class. Leave the location as the Elements folder, select Elements as the project target (if not already selected), and click the Create button. A header file named Writer.h has been added to the Xcode project navigator pane. Click this file to display the Writer protocol (see Listing 2-15).
Listing 2-15. Protocol Template File
#import <Foundation/Foundation.h>

@protocol Writer <NSObject>

@end
In the editor pane, update the Writer.h file as shown in Listing 2-16 (the code updates are shown in bold).
Listing 2-16. Protocol Method Declarations
#import <Foundation/Foundation.h>

@protocol Writer <NSObject>

- (void)write:(NSFileHandle *)file;

@end
This protocol declares a method named write that takes a reference to an NSFileHandle as its parameter and returns nothing. To make the Atom interface adopt this protocol, select the Atom.h file in the navigator pane and then make the updates shown in bold (see Listing 2-17).
Listing 2-17. Adopting a Protocol
#import <Foundation/Foundation.h>
#import "Writer.h"

@interface Atom : NSObject <Writer>

@property (readonly) NSUInteger protons;
@property (readonly) NSUInteger neutrons;
@property (readonly) NSUInteger electrons;
@property (readonly) NSString *chemicalElement;

- (NSUInteger) massNumber;

@end
The Atom interface has effectively been extended with methods from the Writer protocol. Select the Atom.m implementation file and add the code shown in Listing 2-18.
Listing 2-18. Atom Class Implementation
@implementation Atom
...

- (void)write:(NSFileHandle *)file
{
  NSData *data = [self.chemicalElement
                  dataUsingEncoding:NSUTF8StringEncoding];
  [file writeData:data];
  [file closeFile];
}
...
@end
The Atom class now conforms to the Writer protocol, and sending a write: message to an Atom object causes the chemical element name to be written out to a file. This is an example of how protocols can be used to provide common behaviors between classes in different hierarchies.
A category enables the addition of new functionality to an existing class without subclassing it. The methods in a category become part of the class type (within the scope of the program) and are inherited by all its subclasses. This means that you can send a message to any instance of the class (or its subclasses) to invoke a method defined in the category. Typically, categories are used 1) to extend classes defined by others (even if you don’t have access to the source code); 2) as an alternative to a subclass; or 3) to distribute the implementation of a new class into multiple source files (this can help simplify a large class being developed by multiple programmers).
A category interface declaration begins with the @interface keyword followed by the name of the existing class and the category name in parentheses followed by the protocols it adopts (if any). It ends with the @end keyword. Between these statements, the method declarations are provided. The syntax of a category declaration is shown in Listing 2-19.
Listing 2-19. Category Declaration Syntax
@interface ClassName (CategoryName)
// Method declarations
@end
Now let’s extend the Atom class by adding a category. As before, from the Xcode workspace window, select the Elements folder in the navigator area and then create a new file (by selecting New ![]() File . . . from the Xcode File menu). Select Cocoa under OS X; this time, however, select the Objective-C category icon to create a category with implementation and header files, and then click the Next button.
File . . . from the Xcode File menu). Select Cocoa under OS X; this time, however, select the Objective-C category icon to create a category with implementation and header files, and then click the Next button.
In the next window that specifies options for your new file, enter Nuclear for the category name, select Atom in the Category on the drop-down list, and then click the Next button. Next, you’ll be prompted to specify where in your file system to save the class files and the project target for the class. Leave the location as the Elements folder, select Elements as the project target (if not already selected), and click the Create button. In the Xcode project navigator pane, two new files have been added to the Elements folder: Atom+Nuclear.h and Atom+Nuclear.m. These files are the category interface and implementation files. In the Atom+Nuclear.h header file, update the category interface as shown in Listing 2-20.
Listing 2-20. Nuclear Category Interface
#import "Atom.h"

@interface Atom (Nuclear)

-(NSUInteger) atomicNumber;

@end
This category declares a method named atomicNumber that returns a non-negative integer number. Select the Atom+Nuclear.m source file and update the category implementation as shown in Listing 2-21.
Listing 2-21. Nuclear Category Implementation
#import "Atom.h"
#import "Atom+Nuclear.h"

@implementation Atom (Nuclear)

-(NSUInteger) atomicNumber
{
  return self.protons;
}

@end
This completes the implementation of the Nuclear category and thus adds the atomicNumber method to the Atom class and any classes that descend from it. Let’s test the class now. In the main.m file, make the updates shown in Listing 2-22 to the main() method.
Listing 2-22. Code for Testing the Nuclear Category
#import <Foundation/Foundation.h>
#import "Atom.h"
#import "Atom+Nuclear.h"

int main(int argc, const char * argv[])
{
  @autoreleasepool
  {
    Atom *atom = [[Atom alloc] init];
    NSLog(@"Atomic number = %lu", [atom atomicNumber]);
  }

  return 0;
}
Save all the files of the project by selecting Save from the Xcode File menu, and then compile and run it by clicking the Run button in the toolbar. The output pane shown in Figure 2-7 displays the message “Atom number = 0”.
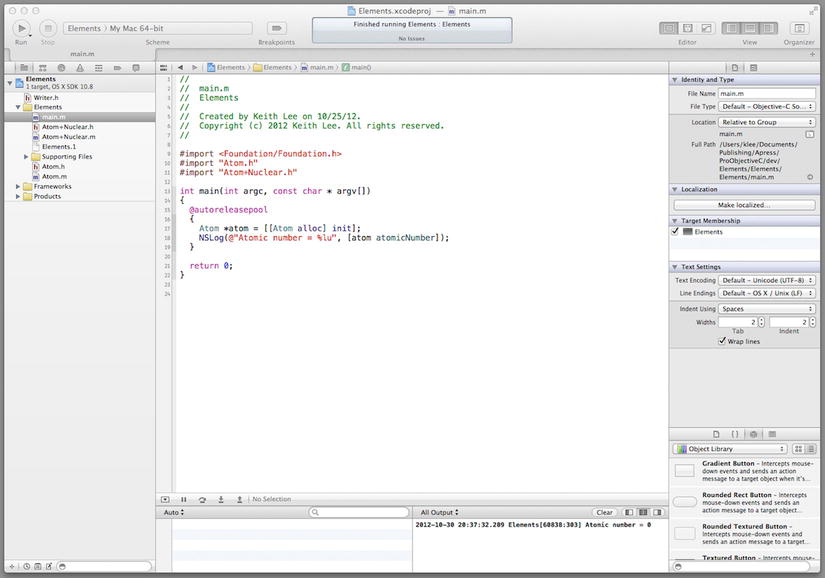
Figure 2-7. Testing the Nuclear category
And that’s it. You have created a category for the Atom class that adds an instance method that returns the atomic number for an Atom object. Now let’s look at extensions.
An extension is considered an anonymous (i.e., unnamed) category. The methods declared in an extension must be implemented in the main @implementation block for the corresponding class (they cannot be implemented in a category). The syntax of a class extension is shown in Listing 2-23.
Listing 2-23. Extension Declaration Syntax
@interface ClassName ()
{
  // Instance variable declarations
}

// Property declarations
// Method declarations
@end
As shown in Listing 2-23, an extension differs from a category in that it can declare instance variables and properties. The compiler will verify that the methods (and properties) declared in an extension are implemented. A class extension is commonly placed in the same file as the class implementation file and it is used to group and declare additional required, private methods (e.g., not part of the publicly declared API) for use solely within a class.
Roundup
Whew. This has been quite an introduction to Objective-C and developing classes! You have covered a lot of ground in this chapter, so let’s take a moment to recap what you’ve learned:
- An Objective-C class is comprised of an interface and an implementation.
- An interface may employ inheritance to obtain the properties and methods of subclasses in a class hierarchy.
- By convention, a class interface is stored (on disk) in a header file (suffixed with .h) and its implementation is stored in a file suffixed with .m.
- A protocol declares methods and properties that can be implemented by any class. They are often used to provide common behaviors in classes that are not hierarchically related.
- A category enables the addition of new functionality to an existing class without subclassing it. Typically, categories are used 1) to extend classes defined by others (even if you don’t have access to the source code); 2) as an alternative to a subclass; or 3) to distribute the implementation of a new class into multiple source files. An extension can be considered an anonymous category; however, its declarations must be implemented in the main implementation block of the class. Extensions can also declare instance variables and properties.
- Xcode provides templates for creating Objective-C classes, protocols, categories, and extensions, thereby making it easy to get started developing your own classes.
This has been a detailed primer on developing classes using Objective-C and Xcode, so this is a good time to take a break and review what you’ve gone over. In the next chapter, you’ll pick up where you left off by exploring the details of object messaging using Objective-C.