Now that you have a good understanding of how to create classes using Objective-C, you may be wondering, “How do I use these classes?” That’s the focus of this chapter; specifically object creation, initialization, and invoking methods on objects using Objective-C.
As you learned in Chapter 2, an Objective-C class is defined by its instance variables, properties, and methods. In addition, through OOP inheritance, a class also contains the state and behavior (i.e., methods and instance variables) of its parent class/classes. At runtime, an object-oriented program executes its logic by creating objects and invoking the desired operations on these objects using messaging—an OOP mechanism for invoking methods on objects and classes.
A class instance (i.e., object) is created by allocating memory for it and initializing it appropriately. Objects of the same kind are said to be members of the same class. What this means is that they have the same methods and matching sets of instance variables. Thus, when you create objects of the same type, you are in effect creating a set of instance variables for the object—along with a set of pointers to the methods defined for the class.
Every class lives in its own namespace. The names assigned within a class definition don’t conflict with names assigned anywhere outside it. This is true both of the instance variables in an object’s data structure and of the object’s methods. Hence, the meaning of a message must be understood relative to the particular object that receives the message. The same message sent to two different objects can invoke two distinct methods. This is a fundamental feature of OOP and simplifies a class interface, because the same names (corresponding to desired operations) can be reused in different classes.
The Foundation Framework provides functionality that simplifies object creation. Specifically, the NSObject class includes methods that are used to create class instances. The NSObject alloc class method returns a new instance of the specified class type; its syntax is
+ (id) alloc
An id is an Objective-C type used to hold a reference to any Objective-C object, regardless of its class. The alloc method can be invoked as
id varName = [ClassName alloc];
This creates an object of type ClassName and assigns it to a variable named varName of type id. You could also create the object as follows:
ClassName *varName = [ClassName alloc];
This would also create an object of type ClassName and assign it to a variable named varName; however, in this case, the variable is of type ClassName * (i.e., a pointer to a class of type ClassName). Explicitly defining the type for the variable provides static type checking, at the expense of flexibility. We’ll discuss this more in Part 2 of the book, which explores the Objective-C runtime. In either case, the alloc method returns objects that are an instance of the receiving class’s type, also known as a related result type. This means that the object returned from sending the alloc message will have the same type as that of the receiving class. Now in Chapter 2, you developed an Atom class. You can create an Atom object and assign it to a variable named atom using the alloc method.
Atom *atom = [Atom alloc];
As the receiving class of the alloc message is Atom, the created object will be of type Atom. Memory is allocated for the object and its instance variables are set to default values (zero).
OK, so this is great: Objective-C (and the Foundation Framework) provides everything you need to create objects. But what about initialization? Well, Objective-C also provides mechanisms to initialize newly created objects. You’ll look at these next.
The alloc method allocates storage for an object and sets its instance variables to zero, but it doesn’t initialize the object’s instance variables to appropriate values nor does it prepare any other necessary objects or resources needed by the object. Therefore, your classes should implement a method to complete the initialization process. NSObject implements an init method that provides the foundation for object initialization, and at a minimum, your classes should override this method to provide any custom initialization behavior required for them. The syntax for the NSObject init method is
- (id) init
Notice that init is an instance method, and like the alloc method, it returns objects of type id that are related result types. Remember the init method you developed in Chapter 2 for the Atom class? It’s shown in Listing 3-1.
Listing 3-1. Atom Class init Method
- (id) init
{
  if ((self = [super init]))
  {
    // Initialization code here.
    _chemicalElement = @"None";
  }

  return self;
}
Let’s examine this code in detail to get a better understanding for the responsibilities of the init method. This line combines several operations in a single line of code:
if ((self = [super init]))
The expression within brackets [super init] performs initialization of the calling object using the init method of its parent class. Since this is the first statement in an init method, it guarantees a series of initializations for an object all the way up its inheritance chain to the root object of the hierarchy (see Figure 3-1).
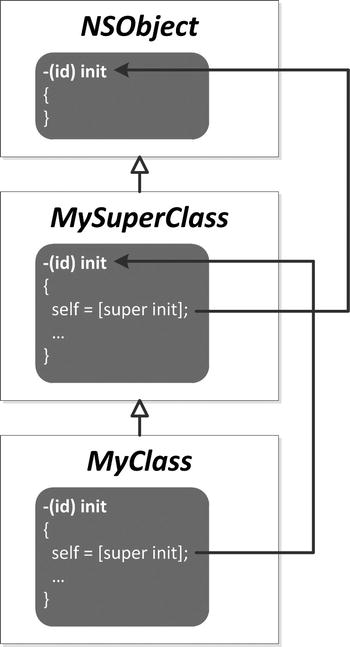
Figure 3-1. Object initializations via init methods
The result returned from the init method invocation is assigned to the special Objective-C self parameter. Each method has an implicit self parameter (it’s not in the method declaration), which is a pointer to the object that received the message. So, the assignment statement
self = [super init]
invokes the superclass’s init method and assigns the result to the calling object, thereby guaranteeing (see Figure 3-1) that any initialization required throughout the object’s class hierarchy is performed.
Looking back at Listing 3-1, you see that the result of this assignment is surrounded (in parentheses) by a conditional if statement (Appendix A provides a complete overview of Objective-C conditional statements). This has the effect of performing conditional logic. In effect, if the superclass initialization succeeds (i.e., the expression [super init] returns a valid object), the custom initialization for the object is performed; otherwise, the init method returns nil.
By convention, the name of an initializer always begins with init. An initializer with no input parameters is simply named init. If the initializer requires one or more input parameters, the name is lengthened accordingly to incorporate the input parameters. A sample declaration of an initializer with one input parameter is
-(id)initWithNeutrons:(NSUInteger) neutrons
As object allocation is coupled with initialization, the two methods are usually performed together in a single line of code; for example,
Atom *atom = [[Atom alloc] init];
Extending the Elements Project
Now you’re going to put into practice what you’ve learned about object allocation and initialization by extending the Elements project. In Chapter 2, you created an Atom class. Let’s subclass this to create different types of atomic chemical elements!
Start Xcode and reopen the Elements project by selecting Open ... from the Xcode File menu. In the navigator area of the Xcode workspace window, select the Elements project, and then create a new file by selecting New ![]() File ... from the Xcode File menu. As you did when creating the Atom class, create an Objective-C class with implementation and header files. Next, in the window where you choose options for your class, enter Hydrogen for the class name, select Atom from the subclass drop-down list, and then click Next (see Figure 3-2).
File ... from the Xcode File menu. As you did when creating the Atom class, create an Objective-C class with implementation and header files. Next, in the window where you choose options for your class, enter Hydrogen for the class name, select Atom from the subclass drop-down list, and then click Next (see Figure 3-2).
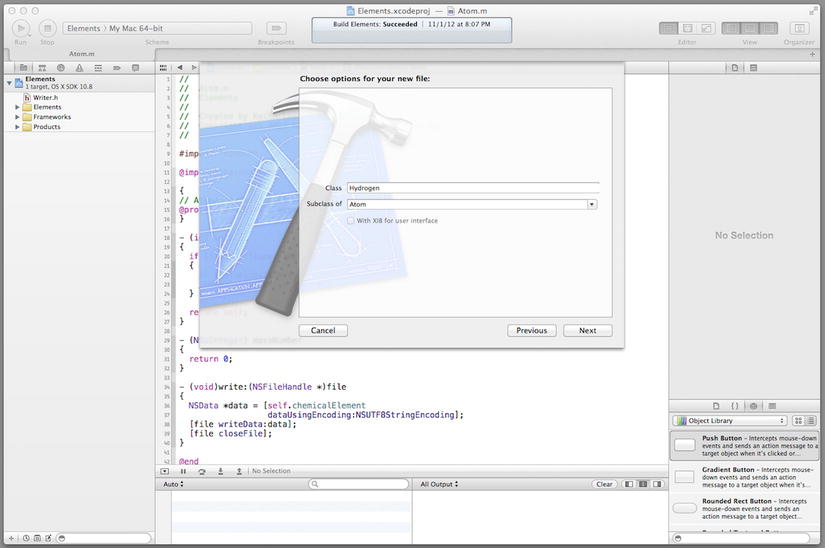
Figure 3-2. Specifying the Hydrogen class options
At the next prompt, leave the location as the Elements folder and the project target as the Elements project, and then click the Create button to create the Hydrogen class.
In the Xcode navigator pane, you see that two new files (Hydrogen.h and Hydrogen.m) have been created. Shortly, you are going to create an init method for the class and also a factory method that will both allocate and initialize new Hydrogen objects; but before doing that, you need to refactor the Atom class.
Refactoring means to restructure existing code without changing its external behavior. It’s something that you’ll do often while developing software to improve its design, facilitate the addition of new features, and so forth. In this case, you are going to refactor the Atom class so that its subclasses can access and update its instance variables during object initialization.
As shown in Chapter 2’s Listing 2-3, the Atom class interface declares a single property named chemicalElement, which is defined using autosynthesis. When the compiler automatically synthesizes a property, it creates a backing instance variable whose scope is declared as private. A private instance variable cannot be directly accessed by its subclasses, so you need to refactor the class to enable instance variable access from its subclasses. You’ll declare the variable in the instance variable declaration block with protected scope. In order to connect the property method generated using autosynthesis to the instance variable, you’ll name it according to the standard property-backed instance variable naming conventions (e.g., the variable name will be the same as the property name, prefaced with an underscore).
So let’s update the Atom interface accordingly. You’ll also add another read-only property (and the corresponding instance variable). In the project navigator pane, select the Atom.h file, and then in the editor pane, update the Atom interface as shown in Listing 3-2 (code updates are shown in bold).
Listing 3-2. Refactored Atom Interface with Protected Variables
@interface Atom : NSObject

// Property-backed instance variables, only accessible in the class hierarchy
{
  @protected NSUInteger _protons;
  @protected NSUInteger _neutrons;
  @protected NSUInteger _electrons;
  @protected NSString *_chemicalElement;
  @protected NSString *_atomicSymbol;
}

@property (readonly) NSUInteger protons;
@property (readonly) NSUInteger neutrons;
@property (readonly) NSUInteger electrons;
@property (readonly) NSString *chemicalElement;
@property (readonly) NSString *atomicSymbol;

- (NSUInteger) massNumber;

@end
In Listing 3-2, you now declare the property-backed instance variables with protected scope, thereby enabling them to be directly accessed (and updated) by subclasses. You also added a new property that retrieves the atomic symbol for an Atom object.
Next, let’s update the Atom implementation to reflect these changes. Select the Atom.m file and then update the Atom implementation of the massNumber instance method, as shown in Listing 3-3.
Listing 3-3. Atom Implementation massNumber Method
- (NSUInteger) massNumber
{
  return self.protons + self.neutrons;
}
As you can see, the mass number of an atom is computed as the sum of the number of protons and neutrons it has. OK, that’s all the refactoring you’ll do on the Atom class for now. Let’s update the Hydrogen class next.
Creating the Hydrogen Initializer Method
Now you’ll create a new init method for the Hydrogen class. It will initialize a Hydrogen object with the input number of neutrons, and set the chemical element name and atomic symbol appropriately. Select the Hydrogen.h file. In the editor pane, update the interface as shown in Listing 3-4.
Listing 3-4. Hydrogen Interface
#import "Atom.h"

@interface Hydrogen : Atom

- (id) initWithNeutrons:(NSUInteger)neutrons;

@end
This interface declares a Hydrogen init method with an input parameter that specifies the number of neutrons for the atom. Next, select the implementation file (Hydrogen.m) and update the implementation as shown in Listing 3-5.
Listing 3-5. Hydrogen Implementation
#import "Hydrogen.h"

@implementation Hydrogen

- (id) initWithNeutrons:(NSUInteger)neutrons
{
  if ((self = [super init]))
  {
    _chemicalElement = @"Hydrogen";
    _atomicSymbol = @"H";
    _protons = 1;
    _neutrons = neutrons;
  }

  return self;
}

@end
The initWithNeutrons: method first invokes the init method for the superclass Atom and then sets its initial values appropriately. For a Hydrogen object, this means setting the chemical element name (Hydrogen), its atomic symbol (H), the number of protons (by definition, hydrogen has one proton), and the number of neutrons provided as an input parameter.
Creating a Hydrogen Factory Method
Class factory methods are convenience methods used to perform class creation and initialization. They are class methods that are typically named following the convention
+ (id) className...
className is the name of the class and begins in lowercase. Now you’re going to implement a factory create method for the Hydrogen class. In the Hydrogen interface file, add the method shown in Listing 3-6.
Listing 3-6. Hydrogen Interface with Factory Create Method
#import "Atom.h"

@interface Hydrogen : Atom

- (id) initWithNeutrons:(NSUInteger)neutrons;
+ (id) hydrogenWithNeutrons:(NSUInteger)neutrons;

@end
A class instance method named hydrogenWithNeutrons: was added to the interface. Notice that the name of the factory create method name is similar to that of the init method, but it is prefixed by the name of the class. This method creates a new Hydrogen object and initializes it using the input parameter. Open the Hydrogen implementation file and add the method definition, as shown in Listing 3-7.
Listing 3-7. Hydrogen Implementation with Factory Create Method
+ (id) hydrogenWithNeutrons:(NSUInteger)neutrons
{
  return [[[self class] alloc] initWithNeutrons:neutrons];
}
Observe that the method allocates memory for a Hydrogen object, calls the initWithNeutrons: method on this new instance, and then returns the newly created and initialized object. Also notice the use of the expression [self class] to retrieve the current class instance. Using this expression (as opposed to specifying the class directly), if the class is subclassed and the factory method is invoked by a subclass, the instance returned is the same type as the subclass. Now let’s test the new class. Select the main.m file and update the main() function as shown in Listing 3-8.
Listing 3-8. Testing the Hydrogen Class
int main(int argc, const char * argv[])
{
  @autoreleasepool
  {
    Atom *atom = [Hydrogen hydrogenWithNeutrons:0];
    [atom logInfo];

    id atom1 = [[Hydrogen alloc] initWithNeutrons:1];
    [atom1 logInfo];

    Hydrogen *atom2 = [Hydrogen hydrogenWithNeutrons:2];
    [atom2 logInfo];
  }

  return 0;
}
The main() function uses both the Hydrogen init method and the class factory method to create and initialize Hydrogen objects, and then display information about the objects in the Xcode output window. Now save all the project files, and then compile and run the program (by clicking the Run button in the toolbar or by selecting Run from the Xcode Product menu). The output pane should display the results shown in Figure 3-3.
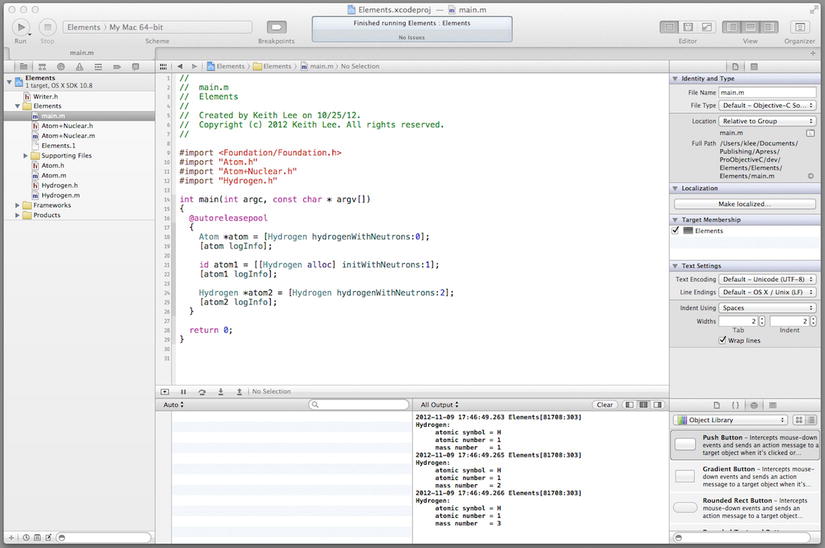
Figure 3-3. Testing the Hydrogen class
Great! You created a Hydrogen class with custom initialization and factory methods, and tested it to verify that it works as expected. Now that you are comfortable with object creation and initialization using Objective-C, let’s focus on object messaging.
Messaging is a fundamental concept in OOP. It is the mechanism used to invoke a method on an object. The receiving object (i.e., receiver) of a message determines at runtime which of its instance methods to invoke. Instance methods have access to an object’s instance variables along with its instance methods. The Objective-C syntax for sending a message to (i.e., invoking a method on) an object is
[receiver messageNameParams]
receiver is the object the message is sent to. The messageNameParams information identifies the method’s actual name and parameter values (if any); and brackets enclose the message. The syntax for the messageNameParams is
keyword1:value1 keyword2:value2 ... keywordN:valueN
A colon separates each method signature keyword and its associated parameter value. It declares that a parameter is required. If a method has no parameters, the colon is omitted (and that method has only one keyword). Take the following message, for example:
[orderObject addItem:burgerObject forPrice:3.50];
The message name is addItem:forPrice:; the receiver of the message is orderObject. The message parameter values are burgerObject (for keyword addItem) and 3.50 (for keyword atPrice). Under normal circumstances, a particular message can only be successfully invoked on a receiving object that has a method with the corresponding message name. In addition, Objective-C supports type polymorphism, whereby different receivers can have different implementations of the same method. The type of receiver is determined at runtime; consequently, different receivers can do different things in response to the same message. In sum, the result of a message can’t be calculated from the message or method name alone; it also depends on the object that receives the message.
As you learned in Chapter 2, Objective-C provides language-level support for an alternative syntax—dot notation, which simplifies invoking property accessor methods. The dot syntax for retrieving a property value is
objectName.propertyName
objectName is the instance variable name and propertyName is the property name. The dot syntax for setting a property value is
objectName.propertyName = Value
Dot syntax is merely an alternative syntax and not a mechanism for directly accessing a property-backed instance variable. The compiler transforms these statements into the corresponding property accessor methods.
Objective-C also provides language-level support for class methods. These are methods defined at the class level and invoked directly on a class. The syntax for invoking a class method is
[className messageNameParams]
Class methods work the same way as instance methods, except that they are invoked on a class, not an object. As a result, class methods do not have access to the instance variables and methods defined for the class. They are commonly used to create new instances of a class (i.e., as factory methods), or for accessing shared information associated with a class.
By separating the message (the requested behavior) from the receiver (the owner of a method that can respond to the request), object messaging directly supports the OOP paradigm of encapsulation.
Objective-C augments its support for object messaging with language-level features that enable you to determine at runtime the method to be invoked, and even change the method implementation. You’ll explore these features in Part 2 of this book; but for now, let’s learn how to handle scenarios where an object receives a message it cannot process.
Objective-C object messaging finds and executes a method on an object based on the message it receives. The object type can either be specified in the code and statically bound at compile time (static typing) or be unspecified with its type resolved at runtime (dynamic typing). In either case, at runtime, the receiving object interprets the message to determine which method to invoke. This runtime resolution of method calls makes it easy to change and/or extend programs dynamically, but also carries with it a certain risk: it permits a program to send a message to an object that may not have a corresponding method attached to it. Under the default scenario, if this happens, a runtime exception is thrown. However, Objective-C provides another option: through a mechanism called message forwarding, it is possible to configure an object to perform user-defined processing when it receives a message not mapped to its set of methods. Message forwarding enables an object to perform a variety of logic on any unrecognized message it receives, perhaps parceling it out to a different receiver who can respond to the message, sending any unrecognized messages to the same destination, or simply silently “swallowing” the message (i.e., performing no processing nor causing a runtime error to be thrown).
Forwarding Options
Objective-C provides two types of message forwarding options that you can use.
- Fast forwarding: Classes that descend from NSObject can implement fast forwarding by overriding the NSObject forwardingTargetForSelector: method to forward the method to another object. This technique makes it appear like the implementations of your object and the forwarding object are combined. This simulates the behavior of multiple inheritance of class implementations. It works well if you have a target class that defines all the possible messages that your object can consume.
- Normal (full) forwarding: Classes that descend from NSObject can implement normal forwarding by overriding the NSObject forwardInvocation: method. This technique enables your object to use the full contents of the message (target, method name, parameters).
Fast forwarding works well if you have a target class that defines all the possible messages that your object can consume. Full fowarding should be used if you don’t have such a target class or you would like to perform other processing on message receipt (for example, just logging and swallowing the message).
Adding Fast Forwarding to the Hydrogen Class
To give you an idea of how message forwarding can be used, you’re going to add this capability to the Hydrogen class you just implemented. You’ll extend the class to provide fast forwarding, and then you’ll create a helper target class that handles the forwarded message by implementing the corresponding method.
Message Forwarding Helper Class
First, you’ll create the helper class. In Xcode, create a new Objective-C class. Name it HydrogenHelper and make the Elements project its target. In the Xcode navigator pane, observe that two new files (HydrogenHelper.h and HydrogenHelper.m) have been created. Select the HydrogenHelper.h file, and then in the editor pane, update the interface as shown in Listing 3-9.
Listing 3-9. HydrogenHelper Interface
#import <Foundation/Foundation.h>

@interface HydrogenHelper : NSObject

- (NSString *) factoid;

@end
This interface declares a single instance method, factoid, which returns a pointer to an NSString (NSString *). Next, select the implementation file (HydrogenHelper.m) and define the factoid method as shown in Listing 3-10.
Listing 3-10. HydrogenHelper Implementation
#import "HydrogenHelper.h"

@implementation HydrogenHelper

- (NSString *) factoid
{
  return @"The lightest element and most abundant chemical substance.";
}
As you can see from Listing 3-10, the HydrogenHelper factoid method returns a simple fact about the Hydrogen element. Now you are going to update the Hydrogen class to support fast forwarding. In the Hydrogen implementation (Hydrogen.m), add the following code to overwrite the default implementation of the forwardingTargetForSelector: method, as shown in Listing 3-11 (updates are shown in bold).
Listing 3-11. Hydrogen Class Message Fast Forwarding Updates
@implementation Hydrogen
{
@private HydrogenHelper *helper;
}
...
- (id) initWithNeutrons:(NSUInteger)neutrons
{
  if ((self = [super init]))
  {
    // Initialization code here.
    _chemicalElement = @"Hydrogen";
    _atomicSymbol = @"H";
    _protons = 1;
    _neutrons = neutrons;

    // Create helper for message forwarding
    helper = [[HydrogenHelper alloc] init];
  }

  return self;
}

- (id) forwardingTargetForSelector:(SEL)aSelector
{
  if ([helper respondsToSelector:aSelector])
  {
    return helper;
  }
  return nil;
}
...
@end
First, the Hydrogen class adds a HydrogenHelper* instance variable. Next, in the init method, the HydrogenHelper object is created and initialized. This is the target object that will be used for message forwarding. Finally, the forwardingTargetForSelector: method is implemented. The method first checks to see if the message is one that the target (HydrogenHelper) object can process. If it can, it returns that object; otherwise, it returns nil. Recall that the HydrogenHelper class has a single instance method, factoid. Thus if a Hydrogen object receives a message for an instance method named factoid, it will be redirected to send that message to its HydrogenHelper object (see Figure 3-4).
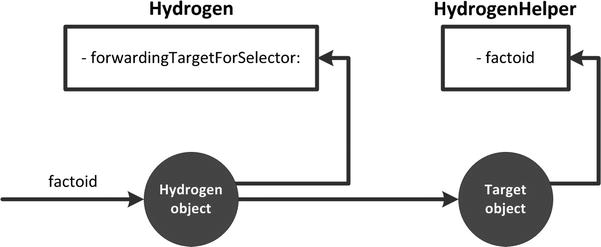
Figure 3-4. Fast forwarding the factoid method for the Hydrogen class
Great! You have implemented fast forwarding for the Hydrogen class. Now let’s test the class using fast forwarding. Select the main.m file and update the main() function, as shown in Listing 3-12.
Listing 3-12. Testing Fast Forwarding of the Hydrogen Class
int main(int argc, const char * argv[])
{
  @autoreleasepool
  {
    Atom *atom = [Hydrogen hydrogenWithNeutrons:0];
    [atom logInfo];

    id atom1 = [[Hydrogen alloc] initWithNeutrons:1];
    [atom1 logInfo];

    // Use message forwarding to get a fact about Hydrogen
    Hydrogen *atom2 = [Hydrogen hydrogenWithNeutrons:2];
    NSString *fact = [atom2 factoid];
    [atom2 logInfo:fact];
  }

  return 0;
}
On the left side of the editor pane, you’ll probably see an exclamation point in a red circle located on the line NSString *fact = [atom2 factoid]. If you click this exclamation point, you will see an error message (see Figure 3-5).
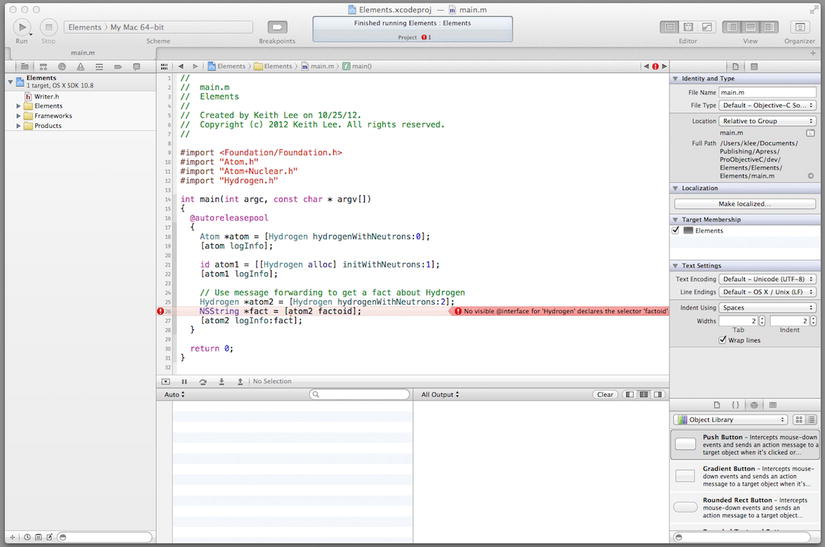
Figure 3-5. Hydrogen class object messaging error
This error, “No visible @interface for ‘Hydrogen’ declares the selector ‘factoid’,” occurs because the Hydrogen class does not have a factoid instance method declared in its interface. The compiler needs to know the full method signature of every message that a program can possibly send—even those that are forwarded. The solution is to declare the unknown method, either in a class interface or in a category. In Xcode, create a new Objective-C category, enter Helper for the name, and select Atom in the category drop-down list. Make the Elements project its target and the Elements folder the location where the files will be saved. In the Xcode project navigator pane, two new files have been added to the Elements folder: Atom+Helper.h and Atom+Helper.m. These files are the category interface and implementation files. Because you don’t need the implementation, delete the Atom+Helper.m file by selecting it in the navigator pane and then selecting Delete from the Xcode Edit menu. Next, in the Atom+Helper.h header file, update the category interface as shown in Listing 3-13.
Listing 3-13. Atom Helper Category Interface
#import "Atom.h"

@interface Atom (Helper)

- (NSString *) factoid;

@end
In Listing 3-13, the factoid method has been added to the category interface. Since the Hydrogen class is a subclass of the Atom class, the compiler will now see the factoid method, thereby resolving the error. The main.m file should include the Atom helper category interface in its list of imports (see Listing 3-14).
Listing 3-14. Imports for main() function
#import <Foundation/Foundation.h>
#import "Atom.h"
#import "Atom+Nuclear.h"
#import "Atom+Helper.h"
#import "Hydrogen.h"

int main(int argc, const char * argv[])
{
  ...
}
If you compile and run the project, the output should be as shown in Figure 3-6.

Figure 3-6. Hydrogen class with message forwarding test
Roundup
This chapter examined the concepts and details around Objective-C object creation, initialization, and messaging. The following are the key takeaways:
- The NSObject alloc method is used to allocate memory for an object, initializing its instance variables to zero. The method returns objects that are an instance of the receiving class’s type, also known as a “related result type.”
- NSObject provides an init method that serves the foundation for object initialization. Your classes should override this method to provide any custom initialization behavior required for them. Typically, instance allocation and initialization are performed with a single line of code: [[ClassName alloc] init].
- Initializer methods should be implemented such that they perform a series of initializations for an object all the way up its inheritance chain to the root object of the hierarchy.
- Objective-C messaging supports OOP type polymorphism, whereby different receivers can have different implementations of the same method. In addition, the type of the receiver is determined at runtime. Consequently, different receivers can do different things in response to the same message.
- Objective-C message forwarding enables an object to perform user-defined processing when it receives a message not mapped to its set of methods. Message forwarding can be used to provide many of the features typically associated with OOP multiple inheritance.
- Objective-C provides two types of message forwarding: fast forwarding and normal (full) forwarding. Both are implemented by overriding the appropriate NSObject instance method, along with implementing any required supporting classes.
In the last two chapters, you learned the ins and outs of developing classes using Objective-C: class design and implementation, object creation and initialization, and object interaction. In fact, why not take a moment to look back over what you have covered so far. This is a great time to go over your example programs and tinker with them to get a better feel for the language. Coming soon (in the next chapter, to be precise), you’ll explore another key topic of Objective-C programming: memory management.