Foundation Framework Specialized Services
In this chapter, you will explore several Foundation Framework classes that provide specialized system services. These classes implement functionality to support event-driven programming via notifications, object persistence via archiving and serialization, and distributed programming with distributed objects.
Notifications
The Foundation Framework includes a collection of APIs—the notifications support classes—that provide a powerful mechanism for event-driven programming. A notification encapsulates information about an event. It can be sent to one or more observing objects in response to an event that occurs within a program. The notifications architecture follows a broadcast model; hence objects receiving events are decoupled from those sending them. The notification support classes enable the creation and posting of notifications, sending and receiving notifications, and asynchronous posting of notifications via queues. The APIs also support registering for notifications and the delivery of notifications to specific threads.
NSNotification encapsulates the information sent by a notification object. It consists of a unique name, the posting object, and (optionally) a dictionary of supplementary information. The class includes methods for creating and initializing notifications, and retrieving notification information. Listing 12-1 creates a notification named ApplicationDidHandleGreetingNotification for a simple greeting.
Listing 12-1. Retrieving the Network Host Name Using NSHost
NSString *nName = @"ApplicationDidHandleGreetingNotification";
NSNotification *notif = [NSNotification notificationWithName:nName
                                                      object:@"Hello, World!"];
So you may be wondering, why the long name for the notification? Well, Apple has provided some guidelines for the names of notifications. It recommends that a notification name be composed of the following elements:
- Name of the associated class
- The word Did or Will
- Unique part of the name
- The word Notification
These guidelines are designed to facilitate the creation of unique notification names that are self-descriptive.
The NSNotificationCenter and NSDistributedNotificationCenter classes provide the mechanisms for broadcasting notifications to interested observers. They include methods for getting the notification center instance, adding and removing notification observers, and posting notifications. NSDistributedNotificationCenter is a subclass of NSNotificationCenter that provides a mechanism for broadcasting notifications to other processes. The class method defaultCenter is used to retrieve the default notification center instance associated with an application, as shown in the following statement.
[NSNotificationCenter defaultCenter];
NSNotificationCenter provides several methods for posting notifications. The following statement uses the postNotification: method to post the notification created in Listing 12-1.
[[NSNotificationCenter defaultCenter] postNotification:notif];
NSNotificationCenter also provides methods to create and post a notification with a single method. The following statement uses the postNotificationName:object: method to create and post a notification using the notification name created in Listing 12-1.
[[NSNotificationCenter defaultCenter] postNotificationName:nName
                                                    object:@"Salut!"];
NSNotificationCenter includes several methods for managing notification observers. You can register an object to receive a notification using the addObserver:selector:name:object: method. This method takes parameters that specify the observer object to receive a notification, the message to send to the observer, the name of the notification for which to register the observer, and the sender from which the observer wants to receive notifications. Listing 12-2 registers an object named handler (an instance of the Greeter class) to receive notifications from the variable named nName (see Listing 12-1), sending the message handleGreeting: to the observer.
Listing 12-2. Registering a Notification Observer
Greeter *handler = [Greeter new];
[[NSNotificationCenter defaultCenter] addObserver:handler
                                        selector:@selector(handleGreeting:)
                                            name:nName
                                          object:nil];
Classes that receive notification events must implement a notification handler method with the following signature.
- (void) methodName :(NSNotification *)notification;
methodName is the name of the method. In Listing 12-2, the Greeter class implements a notification handler method named handleGreeting:.
NSNotificationCenter also provides methods to remove an observer; the removeObserver: method unregisters an observer from notifications that it had previously registered for. The method removeObserver:name:object: is more fine-grained. It removes entries that match a specified observer, notification name, and sender. The following statement removes the notification with variable name nName for the observer named handler.
[[NSNotificationCenter defaultCenter] removeObserver:handler
                                                name:uName
                                              object:nil];
The NSNotificationQueue class provides a queue for notification centers, thereby enabling asynchronous posting and/or the coalescing of notifications. Coalescing is a process that enables you to filter (from a queue) notifications that are similar in some way to a notification that was queued earlier. The class includes methods to retrieve a notification queue instance, and add/remove notifications on the queue. The class method defaultQueue is used to retrieve the default notification queue instance for the current thread, as shown in the following statement.
[NSNotificationQueue defaultQueue];
The method initWithNotificationCenter: provides the capability to create a notification queue for a specified notification center. Listing 12-3 retrieves the default notification center and then creates a notification queue associated with it.
Listing 12-3. Creating a Notification Queue for a Specified Notification Center
NSNotificationCenter *notifier = [NSNotificationCenter defaultCenter];
NSNotificationQueue *queue = [[NSNotificationQueue alloc]
                              initWithNotificationCenter:notifier];
NSNotificationQueue includes two methods for posting notifications. The enqueueNotification:postingStyle:coalesceMask:forModes: method enables you to specify the posting style, coalescing option, and supported run modes for posting the notification. The coalescing options are constant values defined as follows:
- NSNotificationNoCoalescing: Do not coalesce notification, post all.
- NSNotificationCoalescingOnName: Coalesce notifications with the same name, such that only one is posted.
- NSNotificationCoalescingOnSender: Coalesce notifications with the same sender, such that only one is posted.
The posting style defines the interaction mode (synchronous/asynchronous, when idle/as soon as possible) used to queue the notification. These options are specified as constant values, as follows:
- NSPostASAP: Asynchronously posts as soon as possible, when the current iteration of the corresponding run loop completes.
- NSPostWhenIdle: Asynchronously posts when the run loop is waiting for input source or timer events.
- NSPostNow: The notification queued is posted immediately (after coalescing), effectively providing synchronous behavior. This behavior does not require a run loop.
Listing 12-4 synchronously queues the notification assigned to the variable named notif (see Listing 12-1), coalescing notifications with the same name.
Listing 12-4. Posting a Notification to a Queue with Coalescing
[[NSNotificationQueue defaultQueue]
    enqueueNotification:notif
           postingStyle:NSPostNow
           coalesceMask:NSNotificationCoalescingOnName
               forModes:nil];
NSNotificationQueue also includes a method to remove notifications from the queue. The following statement uses the dequeueNotificationsMatching:coalesceMask: method to dequeue notifications assigned to the variable named notif with no coalescing.
[[NSNotificationQueue defaultQueue]
     dequeueNotificationsMatching:notif
                     coalesceMask:NSNotificationNoCoalescing];
Archives and Serialization
The Foundation Framework archives and serialization classes implement mechanisms for converting an object (i.e., an object graph) into an architecture-independent byte buffer. This data can then be written to a file or transmitted to another process, potentially over a network. Later, the data can be converted back into objects, preserving the associated object graph. In this way, these classes provide a lightweight means of data persistence. The serialization process preserves the data and the positions of objects in an object hierarchy, whereas the archiving process is more general purpose—it preserves the data, data types, and the relations between the objects in an object hierarchy.
Archiving
NSCoder is an abstract class that declares the interface used to both marshal and unmarshall object graphs. The marshalling process converts an object’s information into a series of bytes, and the unmarshalling process creates an object from a (previously marshalled) series of bytes. NSCoder includes methods for encoding and decoding data of various types, testing an NSCoder instance, and provides support for secure coding. The Foundation Framework includes four concrete subclasses of NSCoder: NSArchiver, NSUnarchiver, NSKeyedArchiver, and NSKeyedUnarchiver.
Sequential Archives
NSArchiver and NSUnarchiver are used to create sequential archives, which means that the objects and values of a sequential archive must be decoded in the same order that they were encoded. In addition, when decoding a sequential archive, the entire object graph must be decoded. NSArchiver is used to encode objects for writing to a file or some other use, and NSUnarchiver is used to decode objects from an archive. NSArchiver includes methods for initialization, archiving data, retrieving archived data, and substituting classes or objects in an archive. NSUnarchiver includes methods for initialization, decoding objects, substituting classes or objects, and management.
Keyed Archives
Whereas NSArchiver and NSUnarchiver are sequential archives, NSKeyedArchiver and NSKeyedUnarchiver are keyed archives—each value in the archive can be individually named/keyed. The key must be unique within the scope of the object in which the value is being encoded/decoded. When decoding a keyed archive, the values can be decoded out of sequence or not at all. Hence, keyed archives provide better support for forward and backward compatibility and are recommended over the sequential archiving classes. NSKeyedArchiver includes methods for initialization, archiving data, encoding data and objects, and management. NSKeyedUnarchiver includes methods for initialization, unarchiving data, decoding objects, and management.
The code shown in Listing 12-5 uses the NSKeyedArchiver archiveRootObject: method to archive an NSString instance named greeting to a file in the current directory named greeting.archive.
Listing 12-5. Archiving an Object with NSKeyedArchiver
NSString *greeting = @"Hello, World!";
NSString *cwd = [[NSFileManager defaultManager] currentDirectoryPath];
NSString *archivePath = [cwd stringByAppendingString:@"/greeting.archive"];
BOOL result = [NSKeyedArchiver archiveRootObject:greeting toFile:archivePath];
The next code fragment uses the NSKeyedUnarchiver unarchiveObjectWithFile: method to decode an NSString object named greeting from an archive stored in the file archivePath.
NSString *greeting = [NSKeyedUnarchiver unarchiveObjectWithFile:archivePath];
Encoding and Decoding Objects
While the NSKeyedArchiver and NSKeyedUnarchiver classes are responsible for the archiving process, a class must conform to the NSCoding protocol to support enconding/decoding of class instances. This protocol declares two methods, encodeWithCoder: and initWithCoder:, that encode/decode an object’s state (e.g., its properties and instance variables). When a coder object (i.e., an NSKeyedArchiver or NSKeyedUnarchiver instance) archives an object, it instructs the object to encode its state by invoking its encodeWithCoder: method. Hence, a class must implement the appropriate encode and decode method(s) because these will be called by the selected coder object. Listing 12-6 depicts an implementation of a class named MyType that conforms to the NSCoding protocol.
Listing 12-6. Implementing the NSCoding Protocol Methods
@interface MyType : NSObject <NSCoding>

@property NSString *type;

@end

@implementation MyType

- (void)encodeWithCoder:(NSCoder *)coder
{
  [coder encodeObject:self.type forKey:@"TYPE_KEY"];
}

- (id)initWithCoder:(NSCoder *)coder
{
  if ((self = [super init]))
  {
    type = [coder decodeObjectForKey:@"TYPE_KEY"];
  }
  return self;
}

@end
Property List Serialization
Property list serialization provides a means of converting a property list, a structured collection of data organized as name-value pairs, to/from an architecture-independent byte stream. The Foundation Framework NSPropertyListSerialization class provides methods to serialize and deserialize property lists directly and validate a property list. It also supports conversion of property lists to/from XML or an optimized binary format. In contrast to archiving, basic serialization does not record the data type of the values nor the relationships between them; only the values themselves are recorded. Hence, you must write your code to deserialize data with the proper types and in the proper order.
A property list organizes data as named values and collections of values. They are frequently used to store, organize, and access standard types of data. Property lists can be created programmatically, or more commonly, as XML files.
XML Property Lists
Property lists are most commonly stored in XML files, referred to as XML plist files. The NSArray and NSDictionary classes both have methods to persist themselves as XML property list files and to create class instances from XML plists.
NSPropertyListSerialization
The NSPropertyListSerialization class enables the programmatic creation of property lists. This class supports the following Foundation data types (the corresponding Core Foundation toll-free bridged data types are provided in parentheses):
- NSData (CFData)
- NSDate (CFDate)
- NSNumber: integer, float, and Boolean values (CFNumber, CFBoolean)
- NSString (CFString)
- NSArray (CFArray)
- NSDictionary (CFDictionary)
Because the supported data types include the collection classes NSArray and NSDictionary, each of which can contain other collections, an NSPropertyListSerialization object can be used to create hierarchies of data. As a property list is structured as a collection of name-value pairs, a dictionary is used to programmatically create property list data. Listing 12-7 demonstrates the use of the instance method dataWithPropertyList:format:options:error: to serialize an NSDictionary property list collection of name-value pairs to a data buffer named plistData.
Listing 12-7. Property List Serialization of Name-Value Pairs
NSError *errorStr;
NSDictionary *data = @{ @"FirstName" : @"John", @"LastName" : @"Doe" };
NSData *plistData = [NSPropertyListSerialization dataWithPropertyList:data
                     format:NSPropertyListXMLFormat_v1_0
                     options:0
                     error:&errorStr];
The format: parameter specifies the property list format, of type enum NSPropertyListFormat. The allowed values are as follows:
- NSPropertyListOpenStepFormat: Legacy ASCII property list format.
- NSPropertyListXMLFormat_v1_0: XML property list format.
- NSPropertyListBinaryFormat_v1_0: Binary property list format.
The options: parameter is meant to specify the selected property list write option. This parameter is currently unused and should be set to 0. If the method does not complete successfully, an NSError object is returned in the error: parameter that describes the error condition. Listing 12-8 demonstrates use of the propertyListWithData:options:format:error: method to deserialize a property list from the plistData data buffer of Listing 12-7.
Listing 12-8. Property List Deserialization
NSError *errorStr;
NSDictionary *plist = [NSPropertyListSerialization
                       propertyListWithData:plistData
                       options:NSPropertyListImmutable
                       format:NULL
                       error:&errorStr];
The options: parameter specifies the property list read option. This value can be any of those for the enum type NSPropertyListMutabilityOptions. The possible values are as follows:
- NSPropertyListImmutable: The returned property list contains immutable objects.
- NSPropertyListMutableContainers: The returned property list has mutable containers but immutable leaves.
- NSPropertyListMutableContainersAndLeaves: The returned property list has mutable containers and mutable leaves.
The format: parameter contains the format that the property list was stored in. If the value NULL is provided, then it is not necessary to know the format. The possible non-NULL values for the format are of enum type NSPropertyListFormat.
Property list serialization does not preserve the full class identity of its objects, only its general kind. In other words, a property list object may be any of the preceding supported types. When a collection class is stored as a property list, its elements must also be in the list of supported property list data types. In addition, the keys for NSDictionary property list objects must be of type string (NSString). As a result, if a property list is serialized and then deserialized, the objects in the resulting property list might not be of the same class as the objects in the original property list. In particular, when a property list is serialized, the mutability of the container objects (i.e., NSDictionary and NSArray objects) is not preserved. When deserializing, though, you can choose to have all container objects created mutable or immutable.
Property list serialization also does not track the presence of objects referenced multiple times. Each reference to an object within the property list is serialized separately, resulting in multiple instances when deserialized.
OK, now that you have a good handle on the archiving and serialization classes, you’re going to create a program that demonstrates use of the Foundation Framework Archiving APIs. This program will create an object graph from a class hierarchy and then encode and decode the object graph from an archive. The classes that you’ll develop are diagrammed in Figure 12-1.
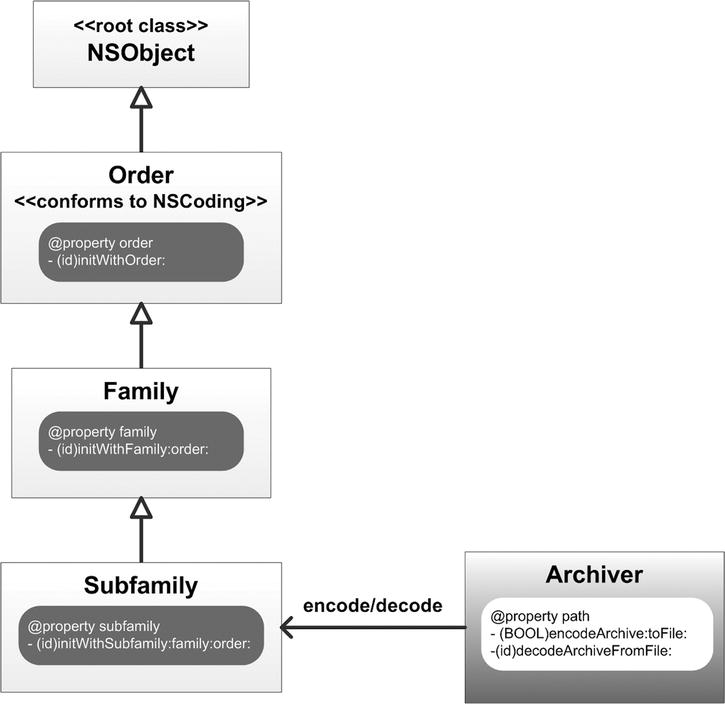
Figure 12-1. ArchiveCat program class hierarchy
As shown in Figure 12-1, the program consists of a class hierarchy (the Subfamily-Family-Order classes) and a class (Archiver) that’s used to archive instances of this hierarchy. In Xcode, create a new project by selecting New ![]() Project . . . from the Xcode File menu. In the New Project Assistant pane, create a command-line application. In the Project Options window, specify ArchiveCat for the Product Name, choose Foundation for the Project Type, and select ARC memory management by selecting the Use Automatic Reference Counting check box. Specify the location in your file system where you want the project to be created (if necessary, select New Folder and enter the name and location for the folder), uncheck the Source Control check box, and then click the Create button.
Project . . . from the Xcode File menu. In the New Project Assistant pane, create a command-line application. In the Project Options window, specify ArchiveCat for the Product Name, choose Foundation for the Project Type, and select ARC memory management by selecting the Use Automatic Reference Counting check box. Specify the location in your file system where you want the project to be created (if necessary, select New Folder and enter the name and location for the folder), uncheck the Source Control check box, and then click the Create button.
Next, you’re going to create the class hierarchy for the object graph. You’ll start with the base class and then successively implement the remaining subclasses. Select New ![]() File . . . from the Xcode File menu, select the Objective-C class template, and name the class Order. Select the ArchiveCat folder for the files location and the ArchiveCat project as the target, and then click the Create button. Next, in the Xcode project navigator pane, select the resulting header file named Order.h and update the interface, as shown in Listing 12-9.
File . . . from the Xcode File menu, select the Objective-C class template, and name the class Order. Select the ArchiveCat folder for the files location and the ArchiveCat project as the target, and then click the Create button. Next, in the Xcode project navigator pane, select the resulting header file named Order.h and update the interface, as shown in Listing 12-9.
Listing 12-9. Order Interface
#import <Foundation/Foundation.h>

@interface Order : NSObject <NSCoding>

@property (readonly) NSString *order;

- (id)initWithOrder:(NSString *)order;

@end
The Order interface adopts the NSCoding protocol, as required for classes that support archiving. The read-only property order identifies the order group in biological classification. The initWithOrder: method initializes an Order object, setting the property to the input parameter value. Now select the Order.m file and update the implementation, as shown in Listing 12-10.
Listing 12-10. Order Implementation
#import "Order.h"

@implementation Order

- (id)initWithOrder:(NSString *)order
{
  if ((self = [super init]))
  {
    _order = order;
  }

  return self;
}

- (id)initWithCoder:(NSCoder *)coder
{
  if ((self = [super init]))
  {
    _order = [coder decodeObjectForKey:@"ORDER_KEY"];
  }
  return self;
}

- (void)encodeWithCoder:(NSCoder *)coder
{
  [coder encodeObject:self.order forKey:@"ORDER_KEY"];
}

- (NSString *) description
{
  return [NSString stringWithFormat:@"Order:%@", self.order];
}

@end
The initWithOrder: implementation is very similar to init methods you’ve developed elsewhere in this book. It simply assigns the order input parameter to the order property’s backing instance variable.
The initWithCoder: method, declared by the NSCoding protocol, initializes the object using the archived state. Its input parameter, coder, is the NSCoder instance used to decode the Order instance archive. The superclass of Order is NSObject; because NSObject doesn’t adopt the NSCoding protocol, the self variable is assigned the returned value of the superclass init call.
self = [super init]
Next, the Order class state (represented by its properties and instance variables) is decoded and initialized. As the Order class has a single property named order, the property’s instance variable is assigned to the value decoded by the decodeObjectForKey: method, where the key is named ORDER_KEY.
The encodeWithCoder: method is used to archive the Order class state, its input parameter, coder, is the NSCoder instance used to encode the Order instance archive. Because the superclass of Order doesn’t adopt the NSCoding protocol, this method doesn’t invoke the superclass’s encodeWithCoder: method, but just encodes the Order class state. Specifically, the method invokes the encodeWithCoder: method on the coder for each property/variable that needs to be archived.
[coder encodeObject:self.order forKey:@"ORDER_KEY"];
Finally, the class overrides the description method (inherited from its superclass) to return a text string listing the value for the order property.
Now you’ll implement the next class in the hierarchy. Select New ![]() File . . . from the Xcode File menu, select the Objective-C class template, and name the class Family. Select the ArchiveCat folder for the files location and the ArchiveCat project as the target, and then click the Create button. Next, in the Xcode project navigator pane, select the resulting header file named Family.h and update the interface, as shown in Listing 12-11.
File . . . from the Xcode File menu, select the Objective-C class template, and name the class Family. Select the ArchiveCat folder for the files location and the ArchiveCat project as the target, and then click the Create button. Next, in the Xcode project navigator pane, select the resulting header file named Family.h and update the interface, as shown in Listing 12-11.
Listing 12-11. Family Interface
#import "Order.h"

@interface Family : Order

@property(readonly) NSString *family;

- (id)initWithFamily:(NSString *)family order:(NSString *)order;

@end
The Family interface subclasses the Order class, and hence adopts the NSCoding protocol. The read-only property family specifies the family group in a biological classification. The initWithFamily:order: method initializes a Family object, setting the family and order properties to the input parameter values provided. Now select the Family.m file and update the implementation, as shown in Listing 12-12.
Listing 12-12. Family Implementation
#import "Family.h"

@implementation Family

- (id)initWithFamily:(NSString *)family order:(NSString *)order
{
  if ((self = [super initWithOrder:order]))
  {
    _family = family;
  }

  return self;
}

- (id)initWithCoder:(NSCoder *)coder
{
  if ((self = [super initWithCoder:coder]))
  {
    _family = [coder decodeObjectForKey:@"FAMILY_KEY"];
  }
  return self;
}

- (void)encodeWithCoder:(NSCoder *)coder
{
  [super encodeWithCoder:coder];
  [coder encodeObject:self.family forKey:@"FAMILY_KEY"];
}

- (NSString *) description
{
  return [NSString stringWithFormat:@"Family:%@, %@", self.family,
          [super description]];
}

@end
This implementation is very similar to that of the Order class, so you’ll just focus on the key differences. The initWithFamily:order: invokes the superclass initWithOrder: method to initialize the superclass state properly, and then assigns the family input parameter to the property’s backing instance variable.
The initWithCoder: method is very similar to that provided for the Order class (as shown in Listing 12-10). However, as the superclass of the Family class (Order) adopts the NSCoding protocol, the self variable is assigned the returned value of the superclass initWithCoder: call.
self = [super initWithCoder:coder]
In this way, the superclass state (the order property) is initialized properly. Next, the Family class state (represented by its properties and instance variables) is decoded and initialized. As the Family class has a single property named family, the property’s instance variable is assigned to the value decoded by the coder’s decodeObjectForKey: method, where the key is named FAMILY_KEY.
The encodeWithCoder: method is used to archive the Family class state. Because the superclass of Family (the Order class) adopts the NSCoding protocol, this method first invokes invoke the superclass’s encodeWithCoder: method. Next, it invokes the encodeWithCoder: method on the coder for each property/variable that needs to be archived; in this case, the family property.
As with the Order class, the description method returns a text string consisting of the value of the family property concatenated with the value of the description for its superclass.
return [NSString stringWithFormat:@"Family:%@, %@", self.family,
        [super description]];
Now you’ll implement the final class in the hierarchy. Select New ![]() File . . . from the Xcode File menu, select the Objective-C class template, and name the class Subfamily. Select the ArchiveCat folder for the files location and the ArchiveCat project as the target, and then click the Create button. Next, in the Xcode project navigator pane, select the resulting header file named Subfamily.h and update the interface, as shown in Listing 12-13.
File . . . from the Xcode File menu, select the Objective-C class template, and name the class Subfamily. Select the ArchiveCat folder for the files location and the ArchiveCat project as the target, and then click the Create button. Next, in the Xcode project navigator pane, select the resulting header file named Subfamily.h and update the interface, as shown in Listing 12-13.
Listing 12-13. Subfamily Interface
#import "Family.h"

@interface Subfamily : Family

@property(readonly) NSString *genus;
@property(readonly) NSString *species;

- (id)initWithSpecies:(NSString *)species
             genus:(NSString *)genus
            family:(NSString *)family
             order:(NSString *)order;

@end
The Subfamily interface subclasses the Family class. The read-only properties genus and species specifies the genus and species for an animal group in a biological classification. The initWithSpecies:family:order: method initializes a Subfamily object, similar to the corresponding methods for the Family and Order classes. Now select the Subfamily.m file and update the implementation, as shown in Listing 12-14.
Listing 12-14. Subfamily Implementation
#import "Subfamily.h"

@implementation Subfamily

- (id)initWithSpecies:(NSString *)species
             genus:(NSString *)genus
            family:(NSString *)family
             order:(NSString *)order
{
  if ((self = [super initWithFamily:family order:order]))
  {
    _species = species;
    _genus = genus;
  }

  return self;
}

- (id)initWithCoder:(NSCoder *)coder
{
  if ((self = [super initWithCoder:coder]))
  {
    _species = [coder decodeObjectForKey:@"SPECIES_KEY"];
    _genus = [coder decodeObjectForKey:@"GENUS_KEY"];
  }
  return self;
}

- (void)encodeWithCoder:(NSCoder *)coder
{
  [super encodeWithCoder:coder];
  [coder encodeObject:self.species forKey:@"SPECIES_KEY"];
  [coder encodeObject:self.genus forKey:@"GENUS_KEY"];
}

- (NSString *) description
{
  return [NSString stringWithFormat:@"Animal - Species:%@ Genus:%@, %@",
          self.species, self.genus, [super description]];
}

@end
This implementation is very similar to that of the Family class, differing primarily in the Subfamily class state (the genus and species properties). In all other respects, the logic is identical, as you’ll see if you compare Listing 12-12 and Listing 12-14. Now you’ll implement the class used to archive the hierarchy. Select New ![]() File . . . from the Xcode File menu, select the Objective-C class template, and name the class Archiver. Select the ArchiveCat folder for the files location and the ArchiveCat project as the target, and then click the Create button. Next, in the Xcode project navigator pane, select the resulting header file named Archiver.h and update the interface, as shown in Listing 12-15.
File . . . from the Xcode File menu, select the Objective-C class template, and name the class Archiver. Select the ArchiveCat folder for the files location and the ArchiveCat project as the target, and then click the Create button. Next, in the Xcode project navigator pane, select the resulting header file named Archiver.h and update the interface, as shown in Listing 12-15.
Listing 12-15. Archiver Interface
#import <Foundation/Foundation.h>

@interface Archiver : NSObject

@property (readwrite) NSString *path;

- (BOOL) encodeArchive:(id)data toFile:(NSString *)file;
- (id) decodeArchiveFromFile:(NSString *) file;

@end
The Archiver interface has a single property, path, which defines the path for the file the archive is written to. The methods encodeArchive:toFile: and decodeArchiveFromFile: are used to encode/decode an archive to/from a file on the file system. Now select the Archiver.m file and update the implementation, as shown in Listing 12-16.
Listing 12-16. Archiver Implementation
#import "Archiver.h"

@implementation Archiver

- (id) init
{
  if ((self = [super init]))
  {
    _path = NSTemporaryDirectory();
  }

  return self;
}

- (BOOL) encodeArchive:(id)objectGraph toFile:(NSString *)file
{
  NSString *archivePath = [self.path stringByAppendingPathComponent:file];

  // Create an archiver for encoding data
  NSMutableData *mdata = [[NSMutableData alloc] init];
  NSKeyedArchiver *archiver = [[NSKeyedArchiver alloc]
                               initForWritingWithMutableData:mdata];

  // Encode the data, keyed with a simple string
  [archiver encodeObject:objectGraph forKey:@"FELINE_KEY"];
  [archiver finishEncoding];

  // Write the encoded data to a file, returning status of the write
  BOOL result = [mdata writeToFile:archivePath atomically:YES];
  return result;
}

- (id) decodeArchiveFromFile:(NSString *) file
{
  // Get path to file with archive
  NSString *archivePath = [self.path stringByAppendingPathComponent:file];

  // Create an unarchiver for decoding data
  NSData *data = [[NSMutableData alloc] initWithContentsOfFile:archivePath];
  NSKeyedUnarchiver *unarchiver = [[NSKeyedUnarchiver alloc]
                                   initForReadingWithData:data];

  // Decode the data, keyed with simple string
  id result = [unarchiver decodeObjectForKey:@"FELINE_KEY"];
  [unarchiver finishDecoding];

  // Return the decoded data
  return result;
}

@end
As shown in Listing 12-16, the init method sets the value for the path property. It uses the Foundation NSTemporaryDirectory() function to create a path to the user’s temporary directory on the file system, and assigns that value to the property’s backing instance variable.
The encodeArchive:toFile: method encodes an object graph to a file. It creates a file path by prepending the path property to the input file string. It then creates a mutable data object for archiving the graph. Next, it creates an NSKeyArchiver instance to perform the archiving, initialized with the data object. It encodes the graph to the data object with the key FELINE_KEY, and then finishes the encoding. Finally, it writes the archived data object to the file, returning a Boolean that indicates the success/failure of the write.
The decodeArchiveFromFile: method decodes an archive from a file, returning the initialized object graph. It creates a file path by prepending the path property to the input file string. It then creates a data object for unarchiving the graph. Next, it creates an NSKeyUnarchiver instance to perform the unarchiving, initialized with the data object. It decodes the graph to a data object with the key FELINE_KEY, finishes the decoding, and then returns the initialized data object.
And that’s it! Now that you have implemented the class hierarchy and the archiver class, let’s use this to archive an object graph. In the Xcode project navigator, select the main.m file and update the main() function, as shown in Listing 12-17.
Listing 12-17. ArchiveCat main( ) Function
#import <Foundation/Foundation.h>
#import "Archiver.h"
#import "Subfamily.h"

int main(int argc, const char * argv[])
{
  @autoreleasepool
  {
    // Create an Archiver to encode/decode an object graph
    Archiver *archiver = [[Archiver alloc] init];

    // Create an object graph and archive it to a file
    id animal = [[Subfamily alloc] initWithSpecies:@"Lion"
                                             genus:@"Panther"
                                            family:@"Felid"
                                             order:@"Carnivore"];
    NSLog(@"
%@", [animal description]);
    NSString *file = @"data.archive";

    // Display results
    if ([archiver encodeArchive:animal toFile:file])
    {
      NSLog(@"You encoded an archive to file %@",
            [[archiver path] stringByAppendingString:file]);
    }

    // Decode object graph from archive and log its description
    id data = [archiver decodeArchiveFromFile:file];
    if ([archiver decodeArchiveFromFile:file])
    {
      NSLog(@"You decoded an archive from file %@
%@",
            [[archiver path] stringByAppendingString:file], [data description]);
    }

  }
  return 0;
}
As shown in Listing 12-17, the main() function begins by creating an Archiver object. It then creates an object graph, logs its description to the output pane, and names the archive file. Next, the graph is archived to the named archive file, and if successful, a message is logged to the console.
The next set of statements decodes an object graph from the archive. First, it decodes the archive using the Archiver decodeArchiveFromFile: method. It then performs a condition check on the result of the method call, and if it returns an object graph (meaning the operation completed successfully), it logs a description of the object graph to the output pane. Now when you compile and run the ArchiveCat program, you should observe messages in the output pane comparable to those shown in Figure 12-2.
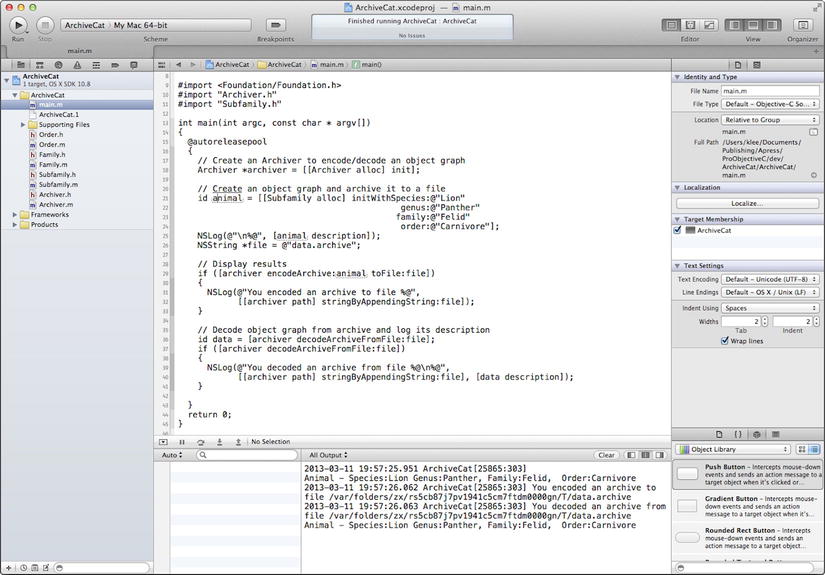
Figure 12-2. ArchiveCat program output
As shown in the output pane, a Subfamily object (i.e., object graph) is created and initialized with its input parameters, and its description is logged to the output pane. Next, the object is archived to the specified file, and the full path of the archive file is logged to the output pane. A corresponding object is then decoded from the archive and its description is logged to the output pane. As the description for the initially created object and the object decoded from the archive is identical, this validates that the archive was correctly encoded and decoded. This demonstrates use of the Archiving APIs to encode/decode an archive. Look this code over for a while and make sure that you have a good handle on the archiving process. When you’re ready, let’s move on to distributed objects.
Distributed Objects
The Distributed Objects classes provide functionality for distributed object communication; in essence, an object in one process sending a message to an object in a different process. The NSConnection class manages connections between distributed objects in different threads and/or processes. NSDistantObject is a subclass of NSProxy that defines proxies for distributed objects in other threads or processes. The NSProtocolChecker, also a subclass of NSProxy, defines an object that restricts the messages that can be sent to another object (its delegate). A protocol checker acts as a type of proxy that only forwards the messages it receives to its target if they are in its designated protocol.
To vend an object (i.e., to make an object instance distributed so that it can be invoked by other applications over a network), the object should first be configured as the root object of an NSConnection instance and the connection should then be registered on the network. Listing 12-18 vends an object named helloServiceObj and registers it under the name HelloService.
Listing 12-18. Registering the HelloService Distributed Object
NSConnection *connection = [NSConnection defaultConnection];
[connection setRootObject:helloServiceObj];
[connection registerName:@"HelloService"];
Registration makes the distributed object available to remote clients. The connection must be started within a run loop (i.e., an NSRunLoop instance) to capture incoming requests for the distributed object.
A client can invoke methods on a distributed object by obtaining a proxy for it. The following statement obtains a proxy on the local host for the distributed object shown in Listing 12-18.
NSDistantObject *helloProxy =
  [NSConnection rootProxyForConnectionWithRegisteredName:@"HelloService"
                                                    host:nil];
The NSDistantObject setProtocolForProxy: method is used to set the methods handled by the distributed object. If the distributed object from Listing 12-18 adopts a protocol named HelloProtocol and its methods comprise those available for clients, and then the following statement can be used to configure the proxy named helloProxy to support this protocol.
[helloProxy setProtocolForProxy: @protocol (HelloProtocol)];
The NSInvocation and NSMethodSignature classes are used to support the Foundation Framework’s distributed object system. The NSInvocation class was introduced in Chapter 9, where you learned that an NSInvocation object is composed of all the elements of an Objective-C message: the receiving (target) object, selector, parameters, and return value. NSMethodSignature is used to forward messages that a receiving (distributed) object does not respond to. It contains type information for the arguments and return value of a method.
The distributed object classes are only available for use on the Mac OS X platform.
Scripting
The Foundation Framework scripting classes support the creation of scriptable applications, that is, applications that can be controlled with AppleScript—a scripting language that makes possible direct control of scriptable applications and scriptable parts of Apple OS X.
NSScriptCommand and its subclasses implement standard AppleScript commands. NSScriptObjectSpecifier and its subclasses locate scriptable objects. NSScriptCoercionHandler and NSScriptKeyValueCoding perform essential functions related to scripting.
The scripting classes are only available for use on the OS X platform.
Roundup
In this chapter, you continued your review of the Foundation Framework, focusing on classes that provide specialized system services for Objective-C programs. You should now be familiar with Foundation Framework classes that provide the following functionality:
- Notifications
- Archives and Serialization
- Distributed Objects
- Scripting