The Game, Part 4: Collision Events
In most action-oriented games, the notion of collision detection plays a primary role. Whether it’s detecting when Mario lands on a Koopa Troopa, or when Pac-Man gobbles a power pellet, or when Master Chief mêlées with a Covenant grunt, being able to detect when two objects come into contact is part and parcel of many types of games.
Astro Rescue is no exception. The gameCoreCollisionEvents.lua source file contains the event handler function (along with some related “stuff”) that is responsible for handling such events. In a very real sense, this code, although rather small in volume, is responsible for making the game work. I know, you could say that about the main game loop (and I think I may have, in fact!), but really, without collisions the game would just be a nifty little demonstration of Corona’s drawing and input capabilities. With collisions, though, it becomes a real game.
When Worlds Collide
Collision detection is the ability to detect when two images, or sprites in typical game parlance, touch. For instance, in Astro Rescue you need to know when the player’s ship is destroyed by the alien’s plasma ball, or when the ship bumps into part of the landscape and therefore unceremoniously blows up.
There are a number of collision-detection algorithms out there to consider using—there’s no one-size-fits-all answer. One type is brute force: your code could check each pixel of one image against each pixel of another, looking for any that share the same x/y coordinates. While this yields 100% accurate detection, it is slow, and more important, it isn’t currently possible in Corona because you don’t have pixel-level access to DisplayObjects (at the time of this writing at least).
Bounding Boxes Collisions
Another method, described visually in Figure 8-1, is called bounding boxes. It is a very simple method: it checks the coordinates of the four corners of the objects and nothing more. If the corner of one object is within the “bounds” of the other, a collision has occurred.
As illustrated in Figure 8-1, each sprite has a square (or rectangular) area around it, called its bounding box, which defines the boundaries of the area the sprite occupies. Note how the lower-right corner of Object 1’s bounding box is within the bounding box of Object 2. This represents a collision. You can detect a collision by running through a series of tests comparing the bounds of each object. If any of the conditions are untrue, then a collision cannot possibly have occurred. For instance, if the bottom of Object 1 is above the top of Object 2, there’s no way a collision could have occurred. In fact, since you’re dealing with a square or rectangular object, you have only four conditions to check, one for each corner, any one of which being false precludes the possibility of a collision. Simply put, if the corner of one object is within the bounding box of another, a collision has occurred.
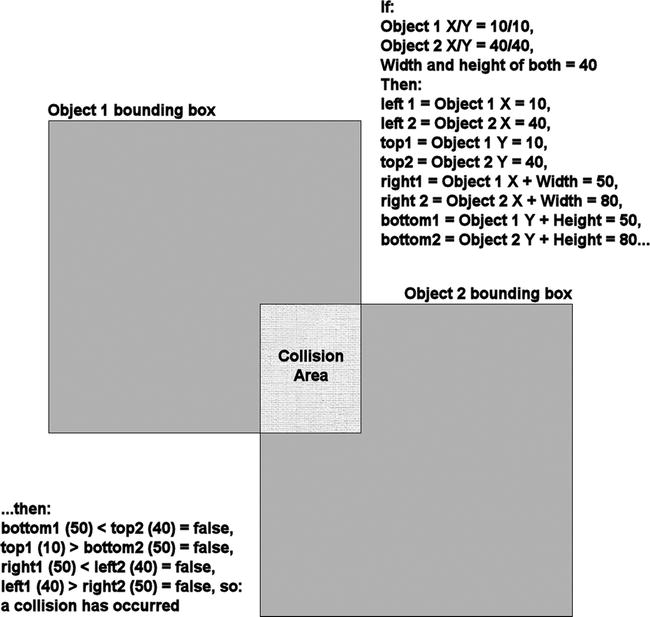
Figure 8-1 . Bounding boxes–based collision detection, illustrated
This technique is certainly doable in Corona, and is in fact common, in addition to being rather speedy and easy to code. However, this algorithm does not yield perfect results because not all game objects are perfect rectangles. Some are circles, some might not fill a square entirely on one side, and so on.
For example, if this technique were to be used in Astro Rescue, you would have some situations where the plasma ball registers a hit on the ship, but if you watch carefully enough, they never actually physically touch. This can happen anywhere there is empty space around the edges of the ship sprite, because even though the corner of the plasma-ball sprite might cross the boundaries of the ship sprite, it only intrudes into the ship sprite’s empty space, not actually the ship itself. In other words, the bounding boxes can collide without the object itself actually touching—it’s enough to be considered a hit when, in reality, it’s not.
Sometimes this is adequate. In many game situations, you really don’t need any more precision than this; the gameplay won’t be negatively impacted by this bit of imprecision. However, in Astro Rescue, it might lead to the player finding it unfair to have to be, in a sense, too accurate in their control movements, given the relatively small screen sizes of most mobile devices relative to the size of the game objects. It would be a little frustrating because it would require the player to be a little too perfect to avoid collisions (e.g., this would also affect flying near the ground). While this could be fixed with pixel-level detection, that’s not available in Corona, at least not at the time of this writing.
So, if you want a more accurate collision detection, you need to do something else. Fortunately, in Corona, an answer can be found in the physics library.
Physics-Based Collisions
The one collision detection built into Corona (not counting bounding boxes, which you can always use) is implemented when using physics. Recall from our earlier discussions of the physics engine in Corona that using physics is entirely optional. Well, that’s true, unless you need collision detection. In that case, say hello to the Physics API, whether you need to simulate physics or not!
Now, to be clear, you aren’t forced to have a physics environment per se, meaning objects don’t need to be affected by gravity and that sort of thing. That’s what I meant when I said “whether you need to simulate physics or not.” You can create physics bodies and simply not have them be affected by gravity, in which case you use them like plain old sprites, except that will activate their ability to receive notification of collision events.
To use collision, there are two steps you must take. First, create physics bodies for the objects that can be involved in collisions. This is absolutely no different than creating any bodies you’ve already seen. Second, register for notification of the "collision" event, either on specific objects or on the global Runtime instance—again, no differently than you’ve seen other events handled.
As with touch events, a collision event has a "began" and "ended" phase, which in this case means when contact begins and when contact is broken between the two objects. In addition, there are "preCollision" and "postCollision" events that you can optionally watch for that give you notification right before two objects are about to interact and right after they finish interacting.
Whenever one of these events occurs, the event object passed in contains two attributes, object1 and object2, which provides a reference to the tables of each object involved in the collision—in other words, a reference to the DisplayObjects involved in the collision. You can interrogate them as needed and act appropriately based on their identity. When you listen for these events on an object itself, you’ll also get an attribute named other that references the other object the collision was with. This is handy because when handling collision events on Runtime, you will need to examine both object1 and object2 frequently to determine what to do, whereas with a local event handler on an object, you automatically know what one of the objects is (namely, the one to which you attach the listener), so your code can be a little simpler. In Astro Rescue, I use the global listener approach, so you’ll see a little bit of this relatively more complex code. Therefore, my suggestion is generally to use local event listeners whenever you can, even if Astro Rescue doesn’t!
The event passed in to a postCollision event handler, regardless of whether the handler is local to an object or global, also contains force and friction attributes that you can use to determine the force of the collision. Note, however, that both preCollision and postCollision can be “noisy,” meaning you may get many of them for a given collision as the forces of the two objects begin to interact. Therefore, use them with caution.
Caution One important point to keep in mind is that if you attempt to manipulate the objects involved in a collision inside the collision event handler, you will almost certainly crash the Box2D physics engine underlying Corona. The workaround for this typically seen is to “wait a bit” by either setting a flag that some other code will read later on to do the manipulation, or use something like timer.performWithDelay() to defer the changes for some period of time.
Sometimes, when you’re working on collision detection, it helps to be able to visualize the objects as Box2D sees them. This is easily accomplished by passing "debug" to the physics.setDrawMode() method, as called from gameCore.lua. Normally, "normal" is passed, so that you see the actual graphics as intended. However, passing "debug" results in something like what you see in Figure 8-2.
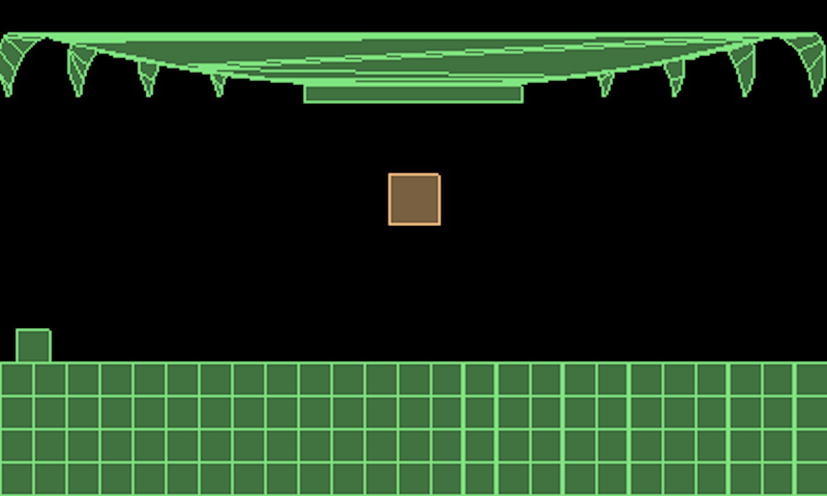
Figure 8-2 . Corona’s view of physics bodies in terms of collisions in debug mode
Now, you can clearly see how each DisplayObject is seen in terms of collision detection: our ship, the square floating in the middle, the ground tiles, and our colonist (the square to the left). All of these are simple bodies so they are just plain old squares. The mothership, by contrast, is a complex body made up of a number of segments, and you can see how each is outlined for collision detection purposes. Even the landing bay, the rectangle below and centered on the mothership, can clearly be seen.
Another option you have, which is shown in Figure 8-3, is to pass "hybrid" instead of "debug". This gives you something of a mixed view: you will see the usual graphics with the collision detection outlines superimposed on them. Either way, this trick, so to speak, can be extremely helpful when debugging why collisions aren’t working as you expect in your games. Not only can you see the outlines, but also information about the physics body besides collision detection data, which is presented in beautiful TechniColor-coding these outlines for your pleasure:
- Orange outlines mean dynamic physics bodies
- Dark blue outlines are kinematic bodies
- Green outlines are static bodies
- Gray means a body is sleeping and not actively being simulated
- Light blue means joints in complex bodies
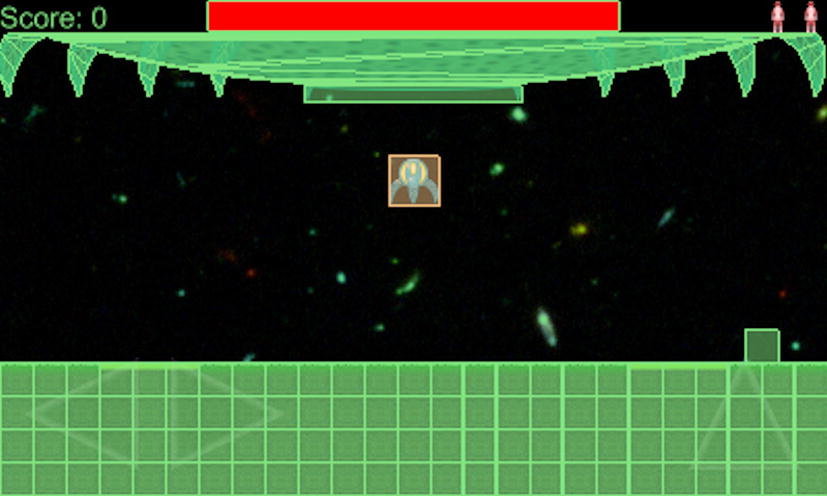
Figure 8-3 . Corona’s view of physics bodies in terms of collisions in hybrid mode
Forward unto the Code
With the high-level look at Corona collision detection out of the way, you can get into the code for handling them in Astro Rescue:
function gc:collision(inEvent)

  local colObj = inEvent.object1.objName;
  if colObj == "ship" then
    colObj = inEvent.object2.objName;
  end
The collision event is attached to the global Runtime object, as you saw when you looked at the gameCore.lua file, and it results in the collision() method of the gc object being called. The first task is to determine which objects collided. Since you know, by virtue of Astro Rescue’s game play, that the ship is always involved in any given collision, the task here is to determine what the other object is. This is what I was talking about earlier: if the event handler were instead attached to the ship, then this wouldn’t be necessary. However, since that’s not the way I wrote the code (bad me!), this code effectively has to do what Corona does automatically when using a local handler. Fortunately, the code is simple enough: get the name (as set by the setup code way back in gameCore.lua) of object1 into the variable colObj and see if it’s our ship. If it is, then you know that the other object involved in the collision is referenced by object2, so get its name. Of course, if the name of object1isn’t "ship", then you already have the name of the other object in colObj and you’re done.
if gc.phase ∼= gc.PHASE_FLYING and colObj ∼= "crash" then
  return;
end
Next, since collision events should only be processed when the ship is flying, and since collisions with anything that doesn’t have a name "crash", such as a fuel can, won’t result in an explosion, you need to abort if these conditions aren’t met.
These Are Bad, M’Kay? Crashing into Stuff
Assuming you get past that one quick check, the next step is to determine what the ship collided with and act accordingly. Of course, you only want to handle collisions during the "began" phase, so you check for that as well—first, in fact.
if inEvent.phase == "began" then
  if colObj == "crash" then

    utils:log("gameCoreCollisionEvents", "Crash");
    gc:showExplosion(gc.ship.sprite.x, gc.ship.sprite.y);
Any object with a name "crash", which includes the tiles that make up the ground, the mothership (not counting the landing bay part), the alien, and the plasma ball, results in a fiery death of our colony-rescuing hero. In that case, a call to the showExplosion() method, passing in the location of the ship, takes care of everything. You’ll be looking at that method later in this chapter.
Set ’er Down Gently: Landing on a Pad
Of course, the ship may have come into contact with a landing pad instead, and that’s what the next branch of the if statement that began in the last section is for. The name "pad" is what you look for in that case.
elseif colObj == "pad" then

  utils:log("gameCoreCollisionEvents", "Pad contact");
  local vX, vY = gc.ship.sprite:getLinearVelocity();
  if vX > 75 or vY > 75 then
    utils:log(
      "gameCoreCollisionEvents",
      "Pad crash (Too fast: vX(75)=" .. vX .. ", vY(75)=" .. vY .. ")"
    );
    gc:showExplosion(gc.ship.sprite.x, gc.ship.sprite.y);
  else
    utils:log("gameCoreCollisionEvents", "Safely landed");
    gc.ship.sprite:setSequence("noThrust");
    gc.ship.sprite:play();
    gc.ship.thrustVertical = false;
    gc.ship.thrustLeft = false;
    gc.ship.thrustRight = false;
    gc.phase = gc.PHASE_LANDED;
  end
Now, when the ship encounters a landing pad you have some further work to do because it may have been going too fast. After all, you’re going through the effort of simulating physics in this game, which means you probably want some degree of realism to it. So, if the player attempts to land while going too fast, as indicated by the flashing warning sign in Figure 8-4, that’s probably something that’s not too good for our poor little ship—I mean, unless it’s built out of unobtanium of course, as any good sci-fi fan knows!
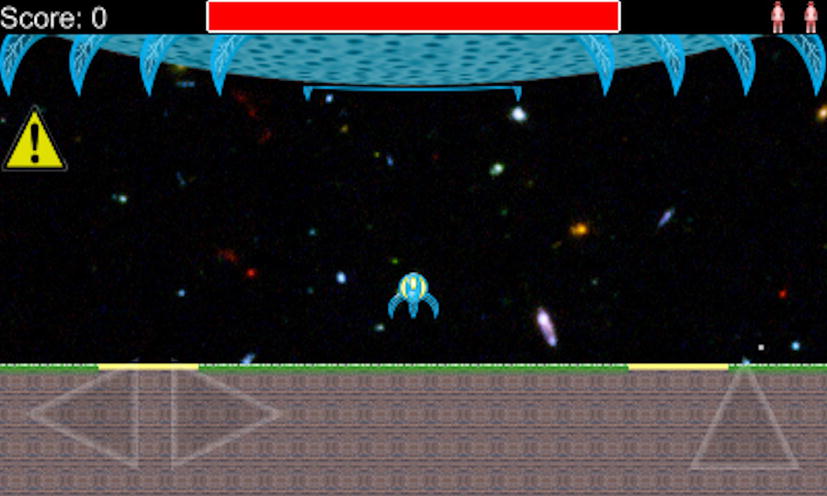
Figure 8-4 . JANE, STOP THIS CRAZY THING!
To make this determination, you examine the linear velocity of the ship, or how fast it’s moving in the x and y directions. The getLinearVelocity() method is added to the ship’s sprite DisplayObject when the physics body is added to it and returns two values, which are captured in the vX and vY variables. If either of these values is greater than the (arbitrary) threshold value 75, then that’s bad news for the player. The code also logs the values, which is really more for testing purposes than anything else (it’s how I was able to determine what a good threshold value was—just trial and error—but I could see what the values were when it “felt” right to me). Once again, showExplosion() is called in this case, too.
Assuming the player doesn’t suffer a fiery death from too forceful a landing, though, you end up in the else branch. Here, the animation sequence of the ship is changed to turn off the thruster flames, and the three movement flags are set to false so that our main game loop stops moving the ship. Of course, the phase attribute of our gameCore object is changed to gc.PHASE_LANDED so that the rest of the code base will be aware of the fact that the ship has successfully landed, triggering the colonist to move toward the ship, assuming there’s one near.
You’re All Clear, Kid, Now Let’s Blow This Thing and Go Home! Entering the Landing Bay
The next object that the player’s ship can collide with is the landing bay of the mothership:
elseif colObj == "bay" then

  utils:log("gameCoreCollisionEvents", "Entered landing bay");
  gc:stopAllActivity();
  gc.phase = gc.PHASE_IN_BAY;
In this case, the only tasks necessary are to ensure that all game activity ceases, hence the call to stopAllActivity(), which you previously looked at, and to switch to PHASE_IN_BAY so the main loop will show the popup on its next iteration.
Err, Sorry, Sir: Hitting a Colonist
While entering the landing bay is a good thing—presuming colonists have been rescued—there is a much worse situation: what if the ship hits a colonist? That is decidedly less positive, well, for the colonist at least! I suppose if the player does this on purpose they may in fact be playing a different game that they may find more enjoyable . . . perhaps the game should detect if you’ve done this too many times and offer links to mental health professionals? Eh, I digress.
elseif colObj == "colonist" and gc.colonist.sprite.isVisible == true then

  gc.sfx.screamChannel = audio.play(gc.sfx.scream);

  gameData.score = gameData.score - 50;
  if gameData.score < 0 then
    gameData.score = 0;
  end
  gc.colonist.sprite.isVisible = false;
  gc.colonist.appearCounter = 0;
The test is whether the ship has in fact come into contact with the colonist, but also whether the colonist is visible or not. Remember that the game only ever hides the colonist, so there’s a chance of a collision when the sprite is hidden, which you don’t want. If these conditions are met then the game plays a little scream sound, and deducts some points from the player’s score (that seems like the least we should do, right?!) The game also hides the colonist and resets the appearCount so the main loop starts counting down to when the colonist should be positioned and shown again.
Note The scream sound is the famous Wilhelm Scream, voiced by Sheb Wooley in 1951 for the movie Distant Drums. It is now a public-domain stock sound that has been used in many movies over the years, including the Star Wars, Lord of the Rings, and Indiana Jones series, as well as numerous video games.
Getting Gas Isn’t Always a Social Faux Pas: Fuel Pods
The last branch in the collision() method deals with the situation where the ship comes into contact with a fuel pod.
    elseif colObj == "fuelPod" then

      gc.sfx.fuelPodPickupChannel = audio.play(gc.sfx.fuelPodPickup);
      gc:showMessage("Got Some Fuel");

      gc.fuelPod.sprite.isVisible = false;
      gc.fuelPod.sprite.x = -5000;
      gc.fuelPod.sprite.y = -5000;

      gc.ship.fuel = gc.ship.fuel + 50;
      if gc.ship.fuel > gc.fuelGauge.fill.width then
        gc.ship.fuel = gc.ship.maxFuel;
      end
      gc.updateFuelGauge();

    end

  end

end
Pretty simple stuff here: play the fuel pod pickup sound (the sound of a can of soda being opened) and a call to showMessage() to show the “Got Some Fuel” message with the 3-D expanding message effect. The game hides and moves the fuel pod offscreen to avoid any collisions occurring before it’s shown again. It also updates the amount of fuel the ship has. This is slightly tricky in that the amount of fuel is also used when drawing the fuel gauge as its width, so you have to cap the amount of fuel to that width. Last, the call to updateFuelGauge(), which you’ll get to shortly, is responsible for redrawing the fuel gauge with the correct new width so it fills up and shrinks like a status/progress bar typically does.
Note Always remember that making an object invisible doesn’t necessarily stop collisions involving it from occurring, but moving it off-screen does. Also remember that the coordinates here are relative to the virtual screen size used for the game, so while–1000, –1000 might not be offscreen on a device with a physical screen size of 1280×1024, it will be if the virtual screen size is 800×480, as it is here.
Show Me The Boom!
Although at this point I have fully covered collision detection as used in Astro Rescue, there are two methods in the gameCoreCollisionEvents.lua source file that go along with collision detection, the first of which is showExplosion(), called any time the player’s ship meets an early end, as shown in Figure 8-5.
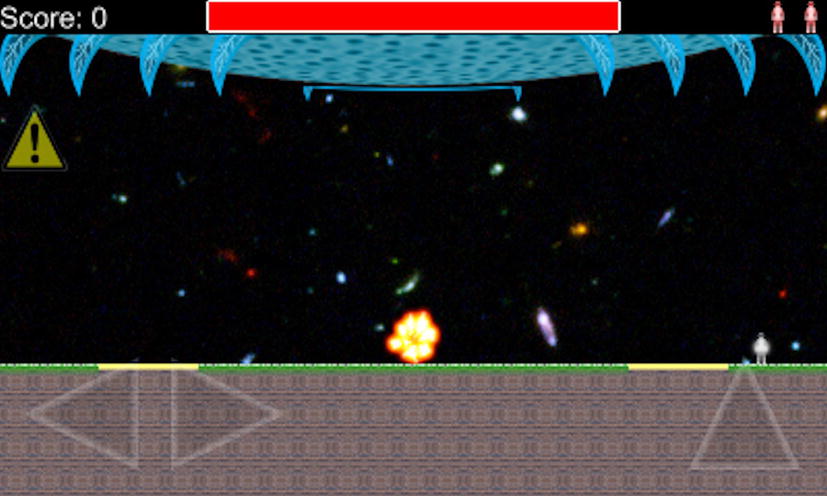
Figure 8-5 . That fireball probably looks pretty from inside the ship—if you can get past the AGONIZING BURNING SENSATION!
function gc:showExplosion(inX, inY, inCallback)

  utils:log("gameCoreCollisionEvents", "showExplosion()");

  gc.stopAllActivity();

  gc.phase = gc.EXPLODING;

  system.vibrate();
After some initial logging, all game activity is stopped via gc.stopAllActivity(); so that things like the alien, or a plasma ball, are done away with. The phase of the game is changed accordingly as well to effectively notify our main loop that the ship is in the process of exploding and its movements should be shut down, among other things.
On devices that support haptic feedback—that is, vibration—the call to system.vibrate() is used to cause a little vibration, perfect for an explosion event.
Note In the simulator, system.vibrate() results in a system beep being heard. On devices that don’t support haptic feedback, nothing happens. For Android devices you need to include android.permission.VIBRATE in the androidPermissions section in your build.settings file. If you forget to do this, your app will probably be fine and the device just won’t vibrate as expected (although you’ll almost certainly see an exception in the logs about it). However, because of the Android security architecture, an exception may be thrown back to the application, resulting in you game unceremoniously crashing. This is true of any “trusted” function for which you need to specify a permission on Android devices. The bottom line is simply this: don’t to forget to add permissions as necessary!
  gc.explosion.sprite.isVisible = true;
  gc.explosion.sprite.x = inX;
  gc.explosion.sprite.y = inY;
  gc.explosion.sprite:setSequence("exploding");
  gc.explosion.sprite:play();
  gc.explosion.callback = inCallback;
  gc.explosion.sprite:addEventListener("sprite",
    function(inEvent)
      if inEvent.target.sequence == "exploding" and
        inEvent.phase == "ended"
      then
        gc.explosion.sprite.isVisible = false;
        gc.phase = gc.PHASE_DEAD;
      end
    end
  );

  gc.sfx.explosionChannel = audio.play(gc.sfx.explosion);

end
Showing the explosion is a simple matter of showing the sprite (remember there’s a single sprite for the explosion; it is just moved around as needed) and positioning it at the x/y coordinates passed in, which happen to correspond to the center of the ship. The "exploding" animation sequence, the only one this sprite supports, is played, and you register a callback for when the animation sequence completes. When it does, the sprite is hidden and the game phase changed, which will result in the “You’re dead” popup being shown by the main loop next time through. Oh yes, and what explosion wouldn’t be complete without a bit of audio loudness? So, the explosion sound is played as well, and that’s how you blow up the hero!
Are We on “E” Yet?
The final method to look at is responsible for updating the fuel gauge any time the amount of fuel on the ship changes, either due to the player activating thrusters or picking up a fuel pod:
function gc:updateFuelGauge()

  if gc.fuelGauge.fill ∼= nil then
    gc.fuelGauge.fill:removeSelf();
    gc.fuelGauge.fill = nil;
  end
The gc.fuelGauge.fill field references the red bar in the middle of the fuel gauge, which is the part that expands and shrinks. While there are a number of ways this could be done, in terms of changing the size of the existing DisplayObject, or perhaps masking it somehow, I decided the easiest way is simply to recreate it with the appropriate new size. So, first, the existing one is destroyed:
  if gc.ship.fuel > 0 then
    gc.fuelGauge.fill = display.newRect(
      (gc.fuelGauge.shell.x - (gc.fuelGauge.shell.width / 2)) + 3,
      (gc.fuelGauge.shell.y - (gc.fuelGauge.shell.height / 2)) + 3,
      gc.ship.fuel, gc.fuelGauge.shell.height - 5
    );
    gc.fuelGauge.fill:setFillColor(255, 0, 0);
    gc.gameDG:insert(gc.fuelGauge.fill);
  end

end
Next, assuming the ship has some fuel left, a new DisplayObject is created, a new rectangle in this case. The x/y location is calculated based on the width of the outer white box and its center. This is done so that if I wanted to rearrange the status bar area of the game (which I did during development), I only had to move the “shell” portion, the outer white box, and the fill portion of the fuel gauge would automatically be positioned properly as well. The width of the new rectangle is the amount of fuel the ship has. Recall from earlier that the maximum amount of fuel the ship can have is dependent on the width of the fuel gauge itself, so these two values directly correspond to each other. The height is simply the height of the shell, minus a few pixels, so that the fill fits nice and snug inside the shell.
The fill color of the new rectangle is inserted into the gameDG DisplayGroup, and you have yourself a resized fuel gauge corresponding to the amount of fuel on the ship at that point.
Summary
In this chapter, you looked at how collisions are handled in Corona using the Physics API, as well as some alternative methods that could be used instead of that facility. You also saw how explosions are created and how the fuel gauge is updated as fuel is consumed.
In the next chapter, you’ll wrap up your exploration of Astro Rescue by looking at endingScene.lua, which is where you find the screen the player sees when they win the game, along with a few new Corona tricks.