
So you’ve spent months of your life hacking away at code, generating art resources, mixing audio, and making sure everything works in the Corona simulator. You’ve polished and you’ve tweaked and your game is ready for the eyes of someone other than yourself to check out. Or, maybe not—maybe it’s just time to see how it runs on a real device. (Of course, you probably would have done that before this point, but work with me on this one!)
In other words: it’s time to build and package your application in a form you can deploy to a real device and, perhaps, to others’ devices as well.
More than that, it might be time to publish your game to an app store and start seeing that sweet, sweet money come a-rollin’ in!
Both of these topics are what this chapter is all about. Here, I’ll show you how to create the appropriate packages that can be run on a real Android or iOS device, I’ll show you some ways to get those files onto the device, and I’ll talk about what it takes to get your app published.
In addition, I’ll talk about some techniques for debugging an application on a real device (some of which was touched upon in Chapter 10 under “Analytics”).
Let’s start with the simplest case first, though: getting your app onto a real Android device.
Feed the Robot: Building for Android
Building your app for Android is perhaps the easiest possibility, so let’s begin there.
Before you can do that, though, you need to ensure that your system has what it needs to build Android applications. At this point I assume you have installed Corona itself (if you haven’t, what have you been doing all this time?!). This allows you to build apps targeted for the simulator, as you well know by now. To be able to then build for Android depends on what your operating system is. If you’re running Mac then you already have everything you need, assuming at least you’re not on an ancient Mac!
It’s a perfectly typical installation so I’ll skip going over it in detail. Once you have it installed, you’re ready to go.
Caution You’ll need the 32-bit version, not the 64-bit version. Unfortunately, if you currently have the 64-bit version installed, you’ll need to uninstall it and install the 32-bit version instead. Alternatively, you can configure your system to ensure that the 32-bit version, which you can install side by side with the 64-bit version, is the default and is what Corona will use. I can tell you from experience, however, that this can be tricky sometimes to get working, so if you have any choice at all I recommend only installing the 32-bit version.
The procedure for building an Android version of your app is simple. First, load it up in the simulator as you normally would. Once it’s running, click the File menu, then Build For, and select Android, as shown in Figure 11-1.
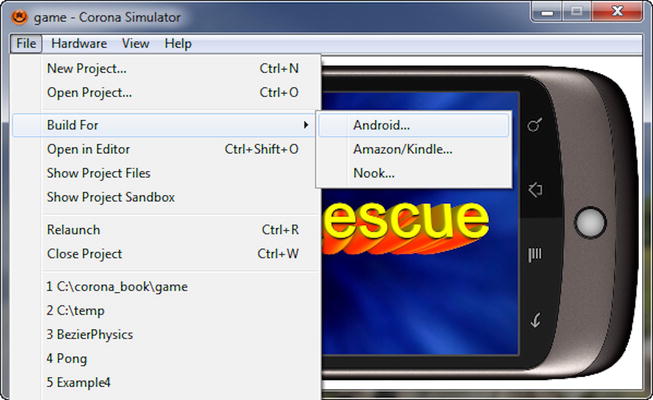
Figure 11-1 . Kicking off an Android build
Once you do so, you’ll be greeted with the window shown in Figure 11-2. Here, you’ll need to fill in a few details, beginning with the Application Name. This can be anything you like, of course (by default, Corona will use the name of the folder your project is in). The Version Code value is an integer value you that must increment every time you update your application. By “update” I mean any time you release a new version into the world as a published application. You do not need to change this value every time you do a new build during development and debugging.
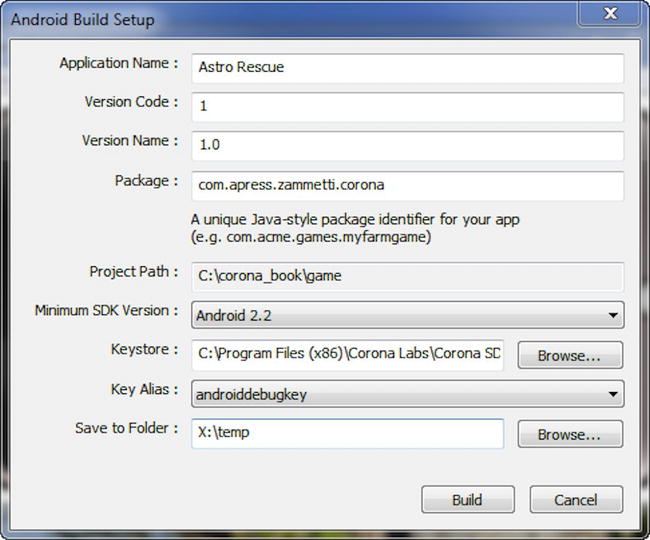
Figure 11-2. Android build settings
The Version Name is a more user-friendly version string and can pretty much be anything that makes sense to you.
Perhaps the most important value is Package. Typically, as the note there says, this is in the form of a unique Java-style package identifier, which is normally tld.company.app. For example, for Astro Rescue I used com.apress.zammetti.corona (com is the top-level domain, or TLD; zammetti is essentially the app name, and corona further breaks it down; you can have as many subdivisions, separated by periods, as you like). If I were publishing this game for real in an app store, I’d probably use something like com.etherient.astrorescue instead.
Note While this Java-style package name is typical, there’s no technical reason you have to use that form. In theory, any unique string here would do the trick. However, the Java-style-package naming convention came about as a good way to avoid name collisions, which is the key here. If you try to use astrorescue as the package, and another app in the store uses the same string, then that’s going to cause problems, most likely for end users who try to install both . . . and since they’re the ones paying the bills, they’re the last ones you want to aggravate!
Also note that some characters are not valid in a package name. Hyphens, for example, are not allowed and must be converted to underscores (or some other supported character, of course, but an underscore is most typical). Any component of the name (read: a value before or after a period) cannot begin with a number. Last, no component of a package name can use a keyword reserved in Java, such as static or public.
The Project Path should be filled in for you, so no worries there. The Minimum SDK Version is the minimum version of Android your game will support. Corona supports a minimum of Android 2.2 (using an ARMv7 processor), so at the time of this writing at least that’s all you’ll find in this dropdown anyway.
The Keystore is next, and for development purposes you’ll typically use the keystore supplied by Corona, which should be selected initially for you; otherwise you’ll need to browse for it in the Corona directory. The keystore holds the cryptographic keys and certificates Corona needs to sign your APK, or Application Package. An APK is, for all intents and purposes, the executable that Android runs and is the final output that Corona gives you at the end of all of this.
Note In reality, an APK is actually an archive file (using the ZIP format) that stores your application’s code and all the resources it uses, such as artwork and audio files. It also contains a certificate that Android uses to validate your application (hence why you need the keystore to build the APK), and metadata describing important information about your application (which Corona generates for you, and perhaps using some of the values you put in build.settings).
The Key Alias field lets you select a certificate stored in the keystore you selected. The Corona-supplied debug keystore only has a single key, androiddebugkey, so make sure that’s selected.
Last, in the Save To Folder field, tell Corona where you want the APK to be placed. Once all of that is done, click the Build button and wait a few seconds. While Corona does its thing, you should see a window like that in Figure 11-3.
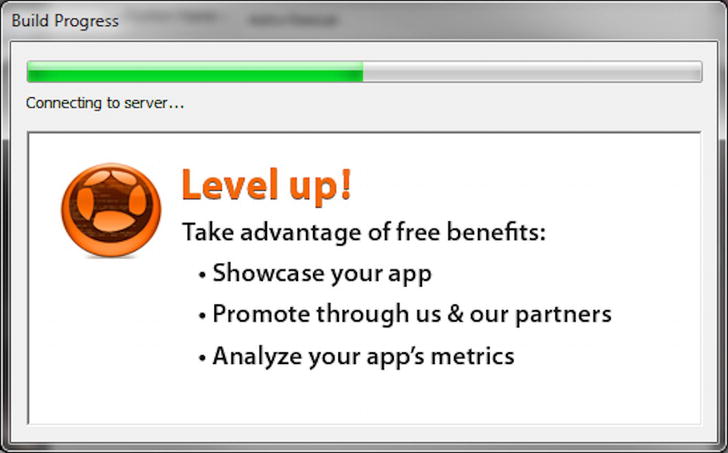
Figure 11-3 . Corona’s “twiddling your thumbs while your APK is built” window
Corona will do a bit of work on your PC and then ship the result off to the Corona build servers to complete the process. What you’ll wind up with is an APK file where you told Corona to put it (barring errors or other problems, naturally). This file is ready for you to run either on the Android emulator on your PC, which would require you to first install the Android SDK, or on a real Android device.
RELEASE BUILD SIGNING
Using the debug keystore is great for development, very quick and easy, but at some point you’re going to want to release your application to the world, and at that point you’ll need your own keystore.
Fortunately, doing so is quite easy. It depends on the JDK you installed earlier. All you need to do is jump out to a command prompt and use this command:
keytool -genkey -v -keystore XXX.keystore -alias YYY -keyalg RSA -validity 999999
Here, XXX is the name of the keystore (I generally use the name of my application, and I have a separate keystore for each application) and YYY is the alias name of the application. Again, the easiest thing to do is to simply use the same application name.
If you're using a Mac, don’t forget that you’ll need to sudo to execute this command.
Once you do this, you’ll be prompted for some information, starting with a password. It is very important that you do not forget this password! If you do, you will likely not be able to update your application in the future and you’ll find yourself having to create a new keystore and essentially a new “branch” of your application. You’ll need to enter the password twice to confirm.
You’ll also be asked for some identifying information, including first and last name, the name of your organizational unit and organization, city, state, and country. What information you actually enter here isn’t terribly important; I’d urge you to use legitimate information, but it’s ultimately up to you and shouldn’t matter much to anything that might be using the keystore.
Once you do this, you’ll be actually prepared to sign and release your application in the Google Play store (which I’ll discuss in the “App Store Model of Distribution” section later in this chapter).
Deploying to Android Devices
So, now that you have an APK irhapnd, how exactly do you get it on a device to play with? Or, on the emulator that comes with the Android SDK? Well, there’s actually a number of different ways, but the first is the Android Debug Bridge, or ADB.
ADB is a tool that comes with the Android SDK, so if you don’t have that installed you’ll either need to visit developer.android.com and install it, or use one of the other methods described.
Assuming you have it installed, then all you need to do is execute this:
adb install -r app.apk
As long as adb is in your path and app.apk is in the current directory, executing that command will push the APK onto the first device ADB finds attached to your PC. If you have an emulator running, it will be that device. If you have an actual Android phone attached via USB, and assuming USB debugging is enabled on the device as well as allowing third-party (non-market) installations turned on, it will be installed on that device.
Another way to get the app onto your device is to simply copy the APK to your device if it’s attached in USB mass storage mode. You’ll then have to browse to the file on the device with the file system browser of your choice and open it. You should again get the usual installation popup at that point.
A third way, if you have access to a web server, is to copy the APK to that server and then access the APK from the browser on your device. Note, however, that if you encounter a problem where you download a text file instead of triggering an application installation, you will need to add a MIME type to your server’s configuration. Assuming it’s Apache for example, add the following line to your .htaccess file:
AddType application/vnd.android.package-archive .apk
A fourth approach, and the technique I personally use most because it is arguably the simplest pnd, in my mind, definitely the most convenient, is this: I simply create a share to a directory on my PC, ensure the APK is created by the Corona build process in that directory, and then, when the build completes, I use a file system browser like ES File Explorer, Astro, or FX—all of which most relevantly have SMB capabilities—to browse to that share and directly launch the file. This approach is nice because I don’t have to bother with USB cables, ensuring drivers are installed, whether ADB sees my device properly, and all that sort of stuff, which can sometimes get sticky with Android development. I also don’t have to worry about uploading to a web server (of course, the web server could be running locally, which frankly would make that approach not much different than this one). It’s still a two-step process—then again, all of these are, but now it’s very straightforward. Plus it’s easy when I’m testing on multiple devices, since the same APK is always at the same location and I can browse to it and install it any time I like.
Note I personally prefer ES File Explorer, but I used Astro early on and FX for a few weeks and they are all quite good. There are also many other choices, which is of course one of the great things about Android generally. Just ensure it has SMB support and you’re good to go.
On-Device Debugging with Android
The next question is how to go about debugging your application once it’s on a device or the emulator. Here there are a couple of approaches.
First, the Android SDK has some tools specifically for this purpose. One of them, adb, you’ve already met, and it offers some debugging commands aside from the install command. The logcat command allows you to view the Android system debug logs. This log contains content from the system as well as from applications. It can be quite helpful, but also can be difficult to wade through. Fortunately, this command also allows you to specify some filtering criteria, such as viewing only fatal error messages. In addition to filtering by priority, you can also filter by tag, which is a string that identifies the component that generated the message. Yes, you can filter it to only see messages generated by your application, but you’ll need to find the tag in a message in the log first to know what it is.
Tip There are logcat viewers in the Google Play Store that will let you view the messages on your device. This can be extremely handy when you’re debugging away from your PC. Simply search for logcat and you’ll find many options to choose from. However, by default you’ll get an absolute boatload of system messages that come flying in fast and furious, so proper filtering is a must (and this is true whether using an on-device viewer or not). Figure 11-4 shows one such on-device viewer.
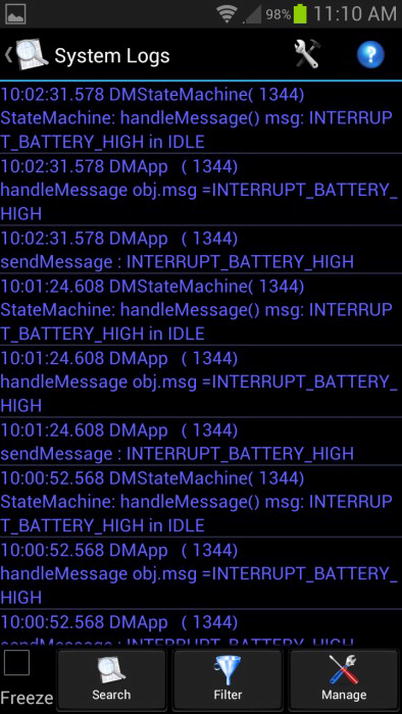
Figure 11-4 . The log viewer function in the Android Tuner app
Another adb command that can be useful is pull. This allows you to grab a specific file from your device. If your application writes its own log file, for example, this is a good way to grab that file to check out on your PC with a proper editor.
If you’re a bit more Java-savvy, the adb jdwp command might be of some use to you. This prints a list of running JDWP (Java Debug Wire Protocol) processes on the device that you can attach to with a debugger for remote debugging.
The Dalvik Debug Monitor Server, or DDMS, is another option available to you. To use this you’ll need to install the Eclipse IDE and the Android Developer Tools extension. Once you do, you’ll have access to a powerful tool that provides all sorts of valuable debugging tools, including the ability to take screenshots, viewing heap usage of a process, tracking object allocations, method profiling, network usage analysis, spoofing location information, and more. As a Corona developer, some of this won’t be of much use. For example, method profiling isn’t likely to provide as much useful information as it does to a native Android developer, since most of the methods you might be interested in are abstracted away from you by Corona itself. Still, you can sometimes gain some insight into your code with it, at least indirectly.
Note At the time of this writing, DDMS is being deprecated by Google in favor of the Android Device Monitor, which is basically the same thing, but with some additional features. You can still use DDMS right now, though, and probably will be able to for a while, but you may want to start looking at Android Device Monitor, too.
Custom Log File
Don’t discount writing out your own log file! Do you remember the utils.lua file and the log() method that you saw way back in Chapter 3? You could modify that as shown in Listing 11-1to easily allow logging to a file.
Listing 11-1. Changing the utils:log( ) Method to Write to a File
function utils:log(inFilename, inMessage, inObject)

  if inObject == nil then
    inObject = " ";
  else
    inObject = " - " .. json.encode(inObject);
  end

  local logMessage = inFilename .. " - " .. inMessage .. inObject;
  print(logMessage);

  if logToFile == true then
    if logFile == nil then
      local path = system.pathForFile("log.txt", system.DocumentsDirectory);
      logFile = io.open(path, "w");
      if logFile == nil then
        logFile = io.open(path, "w");
      end
    end
    logFile:write(logMessage .. "
");
  end

end
This version checks the value of the global variable logToFile. If it’s true then the logged message will also be written to the log.txt file. That way, you can leave that variable set to false and only set it to true when you do a debug build (or vice versa, but that would be a bit dangerous!). You’ll have to close the reference to the opened log file stored in the variable logFile at some point, like when your app ends, but you get the picture (and I’m sure there are even better ways to do this that you can write yourself at this point).
Real-Time FPS and Memory Display
Although in no way specific to Android debugging, check out Listing 11-2. This is a handy function that you may well want to add to your own personal utils.lua file (which I suggest building up over time with the functions you find generally useful).
Listing 11-2. Showing Real-Time FPS and Memory
function utils:showFPSAndMem()

  local prevTime = 0;
  local curTime = 0;
  local dt = 0;
  local fps = 60;
  local mem = 0;
  local frameCount = 0;
  local avg = 0;
  local slowest = 1000;
   underlay = display.newRect(
    0, display.contentHeight - 30, display.contentWidth, 34
  );
  underlay:setReferencePoint(display.TopLeftReferencePoint);
  underlay:setFillColor(0, 0, 0, 128);
   displayInfo = display.newText(
    "FPS: ??, Avg: ?, Slowest: ?, Mem: ????mb", 0, 0, native.systemFontBold, 20
  );
  displayInfo.x = display.contentWidth / 2;
  displayInfo.y = display.contentHeight - 14;
  local function updateText()
    curTime = system.getTimer();
    dt = curTime - prevTime;
    prevTime = curTime;
    fps = math.floor(1000 / dt);
    mem = system.getInfo("textureMemoryUsed") / 1000000;
    if fps > 60 then
      fps = 60
    end
    frameCount = frameCount + 1;
    if frameCount > 150 then
      avg = avg + fps;
      if fps < slowest then
        slowest = fps;
      end
    end
    local a = math.round(avg / (frameCount - 150));
    a = math.floor(a * math.pow(10, 0) + 0.5) / math.pow(10, 0);
    collectgarbage();
    local sysMem = collectgarbage("count") * 0.001;
    sysMem = math.floor(sysMem * 1000) * 0.001;
    displayInfo.text = "FPS: " .. fps .. ", Avg: " .. a ..
      ", Slowest: " .. slowest ..
      ", T-Mem: " .. string.sub(mem, 1, string.len(mem) - 4) .. "mb" ..
      ", S-Mem: " .. sysMem .. "mb";
    underlay:toFront()
    displayInfo:toFront()
  end
  underlay.isVisible = true;
  displayInfo.isVisible = true;
  Runtime:addEventListener("enterFrame", updateText)

end
I’ll leave it as an exercise for you to walk through this code and understand it, but the high-level explanation is simple: this will display, in real-time (well, close enough anyway!) the frames per second (FPS) your app is achieving, the average FPS since the app started, the slowest FPS recorded, how much texture memory is in use by your app, and how much total system memory your app is using. This is invaluable information because obviously you want a good frame rate throughout, so if you hit a part in your game where it slows down too much, you’ll know exactly where to tune it up. Also, there is a general rule of thumb out there that says you don’t want to use more than about 14 MB of texture memory at any given time, lest you run some lower-end devices out of memory and force-close your app.
Note In reality, there are probably not all that many devices out there anymore where this rule of thumb still matters. However, the underlying point, that texture memory usage should be kept to a minimum, is still valid even on the most high-end devices. Ditto system memory.
Logging Objects
One last function I’d like to toss your way is also very useful when writing your own log file. Listing 11-3 is the dump() function (hey now, no off-color jokes there!).
Listing 11-3. The Unfortunately Named, but Highly Useful, dump( ) Function
function utils:dump(inT)

  local print_r_cache = {};

  local function sub_print_r(inT, indent)

    if (print_r_cache[tostring(inT)]) then
      print(indent .. "*" .. tostring(inT));
    else
      print_r_cache[tostring(inT)] = true;
      if (type(inT) == "table") then
        for pos, val in pairs(inT) do
          if (type(val) == "table") then
            print(indent .. "[" .. pos .. "] => " .. tostring(inT) .. " {");
            sub_print_r(val, indent .. string.rep(" ", string.len(pos) + 8));
            print(indent .. string.rep(" ", string.len(pos) + 6) .. "}");
          elseif (type(val) == "string") then
            print(indent .. "[" .. pos .. '] => "' .. val .. '"'),
          else
            print(indent .. "[" .. pos .. "] => " .. tostring(val));
          end
        end
      else
        print(indent .. tostring(inT));
      end
    end
  end

  if (type(inT) == "table") then
      print(tostring(inT) .. " {");
    sub_print_r(inT, "  ");
    print("}");
  else
    sub_print_r(inT, "  ");
  end

  print();

end
This function simply displays a given object passed to it in all its glory. Pass it a table, for example, and it will recursively list every member in that table. This is something that the basic print() function can’t do, but is something that you wind up needing all the time. Naturally, this is highly useful during development, not just debugging on a real device, but either way it’s very useful.
An Apple a Day: Build for iOS
Building your app for iOS isn’t really any more difficult than doing so for Android. However, there is one key requirement: you must have a Mac.
You can’t build an iOS app on Windows, even though most of the actual build process happens on the Corona Labs servers. This is because Xcode, Apple’s IDE and associated tools, and the iOS SDK, are only available on Mac.
Tip If, like me, you aren’t normally a Mac user, and if you don’t own one already (or have easy access to one), and if you don’t intend to switch to Mac full time, I suggest looking at buying a Mac Mini. Assuming you want to buy new and don’t go the eBay route, this is the cheapest way to get a decent enough Mac for iOS development. They are actually very cool little computers and are more than enough for doing some part-time development. There are also services like MacInCloud (www.macincloud.com) that let you essentially rent a virtual Mac over the Internet.
So, I’ll assume at this point that you have access to a Mac in some fashion. The next step is to install the Corona SDK, Xcode, and the iOS SDK. You already know where to get Corona of course, and the other two can be downloaded from the Mac version of the App Store. Once that’s done, you’re ready to build.
Just like under Windows, fire up the Corona Simulator and load your app. Once your app is running, ensure the simulator is the current app and click the File menu, then Build, and finally iOS. This is just like the procedure when building for Android on Windows as previously described; however, the window that results will look a little different, as shown in Figure 11-5.

Figure 11-5 . iOS build settings window on Mac
The required information is similar to doing Android builds, but at the same time a little different. Application Name and Version Name are just like when doing an Android build. The Build For drop-down allows you to choose whether you’re building for an actual iOS device or for the Xcode simulator. This comes with Xcode/iOS SDK and is similar to the Android emulator, which allows you to test your app on a virtual iOS device. The Supported Devices dropdown allows you to determine whether your app targets iPhone only, iPad only, or is a universal application that is designed to work for either form factor.
The Code Signing Identity is similar to the Keystore/Key Alias fields when building for Android, but in the case of iOS it allows you to select a provisioning profile to build the app. You only need to select a profile if you’re building for a real device (not selecting one when building for the simulator is akin to using the Corona-supplied debug certificate when doing an Android build). If you elect to build for the Xcode simulator then at this point you’re ready to go—simply click Build and the simulator will launch and run your app once the build process completes. For simulator work, this is the end of the process.
A provisioning profile is required to build for a device, though, and this is what ties your development devices to your team, or allows you to publish to the App Store. Before you can even deal with profiles, however, you’ll need to do a few things.
First, you’ll need to register as an Apple developer (https://developer.apple.com/programs/register). Once you do that, you need to create a certificate request. To do so you’ll launch the Keychain Access tool found in the Utilities folder of your Mac. Next you’ll select the Certificate Assistant ![]() Request A Certificate From A Certificate Authority menu. You’ll be asked to provide some information such as e-mail address, name, and so on, very much like when creating a certificate for Android builds. Walk through the process as directed until you come to the end, where you’ll save the generated key.
Request A Certificate From A Certificate Authority menu. You’ll be asked to provide some information such as e-mail address, name, and so on, very much like when creating a certificate for Android builds. Walk through the process as directed until you come to the end, where you’ll save the generated key.
Note Before you can deploy to an actual device and publish to the App Store, you’ll need to cough up the $99 annual fee Apple requires to join their iOS developer program. You can sign up for a developer account without paying this fee up front to gain access to iOS development documentation and tools, but until you pay your dues you will only be able to use the Corona and iOS simulators for development, not physical devices.
Next, log on to the iOS Dev Center web site (https://developer.apple.com/devcenter/ios/index.action) and click the link for the iOS Provisioning Portal. Once there, click Devices in the left-hand column and then click the Add Devices button. Add any devices you intend to develop on, including their unique device ID, which you can find in iTunes when your device is connected.
After your devices are added, while still in the provisioning portal, click Certificates on the left and then click Request Certificate. You will then select the keystore file generated in the previous step. In a few seconds, your certificate will be generated and you’ll be able to download it. Do so, and then double-click the file in Finder to add the certificate to your computer.
After that, you need to create a new app ID. On the left in the provisioning portal, click App IDs, then click the New App ID button. Fill in the required information (description, bundle identifier, etc.) and click Submit. Your app ID will be created.
At this point you are now ready to create a provisioning profile. This is done from the Provisioning link on the left side of the provisioning portal. Assuming you are doing development, select the Development tab (when you’re ready to publish your app, the process is the same, except you’ll create a distribution profile via the Distribution tab). Once there, enter the required information, including the app ID you created, select the devices that the profile will work with, and then click Submit.
Now, launch the Xcode Organizer (Figure 11-6) tool on your Mac and click the Devices tab up top. Then, under the Library heading on the left select Provisioning Profiles. Next, click the Refresh button. The profile you just created should appear there. At this point, quit and restart the Corona simulator if it’s running, and the profile should now be selectable in the Code Signing Identity drop-down.

Figure 11-6 . The Xcode Organizer
As you can see, the process for getting an iOS build ready for deployment to a device is considerably more involved than for Android. Once all the prerequisites are done, however, the process really boils down to a few simple steps.
Creating an iOS App Store Package
One other step that you’ll need to be familiar with at this point is how to create an iOS App Store Package, better known as a .ipa file. You’ll need to do this when you’re ready to distribute your app to the App Store, or if you’re going to use TestFlightApp.com, as described in the TestFlightApp.com section (coming up shortly!).
- Create a folder named Payload, ensuring you use that specific capitalization, somewhere on your Mac.
- Put the .app file that Corona generated for you into it.
- Zip up the folder in Finder.
- Rename the resultant archive to xxx.ipa where xxx is anything you like.
Yep, that’s it! The .ipa file will now be ready to ship off to the App Store (assuming you uses a valid distribution provisioning profile when you built it) or to TestFlightApp.com.
Deploying to iOS Devices
Now that you can build an iOS app that is deployable to one of your registered development devices, how do you actually go about getting it onto a device? Here, as with Android, you have a couple of choices.
First, you can use the Xcode Organizer tool. To do this, first connect your device to your Mac. Then launch Xcode Organizer and look for the device name under the Devices header on the left. You should find the device with a green indicator next to it. Next, expand the device menu and select Applications. Click the Add button, navigate to the folder where the .app file that the Corona Simulator generated for you is, and select it. The app should then be installed on the device.
Alternatively, you can use iTunes to install your app. To do this, open iTunes and connect your device. Then, drag the .app file into the Library in the upper left. You should then see the app available for installation in the Apps tab, and you can install it like any other app.
TestFlightApp.com
One third option, which I personally like quite a bit, is a site called TestFlightApp.com. This site allows you to distribute your app to beta testers without their needing to do anything special in terms of setting up SDKs or any of that.
The process is simple. First, you sign up for a TestFlightApp.com account. Next, you invite users to be part of your testing via tools available on the site. This process will also collect the device IDs of those users. You then add those IDs back on the iOS Provisioning Portal page. Last, you build your app as always and upload it to https://testflightapp.com, and that’s it! The users will receive notification via e-mail of the app’s availability, and will be provided a link to use to install and begin testing it.
This process requires a .ipa file, which was described in the “Creating an iOS App Store Package” section. Other than that, though, the process is very straightforward (oh, and did I mention free?!).
Caution TestFlightApp.com also offers an SDK that allows you to hook in some good telemetry and statistics capturing. Unfortunately, it doesn’t seem that you can use that with a Corona-built app, at least not without purchasing an Enterprise license and writing your own plugin in Objective-C, which is a whole other can of worms, as they say. Also, they are currently working on an Android version of their services that, when ready, will help streamline beta testing on that platform as well.
On-Device Debugging with iOS
When working in the iOS simulator, you can view the log by executing the following in a terminal:
tail -f /var/log/system.log
This is along the lines of using logcat to view logs in Android.
When debugging on a real device you can view those same logs from the Xcode Organizer.
Note Aside from these logs, all the same generic advice given earlier in the “On-Device Debugging with Android” section applies to iOS, too, in terms of extra functions in utils and such. Unfortunately, the native platform tools, whether for Android or iOS, while perhaps helpful in some situations, probably won’t be as helpful as you’d like. Logging and perhaps analytics are probably your best bets for the most part.
The App Store Model of Distribution
Sit here at my knee, children, and let me spin you a tale. Time was, I reckon, way back in history, around the year 2000. I remember like it was . . . just 13 years ago!
Microsoft had come out with what I thought was a pretty cool mobile operating system: PocketPC (later renamed to Windows Mobile, and now of course Windows Phone, but I’ll stick with PocketPC since that’s the timeframe I’m referring to). Back then, when you made an app to sell for PocketPC, you had to do it all yourself. Meaning, you likely created your own web site, as I did, for example, and did your own custom programming to handle purchases and registrations, and all that good stuff. So, you not only had to be an app developer but you had to be a web developer too! You then put your app up there for sale and then went about advertising in whatever way you could.
The plus side to that was complete control and 100% profit. Everything you made went right into your pocket and you could create any sales model that made sense. You could go out and purchase banner ad space that linked back to your site for purchases. You could possibly form a partnership with another developer to include an advertisement for your game when they started up theirs, and vice versa. Whatever you could dream up and make work, it was all up to you.
Now, it didn’t take long for people to think to themselves, “Self, there’s got to be an easier way!”
And before you knew it, there it was: storefront sites started to pop up. These sites would do all the hard work for you: advertising, credit card processing, handling of returns, and so forth. They would do all this in exchange for a percentage of your sales. So, you gave up a little bit off each sale and in return your hassle level went way down.
This worked fairly well, but people who wanted apps still had to find out about these sites. They had to go visit them in the relatively primitive web browser on their device, or, as was more common at the time, they would do so on their PC, download the installation file, manually copy it to their device, and then execute it there to be installed.
It wasn’t a particularly pleasant experience, truth be told, but by and large it did work.
Today, of course, we have what are really the descendants of those storefront sites. Apple’s App Store, Google’s Play store, Amazon’s Appstore for Android: all of these serve the same basic purpose.
They also work in much the same way: for a percentage of each sale, and in some cases some small up-front fees, they will take care of most of the details of selling your apps for you.
In today’s world, though, they go a step further (and some a lot further). As will be discussed in the remainder of this chapter, these are curated experiences to varying degrees. This means that in contrast to the old days, where the storefront sites would generally sell any app—and of course you could still sell them yourself—the companies that run these new app stores do some degree of quality control on the apps they sell. There are requirements you have to meet, guidelines you have to follow.
But the benefit is great: we very much live in an app-centric world right now. People with their fancy, über-powerful smartphones think of apps when they think of things to do with their devices. As part of that mind-set, they are very much trained to go to the app stores provided to them, and in some cases that’s the only way they can get apps on to their device (without resorting to nonstandard techniques at least).
These modern-day app stores also absolutely dwarf those old storefront sites, both in terms of the volume of apps available and in terms of your profit potential. Simply put, even if there are other ways you might sell your apps, if you aren’t in these modern stores, you are almost certainly giving away money (and if money isn’t your motivating factor, then you’re giving up exposure, too).
So what are the major app stores out there today, and what does it take to get into them? Well, as I said, that’s not a simple, one-size-fits-all answer—it’s actually a spectrum. Let’s start by discussing the one that most developers generally acknowledge as easiest to deal with in most regards.
Google Play
Google Play (http://play.google.com) is the latest iteration of the store Google has built for its Android platform. While there are a number of other stores out there for Android, Google Play is what you might call the canonical store, and certainly the most popular overall. It also happens to be the one with possibly the lowest barrier to entry.
You can get going with Google Play in just a few minutes! All it takes is a few simple steps:
- Register for a Google Play publisher account (https://accounts.google.com/ServiceLogin?service=androiddeveloper&passive=1209600&continue=https://play.google.com/apps/publish/v2/&followup=https://play.google.com/apps/publish/v2/).
- Pay the $25 registration fee when you sign up.
- Wait approximately 48 hours for your registration to be processed (may be considerably less, but could take this long in some cases).
- If you intend to publish only free apps, then you’re done when your registration is processed.
- If you intend to sell apps, you also need to set up a Google Merchant account (https://accounts.google.com/ServiceLogin?service=sierra<mpl=seller&continue=https://checkout.google.com/merchantSignInRedirect). You can go ahead and do this while you’re waiting for your registration to process.
Once you’re alerted via e-mail that your registration is complete, you can log on to the developer console (https://play.google.com/apps/publish) and you can publish an app at your convenience.
Tip A unique feature of Google Play, and one that is incredibly handy, is the ability to browse for apps on your PC and then automatically install apps to an Android device. As long as your device is known to Google Play, you’ll be able to select it from a list when you click the Install button for a given app, and the app will magically be installed in just a few seconds!
Google takes 30% of each sale; 70% goes to you. They handle all the details of sales and refunds for you, and may even do some small degree of advertising on your behalf (although as your only source of advertising it’s nothing to count on). You are paid each month via your Google Merchant account, which results in a direct deposit to the checking account you put on file. There are no recurring fees either, just the initial $25. That’s quite a low barrier to entry!
Publishing to Google Play
Adding a new application is a simple step-by-step process that the developer console walks you through. Along the way you’ll need to enter a host of information, including application title, description, recent changes (if updating an already published app), categories under which your app should appear in Google Play, URLs for your web site, pricing information, and other basic information about the app. You’ll also have the opportunity to upload screenshots and even link to demonstration videos of your app in action.
Naturally, you’ll have to upload the APK you generated as well, signed with the certificate in the keystore you created as detailed in the “Feed the Robot” section. My experience has been that once you do all this, it should take less than an hour in most cases for your app to appear in Google Play, although it could take 24 to 48 hours when browsing Google Play on your device, because Google Play only shows apps compatible with your device, and it takes some time to populate that list.
Unlike the Apple App Store, which I’ll discuss in an upcoming section, Google is extremely lenient when it comes to the apps it publishes. There are some automated test tools it runs against your APK to ensure validity and to weed out some obvious malware, but generally you can publish anything you like without a problem.
Note Some people feel this is too lenient, but it’s entirely a matter of opinion. Some people prefer the more stringent Apple curation approach, while others think the Google approach is more open. Certainly it can’t be argued that it is easier and faster to get an app published in Google Play, and virtually anyone can do it, but whether that’s a good thing or a bad thing is for you as a customer to decide. As an app developer, though, you certainly want to be in as many stores on as many platforms as possible to maximize your earning potential.
Updating your app later is similarly easy: just go back into the developer console, edit your app, upload the new APK (and screenshots if needed), update the meta-information, and click a button. Usually in only a few minutes your new version will be available to the world.
If you are charging for your app, the Google Merchant account you created can be accessed (http://checkout.google.com/sell) to see all the sales you’ve had, as well as refunds given. You can also get financial reports there for tax purposes.
All in all, there really isn’t much to working with Google Play! Once you know how to create an APK using the steps discussed earlier in this chapter, and you have the necessary account(s) set up with Google, it’s really just entering some information and clicking a few buttons.
Other App Stores: Amazon Appstore for Android and Barnes & Noble Nook Store
As I mentioned, the Google Play store is the One App Store to Rule Them All™ for Android—or at least, that’s probably what Google would want you to think. Strictly speaking, thought, it isn’t the only game in town.
With the release of their Kindle device, which is Android based, Amazon has created their own store, pedantically named the Amazon Appstore for Android. However, Amazon’s store isn’t just for Kindle devices: you can install their store app (http://www.amazon.com/mobile-apps/b?ie=UTF8&node=2350149011) on any Android device (as long as you set your device to allow installation of third-party apps from unknown sources; see your device’s security settings for these options).
Once you do so, you’ll be able to browse their collection of apps. This includes much of what you find on Google Play, but there might be a few other gems unique to the Amazon store to be found. Also, from the first day their store went live, Amazon has given away one app for free daily. As with Android apps in general, if you get an app for free that normally isn’t, you’ll still “own” the app and can install it later.
Tip In case it didn’t occur to you: even if you don’t intend to use Amazon’s store, I generally still suggest visiting it daily to get the free app. That way, if you decide down the road you want an app, you may find that you in fact own it already, thanks to Amazon!
Nominally, Amazon charges a $99 annual fee to publish to their store. However, they are “currently” waiving that fee. I use quotes because they have in fact been waiving that fee from the very beginning! They may well stop waiving it at some point, but it seems like a bit of marketing on their part to continue “waiving” it. Like Google, Amazon takes a 30% cut of each sale. However, there’s no extra merchant-type account to deal with; the single account you create (https://developer.amazon.com/welcome.html) takes care of all of it in one place. Payment is monthly with Amazon as well, and again is a direct deposit.
Submitting an app is very much like the Google process and requires substantially the same information. The difference, though, is that Amazon does some deeper verification of your app and even does a little bit of quality control (although very little, it seems). There is also a longer waiting period for an app to be initially published, sometimes up to two weeks. Updates tend to be processed much quicker, however.
Barnes & Noble also has a store specific to their Nook devices. Unlike Amazon, however, this store truly is specific to those devices: you cannot access the Nook store from a non–Barnes & Noble device.
Overall, the process is very similar to both Google Play and the Amazon Appstore, and the fees involved are very similar in terms of setting up an account and selling your apps. However, Barnes & Noble is the most stringent of the three when it comes to reviewing your app. In fact, they have been known to reject apps that aren’t of “sufficient quality.” Other times, you may have to go through review a few times to get all the kinks worked out to their liking before your app is published.
Note My own experience with Barnes & Noble was like this. My game, Engineer, had to go through review three times before it was accepted. Each time there was something I had missed that didn’t meet their app guidelines, which are available to you once you create a developer account with them. I strongly suggest becoming familiar with these guidelines before you begin writing your apps. That will make your life a lot easier down the road, I can tell you from experience!
As I mentioned, it’s a good idea to be in as many stores as possible, to reach as large an audience as you can with your apps. Of course, using Corona gives your app the ability to be on many supported platforms, so by choosing Corona you must already be thinking along these lines! None of the Android stores are difficult to get into, nor are they difficult to deal with once you’re in them, so I definitely encourage you not to ignore any of them, for the sake of your bank account if nothing else!
The Only Game in Town for iOS: The Apple App Store
You’ll need to pay the $99 fee to get into the iOS developer program before you can publish to the App Store. Once you do that, the process isn’t very much different than publishing to Google Play. Everything you need is on the Apple Developer Center web site (https://developer.apple.com/membercenter).
Getting published is a more difficult experience here than in other stores because Apple takes a much more proactive role in ensuring quality. They do a far more in-depth review of applications and have a much more stringent set of guidelines you’ll need to follow. The process also takes considerably longer, sometimes weeks. The result, though, is that apps that make it through the process are all but guaranteed to be of a certain level of quality and to have a certain degree of consistency among them.
The app review guidelines can be found here at https://developer.apple.com/appstore/guidelines.html and I highly suggest reviewing them before you submit your app for review. It’s not at all unusual to fail review the first (or even second or third!) time through, but the more familiar you are with the guidelines and the more you strive to adhere to them, the better your chances are. It should be noted that if you do fail, subsequent review rounds tend to happen quite a bit faster.
Publishing to the Apple App Store
Figure 11-7 shows what you’ll see when you visit the Apple Developer Center site and log in after becoming a member.
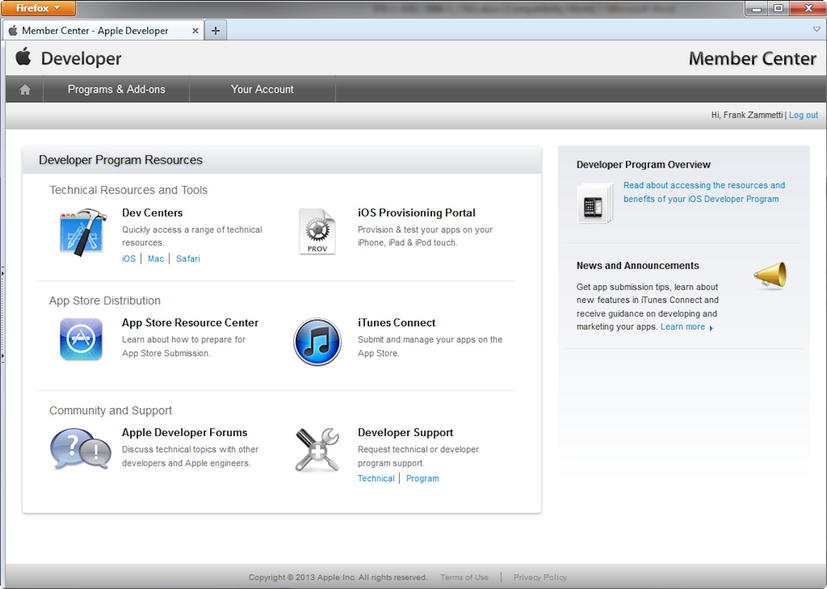
Figure 11-7 . The Apple Developer portal page
Once there, you’ll use iTunes Connect to begin the process. When you click that link you’ll be greeted with the window shown in Figure 11-8.
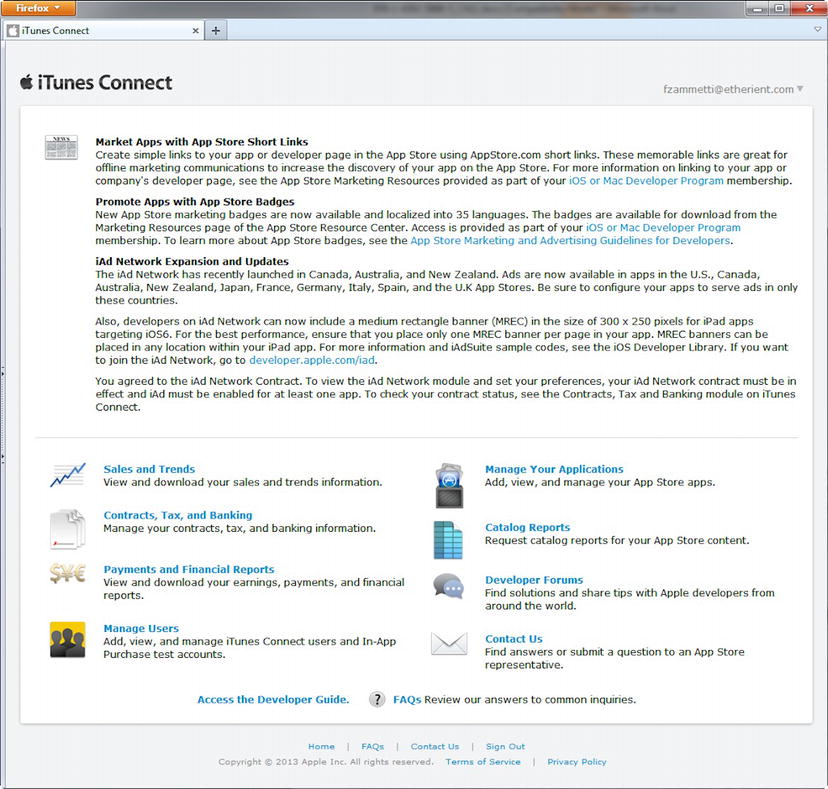
Figure 11-8 . iTunes Connect site
Click the Manage Your Applications link and you’ll be brought to a page that lists all your existing apps, if any, but the most important feature will be the Add New App button. Once you click that you’ll be guided through the process of creating an iTunes Connect app record, which you can think of as the stub of your new application. You’ll enter some basic application information as in other stores and eventually, at the end, the record will be created.
You’ll be returned to iTunes Connect and will need to select the new link to manage your new application that has been added for you by the system. You will then have to fill out an export compliance questionnaire and then click the Ready to Upload Binary button. The status of the record will then change to Waiting for Upload.
The next step is back on your Mac in the Corona Simulator. Build your app again and this time use a distribution profile that you create. Once you do so you’ll be greeted with the message shown in Figure 11-9.
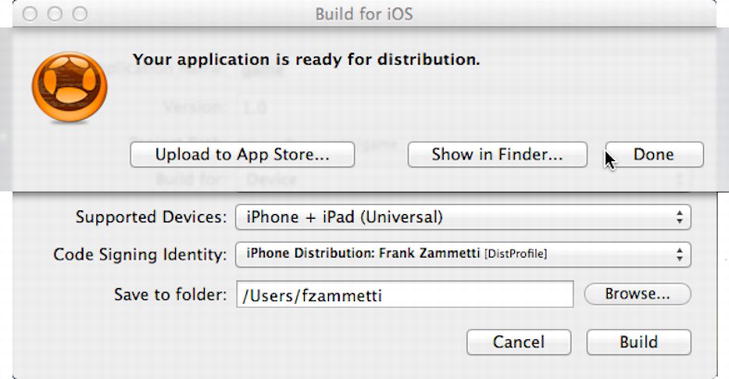
Figure 11-9 . Building for distribution
Click the Upload to App Store button and the Application Loader (Figure 11-10) will be launched. This tool will walk you through the process of uploading your app in a few simple steps.
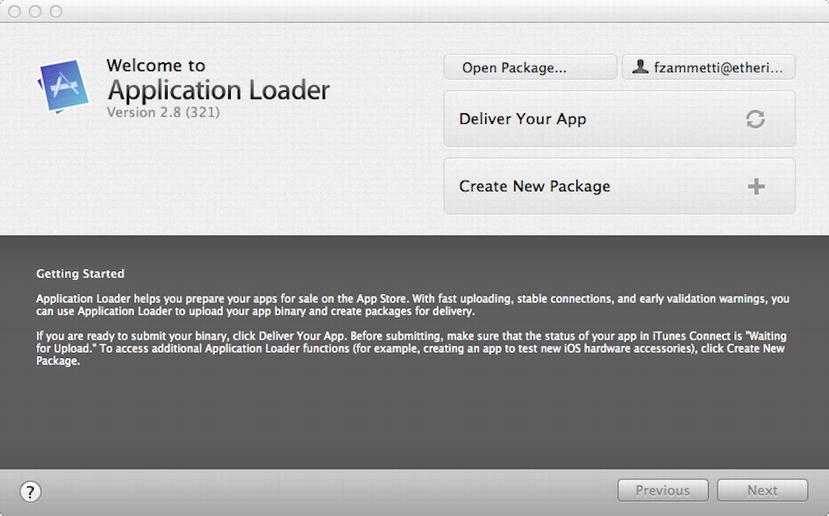
Figure 11-10 . Application Loader
You simply click the Deliver Your App button and follow the simple directions. Note that you will only be able to do this if the record on the iTunes Connect site is in the Waiting for Upload status, so be sure it is before launching Application Loader or you’ll have to start back in the Corona Simulator again.
Once the binary is uploaded your app will be pending review, and then it’s just a waiting game (and crossing your fingers hoping it gets through review unscathed!). If you do need to make changes based on the review, you’ll follow the same basic steps outlined here and again click the Ready to Upload Binary button in the iTunes Connect site and upload the new version through Application Loader.
Eventually, though, your app will be published and with a little luck you’ll be putting your kids through college with money to spare in no time!
Summary
In this chapter, you took the final steps (well, “final” steps in terms of initial development at least—developing a good app almost never stops!) that any application goes through: building and deploying to various real devices for testing.
I also talked about some techniques for debugging on a real device to gather information and deal with real-world issues that don’t always arise in the Corona Simulator.
Last, I discussed the app store models of Android and iOS and what it takes to get an app published in those stores.
And with this final chapter, we conclude our journey of exploration in the Corona SDK. I hope you’ve enjoyed the trip and have learned a lot along the way. I bid you now venture out into the world and produce great games and applications with all you’ve learned, and it goes without saying: name your next child after me!