
![]()
Automated Build with Phing
If version control is one side of the coin, then automated build is the other. Version control allows multiple developers to work collaboratively on a single project. With many coders each deploying a project in her own space, automated build soon becomes essential. One developer may have her Web-facing directory in /usr/local/apache/htdocs; another might use /home/bibble/public_html. Developers may use different database passwords, library directories, or mail mechanisms. A flexible codebase might easily accommodate all of these differences, but the effort of changing settings and manually copying directories around your file system to get things working would soon become tiresome—especially if you need to install code in progress several times a day (or several times an hour).
You have already seen that PEAR handles installation. You’ll almost certainly want to deliver a project to an end user via a PEAR package, because that mechanism provides the lowest barrier to installation (users will likely already have PEAR present on their systems, and PEAR supports network installation). PEAR handles the last stages of installation admirably, but there’s a lot of work that might need automating before a package has been created. You may want to extract files from a version control repository, for example. You should run tests and compile files together into a build directory. Finally, you’ll want to automate the creation of the PEAR package itself. In this chapter, I introduce you to Phing, which handles just such jobs. This chapter will cover:
- Getting and installing Phing: Who builds the builder?
- Properties: Setting and getting data.
- Types: Describing complex parts of a project.
- Targets: Breaking a build into callable, interdependent sets of functionality.
- Tasks: The things that get stuff done.
What Is Phing?
Phing is a PHP tool for building projects. It is very closely modeled on the hugely popular (and very powerful) Java tool called Ant. Ant was so named because it is small but capable of constructing things that are very large indeed. Both Phing and Ant use an XML file (usually named build.xml) to determine what to do in order to install or otherwise work with a project.
The PHP world really needs a good build solution. Serious developers have had a number of options in the past. First, it is possible to use make, the ubiquitous Unix build tool that is still used for most C and Perl projects. However, make is extremely picky about syntax and requires quite a lot of shell knowledge, up to and including scripting—this can be challenging for some PHP programmers who have not come to programming via the Unix or Linux command line. What’s more, make provides very few built-in tools for common build operations such as transforming file names and contents. It is really just a glue for shell commands. This makes it hard to write programs that will install across platforms. Not all environments will have the same version of make, or even have it at all. Even if you have make, you may not have all the commands the makefile (the configuration file that drives make) requires.
Phing’s relationship with make is illustrated in its name: Phing stands for PHing Is Not Gnu make. This playful recursion is a common coder’s joke (for example, GNU itself stands for Gnu is Not Unix).
Phing is a native PHP application that interprets a user-created XML file in order to perform operations on a project. Such operations would typically involve the copying of files from a distribution directory to various destination directories, but there is much more to Phing. Phing can be used to generate documentation, run tests, invoke commands, run arbitrary PHP code, create PEAR packages, replace keywords in files, strip comments, and generate tar/gzipped package releases. Even if Phing does not yet do what you need, it is designed to be easily extensible.
Because Phing is itself a PHP application, all you need to run it is a recent PHP engine. As Phing is an application for installing PHP applications, the presence of a PHP executable is a reasonably safe bet.
You have seen that PEAR packages are breathtakingly easy to install. PEAR supports its own automated build mechanism. Because PEAR is bundled with PHP, should you not use the PEAR mechanism to install your own projects? Ultimately the answer to this is yes. PEAR makes installation easy, and supports dependencies well (so that you can ensure your packages are compatible with one another). There’s a lot of tough work that must be automated during development, up to and including package creation. This technique, to use Phing for project development but to have it generate a PEAR package upon release, is used to produce the Phing application itself.
If it is difficult to install an install tool, then something is surely wrong! However, assuming that you have PHP 5 or better on your system (and if you haven’t, this isn’t the book for you!), installation of Phing could not be easier.
You can acquire and install Phing with two simple commands.
$ pear channel-discover pear.phing.info
$ pear install phing/phing
This will install Phing as a PEAR package. You should have write permission for your PEAR directories, which, on most Unix or Linux systems, will mean running the command as the root user.
If you run into any installation problems, you should visit the download page at http://phing.info/trac/wiki/Users/Download. You will find plenty of installation instructions there.
You should now be ready to get cracking with Phing! Let’s test things out:
$ phing -v
Phing version 2.5.0
The -v flag to the phing command causes the script to return version information. By the time you read this, the version number may have changed, but you should see a similar message when you run the command on your system.
Now I’ll run the phing command without arguments:
$ phing
Buildfile: build.xml does not exist!
As you can see, Phing is lost without instructions. By default, it will look for a file called build.xml. Let’s build a minimal document so that we can at least make that error message go away:
<?xml version="1.0"?>
<!-- build xml -->

<project name="megaquiz" default="main">
    <target name="main"/>
</project>
This is the bare minimum you can get away with in a build file. If we save the previous example as build.xml and run phing again, we should get some more interesting output:
$ phing
Buildfile: /home/bob/working/megaquiz/build.xml
Warning: target 'main' has no tasks or dependencies

megaquiz > main:

BUILD FINISHED

Total time: 1.3404 second
A lot of effort to achieve precisely nothing, you may think, but we have to start somewhere! As you can see, Phing also helpfully points out there’s nothing very useful about this build file. Look again at that build file. Because we are dealing with XML, I include an XML declaration. As you probably know, XML comments look like this:
<!-- this is an XML comment. OK? -->
So, because it’s a comment, the second line in my build file is ignored. You can put as many comments as you like in your build files, and as they grow, you should make full use of this fact. Large build files can be hard to follow without suitable comments.
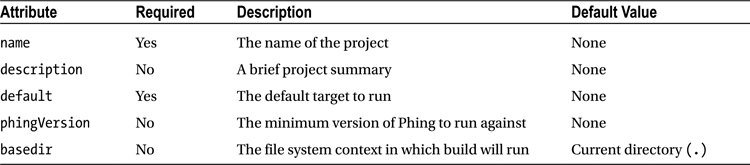
The real start of any build file is the project element. The project element can include up to five attributes. Of these, name and default are compulsory. The name attribute establishes the project’s name; default defines a target to run if none are specified on the command line. An optional description attribute can provide summary information. You can specify the context directory for the build using a basedir attribute. If this is omitted, the current working directory will be assumed. Finally, you can specify the minimum version of the Phing application with which the build file should work using phingVersion. You can see these attributes summarized in Table 19-1.
Table 19-1. The Attributes of the project Element
Once I have defined a project element, I must create at least one target—the one I reference in the default attribute.
Targets
Targets are similar, in some senses, to functions. A target is a set of actions grouped together to achieve an objective: to copy a directory from one place another, for example, or to generate documentation.
In my previous example, I included a bare-minimum implementation for a target:
<target name="main"/>
As you can see, a target must define at least a name attribute. I have made use of this in the project element. Because the default element points to the main target, this target will be invoked whenever Phing is run without command-line arguments. This was confirmed by the output:
megaquiz > main:Targets can be organized to depend on one another. By setting up a dependency between one target and another, you tell Phing that the first target should not run before the target it depends on has been run. Now to add a dependency to my build file:
<?xml version="1.0"?>
<!-- build xml -->

<project name="megaquiz"
         default="main"
>
    <target name="runfirst" />
    <target name="runsecond" depends="runfirst"/>
    <target name="main" depends="runsecond"/>
</project>
As you can see, I have introduced a new attribute for the target element. depends tells Phing that the referenced target should be executed before the current one, so I might want a target that copies certain files to a directory to be invoked before one that runs a transformation on all files in that directory. I added two new targets in the example: runsecond, on which main depends, and runfirst, on which runsecond depends. Here’s what happens when I run Phing with this build file:
$ phing
Buildfile: /home/bob/working/megaquiz/build.xml
Warning: target 'runfirst' has no tasks or dependencies

megaquiz > runfirst:
megaquiz > runsecond:
megaquiz > main:

BUILD FINISHED

Total time: 0.3029 seconds
As you can see, the dependencies are honored. Phing encounters the main target, sees its dependency, and moves back to runsecond. runsecond has its own dependency, and Phing invokes runfirst. Having satisfied its dependency, Phing can invoke runsecond. Finally, main is invoked. The depends attribute can reference more than one target at a time. A comma-separated list of dependencies can be provided, and each will be honored in turn.
Now that I have more than one target to play with, I can override the project element’s default attribute from the command line:
$ phing runsecond
Buildfile: /home/bob/working/megaquiz/build.xml
Warning: target 'runfirst' has no tasks or dependencies

megaquiz > runfirst:
megaquiz > runsecond:

BUILD FINISHED

Total time: 0.2671 seconds
By passing in a target name, I cause the default attribute to be ignored. The target matching my argument is invoked instead (as well as the target on which it depends). This is useful for invoking specialized tasks, such as cleaning up a build directory or running postinstall scripts.
The target element also supports an optional description attribute, to which you can assign a brief description of the target’s purpose:
<?xml version="1.0"?>
<!-- build xml -->

<project name="megaquiz"
         default="main"
         description="A quiz engine">
    <target name="runfirst"
            description="The first target" />
    <target name="runsecond"
            depends="runfirst"
            description="The second target" />
    <target name="main"
            depends="runsecond"
            description="The main target" />
</project>
Adding a description to your targets makes no difference to the normal build process. If the user runs Phing with a -projecthelp flag, however, the descriptions will be used to summarize the project:
$ phing -projecthelp
Buildfile: /home/bob/working/megaquiz/build.xml
Warning: target 'runfirst' has no tasks or dependencies
A quiz engine
Default target:
-------------------------------------------------------------------------------
 main       The main target
Main targets:
-------------------------------------------------------------------------------
 main       The main target
 runfirst   The first target
 runsecond  The second target
Notice that I added the description attribute to the project element, too. If you want to hide a target from a listing like this, you can add a hidden attribute. This is useful for targets that provide housekeeping functionality but which should not be invoked directly from the commandline.
<target name="housekeeping" hidden="true" />
    <!-- useful things that should not be called directly -->
</target>
Properties
Phing allows you to set such values using the property element.
Properties are similar to global variables in a script. As such, they are often declared toward the top of a project to make it easy for developers to work out what’s what in the build file. Here I create a build file that works with database information:
<?xml version="1.0"?>
<!-- build xml -->

<project name="megaquiz"
         default="main">

    <property name="dbname"  value="megaquiz" />
    <property name="dbpass"  value="default" />
    <property name="dbhost" value="localhost" />

    <target name="main">
        <echo>database: ${dbname}</echo>
        <echo>pass:     ${dbpass}</echo>
        <echo>host:     ${dbhost}</echo>
    </target>
</project>
I introduced a new element: property. property requires name and value attributes. Notice also that I have added to the main target. echo is an example of a task. I will explore tasks more fully in the next section. For now, though, it’s enough to know that echo does exactly what you would expect—it causes its contents to be output. Notice the syntax I use to reference the value of a property here: by using a dollar sign, and wrapping the property name in curly brackets, you tell Phing to replace the string with the property value.
${propertyname}
All this build file achieves is to declare three properties and to print them to standard output. Here it is in action:
$ phing
Buildfile: /home/bob/working/megaquiz/build.xml
megaquiz > main:
     [echo] database: megaquiz
     [echo] pass:     default
     [echo] host:     localhost
BUILD FINISHED
Total time: 0.4402 seconds
Now that I have introduced properties, I can wrap up my exploration of targets. The target element accepts two additional attributes: if and unless. Each of these should be set with the name of a property. When you use if with a property name, the target will only be executed if the given property is set. If the property is not set, the target will exit silently. Here, I comment out the dbpass property and make the main task require it using the if attribute:
<property name="dbname"  value="megaquiz" />
<!--<property name="dbpass"  value="default" />-->
<property name="dbhost" value="localhost" />

<target name="main" if="dbpass">
    <echo>database: ${dbname}</echo>
    <echo>pass:     ${dbpass}</echo>
    <echo>host:     ${dbhost}</echo>
</target>
Let’s run phing again:
$ phing
Buildfile: /home/bob/working/megaquiz/build.xml

megaquiz > main:

BUILD FINISHED

Total time: 0.2628 seconds
As you can see, I have raised no error, but the main task did not run. Why might I want to do this? There is another way of setting properties in a project. They can be specified on the command line. You tell Phing that you are passing it a property with the -D flag followed by a property assignment. So the argument should look like this:
-Dname=value
In my example, I want the dbname property to be made available via the command line:
$ phing -Ddbpass=userset
Buildfile: /home/bob/working/megaquiz/build.xml

megaquiz > main:

     [echo] database: megaquiz
     [echo] pass:     userset
     [echo] host:     localhost

BUILD FINISHED

Total time: 0.4611 seconds
The if attribute of the main target is satisfied that the dbpass property is present, and the target is allowed to execute.
As you might expect, the unless attribute is the opposite of if. If a property is set and it is referenced in a target’s unless attribute, then the target will not run. This is useful if you want to make it possible to suppress a particular target from the command line. So I might add something like this to the main target:
<target name="main" unless="suppressmain">
main will be executed unless a suppressmain property is present:
$ phing -Dsuppressmain=yes
Now that I have wrapped up the target element, Table 19-2 shows a summary of its attributes.
Table 19-2. The Attributes of the Target Element
Attribute |
Required |
Description |
|---|---|---|
| name | Yes | The name of the target |
| depends | No | Targets on which the current depends |
| if | No | Execute target only if given property is present |
| unless | No | Execute target only if given property is not present |
| hidden | No | Hide target from lists and summaries |
| description | No | A short summary of the target’s purpose |
When a property is set on the command line, it overrides any and all property declarations within the build file. There is another condition in which a property value can be overwritten. By default, if a property is declared twice, the original value will have primacy. You can alter this behavior by setting an attribute called override in the second property element. Here’s an example:
<?xml version="1.0"?>
<!-- build xml -->

<project name="megaquiz"
         default="main"
>

    <property name="dbpass"  value="default" />

    <target name="main">
        <property name="dbpass" override="yes" value="specific" />
        <echo>pass:     ${dbpass}</echo>
    </target>

</project>
I set a property called dbpass, giving it the initial value "default". In the main target I set the property once again, adding an override attribute set to "yes" and providing a new value. The new value is reflected in the output:
$ phing
Buildfile: /home/bob/working/megaquiz/build.xml

megaquiz > main:

     [echo] pass:     specific

BUILD FINISHED

Total time: 0.3802 seconds
If I had not set the override element in the second property element, the original value of "default" would have stayed in place. It is important to note that targets are not functions: there is no concept of local scope. If you override a property within a task, it remains overridden for all other tasks throughout the build file. You could get around this, of course, by storing a property value in a temporary property before overriding, and then resetting it when you have finished working locally.
So far, I have dealt with properties that you define yourself. Phing also provides built-in properties. You reference these in exactly the same way that you would reference properties you have declared yourself. Here’s an example:
<?xml version="1.0"?>
<!-- build xml -->

<project name="megaquiz"
         default="main"
>

    <target name="main">
        <echo>name:     ${phing.project.name}</echo>
        <echo>base:     ${project.basedir}</echo>
        <echo>home:     ${user.home}</echo>
        <echo>pass:     ${env.DBPASS}</echo>
    </target>

</project>
I reference just a few of the built-in Phing properties. phing.project.name resolves to the name of the project as defined in the name attribute of the project element; project.basedir gives the starting directory; user.home provides the executing user’s home directory (this is useful for providing default install locations).
Finally, the env prefix in a property reference indicates an operating system environment variable. So by specifying ${env.DBPASS}, I am looking for an environment variable called DBPASS. Here I run Phing on this file:
$ phing
Buildfile: /home/bob/working/megaquiz/build.xml

megaquiz > main:

     [echo] name:     megaquiz
     [echo] base:     /home/bob/working/megaquiz
     [echo] home:     /home/bob
     [echo] pass:     ${env.DBPASS}

BUILD FINISHED

Total time: 0.1120 seconds
Notice that the final property has not been translated. This is the default behavior when a property is not found—the string referencing the property is left untransformed. If I set the DBPASS environment variable and run again, I should see the variable reflected in the output:
$ export DBPASS=wooshpoppow
$ phing
Buildfile: /home/bob/working/megaquiz/build.xml

megaquiz > main:
     ...
     [echo] pass:     whooshpoppow

BUILD FINISHED

Total time: 0.2852 seconds
So now you have seen three ways of setting a property: the property element, a command line argument, and an environment variable.
There is a fourth approach that complements these. You can use a separate file to specify property values. As my projects grow in complexity I tend to favor this approach. Let’s return to a basic build file:
<?xml version="1.0"?>
<!-- build xml -->

<project name="megaquiz"
         default="main">

    <target name="main">
        <echo>database: ${dbname}</echo>
        <echo>pass:     ${dbpass}</echo>
        <echo>host:     ${dbhost}</echo>
    </target>
</project>
As you can see, this build file simply outputs properties without first declaring them, or checking that their values exist. This is what I get when I run this with no arguments:
$ phing
...
     [echo] database: ${dbname}
     [echo] pass:     ${dbpass}
     [echo] host:     ${dbhost}
...
Now to declare my properties in a separate file. I’ll call it megaquiz.properties:
dbname=filedb
dbpass=filepass
dbhost=filehost
Now I can apply this file to my build process with Phing’s propertyfile option:
$ phing -propertyfile megaquiz.properties
...
     [echo] database: filedb
     [echo] pass:     filepass
     [echo] host:     filehost
...
I find this mechanism much more convenient than managing long lists of command line options. However, you do need to be careful not to check your property file into your version control system!
You can use targets to ensure that properties are populated. Let’s say, for example, that my project requires a dbpass property. I would like the user to set dbpass on the command line (this always has priority over other property assignment methods). Failing that, I should look for an environment variable. Finally, I should give up and go for a default value:
<?xml version="1.0"?>
<!-- build xml -->

<project name="megaquiz"
         default="main">

    <target name="setenvpass" if="env.DBPASS" unless="dbpass">
        <property name="dbpass" override="yes" value="${env.DBPASS}" />
    </target>

    <target name="setpass" unless="dbpass" depends="setenvpass">
        <property name="dbpass" override="yes" value="default" />
    </target>

    <target name="main" depends="setpass">
        <echo>pass:     ${dbpass}</echo>
    </target>

</project>
So, as usual, the default target main is invoked first. This has a dependency set, so Phing goes back to the setpass target. setpass, though, depends on setenvpass, so I start there. setenvpass is configured to run only if dbpass has not been set and if env.DBPASS is present. If these conditions are met, then I set the dbpass property using the property element. At this stage then, dbpass is populated either by a command-line argument or by an environment variable. If neither of these were present, then the property remains unset at this stage. The setpass target is now executed, but only if dbpass is not yet present. In this case, it sets the property to the default string: "default".
Conditionally Setting Property Values with the Condition task
The previous example set up quite a complex assignment logic. More often, however, you’ll need a simple default value. The condition task allows you to set a property’s value based upon configurable conditions. Here is an example:
<?xml version="1.0"?>

<!-- build xml -->

<project name="megaquiz"
         default="main">

    <condition property="dbpass" value="default">
        <not>
            <isset property="dbpass" />
        </not>
    </condition>

    <target name="main">
        <echo>pass:     ${dbpass}</echo>
    </target>

</project>
The condition task requires a property attribute. It also optionally accepts a value attribute, which is assigned to the property if the nested test clause resolves to true. If no value attribute is provided, then the property will be set to true if the nested test resolves to true.
The test clause is one of a number of tags, some of which like not in this example accept their own nested elements. I used the isset element which returns true if the referenced property is set. Because I want to assign a value to the dbpass property if it is not set, I need to negate this result by wrapping it in the not tag. This inverts the resolution of the tag it contains. So, in terms of PHP syntax, the condition task in my example is analogous to:
if ( ! isset( $dbname ) ) {
    $dbname = "default";
}
![]() Note You can see a list of all available condition elements in the Phing documentation at http://www.phing.info/docs/guide/stable/chapters/ProjectComponents.html#Conditions
Note You can see a list of all available condition elements in the Phing documentation at http://www.phing.info/docs/guide/stable/chapters/ProjectComponents.html#Conditions
Types
You may think that having looked at properties, you are now through with data. In fact, Phing supports a set of special elements called types that encapsulate different kinds of information useful to the build process.
FileSet
Let’s say that you need to represent a directory in your build file, a common situation as you might imagine. You could use a property to represent this directory, certainly, but you’d run into problems straightaway if your developers use different platforms that support distinct directory separators. The answer is the FileSet data type. FileSet is platform independent, so if you represent a directory with forward slashes in the path, they will be automatically translated behind the scenes into backslashes when the build is run on a Windows machine. You can define a minimal fileset element like this:
<fileset dir="src/lib" />
As you can see, I use the dir attribute to set the directory I wish to represent. You can optionally add an id attribute, so that you can refer to the fileset later on:
<fileset dir="src/lib" id="srclib">
The FileSet data type is particularly useful in specifying types of documents to include or exclude. When installing a set of files, you may not wish those that match a certain pattern to be included. You can handle conditions like this in an excludes attribute:
<fileset dir="src/lib" id="srclib"
     excludes="**/*_test.php **/*Test.php" />
Notice the syntax I have used in the excludes attribute. Double asterisks represent any directory or subdirectory within src/lib. A single asterisk represents zero or more characters. So I am specifying that I would like to exclude files that end in _test.php or Test.php in all directories below the starting point defined in the dir attribute. The excludes attribute accepts multiple patterns separated by white space.
I can apply the same syntax to an includes attribute. Perhaps my src/lib directories contain many non-PHP files that are useful to developers but should not find their way into an installation. I could exclude those files, of course, but it might be simpler just to define the kinds of files I can include. In this case, if a file doesn’t end in .php, it isn’t going to be installed:
<fileset dir="src/lib" id="srclib"
     excludes="**/*_test.php **/*Test.php"
     includes="**/*.php" />
As you build up include and exclude rules, your fileset element is likely to become overly long. Luckily, you can pull out individual exclude rules and place each one in its own exclude subelement. You can do the same for include rules. I can now rewrite my FileSet like this:
<fileset dir="src/lib" id="srclib">
     <exclude name="**/*_test.php" />
     <exclude name="**/*Test.php" />
     <include name="**/*.php" />
</fileset>
You can see some of the attributes of the fileset element in Table 19-3.
Table 19-3. Some Attributes of the Fileset Element
Attribute |
Required |
Description |
|---|---|---|
| refid | No | Current fileset is a reference to fileset of given ID |
PatternSet
As you build up patterns in your fileset elements (and in others), there is a danger that you will begin to repeat groups of exclude and include elements. In my previous example, I defined patterns for test files and regular code files. I may add to these over time (perhaps I wish to include .conf and .inc extensions to my definition of code files). If I define other fileset elements that also use these patterns, I will be forced to make any adjustments across all relevant fileset elements.
You can overcome this problem by grouping patterns into patternset elements. The patternset element groups include and exclude elements so that they can be referenced later from within other types. Here I extract the include and exclude elements from my fileset example and add them to patternset elements:
<patternset id="inc_code">
     <include name="**/*.php" />
     <include name="**/*.inc" />
     <include name="**/*.conf" />
</patternset>

<patternset id="exc_test">
     <exclude name="**/*_test.php" />
     <exclude name="**/*Test.php" />
</patternset>
I create two patternset elements, setting their id attributes to inc_code and exc_test respectively. inc_code contains the include elements for including code files, and exc_test contains the exclude files for excluding test files. I can now reference these patternset elements within a fileset:
<fileset dir="src/lib" id="srclib">
     <patternset refid="inc_code" />
     <patternset refid="exc_test" />
</fileset>
To reference an existing patternset, you must use another patternset element. The second element must set a single attribute: refid. The refid attribute should refer to the id of the patternset element you wish to use in the current context. In this way, I can reuse patternset elements:
<fileset dir="src/views" id="srcviews">
     <patternset refid="inc_code" />
</fileset>
Any changes I make to the inc_code patternset will automatically update any types that use it. As with FileSet, you can place exclude rules either in an excludes attribute or a set of exclude subelements. The same is true of include rules.
Some patternset element attributes are summarized in Table 19-4.
Table 19-4. Some Attributes of the Patternset Element
Attribute |
Required |
Description |
|---|---|---|
| Id | No | A unique handle for referring to the element |
| excludes | No | A list of patterns for exclusion |
| includes | No | A list of patterns for inclusion |
| refid | No | Current patternset is a reference to patternset of given ID |
FilterChain
The types that I have encountered so far have provided mechanisms for selecting sets of files. FilterChain, by contrast, provides a flexible mechanism for transforming the contents of text files.
In common with all types, defining a filterchain element does not in itself cause any changes to take place. The element and its children must first be associated with a task—that is, an element that tells Phing to take a course of action. I will return to tasks a little later.
A filterchain element groups any number of filters together. Filters operate on files like a pipeline—the first alters its file and passes its results on to the second, which makes its own alterations, and so on. By combining multiple filters in a filterchain element, you can effect flexible transformations.
Here I dive straight in and create a filterchain that removes PHP comments from any text passed to it:
<filterchain>
    <stripphpcomments />
</filterchain>
The StripPhpComments task does just what the name suggests. If you have provided detailed API documentation in your source code, you may have made life easy for developers, but you have also added a lot of dead weight to your project. Because all the work that matters takes place within your source directories, there is no reason why you should not strip out comments on installation.
![]() Note If you use a build tool for your projects, ensure that no one makes changes in the installed code. The installer will copy over any altered files, and the changes will be lost. I have seen it happen.
Note If you use a build tool for your projects, ensure that no one makes changes in the installed code. The installer will copy over any altered files, and the changes will be lost. I have seen it happen.
Let’s sneak a peek of the next section and place the filterchain element in a task:
<target name="main">
    <copy todir="build/lib">
        <fileset refid="srclib"/>
        <filterchain>
            <stripphpcomments />
        </filterchain>
    </copy>
</target>
The Copy task is probably the one you get most use out of. It copies files from place to place. As you can see, I define the destination directory in the todir attribute. The source of the files is defined by the fileset element I created in the previous section. Then comes the filterchain element. Any file copied by the Copy task will have this transformation applied to it.
Phing supports filters for many operations including stripping new lines (StripLineBreaks) and replacing tabs with spaces (TabToSpaces). There is even an XsltFilter for applying XSLT transformations to source files! Perhaps the most commonly used filter, however, is ReplaceTokens. This allows you to swap tokens in your source code for properties defined in your build file, pulled from environment variables, or passed in on the command line. This is very useful for customizing an installation. It’s a good idea to centralize your tokens into a central configuration file for easy overview of the variable aspects of your project.
ReplaceTokens optionally accepts two attributes, begintoken and endtoken. You can use these to define the characters that delineate token boundaries. If you omit these, Phing will assume the default character of @. In order to recognize and replace tokens, you must add token elements to the replacetokens element. Now to add a replacetokens element to my example:
<copy todir="build/lib">
        <fileset refid="srclib"/>
        <filterchain>
            <stripphpcomments />
            <replacetokens>
                 <token key="dbname" value="${dbname}" />
                 <token key="dbhost" value="${dbhost}" />
                 <token key="dbpass" value="${dbpass}" />
            </replacetokens>
        </filterchain>
</copy>
As you can see, token elements require key and value attributes. Let’s see the effect of running this task with its transformations on a file in my project. The original file lives in a source directory, src/lib/Config.php:
/**
 * Quick and dirty Conf class
**/
class Config {
    public $dbname ="@dbname@";
    public $dbpass ="@dbpass@";
    public $dbhost ="@dbhost@";
}
Running my main target containing the Copy task defined previously gives the following output:
$ phing
Buildfile: /home/bob/working/megaquiz/build.xml

megaquiz > main:

     [copy] Copying 8 files to /home/bob/working/megaquiz/build/lib
     [filter:ReplaceTokens] Replaced "@dbname@" with "megaquiz"
     [filter:ReplaceTokens] Replaced "@dbpass@" with "default"
     [filter:ReplaceTokens] Replaced "@dbhost@" with "localhost"

BUILD FINISHED

Total time: 0.1413 seconds
The original file is untouched, of course, but thanks to the Copy task, it has been reproduced at build/lib/Config.php:
class Config {
    public $dbname ="megaquiz";
    public $dbpass ="default";
    public $dbhost ="localhost";
}
Not only has the comment been removed, but the tokens have been replaced with their property equivalents.
Tasks
Tasks are the elements in a build file that get things done. You won’t achieve much without using a task, which is why I have cheated and used a couple already. I’ll reintroduce these.
Echo
The Echo task is perfect for the obligatory “Hello World” example. In the real world, you can use it to tell the user what you are about to do or what you have done. You can also sanity-check your build process by displaying the values of properties. As you have seen, any text placed within the opening and closing tags of an echo element will be printed to the browser:
<echo>The pass is '${dbpass}', shhh!</echo>
Alternatively, you can add the output message to a msg attribute:
<echo msg="The pass is '${dbpass}', shhh!" />
This will have the identical effect of printing the following to standard output:
[echo] The pass is 'default', shhh!
Copy
Copying is really what installation is all about. Typically, you will create one target that copies files from your source directories and assembles them in a temporary build directory. You will then have another target that copies the assembled (and transformed) files to their output locations. Breaking the installation into separate build and install phases is not absolutely necessary, but it does mean that you can check the results of the initial build before committing to overwriting production code. You can also change a property and install again to a different location without the need to run a potentially expensive copy/replace phase again.
At its simplest, the Copy task allows you to specify a source file and a destination directory or file:
<copy file="src/lib/Config.php" todir="build/conf" />
As you can see, I specify the source file using the file attribute. You may be familiar already with the todir attribute, which is used to specify the target directory. If the target directory does not exist, Phing will create it for you.
If you need to specify a target file, rather than a containing directory, you can use the tofile attribute instead of todir.
<copy file="src/lib/Config.php" tofile="build/conf/myConfig.php" />
Once again, the build/conf directory is created if necessary, but this time, Config.php is renamed to myConfig.php.
As you have seen, to copy more than one file at a time, you need to add a fileset element to copy:
<copy todir="build/lib">
    <fileset refid="srclib"/>
</copy>
The source files are defined by the srclib fileset element, so all you have to set in copy is the todir attribute.
Phing is smart enough to test whether or not your source file has been changed since the target file was created. If no change has been made, then Phing will not copy. This means that you can build many times and only the files that have changed in the meantime will be installed. This is fine, as long as other things are not likely to change. If a file is transformed according to the configuration of a replacetokens element, for example, you may want to ensure that the file is transformed every time that the Copy task is invoked. You can do this by setting an overwrite attribute:
<copy todir="build/lib" overwrite="yes">
    <fileset refid="srclib"/>
    <filterchain>
         <stripphpcomments />
         <replacetokens>
             <token key="dbpass" value="${dbpass}" />
         </replacetokens>
    </filterchain>
</copy>
Now whenever copy is run, the files matched by the fileset element are replaced whether or not the source has been recently updated.
You can see the copy element summarized in Table 19–5.
Table 19-5. The Attributes of the Copy Element

Input
You have seen that the echo element is used to send output to the user. To gather input from the user, I have used separate methods involving the command line and an environment variable. These mechanisms are neither very structured nor interactive, however.
![]() Note One reason for allowing users to set values at build time is to allow for flexibility from build environment to build environment. In the case of database passwords, another benefit is that this sensitive data is not enshrined in the build file itself. Of course, once the build has been run, the password will be saved into a source file, so it is up to the developer to ensure the security of his system!
Note One reason for allowing users to set values at build time is to allow for flexibility from build environment to build environment. In the case of database passwords, another benefit is that this sensitive data is not enshrined in the build file itself. Of course, once the build has been run, the password will be saved into a source file, so it is up to the developer to ensure the security of his system!
The input element allows you to present the user with a prompt message. Phing then awaits input which it assigns it to a property. Here’s an example:
<target name="setpass" unless="dbpass">
    <input message="You don't seem to have set a db password"
           propertyName="dbpass"
           defaultValue="default"
           promptChar=" >" />
</target>

<target name="main" depends="setpass">
    <echo>pass:     ${dbpass}</echo>
</target>
Once again, I have a default target: main. This depends on another target, setpass, which is responsible for ensuring that the dbpass property is populated. To this end, I use the target element’s unless attribute, which ensures that it will not run if dbpass is already set.
The setpass target consists of a single input task element. An input element can have a message attribute, which should contain a prompt for the user. The propertyName attribute is required and defines the property to be populated by user input. If the user presses Enter at the prompt without setting a value, the property is given a fallback value if the defaultValue attribute is set. Finally, you can customize the prompt character using the promptChar attribute—this provides a visual cue for the user to input data. Let’s run Phing using the previous targets:
$ phing
Buildfile: /home/bob/working/megaquiz/build.xml

megaquiz > setpass:
You don't seem to have set a db password [default] > mypass
megaquiz > main:
     [echo] pass:     mypass

BUILD FINISHED

Total time: 6.0322 seconds
The input element is summarized in Table 19-6.
Table 19-6. The Attributes of the Input Element
Attribute |
Required |
Description |
|---|---|---|
| propertyName | Yes | The property to populate with user input. |
| message | No | The prompt message. |
| defaultValue | No | A value to assign to the property if the user does not provide input. |
| validArgs | No | A list of acceptable input values separated by commas. If the user inputs a value that is not on this list Phing will re-present the prompt. |
| promptChar | No | A visual cue that the user should provide input. |
Installation is generally about creating, copying, and transforming files. Deletion has its place as well, however. This is particularly the case when you wish to perform a clean install. As I have already discussed, files are generally only copied from source to destination for source files that have changed since the last build. By deleting a build directory, you ensure that the full compilation process will take place.
Here I delete a directory:
<target name="clean">
    <delete dir="build" />
</target>
When I run phing with the argument clean (the name of the target), my delete task element is invoked. Here’s Phing’s output:
$ phing clean
Buildfile: /home/bob/working/megaquiz/build.xml

megaquiz > clean:
   [delete] Deleting directory /home/bob/working/megaquiz/build

BUILD FINISHED
The delete element accepts an attribute, file, which can be used to point to a particular file. Alternatively, you can fine-tune your deletions by adding a fileset subelement to delete.
Summary
Serious development rarely happens all in one place. A codebase needs to be separated from its installation, so that work in progress does not pollute production code that needs to remain functional at all times. Version control allows developers to check out a project and work on it in their own space. This requires that they should be able to configure the project easily for their environments. Finally, and perhaps most importantly, the customer (even if the customer is yourself in a year’s time, when you’ve forgotten the ins and outs of your code) should be able to install your project after a glance at a Read Me file.
In this chapter, I have covered some of the basics of Phing, a fantastic tool, which brings much of the functionality of Apache Ant to the PHP world. I have only scratched the surface of Phing’s capabilities. Nevertheless, once you are up and running with the targets, tasks, types, and properties discussed here, you’ll find it easy to bolt on new elements for advanced features, like creating tar/gzipped distributions, automatically generating PEAR package installations, and running PHP code directly from the build file.
If Phing does not satisfy all your build needs, you will discover that, like Ant, it is designed to be extensible—get out there and build your own tasks! Even if you don’t add to Phing, you should take some time out to examine the source code. Phing is written entirely in object-oriented PHP, and its code is chock full of design examples.