
![]()
Chapter 5 covered binding, the process by which the ASP.NET Web API framework maps the incoming HTTP request to the parameters of your action methods. As part of the binding process, ASP.NET Web API runs the validation rules you set against the properties of your model classes—a feature called model validation . The greatest benefit to using model validation instead of having your validation logic in other classes like controllers, helpers, or domain classes is that the validation logic is isolated in one place instead of duplicated in multiple places where it is difficult to maintain. Model validation helps you follow the Don’t Repeat Yourself (DRY) principle.
6.1 Validation Using Data Annotations
In the .NET framework, you can use data annotation attributes to declaratively specify the validation rules. In this exercise, you will use the out-of-the-box attribute classes that are part of the System.ComponentModel.DataAnnotations namespace to enforce the validity of the incoming request.
- Create a new ASP.NET MVC 4 project named RequestValidation, using the Web API template.
- Create a new empty API controller named EmployeesController.
- Create a new model class named Employee, as shown in Listing 6-1. Create this class in the Models folder. The properties of the Employee class have data annotations applied to enforce the following requirements:
- a. For the Id property, the input must be between 10000 and 99999.
- b. The LastName property must contain a value, and the value cannot exceed a length of 20.
- c. The Department property must match the regular expression [0-1][0-9]. In other words, values 00 through 19 are allowed.
Listing 6-1. The Employee Model
using System.ComponentModel.DataAnnotations;

public class Employee
{
        [Range(10000, 99999)]
        public int Id { get; set; }

        public string FirstName { get; set; }

        [Required]
        [MaxLength(20)]
        public string LastName { get; set; }

        [RegularExpression("[0-1][0-9]")]
        public string Department { get; set; }
} - Implement an action method to handle HTTP POST in EmployeesController, as shown in Listing 6-2. Place a breakpoint on the starting brace of the action method.
Listing 6-2. The POST Action Method
using System.Linq;
using System.Web.Http;
using RequestValidation.Models;

public class EmployeesController : ApiController
{
    public void Post(Employee employee)
    {
        if (ModelState.IsValid)
        {
            // Just be happy and do nothing
        }
        else
        {
            var errors = ModelState.Where(e => e.Value.Errors.Count > 0)
                                .Select(e => new
                                {
                                    Name = e.Key,
                                    Message = e.Value.Errors.First().ErrorMessage
                                }).ToList();
        }
    }
} - Rebuild the solution and press F5 to run the project in Visual Studio.
- Run Fiddler, go to the Composer tab, and issue a POST to the URI http://localhost:55778/api/employees. Remember to replace the port 55778 with the actual port that your application runs on. Copy the JSON {"Id":12345, "FirstName":"John", "LastName":"Human", "Department":"19"} into the Request Body text box. Copy Content-Type: application/json into the Request Headers text box. Click Execute.
- When the breakpoint is hit, inspect the IsValid property of ModelState. For this request, it will be true, indicating that all is well in terms of the rules you have specified through data annotations.
- Issue another POST to the same URI, keeping Content-Type: application/json in the Request Headers text box and putting the JSON {"Id":12345, "FirstName":"John", "LastName":"Human", "Department":"190"} in the Request Body text box. Notice the invalid department number that we are supplying in this request.
- When the breakpoint is hit, inspect ModelState.IsValid. For this request, it will be false. Step over by pressing F10 until the line that sets errors is executed. Inspect errors. See Figure 6-1.
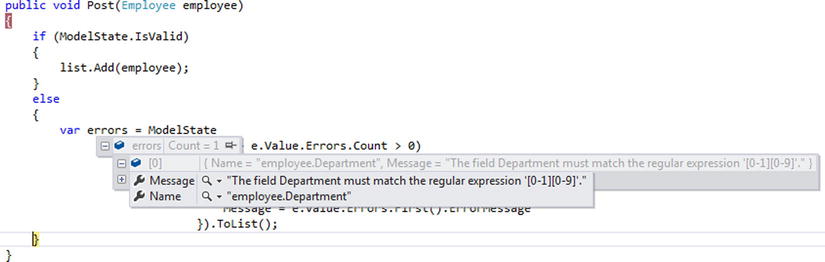
Figure 6-1. Model state errors
- Repeat the request with different JSON payloads like the following, and inspect the resulting errors collection:
- a. {"Id":123455, "FirstName":"John", "LastName":"Human", "Department":"190"}
- b. {"Id":12345, "FirstName":"John", "LastName":"Humannnnnnnnnnnnnnnnnn", "Department":"19"}
- c. {"Id":12345, "FirstName":"John", "Department":"19"}
- d. {"Id":123455, "FirstName":"John", "LastName":" Humannnnnnnnnnnnnnnnnn ", "Department":"190"}
- By simply checking ModelState.IsValid in the action method, you are able to perform the input validation, with the help of data annotation attributes. Generally, in an application these rules are universally applicable and there is no need to replicate the rule in multiple places. Because we’ve placed the rule in the model class and used model validation, you can simply check ModelState.IsValid to determine if all is well in terms of the request validity.
Now, let us examine the unique case of the Required attribute being used with a value type such as int.
- Modify the Employee class as shown in Listing 6-3. The Department property type is changed to int and the Required attribute has been applied.
Listing 6-3. The Modified Employee Class
public class Employee
{
        [Range(10000, 99999)]
        public int Id { get; set; }

        public string FirstName { get; set; }

        [Required]
        [MaxLength(20)]
        public string LastName { get; set; }

        [Required]
        public int Department { get; set; }
} - Rebuild the solution and press F5 to run the project in Visual Studio.
- From Fiddler’s Composer tab, issue a POST to the URI http://localhost:55778/api/employees with Content-Type: application/json in the Request Headers text box and the JSON {"Id":12345, "FirstName":"John", "LastName":"Human"} in the Request Body box. Notice the missing Department field in JSON.
- An exception is thrown with the following message:
Property 'Department' on type 'HelloWebApi.Models.Employee' is invalid. Value-typed properties marked as [Required] must also be marked with [DataMember(IsRequired=true)] to be recognized as required.
- A class that is part of the ASP.NET Web API framework, System.Web.Http.Validation.Providers.InvalidModelValidatorProvider, is responsible for throwing this exception. Depending on when you work through these steps and the version of the ASP.NET Web API framework you use at that time, you might not get the exception in the previous step. According to the commit f60aadf2b44b (http://aspnetwebstack.codeplex.com/SourceControl/changeset/f60aadf2b44ba8d8aee5fd7d09c73d27f9ef7a82 ), InvalidModelValidatorProvider has been removed from the list of default providers, but that change has not been released at the time of writing this chapter. If this commit is part of the framework version that you use, as you read and work through this chapter, you will not get the exception.
- Put a breakpoint anywhere inside the Register method of WebApiConfig in the App_Start folder. Press F5 to run the project. When the execution breaks on this breakpoint, type the following line (including the question mark) in the Immediate window of Visual Studio and press Enter:
?config.Services.GetModelValidatorProviders().ToList()
- Three model validator providers will be displayed.
Count = 3
    [0]: {System.Web.Http.Validation.Providers.DataAnnotationsModelValidatorProvider}
    [1]: {System.Web.Http.Validation.Providers.DataMemberModelValidatorProvider}
[2]: {System.Web.Http.Validation.Providers. InvalidModelValidatorProvider} - If the version of the ASP.NET Web API framework that you use includes the changes from commit f60aadf2b44b to remove InvalidModelValidatorProvider, you will not see the provider in the preceding list. However, if you do see the provider, you can easily remove it yourself by adding a line of code to the Register method of WebApiConfig in the App_Start folder, as shown in Listing 6-4.
Listing 6-4. Removal of InvalidModelValidatorProvider
using System.Web.Http;
using System.Web.Http.Validation;
using System.Web.Http.Validation.Providers;

public static class WebApiConfig
{
    public static void Register(HttpConfiguration config)
    {
        config.Routes.MapHttpRoute(
            name: "DefaultApi",
            routeTemplate: "api/{controller}/{id}",
            defaults: new { id = RouteParameter.Optional }
        );

        config.Services.RemoveAll(typeof(ModelValidatorProvider),
                                                    v => v is InvalidModelValidatorProvider);
    }
} - Now, make a slight modification to the Post action method, as shown in Listing 6-5. This modification and the following steps are required, regardless of the version of ASP.NET Web API you are working with.
Listing 6-5. Changes to the Post Action Method
public void Post(Employee employee)
{
    if (ModelState.IsValid)
    {
        list.Add(employee);
    }
    else
    {
        var errors = ModelState
                        .Where(e => e.Value.Errors.Count > 0)
                            .Select(e => new
                            {
                                Name = e.Key,
                                Message = e.Value.Errors.First().ErrorMessage,
                                Exception = e.Value.Errors.First().Exception
                            }).ToList();
    }
} - Rebuild the solution and press F5 to run the project in Visual Studio.
- From Fiddler’s Composer tab, issue a POST to the URI http://localhost:55778/api/employees. Remember to replace the port 55778 with the actual port that your application runs on. Copy the JSON {"Id":12345, "FirstName":"John", "LastName":"Human"} into the Request Body text box. Note the missing Department in the JSON. Copy Content-Type: application/json into the Request Headers box. Click Execute.
- There is no exception this time. When the execution breaks inside the action method of the controller, inspect ModelState.IsValid. It is false. Keep stepping by pressing F10 a few times, until the errors variable is populated. Inspect errors. You will see that Exception has a clear message: Required property 'Department' not found in JSON. Path '', line 1, position 52 .
- Press F5 to continue.
- With the project still running in Visual Studio, issue another POST request from Fiddler with Content-Type: application/xml in the Request Headers text box and the following XML in the Request Body text box. This XML is very similar to the JSON we used earlier in that Department is missing here as well.
<Employee xmlns=" http://schemas.datacontract.org/2004/07/RequestValidation.Models ">
       <FirstName>John</FirstName>
       <Id>12345</Id>
       <LastName>Human</LastName>
</Employee> - There is no exception this time as well, as expected. When the execution breaks, inspect ModelState.IsValid. It is true, and that is unexpected!
- The major reason for having the InvalidModelValidatorProvider is to prevent the situation we are in right now. When the value is missing, the property, being a value type, cannot be null and is assigned the default value (0 in the case of int). Some formatters will not raise a model error, making the developer think all is well, when it is actually not. XmlMediaTypeFormatter does exactly this and will only raise a model error when the DataMember(IsRequired=true) attribute is applied.
- InvalidModelValidatorProvider will be removed in a future release (unless it has already been removed by the time you read this), but it is worth noting the challenge of using the Required attribute on value types. It is important to note that XmlMediaTypeFormatter will not work correctly with the Required attribute against value types. It will need the DataMember(IsRequired=true) attribute to be applied to create model errors correctly, when a value type is missing in the request.
6.2 Handling Validation Errors
In this exercise, you will handle the errors raised by model validation as part of the binding process. Model validation runs the checks and sets the ModelState accordingly. It does not fail the request by sending back the errors. You must check the ModelState and take actions that are appropriate for the requirement at hand.
In the ASP.NET Web API pipeline, after the request processing part of the message handlers runs, the authorization filters are run (if you have used the Authorize attribute). Following this, model binding and the model validation occur. Then the action filters are run. More specifically, the OnActionExecuting method of each action filter is run, and then the action method of the controller runs. Hence, we can check for ModelState and send the error back in the OnActionExecuting method of an action filter. This is ideal because the model validation is finished by the time execution comes to the action filter, but the action method of the controller is yet to run. See Figure 6-2.
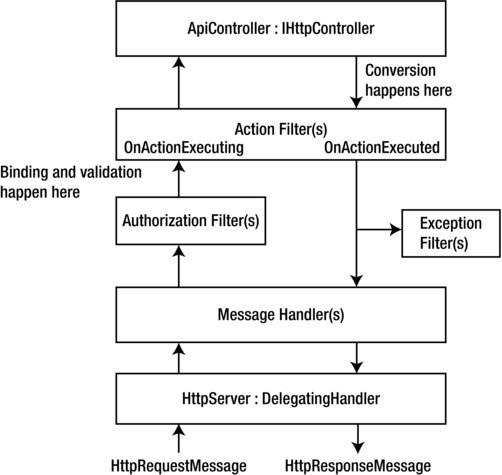
Figure 6-2. Action filters in the ASP.NET Web API pipeline
- Add a new class named ValidationErrorHandlerFilterAttribute that derives from ActionFilterAttribute, as shown in Listing 6-6.
Listing 6-6. The ValidationErrorHandlerFilterAttribute Class
using System.Net;
using System.Net.Http;
using System.Web.Http.Controllers;
using System.Web.Http.Filters;

public class ValidationErrorHandlerFilterAttribute : ActionFilterAttribute
{
    public override void OnActionExecuting(HttpActionContext actionContext)
    {
        if (!actionContext.ModelState.IsValid)
        {
            actionContext.Response = actionContext.Request
                                                           .CreateErrorResponse(
                                                                    HttpStatusCode.BadRequest,
                                                                             actionContext.ModelState);
        }
    }
} - You can apply this selectively on your controller classes or configure it as a global filter in the Register method of WebApiConfig in the App_Start folder, like so:
config.Filters.Add(new ValidationErrorHandlerFilterAttribute()); - Rebuild the solution and press F5 to run the project in Visual Studio.
- From Fiddler’s Composer tab, issue a POST to the URI http://localhost:55778/api/employees with the JSON {"Id":12345, "FirstName":"John", "LastName":"Humansssssssssssssssssssssssssssssssss"} in the Request Body text box and Content-Type: application/json in the Request Headers box.
- Review the response message in the Inspectors tab in Fiddler. You will get a response with a 400 status code and a response body containing JSON:
{
   "Message":"The request is invalid.",
   "ModelState":{
      "employee":[
         "Required property 'Department' not found in JSON. Path '', line 1, position 85."
      ],
      "employee.LastName":[
         "The field LastName must be a string or array type with a maximum length of '20'."
      ]
   }
} - Issue a POST to the URI http://localhost:55778/api/employees with the following XML in the Request Body text box and Content-Type: application/xml in the Request Headers box:
<Employee xmlns=" http://schemas.datacontract.org/2004/07/RequestValidation.Models ">
       <FirstName>John</FirstName>
       <Id>12345</Id>
       <LastName>Humansssssssssssssssssssssssssssssssss</LastName>
</Employee> - You will now get an XML response:
<Error>
        <Message>The request is invalid.</Message>
        <ModelState>
                <employee.LastName>
                 The field LastName must be a string or array type with a maximum length of '20'.
                </employee.LastName>
        </ModelState>
</Error>
You can see that ASP.NET Web API is serializing even the errors into the appropriate media type based on the results of content negotiation.
It’s also important to notice that although we did not supply a value for department in the XML request, there is no error, unlike in the JSON behavior. Recall that in an earlier exercise we removed InvalidModelValidatorProvider. XmlMediaTypeFormatter will not work with the Required attribute against value types. It will need the DataMember(IsRequired=true) attribute to be applied to create model errors correctly.
- Change the Employee class as shown in Listing 6-7. This time we specify the error message that needs to be sent back when the validation fails.
Listing 6-7. The Employee Class with a Custom Error Message
public class Employee
{
    [Range(10000, 99999)]
    public int Id { get; set; }

    public string FirstName { get; set; }

    [Required]
    [MaxLength(20,
        ErrorMessage="You can enter only 20 characters.
                                           No disrespect it is only a system constraint")]
    public string LastName { get; set; }

    [Required]
    public int Department { get; set; }
} - Rebuild the solution and from Fiddler issue a POST to the URI http://localhost:55778/api/employees with the JSON {"Id":12345, "FirstName":"John", "LastName":"Humansssssssssssssssssssssssssssssssss"} in the Request Body text box and Content-Type: application/json in the Request Headers box. The response is as follows:
{
   "Message":"The request is invalid.",
   "ModelState":{
      "employee.LastName":[
         "You can enter only 20 characters. No disrespect it is only a system constraint"
      ]
   }
} - Change the Employee class as shown in Listing 6-8. Here we don’t specify the error message directly but point to the resource file from which the message is to be picked up.
Listing 6-8. The Employee Class with a Custom Error Message From the Resource File
using System.ComponentModel.DataAnnotations;
using Resources;

public class Employee
{
    [Range(10000, 99999)]
    public int Id { get; set; }

    public string FirstName { get; set; }

    [Required]
    [MaxLength(20,
        ErrorMessageResourceName = "InvalidLastNameLength",
        ErrorMessageResourceType = typeof(Messages))]

    public string LastName { get; set; }

    [Required]
    public int Department { get; set; }
} - Let us create the resource files now. Right-click on the project in Solution Explorer from Visual Studio and select Add ➤ Add ASP.NET Folder ➤ App_GlobalResources.
- Right-click the App_GlobalResources folder created and select Add ➤ New Item . . . Select Resources File and give it a name of Messages.resx.
- Add a new string with a Name of InvalidLastNameLength and a Value of You can enter only 20 characters. No disrespect it is only a system constraint. Save.
- Duplicate the Message.resx by pasting the file into the same folder. Rename the duplicate file as Messages.fr-fr.resx.
- Copy and paste Vous pouvez entrer que 20 caractères. Sans manquer de respect, il est seulement une contrainte de système into Value. Save.
- We need the CultureHandler message handler that we created in Chapter 4. This message handler gets the language preferences from the Accept-Language request header and establishes the CurrentUICulture. For simplicity, this exercise supports only two cultures, English, United States (en-us) and French, France (fr-fr). Create a new class named CultureHandler and copy and paste the code from Listing 6-9.
Listing 6-9. The CultureHandler Class
using System;
using System.Collections.Generic;
using System.Globalization;
using System.Linq;
using System.Net.Http;
using System.Threading;
using System.Threading.Tasks;

public class CultureHandler : DelegatingHandler
{
    private ISet<string> supportedCultures = new HashSet<string>() { "en-us", "en", "fr-fr", "fr" };

    protected override async Task<HttpResponseMessage> SendAsync(HttpRequestMessage request,
                                                            CancellationToken cancellationToken)
    {
        var list = request.Headers.AcceptLanguage;
        if (list != null && list.Count > 0)
        {
            var headerValue = list.OrderByDescending(e => e.Quality ?? 1.0D)
                                    .Where(e => !e.Quality.HasValue ||
                                                e.Quality.Value > 0.0D)
                                    .FirstOrDefault(e => supportedCultures
                                            .Contains(e.Value, StringComparer.OrdinalIgnoreCase));

            // Case 1: We can support what client has asked for
            if (headerValue != null)
            {
                Thread.CurrentThread.CurrentUICulture =
                                CultureInfo.GetCultureInfo(headerValue.Value);

                Thread.CurrentThread.CurrentCulture =
                                                           Thread.CurrentThread.CurrentUICulture;
            }

            // Case 2: Client is okay to accept anything we support except
            // the ones explicitly specified as not preferred by setting q=0
            if (list.Any(e => e.Value == "*" &&
                    (!e.Quality.HasValue || e.Quality.Value > 0.0D)))
            {
                var culture = supportedCultures.Where(sc =>
                                        !list.Any(e =>
                                                e.Value.Equals(sc, StringComparison.OrdinalIgnoreCase) &&
                                                    e.Quality.HasValue &&
                                                        e.Quality.Value == 0.0D))
                                                            .FirstOrDefault();
                if (culture != null)
                {
                    Thread.CurrentThread.CurrentUICulture =
                                        CultureInfo.GetCultureInfo(culture);

                    Thread.CurrentThread.CurrentCulture =
                                                           Thread.CurrentThread.CurrentUICulture;
                }
            }
        }

        return await base.SendAsync(request, cancellationToken);
    }
} - Add the handler to the handlers collection in WebApiConfig in the App_Start folder:
config.MessageHandlers.Add(new CultureHandler());
- Rebuild the solution and issue a POST from Fiddler to the URI http://localhost:55778/api/employees with the JSON {"Id":12345, "FirstName":"John", "LastName":"Humansssssssssssssssssssssssssssssssss", "Department": 5} in the Request Body text box and Content-Type: application/json in the Request Headers box.
- The response is in English and is as follows.
{
   "Message":"The request is invalid.",
   "ModelState":{
      "employee.LastName":[
         "You can enter only 20 characters. No disrespect it is only a system constraint"
      ]
   }
} - Repeat the previous POST request with an additional request header of Accept-Language: fr-fr.
- The response is now in French and the JSON is as follows:
{
   "Message":"The request is invalid.",
   "ModelState":{
      "employee.LastName":[
         "Vous pouvez entrer que 20 caractères. Sans manquer de respect, il est seulement une contrainte de système"
      ]
   }
}
6.3 Extending an Out-of-the-Box Validation Attribute
When an out-of-the-box validation attribute does not meet all your requirements, you can extend it with additional functionality. To illustrate this point, in this exercise, you will extend the out-of-the-box validation attribute Range to make the range validation applicable for all the members of a collection.
- Modify the Employee class, as shown in Listing 6-10. The Department property type is changed to List<int>, and the MemberRange attribute, which we create based on the Range attribute, has been applied.
Listing 6-10. The Modified Employee Class with the MemberRange Attribute
public class Employee
{
        [Range(10000, 99999)]
        public int Id { get; set; }

        public string FirstName { get; set; }

        [Required]
        [MaxLength(20)]
        public string LastName { get; set; }

        [MemberRange(0, 9)]
        public List<int> Department { get; set; }
} - Create the MemberRangeAttribute class, which derives from RangeAttribute, as shown in Listing 6-11. This code overrides the IsValid method to validate every individual member of the collection that calls the IsValid method of the base class.
Listing 6-11. The MemberRangeAttribute Class
using System.Collections;
using System.ComponentModel.DataAnnotations;
using System.Linq;

public class MemberRangeAttribute : RangeAttribute
{
    public MemberRangeAttribute(int minimum, int maximum) : base(minimum, maximum) { }

    public override bool IsValid(object value)
    {
        if (value is ICollection)
        {
            var items = (ICollection)value;
            return items.Cast<int>().All(i => IsValid(i));
        }
        else
            return base.IsValid(value);
    }
} - Rebuild the solution and issue a POST from Fiddler to the URI http://localhost:55778/api/employees with the JSON {"Id":12345, "FirstName":"John", "LastName":"Human", "Department":[0,9]} in the Request Body text box and Content-Type: application/json in the Request Headers box.
This request goes through without any validation failures and an HTTP status code of 204 - No Content is returned.
- Issue another POST to the URI http://localhost:55778/api/employees with the JSON {"Id":12345, "FirstName":"John", "LastName":"Human", "Department":[90,9]} in the Request Body text box and Content-Type: application/json in the Request Headers box.
The response is
{"Message":"The request is invalid.","ModelState":{"employee.Department":["The field Department must be between 0 and 9."]}}
As you can see, we have extended the out-of-the-box RangeAttribute and created a new attribute that applies the range validation logic on each of the members of the collection.
6.4 Creating Your Own Validation Attribute
In this exercise, you will create your own validation attribute that enforces validation based on the value of some other property. In the examples we have seen so far, the validation is limited to the value of a property in isolation. In reality, the rules to be checked against a property can be dependent on some other property of the same model. Say, you want to implement an internal policy related to the employee contribution to 401K, which is that an employee can contribute a maximum of 75 percent of their annual income. Here the validation rule for the contribution amount depends on a static value of 75 percent and the value of the other property that stores the annual income.
- Modify the Employee class as shown in Listing 6-12. Two new properties are introduced: AnnualIncome and Contribution401K. The LimitChecker custom attribute is applied to the Contribution401K property.
Listing 6-12. The Employee Class with a Custom Validation Attribute
public class Employee
    {
        [Range(10000, 99999)]
        public int Id { get; set; }

        public string FirstName { get; set; }

        [Required]
        [MaxLength(20,
            ErrorMessageResourceName = "InvalidLastNameLength",
            ErrorMessageResourceType = typeof(Messages))]

        public string LastName { get; set; }

        [MemberRange(0, 9)]
        public List<int> Department { get; set; }

        public decimal AnnualIncome { get; set; }

        [LimitChecker("AnnualIncome", 75)]
        public decimal Contribution401K { get; set; }
} - Create the new LimitCheckerAttribute class, deriving from ValidationAttribute, as shown in Listing 6-13. This code works as follows:
- a. The BaseProperty and Percentage properties store the values passed in, respectively the name of the property that is the basis for the property to which this attribute is applied, and the percentage value. In our example, BaseProperty will be the string “AnnualIncome”, which is the name of the property that Contribution401K will be based on.
- b. In the IsValid method, we just get the base amount, which is the value in the AnnualIncome property from the ValidationContext object. Then it is simple math to check whether the value passed in, which is the value of Contribution401K, is less than or equal to 75 percent of AnnualIncome.
- c. In the FormatErrorMessage method, we just plug in the property names and the percentage value so that the resulting error message is easy to understand.
Listing 6-13. The LimitCheckerAttribute Class
using System.ComponentModel.DataAnnotations;

public class LimitCheckerAttribute : ValidationAttribute
{
    public LimitCheckerAttribute(string baseProperty, double percentage)
    {
        this.BaseProperty = baseProperty;
        this.Percentage = percentage;
        this.ErrorMessage = "{0} cannot exceed {1}% of {2}";
    }

    public string BaseProperty { get; set; }
    public double Percentage { get; set; }

    public override string FormatErrorMessage(string name)
    {
        return string.Format(ErrorMessageString, name, this.Percentage, BaseProperty);
    }

    protected override ValidationResult IsValid(object value,
                                                    ValidationContext validationContext)
    {
        decimal amount = (decimal)value;

        var propertyInfo = validationContext
                                        .ObjectType
                                           .GetProperty(this.BaseProperty);

        if (propertyInfo != null)
        {
            decimal baseAmount = (decimal)propertyInfo.GetValue(
                                     validationContext.ObjectInstance, null);

            decimal maxLimit = baseAmount * (decimal)this.Percentage / 100;

            if(amount <= maxLimit)
                return ValidationResult.Success;
        }

        return new ValidationResult(
                    FormatErrorMessage(validationContext.DisplayName));
    }
} - Rebuild the solution and issue a POST from Fiddler to the URI http://localhost:55778/api/employees with the JSON {"Id":12345, "FirstName":"John", "LastName":"Human", "Department": [1], "AnnualIncome": 100, "Contribution401K":75.01} in the Request Body text box and Content-Type: application/json in the Request Headers box
- The response is as follows.
{
   "Message":"The request is invalid.",
   "ModelState":{
      "employee.Contribution401K":[
         "Contribution401K cannot exceed 75% of AnnualIncome"
      ]
   }
}
6.5 Implementing the IValidatableObject Interface
In this exercise, you will implement the System.ComponentModel.DataAnnotations.IValidatableObject interface in the Employee class. So far in this chapter, we have been focusing on the validity of a property in isolation. Even in the case of the custom validation attribute, our focus is on a specific property, which is Contribution401K. Although we compared it to the value of another property (AnnualIncome) in the process of validating the original property, our basic objective is validating the Contribution401K property.
By implementing the IValidatableObject interface, however, you can examine the object as a whole with all the properties to determine if the object state is valid or not. Though validation attributes help you keep the validation logic in one place, implementing IValidatableObject lets you keep all the business and the validation rules of a model class in one place, which is the class itself. Using validation attributes lets you specify the rules in a declarative way, whereas implementing IValidatableObject lets you specify the rules in an imperative way.
- Modify the Employee class by commenting out the existing class and pasting the code from Listing 6-14. Here we implement the IValidatableObject interface and as part of that, implement the Validate method. We just make all the validations in this method imperatively and yield the return ValidationResult.
Listing 6-14. The Employee Class Implementing IValidatableObject
using System;
using System.Collections.Generic;
using System.ComponentModel.DataAnnotations;

public class Employee : IValidatableObject
{
    private const decimal PERCENTAGE = 0.75M;

    public int Id { get; set; }

    public string FirstName { get; set; }

    public string LastName { get; set; }

    public decimal AnnualIncome { get; set; }

    public decimal Contribution401K { get; set; }

    public IEnumerable<ValidationResult> Validate(ValidationContext validationContext)
    {
        if(this.Id < 10000 || this.Id > 99999)
            yield return new ValidationResult("ID must be in the range 10000 - 99999");

        if (String.IsNullOrEmpty(this.LastName))
            yield return new ValidationResult("Last Name is mandatory");
        else if(this.LastName.Length > 20)
            yield return new ValidationResult(
                          "You can enter only 20 characters. No disrespect it is only a system constraint");

        if (this.Contribution401K > Decimal.Zero &&
                this.Contribution401K > this.AnnualIncome * PERCENTAGE)
            yield return new ValidationResult(
                                      "You can contribute a maximum of 75% of your annual income to 401K");
    }
} - Rebuild the solution and issue a POST to the URI http://localhost:55778/api/employees with the JSON {"Id":123455, "FirstName":"Johnny", "LastName":" Humanssssssssssssssssssssssssssssssssssssssssss", "AnnualIncome": 100, "Contribution401K":75.01} in the Request Body box.
- The response is as follows.
{
   "Message":"The request is invalid.",
   "ModelState":{
      "employee":[
         "ID must be in the range 10000 - 99999",
         "You can enter only 20 characters. No disrespect it is only a system constraint",
         "You can contribute a maximum of 75% of your annual income to 401K"
      ]
   }
}
Summary
Binding is the process by which the ASP.NET Web API framework maps the incoming HTTP request to the parameters of your action methods. As part of the binding process, ASP.NET Web API runs the validation rules you set against the properties of your model classes; this feature is called model validation. The greatest benefit of using model validation is that your validation code is all in one place, following the Don’t Repeat Yourself (DRY) principle.
In the .NET framework, you can use data annotation attributes to specify the validation rules declaratively. You can use the out-of-the-box attribute classes that are part of the System.ComponentModel.DataAnnotations namespace to enforce the validity of the incoming request with ASP.NET Web API.
Model validation runs the checks and sets the ModelState based on the result of these checks. However, model binding does not fail the request by sending back the errors. A developer must check the ModelState and take actions that are appropriate for the requirement at hand. You can check for ModelState and send the error back in the OnActionExecuting method of an action filter. This is ideal for most cases because the model validation is complete by the time execution comes to the action filter, but the action method of the controller is yet to run.
In addition to using the out-of-the-box validation attributes from the System.ComponentModel.DataAnnotations namespace, you can also subclass an existing attribute and extend its out-of-the-box functionality. Another option is to create your own custom validation attribute by deriving from the System.ComponentModel.DataAnnotations.ValidationAttribute abstract class.
Finally, by creating a validatable object by implementing the System.ComponentModel.DataAnnotations.IValidatableObject interface, you can look at the model object as a whole with all the properties to determine if the object state is valid or not. Though validation attributes help you keep the validation logic in one place, implementing IValidatableObject lets you keep all the business and the validation rules of a model class in one place, which is the model class itself. Using validation attributes lets you specify the rules in a declarative way, whereas implementing IValidatableObject lets you specify the rules in an imperative way.