
![]()
Though ASP.NET Web API has ASP.NET in the name, it is not tied to ASP.NET. In fact, ASP.NET Web API is host-independent. There are three ways you can host your HTTP services built using ASP.NET Web API:
- Using the ASP.NET infrastructure backed by the IIS (Internet Information Services) server, a technique called web hosting
- Using any Windows process such as a console application or Windows service, a technique called self-hosting
- Connecting a client to the Web API runtime, without hitting the network, a technique called in-memory hosting, used mainly for testing purposes
9.1 Web Hosting ASP.NET Web API
In this exercise, you will web-host your ASP.NET Web API in the local IIS server. You will create a new Visual Studio solution with all the related projects in such a way that this solution structure is as host-agnostic as possible. Table 9-1 lists the name of the projects you will create in this exercise with a brief description of the project contents.
Table 9-1. Project Description
| Project Name | Description |
|---|---|
| Robusta.TalentManager.Domain | Contains the domain classes implementing the business rules pertaining to the domain. However, in this exercise, there are not a lot of business rules implemented, since the focus of this book is on ASP.NET Web API and not on solving a domain problem. |
| Robusta.TalentManager.Data | Contains the classes related to data access, specifically the classes related to the Entity Framework. |
| Robusta.TalentManager.WebApi.Core | Contains the core classes related to ASP.NET Web API, such as controllers, filters, message handlers, configuration files, and so on. |
| Robusta.TalentManager.WebApi.Dto | Contains the data transfer object class: the class that is formatted into a response and bound from a request. For this exercise, we will create just one DTO class. |
| Robusta.TalentManager.WebApi.WebHost | Contains just the Global.asax and Web.config file, and this is pretty much an empty web application that contains references to the other projects. This is the project that will be deployed in IIS for web hosting. |
This is not the only way you can organize your projects to web-host your HTTP services based on ASP.NET Web API. You can equally well create an ASP.NET MVC 4 project based on the Web API template, as you have been doing so far. I use a slightly different organization here to demonstrate that there are various ways to create your ASP.NET Web API project. Also, by following this approach, we can reuse the projects for self-hosting.
- Run Visual Studio 2012 as administrator.
- Select File ➤ New ➤ Project and create a blank solution with a name of Robusta.TalentManager, by selecting Templates ➤ Other Project Types ➤ Visual Studio Solutions. I follow the convention of using the organization name, and the product or the application in the namespace. Assume the organization's name is Robusta, and your application is TalentManager.
- In the Solution Explorer, right-click Solution 'Robusta.TalentManager' and choose Add ➤ New Project. Under Visual C# templates, select Windows and choose Class Library. Give it a name of Robusta.TalentManager.Domain. Delete the default generated class Class1.
- Repeat the previous step and create three more Class Library projects with the following names: Robusta.TalentManager.Data, Robusta.TalentManager.WebApi.Core, and Robusta.TalentManager.WebApi.Dto. Delete the default Class1 in all these projects.
- In the Solution Explorer, right-click Solution 'Robusta.TalentManager' and choose Add ➤ New Project. Under Visual C# templates, select Web and choose ASP.NET Empty Web Application. Give it a name of Robusta.TalentManager.WebApi.WebHost. Right-click this project in Solution Explorer and select Set As Startup Project.
- Save the solution by pressing Ctrl+S and rebuild the solution just to ensure that it builds.
- Add the following references to Robusta.TalentManager.Data:
- a. EntityFramework 5.0.0 (NuGet package)
- b. Robusta.TalentManager.Domain (Project reference: Solution ➤ Projects)
 Note For NuGet packages, right-click References under the respective project and select Manage NuGet Packages. Search for and select the package, and click Install.
 - Add the following references to Robusta.TalentManager.WebApi.Core:
- a. Robusta.TalentManager.Domain (Project reference)
- b. Robusta.TalentManager.Data (Project reference)
- c. Robusta.TalentManager.WebApi.Dto (Project reference)
- d. Microsoft.AspNet.WebApi.Core (NuGet package)
- e. AutoMapper (NuGet package)
- f. StructureMap (NuGet package)
- Add the following references to Robusta.TalentManager.WebApi.WebHost:
- a. Robusta.TalentManager.Domain (Project reference)
- b. Robusta.TalentManager.WebApi.Dto (Project reference)
- c. Robusta.TalentManager.WebApi.Core (Project reference)
- d. Microsoft.AspNet.WebApi.WebHost (NuGet package)
- Rebuild the solution and make sure everything compiles at this point.
We will incorporate some of the features we implemented in Chapter 7. There will be some code repetition, but the objective is to get a working application on top of which we will add more functionality, as we progress through the exercises. We will reuse the same database, talent_manager.
- In the Robusta.TalentManager.Domain project, create the Employee class along with two interfaces, IIdentifiable and IVersionable, as shown in Listing 9-1.
Listing 9-1. The Employee Class and the Related Interfaces
public interface IIdentifiable
{
    int Id { get; }
}

public interface IVersionable
{
    byte[] RowVersion { get; set; }
}

public class Employee : IIdentifiable, IVersionable
{
    public int Id { get; set; }

    public string FirstName { get; set; }

    public string LastName { get; set; }

    public int DepartmentId { get; set; }

    public byte[] RowVersion { get; set; }
} - In the Robusta.TalentManager.Data project, create a folder named Configuration. Under this folder, create a class EmployeeConfiguration, as shown in Listing 9-2.
Listing 9-2. The EmployeeConfiguration Class
using System.ComponentModel.DataAnnotations.Schema;
using System.Data.Entity.ModelConfiguration;
using Robusta.TalentManager.Domain;

public class EmployeeConfiguration : EntityTypeConfiguration<Employee>
{
    public EmployeeConfiguration()
    {
        HasKey(k => k.Id);

        Property(p => p.Id)
            .HasColumnName("employee_id")
                .HasDatabaseGeneratedOption(DatabaseGeneratedOption.Identity);

        Property(p => p.FirstName).HasColumnName("first_name");
        Property(p => p.LastName).HasColumnName("last_name");
        Property(p => p.DepartmentId).HasColumnName("department_id");

        Property(p => p.RowVersion).HasColumnName("row_version").IsRowVersion();
    }
} - In the Robusta.TalentManager.Data project, create three interfaces, IContext, IRepository, and IUnitOfWork, as shown in Listing 9-3. You can create three separate .cs files for these interfaces.
Listing 9-3. The IContext, IRepository, and IUnitOfWork Interfaces
using System;
using System.Linq;
using System.Linq.Expressions;
using Robusta.TalentManager.Domain;

public interface IContext : IDisposable
{
    int SaveChanges();
}

public interface IRepository<T> : IDisposable where T : class, IIdentifiable
{
    IQueryable<T> All { get; }
    IQueryable<T> AllEager(params Expression<Func<T, object>>[] includes);
    T Find(int id);

    void Insert(T entity);

    void Update(T entity);

    void Delete(int id);
}

public interface IUnitOfWork : IDisposable
{
    int Save();
    IContext Context { get; }
} - Create the corresponding concrete classes, Context, Repository<T>, and UnitOfWork, in the Robusta.TalentManager.Data project, as shown in Listing 9-4.
Listing 9-4. The Context, Repository<T>, and UnitOfWork Concrete Classes
using System.Data.Entity;
using System.Data.Entity.ModelConfiguration.Conventions;
using Robusta.TalentManager.Data.Configuration;

public class Context : DbContext, IContext
{
    static Context()
    {
        Database.SetInitializer<Context>(null);
    }

    public Context() : base("DefaultConnection") { }

    protected override void OnModelCreating(DbModelBuilder modelBuilder)
    {
        modelBuilder.Conventions.Remove<PluralizingTableNameConvention>();

        modelBuilder.Configurations
            .Add(new EmployeeConfiguration());
    }
}

using System;
using System.Data;
using System.Data.Entity;
using System.Linq;
using System.Linq.Expressions;
using Robusta.TalentManager.Domain;

public class Repository<T> : IRepository<T> where T : class, IIdentifiable
{
    private readonly Context context;

    public Repository(IUnitOfWork uow)
    {
        context = uow.Context as Context;
    }

    public IQueryable<T> All
    {
        get
        {
            return context.Set<T>();
        }
    }

    public IQueryable<T> AllEager(params Expression<Func<T, object>>[] includes)
    {
        IQueryable<T> query = context.Set<T>();

        foreach (var include in includes)
        {
            query = query.Include(include);
        }

        return query;
    }

    public T Find(int id)
    {
        return context.Set<T>().Find(id);
    }

    public void Insert(T item)
    {
        context.Entry(item).State = EntityState.Added;
    }

    public void Update(T item)
    {
        context.Set<T>().Attach(item);
        context.Entry(item).State = EntityState.Modified;
    }

    public void Delete(int id)
    {
        var item = context.Set<T>().Find(id);
        context.Set<T>().Remove(item);
    }

    public void Dispose()
    {
        context.Dispose();
    }
}

public class UnitOfWork : IUnitOfWork
{
    private readonly IContext context;

    public UnitOfWork()
    {
        context = new Context();
    }

    public UnitOfWork(IContext context)
    {
        this.context = context;
    }
    public int Save()
    {
        return context.SaveChanges();
    }

    public IContext Context
    {
        get
        {
            return context;
        }
    }

    public void Dispose()
    {
        context.Dispose();
    }
} - In the Robusta.TalentManager.WebApi.Dto project, create a class EmployeeDto, as shown in Listing 9-5.
Listing 9-5. The EmployeeDto Class
public class EmployeeDto
{
    public int Id { get; set; }

    public string FirstName { get; set; }

    public string LastName { get; set; }

    public int DepartmentId { get; set; }

    public byte[] RowVersion { get; set; }
} - In the Robusta.TalentManager.WebApi.Core project, create a folder Infrastructure and under this folder, create two classes, StructureMapContainer and StructureMapDependencyScope, as shown in Listing 9-6. These classes are straight from Chapter 7. However, if you plan to copy and paste from the project corresponding to Chapter 7, ensure that the namespace of these classes is correct after the copy-paste: Robusta.TalentManager.WebApi.Core.Infrastructure.
Listing 9-6. StructureMapContainer and StructureMapDependencyScope
using System;
using System.Collections.Generic;
using System.Linq;
using System.Web.Http.Dependencies;
using StructureMap;

namespace Robusta.TalentManager.WebApi.Core.Infrastructure
{
    public class StructureMapDependencyScope : IDependencyScope
    {
        private readonly IContainer container = null;

        public StructureMapDependencyScope(IContainer container)
        {
            this.container = container;
        }

        public object GetService(Type serviceType)
        {
            bool isConcrete = !serviceType.IsAbstract && !serviceType.IsInterface;

            return isConcrete ?
                        container.GetInstance(serviceType):
                            container.TryGetInstance(serviceType);
        }

        public IEnumerable<object> GetServices(Type serviceType)
        {
            return container.GetAllInstances<object>()
                        .Where(s => s.GetType() == serviceType);
        }

        public void Dispose()
        {
            if (container != null)
                container.Dispose();
        }
    }
}

using System.Web.Http.Dependencies;
using StructureMap;

namespace Robusta.TalentManager.WebApi.Core.Infrastructure
{
    public class StructureMapContainer : StructureMapDependencyScope, IDependencyResolver
    {
        private readonly IContainer container = null;

        public StructureMapContainer(IContainer container)
            : base(container)
        {
            this.container = container;
        }

        public IDependencyScope BeginScope()
        {
            return new StructureMapDependencyScope(container.GetNestedContainer());
        }
    }
} - In the Robusta.TalentManager.WebApi.Core project, create a folder Configuration and under this folder, create three configuration classes, WebApiConfig, DtoMapperConfig, and IocConfig, as shown in Listing 9-7.
Listing 9-7. The WebApiConfig, DtoMapperConfig, and IocConfig Classes
using System.Web.Http;

public static class WebApiConfig
{
    public static void Register(HttpConfiguration config)
    {
        config.Routes.MapHttpRoute(
            name: "DefaultApi",
            routeTemplate: "api/{controller}/{id}",
            defaults: new { id = RouteParameter.Optional }
        );
    }
}

using System;
using System.Linq;
using System.Web.Http;
using AutoMapper;
using Robusta.TalentManager.Data;
using Robusta.TalentManager.WebApi.Core.Infrastructure;
using StructureMap;

public static class IocConfig
{
    public static void RegisterDependencyResolver(HttpConfiguration config)
    {
        ObjectFactory.Initialize(x =>
        {
            x.Scan(scan =>
            {
                scan.WithDefaultConventions();

                AppDomain.CurrentDomain.GetAssemblies()
                    .Where(a => a.GetName().Name.StartsWith("Robusta.TalentManager"))
                        .ToList()
                            .ForEach(a => scan.Assembly(a));
            });

            x.For<IMappingEngine>().Use(Mapper.Engine);
            x.For(typeof(IRepository<>)).Use(typeof(Repository<>));

        });

        config.DependencyResolver = new StructureMapContainer(ObjectFactory.Container);
    }
}

using AutoMapper;
using Robusta.TalentManager.Domain;
using Robusta.TalentManager.WebApi.Dto;

public static class DtoMapperConfig
{
    public static void CreateMaps()
    {
        Mapper.CreateMap<EmployeeDto, Employee>();
        Mapper.CreateMap<Employee, EmployeeDto>();
    }
} - In the project Robusta.TalentManager.WebApi.WebHost, create a new Global Application Class and accept the default name of Global.asax. Remove all the methods except Application_Start. Add the code in Listing 9-8 to this method.
Listing 9-8. Global.asax.cs
using System;
using System.Web.Http;
using Robusta.TalentManager.WebApi.Core.Configuration;

public class Global : System.Web.HttpApplication
{
    protected void Application_Start(object sender, EventArgs e)
    {
        IocConfig.RegisterDependencyResolver(GlobalConfiguration.Configuration);
        WebApiConfig.Register(GlobalConfiguration.Configuration);
        DtoMapperConfig.CreateMaps();
    }
} - Edit Web.Config in the project Robusta.TalentManager.WebApi.WebHost to add the configSections and connectionStrings entries shown in Listing 9-9. Edit the connection to string and supply the appropriate server name and the connection credentials of user ID and password.
Listing 9-9. Web.Config
<configuration>
        <configSections>
                <section name="entityFramework"
                        type="System.Data.Entity.Internal.ConfigFile.EntityFrameworkSection,
                                EntityFramework, Version=5.0.0.0, Culture=neutral,
                                        PublicKeyToken=b77a5c561934e089"
                        requirePermission="false" />
        </configSections>
        <connectionStrings>
                <add name="DefaultConnection"
                        providerName="System.Data.SqlClient"
                        connectionString="Server= server;Database=talent_manager;
                        User Id= uid;Password= pwd;" />
        </connectionStrings>
...
</configuration> - In the project Robusta.TalentManager.WebApi.Core, create a folder named Controllers and under this folder, add a class EmployeesController, as shown in Listing 9-10.
Listing 9-10. EmployeesController
using System;
using System.Net;
using System.Net.Http;
using System.Web.Http;
using AutoMapper;
using Robusta.TalentManager.Data;
using Robusta.TalentManager.Domain;
using Robusta.TalentManager.WebApi.Dto;

public class EmployeesController : ApiController
{
    private readonly IUnitOfWork uow = null;
    private readonly IRepository<Employee> repository = null;
    private readonly IMappingEngine mapper = null;

    public EmployeesController(IUnitOfWork uow,
                                     IRepository<Employee> repository,
                                            IMappingEngine mapper)
    {
        this.uow = uow;
        this.repository = repository;
        this.mapper = mapper;
    }

    public HttpResponseMessage Get(int id)
    {
        var employee = repository.Find(id);
        if (employee == null)
        {
            var response = Request.CreateResponse(HttpStatusCode.NotFound, "Employee not found");

            throw new HttpResponseException(response);
        }

        return Request.CreateResponse<EmployeeDto>(
                            HttpStatusCode.OK,
                                     mapper.Map<Employee, EmployeeDto>(employee));
    }

    public HttpResponseMessage Post(EmployeeDto employeeDto)
    {
        var employee = mapper.Map<EmployeeDto, Employee>(employeeDto);

        repository.Insert(employee);
        uow.Save();

        var response = Request.CreateResponse<Employee>(
                                        HttpStatusCode.Created,
                                                employee);

        string uri = Url.Link("DefaultApi", new { id = employee.Id });
        response.Headers.Location = new Uri(uri);
        return response;
    }

    protected override void Dispose(bool disposing)
    {
        if (repository != null)
            repository.Dispose();

        if (uow != null)
            uow.Dispose();

        base.Dispose(disposing);
    }
} - Rebuild the solution and make a GET to http://localhost:7387/api/employees/1 from Fiddler. Adjust the port in the URI to reflect the port used by your application.
It works and returns the JSON representation of the employee resource. Thus, we have created the Visual Studio solution with all the projects from scratch without using the Web API template. The project Robusta.TalentManager.WebApi.WebHost is what you will deploy to IIS to web-host the Web API. You will follow the same process you typically follow to deploy any ASP.NET application, and we will now use local IIS to run our application.
- Ensure that you have launched Visual Studio as administrator. If not, close and run as administrator.
- Double-click Properties under Robusta.TalentManager.WebApi.WebHost in the Solution Explorer and go to the Web tab.
- In the Servers section, uncheck Use IIS Express. Give the Project URL of http://localhost/TalentManager and click Create Virtual Directory. Dismiss the success message dialog and save the changes.
Note If you do not have IIS installed in your computer, the checkbox Use IIS Express will be checked and disabled, and you will not be able to uncheck it. You can install IIS or leave the checkbox checked and use IIS Express, which comes with Visual Studio.
- Rebuild the solution and make a GET to http://localhost/talentmanager/api/employees/1. You will get the JSON representation of the employee resource back, the same as last time. The only difference is that the application runs in IIS now.
- Run the Internet Information Services (IIS) Manager application. The path to this application in Windows 7 is %windir%system32inetsrvInetMgr.exe. In Windows 7, you can type inetmgr in the Run box and click OK to launch IIS manager. In Windows 8, type inetmgr in the Search box and press Enter.
I use IIS 7.5 and depending on the version, what you see in your machine could be different from the screenshots (See Figure 9-1).
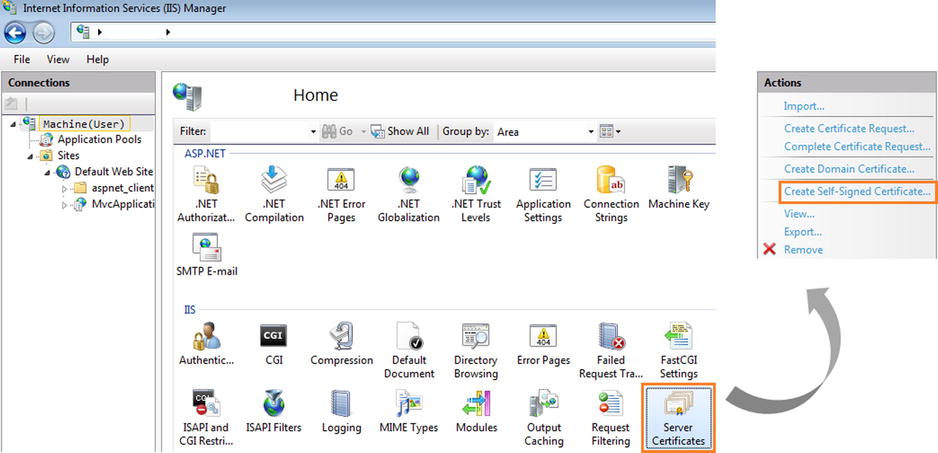
Figure 9-1. IIS Manager—Server Certificate Generation
- Click on the root machine node in the tree view on the left pane and double-click the Server Certificates icon in the right pane.
- In the resulting screen, click the Create Self-Signed Certificate link. Enter a friendly name such as MyWebApiCert in the pop-up and click OK to complete server certificate generation.
- Now that we have the server certificate, we need to let IIS use it. Click the Default Web Site node of the tree view in the left pane.
- In the Actions pane on the right, click Bindings. and then Add (see Figure 9-2). In the Add Site Binding dialog, select HTTPS as the Type and select the certificate we just generated, which is MyWebApiCert. Click OK to complete creating the binding.
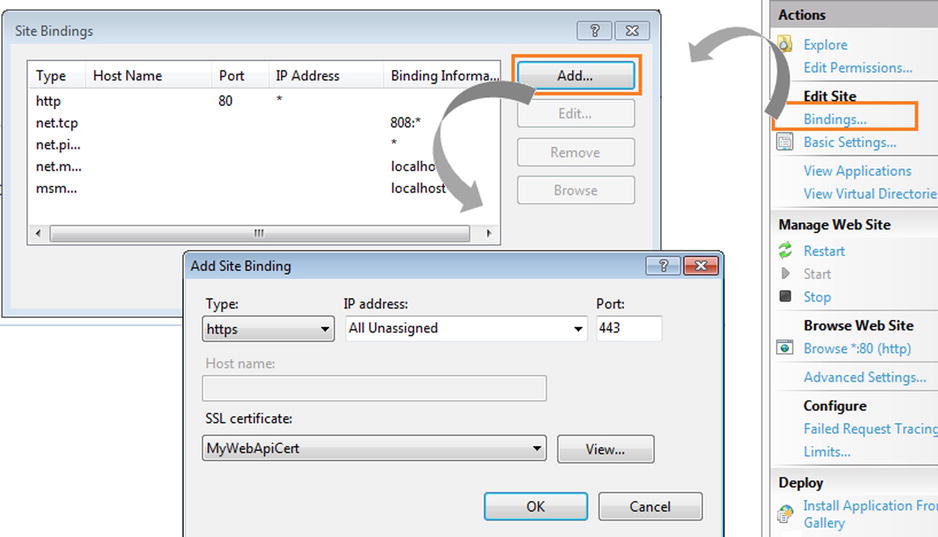
Figure 9-2. IIS Manager—configuring HTTPS binding
- Now, you are all set to invoke the Web API using HTTPS. Open Internet Explorer and type https://localhost/talentmanager/api/employees/1 in the address bar and press Enter.
- Since this is a self-signed certificate, the browser will not be happy and will show the warning that the certificate is not something it trusts. Click the Continue To This Website (Not Recommended) link. It works, and the JSON representation is downloaded.
Thus, we have hosted our Web API in IIS and enabled HTTPS as well.
![]() Note A self-signed certificate like the one we just created using IIS Manager is signed by the same entity for whose identity it stands. This is similar to you certifying yourself. In the real world, unless you are someone whom everyone else trusts, no one is going to believe the certificate you give to yourself. A third party that is trusted by both the first and second party is needed to complete the circle of trust. In the world of digital certificates, that trusted third party is a certification authority (CA) such as VeriSign. A certificate issued by a CA is trusted by all, but it does cost money. A self-signed certificate costs nothing but is trusted by no one. It can be used for testing purposes only.
Note A self-signed certificate like the one we just created using IIS Manager is signed by the same entity for whose identity it stands. This is similar to you certifying yourself. In the real world, unless you are someone whom everyone else trusts, no one is going to believe the certificate you give to yourself. A third party that is trusted by both the first and second party is needed to complete the circle of trust. In the world of digital certificates, that trusted third party is a certification authority (CA) such as VeriSign. A certificate issued by a CA is trusted by all, but it does cost money. A self-signed certificate costs nothing but is trusted by no one. It can be used for testing purposes only.
9.2 Self-Hosting ASP.NET Web API
In this exercise, you will self-host your ASP.NET Web API. One of the great features of ASP.NET Web API is that it is host-independent. The same code we web-hosted in the previous exercise can be self-hosted. Self-hosting does not require IIS, and you can self-host a Web API in your own process. You will use a console application to self-host Web API in this exercise.
- Run Visual Studio as administrator.
- Open the Robusta.TalentManager solution from Exercise 9.1. In the Solution Explorer, right-click Solution 'Robusta.TalentManager’ and choose Add ➤ New Project. Under Visual C# templates, select Windows and choose Console Application. Give it a name of Robusta.TalentManager.WebApi.SelfHost. Right-click this project in the Solution Explorer and select Set As Startup Project.
- Right-click References under the Robusta.TalentManager.WebApi.SelfHost project. Select Manage NuGet Packages. Search for the package Microsoft.AspNet.WebApi.SelfHost, select the package in the search results, and click Install. We need references to the System.Web.Http.SelfHost, System.Net.Http, and System.Web.Http assemblies.
- Add the following project references to Robusta.TalentManager.WebApi.SelfHost:
- a. Robusta.TalentManager.Domain
- b. Robusta.TalentManager.WebApi.Dto
- c. Robusta.TalentManager.WebApi.Core
- In the Robusta.TalentManager.WebApi.SelfHost project, modify the Program class, as shown in Listing 9-11. Pay attention to the URI specified. We will use the same URI to make our Web API requests.
Listing 9-11. The Program Class
using System;
using System.Web.Http.SelfHost;
using Robusta.TalentManager.WebApi.Core.Configuration;

class Program
{
    static void Main(string[] args)
    {
        var configuration = new HttpSelfHostConfiguration(" http://localhost: 8086");

        WebApiConfig.Register(configuration);
        DtoMapperConfig.CreateMaps();
        IocConfig.RegisterDependencyResolver(configuration);

        using (HttpSelfHostServer server = new HttpSelfHostServer(configuration))
        {
            server.OpenAsync().Wait();
            Console.WriteLine("Press Enter to terminate the server...");
            Console.ReadLine();
        }
    }
} - In the Robusta.TalentManager.WebApi.SelfHost project, replace the contents of the App.Config file with the XML shown in Listing 9-12. Edit the connection string to supply the appropriate server name and connection credentials.
Listing 9-12. App.Config
<?xml version="1.0" encoding="utf-8" ?>
<configuration>
        <configSections>
                <section name="entityFramework"
                        type="System.Data.Entity.Internal.ConfigFile.EntityFrameworkSection,
                                EntityFramework, Version=5.0.0.0, Culture=neutral,
                                        PublicKeyToken=b77a5c561934e089"
                        requirePermission="false" />
        </configSections>
        <startup>
                <supportedRuntime version="v4.0" sku=".NETFramework,Version=v4.5" />
        </startup>
        <connectionStrings>
                <add name="DefaultConnection"
                        providerName="System.Data.SqlClient"
                        connectionString="Server= server;Database=talent_manager;
                        User Id= uid;Password= pwd;" />
        </connectionStrings>
</configuration> - Rebuild the solution, run the Robusta.TalentManager.WebApi.SelfHost Console Application project in Visual Studio, and make a GET to http://localhost:8086/api/employees/1 from Fiddler. Unlike what you have been doing so far, you will not change the port 8086, since this URI is based on Listing 9-11, where we have the port specified.
- You will get a JSON representation of the employee resource. You have just self-hosted the same Web API code you created in the Exercise 9.1. Close the console application hosting our Web API by pressing Enter on the command window.
We will now enable HTTPS. For this, we will use the same MyWebApiCert server certificate that we generated in Exercise 9.1.
- Open Microsoft Management Console (MMC). In Windows 7 and Windows 8, you can search for mmc and run the program.
- Select File ➤ Add/Remove Snap-In, followed by the Certificates snap-in on the left side under Available Snap-Ins.
- Click Add and subsequently select Computer Account and click Next; then select Local Computer and click Finish to see the certificates on your computer.
- In the left tree view, select Certificates (Local Computer) ➤ Personal ➤ Certificates. In the right list view, the certificates will be displayed. Select the one with the Friendly Name of MyWebApiCert. This certificate will be issued to your local machine name.
- Double-click the certificate and go to the Details tab. Click the Thumbprint field. Copy the value, which will be something like this:
a7 8f f5 7f 70 ce 4f a2 b1 07 41 0f b5 33 79 37 d2 d5 11 67 - Open a DOS command prompt as administrator and run the following command:
netsh http add sslcert ipport=0.0.0.0: 8086certhash=a78ff57f70ce4fa2b107410fb5337937d2d51167 appid={951B215B-DE1E-42AD-B82C-4F966867CE41}
- a. For ipport, the IP address 0.0.0.0 matches all IP addresses for the local machine, and 8086 is the port our self-host server listens on.
- b. For certhash, specify the thumbprint value you got from MMC, the value you copied from the Thumbprint field without any spaces.
- c. For appid, specify a GUID. It can be any GUID that will represent your application.
- To the Robusta.TalentManager.WebApi.SelfHost project, add a reference to System.ServiceModel (Assemblies ➤ Framework).
- Add a class MySelfHostConfiguration to the Robusta.TalentManager.WebApi.SelfHost project, deriving from HttpSelfHostConfiguration, as shown in Listing 9-13.
Listing 9-13. The MySelfHostConfiguration Class
using System.ServiceModel.Channels;
using System.Web.Http.SelfHost;
using System.Web.Http.SelfHost.Channels;

public class MySelfHostConfiguration : HttpSelfHostConfiguration
{
    public MySelfHostConfiguration(string baseAddress) : base(baseAddress) { }

    protected override BindingParameterCollection OnConfigureBinding(HttpBinding httpBinding)
    {
        httpBinding.Security.Mode = HttpBindingSecurityMode.Transport;

        return base.OnConfigureBinding(httpBinding);
    }
} - In the Main method of the Program class, comment out the line
var configuration = new HttpSelfHostConfiguration(" http://localhost:8086 ");
and add the line
var configuration = new MySelfHostConfiguration(" https://localhost:8086 ");
- Rebuild the solution and run the Robusta.TalentManager.WebApi.SelfHost Console Application project in Visual Studio.
- Open Internet Explorer, type https://localhost:8086/api/employees/1 in the address bar, and press Enter.
- Click the Continue To This Website link. It works, and the JSON representation is downloaded.
As in the case of web hosting, Internet Explorer will not be happy with the self-signed certificate and will show the warning that the certificate is not something it trusts.
![]() Note Our console application listens on port 8086 for HTTP traffic. This requires administrator privileges. This is the reason we run Visual Studio as administrator. You will not be able to run in the elevated level all the time, and it is not a good practice, anyway. But if you do not run as administrator, you will get the error HTTP could not register URL http://+:8086/. To resolve this problem, use Netsh.exe to reserve the URL for non-administrator accounts. Open a command prompt as administrator and run the following command: netsh http add urlacl url=http://+:8086/ user=<your account>. You can delete the URL reservation for non-administrator accounts by running the following command: netsh http delete urlacl url=http://+:8086/.
Note Our console application listens on port 8086 for HTTP traffic. This requires administrator privileges. This is the reason we run Visual Studio as administrator. You will not be able to run in the elevated level all the time, and it is not a good practice, anyway. But if you do not run as administrator, you will get the error HTTP could not register URL http://+:8086/. To resolve this problem, use Netsh.exe to reserve the URL for non-administrator accounts. Open a command prompt as administrator and run the following command: netsh http add urlacl url=http://+:8086/ user=<your account>. You can delete the URL reservation for non-administrator accounts by running the following command: netsh http delete urlacl url=http://+:8086/.
9.3 In-Memory Hosting ASP.NET Web API
In this exercise, you will use in-memory hosting to integration-test your ASP.NET Web API. In the case of in-memory hosting, nothing goes over the wire. Hence it does not require a port or an IP address, and everything runs in memory. This attribute makes in-memory hosting very useful for testing the ASP.NET Web API pipeline. In Chapter 7, we unit-tested controllers in isolation. There are scenarios where you will want to test the controller along with some other components running in the pipeline, say a filter and a message handler. In-memory hosting makes it possible to test those cases quickly at the same pace that an isolated unit test runs.
- In the Robusta.TalentManager.WebApi.Core project, apply the Authorize filter on the Get(int) action method of EmployeesController, as shown in Listing 9-14.
Listing 9-14. The GET Action Method with the Authorize Filter
[Authorize]
public HttpResponseMessage Get(int id)
{
    var employee = repository.Find(id);
    if (employee == null)
    {
        var response = Request.CreateResponse(HttpStatusCode.NotFound, "Employee not found");

        throw new HttpResponseException(response);
    }

    return Request.CreateResponse<EmployeeDto>(
                        HttpStatusCode.OK,
                        mapper.Map<Employee, EmployeeDto>(employee));
} - Rebuild the solution and make a GET to our web-hosted API (http://localhost/talentmanager/api/employees/1) from Fiddler. You will receive a 401 - Unauthorized status code back.
The Authorize filter is not allowing the action method to run, since the user identity is not authenticated. I cover security in Chapter 10, but for the sake of this exercise, let us create a message handler that simply sets a hard-coded but authenticated identity, as long as the request contains the custom header X-PSK.
- In the Robusta.TalentManager.WebApi.Core project, create a folder named Handlers and under this folder, create a class with a name of AuthenticationHandler, as shown in Listing 9-15.
Listing 9-15. The Authentication Message Handler
using System.Collections.Generic;
using System.Net.Http;
using System.Security.Claims;
using System.Threading;
using System.Threading.Tasks;

public class AuthenticationHandler : DelegatingHandler
{
    protected async override Task<HttpResponseMessage> SendAsync(
                                            HttpRequestMessage request,
                                                   CancellationToken cancellationToken)
    {
        if (request.Headers.Contains("X-PSK"))
        {
            var claims = new List<Claim>
            {
                new Claim(ClaimTypes.Name, "jqhuman")
            };

            var principal = new ClaimsPrincipal(new[] { new ClaimsIdentity(claims, "dummy") });

            Thread.CurrentPrincipal = principal;
        }

        return await base.SendAsync(request, cancellationToken);
    }
} - In the WebApiConfig class under the Configuration folder in the project Robusta.TalentManager.WebApi.Core, add the following line of code in the Register method:
config.MessageHandlers.Add(new AuthenticationHandler()); - This will add the handler to the handler collection so that the handler runs in the pipeline. You will need to add the following directive to the WebApiConfig class.
using Robusta.TalentManager.WebApi.Core.Handlers; - Rebuild the solution and make a GET to the web-hosted API (http://localhost/talentmanager/api/employees/1) from Fiddler with a request header X-PSK: somekey. It starts working again, and you will receive a JSON representation.
Now, let us in-memory host our Web API to integration-test all these three classes together: controller, filter, and message handler.
- In the Solution Explorer, right-click Solution ‘Robusta.TalentManager’ and choose Add ➤ New Project. Under Visual C# templates, select Test and choose Unit Test Project. Give it a name of Robusta.TalentManager.WebApi.Test.
- Right-click References under the Robusta.TalentManager.WebApi.Test project and select Manage NuGet Packages. Search for the package Microsoft.AspNet.WebApi.Core, select the package in the search results, and click Install.
- Add the following project references to Robusta.TalentManager.WebApi.Test:
- a. Robusta.TalentManager.Domain
- b. Robusta.TalentManager.WebApi.Dto
- c. Robusta.TalentManager.WebApi.Core
- Right-click the Robusta.TalentManager.WebApi.Test project and select Add ➤ New Item and create a new Application Configuration File. Accept the default name of App.Config. Copy and paste the code in Listing 9-16 to the App.Config file. We need the Entity Framework–related information in the config file, because these are integration tests and they do touch the actual database. Also, edit the connection string to supply the appropriate server name and connection credentials.
Listing 9-16. App.Config
<?xml version="1.0" encoding="utf-8" ?>
<configuration>
        <configSections>
                <section name="entityFramework"
                        type="System.Data.Entity.Internal.ConfigFile.EntityFrameworkSection,
                                EntityFramework, Version=5.0.0.0, Culture=neutral,
                                        PublicKeyToken=b77a5c561934e089"
                        requirePermission="false" />
        </configSections>
        <connectionStrings>
                <add name="DefaultConnection"
                        providerName="System.Data.SqlClient"
                        connectionString="Server= server;Database=talent_manager;
                        User Id= uid;Password= pwd;" />
        </connectionStrings>
</configuration> - Rename UnitTest1 to EmployeesControllerIntegrationTest. Add the code from Listing 9-17 to this class. It does the following:
- a. In the Initialize method (decorated with TestInitialize) that runs before the test, we create a new instance of HttpConfiguration and call our config classes. We then create a new instance of HttpServer to be used in the test method. We also clear the Thread.CurrentPrincipal, since it has the Windows identity—the Windows account under which Visual Studio runs.
- b. In the Cleanup method that runs after the test, we just call Dispose on the HttpServer instance.
Listing 9-17. The EmployeesControllerIntegrationTest Class (Incomplete)
using System;
using System.Net;
using System.Net.Http;
using System.Security.Principal;
using System.Threading;
using System.Web.Http;
using Microsoft.VisualStudio.TestTools.UnitTesting;
using Robusta.TalentManager.WebApi.Core.Configuration;
using Robusta.TalentManager.WebApi.Dto;

[TestClass]
public class EmployeesControllerIntegrationTest
{
    private HttpServer server = null;

    [TestInitialize()]
    public void Initialize()
    {
        var configuration = new HttpConfiguration();

        IocConfig.RegisterDependencyResolver(configuration);
        WebApiConfig.Register(configuration);
        DtoMapperConfig.CreateMaps();

        server = new HttpServer(configuration);

        // This test runs under the context of my user
        // account (Windows Identity) and hence I clear that
        Thread.CurrentPrincipal = new GenericPrincipal(
                                        new GenericIdentity(String.Empty),
                                                null);
    }

    // Test methods go here

    [TestCleanup]
    public void Cleanup()
    {
        if (server != null)
            server.Dispose();
    }
} - Add the test method that checks for 401 - Unauthorized, when the credential is not sent in the request, as shown in Listing 9-18. Here we create an instance of HttpMessageInvoker using the HttpServer instance and make a request. The URI in the request is used only to extract the route data, and a real endpoint need not exist, since we use the in-memory–hosted Web API here. In this test, we have not set the request header for the handler to create the identity. The Authorize filter catches it and returns a 401.
Listing 9-18. The MustReturn401WhenNoCredentialsInRequest Test Method
[TestMethod]
public void MustReturn401WhenNoCredentialsInRequest()
{
    using (var invoker = new HttpMessageInvoker(server))
    {
        using (var request = new HttpRequestMessage(HttpMethod.Get,
                                            " http://localhost/api/employees/1 "))
        {
            using (var response = invoker.SendAsync(request,
                                                CancellationToken.None).Result)
            {
                Assert.AreEqual(HttpStatusCode.Unauthorized, response.StatusCode);
            }
        }
    }
} - Add the test method that checks for 200 - OK, when the credential is sent in the request, as shown in Listing 9-19. In this test, we set the request header for the handler to create the identity. Thus, the Authorize filter is happy and it lets the action method run, which returns the employee data.
Listing 9-19. The MustReturn200AndEmployeeWhenCredentialsAreSupplied Test Method
[TestMethod]
public void MustReturn200AndEmployeeWhenCredentialsAreSupplied()
{
    using (var invoker = new HttpMessageInvoker(server))
    {
        using (var request = new HttpRequestMessage(HttpMethod.Get,
                                            " http://localhost/api/employees/1 "))
        {
            request.Headers.Add("X-PSK", "somekey"); // Credentials

            using (var response = invoker.SendAsync(request,
                                                CancellationToken.None).Result)
            {
                Assert.IsNotNull(response);
                Assert.IsNotNull(response.Content);
                Assert.IsInstanceOfType(response.Content, typeof(ObjectContent<EmployeeDto>));
                Assert.AreEqual(HttpStatusCode.OK, response.StatusCode);

                var content = (response.Content as ObjectContent<EmployeeDto>);
                var result = content.Value as EmployeeDto;

                Assert.AreEqual(1, result.Id);
                Assert.AreEqual("Johnny", result.FirstName);
                Assert.AreEqual("Human", result.LastName);
            }
        }
    }
} - Rebuild the solution and run the tests from Test Explorer in Visual Studio (TEST menu ➤ Run ➤ All Tests).
Summary
ASP.NET Web API is host-independent, regardless of what the name suggests. ASP.NET infrastructure with IIS is not mandatory. There are three ways you can host your HTTP services built using ASP.NET Web API: web hosting, self-hosting, and in-memory hosting.
Web hosting uses the ASP.NET infrastructure backed by the IIS, and this is similar to hosting any ASP.NET application in IIS. Setting up transport security (HTTPS) is also similar to the way you set up HTTPS for any other ASP.NET application.
ASP.NET Web API can be self-hosted using any Windows process, such as a console application or Windows service. This option is useful when you do not or cannot have IIS. To enable HTTPS or reserve the URL for your Web API, you will need to use the netsh utility.
In the case of in-memory hosting, the clients connect directly to the Web API runtime, without hitting the network. This is used mainly for integration testing purposes, where you want to test the integration of multiple components running in the ASP.NET Web API pipeline.