
![]()
Using Data Templates
In the previous edition of this book, I introduced data templates using the jQuery Templates plug-in. This history of this plug-in was rather odd. Microsoft and the jQuery team announced that three plug-ins developed by Microsoft had been accepted as “official” plug-ins, a status that had not been accorded to any other plug-in. A while later, the jQuery team announced that the plug-ins were deprecated, that the official status was removed, and that there were plans to replace them with other functionality. A replacement for the template plug-in would be created as part of jQuery UI (which I describe in Part IV of this book).
That was a while ago and the new official jQuery template engine that was announced, which was named jsViews, is still not finished. There is a beta version available, but it has rough edges and remains volatile. I am not a fan, but you can learn more and get the latest beta version of the library at https://github.com/BorisMoore/jsviews.
In the meantime, the deprecated jQuery Templates package I used in the last edition has not aged well. I stopped using it a while ago in my own projects and settled on an alternative called Handlebars, which is available from http://handlebarsjs.com. It doesn’t come with any jQuery integration – in fact, it isn’t a jQuery plug-in at all – but it is easy to write a small amount of code to support templates through the jQuery syntax, and I show you how this is done.
Handlebars – as did the jQuery Templates plug-in before it – supports mustache templates, which are expressed as HTML containing special mustache directives. I explain what these are, but the use of the term mustache comes from the fact that they are denoted using the brace characters ({ and }) which look a little like sideways mustaches. Table 12-1 provides the summary for this chapter.
Table 12-1. Chapter Summary
| Problem | Solution | Listing |
|---|---|---|
| Generate elements using a template. | Install the Handlebars library, create a jQuery plug-in, and use the template method. | 1–6 |
| Assign the elements generated from a template to different parents. | Either split the source data and apply the template twice, or use the slice filter and end methods to divide up the generated elements. | 7–10 |
| Change the output of the template if a data property is defined and isn’t null. | Use the built-in #if or #unless template helpers. | 11, 12 |
| Enumerate the contents of an array or the properties of an object. | Use the #each template helper. | 13, 14 |
| Refer to another part of the data object in a template. | Use the #with template helper, or use the ../ path. | 15–17 |
| Create a custom template helper. | Use the Handlebars.registerHelper method to register the name of the helper and a helper function that returns template content. | 18–22 |
| Receive optional arguments in a template helper function. | Use the options.hash property. | 23, 24 |
| Define special properties that can be used within the block of a custom template helper. | Use the options.data property. | 25, 26 |
Understanding the Problem That Templates Solve
Data templates solve a specific problem: they allow you to programmatically generate elements from the properties and values of JavaScript objects. This is something you can do in other ways, and, in fact, I did something similar in Chapter 11 when I created some elements to represent additional flowers in the example document. Listing 12-1 shows the relevant statements from that chapter.
Listing 12-1. Creating Elements Programmatically
...
<script type="text/javascript">
    $(document).ready(function() {
        var fNames = ["Carnation", "Lily", "Orchid"];
        var fRow = $("<div id=row3 class=drow/>").appendTo("div.dtable");
        var fTemplate = $("<div class=dcell><img/><label/><input/></div>");
        for (var i = 0; i < fNames.length; i++) {
            fTemplate.clone().appendTo(fRow).children()
                .filter("img").attr("src", fNames[i] + ".png").end()
                .filter("label").attr("for", fNames[i]).text(fNames[i]).end()
                .filter("input").attr({name: fNames[i], value: 0, required: "required"})
        }
    });
</script>
...
The statements in the listing are hard to read, and the difficulty increases sharply for more complex elements. Handily, as I’ll explain, data templates put the emphasis back on HTML and minimize the amount of code needed to generate elements from data.
Taking a broader view, the need to integrate data into the document is a common issue to resolve. In my projects, it arises through two situations. The first is because I am working with some preexisting system that contains the data that drives my web application. I could obtain the data and integrate it into the document at the server – nd there are some great technologies available to do this – but it means that my server farm spends a lot of time doing work that I could get the browser to do for me. If you have ever built and operated a high-volume web application, you know that the costs are substantial and that any opportunity to reduce the amount of processing required is considered seriously.
The second reason I need to integrate data into a document is that my web application is sourcing the data via Ajax in response to a user action. I will explain the jQuery support for Ajax fully in Chapters 14 and 15, but the short version is that you can obtain and display data from a server without reloading the entire page in the browser. It is a powerful technique that is widely used, and the data templates work nicely with it.
Setting Up the Template Library
Before you can use templates, you must download the template library and link to it in your document. You can download the library from http://handlebarsjs.com, and I saved the JavaScript code to a file called handlebars.js, alongside the jQuery JavaScript file.
The handlebars library doesn’t have any integration with jQuery, but it is a simple matter to create a jQuery plug-in that allows me to use jQuery syntax to generate templates. I created a file called handlebars-jquery.js and used it to define the code shown in Listing 12-2.
Listing 12-2. Adapting handlerbars.js to Use jQuery Syntax in the handlebars-jquery.js File
(function ($) {
    var compiled = {};
    $.fn.template = function (data) {
        var template = $.trim($(this).first().html());
        if (compiled[template] == undefined) {
            compiled[template] = Handlebars.compile(template);
        }
        return $(compiled[template](data));
    };
})(jQuery);
CREATING CUSTOM JQUERY PLUG-INS
As Listing 12-2 demonstrates, it is simple to create plug-ins for jQuery, especially if you are just creating a wrapper around an existing library. I don't describe how custom plug-ins work in this book because it is something that few developers need to do, but you can get full details at http://learn.jquery.com/plugins.
This code defines a method called template that can be called on jQuery objects to apply a template to a data object using handlebars. The result is a jQuery object containing the HTML elements generated from the template. In order to generate templates, I need to add script elements for the handlebars.js and handlebars-jquery.js files to the example document, as shown in Listing 12-3.
Listing 12-3. Adding the Library to the Example Document
<!DOCTYPE html>
<html>
<head>
    <title>Example</title>
    <script src="jquery-2.0.2.js" type="text/javascript"></script>
    <script src="handlebars.js" type="text/javascript"></script>
    <script src="handlebars-jquery.js" type="text/javascript"></script>
    <link rel="stylesheet" type="text/css" href="styles.css"/>
    <script type="text/javascript">
        $(document).ready(function () {

            // ...
example code will go here...

        });
    </script>
</head>
<body>
    <h1>Jacqui's Flower Shop</h1>
    <form method="post">
        <div id="oblock">
            <div class="dtable">
                <div id="row1" class="drow"></div>
                <div id="row2"class="drow"></div>
            </div>
        </div>
        <div id="buttonDiv"><button type="submit">Place Order</button></div>
    </form>
</body>
</html>
I will use this listing as the example document for this chapter. Aside from the addition of the template library and my simple plug-in, you will notice that I have removed the elements that describe individual flowers – I have done this so that I can explore different techniques for adding them back in using templates. You can see how this initial HTML document appears in the browser in Figure 12-1.
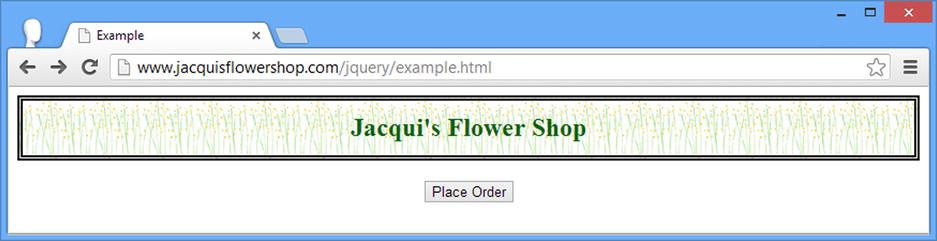
Figure 12-1. The starting example document
A First Data Templates Example
The best way to start learning about data templates is to jump right in. Listing 12-4 demonstrates the basic template features. I have included the full HTML document in this listing because templates are expressed using a script element, but I’ll just show the changes needed in subsequent listings.
Listing 12-4. A First Data Templates Example
<!DOCTYPE html>
<html>
<head>
    <title>Example</title>
    <script src="jquery-2.0.2.js" type="text/javascript"></script>
    <script src="handlebars.js" type="text/javascript"></script>
    <script src="handlebars-jquery.js" type="text/javascript"></script>
    <link rel="stylesheet" type="text/css" href="styles.css"/>
    <script id="flowerTmpl" type="text/x-handlebars-template">
        {{#each flowers}}
            <div class="dcell">
            <img src="{{product}}.png"/>
            <label for="{{product}}">{{name}}:</label>
            <input name="{{product}}" data-price="{{price}}" data-stock="{{stock}}"
                value="0" required />
        </div>
        {{/each}}
    </script>
    <script type="text/javascript">
        $(document).ready(function () {
            var data = {
                flowers: [
                { name: "Aster", product: "aster", stock: "10", price: 2.99 },
                { name: "Daffodil", product: "daffodil", stock: "12", price: 1.99 },
                { name: "Rose", product: "rose", stock: "2", price: 4.99 },
                { name: "Peony", product: "peony", stock: "0", price: 1.50 },
                { name: "Primula", product: "primula", stock: "1", price: 3.12 },
                { name: "Snowdrop", product: "snowdrop", stock: "15", price: 0.99 }]
            };
            var template = $("#flowerTmpl").template(data).appendTo("#row1");
        });
    </script>
</head>
<body>
    <h1>Jacqui's Flower Shop</h1>
    <form method="post">
        <div id="oblock">
            <div class="dtable">
                <div id="row1" class="drow"></div>
                <div id="row2"class="drow"></div>
            </div>
        </div>
        <div id="buttonDiv"><button type="submit">Place Order</button></div>
    </form>
</body>
</html>
In the sections that follow, I’ll break down the example and explain each part.
![]() Tip When the data is part of the document, it is known as inline data. The alternative is remote data, which is where you get the data from a server separately from the document. I’ll demonstrate remote data later in the chapter, but it touches upon the jQuery support for Ajax, which is the topic of Chapters 14 and 15.
Tip When the data is part of the document, it is known as inline data. The alternative is remote data, which is where you get the data from a server separately from the document. I’ll demonstrate remote data later in the chapter, but it touches upon the jQuery support for Ajax, which is the topic of Chapters 14 and 15.
Defining the Data
The starting point for the example is the data, which in this case is an object with a single property that is set to an array of objects. Each object describes a single flower product, and Listing 12-5 shows the relevant statements from the example HTML document.
Listing 12-5. Defining the Flower Data
...
var data = {
    flowers: [
        { name: "Aster", product: "aster", stock: "10", price: 2.99 },
        { name: "Daffodil", product: "daffodil", stock: "12", price: 1.99 },
        { name: "Rose", product: "rose", stock: "2", price: 4.99 },
        { name: "Peony", product: "peony", stock: "0", price: 1.50 },
        { name: "Primula", product: "primula", stock: "1", price: 3.12 },
        { name: "Snowdrop", product: "snowdrop", stock: "15", price: 0.99 }]
};
...
Handlebars templates work on objects and properties, which is why I have to have an object wrapper around my array of flower objects. For this example, the array contains six objects, each of which has a set of properties that describe a flower shop product: the display name, the product name, the stock level, and the price.
As you might imagine, at the heart of the data template library is the data template. This is a set of HTML elements containing placeholders that correspond to aspects of the data objects. Listing 12-6 shows the template for this example.
Listing 12-6. Defining the Data Template
...
<script id="flowerTmpl" type="text/x-handlebars-template">
    {{#flowers}}
    <div class="dcell">
        <img src="{{product}}.png"/>
        <label for="{{product}}">{{name}}:</label>
        <input name="{{product}}" data-price="{{price}}" data-stock="{{stock}}"
            value="0" required />
    </div>
    {{/flowers}}
</script>
...
The first point to note about the template is that it is contained within a script element with a type attribute of text/x-handlebars-template. This is to stop the browser from interpreting the contents of the template. The second point of note is that I have assigned a name to my script element using the id attribute: in this example, the template is called flowerTmpl. The name is important because I will need it to apply the template to the data.
The contents of the template will be applied to the objects in the data array in order to produce a set of HTML elements for each and every object. You can see that the structure of the template corresponds to the set of elements that I have used for the flower products in previous chapters.
The key difference, of course, is the parts I have emphasized in the listings. These are double mustache directives (so called because the brace characters used to denote them look like mustaches – hence the term mustache template). There are two kinds of directives in this example (and I’ll introduce further types later in the chapter).
The first kind of directive is a section, which defines a region of the template that will be generated for each value of the property with the same name in the data object. Section directives start with a # character ({{#flowers}}, in this case) and end with a / character ({{/flowers}}). The section directive I used will generate the section of the template it contains for each of the objects assigned to the flowers property.
The other type of directive is a variable, which will be replaced with the corresponding property value from the data object. So, for example, when the template library encounters the {{product}} variable it replaces it with the value of the product property from the object that is being processed, meaning that the part of the template like this:
...
<img src="{{product}}.png"/>
...
is transformed into this:
...
<img src="aster.png"/>
...
Applying the Template
I apply the template to the data using the template method that I defined in my jQuery plug-in in Listing 12-2. Here is the call to the template method from the example HTML document:
...
var template = $("#flowerTmpl").template(data).appendTo("#row1");
...
I use the jQuery $ function to select the script element that contains the template and then call the template method on the resulting jQuery object, passing in the data that I want to process.
The template method returns a standard jQuery object that contains the elements produced from the template. In this case, I end up with a set of div elements, each of which contains an img, label, and input element that has been tailored for one of the objects in my data array. I use the appendTo method to insert the complete set as children to the row1 element. You can see the result in Figure 12-2.

Figure 12-2. Using data templates
Tweaking the Result
I don’t get exactly the result I wanted – all of the flowers are in a single row, rather than split over two rows as in previous chapters. But, since I am dealing with a jQuery object, I can slice and dice the elements using the techniques I described in Part 2. Listing 12-7 shows how you can do this by operating on the jQuery object that the template method returns.
Listing 12-7. Processing the Results from a Template
...
<script type="text/javascript">
    $(document).ready(function () {
        var data = {
            flowers: [
                { name: "Aster", product: "aster", stock: "10", price: 2.99 },
                { name: "Daffodil", product: "daffodil", stock: "12", price: 1.99 },
                { name: "Rose", product: "rose", stock: "2", price: 4.99 },
                { name: "Peony", product: "peony", stock: "0", price: 1.50 },
                { name: "Primula", product: "primula", stock: "1", price: 3.12 },
                { name: "Snowdrop", product: "snowdrop", stock: "15", price: 0.99 }]
        };

        $("#flowerTmpl").template(data)
            .slice(0, 3).appendTo("#row1").end().end().slice(3).appendTo("#row2")
    });
</script>
...
In this example, I use the slice and end methods to narrow and broaden the selection and the appendTo method to add subsets of the elements generated from the template to different rows.
Notice that I have to call the end method twice in succession to unwind the narrowing caused by the slide and appendTo methods. You can see the effect in Figure 12-3 – I am closer, but I still didn’t get the result I had aimed for.
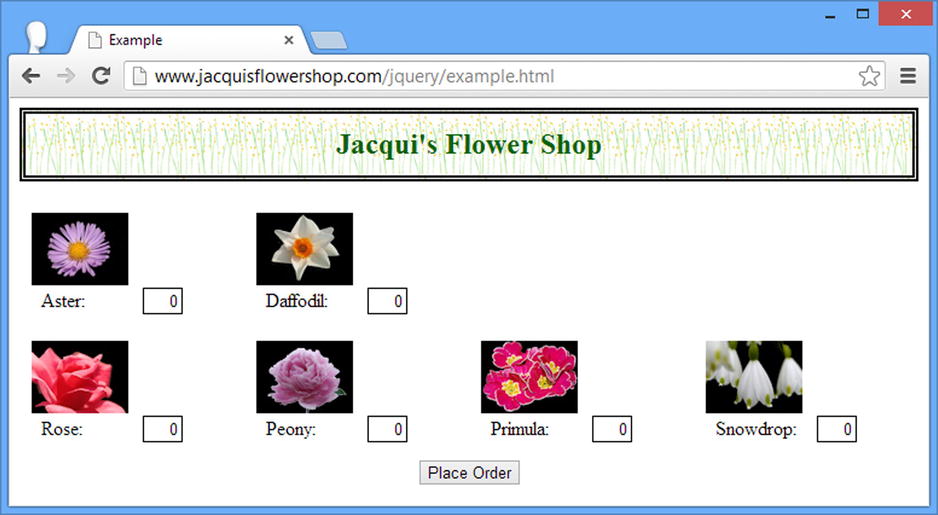
Figure 12-3. Trying to adjust the layout of the HTML generated from the data
The problem is that Handlebars adds text nodes to the HTML it generates at the point where the contents of my template are split across multiple lines – and since my use of the slice method applies to all of the elements that the template generates (including text nodes), I am splitting the content in the wrong place.
There are several ways of fixing this. The first is to adjust the template so that all of the content is on one line – but I don’t like this approach, preferring to make templates as readable as possible.
Another approach is to adjust the indexes pass to the slice method to take the text nodes into account – but I don’t like this either, because not all text editors represent new lines in a way that causes the text nodes to be created, and that means that editing the HTML file with a different editor can change the behavior of the JavaScript code, which is far from ideal.
My preferred approach is to use jQuery to remove the text nodes from the HTML generated by the template before adding it into the DOM. Unfortunately, jQuery doesn’t include a useful method for this task and so the best approach is to use the filter method with the * selector, which matches all HTML tag types but excludes text nodes. You can see the addition of the filter method to my jQuery in Listing 12-8.
Listing 12-8. Using the filter Method to Remove Text Nodes
...
$("#flowerTmpl").template(data).filter("*")
    .slice(0, 3).appendTo("#row1").end().end().slice(3).appendTo("#row2")
...
You can see the result in Figure 12-4: the flowers are split properly across the two rows.
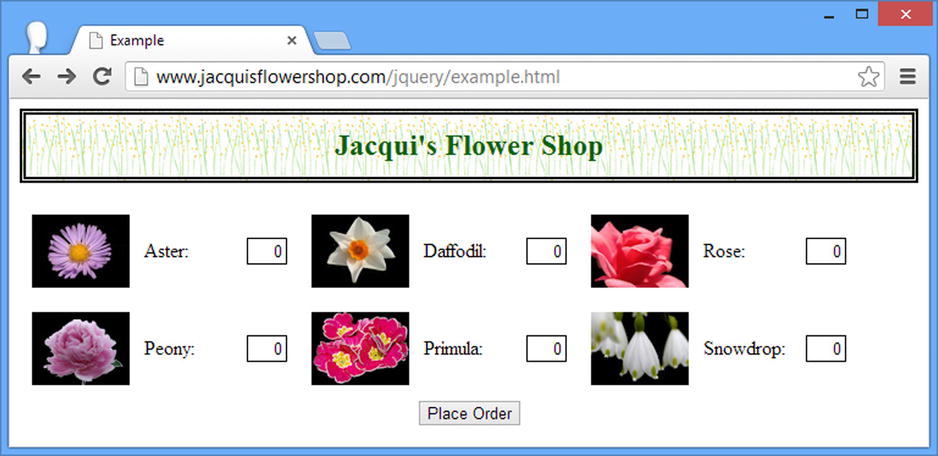
Figure 12-4. Using the filter method to remove text nodes
I am still not happy with the way that I handle the HTML generated by the template. I generally like using the end method to create single-statement operations, but I find the end().end() sequence dislikable. Instead, I would usually break down the steps into separate operations, as shown in Listing 12-9, which produces the same result as Listing 12-8, but is easier to read.
Listing 12-9. Splitting the Elements Using Multiple Statements
...
var templateHtml = $("#flowerTmpl").template(data).filter("*");
templateHtml.slice(0, 3).appendTo("#row1");
templateHtml.slice(3).appendTo("#row2");
...
A different approach is to adjust the data that you pass to the template method. Listing 12-10 shows how this can be done.
Listing 12-10. Using the Data to Adjust the Output from the Template
...
<script type="text/javascript">
    $(document).ready(function () {
        var data = {
            flowers: [
            { name: "Aster", product: "aster", stock: "10", price: 2.99 },
            { name: "Daffodil", product: "daffodil", stock: "12", price: 1.99 },
            { name: "Rose", product: "rose", stock: "2", price: 4.99 },
            { name: "Peony", product: "peony", stock: "0", price: 1.50 },
            { name: "Primula", product: "primula", stock: "1", price: 3.12 },
            { name: "Snowdrop", product: "snowdrop", stock: "15", price: 0.99 }]
        };

        var tElem = $("#flowerTmpl");
        tElem.template({ flowers: data.flowers.slice(0, 3) }).appendTo("#row1");
        tElem.template({ flowers: data.flowers.slice(3) }).appendTo("#row2");
    });
</script>
...
In this script, I solve the problem of allocating flowers to rows by using the template twice – once for each row. I used the split method so that I could feed a range of data objects to the template each time. The technique is different, but the result is the same, as shown in Figure 12-4. Notice that I have to take care to preserve the shape of the object that I pass to the template method so that it matches my section declarations – I must ensure that the object has a property called flowers that is set to the array of data objects that I want to process.
Using Template Logic
One of the ways you can differentiate between the huge varieties of JavaScript template engines is to look at how the output of the templates can be varied based on different data values.
At one end of the spectrum is the logic-less template , which contains no logic at all and varying the output from the template means careful preparation of the data before using the template engine. The other extreme is the full-logic template , which is like having a simple programming language dedicated to defining and executing templates, with built-in support for conditional statements, loops, array processing, and managing collections of data.
Opinions differ on just how much logic should be in a template and the whole topic is contentious. I like to be somewhere in the middle of the spectrum – I like to be able to use logic in my templates, but I want to keep it simple and not have add another language to my HTML documents. One of the reasons I chose the Handlebars library for this chapter is that it allows you to use as little or as much logic in a template as you like – and, as you’ll see later in the chapter, makes it easy to define custom logic to solve specific problems. The Handlebars library contains some built-in helpers , described in Table 12-2, which are simple logic operators that can be used to vary the output from the template based on data values.
Table 12-2. The Built-in Handlebars Helpers
| Helper | Description |
|---|---|
| #if | An if/then/else conditional, which evaluates to true if the specified property exists and is not null. |
| #unless | The inverse of the #if helper; evaluates to true if the specified property does not exist or is null. |
| #each | Iterates over an array of objects or the properties of an object. |
| #with | Sets the context for a section of the template. |
Creating Conditional Content
To demonstrate how logic is used in Handlebars templates, I am going to set the value attribute of the input element in the template based on the value of the stock property of each object in the flowers array of the data object. My goal is to set the value to 1 when the corresponding stock property is greater than zero. You can see how I have done this by applying the #if helper in Listing 12-11.
Listing 12-11. Using Template Logic to Alter the Output from a Template
...
<script id="flowerTmpl" type="text/x-handlebars-template">
    {{#flowers}}
    <div class="dcell">
        <img src="{{product}}.png"/>
        <label for="{{product}}">{{name}}:</label>
        <input name="{{product}}" data-price="{{price}}" data-stock="{{stock}}"
            value="{{#if stock}}1{{else}}0{{/if}}"required />
    </div>
    {{/flowers}}
</script>
<script type="text/javascript">
    $(document).ready(function () {
        var data = {
            flowers: [
            { name: "Aster", product: "aster", stock: "10", price: 2.99 },
            { name: "Daffodil", product: "daffodil", stock: "12", price: 1.99 },
            { name: "Rose", product: "rose", stock: "2", price: 4.99 },
            { name: "Peony", product: "peony", stock: "0", price: 1.50 },
            { name: "Primula", product: "primula", stock: "1", price: 3.12 },
            { name: "Snowdrop", product: "snowdrop", stock: "15", price: 0.99 }]
        };
        for (var i = 0; i < data.flowers.length; i++) {
            if (data.flowers[i].stock == 0) {
                data.flowers[i].stock = null;
            }
        }
        var tElem = $("#flowerTmpl");
        tElem.template({ flowers: data.flowers.slice(0, 3) }).appendTo("#row1");
        tElem.template({ flowers: data.flowers.slice(3) }).appendTo("#row2");
    });
</script>
...
Each part of the helper is expressed using double mustaches: the first consists of #if followed by the property that I want to inspect, which is stock in this case. This will evaluate as true if the current object being processed by the #flowers section directive defines a stock property and that property is not null. If this is the case, the template engine will insert the value that follows the first part of the conditional into the HTML, which is 1 in this example.
The optional else section works just like it does in JavaScript and allows me to provide an alternative value that will be used if the current object doesn’t have a stock property or if there is a stock property and it is null. In this case, the template engine will insert 0 into the HTML generated from the template. The final section is /if, which denotes the end of the conditional block.
The logic that is behind the #if helper is basic and returning true based on whether the property exists and is defined forces me to process my data before passing it to the template method. I use a JavaScript for loop to enumerate the flower objects and set any stock property that has a value of 0 to null. The result is that all of the input elements generated from the template will have a value of 1 except the one for the Peony, as shown in Figure 12-5.

Figure 12-5. Using logic in a template to vary the generated HTML
![]() Tip I am not fond of having to process the data to suit the limitations of the template engine, and I’ll show you how to create custom logic that doesn’t require data processing later in the chapter.
Tip I am not fond of having to process the data to suit the limitations of the template engine, and I’ll show you how to create custom logic that doesn’t require data processing later in the chapter.
The #unless helper works in the same way as the #if helper, but will evaluate as true if the property it is applied to is doesn’t exist or is null. In Listing 12-12, you can see how I have applied the #if and #unless helpers alongside each other without their optional else directives to set the value attribute of the input element in the template.
Listing 12-12. Applying the #if and #unless Helpers in the Template
...
<script id="flowerTmpl" type="text/x-handlebars-template">
    {{#flowers}}
    <div class="dcell">
        <img src="{{product}}.png"/>
        <label for="{{product}}">{{name}}:</label>
        <input name="{{product}}" data-price="{{price}}" data-stock="{{stock}}"
            value="{{#if stock}}1{{/if}}{{#unless stock}}0{{/unless}}"required />
    </div>
    {{/flowers}}
</script>
...
The #if and #unless helpers are completely independent of each other, but using them this way shows how you can test for the presence or the absence of a property without using an else directive. This listing produces the same result as Listing 12-11, which was illustrated by Figure 12-5.
Enumerating Arrays and Properties
The section directive that I used in Listing 12-12 is part of the Handlebars library’s support for the more widely used mustache templates, and the #each helper is a more sophisticated alternative that provides some special properties that can be used within the template. These properties are described in Table 12-3.
Table 12-3. The Special Properties Provided by the #each Helper
| Name | Description |
|---|---|
| this | Returns the object that is being processed. |
| @index | Returns the index of the current object when the #each helper is used on an array. |
| @key | Returns the name of the current property when used on an object. |
In Listing 12-13, you can see how I have used the #each helper on the existing data, along with the @index property.
Listing 12-13. Using the #each Helper and the @index Property
...
<script id="flowerTmpl" type="text/x-handlebars-template">
    {{#each flowers}}
    <div class="dcell">
        <label>Position: {{@index}}</label>
        <img src="{{product}}.png"/>
        <label for="{{product}}">{{name}}:</label>
        <input name="{{product}}" data-price="{{price}}" data-stock="{{stock}}"
            value="{{#if stock}}1{{/if}}{{#unless stock}}0{{/unless}}" required />
    </div>
    {{/each}}
</script>
...
I specify the source of the objects to be enumerated as the argument to the #each helper, which is this case is the value of the flowers property of the data object passed to the template method. You can see the result in Figure 12-6 (the indexes restart for each row because I am splitting the data into two sections and calling the template method twice, as shown in Listing 12-11).
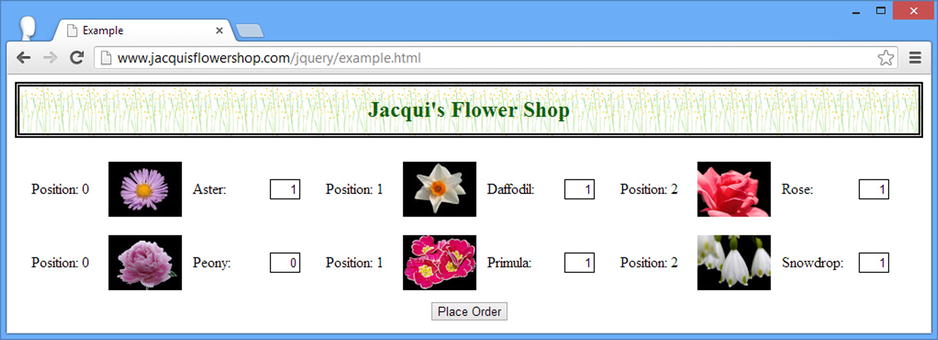
Figure 12-6. Using the #each helper and the @index property
The this and @key properties are useful when passing objects to the template method, rather than arrays. The Handlebars library will enumerate the properties of the object – the @key property is used to get the current property name and the this property is used to get the current value. You can see both properties used together in Listing 12-14.
Listing 12-14. Enumerating the Properties of an Object with the #each Helper
<!DOCTYPE html>
<html>
<head>
    <title>Example</title>
    <script src="jquery-2.0.2.js" type="text/javascript"></script>
    <script src="handlebars.js" type="text/javascript"></script>
    <script src="handlebars-jquery.js" type="text/javascript"></script>
    <link rel="stylesheet" type="text/css" href="styles.css"/>
    <script id="flowerListTmpl" type="text/x-handlebars-template">
        <ul>
            {{#each stockData}}
                <li>{{@key}} ({{this}} in stock)</li>
            {{/each}}
        </ul>
    </script>
    <script type="text/javascript">
        $(document).ready(function () {

            var data = {
                stockData: {
                    Aster: 10, Daffodil: 12, Rose: 2,
                    Peony: 0, Primula: 1, Snowdrop: 15
                }
            };
            $("#flowerListTmpl").template(data).appendTo("form");
        });
    </script>
</head>
<body>
    <h1>Jacqui's Flower Shop</h1>
    <form method="post">
    </form>
</body>
</html>
I have replaced the data in this example with a simpler structure – the data.stockData property returns an object whose property names describe flowers and whose values describe the number in stock. For the template I use the #each helper on the stockData property (remember that I have to pass an object to the template method and apply the helpers and directives to its properties). The template in this example creates a list. I get the value of each property with the this property and the name of the property with the @key property, and you can see the result in Figure 12-7.
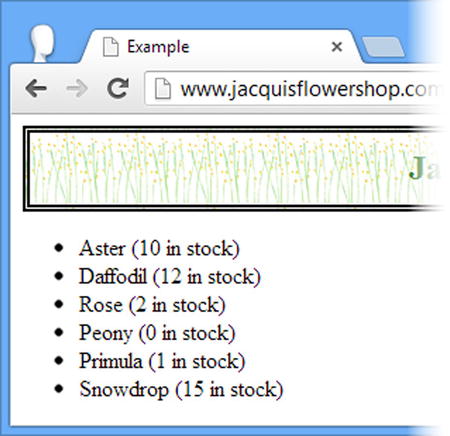
Figure 12-7. Using the @key and this properties with the #each helper
Changing the Data Context
The data context is the part of the data object that helpers and variables are applied to. When template processing begins, the context is the entire data object, but it is changed by helpers and section directives to make writing the template easier, as shown in the template I used in the last example:
...
{{#each stockData}}
    <li>{{@key}} ({{this}} in stock)</li>
{{/each}}
...
The #each helper shifts the context to each of the properties of the data object in turn – and that means that variables and helpers defined within the #each helper block will all be evaluated relative to the current object. You can see this more clearly in Listing 12-15, where I have changes the data and the template to make the effect of the context clearer.
Listing 12-15. Emphasizing the Role of the Context in a Template
...
<script id="flowerListTmpl" type="text/x-handlebars-template">
    <ul>
        <h3>{{title}}</h3>
        {{#each stockData}}
            <li>{{description.Name}} ({{description.Stock}} in stock)</li>
        {{/each}}
    </ul>
</script>
<script type="text/javascript">
    $(document).ready(function () {

        var data = {
            title: "Stock List",
            stockData: {
                aster: {
                    description: { Name: "Aster", Stock: 10 }
                },
                daffodil: {
                    description: { Name: "Daffodil", Stock: 12 }
                },
                rose: {
                    description: { Name: "Rose", Stock: 2 }
                }
            }
        };
        $("#flowerListTmpl").template(data).appendTo("form");
    });
</script>
...
I have added a title property to the data object and structure to the individual flowers. The first directive of the template relies on the default data context, which is the entire data object:
...
<h3>{{title}}</h3>
...
You can see what I mean about the directives being evaluated relative to the context – I just need to specify the property name without any qualification to get the value of the title property from the data object. The next directive in the template changes the context:
...
{{#each stockData}}
...
The #each helper enumerates the properties of the object returned by the stockData property and changes the context to be each property value in turn. You can see the effect in the next line of the template:
...
<li>{{description.Name}} ({{description.Stock}} in stock)</li>
...
I access the Name and Stock properties relative to the current context – and that means using a path to navigate through the description object, following the structure of the data object. The result is shown in Figure 12-8.
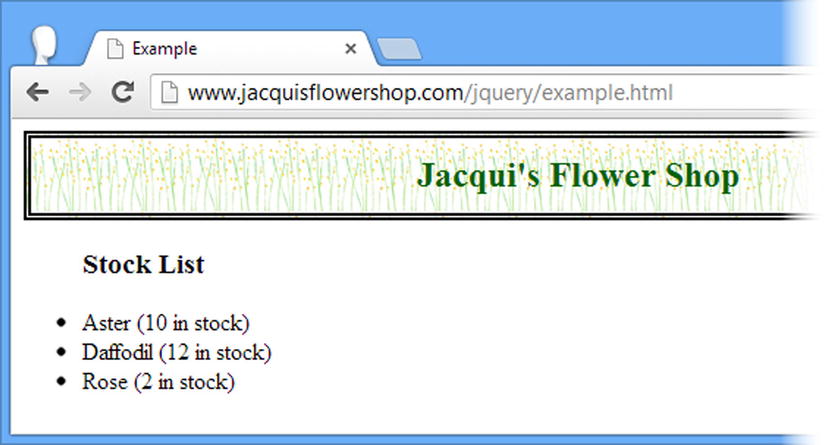
Figure 12-8. Accessing properties relative to the context
Using the #with Helper
In the previous example, I had to specify description.Name and description.Stock to access the property values I wanted for my template. The #with helper can eliminate the need to duplicate common property names by changing the data context for all of the directives that it contains, as shown in Listing 12-16.
Listing 12-16. Changing the Data Context with the #with Helper
...
<script id="flowerListTmpl" type="text/x-handlebars-template">
    <ul>
        <h3>{{title}}</h3>
        {{#each stockData}}
            {{#with description}}
                <li>{{Name}} ({{Stock}} in stock)</li>
            {{/with}}
        {{/each}}
    </ul>
</script>
...
Within the scope of the #with block the context is narrowed to the description property. When combined with the change in data context made by the #each helper, I am able to access the Name and Stock properties of each flower object without having to qualify the name.
Access Parent Data Contexts
Changes in data context are not always helpful, and you sometimes need to access another part of the data object to get a common property value. You can navigate to the parent context by prefixing variables with ../, as shown in Listing 12-17.
Listing 12-17. Accessing the Parent Data Context
...
<script id="flowerListTmpl" type="text/x-handlebars-template">
    <ul>
        <h3>{{title}}</h3>
        {{#each stockData}}
            {{#with description}}
                <li>{{Name}}{{../../prefix}}{{Stock}}{{../../suffix}}</li>
            {{/with}}
        {{/each}}
    </ul>
</script>
<script type="text/javascript">
    $(document).ready(function () {

        var data = {
            title: "Stock List",
            prefix: " (",
            suffix: " in stock)",
            stockData: {
                aster: {
                    description: { Name: "Aster", Stock: 10 }
                },
                daffodil: {
                    description: { Name: "Daffodil", Stock: 12 }
                },
                rose: {
                    description: { Name: "Rose", Stock: 2 }
                }
            }
        };
        $("#flowerListTmpl").template(data).appendTo("form");
    });
</script>
...
I have defined prefix and suffix properties at the top-level of the data object. To access these from the template, I need to navigate up two context levels, as follows:
...
{{../../prefix}}
...
This directive appears within the scope of the #with helper and so applying ../ once will change the context to the next level up in the template, which is the #each helper. The #each helper has set the context to be the contents of the stockData property, and so I need to up another level to get to the prefix property, meaning I must reference ../../prefix to get the value I want.
![]() Tip The ../ sequence navigates up one level in the template and not the data object.
Tip The ../ sequence navigates up one level in the template and not the data object.
Creating Custom Template Helpers
The logic in some of the helpers is pretty basic, and this means that processing the data to fit into the way the helpers work is often required. You can see an example of this in Listing 12-18, which repeats the example I used to demonstrate the #if helper earlier in the chapter.
Listing 12-18. Preparing Data for Use with a Template Helper
<!DOCTYPE html>
<html>
<head>
    <title>Example</title>
    <script src="jquery-2.0.2.js" type="text/javascript"></script>
    <script src="handlebars.js" type="text/javascript"></script>
    <script src="handlebars-jquery.js" type="text/javascript"></script>
    <link rel="stylesheet" type="text/css" href="styles.css"/>

    <script id="flowerTmpl" type="text/x-handlebars-template">
        {{#flowers}}
        <div class="dcell">
            <img src="{{product}}.png"/>
            <label for="{{product}}">{{name}}:</label>
            <input name="{{product}}" data-price="{{price}}" data-stock="{{stock}}"
                value="{{#if stock}}1{{else}}0{{/if}}"required />
        </div>
        {{/flowers}}
    </script>
    <script type="text/javascript">
        $(document).ready(function () {
            var data = {
                flowers: [
                { name: "Aster", product: "aster", stock: "10", price: 2.99 },
                { name: "Daffodil", product: "daffodil", stock: "12", price: 1.99 },
                { name: "Rose", product: "rose", stock: "2", price: 4.99 },
                { name: "Peony", product: "peony", stock: "0", price: 1.50 },
                { name: "Primula", product: "primula", stock: "1", price: 3.12 },
                { name: "Snowdrop", product: "snowdrop", stock: "15", price: 0.99 }]
            };
            for (var i = 0; i < data.flowers.length; i++) {
                if (data.flowers[i].stock == 0) {
                    data.flowers[i].stock = null;
                }
            }
            var tElem = $("#flowerTmpl");
            tElem.template({ flowers: data.flowers.slice(0, 3) }).appendTo("#row1");
            tElem.template({ flowers: data.flowers.slice(3) }).appendTo("#row2");
        });
    </script>
</head>
<body>
    <h1>Jacqui's Flower Shop</h1>
    <form method="post">
        <div id="oblock">
            <div class="dtable">
                <div id="row1" class="drow"></div>
                <div id="row2"class="drow"></div>
            </div>
        </div>
        <div id="buttonDiv"><button type="submit">Place Order</button></div>
    </form>
</body>
</html>
I dislike having to process my data before passing it to the template engine because it means that I have logic for displaying my data in two places: the template and the for loop.
This is where the use of templates becomes contentious because there are two approaches to ensuring that the logic for generating content from the template is in just one place: remove the logic from the template and define it all in JavaScript or to remove the for loop and add extra logic to the template. There are lots of arguments to support both approaches, but it is essentially a personal choice driven by preference and the nature of the data that you are working with. I prefer to add logic to the template, which is something that the Handlebars library makes simple and easy.
Creating a Conditional Template Helper
In Listing 12-19, you can see the additions I made to the handlebars-jquery.js file to create a custom helper for my template.
![]() Tip You can define the custom logic in any script element or JavaScript file. I like to keep my additions to Handlebar.js in one place – but that’s just personal preference.
Tip You can define the custom logic in any script element or JavaScript file. I like to keep my additions to Handlebar.js in one place – but that’s just personal preference.
Listing 12-19. Defining Custom Conditional Logic for Handlebars in the handlebars-jquery.js File
(function ($) {

    Handlebars.registerHelper('gt', function (a, b, options) {
        return (a > b) ? options.fn(this) : options.inverse(this);
    });

    var compiled = {};
    $.fn.template = function (data) {
        var template = $.trim($(this).first().html());
        if (compiled[template] == undefined) {
            compiled[template] = Handlebars.compile(template);
        }
        return $(compiled[template](data));
    };
})(jQuery);
The Handlebars library defines a global object called Handlebars, which in turn defines a method called registerHelper. The registerHelper takes two arguments – the name that you want to give your helper and a helper function that will be invoked when the helper is encountered in the template. I have called my custom helper gt (short for greater than), but the easiest way to demonstrate how the helper function works is to demonstrate my custom helper in action and then explain how its behavior relates to its definition. In Listing 12-20, you can see how I have applied my gt helper to the example HTML document.
Listing 12-20. Applying a Custom Template Helper
...
<script id="flowerTmpl" type="text/x-handlebars-template">
    {{#flowers}}
    <div class="dcell">
        <img src="{{product}}.png"/>
        <label for="{{product}}">{{name}}:</label>
        <input name="{{product}}" data-price="{{price}}" data-stock="{{stock}}"
            value="{{#gt stock 0}}1{{else}}0{{/gt}}" required />
    </div>
    {{/flowers}}
</script>
<script type="text/javascript">
    $(document).ready(function () {
        var data = {
            flowers: [
            { name: "Aster", product: "aster", stock: "10", price: 2.99 },
            { name: "Daffodil", product: "daffodil", stock: "12", price: 1.99 },
            { name: "Rose", product: "rose", stock: "2", price: 4.99 },
            { name: "Peony", product: "peony", stock: "0", price: 1.50 },
            { name: "Primula", product: "primula", stock: "1", price: 3.12 },
            { name: "Snowdrop", product: "snowdrop", stock: "15", price: 0.99 }]
        };
        var tElem = $("#flowerTmpl");
        tElem.template({ flowers: data.flowers.slice(0, 3) }).appendTo("#row1");
        tElem.template({ flowers: data.flowers.slice(3) }).appendTo("#row2");
    });
</script>
...
![]() Tip You may have to reload the web page in the browser to see the right effect. JavaScript files are sometimes aggressively cached, which can prevent changes from taking effect.
Tip You may have to reload the web page in the browser to see the right effect. JavaScript files are sometimes aggressively cached, which can prevent changes from taking effect.
My#gt helper checks to see if the value of the stock property is greater than zero. If it is, then 1 is inserted into the template and 0 is inserted otherwise.
I have to call the Handlebars.registerHelper method before I generate content from the template so that the Handlebars library knows about the #gt helper. When the helper directive is encountered, Handlebars will pass all of the values that follow #gt in the directive as arguments to my function, after replacing any that can be resolved as variables in the current data context.
In the listing, I have placed the reference to the #gt helper inside of a section directive, which means that Handlebars will enumerate the data.flowers array, and the stock property will be replaced by the value for the current flower – this means that for the Aster, for example, the arguments passed to my helper function will be 10, the value of the Aster stock property, and 1, which cannot be resolved to a data value and is passed unchanged.
![]() Tip You can provide as many or as few arguments to your helper function as required. Two is just the number I need to perform a basic comparison.
Tip You can provide as many or as few arguments to your helper function as required. Two is just the number I need to perform a basic comparison.
These are the a and b values I receive in my helper function. I also receive an options object that is provided by Handlebars:
...
Handlebars.registerHelper('gt', function (a, b, options) {
    return (a > b) ? options.fn(this) : options.inverse(this);
});
...
The options object provides features that are useful for writing helpers, as described in Table 12-4.
Table 12-4. The Properties and Methods eDfined by the Options Object
| Name | Description |
|---|---|
| fn(data) | Called to get the content that has been defined for the true outcome of a conditional helper, or the sole content for helpers that don’t have an else directive. |
| inverse(data) | Called to get the content that has been defined in the else clause of a helper. |
| Hash | Used to receive optional arguments into the helper function. |
| Data | Used to provide templates with special properties. |
In my #gt helper, I call the options.fn method to get the content that should be inserted into the HTML if a is greater than b (which in the example means that the value of the stock property of the current flower is greater than zero). I pass the this variable, which Handlebars sets to be the current data context. If a is not greater than b, then I call the options.inverse method instead. For this example, the options.fn method will return 1 and the options.inverse method will return 0.
Returning More Complex Content
The content inserted into the HTML is the result from the helper function, which means that I am free to increase the complexity of my helper functions to simplify my templates by inserting larger fragments of HTML. In Listing 12-21, you can see how I have defined a helper called#gtValAttr in the handlebars-jquery.js file.
Listing 12-21. Defining a More Complex Helper in the handlebars-jquery.js File
(function ($) {

    Handlebars.registerHelper('gt', function (a, b, options) {
        return (a > b) ? options.fn(this) : options.inverse(this);
    });

    Handlebars.registerHelper("gtValAttr", function () {
        return "value='" + (this.stock > 0 ? "1" : "0") + "'";
    });

    var compiled = {};
    $.fn.template = function (data) {
        var template = $.trim($(this).first().html());
        if (compiled[template] == undefined) {
            compiled[template] = Handlebars.compile(template);
        }
        return $(compiled[template](data));
    };
})(jQuery);
The new helper doesn’t take any arguments at all – it gets the value it required through the this property (which, as I mentioned, is set to the current data context). The result from the helper function is a complete definition of the value attribute, tailored to the template in which it will be used. You can see how I have applied the #gtValAttr helper in the template in Listing 12-22.
Listing 12-22. Applying the #gtValAttr Helper in the Template
...
<script id="flowerTmpl" type="text/x-handlebars-template">
    {{#flowers}}
    <div class="dcell">
        <img src="{{product}}.png"/>
        <label for="{{product}}">{{name}}:</label>
        <input name="{{product}}" data-price="{{price}}" data-stock="{{stock}}"
            {{#gtValAttr}}{{/gtValAttr}}required />
    </div>
    {{/flowers}}
</script>
...
![]() Note I have shown you this helper to demonstrate the flexibility that the Handlebars library provides, but I don’t use this kind of helper in real projects. It depends too much on the structure of the data and the template, and a change to either of them will break the code. I prefer to create small, focused helpers like #gt that can be used in any template and that generate the smallest amount of content possible, ideally provided through arguments.
Note I have shown you this helper to demonstrate the flexibility that the Handlebars library provides, but I don’t use this kind of helper in real projects. It depends too much on the structure of the data and the template, and a change to either of them will break the code. I prefer to create small, focused helpers like #gt that can be used in any template and that generate the smallest amount of content possible, ideally provided through arguments.
Receiving Optional Arguments in the Helper Function
You can define arguments in the template that are passed to the helper function. The purpose of these optional arguments is entirely up to the creator of the helper, but the most common purpose is to pass attribute values to helpers that generate complete HTML elements. In Listing 12-23, you can see that I have defined a helper that creates complete input elements from a flower data object. Once again, this isn’t how I like to use templates in my own projects, but readers may prefer complexity in the helpers to complexity in the template.
Listing 12-23. Defining a Helper That Takes Optional Arguments in the handlebars-jquery.js File
(function ($) {

    Handlebars.registerHelper('gt', function (a, b, options) {
        return (a > b) ? options.fn(this) : options.inverse(this);
    });

    Handlebars.registerHelper("gtValAttr", function () {
        return "value='" + (this.stock > 0 ? "1" : "0") + "'";
    });

    Handlebars.registerHelper("inputElem", function (product, stock, options) {
        options.hash.name = product;
        options.hash.value = stock > 0 ? "1" : "0";
        options.hash.required = "required";
        return $("<input>", options.hash)[0].outerHTML;
    });

    var compiled = {};
    $.fn.template = function (data) {
        var template = $.trim($(this).first().html());
        if (compiled[template] == undefined) {
            compiled[template] = Handlebars.compile(template);
        }
        return $(compiled[template](data));
    };
})(jQuery);
The #inputElem helper generates a complete input element for a flower – but once again, it will be easier to understand how it works by seeing it applied in the template, as shown in Listing 12-24.
Listing 12-24. Applying the #inputElem Helper in the Template
...
<script id="flowerTmpl" type="text/x-handlebars-template">
    {{#flowers}}
    <div class="dcell">
        <img src="{{product}}.png"/>
        <label for="{{product}}">{{name}}:</label>
        {{#inputElem product stock data-stock=stock data-price=price}}{{/inputElem}}
    </div>
    {{/flowers}}
</script>
...
As you can see in Listing 12-23, the #inputElem helper function takes two arguments, and I use these to pass the value of the product and stock properties when I apply the helper in the template. The additional arguments are in the form key=value, and these are passed to the helper function via the options.hash property, having first being resolved against the current data context. For my example, this means that the options.hash property returns an object that looks like this for the Aster flower:
{"data-stock": 10, "data-price": 2.99}
In Part 2, I explained that there was a version of the jQuery $ function that generates a jQuery object from an HTML string and a map object of attributes, and the option.hash object is just the format I need to create the input element I desire. But it doesn’t contain all of the attributes that I require, so I use the following statements to complete the set:
...
options.hash.name = product;
options.hash.value = stock > 0 ? "1" : "0";
options.hash.required = "required";
...
I can use the jQuery $ function to create my input element, apply the attributes, and return the HTML string that is required for the template, as follows:
...
return $("<input>", options.hash)[0].outerHTML;
...
To get the HTML string, I use an array indexer to get the HTMLElement object at index 0 and use the outerHTML property to get a string like this:
<input data-stock="10" data-price="2.99" name="aster" value="1" required="required">
Handlebars and jQuery work well together to make generating complete HTML elements from helpers easy – as the #inputElem helper demonstrates.
![]() Tip There is no convenient way to get the HTML of an element using jQuery, which is why I used the outerHTML property of the underlying HTMLElement object. The closest method is html, but that returns the HTML content of an element and not the HTML of the element itself, which means that I would have had to append my input element to another element before I could use the html method, like this: $("<div />").append($("<input>", options.hash)).html(); I find that using the HTML element is simpler and easier to read.
Tip There is no convenient way to get the HTML of an element using jQuery, which is why I used the outerHTML property of the underlying HTMLElement object. The closest method is html, but that returns the HTML content of an element and not the HTML of the element itself, which means that I would have had to append my input element to another element before I could use the html method, like this: $("<div />").append($("<input>", options.hash)).html(); I find that using the HTML element is simpler and easier to read.
Providing Custom Template Properties
I explained earlier in the chapter that the #each helper defines special properties that are available within the block it defines. This is something that you can do in custom helpers as well, and it can be a nice way to simplify the structure of a template. As a demonstration, I have created the #stockValue helper, shown in Listing 12-25.
Listing 12-25. Creating the #stockValue Helper in the handlebars-jquery.js File
(function ($) {

    Handlebars.registerHelper('gt', function (a, b, options) {
        return (a > b) ? options.fn(this) : options.inverse(this);
    });

    Handlebars.registerHelper("gtValAttr", function () {
        return "value='" + (this.stock > 0 ? "1" : "0") + "'";
    });

    Handlebars.registerHelper("inputElem", function (product, stock, options) {
        options.hash.name = product;
        options.hash.value = stock > 0 ? "1" : "0";
        options.hash.required = "required";
        return $("<input>", options.hash)[0].outerHTML;
    });

    Handlebars.registerHelper("stockValue", function (options) {
        options.data.attributeValue = this.stock > 0 ? "1" : "0";
        return options.fn(this);
    });

    var compiled = {};
    $.fn.template = function (data) {
        var template = $.trim($(this).first().html());
        if (compiled[template] == undefined) {
            compiled[template] = Handlebars.compile(template);
        }
        return $(compiled[template](data));
    };
})(jQuery);
This is a simple helper and all it does is create a property called attributeValue on the options.data object and assigns it the value that I want as the value attribute for the input element. I can access this value within the template block contained by the #stockValue helper in the template using the special property called @attributeValue , as shown in Listing 12-26.
Listing 12-26. Accessing the Special Property in the Template
...
<script id="flowerTmpl" type="text/x-handlebars-template">
    {{#flowers}}
    <div class="dcell">
        <img src="{{product}}.png"/>
        <label for="{{product}}">{{name}}:</label>
        {{#stockValue}}
            <input name="{{product}}" data-price="{{price}}" data-stock="{{stock}}"
                value="{{@attributeValue}}" required />
        {{/stockValue}}
    </div>
    {{/flowers}}
</script>
...
Summary
In this chapter, I introduced the Handlebars template library, which gives you a nice set of features for translating JavaScript data into HTML elements without getting bogged down in a mass of nasty code. The reason that I like using this library is that it provides flexibility as to how much logic is defined in the template, how much is handled by processing data, and how much is hidden away in handlers. In the next chapter, I show you how jQuery supports HTML forms and how to apply a widely used plug-in to validate the data that users enter into them.