![]()
Pattern and Tools Primer
In this chapter, I provide a brief overview of the pattern that the MVC framework follows and demonstrate the process for creating a simple MVC project using Visual Studio 2013. The purpose of this chapter is to refresh your memory about the nature, objectives, and benefits of the MVC pattern and to show you the process I use to create the examples in this book.
This chapter isn’t a tutorial for the MVC framework. As I explained in Chapter 1, you already need to have a basic understanding of MVC framework development in order to benefit from the features and techniques I describe in this book. If you do not have experience with the MVC framework, then read Pro ASP.NET MVC 5, also from Apress, before continuing.
Understanding the MVC Pattern
The term Model-View-Controller has been in use since the late 1970s and arose from the Smalltalk project at Xerox PARC where it was conceived as a way to organize early GUI applications. Some of the details of the original MVC pattern was tied to Smalltalk-specific concepts, such as screens and tools, but the broader concepts are still applicable to applications—and are especially well-suited to web applications.
Interactions with an MVC application follow a natural cycle of user actions and view updates, where the view is assumed to be stateless. This fits nicely with the HTTP requests and responses that underpin a web application.
Further, the MVC pattern enforces a separation of concerns—the domain model and controller logic are decoupled from the user interface, which means that an MVC application will be split into at least three pieces:
- Models, which contain or represent the data that users work with. These can be simple view models, which just represent data being transferred between views and controllers; or they can be domain models, which contain the data in a business domain as well as the operations, transformations, and rules for manipulating that data.
- Views, which are used to render some part of the model as a user interface.
- Controllers, which process incoming requests, perform operations on the model, and select views to render to the user.
In the MVC framework, controllers are C# classes derived from the System.Web.Mvc.Controller class. Each public method in a class derived from Controller is an action method, which is associated with a URL defined through the ASP.NET routing system. When a request is sent to the URL associated with an action method, the statements in the controller class are executed in order to perform some operation on the domain model and then select a view to display to the client. Figure 2-1 shows the interactions between the controller, model, and view.

Figure 2-1. The interactions in an MVC application
The ASP.NET MVC framework use a view engine, which is the component responsible for rendering a view to generate a response for the browser. The view engine for the MVC framework is called Razor, and you’ll see examples of Razor markup throughout this book. If you don’t like Razor, then you can select one of the many third-party view engines that are available (although I won’t be doing so in this book, not least because I find Razor to be robust and easy to work with).
Models are the definition of the universe your application works in. In a banking application, for example, the model represents everything in the bank that the application supports, such as accounts, the general ledger, and credit limits for customers—as well as the operations that can be used to manipulate the data in the model, such as depositing funds and making withdrawals from the accounts. The model is also responsible for preserving the overall state and consistency of the data—for example, making sure that all transactions are added to the ledger and that a client doesn’t withdraw more money than he is entitled to or more money than the bank has.
Models are also defined by what they are not responsible for: Models don’t deal with rendering UIs or processing requests; those are the responsibilities of views and controllers. Views contain the logic required to display elements of the model to the user—and nothing more. They have no direct awareness of the model and do not directly communicate with the model in any way. Controllers are the bridge between views and the model; requests come in from the client and are serviced by the controller, which selects an appropriate view to show the user and, if required, an appropriate operation to perform on the model.
The MVC framework doesn’t apply any constraints on the implementation of your domain model. You can create a model using regular C# objects and implement persistence using any of the databases, object-relational mapping frameworks, or other data tools supported by .NET.
Understanding the Benefits of the MVC Pattern
Each piece of the MVC architecture is well-defined and self-contained—this is the separation of concerns. The logic that manipulates the data in the model is contained only in the model; the logic that displays data is only in the view, and the code that handles user requests and input is contained only in the controller. This separation is at the heart of the benefits imparted by the MVC pattern—and by implication—the MVC framework.
The first benefit is scale, not in terms of how many users a web application can support but in terms of how complex it can be. Technologies such as Web Forms can be used to build complex applications, of course, but doing so requires detailed planning and attention to detail, and many projects end up as a morass of code that duplicates functionality and markup in multiple places, making extending or fixing the application difficult. It is possible to get into the same kind of mess with the MVC framework, but only by ignoring the MVC pattern. Most developers produce MVC projects that can scale in complexity without much difficulty and that are easy to maintain and extend (and if you do find yourself in a mess, the separation of concerns in an MVC framework application makes it easier to refactor the application back onto a stable footing).
The second benefit is unit testing. The module nature of the MVC framework makes it easy to perform unit testing, aided by the testing support provided by Visual Studio (although many other testing toolkits are available).
The third benefit is flexibility. The separation of concerns makes it relatively easy to respond to changes in requirements throughout the life of the application. This is a hard benefit to quantify and comes in part from the MVC pattern and in part from the convention-over-configuration approach that the MVC framework has adopted, but once the fundamental pieces of an application have been developed, it is a simple task to modify or rearrange them to respond to requests in new ways.
![]() Note If there is one drawback of the MVC framework, it is that there is an initial investment of time required to create and arrange components in an application before you start seeing results. This is time well spent for large projects but not for quick and simple prototyping. In these situations, I still use Web Forms because it can be used to create simple applications in just a few minutes, despite lacking all of the long-term benefits that the MVC framework provides.
Note If there is one drawback of the MVC framework, it is that there is an initial investment of time required to create and arrange components in an application before you start seeing results. This is time well spent for large projects but not for quick and simple prototyping. In these situations, I still use Web Forms because it can be used to create simple applications in just a few minutes, despite lacking all of the long-term benefits that the MVC framework provides.
Creating the Example Project
In this section, I am going to walk through the process of creating a simple MVC framework application. Not only will this act as a quick primer for how Visual Studio supports MVC development, but it will also allow me to demonstrate the way that I like to create projects. Visual Studio is set up to add default template content to most projects, but I prefer to start with a minimal project and explicitly add the features I require.
![]() Note You will need to have downloaded and installed Visual Studio if you want to create this example yourself. See Chapter 1 for details.
Note You will need to have downloaded and installed Visual Studio if you want to create this example yourself. See Chapter 1 for details.
To get started, I created a new Visual Studio project. Select File ![]() New Project to open the New Project dialog window. Navigate through the Templates section to select the Visual C#
New Project to open the New Project dialog window. Navigate through the Templates section to select the Visual C# ![]() Web
Web ![]() ASP.NET Web Application template and set the name of the project to SimpleApp, as shown in Figure 2-2.
ASP.NET Web Application template and set the name of the project to SimpleApp, as shown in Figure 2-2.
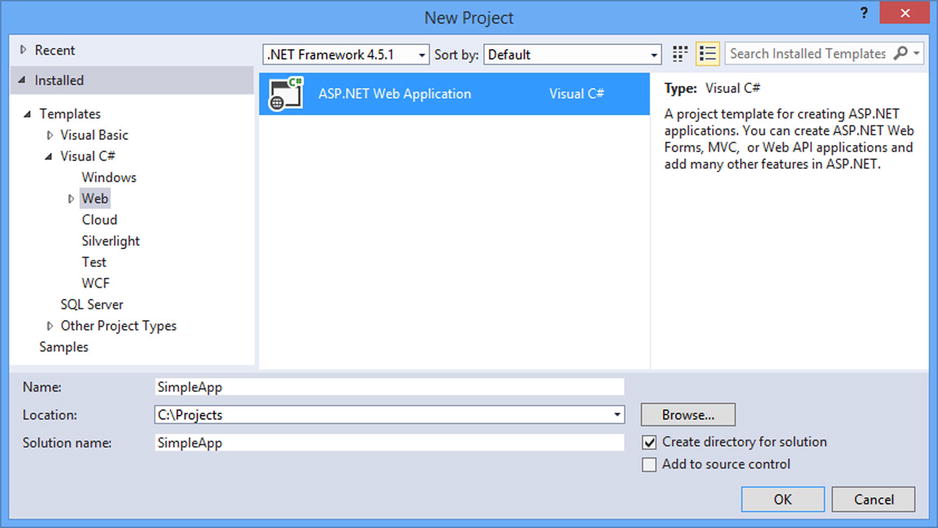
Figure 2-2. Creating the Visual Studio project
Click the OK button to move to the New ASP.NET Project dialog window. Ensure that the Empty option is selected and check the MVC option, as shown in Figure 2-3. Click the OK button, and Visual Studio will create a new project called SimpleApp.
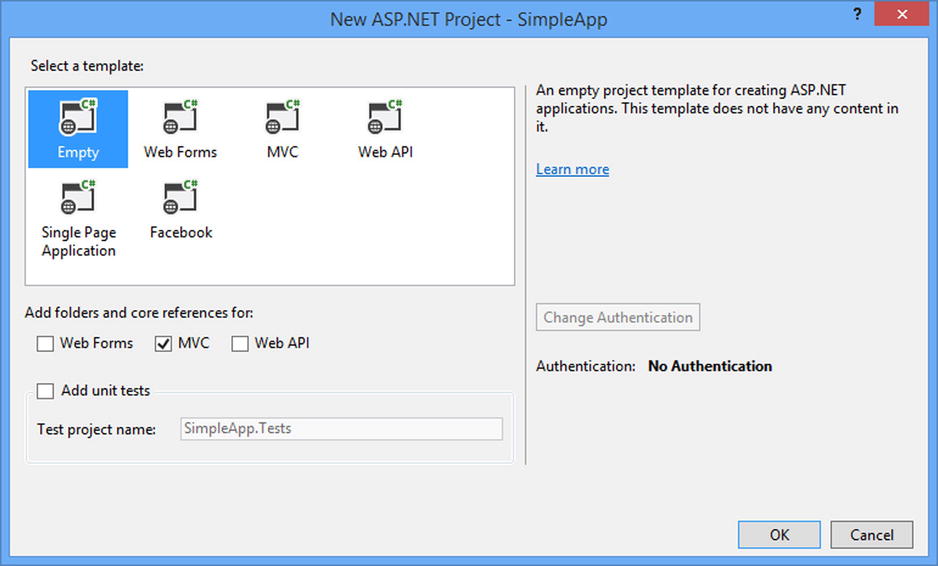
Figure 2-3. Selecting the ASP.NET project type
Creating the MVC Components
I need three components to create an MVC framework application: the model, the view, and the controller. Most projects start with the model, and for this example, I am going to create a simple model that is stored entirely in memory and is reset each time the application is restarted so that I don’t have to create and configure a database, although in a real project data persistence is usually required.
Right-click the Models folder in the Visual Studio Solution Explorer and select Add ![]() Class from the pop-up menu. Set the name to Votes.cs and click the Add button to create the class file. Edit the contents of the file to match those shown in Listing 2-1.
Class from the pop-up menu. Set the name to Votes.cs and click the Add button to create the class file. Edit the contents of the file to match those shown in Listing 2-1.
Listing 2-1. The Contents of the Votes.cs File
using System.Collections.Generic;

namespace SimpleApp.Models {

    public enum Color {
        Red, Green, Yellow, Purple
    };

    public class Votes {
        private static Dictionary<Color, int> votes = new Dictionary<Color, int>();

        public static void RecordVote(Color color) {
            votes[color] = votes.ContainsKey(color) ? votes[color] + 1 : 1;
        }

        public static void ChangeVote(Color newColor, Color oldColor) {
            if (votes.ContainsKey(oldColor)) {
                votes[oldColor]--;
            }
            RecordVote(newColor);
        }

        public static int GetVotes(Color color) {
            return votes.ContainsKey(color) ? votes[color] : 0;
        }
    }
}
![]() Tip You don’t have to type the example code to see the example projects in this book. The complete source code for every chapter is available in a free download from www.apress.com.
Tip You don’t have to type the example code to see the example projects in this book. The complete source code for every chapter is available in a free download from www.apress.com.
My example application will allow users to vote for their favorite color. This isn’t an exciting demonstration, but it will provide me with a simple application that I can use to demonstrate where the ASP.NET framework stops and the MVC framework starts when I extend the project in later chapters.
I have defined an enum of colors that users can vote for and a Votes class that records and reports on the votes for each color. The methods presented by the Votes class are static, and the data, which is stored in a dictionary collection, will be lost when the application is stopped or restarted.
![]() Note Using static data and methods in the Votes class means I don’t have to use a technique called dependency injection to provide instances of Votes to application components that require them. I wouldn’t use the static approach in a real project because dependency injection is a useful technique that helps create an easy-to-manage code base. See my Pro ASP.NET MVC 5 book for details of setting up and using dependency injection. For this chapter, I need a simple MVC application and don’t have to consider long-term maintenance or testing.
Note Using static data and methods in the Votes class means I don’t have to use a technique called dependency injection to provide instances of Votes to application components that require them. I wouldn’t use the static approach in a real project because dependency injection is a useful technique that helps create an easy-to-manage code base. See my Pro ASP.NET MVC 5 book for details of setting up and using dependency injection. For this chapter, I need a simple MVC application and don’t have to consider long-term maintenance or testing.
The controller is the component that defines the logic for receiving HTTP requests from the browser, updating the model, and selecting the view that will be displayed to the user.
An MVC framework controller provides one or more action methods that are targeted by individual URLs. The mapping between URLs and action methods is handled through the URL routing feature, and the default routing configuration specifies that requests to the default URL (the / URL) for the application are mapped to the Index action method in a controller called Home.
I am not going to get into the details of the URL routing system in this book, but the default configuration is sufficient for my example application as long as I create a controller with the right name.
Right-click the Controllers folder in the Visual Studio Solution Explorer and select Add ![]() Controller from the pop-up menu. Select MVC 5 Controller – Empty from the list of options and click the Add button. Set the name to be HomeController and click the Add button to create the Controllers/HomeController.cs file. Edit the new file to match Listing 2-2.
Controller from the pop-up menu. Select MVC 5 Controller – Empty from the list of options and click the Add button. Set the name to be HomeController and click the Add button to create the Controllers/HomeController.cs file. Edit the new file to match Listing 2-2.
Listing 2-2. The Contents of the HomeController.cs File
using System.Web.Mvc;
using SimpleApp.Models;

namespace SimpleApp.Controllers {
    public class HomeController : Controller {

        public ActionResult Index() {
            return View();
        }

        [HttpPost]
        public ActionResult Index(Color color) {
            Color? oldColor = Session["color"] as Color?;
            if (oldColor != null) {
                Votes.ChangeVote(color, (Color)oldColor);
            } else {
                Votes.RecordVote(color);
            }
            ViewBag.SelectedColor = Session["color"] = color;
            return View();
        }
    }
}
![]() Note The URL routing system is actually part of the ASP.NET platform rather than the MVC framework, but I described URL routing in detail in my Pro ASP.NET MVC 5 book, and I am not going to repeat the information here.
Note The URL routing system is actually part of the ASP.NET platform rather than the MVC framework, but I described URL routing in detail in my Pro ASP.NET MVC 5 book, and I am not going to repeat the information here.
One useful feature of controllers is the ability to define multiple action methods with the same name and then differentiate them through the use of attributes. In the listing, I have applied the HttpPost attribute to the Index action method that takes an argument, which tells the MVC framework that the method should be used to handle HTTP POST requests. HTTP GET requests will be handled by the Index method that takes no arguments.
The goal of an action method is to update the model and select a view to be displayed to the user. I don’t need to update my model when dealing with GET requests, so I just return the result from calling the View method, which selects the default view associated with the action method. I need to update the vote tally when dealing with POST requests, either by registering a new vote or, if the user has voted already, by changing an existing vote. I keep track of whether a user has voted through the Session property, which allows me to maintain state data for the duration of the user’s browser session.
The final component is the view, which generates the HTML that is displayed to the user as the response to an HTTP request. Both of the action methods in the Home controller call the View method without any arguments, which tells the MVC framework to look for a view whose name matches the action method name. The MVC framework will search for an Index view with different file extensions and in different folder locations, one combination of which is /Views/Home/Index.cshtml. The Views folder is the conventional location of views in an MVC application, the Home folder is the conventional location for views used by the Home controller, and the .cshtml file extension specifies that the view contains C# Razor annotations.
To create the view for the example application, right-click either of the action methods in the HomeController class and select Add View from the pop-up menu to open the Add View dialog window. Set the Name field to Index, set the Template field to Empty (without model), and ensure that the Create as a partial view and Use a layout page options are not checked, as shown in Figure 2-4.
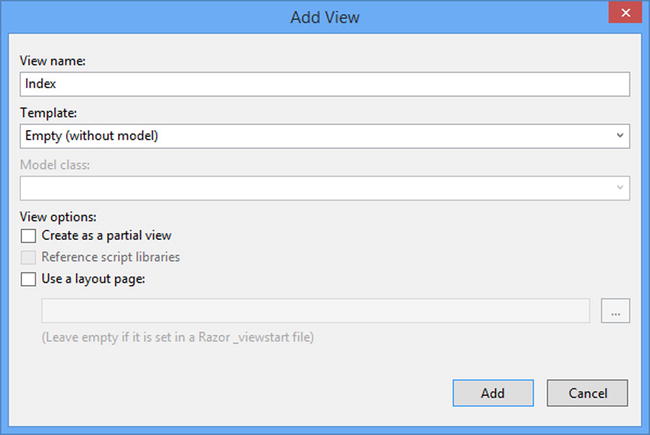
Figure 2-4. Creating the view
Click the Add button, and Visual Studio will create a file called Index.cshtml in the Views/Home folder. Edit this file so that it matches Listing 2-3.
Listing 2-3. The Contents of the Index.cshtml File
@using SimpleApp.Models
@{ Layout = null; }

<!DOCTYPE html>
<html>
<head>
    <meta name="viewport" content="width=device-width" />
    <title>Vote</title>
</head>
<body>
    @if (ViewBag.SelectedColor == null) {
        <h4>Vote for your favorite color</h4>
    } else {
        <h4>Change your vote from @ViewBag.SelectedColor</h4>
    }

    @using (Html.BeginForm()) {
        @Html.DropDownList("color",
                new SelectList(Enum.GetValues(typeof(Color))), "Choose a Color")
        <div>
            <button type="submit">Vote</button>
        </div>
    }
    <div>
        <h5>Results</h5>
        <table>
            <tr><th>Color</th><th>Votes</th></tr>
            @foreach (Color c in Enum.GetValues(typeof(Color))) {
                <tr><td>@c</td><td>@Votes.GetVotes(c)</td></tr>
            }
        </table>
    </div>
</body>
</html>
An MVC framework view uses a combination of standard HTML elements and Razor annotations to dynamically generate content. I am using a single view to response to HTTP GET and POST requests, so some of the Razor annotations adapt the content to reflect whether the user has already voted; the other annotations generate HTML elements based on the enumeration of colors and the total number of votes.
Once you have created the three components in the previous section, you can test them by selecting Start Debugging from the Visual Studio Debug menu. Visual Studio will open a browser window and navigate to the application URL, allowing you to select a color and vote. Figure 2-5 illustrates the voting process.
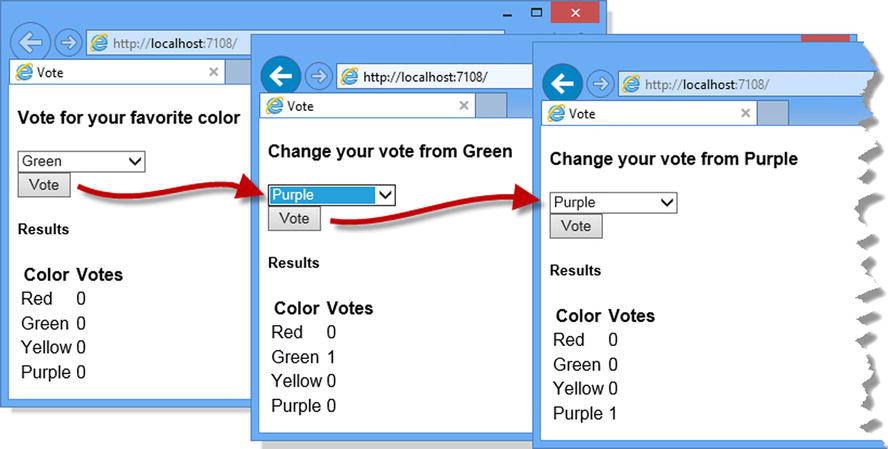
Figure 2-5. Using the application
![]() Note I refer to the Visual Studio Debug menu, but it is really the DEBUG menu because Microsoft has adopted an all-capitals policy to menu names. I think this is an odd thing to do, and I will refer to menu items in mixed case in this book.
Note I refer to the Visual Studio Debug menu, but it is really the DEBUG menu because Microsoft has adopted an all-capitals policy to menu names. I think this is an odd thing to do, and I will refer to menu items in mixed case in this book.
Adding Packages to the Project
As I explained earlier in the chapter, I prefer to create a basic Visual Studio project and then explicitly add the features I need. This is less work than you might expect because Visual Studio supports NuGet, which is a package manager that provides access to a wide catalog of packages for .NET application development. The integration into Visual Studio allows for the automatic downloading, installation, and dependency management of packages and has transformed the process of using standard libraries in .NET development.
The NuGet package catalog, which you can browse at www.nuget.org, is extensive and includes many popular open source web application packages. Microsoft has given tacit support to some of these packages by including them in the Visual Studio templates for new ASP.NET projects, but you can use NuGet directly to install these packages without getting the rest of the (generally useless) template content.
One package that Microsoft has adopted with the MVC 5 release is Bootstrap, which is an excellent CSS and JavaScript library for styling HTML that grew out of a project at Twitter. I have absolutely no design skills at all, and I like using Bootstrap because it lets me style content during the early stages of development without making too much of a mess. I like to work with professional designers on real projects (and I recommend you do the same), but in this book I’ll use Bootstrap to make some the examples easier to understand and to highlight specific results and features.
![]() Note Bootstrap is only one of the packages that Microsoft has adopted, and I only briefly describe its use in this chapter. For full details of client-side development for MVC framework projects, see my Pro ASP.NET MVC 5 Client Development book, which is published by Apress.
Note Bootstrap is only one of the packages that Microsoft has adopted, and I only briefly describe its use in this chapter. For full details of client-side development for MVC framework projects, see my Pro ASP.NET MVC 5 Client Development book, which is published by Apress.
I’ll show you how I use Bootstrap later in this chapter, but in this section I will show you how to use the Visual Studio support for NuGet to download and install the Bootstrap package.
![]() Note Bootstrap isn’t directly related to the MVC Framework or the ASP.NET platform. In this chapter I use it to demonstrate how to install a NuGet package and in later chapters to make the examples easier to follow. If you are familiar with NuGet and Bootstrap (or are not interested in either), then you can move directly to Part 2 of this book, where I turn to the details of the ASP.NET platform.
Note Bootstrap isn’t directly related to the MVC Framework or the ASP.NET platform. In this chapter I use it to demonstrate how to install a NuGet package and in later chapters to make the examples easier to follow. If you are familiar with NuGet and Bootstrap (or are not interested in either), then you can move directly to Part 2 of this book, where I turn to the details of the ASP.NET platform.
Visual Studio provides a graphical interface that lets you navigate through the package catalog, but I prefer to use the console feature that accepts NuGet commands directly in Visual Studio. Open the console by selecting Package Manager Console from the Tools ![]() Library Package Manager menu and enter the following command:
Library Package Manager menu and enter the following command:
Install-Package -version 3.0.3 bootstrapThe Install-Packagecommand instructs Visual Studio to add a new package to the project. When you press the Enter key, Visual Studio will download and install the Bootstrap package and any other packages that it depends on. Bootstrap depends only on the popular jQuery library, which Visual Studio added automatically when setting up the project, along with some additional JavaScript files that use jQuery to handle form validation.
![]() Tip The -version argument allows me to specify a particular version of the package, and version 3.0.3 is the current version of Bootstrap available as I write this. The latest version of the package will be installed if you omit the –version argument when using the Install-Package command. I use specific versions of packages in this book to ensure that you are able to re-create the examples.
Tip The -version argument allows me to specify a particular version of the package, and version 3.0.3 is the current version of Bootstrap available as I write this. The latest version of the package will be installed if you omit the –version argument when using the Install-Package command. I use specific versions of packages in this book to ensure that you are able to re-create the examples.
The Bootstrap NuGet package adds some CSS files to the Content folder (which is the home of static content in an MVC framework application) and some JavaScript files to the Scripts folder. Bootstrap mainly works through CSS files, but there are some JavaScript enhancements for more complex interactions. (The Bootstrap package also creates a fonts folder. Not all open source libraries fit neatly into the ASP.NET project structure, so occasionally you will see artifacts like this to support assumptions made by the library about the layout of its files.)
Using Bootstrap
I don’t want to get into too much detail about Bootstrap because it isn’t the topic of this book, and I will be using it only to make the examples easier to understand. To demonstrate the basic Bootstrap features, I have applied some of the most useful styles to the Views/Home/Index.cshtml file, as shown in Listing 2-4.
Listing 2-4. Applying Bootstrap Styles to the Index.cshtml File
@using SimpleApp.Models
@{ Layout = null; }

<!DOCTYPE html>
<html>
<head>
    <meta name="viewport" content="width=device-width" />
    <title>Vote</title>
    <link href="∼/Content/bootstrap.min.css" rel="stylesheet" />
    <link href="∼/Content/bootstrap-theme.min.css" rel="stylesheet" />
</head>
<body class="container">
    <div class="panel panel-primary">
        @if (ViewBag.SelectedColor == null) {
            <h4 class="panel-heading">Vote for your favorite color</h4>
        } else {
            <h4 class="panel-heading">Change your vote from @ViewBag.SelectedColor</h4>
        }

        <div class="panel-body">

            @using (Html.BeginForm()) {
                @Html.DropDownList("color",
                        new SelectList(Enum.GetValues(typeof(Color))), "Choose a Color",
                            new { @class = "form-control" })
                <div>
                    <button class="btn btn-primary center-block"
                         type="submit">Vote</button>
                </div>
            }

        </div>
    </div>

    <div class="panel panel-primary">
        <h5 class="panel-heading">Results</h5>
        <table class="table table-condensed table-striped">
            @foreach (Color c in Enum.GetValues(typeof(Color))) {
                <tr><td>@c</td><td>@Votes.GetVotes(c)</td></tr>
            }
        </table>
    </div>
</body>
</html>
The first changes in the view are the addition of link elements to import the bootstrap.min.css and bootstrap-theme.min.css files into the HTML document. Bootstrap includes a set of base CSS classes that are supplemented by replaceable themes. The base classes are in the bootstrap.min.css file, and I have used the default theme that is defined by the bootstrap-theme.min.css file and that is installed by the NuGet package.
![]() Tip I am using the minified versions of the Bootstrap files in this example, which have been processed to remove whitespace, comments, and other optional content. Minified files are used in deployment to reduce bandwidth requirements or (as here) when using third-party packages that you do not need to debug. The NuGet package also installs the human-readable files if you want to take a look at how Bootstrap works.
Tip I am using the minified versions of the Bootstrap files in this example, which have been processed to remove whitespace, comments, and other optional content. Minified files are used in deployment to reduce bandwidth requirements or (as here) when using third-party packages that you do not need to debug. The NuGet package also installs the human-readable files if you want to take a look at how Bootstrap works.
The other changes apply the Bootstrap CSS classes to style the HTML content that the view will generate. Bootstrap includes a lot of CSS classes, and I am only using some of the most basic, but they are representative of the examples you will see throughout this book. Figure 2-6 shows the effect that the changes in Listing 2-4 have on the application, which will provide some useful context.
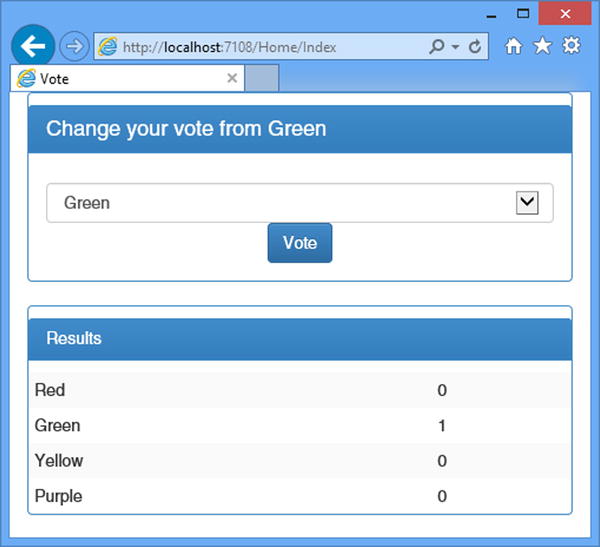
Figure 2-6. The effect of using Bootstrap on the example application
![]() Note Bootstrap functionality is largely provided through CSS classes but is supplemented with some JavaScript additions. I don’t need to use the JavaScript features for this example and am only using the CSS classes.
Note Bootstrap functionality is largely provided through CSS classes but is supplemented with some JavaScript additions. I don’t need to use the JavaScript features for this example and am only using the CSS classes.
I am not going to describe the individual Bootstrap classes in detail, but I have provided a quick summary of those that I have used in Listing 2-4 in Table 2-1 so that you can see how I created the effect shown in the figure.
Table 2-1.The Bootstrap Classes Applied to the Index.cshtml File
Name |
Description |
|---|---|
Btn |
Styles button or a elements as Bootstrap buttons. This class is usually applied in conjunction with a button theme class, such as btn-primary. |
btn-primary |
Used in conjunction with the btn class to apply a theme color to a button. The other button theme classes are btn-default, btn-success, btn-info, btn-warning, and btn-danger. |
center-block |
Centers elements. I used this class in the view to position the Vote button. |
container |
Centers the contents of the element it is applied to. In the listing, I applied this class to the body element so that all of the HTML content is centered. |
form-control |
Styles a Bootstrap form element. There is only one form element in the listing, but this class usefully sizes and aligns elements to present a form. |
panel |
Groups related content together. Used with the panel-body and panel-heading classes to denote the sections of the panel and, optionally, with a class that applies a theme color, such as panel-primary. |
panel-body |
Denotes the content section of a panel. |
panel-heading |
Denotes the heading section of a panel. |
panel-primary |
Used in conjunction with the panel class to apply a theme color to a panel. The other theme classes are panel-default, panel-success, panel-info, panel-warning, and panel-danger. |
table |
Styles a Bootstrap table. |
table-condensed |
Used in conjunction with the table class to create a compact table layout. |
table-striped |
Used in conjunction with the table class to color alternate rows in a table. |
The Bootstrap classes are simple to use and can quickly create a consistent layout for the HTML in a view. For the most part, I applied the classes to the static HTML elements in the view in Listing 2-4, but I have also used a Bootstrap class with the HTML helper method that generates the select element from the enumeration of color values, like this:
...
@Html.DropDownList("color", new SelectList(Enum.GetValues(typeof(Color))),
    "Choose a Color",new { @class = "form-control" })
...
The HTML helpers are convenience methods used in Razor views to generate HTML elements from model data. All of the helper methods are overridden so that there is a version that accepts an object that is used to apply attributes to the elements that are created. The properties of the object are used for the attribute names, and the values for the attributes are taken from the property values. For the DropDownList helper in the example, I have passed in a dynamic object that defines a class property that applies the Bootstrap form-control class to the select element that the helper creates.
![]() Tip I have to prefix the property name with @ because class is a C# keyword. The @ symbol is a standard C# feature that allows the use of keywords without confusing the compiler.
Tip I have to prefix the property name with @ because class is a C# keyword. The @ symbol is a standard C# feature that allows the use of keywords without confusing the compiler.
Summary
In this chapter, I started by refreshing your memory as to the nature and purpose of the MVC pattern. Understanding the MVC pattern will provide some useful context when considering the design and application of the platform features that I describe in Part 2 of this book.
I also showed you how to create a simple MVC framework application using Visual Studio. Visual Studio is a feature-rich and flexible development tool, and there are many choices about how projects are created and built. As this chapter demonstrated, I prefer a basic starting point from which I can add the functionality and features that I require, such as the Bootstrap library that I added to the example project with NuGet and that I briefly described. In Part 2 of this book, I begin to describe the ASP.NET platform in detail, starting with the two life cycles of an ASP.NET application.