
![]()
Handlers
Handlers are responsible for generating the response content for an HTTP request. In this chapter, I explain how handlers generate content, demonstrate how to create custom handlers, and show you how modules can provide services to handlers. Table 5-1 summarizes this chapter.
Table 5-1. Chapter Summary
Problem |
Solution |
Listing |
|---|---|---|
Create a handler. |
Implement the IHttpHandler interface. |
|
Register a handler using a URL route. |
Create an implementation of the IRouteHandler interface that returns the handler from its GetHttpHandler method and use it as an argument to the RouteCollection.Add method. |
|
Register a handler using the Web.config file. |
Add handlers to the system.webServer/handlers section. |
|
Create a handler that generates content asynchronously. |
Derive from the HttpTaskAsyncHandler class. |
|
Provide a service from one module to another. |
Define events and use a declarative interface. |
|
Control the instantiation of handler classes. |
Create a custom handler factory. |
Preparing the Example Project
I am going to continue using the SimpleApp project I created in Chapter 2 and have been using ever since. I defined three modules that add fragments of HTML to the response in Chapter 4, which has the effect of cluttering up the response in the browser window and which I don’t need in this chapter. Listing 5-1 shows how I commented out the module registration elements in the Web.config file.
Listing 5-1. Disabling Modules in the Web.config File
<?xml version="1.0" encoding="utf-8"?>
<configuration>
  <appSettings>
    <add key="webpages:Version" value="3.0.0.0" />
    <add key="webpages:Enabled" value="false" />
     <add key="ClientValidationEnabled" value="true" />
    <add key="UnobtrusiveJavaScriptEnabled" value="true" />
  </appSettings>
  <system.web>
    <compilation debug="true" targetFramework="4.5.1" />
    <httpRuntime targetFramework="4.5.1" />
  </system.web>
  <system.webServer>
    <modules>
      <!--<add name="Timer" type="SimpleApp.Infrastructure.TimerModule"/>-->
      <!--<add name="Total" type="SimpleApp.Infrastructure.TotalTimeModule"/>-->
    </modules>
  </system.webServer>
</configuration>
Listing 5-2 shows how I commented out the PreApplicationStartMethod in the ModuleResigstration.cs file in the CommonModules project.
Listing 5-2. Disabling the Module in the ModuleRegistration.cs File
using System.Web;

//[assembly: PreApplicationStartMethod(typeof(CommonModules.ModuleRegistration),
//    "RegisterModule")]

namespace CommonModules {
    public class ModuleRegistration {

        public static void RegisterModule() {
            HttpApplication.RegisterModule(typeof(CommonModules.InfoModule));
        }
    }
}
Adding the System.Net.Http Assembly
Later in the chapter, I will be using the System.Net.Http.HttpClient class that is defined in the System.Net.Http assembly. The assembly isn’t added to ASP.NET projects by default, so select the SimpleApp project in the Solution Explorer and then select Add Reference from the Visual Studio Project menu; then locate the System.Net.Http assembly in the Assemblies ![]() Framework section and check the box next to it, as shown in Figure 5-1. Click the Add button to add the assembly reference and close the dialog box.
Framework section and check the box next to it, as shown in Figure 5-1. Click the Add button to add the assembly reference and close the dialog box.
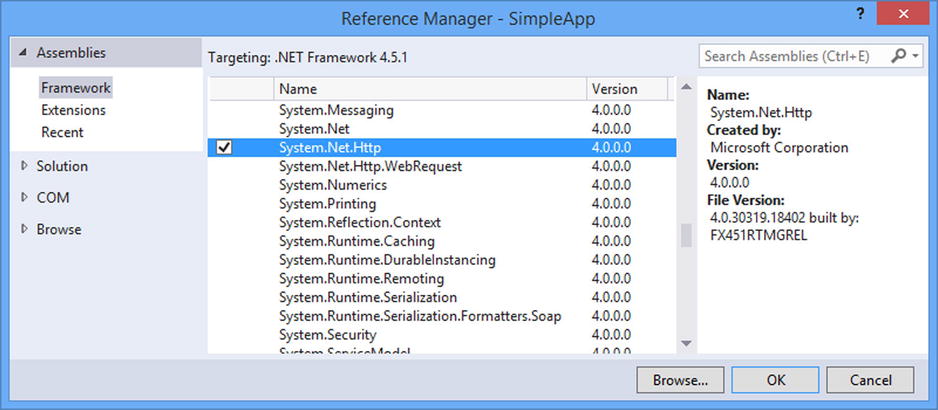
Figure 5-1. Adding the System.Net.Http assembly to the project
ASP.NET Handlers
As part of the request handling life cycle, ASP.NET selects a handler to generate the content that will be returned to the client. The ASP.NET platform doesn’t care what form the content takes or what process the handler uses to generate the content; it just treats the content as an opaque chunk of data that needs to be sent to the client at the end of the request life cycle. This opacity is the key to how ASP.NET is able to support different approaches to web application development: There are handlers for the MVC framework, Web Forms, SignalR, and the Web API, and the ASP.NET platform treats them all equally. Table 5-2 puts handlers into context.
Table 5-2. Putting Handlers in Context
Understanding Handlers in the Request Life Cycle
A common source of confusion when working with the ASP.NET platform is the difference between modules and handlers, so it is important I explain the role of each component before digging into the details of how handlers work.
The best way to understand each component is within the scope of the request life cycle. As I explained in Chapter 4, modules have two roles in request handling. They can be used flor diagnosis and debugging, or they can provide services used by other components. The modules I created in Chapter 4 fall into the diagnosis category: They added fragments of HTML to the response that provided insight into how the request was processed. By contrast, most of the built-in modules that come with ASP.NET provide services, such as caching, security, or the management of state data. As I explained in Chapter 1, these are the services that you consume within MVC framework controllers and views, as shown in Figure 5-2.
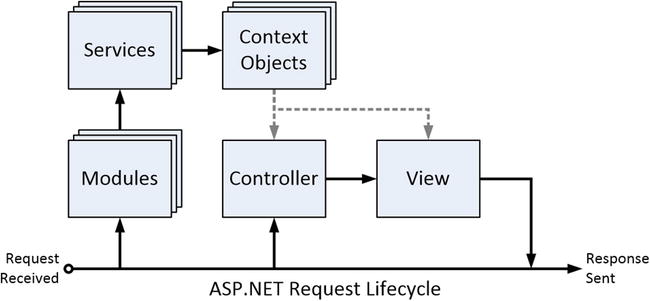
Figure 5-2. The relationship between module services and MVC framework controllers
This figure is a refinement of one I showed you in Chapter 1, expanded to show more details about the ASP.NET components and request life cycle. As the figure illustrates, modules are instantiated at the start of the request handling process, and they set up services that are consumed through the ASP.NET context objects by the MVC framework controller and view in order to generate the response that will be sent to the client.
In Figure 5-1, I have shown the MVC framework programmer’s view of the controller and view, but, as you may have guessed, the MVC functionality is integrated into the ASP.NET platform through a handler, as shown in Figure 5-3.
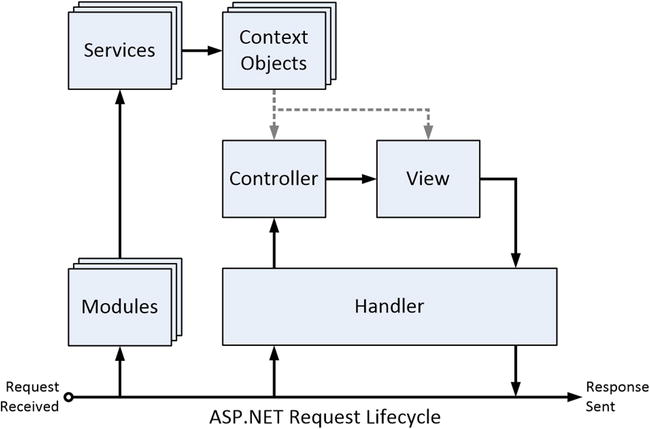
Figure 5-3. Showing the handler in the request life cycle
The first thing to notice is that there are multiple modules for each request but only one handler. The reason I am being so emphatic about the relationship between these components is because I want to be clear about they mesh with the request life-cycle events: The modules are created as soon as the request life cycle begins, but the selection and creation of the handler are built right into the life cycle, as shown in Figure 5-4.
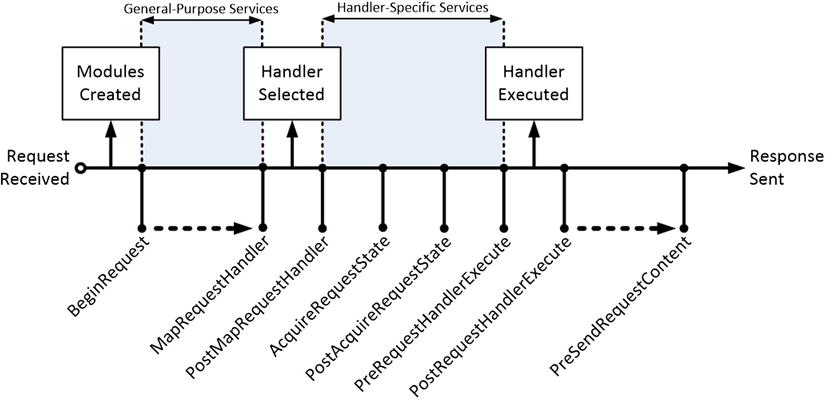
Figure 5-4. The relationship between life-cycle events, modules, and handlers
The MapRequestHandler event is triggered before the ASP.NET platform locates the handler that will generate the content for the request, the process for which I describe in the “Creating a Handler” section later in this chapter. The PostMapRequestHandler event is triggered once the handler has been identified and instantiated. However, the handler isn’t asked to generate the content until the PreRequestHandlerExecute event is triggered, which means that modules have an opportunity to respond to the handler selection and provide services that are unique to that handler, as shown in the figure. You’ll see how this all works in the “Targeting a Specific Handler” section later in this chapter. (Modules can also override the handler selection process, as described in Chapter 6.)
Understanding Handlers
Handlers are classes that implement the System.Web.IHttpHandler interface, which defines the two methods that I have described in Table 5-3.
Table 5-3. The Members Defined by the IHttpHandler Interface
Name |
Description |
|---|---|
This method is called when the ASP.NET framework wants the handler to generate a response for a request. The parameter is an HttpContext object, which provides access to details of the request. |
|
This property tells the ASP.NET framework whether the handler can be used to handle further requests. If the property returns false, then the ASP.NET framework will create new instances for each request. In most situations, returning a value of true doesn’t mean that handlers will be reused unless you implement a custom handler factory, which I describe in the “Custom Handler Factories” section of this chapter. |
The ProcessRequest method is passed an HttpContext object, which can be used to inspect the request and the state of the application through the properties I described in Chapter 3.
Handlers can generate any kind of content that can be delivered over HTTP, and the ASP.NET platform does not impose any constraints on how the content is created. ASP.NET includes a set of default handlers that support the Web Forms, the MVC framework, SignalR, and Web API technology stacks, but custom handlers can be used to support new kinds of applications or data.
Handlers and the Life-Cycle Events
In Figure 5-3, I explained that handler selection and content generation are part of the request life cycle, but I describe the significant events from the perspective of modules. Table 5-4 describes the key life-cycle events from the perspective of the handler.
Table 5-4. The Request Life-Cycle Events Relevant to Handlers
Name |
Description |
|---|---|
MapRequestHandlerPostMapRequestHandler |
MapRequestHandler is triggered when the ASP.NET framework wants to locate a handler for the request. A new instance of the handler will be created unless an existing instance declares it can be reused. The PostMapRequestHandler event is triggered once the handler has been selected. |
PreRequestHandlerExecutePostRequestHandlerExecute |
These events are triggered immediately before and after the call to the handler ProcessRequest method. |
The life cycle of a handler is interwoven with the request and module life cycles. This may seem over complicated, but it provides for flexible interactions between handlers and modules (or the global application class if that’s where you have defined your event handlers). All of this will start to make more sense as you see some examples of handlers and the way they can be used.
The MapRequestHandler and PostMapRequestHandler events are different from the other pairs of events in the life cycle. Normally, the first event in a pair is a request for a module to provide a service, and the second event signals that phase of the life cycle is complete. So, for example, the AcquireRequestState event is a request for modules that handle state data to associate data with the request, and the PostAcquireRequestState event signals that all of the modules that handled the first event have finished responding.
The MapRequestHandler event isn’t an invitation for a module to supply a handler for a request; that’s a task that ASP.NET handles itself, and the event just signals that the selection is about to be made (a process I describe in the next section). The PostMapRequestHandler event signals that the handler has been selected, which allows modules to respond to the handler choice—generally by setting up services or data specific to the chosen handler.
The handler’s ProcessRequest method is called between the PreRequestHandlerExecute and PostRequestHandlerExecute events. Modules can use these events as the last opportunity to manipulate the context objects before the content is generated by the handler and the first opportunity to manipulate the response once the handler is done.
Creating a Handler
It is time to create a handler now that you understand the purpose of handlers and the context in which they exist. I created a class file called DayOfWeekHandler.cs in the Infrastructure folder and used it to define the handler shown in Listing 5-3.
Listing 5-3. The Contents of the DayOfWeekHandler.cs File
using System;
using System.Web;

namespace SimpleApp.Infrastructure {
    public class DayOfWeekHandler: IHttpHandler {

        public void ProcessRequest(HttpContext context) {
            string day = DateTime.Now.DayOfWeek.ToString();

            if (context.Request.CurrentExecutionFilePathExtension == ".json") {
                context.Response.ContentType = "application/json";
                context.Response.Write(string.Format("{{"day": "{0}"}}", day));
            } else {
                context.Response.ContentType = "text/html";
                context.Response.Write(string.Format("<span>It is: {0}</span>", day));
            }
        }

        public bool IsReusable {
            get { return false; }
        }
    }
}
When content is required for a request, the ASP.NET platform calls the ProcessRequest method and provides the handler with an HttpContext object. After that, it is up to the handler to figure out what’s needed; that can be a complex process such as the one used by the MVC framework to locate and invoke an action method and render a view, or as simple as generating simple string responses, which is what this example handler does.
I want to demonstrate that the ASP.NET platform doesn’t restrict the content that the handler generates, so I use the HttpResponse.CurrentExecutionFilePathExtension property to detect requests for URLs whose file component ends with .json and return the current day of the week as JSON data. For all other requests, I assume that the client requires a fragment of HTML.
![]() Note The JavaScript Object Notation (JSON) format is commonly used in web applications to transfer data using Ajax requests. The structure of JSON is similar to the way that JavaScript data values are defined, which makes it easy to process in the browser. I don’t get into the details of JSON in this book, but I dig into the details of generating and processing JSON data in my Pro ASP.NET MVC Client Development book, which is published by Apress.
Note The JavaScript Object Notation (JSON) format is commonly used in web applications to transfer data using Ajax requests. The structure of JSON is similar to the way that JavaScript data values are defined, which makes it easy to process in the browser. I don’t get into the details of JSON in this book, but I dig into the details of generating and processing JSON data in my Pro ASP.NET MVC Client Development book, which is published by Apress.
Registering a Handler Using URL Routing
Handlers must be registered before they can be used to generate content for requests, and there are two ways in which this can be done. The firs technique for registering a handler is to use the routing system. In Listing 5-4, you can see how I have edited the RouteConfig.cs file to set up a route that matches URLs that start with /handler to my DayOfWeekHandler class.
Listing 5-4. Setting Up a Route for a Custom Handler in the RouteConfig.cs File
using System;
using System.Collections.Generic;
using System.Linq;
using System.Web;
using System.Web.Mvc;
using System.Web.Routing;
using SimpleApp.Infrastructure;

namespace SimpleApp {
    public class RouteConfig {
        public static void RegisterRoutes(RouteCollection routes) {
            routes.IgnoreRoute("{resource}.axd/{*pathInfo}");

            routes.Add(new Route("handler/{*path}",
                new CustomRouteHandler {HandlerType = typeof(DayOfWeekHandler)}));

            routes.MapRoute(
                name: "Default",
                url: "{controller}/{action}/{id}",
                defaults: new { controller = "Home", action = "Index",
                    id = UrlParameter.Optional }
            );
        }
    }

    class CustomRouteHandler : IRouteHandler {

        public Type HandlerType { get; set; }

        public IHttpHandler GetHttpHandler(RequestContext requestContext) {
    return (IHttpHandler)Activator.CreateInstance(HandlerType);
        }
    }
}
The RouteCollection.Add method creates a route and associates it with an implementation of the IRouteHandler interface, which defines the GetHttpHandler method. This method is responsible for returning an instance of the IHttpHandler interface that will be used to generate content for the request. My implementation of IRouteHandler is configured with a C# type that I instantiate using the System.Activator class. This allows me to tie a specific custom handler to a URL pattern, like this:
...
routes.Add(new Route("handler/{*path}",
    new CustomRouteHandler {HandlerType = typeof(DayOfWeekHandler)}));
...
Registering a Handler Using the Configuration File
Using the routing system to set up custom handlers is workable, but it isn’t the approach that I use in my own projects. Instead, I use the Web.config file to register my handlers, in part because not all ASP.NET projects use the routing system (and, in part, out of habit because I have been writing web applications for a long time, and the routing system is a relatively new addition to ASP.NET). Listing 5-5 shows the additions I made to the Web.config file to register my custom handler.
Listing 5-5. Registering a Handler in the Web.config File
<?xml version="1.0" encoding="utf-8"?>
<configuration>
  <appSettings>
    <add key="webpages:Version" value="3.0.0.0" />
    <add key="webpages:Enabled" value="false" />
     <add key="ClientValidationEnabled" value="true" />
    <add key="UnobtrusiveJavaScriptEnabled" value="true" />
  </appSettings>
  <system.web>
    <compilation debug="true" targetFramework="4.5.1" />
    <httpRuntime targetFramework="4.5.1" />
  </system.web>
  <system.webServer>
    <modules>
      <!--<add name="Timer" type="SimpleApp.Infrastructure.TimerModule"/>-->
      <!--<add name="Total" type="SimpleApp.Infrastructure.TotalTimeModule"/>-->
    </modules>
    <handlers>
      <add name="DayJSON" path="/handler/*.json" verb="GET"
              type="SimpleApp.Infrastructure.DayOfWeekHandler"/>
      <add name="DayHTML" path="/handler/day.html" verb="*"
              type="SimpleApp.Infrastructure.DayOfWeekHandler"/>
    </handlers>
  </system.webServer>
</configuration>
Handlers are registered in the system.webServer/handlers section of the Web.config file, through the use of the add element, which defines the attributes shown in Table 5-5. (The set of handlers is a configuration collection, which I explain in Chapter 9 when I describe the ASP.NET configuration system in detail.)
Table 5-5. The Attributes Defined by the handlers/add Attribute
Name |
Description |
|---|---|
name |
Defines a name that uniquely identifies the handler. |
path |
Specifies the URL path for which the handler can process. |
verb |
Specifies the HTTP method that the handler supports. You can specify that all methods are supported by using an asterisk (*), specify that a single method is supported (GET), or use comma-separated values for multiple methods ("GET,POST"). When using comma-separated values, be sure not to use spaces between values. |
type |
Specifies the type of the IHttpHandler or IHttpHandlerFactory implementation class. (I describe the IHttpHandlerFactory interface in the “Custom Handler Factories” section later in this chapter.) |
![]() Tip Some additional attributes relate to IIS and file access. They are not often used, and I don’t describe them in this book, but you can get details at http://msdn.microsoft.com/en-us/library/ms691481(v=vs.90).aspx.
Tip Some additional attributes relate to IIS and file access. They are not often used, and I don’t describe them in this book, but you can get details at http://msdn.microsoft.com/en-us/library/ms691481(v=vs.90).aspx.
You can be as general or as specific as you want when you register a custom handler, and you can create any number of configuration entries for each handler. I created two entries in the Web.config file to set up the new handler. This isn’t essential for such a simple handler, but I wanted to demonstrate that a handler can be set up to support multiple types of request. The first entry registers the custom handler to deal with requests with URLs that start with /handlerand have the JSON extension and are made using the GET method. The second entry registers the same handler class, but only for requests made using any HTTP method for the /handler/day.html URL.
There is one more configuration step, and that’s to stop the URL routing feature from intercepting requests that I want to go to my custom handler. The default routing configuration that Visual Studio adds to ASP.NET projects assumes that all incoming requests will routed and sends a 404 – Not Found error to the client when a request can’t be matched to a route. To avoid this problem, I have edited the App_Start/RouteConfig.cs file to tell the routing system to ignore any requests intended for my custom handler, as shown in Listing 5-6.
Listing 5-6. Ignoring Requests for the Custom handler in the RouteConfig.cs File
using System;
using System.Collections.Generic;
using System.Linq;
using System.Web;
using System.Web.Mvc;
using System.Web.Routing;
using SimpleApp.Infrastructure;

namespace SimpleApp {
    public class RouteConfig {
        public static void RegisterRoutes(RouteCollection routes) {
            routes.IgnoreRoute("{resource}.axd/{*pathInfo}");

            //routes.Add(new Route("handler/{*path}",
            //    new CustomRouteHandler {HandlerType = typeof(DayOfWeekHandler)}));

            routes.IgnoreRoute("handler/{*path}");

            routes.MapRoute(
                name: "Default",
                url: "{controller}/{action}/{id}",
                defaults: new { controller = "Home", action = "Index",
                    id = UrlParameter.Optional }
            );
        }
    }

    class CustomRouteHandler : IRouteHandler {

        public Type HandlerType { get; set; }
        public IHttpHandler GetHttpHandler(RequestContext requestContext) {
            return (IHttpHandler)Activator.CreateInstance(HandlerType);
        }
    }
}
The RouteCollection.IgnoreRoute method tells the routing system to ignore a URL pattern. In the listing, I used the IgnoreRoute method to exclude any URL whose first segment is /handler. When a URL pattern is excluded, the routing system won’t try to match routes for it or generate an error when there is no route available, allowing the ASP.NET platform to locate a handler from the Web.config file.
Testing the Handler
To test the custom handler, start the application and request the /handler/day.html URL. This request will select the DayOfWeekHandler to generate the content, and the handler will return an HTML fragment, as shown in Figure 5-5.
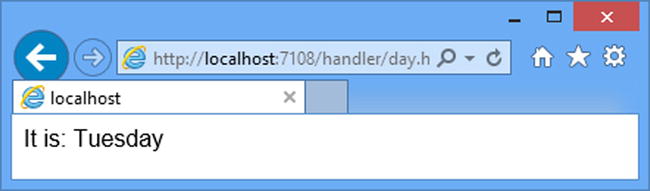
Figure 5-5. Generating an HTML fragment from the custom handler
The custom handler will also generate a JSON response. To test this, you can request any URL that starts with /handler and ends with .json, such as /handler/day.json. Internet Explorer won’t display JSON content in the browser window, and you will be prompted to open a file that contains the following content:
{"day": "Tuesday"}Creating Asynchronous Handlers
If your handler needs to perform asynchronous operations, such as making a network request, for example, then you can create an asynchronous handler. Asynchronous handlers prevent a request handling thread from waiting for an operation to complete, which can improve the overall throughput of a server.
![]() Note Asynchronous programming is an advanced topic that is beyond the scope of this book. Don’t use asynchronous features unless you understand how they work because it is easy to get into trouble. If you want more details about the .NET support for asynchronous programming, then see my Pro .NET Parallel Programming in C# book, which is published by Apress.
Note Asynchronous programming is an advanced topic that is beyond the scope of this book. Don’t use asynchronous features unless you understand how they work because it is easy to get into trouble. If you want more details about the .NET support for asynchronous programming, then see my Pro .NET Parallel Programming in C# book, which is published by Apress.
Asynchronous handlers implement the IHttpAsyncHandler interface, but this interface follows the old style of .NET asynchronous programming of having Begin and End methods and relying on IAsyncResult implementations. C# and .NET have moved on in recent years, and a much simpler approach is to derive the handler from the HttpTaskAsyncHandler class, which allows the use of Task objects and the async and await keywords. To demonstrate creating an asynchronous handler, I created a class file called SiteLengthHandler.cs in the Infrastructure folder and used it to define the handler shown in Listing 5-7.
Listing 5-7. The Contents of the SiteLengthHandler.cs File
using System.Net.Http;
using System.Threading.Tasks;
using System.Web;

namespace SimpleApp.Infrastructure {

    public class SiteLengthHandler : HttpTaskAsyncHandler {

        public override async Task ProcessRequestAsync(HttpContext context) {
            string data = await new HttpClient().GetStringAsync("http://www.apress.com");
            context.Response.ContentType = "text/html";
            context.Response.Write(string.Format("<span>Length: {0}</span>",
                data.Length));
        }
    }
}
Asynchronous handlers override the ProcessRequestAsync method, which is passed an HttpContext object and which must return a Task that represents the asynchronous operation. I have annotated the method with the async keyword, which allows me to use await in the method body and avoid working directly with Tasks.
![]() Tip The await and async keywords are recent additions to C# and are processed by the compiler to standard Task Parallel Library objects and methods.
Tip The await and async keywords are recent additions to C# and are processed by the compiler to standard Task Parallel Library objects and methods.
My example handler uses the HttpClient class to make an asynchronous HTTP request to www.apress.com and determine how many characters the result contains. In real projects, a more likely asynchronous operation would be to read from a file or query a database, but I want to keep this example as simple as possible. Asynchronous handlers are registered in just the same way as regular handlers, as shown in Listing 5-8.
Listing 5-8. Registering the Asynchronous Handler in the Web.config File
<?xml version="1.0" encoding="utf-8"?>
<configuration>
  <appSettings>
    <add key="webpages:Version" value="3.0.0.0" />
    <add key="webpages:Enabled" value="false" />
     <add key="ClientValidationEnabled" value="true" />
    <add key="UnobtrusiveJavaScriptEnabled" value="true" />
  </appSettings>
  <system.web>
    <compilation debug="true" targetFramework="4.5.1" />
    <httpRuntime targetFramework="4.5.1" />
  </system.web>
  <system.webServer>
    <modules>
      <!--<add name="Timer" type="SimpleApp.Infrastructure.TimerModule"/>-->
      <!--<add name="Total" type="SimpleApp.Infrastructure.TotalTimeModule"/>-->
    </modules>
    <handlers>
      <add name="DayJSON" path="/handler/*.json" verb="GET"
              type="SimpleApp.Infrastructure.DayOfWeekHandler"/>
      <add name="DayHTML" path="/handler/day.html" verb="*"
              type="SimpleApp.Infrastructure.DayOfWeekHandler"/>
      <add name="SiteLength" path="/handler/site" verb="*"
              type="SimpleApp.Infrastructure.SiteLengthHandler"/>
    </handlers>
  </system.webServer>
</configuration>
![]() Tip I don’t need to add an IgnoreRoute method call to the RouteConfig.cs file for this handler because the URL it supports is already covered by the URL pattern that I used in Listing 5-6.
Tip I don’t need to add an IgnoreRoute method call to the RouteConfig.cs file for this handler because the URL it supports is already covered by the URL pattern that I used in Listing 5-6.
To test the asynchronous handler, start the application and request the /handler/site URL. The exact length of the content returned from www.apress.com changes often, but you can see an example of the output in Figure 5-6.
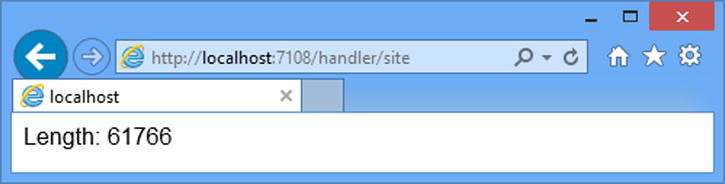
Figure 5-6. The content generated by the asynchronous handler
Creating Modules That Provide Services to Handlers
Now that you have seen the basic mechanism for defining a registering a handler, it is time to show you how to coordinate the actions of modules and handlers within an ASP.NET application.
Modules can provide services to handlers by assigning data values to the context objects. You can set a value for one of the predefined context object properties, such as HttpContext.Session, for example, if you are implementing a session state feature. Using the predefined properties generally means you are replacing one of the built-in features, but a module can also pass arbitrary data to the handler using the HttpContext.Items property. The Items property returns an IDictionary implementation that can be used to store any data that the handler requires access to.
![]() Tip If you are replacing one of the built-in services, then you will need to disable the service’s module in one of the ASP.NET configuration files that are outside of the project. I explain how these files work and tell you how to find them in Chapter 9.
Tip If you are replacing one of the built-in services, then you will need to disable the service’s module in one of the ASP.NET configuration files that are outside of the project. I explain how these files work and tell you how to find them in Chapter 9.
To demonstrate how the Items property can be used, I created a class file called DayModule.cs in the Infrastructure folder and used it to define the module shown in Listing 5-9.
Listing 5-9. The Contents of the DayModule.cs File
using System;
using System.Web;

namespace SimpleApp.Infrastructure {
    public class DayModule : IHttpModule {

        public void Init(HttpApplication app) {
            app.BeginRequest += (src, args) => {
                app.Context.Items["DayModule_Time"] = DateTime.Now;
            };
        }

        public void Dispose() {
            // nothing to do
        }
    }
}
This module handles the BeginRequest life-cycle event and adds data to the Items collection. The name of the property is DayModule_Time, and I assign the value of the DateTime.Now property, which is the current date and time. In Listing 5-10, you can see how I registered the module in the Web.config file.
Listing 5-10. Registering the Module in the Web.config File
<?xml version="1.0" encoding="utf-8"?>
<configuration>
  <appSettings>
    <add key="webpages:Version" value="3.0.0.0" />
    <add key="webpages:Enabled" value="false" />
     <add key="ClientValidationEnabled" value="true" />
    <add key="UnobtrusiveJavaScriptEnabled" value="true" />
  </appSettings>
  <system.web>
    <compilation debug="true" targetFramework="4.5.1" />
    <httpRuntime targetFramework="4.5.1" />
  </system.web>
  <system.webServer>
    <modules>
      <!--<add name="Timer" type="SimpleApp.Infrastructure.TimerModule"/>-->
      <!--<add name="Total" type="SimpleApp.Infrastructure.TotalTimeModule"/>-->
      <add name="DayPrep" type="SimpleApp.Infrastructure.DayModule"/>
    </modules>
    <handlers>
      <add name="DayJSON" path="/handler/*.json" verb="GET"
          type="SimpleApp.Infrastructure.DayOfWeekHandler"/>
      <add name="DayHTML" path="/handler/day.html" verb="*"
          type="SimpleApp.Infrastructure.DayOfWeekHandler"/>
      <add name="SiteLength" path="/handler/site" verb="*"
          type="SimpleApp.Infrastructure.SiteLengthHandler"/>
    </handlers>
  </system.webServer>
</configuration>
![]() Tip There is no segregation of the data in the Items collection, which means that care had to be taken to ensure that two modules don’t assign data using the same keys. The way I do this is to include the name of the module class in the Items key, as shown in Listing 5-9, where I used the key DayModule_Time to indicate that the data value was set by the DayModule module.
Tip There is no segregation of the data in the Items collection, which means that care had to be taken to ensure that two modules don’t assign data using the same keys. The way I do this is to include the name of the module class in the Items key, as shown in Listing 5-9, where I used the key DayModule_Time to indicate that the data value was set by the DayModule module.
The same Items collection that the module uses is available to the handler via the HttpContext.Items property. Listing 5-11 shows how I have updated the DayOfWeekHandler so that it consumes the data provided by DayModule.
Listing 5-11. Consuming Module Data in the DayOfWeekHandler.cs File
using System;
using System.Web;

namespace SimpleApp.Infrastructure {
    public class DayOfWeekHandler : IHttpHandler {

        public void ProcessRequest(HttpContext context) {

            if (context.Items.Contains("DayModule_Time")
                    &&(context.Items["DayModule_Time"] is DateTime)) {

                string day = ((DateTime)context.Items["DayModule_Time"])
                    .DayOfWeek.ToString();

                if (context.Request.CurrentExecutionFilePathExtension == ".json") {
                    context.Response.ContentType = "application/json";
                    context.Response.Write(string.Format("{{"day": "{0}"}}", day));
                } else {
                    context.Response.ContentType = "text/html";
                    context.Response.Write(string.Format("<span>It is: {0}</span>",
                        day));
                }

            } else {
                context.Response.ContentType = "text/html";
                context.Response.Write("No Module Data Available");
            }
        }

        public bool IsReusable {
            get { return false; }
        }
    }
}
Caution is required when retrieving the data from the Items collection. First, you must establish that the data has been added to the collection because there is no guarantee that a specific module has been registered in the Web.config file. Second, you must ensure that the data is of the expected type because there is nothing to prevent modules from adding different data to the Items collection using the same key. Once you have established that the data exists and is of the correct type, you can read the value from the Items collection and use it to generate content for a request. In the example, I get the DataTime value provided by the module and use it to generate my HTML and JSON fragments.
Targeting a Specific Handler
The module that I defined in Listing 5-9 adds data to the Items collection for every request, whether or not the handler that is selected will use it. That doesn’t present a problem when the data is as easy to create as the current date and time, but it becomes a problem if there is significant time or expense required to obtain or generate the data. As an example, you won’t want to query a database in the module to obtain data that will be ignored by most handlers. To avoid this, you can respond to the PostMapRequestHandler life-cycle event in the module and add data to the Items collection only if the handler that ASP.NET has selected is one that will consume the data. In Listing 5-12, I have modified the DayModule so that it will add data to the collection only when DayOfWeekHandler is selected to generate content for the request.
Listing 5-12. Targeting a Specific Handler in the DayModule.cs File
using System;
using System.Web;

namespace SimpleApp.Infrastructure {
    public class DayModule : IHttpModule {

        public void Init(HttpApplication app) {
            app.PostMapRequestHandler += (src, args) => {
                if (app.Context.Handler is DayOfWeekHandler) {
                    app.Context.Items["DayModule_Time"] = DateTime.Now;
                }
            };
        }

        public void Dispose() {
            // nothing to do
        }
    }
}
The module now handles the PostMapRequestHandler event, which is triggered after the handler has been selected to generate content for the request and uses the HttpContext.Handler property to check the type of the selected handler. The module adds a DateTime value to the Items collection if the handler is an instance of DayWeekHandler, but not otherwise.
Decoupling Components Using Declarative Interfaces
The basic approach shown in Listing 5-12 works, but it creates a situation where the module and handler are tightly coupled (meaning that they are harder to test and maintain) and where the module can provide a service only to a single handler class. A more flexible approach is to identify handlers that a module will provide services to using declarative interfaces, which are regular C# interfaces that define no methods and exist just so a handler can declare that it requires a specific service.
To demonstrate the use of a declarative interface, I added a class file called IRequiresDate.cs to the Infrastructure folder and used it to define the interface shown in Listing 5-13.
Listing 5-13. The Contents of the IRequiresDate.cs File
namespace SimpleApp.Infrastructure {

    public interface IRequiresDate {
        // this interface is declarative and defines no members
    }
}
I can then apply the declarative interface to the DayOfWeekHandler class, as shown in Listing 5-14.
Listing 5-14. Applying the Declarative Interface in the DayOfWeekHandler.cs File
...
namespace SimpleApp.Infrastructure {
    public class DayOfWeekHandler : IHttpHandler, IRequiresDate{
...
And finally, I can update DayModule so that it looks for the declarative interface rather than the handler class, as shown in Listing 5-15.
Listing 5-15. Updating the Module to Use the Declarative Interface in the DayModule.cs File
using System;
using System.Web;

namespace SimpleApp.Infrastructure {
    public class DayModule : IHttpModule {

        public void Init(HttpApplication app) {
            app.PostMapRequestHandler += (src, args) => {
                if (app.Context.Handler is IRequiresDate) {
                    app.Context.Items["DayModule_Time"] = DateTime.Now;
                }
            };
        }

        public void Dispose() {
            // nothing to do
        }
    }
}
Not only does this make it easier to test and maintain both the handler and the module, it also allows any handler that implements the declarative interface to receive the services that the module provides.
![]() Note A good declarative interface example can be found in the module responsible for session state. As I will demonstrate in Chapter 10, you can elect to store session state in a database in order to reduce memory consumption on the server and improve data persistence. The process of retrieving session data and associating it with the request can slow down request processing, so the session module will undertake this work only if the handler implements the IRequiresSessionState interface, which is contained in the System.Web.SessionState namespace. I describe how the session state feature works in detail in Chapter 10.
Note A good declarative interface example can be found in the module responsible for session state. As I will demonstrate in Chapter 10, you can elect to store session state in a database in order to reduce memory consumption on the server and improve data persistence. The process of retrieving session data and associating it with the request can slow down request processing, so the session module will undertake this work only if the handler implements the IRequiresSessionState interface, which is contained in the System.Web.SessionState namespace. I describe how the session state feature works in detail in Chapter 10.
Handler factories are the ASP.NET component responsible for creating instances of handlers to service requests. ASP.NET includes a default handler factory that creates a new instance of the handler class, but you can take more control of the process by creating a custom factory. There are three reasons you may require a custom handler factory:
- You need to take control of the way that custom handler classes are instantiated.
- You need to choose between different custom handlers for the same request type.
- You need to reuse handlers rather than create a new one for each request.
I’ll show you how to address each of these issues in the sections that follow. Table 5-6 puts custom handler factories into context.
Table 5-6. Putting Handler Factories in Context
![]() Tip Handler factories are used only when handlers are selected using the Web.config file registrations. They are not involved in the process of creating handlers through the URL routing policy, which I demonstrated in the “Registering a Handler Using URL Routing” section earlier in this chapter.
Tip Handler factories are used only when handlers are selected using the Web.config file registrations. They are not involved in the process of creating handlers through the URL routing policy, which I demonstrated in the “Registering a Handler Using URL Routing” section earlier in this chapter.
Handler factories are classes that implement the IHttpHandlerFactory interface and that are registered like a handler in the Web.config file. The IHttpHandlerFactory interface defines the methods described in Table 5-7.
Table 5-7. The Methods Defined by the IHttpHandlerFactory Interface
Name |
Description |
|---|---|
Called when the ASP.NET framework requires a handler for a request that matches the Web.confing registration |
|
Called after a request, providing the factory with the opportunity to reuse the handler |
The GetHandler method is called when the ASP.NET framework requires a handler to process a request. A single factory can support multiple types of handler, so the GetHandler method is passed details of the request so that the right kind of handler can be returned. I have described each of the parameters to the GetHandler method in Table 5-8.
Table 5-8. The Parameters of the IHttpHandlerFactory.GetHandler Method
Name |
Description |
|---|---|
context |
An HttpContext object through which information about the request and the state of the application can be obtained |
verb |
A string containing the HTTP method used to make the request (GET, POST, and so on) |
url |
A string containing the request URL |
path |
A string that combines the directory to which the application has been deployed and the request URL |
Controlling Handler Instantiation
The simplest kind of handler factory is one that controls the way that custom handlers are instantiated. The best example I have seen of this kind of factory is the one that handles requests for Web Form files, which involves a complex parsing and compilation process to generate a class that can return a response to the browser. This is similar to the process that the MVC framework uses for Razor views but is implemented using a handler factory.
Needing to generate and compile handler classes is pretty unusual; the most common kind of handler that requires a factory is one that requires some kind of initialization or a constructor argument for resource configuration, such as a database connection or a license key.
To keep the example focused on the handler factory, I am going to demonstrate how to create instances of a handler that requires a constructor argument—something that the default handler can’t resolve. I added a class file called CounterHandler.cs to the Infrastructure folder and used it to define the handler shown in Listing 5-16.
Listing 5-16. The Content of the CounterHandler.cs File
using System.Web;

namespace SimpleApp.Infrastructure {
    public class CounterHandler : IHttpHandler {
        private int handlerCounter;

        public CounterHandler(int counter) {
            handlerCounter = counter;
        }

        public void ProcessRequest(HttpContext context) {
            context.Response.ContentType = "text/plain";
            context.Response.Write(string.Format("The counter value is {0}",
                handlerCounter));
        }

        public bool IsReusable {
            get { return false; }
        }
    }
}
This handler takes an int constructor argument, which prevents it from being instantiated by the built-in handler. In Listing 5-17, you can see the contents of the CounterHandlerFactory.cs file, which I added to the Infrastructure folder to define a handler factory that can provide the CounterHandler with the constructor argument it needs.
Listing 5-17. The Contents of the CounterHandlerFactory.cs File
using System.Web;

namespace SimpleApp.Infrastructure {
    public class CounterHandlerFactory : IHttpHandlerFactory {
        private int counter = 0;

        public IHttpHandler GetHandler(HttpContext context, string verb,
                string url, string path) {
            return new CounterHandler(++counter);
        }
        public void ReleaseHandler(IHttpHandler handler) {
            // do nothing - handlers are not reused
        }
    }
}
ASP.NET doesn’t care how the GetHandler method provides it with a handler, just as long as it does. In this simple example, the handler factory increments a counter and uses it as the constructor argument to create a new instance of CounterHandler.
Registering the Handler Factory
Handler factories are registered in the Web.config file, just as you would register a handler. When ASP.NET looks at the interfaces implemented by the type, it matches from the list of registered handlers and knows the difference between IHttpHandler and IHttpHandlerFactory implementations. Listing 5-18 shows the addition I made to the Web.config file to register the CounterHandlerFactory.
Listing 5-18. Registering a Handler Factory in the Web.config File
<?xml version="1.0" encoding="utf-8"?>
<configuration>
  <appSettings>
    <add key="webpages:Version" value="3.0.0.0" />
    <add key="webpages:Enabled" value="false" />
     <add key="ClientValidationEnabled" value="true" />
    <add key="UnobtrusiveJavaScriptEnabled" value="true" />
  </appSettings>
  <system.web>
    <compilation debug="true" targetFramework="4.5.1" />
    <httpRuntime targetFramework="4.5.1" />
  </system.web>
  <system.webServer>
    <modules>
      <!--<add name="Timer" type="SimpleApp.Infrastructure.TimerModule"/>-->
      <!--<add name="Total" type="SimpleApp.Infrastructure.TotalTimeModule"/>-->
      <add name="DayPrep" type="SimpleApp.Infrastructure.DayModule"/>
    </modules>
    <handlers>
      <add name="DayJSON" path="/handler/*.json" verb="GET"
           type="SimpleApp.Infrastructure.DayOfWeekHandler"/>
      <add name="DayHTML" path="/handler/day.html" verb="*"
           type="SimpleApp.Infrastructure.DayOfWeekHandler"/>
      <add name="SiteLength" path="/handler/site" verb="*"
           type="SimpleApp.Infrastructure.SiteLengthHandler"/>
      <add name="CounterFactory" path="/handler/counter" verb="*"
          type="SimpleApp.Infrastructure.CounterHandlerFactory"/>
    </handlers>
  </system.webServer>
</configuration>
![]() Tip You don’t register handlers in the Web.config file when they are instantiated by a custom handler factory.
Tip You don’t register handlers in the Web.config file when they are instantiated by a custom handler factory.
I have registered the handler factory so that it will be used for the URL /handler/counter. You can test the factory and handler by starting the application and requesting this URL. The content generated by the handler will display an incrementing counter for each request, as shown in Figure 5-7.
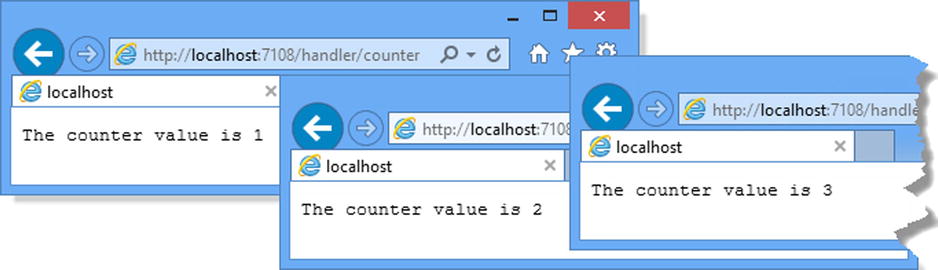
Figure 5-7. Creating instances of handlers in a handler factory
![]() Tip What happens when you create and register a class that implements the IHttpHandler and IHttpHandlerFactory interfaces? ASP.NET checks for the IHttpHandler interface first, which means your class will be treated as a handler and the methods defined by the IHttpHandlerFactory interface will never be called.
Tip What happens when you create and register a class that implements the IHttpHandler and IHttpHandlerFactory interfaces? ASP.NET checks for the IHttpHandler interface first, which means your class will be treated as a handler and the methods defined by the IHttpHandlerFactory interface will never be called.
Selecting Handlers Dynamically
The Web.config file can be used to match handlers to combinations of HTTP method and URL, but that is the limit of the built-in support for matching handlers to requests. For more complex selections, a handler factory is required. Listing 5-19 shows how I have changed the CounterHandlerFactory to instantiate different handlers based on the browser that makes the request.
Listing 5-19. Dynamically Selecting Handlers Based on Request Details in the CounterHandlerFactory.cs File
using System.Web;

namespace SimpleApp.Infrastructure {
    public class CounterHandlerFactory : IHttpHandlerFactory {
        private int counter = 0;

        public IHttpHandler GetHandler(HttpContext context, string verb,
                string url, string path) {
            if (context.Request.UserAgent.Contains("Chrome")) {
                return new SiteLengthHandler();
            } else {
                return new CounterHandler(++counter);
            }
        }
        public void ReleaseHandler(IHttpHandler handler) {
            // do nothing - handlers are not reused
        }
    }
}
As I explained earlier, ASP.NET doesn’t care how the handler factory creates handlers, but neither does it care which handlers are created. In this case, I use the context objects to get the user agent string that the browser sends as part of the HTTP request and select the SiteLengthHandler for requests made by the Google Chrome browser users and the CounterHandler otherwise. (I created the SiteLengthHandler in the “Creating Asynchronous Handlers” section earlier in this chapter.) You can see the effect of requesting the /handler/counter URL in Internet Explorer and Chrome in Figure 5-8.
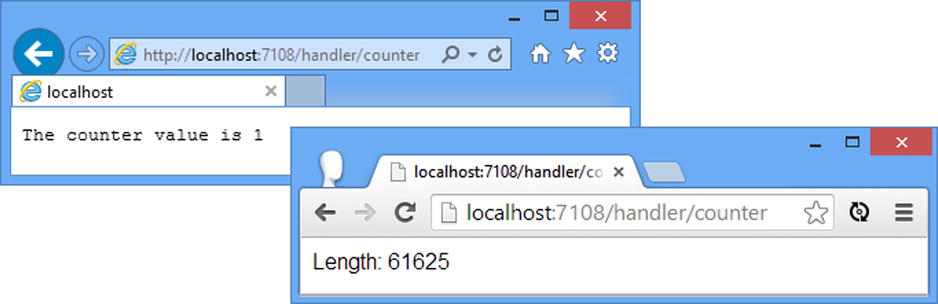
Figure 5-8. Selecting handlers dynamically
Reusing Handlers
The IHttpHandler interface defines the IsReusable property, which allows handlers to indicate that they can be used to generate content for multiple requests in sequence. The built-in handler factory ignores the IsReuseable property value and always creates new handlers for each request.
The main situation where reusing handlers is attractive is when they require significant time or resources to create, typically because they need to load or generate substantial amounts of data before they are able to generate any content. Listing 5-20 shows how I have modified the CounterHandler so that it can be reused, but only for three requests. This isn’t a common scenario, but I want to emphasize the way that handler instances can control their own reuse through the IsReusable property.
Listing 5-20. Creating a Reusable Handler in the CounterHandler.cs File
using System.Web;

namespace SimpleApp.Infrastructure {
    public class CounterHandler : IHttpHandler {
        private int handlerCounter;
        private int requestCounter = 0;

        public CounterHandler(int counter) {
            handlerCounter = counter;
        }

        public void ProcessRequest(HttpContext context) {
            requestCounter++;
            context.Response.ContentType = "text/plain";
            context.Response.Write(
                string.Format("The counter value is {0} (Request {1} of 3)",
                    handlerCounter, requestCounter));
        }

        public bool IsReusable {
            get { return requestCounter < 2; }
        }
    }
}
![]() Caution This is an advanced technique that requires knowledge of concurrent programming, which is a topic in its own right. See my Pro .NET Parallel Programming in C# for details.
Caution This is an advanced technique that requires knowledge of concurrent programming, which is a topic in its own right. See my Pro .NET Parallel Programming in C# for details.
The handler keeps track of the number of requests for which it has generated content and uses this value as the basis for the IsReusable property. Listing 5-21 shows the changes I have made to the CounterHandlerFactory to support reusable handlers.
Listing 5-21. Reusing Handlers in the CounterHandlerFactory.cs File
using System.Collections.Concurrent;
using System.Web;

namespace SimpleApp.Infrastructure {
    public class CounterHandlerFactory : IHttpHandlerFactory {
        private int counter = 0;
        private int handlerMaxCount = 3;
        private int handlerCount = 0;
        private BlockingCollection<CounterHandler> pool
            = new BlockingCollection<CounterHandler>();

        public IHttpHandler GetHandler(HttpContext context, string verb,
                string url, string path) {

                CounterHandler handler;
                if (!pool.TryTake(out handler)) {
                    if (handlerCount < handlerMaxCount) {
                        handlerCount++;
                        handler = new CounterHandler(++counter);
                        pool.Add(handler);
                    } else {
                        handler = pool.Take();
                    }
                }
                return handler;
        }
        public void ReleaseHandler(IHttpHandler handler) {
            if (handler.IsReusable) {
                pool.Add((CounterHandler)handler);
            } else {
                handlerCount--;
            }
        }
    }
}
The handler factory uses a BlockingCollection to maintain a pool of handlers, each of which will be used for three requests. The pool contains a maximum of three handlers, and requests are queued up until a handler is available.
![]() Note In reality, the pool can contain more than three handlers because I don’t guard against multiple simultaneous requests from creating new handlers if one isn’t available and there is space in the pool.
Note In reality, the pool can contain more than three handlers because I don’t guard against multiple simultaneous requests from creating new handlers if one isn’t available and there is space in the pool.
Summary
In this chapter, I introduced the handler component and explained how it relates to modules and the request life-cycle events. I demonstrated how to create and register a custom handler, how to create handlers that perform asynchronous operations, and how modules can provide handlers with services. I finished the chapter by exploring handler factories, which allow you to control how handlers are created and used. In the next chapter, I describe techniques for interrupting the normal flow of the request life cycle.