
![]()
Modules
In the previous chapter, I showed you how to handle life-cycle requests in the global application class. The problem with this approach is that the code quickly becomes a mess, especially when you are trying to perform different kinds of work driven by the same set of events. In this chapter, I describe modules, which are self-contained components that receive and handle life-cycle requests and which can monitor or modify a request and its response. Not only do modules avoid a morass of code in the global application class, but they can be packaged up and used in multiple applications, providing a useful mechanism for creating reusable features for customizing or debugging the ASP.NET request handling process.
In this chapter, I explain how modules work, how you can create them, and how they fit into the request life cycle. In Chapter 5, I explain how modules can be used to provide services to handlers, which are the component responsible for generating content for a request. Table 4-1 summarizes this chapter.
Table 4-1. Chapter Summary
Problem |
Solution |
Listing |
|---|---|---|
Create a module. |
Implement the IHttpModule interface. |
|
Register a module. |
Create an add element in the system.webServer/modules section of the Web.config file or apply the PreApplicationStartMethod attribute. |
|
Define a module event. |
||
Consume functionality from other modules. |
Locate the module via the HttpApplication instance and register a handler for the events it defines. |
Preparing the Example Project
I am going to continue using the SimpleApp project I created in Chapter 2 and modified in Chapter 3. At the end of the previous chapter, I demonstrated how to display details about the current HTTP request using the HttpRequest object. To prepare for this chapter, I have removed the table element that displays information from the Views/Home/Index.cshtml file, as shown in Listing 4-1.
Listing 4-1. The Contents of the Index.cshtml File
@using SimpleApp.Models
@{ Layout = null; }

<!DOCTYPE html>
<html>
<head>
    <meta name="viewport" content="width=device-width" />
    <title>Vote</title>
    <link href="∼/Content/bootstrap.min.css" rel="stylesheet" />
    <link href="∼/Content/bootstrap-theme.min.css" rel="stylesheet" />
</head>
<body class="container">
    <div class="panel panel-primary">
        @if (ViewBag.SelectedColor == null) {
            <h4 class="panel-heading">Vote for your favorite color</h4>
        } else {
            <h4 class="panel-heading">Change your vote from @ViewBag.SelectedColor</h4>
        }

        <div class="panel-body">

            @using (Html.BeginForm()) {
                @Html.DropDownList("color",
                        new SelectList(Enum.GetValues(typeof(Color))), "Choose a Color",
                            new { @class = "form-control" })
                <div>
                    <button class="btn btn-primary center-block"
                            type="submit">
                        Vote
                    </button>
                </div>
            }

        </div>
    </div>

    <div class="panel panel-primary">
        <h5 class="panel-heading">Results</h5>
        <table class="table table-condensed table-striped">
            @foreach (Color c in Enum.GetValues(typeof(Color))) {
                <tr><td>@c</td><td>@Votes.GetVotes(c)</td></tr>
            }
        </table>
    </div>

</body>
</html>
The example application contains some other remnants from the previous chapter, such as the global application class generating timestamps in response to application life-cycle notifications and request life-cycle events, but I am going to ignore those for the moment. Figure 4-1 shows how the browser displays the view rendered by the example application.
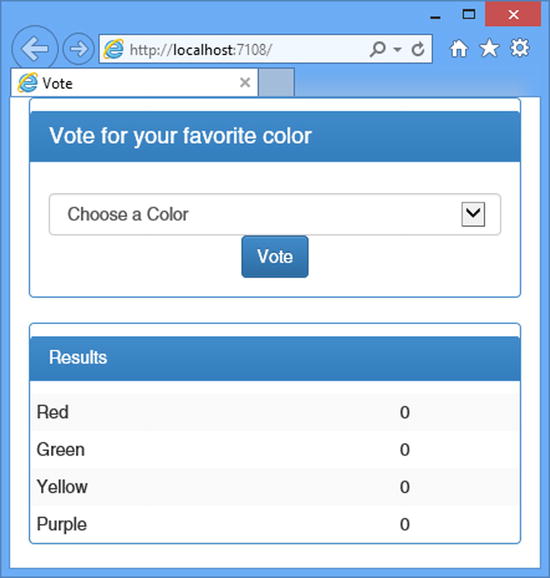
Figure 4-1. The example application
ASP.NET Modules
In this section, I introduce you to the interface that defines modules, show you how to create your own module, and explain the process for registering modules with the ASP.NET platform. Table 4-2 puts modules in context.
Table 4-2. Putting Modules in Context
Question |
Answer |
|---|---|
What is it? |
Modules are classes that handle life-cycle events to monitor or manipulate requests or responses. Modules can also provide services to handlers, which I describe in Chapter 5. |
Why should I care? |
Modules are one of the easiest ways to take control of the ASP.NET request handling process, which allows you to customize the way that ASP.NET works or provide custom services to your MVC framework applications. |
How is it used by the MVC framework? |
The MVC framework includes a module that prevents requests for view files. In addition, MVC relies on several ASP.NET platform services, which are delivered using modules and which are described in Part 3. |
Creating a Module
Modules are classes that implement the System.Web.IHttpModule interface. The interface defines the two methods described in Table 4-3. I am going to begin by creating a simple module and showing you how to use it in an MVC framework application.
Table 4-3. The Methods Defined by the IHttpModule Interface
Name |
Description |
|---|---|
This method is called when the module class is instantiated and is passed an HttpApplication object, which is used to register handler methods for the request life-cycle events and to initialize any resources that are required. |
|
This method is called when the request processing has finished. Use this method to release any resources that require explicit management. |
I started by creating a folder called Infrastructure, which is where I like to put supporting classes in an MVC framework project. I added a class file called TimerModule.cs to the new folder and used it to define the module shown in Listing 4-2.
Listing 4-2. The Contents of the TimerModule.cs File
using System;
using System.Diagnostics;
using System.Web;

namespace SimpleApp.Infrastructure {

    public class TimerModule : IHttpModule {
        private Stopwatch timer;

        public void Init(HttpApplication app) {
            app.BeginRequest += HandleEvent;
            app.EndRequest += HandleEvent;
        }

        private void HandleEvent(object src, EventArgs args) {
            HttpContext ctx = HttpContext.Current;
            if (ctx.CurrentNotification == RequestNotification.BeginRequest) {
                timer = Stopwatch.StartNew();
            } else {
                ctx.Response.Write(string.Format(
                    "<div class='alert alert-success'>Elapsed: {0:F5} seconds</div>",
                     ((float) timer.ElapsedTicks) / Stopwatch.Frequency));
            }
        }

        public void Dispose() {
            // do nothing - no resources to release
        }
    }
}
![]() Tip Be careful if you use Visual Studio to implement the interface in a module class (by right-clicking the interface name on the class definition and selecting Implement Interface from the pop-up menu). Visual Studio will add method implementations that throw a NotImplementedException, and a common mistake is to forget to remove the exception from the Dispose method. The ASP.NET platform will invoke the Dispose method even if you don’t have any resource to release. Remove the throw statement from the method body and replace it with a comment, as shown in Listing 4-2.
Tip Be careful if you use Visual Studio to implement the interface in a module class (by right-clicking the interface name on the class definition and selecting Implement Interface from the pop-up menu). Visual Studio will add method implementations that throw a NotImplementedException, and a common mistake is to forget to remove the exception from the Dispose method. The ASP.NET platform will invoke the Dispose method even if you don’t have any resource to release. Remove the throw statement from the method body and replace it with a comment, as shown in Listing 4-2.
This module uses the high-resolution Stopwatch timer class in the System.Diagnostics namespace to measure the elapsed time between the BeginRequest and EndRequest life-cycle events. Since this is the first module I have demonstrated, I will walk through the way it works in detail.
![]() Tip The Stopwatch class expresses elapsed time in ticks, which are based on the underlying timing mechanism available to the .NET Framework on the machine on which the code is executing. I have to use the static Frequency property when I display the result, which tells me how many ticks the timer makes per second.
Tip The Stopwatch class expresses elapsed time in ticks, which are based on the underlying timing mechanism available to the .NET Framework on the machine on which the code is executing. I have to use the static Frequency property when I display the result, which tells me how many ticks the timer makes per second.
Modules are instantiated when the ASP.NET framework creates an instance of the global application class. The module Init method is invoked so that the module can prepare itself to handle requests, which usually means registering event handlers with the HttpApplication object that is passed as the method’s argument. In the TimerModule, I use the Init method to register the HandleEvent method as a handler for the BeginRequest and EndRequest events, like this:
...
public void Init(HttpApplication app) {
    app.BeginRequest += HandleEvent;
    app.EndRequest += HandleEvent;
}
...
![]() Caution As I explained in Chapter 3, the ASP.NET framework creates multiple instances of the global application class, some of which will exist at the same time so that HTTP requests can be processed concurrently. Each global application class instance is given its own set of module objects, which means you must write your module code such that multiple instances can exist simultaneously in harmony and that each module can handle multiple requests sequentially.
Caution As I explained in Chapter 3, the ASP.NET framework creates multiple instances of the global application class, some of which will exist at the same time so that HTTP requests can be processed concurrently. Each global application class instance is given its own set of module objects, which means you must write your module code such that multiple instances can exist simultaneously in harmony and that each module can handle multiple requests sequentially.
The Init method is called only when a module object is instantiated, which means you must use the Init method only to perform one-off configuration tasks such as setting up event handlers. You must not perform configuration tasks that are required to process individual requests, which is why I don’t instantiate the timer object in the Init method of this module.
Handling the BeginRequest Event
The BeginEvent life-cycle event is my cue to start the timer. I use the same method to handle both of the events I am interested in, which means I have to use the HttpContext.CurrentNotification property, which I described in Chapter 3, to work out which event I have received, as follows:
...
private void HandleEvent(object src, EventArgs args) {
    HttpContext ctx = HttpContext.Current;
    if (ctx.CurrentNotification == RequestNotification.BeginRequest) {
        timer = Stopwatch.StartNew();
    } else {
        ctx.Response.Write(string.Format(
            "<div class='alert alert-success'>Elapsed: {0:F5} seconds</div>",
            ((float) timer.ElapsedTicks) / Stopwatch.Frequency));
    }
}
...
The src object passed to event handlers for life-cycle events is an instance of the HttpApplication class, which you can use to get an HttpContext object, but I find it easier to use the static HttpContext.Current property. I instantiate and start a new timer if the CurrentNotification property indicates that I have received the BeginRequest event.
![]() Tip This is a per-request configuration task, which means it should not be performed in the Init method, as described in the previous section. The ASP.NET framework is free to create and destroy instances of modules as it sees fit, and there is no way of telling how many requests an instance of a module class will be used to service (although you can be sure that each instance will be used to service only one request at a time).
Tip This is a per-request configuration task, which means it should not be performed in the Init method, as described in the previous section. The ASP.NET framework is free to create and destroy instances of modules as it sees fit, and there is no way of telling how many requests an instance of a module class will be used to service (although you can be sure that each instance will be used to service only one request at a time).
Receiving the EndRequest event tells me that the request has been marshaled through the request life cycle and the MVC framework has generated a response that will be sent to the browser. The response has not been sent when the EndRequest event is triggered, which allows me to manipulate it through the HttpResponse context object. In this example, I append a message to the end of the response that reports the elapsed time between the BeginRequest and EndRequest, as follows:
...
private void HandleEvent(object src, EventArgs args) {
    HttpContext ctx = HttpContext.Current;
    if (ctx.CurrentNotification == RequestNotification.BeginRequest) {
        timer = Stopwatch.StartNew();
    } else {
        ctx.Response.Write(string.Format(
            "<div class='alert alert-success'>Elapsed: {0:F5} seconds</div>",
            ((float) timer.ElapsedTicks) / Stopwatch.Frequency));
    }
}
...
I use the HttpResponse.Write method to add a string to the response. I format the string as HTML and use the Bootstrap alert and alert-success CSS classes to style the content as an inline alert box.
Unlike the MVC framework, the ASP.NET platform doesn’t discover classes dynamically, which means you have to explicitly register a module with the ASP.NET framework before it takes effect. Modules are registered in the Web.config file, as shown in Listing 4-3.
Listing 4-3. Registering a Module in the Web.config File
<?xml version="1.0" encoding="utf-8"?>
<configuration>
  <appSettings>
    <add key="webpages:Version" value="3.0.0.0" />
    <add key="webpages:Enabled" value="false" />
     <add key="ClientValidationEnabled" value="true" />
    <add key="UnobtrusiveJavaScriptEnabled" value="true" />
  </appSettings>
  <system.web>
    <compilation debug="true" targetFramework="4.5.1" />
    <httpRuntime targetFramework="4.5.1" />
  </system.web>
  <system.webServer>
    <modules>
      <add name="Timer" type="SimpleApp.Infrastructure.TimerModule"/>
    </modules>
  </system.webServer>
</configuration>
I describe the Web.config file in detail in Chapter 9, but for the moment it is enough to know that modules are registered in the system.webServer/modules section and that each module is defined using the add element. The attributes for the add element are name, which is a unique name that describes the module, and type, which is the fully qualified name of the module class.
All that remains is to start the application and see the effect the module has. Each time the ASP.NET framework receives an HTTP request, the TimerModule class will be sent the BeginRequest event, which starts the clock. After the request has proceeded through its life cycle, the module is sent the EndRequest event, which stops the clock and adds the time summary to the response, as illustrated by Figure 4-2.
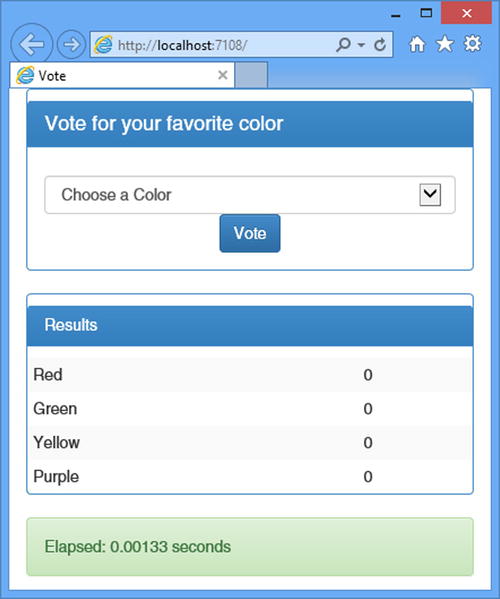
Figure 4-2. The effect of the module
If you look at the HTML that has been sent to the browser (by right-clicking in the browser window and selecting View Source from the pop-up menu), you will see how the message from the module has been added to the response:
...
    <div class="panel panel-primary">
        <h5 class="panel-heading">Results</h5>
        <table class="table table-condensed table-striped">
                <tr><td>Red</td><td>0</td></tr>
                <tr><td>Green</td><td>0</td></tr>
                <tr><td>Yellow</td><td>0</td></tr>
                <tr><td>Purple</td><td>0</td></tr>
        </table>
    </div>
</body>
</html>
<div class='alert alert-success'>Elapsed: 0.00133 seconds</div>
Notice that the div element that the module adds to the response appears after the closing html tag. This happens because the ASP.NET framework doesn’t care about the kind of data that an HTTP response contains and so there is no special support for ensuring that HTML is properly formatted. The main part of the response is generated by the handler, which I describe in Chapter 5, and additions to the response by modules either precede or follow the content that the handler generates.
![]() Tip Browsers are incredibly tolerant to badly formatted HTML because there is so much of it on the Internet. It is bad practice to rely on a browser being able to figure out how to handle bad data, but I admit that I often do just that when I am using modules to debug request processing or performance problems.
Tip Browsers are incredibly tolerant to badly formatted HTML because there is so much of it on the Internet. It is bad practice to rely on a browser being able to figure out how to handle bad data, but I admit that I often do just that when I am using modules to debug request processing or performance problems.
Creating Self-registering Modules
One of the benefits modules confer is that they can be reused across multiple projects. A common approach to module development is to define them in a separate project from the rest of the web application so that the output from the project can be used multiple times.
Creating a module project is a simple task, except for the process of registering the modules. You can define a fragment of XML that has to be inserted into the Web.config file, but this puts you at the mercy of the developer or administrator who sets up the web application—something that I generally like to avoid, especially when I have several modules that work together to deliver functionality. A better approach is to create modules that register themselves automatically using an assembly attribute called PreApplicationStartMethod. This attribute allows an assembly to define a method that is executed before the Application_Start method in the global application class is invoked, which is exactly when modules need to be registered. In the sections that follow, I’ll walk through the process of using the PreApplicationStartMethod, which is summarized by Table 4-4.
Table 4-4. Putting the PreApplicationStartMethod Attribute in Context
Question |
Answer |
|---|---|
What is it? |
The PreApplicationStartMethod attribute allows assemblies to specify a method that will be executed when the web application is started, prior to the global application class Application_Start method being invoked. |
Why should I care? |
This attribute makes it easy to perform one-off configuration tasks in class library projects so that additions to the Web.config file are not required. |
How is it used by the MVC framework? |
The MVC framework uses the attribute to configure a range of features, including registering HTML helper methods and setting up authentication providers for Facebook and other services. (See Part 3 for details of ASP.NET authentication.) |
Creating the Project
I am going to create a second project called CommonModules within the Visual Studio solution that contains the SimpleApp project. This is not a requirement of using the PreApplicationStartMethod attribute, but it makes it easier for me to demonstrate the technique and use the output from the CommonModules project as a dependency of the SimpleApp project.
Right-click the Solution item in the Visual Studio Solution Explorer and select Add ![]() New Project from the pop-up menu. Visual Studio will display the Add New Project dialog window; select the Installed
New Project from the pop-up menu. Visual Studio will display the Add New Project dialog window; select the Installed ![]() Visual C#
Visual C# ![]() Class Library project type, set the name to CommonModules, and click the OK button to create the project.
Class Library project type, set the name to CommonModules, and click the OK button to create the project.
I need to add the System.Web assembly to the CommonModules project so that I have access to the IHttpModule interface and the context objects. Click the CommonModules project in the Solution Explorer and select Add Reference from the Visual Studio Project menu. Locate the System.Web assembly (you’ll find it in the Assemblies ![]() Framework section) and check the box next it, as shown in Figure 4-3. Click the OK button to dismiss the dialog box and add the assembly reference to the project.
Framework section) and check the box next it, as shown in Figure 4-3. Click the OK button to dismiss the dialog box and add the assembly reference to the project.

Figure 4-3. Adding the System.Web assembly to the CommonModules project
I need to add a reference from the SimpleApp project to the CommonModules project so that the module I create will be available in the web application. Select the SimpleApp project in the Solution Explorer and select Add Reference from the Project menu. Click the Solution section and check the box next to the CommonModules entry, as shown in Figure 4-4. Click the OK button to dismiss the dialog box and add the assembly reference to the project.
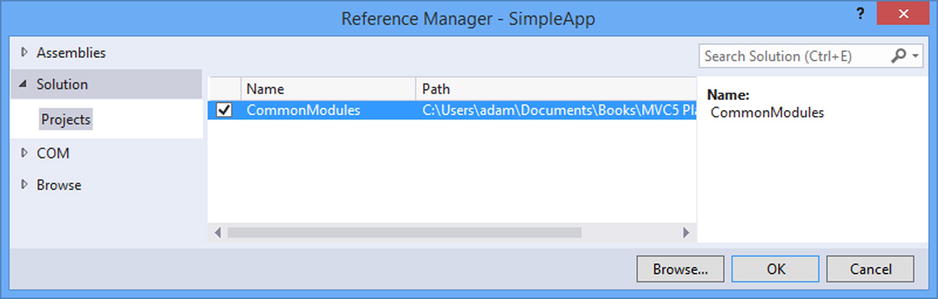
Figure 4-4. Adding a reference to the CommonModules project
Now that there are two projects in the solution, I need to tell Visual Studio which one I want to start when I run the debugger. Right-click the SimpleApp project in the Solution Explorer and select Set As StartUp Project from the pop-up menu.
Creating the Module
Visual Studio adds a class file called Class1.cs to the new project. Rename this file to InfoModule.cs and edit the contents to match Listing 4-4.
Listing 4-4. The Contents of the InfoModule.cs File
using System.Web;

namespace CommonModules {

    public class InfoModule : IHttpModule {

        public void Init(HttpApplication app) {
            app.EndRequest += (src, args) => {
                HttpContext ctx = HttpContext.Current;
                ctx.Response.Write(string.Format(
                    "<div class='alert alert-success'>URL: {0} Status: {1}</div>",
                    ctx.Request.RawUrl, ctx.Response.StatusCode));
            };
        }

        public void Dispose() {
            // do nothing - no resources to release
        }
    }
}
This module handles the EndRequest event and appends a fragment of HTML to the response, which details the URL that was requested and the status code sent to the browser. I have handled the event using a lambda expression (just for variety), but the overall structure/nature of the module is similar to the TimerModule module I created in the previous section.
Creating the Registration Class
To automatically register a module, I need to create a method that calls the static HttpApplication.RegisterModule method and then apply the PreApplicationStartMethod attribute to call this method when the application starts. I like to define a separate class to register the module because it means I can register all of the modules in the project in a single place. I added a class file called ModuleRegistration.cs to the CommonModules project. Listing 4-5 shows the contents of the new file.
Listing 4-5. The Contents of the ModuleRegistration.cs File
using System.Web;

[assembly: PreApplicationStartMethod(typeof(CommonModules.ModuleRegistration),
    "RegisterModule")]

namespace CommonModules {
    public class ModuleRegistration {

        public static void RegisterModule() {
            HttpApplication.RegisterModule(typeof(CommonModules.InfoModule));
        }
    }
}
The arguments for the PreApplicationStartMethod are the type of the class that contains the method that will be executed when the application starts and the name of that method, expressed as a string. I have applied the attribute in the file that contains the class and the method, as follows:
...
[assembly: PreApplicationStartMethod(typeof(CommonModules.ModuleRegistration),
    "RegisterModule")]
...
The method must be public and static and cannot take any arguments. You are free to put any statements in the method, but it is good practice to only perform tasks that configure the code in the project to work with the web application, such as registering modules.
You can test the effect of the PreApplicationStartMethod attribute by selecting Start Debugging from the Visual Studio Debug menu. Visual Studio will build both projects, start the application, and load the module from the CommonModules project. You can see the message that the module adds to the response in Figure 4-5.
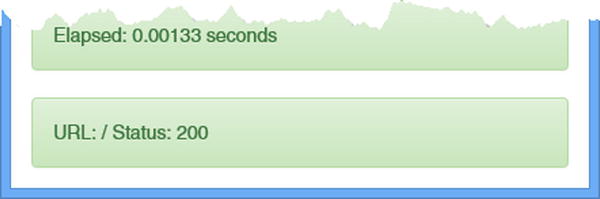
Figure 4-5. The output from the InfoModule
My timer module is a nice demonstration of the way that modules can participate in the request processing life cycle and—optionally—manipulate the response sent to the client, but it has one problem: The timing information that it generates is locked away, which will force me to duplicate functionality if I need to do something similar in another module. Not only does this create a code maintenance concern—an anathema in MVC applications—but it also adds to the amount of time taken to process each request, leading to inconsistencies in the timing information within different modules.
What I need is the ability to share the timing information with other modules so that I can build on my core functionality, which I can do by creating a module event. Module events allow modules to coordinate their activities and share data. Table 4-5 puts module events in context.
Table 4-5. Putting Module Events in Context
I am going to create a new module that keeps track of the total amount of time taken to process requests. Obviously, this requires me to measure the time taken for individual requests, which would duplicate the functionality of the TimerModule that I created at the start of the chapter.
Rather than duplicate the TimerModule functionality, I am going to extend it by adding an event that is triggered when timing information is available. To this end, you can see the changes I have made to the TimerModule.cs file in Listing 4-6.
Listing 4-6. Adding an Event to the TimerModule.cs File
using System;
using System.Diagnostics;
using System.Web;

namespace SimpleApp.Infrastructure {

    public class RequestTimerEventArgs : EventArgs {
        public float Duration { get; set; }
    }

    public class TimerModule : IHttpModule {
        public event EventHandler<RequestTimerEventArgs> RequestTimed;
        private Stopwatch timer;

        public void Init(HttpApplication app) {
            app.BeginRequest += HandleEvent;
            app.EndRequest += HandleEvent;
        }

        private void HandleEvent(object src, EventArgs args) {
            HttpContext ctx = HttpContext.Current;
            if (ctx.CurrentNotification == RequestNotification.BeginRequest) {
                timer = Stopwatch.StartNew();
            } else {
                float duration = ((float) timer.ElapsedTicks) / Stopwatch.Frequency;
                ctx.Response.Write(string.Format(
                    "<div class='alert alert-success'>Elapsed: {0:F5} seconds</div>",
                    duration));
                if (RequestTimed != null) {
                    RequestTimed(this,
                        new RequestTimerEventArgs { Duration = duration });
                }
            }
        }

        public void Dispose() {
            // do nothing - no resources to release
        }
    }
}
I have defined an event called RequestTimed that sends a RequestTimerEventArgsobject to its handlers. This object defines a float value that provides access to the time taken for the request to be processed.
My next step is to create a module that will handle the event from TimerModule and gather details of the overall amount of time spent handling requests. I could create this module in either of the projects in the solution, but it makes sense to keep modules that depend on one another together, so I added a class file called TotalTimeModule.cs to the Infrastructure folder of the SimpleApp project. Listing 4-7 shows the module I defined in the new file.
Listing 4-7. The Contents of the TotalTimeModule.cs File
using System.IO;
using System.Web;
using System.Web.UI;

namespace SimpleApp.Infrastructure {
    public class TotalTimeModule : IHttpModule {
        private static float totalTime = 0;
        private static int requestCount = 0;

        public void Init(HttpApplication app) {
            IHttpModule module = app.Modules["Timer"];
            if (module != null && module is TimerModule) {
                TimerModule timerModule = (TimerModule)module;
                timerModule.RequestTimed += (src, args) => {
                    totalTime += args.Duration;
                    requestCount++;
                };
            }

            app.EndRequest += (src, args) => {
                app.Context.Response.Write(CreateSummary());
            };
        }

        private string CreateSummary() {
            StringWriter stringWriter = new StringWriter();
            HtmlTextWriter htmlWriter = new HtmlTextWriter(stringWriter);
            htmlWriter.AddAttribute(HtmlTextWriterAttribute.Class,
                "table table-bordered");
            htmlWriter.RenderBeginTag(HtmlTextWriterTag.Table);
                htmlWriter.AddAttribute(HtmlTextWriterAttribute.Class, "success");
                htmlWriter.RenderBeginTag(HtmlTextWriterTag.Tr);
                    htmlWriter.RenderBeginTag(HtmlTextWriterTag.Td);
                        htmlWriter.Write("Requests");
                        htmlWriter.RenderEndTag();
                        htmlWriter.RenderBeginTag(HtmlTextWriterTag.Td);
                        htmlWriter.Write(requestCount);
                    htmlWriter.RenderEndTag();
                htmlWriter.RenderEndTag();
                    htmlWriter.AddAttribute(HtmlTextWriterAttribute.Class, "success");
                    htmlWriter.RenderBeginTag(HtmlTextWriterTag.Tr);
                        htmlWriter.RenderBeginTag(HtmlTextWriterTag.Td);
                        htmlWriter.Write("Total Time");
                        htmlWriter.RenderEndTag();
                        htmlWriter.RenderBeginTag(HtmlTextWriterTag.Td);
                        htmlWriter.Write("{0:F5} seconds", totalTime);
                    htmlWriter.RenderEndTag();
                htmlWriter.RenderEndTag();
            htmlWriter.RenderEndTag();
            return stringWriter.ToString();
        }

        public void Dispose() {
            // do nothing
        }
    }
}
The module looks more complicated than it really is because of the way I have chosen to create the HTML fragment that is inserted into the response to the browser. I’ll explain how this works in the “Generating HTML” section later in the chapter. The most important part of this example is the technique for setting up the handler for the event defined by the TimerModule class.
The HttpApplication class defines a property called Modules that returns a collection of modules objects, indexed by the name with which they were registered, either in the Web.config file or using the PreApplicationStartMethod attribute. This allows me to locate the TimerModule, which was registered using the name Timer in Listing 4-3, like this:
...
IHttpModule module = app.Modules["Timer"];
if (module != null && module is TimerModule) {
    TimerModule timerModule = (TimerModule)module;
    timerModule.RequestTimed += (src, args) => {
        totalTime += args.Duration;
        requestCount++;
    };
}
...
![]() Tip The collection returned by the Modules property is also indexed by position so that, for example, Modules[0] and Modules[1] return the first two modules that were registered.
Tip The collection returned by the Modules property is also indexed by position so that, for example, Modules[0] and Modules[1] return the first two modules that were registered.
Once I have located the module I want, I cast the object and add a handler to the event that I defined in the previous section. All modules require registration, and in Listing 4-8 you can see the addition I made to the Web.config file to register the TotalTimeModule class.
Listing 4-8. Registering the Module in the Web.config File
<?xml version="1.0" encoding="utf-8"?>
<configuration>
  <appSettings>
    <add key="webpages:Version" value="3.0.0.0" />
    <add key="webpages:Enabled" value="false" />
     <add key="ClientValidationEnabled" value="true" />
    <add key="UnobtrusiveJavaScriptEnabled" value="true" />
  </appSettings>
  <system.web>
    <compilation debug="true" targetFramework="4.5.1" />
    <httpRuntime targetFramework="4.5.1" />
  </system.web>
  <system.webServer>
    <modules>
      <add name="Timer" type="SimpleApp.Infrastructure.TimerModule"/>
      <add name="Total" type="SimpleApp.Infrastructure.TotalTimeModule"/>
    </modules>
  </system.webServer>
</configuration>
![]() Tip All of the registered module classes are instantiated before their Init methods are invoked. The order in which modules are registered determines the order in which life-cycle requests are sent to modules but doesn’t have an impact on locating other modules through the HttpApplication.Modules property.
Tip All of the registered module classes are instantiated before their Init methods are invoked. The order in which modules are registered determines the order in which life-cycle requests are sent to modules but doesn’t have an impact on locating other modules through the HttpApplication.Modules property.
You can see the new module consuming the event from the Timer module by starting the application, as illustrated by Figure 4-6.
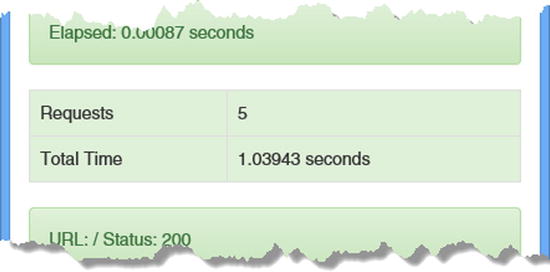
Figure 4-6. Generating diagnostic data based on an event in another module
The modules I created in this chapter add some HTML content to the response sent to the browser. This isn’t the only thing you can do with modules, of course, and you’ll get a sense of what’s possible when I describe the built-in modules later in this chapter and show you how modules can provide custom services to handlers in Chapter 5—but I find adding diagnostic fragments to be helpful in solving complex problems.
I used two different techniques for generating the HTML fragments. The first, which I used in the TimerModule class, is to use the standard C# string composition feature, like this:
...
string.Format("<div class='alert alert-success'>Elapsed: {0:F5} seconds</div>",
    duration));
...
This approach is fine for tiny pieces of HTML, but it becomes difficult to manage for anything other than single elements. The problem is that you need to create strings that can be safely processed twice: once by the .NET runtime and once by the browser. Careful attention must be paid to getting the single and double quotes right, escaping dangerous characters, and making sure that the data values with which the HTML string is composed are safe to display.
The other technique I used was to apply the HtmlTextWriter class, which is defined in the System.Web.UI namespace. The namespace contains a lot of Web Forms classes, but the HtmlTextWriter can be used in any ASP.NET application, and it takes a much more structured approach to creating HTML. The result is correctly structured HTML, but the code is more verbose and takes a little time to get used to. Table 4-6 shows the HtmlTextWriter methods that I used in Listing 4-7.
Table 4-6. The HtmlTextWriter Methods Used in the TotalTimeModule
Name |
Description |
|---|---|
AddAttribute(attr, value) |
Sets an attribute that will be applied to the next element that is rendered. The attribute is specified as a value from the HtmlTextWriterAttribute enumeration. |
RenderBeginTag(tag) |
Writes the opening tag of an HTML element specified as a value from the HtmlTextWriterTag enumeration. |
RenderEndTag() |
Writes the ending tag to match the most recently written opening tag. |
Write(content) |
Writes content to the response. There are overloaded versions of this method for strings and the C# primitive types (int, bool, long, and so on). |
Notice that I had to call the AddAttribute method before I called the RenderBeginTag method. The RenderBeginTag method will write out all of the attributes I defined since the last opening tag was written. It is a little odd to define the attributes before specifying the element that they apply to, but it quickly becomes second nature.
The main problem with the HtmlTextWriter class is that you often end up with a mass of method calls that are hard to read. This is why I indented the C# statements in Listing 4-7; I find that organizing the statements to match the structure of the HTML I am generating makes it easier to figure out what is going on.
Understanding the Built-in Modules
The ASP.NET framework contains a number of built-in modules, many of which support the core platform services that I describe in Part 3 of this book. Some of these modules define events that you can handle to get fine-grained information about their activities, although for the most part, you interact with the functionality they provide through the context objects that I described in Chapter 3. In this section, I am going to show you how to enumerate the modules, explain what each of them does, and describe the events that some of them define. To generate the list of modules, I have added a new action method to the Home controller, as shown in Listing 4-9.
Listing 4-9. Adding an Action Method to the HomeController.cs File
using System;
using System.Collections.Generic;
using System.Linq;
using System.Web.Mvc;
using SimpleApp.Models;

namespace SimpleApp.Controllers {
    public class HomeController : Controller {

        public ActionResult Index() {
            return View(GetTimeStamps());
        }

        [HttpPost]
        public ActionResult Index(Color color) {
            Color? oldColor = Session["color"] as Color?;
            if (oldColor != null) {
                Votes.ChangeVote(color, (Color)oldColor);
            } else {
                Votes.RecordVote(color);
            }
            ViewBag.SelectedColor = Session["color"] = color;
            return View(GetTimeStamps());
        }

        public ActionResult Modules() {
            var modules = HttpContext.ApplicationInstance.Modules;
            Tuple<string, string>[] data =
                modules.AllKeys
                    .Select(x => new Tuple<string, string>(
                        x.StartsWith("__Dynamic") ? x.Split('_',',')[3] : x,
                        modules[x].GetType().Name))
                    .OrderBy(x => x.Item1)
                    .ToArray();
            return View(data);
        }

        private List<string> GetTimeStamps() {
            return new List<string> {
                string.Format("App timestamp: {0}",
                    HttpContext.Application["app_timestamp"]),
                string.Format("Request timestamp: {0}", Session["request_timestamp"]),
            };
        }
    }
}
The new action method is called Modules, and it uses LINQto generate an array of Tuple<string, string> objects from the module objects returned by the HttpApplication.Module property. Modules registered using the PreApplicationStartMethod URL are done so using the fully qualified class name prefixed with __Dynamic_, and the LINQ methods locate and reformat the names to make them more readable. The result is an array of tuples that are sorted by name that I pass to the View method, which tells the MVC framework to render the view default associated with the action method.
![]() Tip Notice that to get the HttpApplication object, I have to use the HttpContext convenience property (defined by the Controller base class) to get an HttpContext object and then read the ApplicationInstance property. I described the convenience context objects and the convenience properties available in Chapter 3.
Tip Notice that to get the HttpApplication object, I have to use the HttpContext convenience property (defined by the Controller base class) to get an HttpContext object and then read the ApplicationInstance property. I described the convenience context objects and the convenience properties available in Chapter 3.
To create this view, right-click the Modules action method in the code editor and select Add View from the pop-up menu. Ensure View Name is set to Modules, select Empty (without model) for Template, and uncheck the option boxes. Click Add to create the Views/Home/Modules.cshtml file and add the markup shown in Listing 4-10.
Listing 4-10. The Contents of the Modules.cshtml File
@model Tuple<string, string>[]
@{
    Layout = null;
}

<!DOCTYPE html>

<html>
<head>
    <meta name="viewport" content="width=device-width" />
    <title>Modules</title>
    <link href="∼/Content/bootstrap.min.css" rel="stylesheet" />
    <link href="∼/Content/bootstrap-theme.min.css" rel="stylesheet" />
</head>
<body class="container">
    <table class="table table-bordered table-striped">
        <thead>
            <tr><th>Name</th><th>Type</th></tr>
        </thead>
        <tbody>
            @foreach (Tuple<string, string> x in Model) {
                <tr><td>@x.Item1</td><td>@x.Item2</td></tr>
            }
        </tbody>
    </table>
</body>
</html>
The view consists of a table element that I have styled using Bootstrap and that contains a row for each of the Tuple objects passed from the controller. You can see the list of built-in modules by starting the application and requesting the /Home/Modules URL, as illustrated by Figure 4-7.
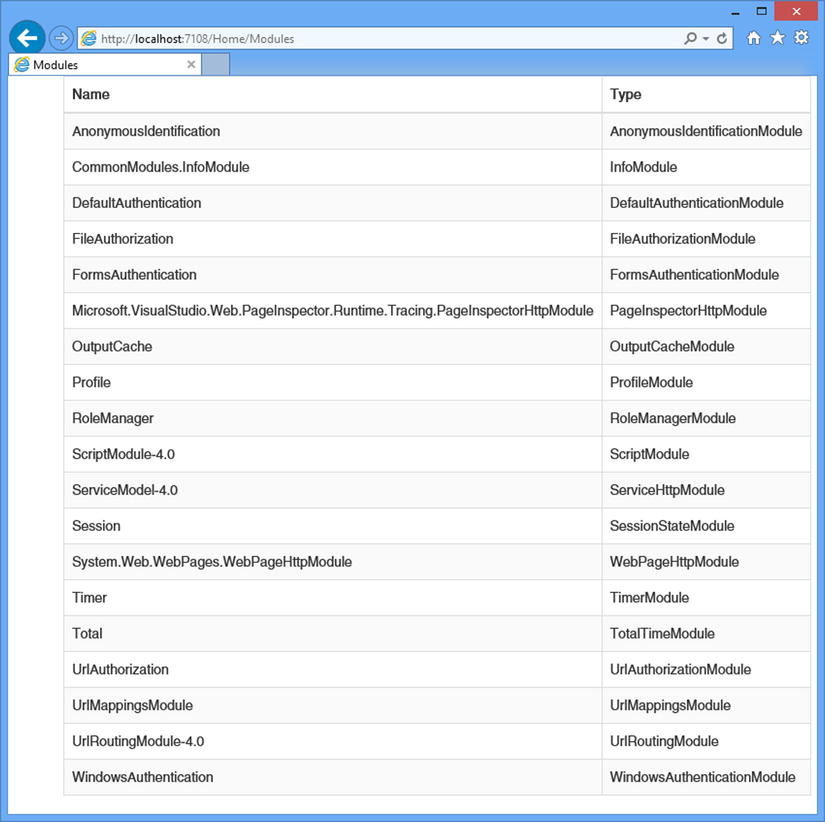
Figure 4-7. Displaying a list of the built-in modules
It can be hard to read the details of the modules from the figure, so I have repeated the information in Table 4-7 and described each module.
Table 4-7. The Modules in an ASP.NET Framework Application
Name |
Type |
|---|---|
AnonymousIdentification |
This module is implemented by the System.Web.Security.AnonymousIdentificationModule class and is responsible for uniquely identifying requests so that features such as user data can be used even when the user has not been authenticated. |
DefaultAuthentication |
This module is implemented by the System.Web.Security.DefaultAuthenticationModule class and is responsible for ensuring that the User property of the HttpContext object is set to an object that implements the IPrincipal interface if this has not been done by one of the other authentication modules. See Part 3 for details of authentication. |
FileAuthorization |
This module is implemented by the System.Web.Security.FileAuthorizationModule class and ensures that the user has access to the file the request relates to when Windows authentication is used. I describe authentication in Part 3, but I don’t describe Windows authentication in this book because it is not widely used. |
FormsAuthentication |
This module is implemented by the System.Web.Security.FormsAuthenticationModule class and sets the value of the HttpContext.User property when forms authentication is used. I explain authentication in Part 3. |
CommonModules.InfoModule |
This is one of the example modules I created earlier in the chapter. |
OutputCache |
This module is implemented by the System.Web.Caching.OutputCacheModule class and is responsible for caching responses sent to the browser. I explain how the ASP.NET framework caching features work in Chapters 11 and 12. |
PageInspectorHttpModule |
This module supports the Visual Studio Page Inspector feature, which allows for HTML and CSS content to be debugged within Visual Studio. I don’t describe this feature and find that the developer tools in modern web browsers are more useful. |
Profile |
This module is implemented by the System.Web.Profile.ProfileModule class and is responsible for associating user profile data with a request. See Part 3 for details of authentication. (This module supports the obsolete Membership API.) |
RoleManager |
This module is implemented by the System.Web.Security.RoleManagerModule class and is responsible for assigning details of the roles that a user has been assigned to a request. (This module supports the obsolete Membership API.) |
ScriptModule-4.0 |
This module is implemented by the System.Web.Handlers.ScriptModule class and is responsible for supporting Ajax requests. This module has been outmoded by support for Ajax requests in the MVC framework and, more recently the Web API. |
ServiceModel-4.0 |
This module is implemented by the System.ServiceModel.Activation.ServiceHttpModule class. This module is used to activate ASP.NET web services, which have been outmoded by the MVC framework and the Web API. |
Session |
This module is implemented by the System.Web.SessionState.SessionStateModule class and is responsible for associating session data with a request. See Chapter 10 for details of using session data. |
Timer |
This is the TimerModule class that I created earlier in the chapter. |
Total |
This is the TotalTimeModule class that I created earlier in the chapter. |
UrlAuthorization |
This module is implemented by the System.Web.Security.UrlAuthorizationModule class and ensures that users are authorized to access the URLs they request. |
UrlMappingsModule |
This module is implemented by the System.Web.UrlMappingsModule class and is responsible for implementing the URL Mappings feature, which is not used in MVC framework applications. |
UrlRoutingModule-4.0 |
This module is implemented by the System.Web.Routing.UrlRoutingModule class and is responsible for implementing the URL routing feature. |
WebPageHttpModule |
This module intercepts requests for MVC framework view files and displays an error when they are asked for (for example with a URL for /Views/Home/Index.cshtml). Views can be rendered only as a result of a URL that targets an action method in a controller. |
WindowsAuthentication |
This module is implemented by the System.Web.Security.WindowsAuthenticationModule class and is responsible for setting the value of the HttpContext.User property when Windows authentication is used. I don’t describe Windows authentication in this book because it is no longer widely used. |
![]() Tip Some of the modules that are described in Table 4-7 are part of the membership system, which provides authentication and user management features. This has been replaced with the Identity API, which I describe in Part 3.
Tip Some of the modules that are described in Table 4-7 are part of the membership system, which provides authentication and user management features. This has been replaced with the Identity API, which I describe in Part 3.
Some of the built-in modules define events that can be handled to receive notifications when important changes occur. I have listed these modules and their events in Table 4-8.
Table 4-8. The Built-in Modules That Define Events
Module |
Description |
|---|---|
AnonymousIdentification |
Defines the event Creating, which provides an opportunity to override the identification. The Creating event sends an instance of the AnonymousIdentificationEventArgs class to event handlers. |
DefaultAuthentication |
This module defines the Authenticate event that is triggered when the module sets the User property and that sends an instance of the DefaultAuthenticationEventArgs class to event handlers. |
FormsAuthentication |
This module defines the Authenticate event that lets you override the value of the User property. Event handlers are sent a FormsAuthenticationEventArgs object. |
Profile |
The MigrateAnonymous event is triggered when an anonymous user logs in and sends a ProfileMigrateEventArgs object to handlers. The Personalize event is triggered when the profile data is being associated with the request and provides an opportunity to override the data that is used (handlers are sent a ProfileEventArgs object). |
RoleManager |
This module defines the GetRoles event that allows you to override the role information associated with a request. Event handlers are sent a RoleManagerEventArgs object. |
Session |
The Start event is triggered when a new session is started, and the End event is triggered when an event expires. Both events sent standard EventArgs objects to handlers. |
The most widely used events are those defined by the Session module because they allow applications to associate default state data with sessions when they are created. I explain how ASP.NET sessions and state data work in Chapter 10.
Summary
In this chapter, I described the role that modules play in ASP.NET request handling. I showed you how to create modules by implementing the IHttpModule interface and how to register those modules with ASP.NET, both through the Web.config file and by using the PreApplicationStartMethod assembly attribute. I showed you how modules can provide services by defining events and demonstrated the process for locating another module and creating an event handler. I completed the chapter by describing the built-in modules, many of which provide services that I describe in Part 3 of this book. In the next chapter, I describe the handler component, which is responsible for generating responses for HTTP requests.