Throughout this book, you’ve seen numerous PowerCLI scripts that can perform complex tasks with a minimal amount of code. Microsoft PowerShell was designed to help system administrators manage their systems more efficiently and easily. VMware PowerCLI extends that ease of management to your VMware infrastructure.
Have you ever had to make a simple change such as updating the network connection for a number of virtual machines? If so, you know it is time consuming and tedious and opens the possibility of misconfiguration if you need to reconfigure a large number of virtual machines. With PowerCLI, such a change can be made on any number of targets with a simple, one-line script.
The following topics are discussed in this chapter:
Learn to install PowerShell and PowerCLI
Understand the basics of using PowerCLI
Manage virtual machines with PowerCLI
Manage ESXi hosts and vCenter Server with PowerCLI
Extend PowerCLI with other tools
PowerCLI is supported on a wide range of Windows versions, from Windows XP to Windows Server 2008 R2. Both 32- and 64-bit versions of Windows are supported. Documentation and the download for PowerCLI can be found at this link: http://www.vmware.com/go/powercli. Prior to your installation, you should ensure that the computer has the following prerequisites:
Microsoft .NET 2.0 SP1
Windows PowerShell 1.0/2.0
For Windows XP, Vista, and Server 2003, you can download PowerShell from Microsoft’s Web site. PowerShell is included with Windows 7 and Server 2008 R2 and is available as an Optional Feature in Server Manager on Windows Server 2008.
The computer running PowerShell also requires HTTPS or HTTP access to your vCenter Server or ESXi. You can test connectivity by accessing the vSphere Managed Object Browser (MOB) on the hosts that you plan to manage with PowerCLI. It is redundant to test connectivity if you’re already using the vSphere client or other tools on your computer to manage your vSphere infrastructure. However, accessing the MOB provides valuable information about the objects in your vCenter datacenter and their properties.
The vSphere MOB is not a well-known tool, but it is available on both your ESXi hosts and vCenter Server. A Web-based tool, the MOB provides a graphical visualization of the vSphere entities that are available in the vSphere application programming interface (API). The MOB can be used to display the properties of a certain object and reveal the relationships to other vSphere API objects. The relationships between objects in the MOB are reflected in the way that the various cmdlets of the PowerCLI interact to create complex actions with relatively short scripts.
To access the MOB, you can use the following steps:
Open a Web browser on your management computer.
Access the MOB by using the hostname or Internet Protocol (IP) address, as shown here:
https://vcenter.mishchenko.net/mob
Enter a username and password. This account should have access to your ESXi host or vCenter Server.
If you have not replaced the self-signed certificate on the host, you can disregard the warning message regarding the Secure Sockets Layer (SSL) certificate and proceed to the MOB.
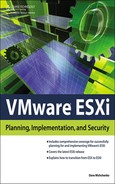
On the start page, find the Content property and then click on the Content link in the Value column. A list of vCenter objects are displayed, as shown in Figure 9.1. If you click on the About property, you are shown a list of properties about the vCenter Server host, including the version and build for vCenter Server. If you navigate back to the Content page, you can find the rootFolder property. Then click on the value for rootFolder, which in Figure 9.1 is group-d1. The page shown for group-d1 contains the objects that are directly related to the vCenter Server. These include alarms that are defined at the vCenter object level, datacenters, and permissions. The objects that are linked to the vCenter object are the same ones that are available in the vSphere client. On the rootFolder page, you can also find a section called Methods. The methods are the functions that can be performed on this object. These include adding hosts, creating clusters, and creating datacenters. If you click the CreateDatacenter link, you are taken to the Invoke Method page for CreateDatacenter method. Required parameters for creating the object are listed, which in the case of a datacenter is only a name. If you enter a Value for the Name parameter and click the Invoke Method link, a new datacenter is created on your vCenter Server host. The Invoke Method page will refresh to display a link to the new datacenter object. You can click that link to display the Object page for the new datacenter and to see the objects that are linked to it. On a datacenter Object page, you can access objects such as the network, datastores, and hosts that are a part of that datacenter.
The vSphere MOB certainly isn’t intended as a day-to-day management tool, but it does provide a valuable source of information on the objects in vCenter and the properties for those objects. For more information on the vSphere API, you can consult the vSphere Web Services software development kit (SDK) documentation at the following link: http://www.vmware.com/support/developer/vc-sdk/.
To install PowerCLI, you can follow these steps after you have installed the prerequisites:
Start the installation by double-clicking on the executable that you have downloaded.
You may receive a warning that the installation requires the component VMware VIX. Click OK to continue.
Click Next on the Welcome screen to proceed with the installation.
Accept the license agreement, then click Next.
Select the installation path for the installation and continue. The default location is
C:Program FilesVMwareInfrastructurevSphere PowerCLI.On the Ready to Install the Program screen, click Install.
Click Finish to complete the installation process.
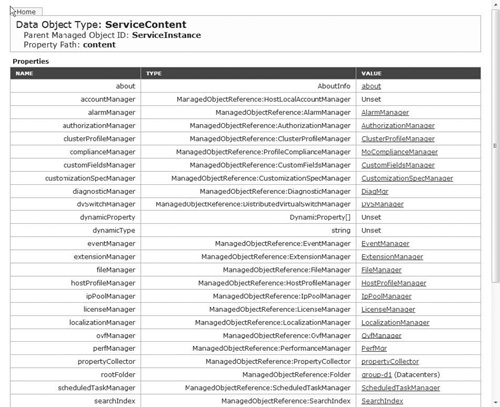
During the installation, the warning dialog box shown in Figure 9.2 may appear. You can click Do This for Me to change the execution policy or click Continue to proceed with the installation without making changes to the execution policy. By default, PowerShell is configured to have a policy of Restricted. With this policy, no scripts can be run and you can use PowerShell only in interactive mode. The other policies are the following:
AllSigned: Only scripts signed by a trusted publisher can be executed.
RemoteSigned: Downloaded scripts must be signed by a trusted publisher before they can be run.
Unrestricted: Any PowerShell script can be executed.
If you select Continue on the execution policy screen during the installation, you need to set the policy in a PowerCLI console window before you can begin using the PowerCLI cmdlets. To start a PowerCLI console window, click Start and select All Programs > VMware > VMware vSphere PowerCLI > VMware vSphere PowerCLI. In the console window that opens, a warning message is displayed about the execution policy. Run the following command to set the policy to RemoteSigned, which is the recommended setting for using PowerCLI. With some version of Windows, you have to start the PowerCLI console window as an administrator to be able to execute the following command:
Set-ExecutionPolicy RemoteSigned

Execution Policy Change
The execution policy helps protect you from scripts that you do not trust.
Changing the execution policy might expose you to the security risks described
    in the about_Execution_Policies help topic. Do you want to change the execution
    policy?
[Y] Yes [N] No [S] Suspend [?] Help (default is "Y"): Y
Tip
If you use the RemoteSigned policy and download a script to use from the Internet, you may receive the error message The File Is Not Signed. On Windows Vista, 7, and 2008, open Windows Explorer, right-click on the file, and click Unblock.
To test your installation, you can issue the Connect-VIServer cmdlet to open a session to vCenter Server or your ESXi host. If you have just set the execution policy, then you need to restart your PowerCLI console session. The Connect-VIServer cmdlet takes the following parameters:
Connect-VIServer -Server <hostname or IP address> -Protocol <HTTPS or HTTP>
   -User <username> -Password <password>
If you are connecting to your vCenter Server host, you can merely use the -Server parameter and your Windows credentials are used for authentication. For an ESXi host, you can use your Windows credentials if the host has been configured for Active Directory integration, but you need to enter that account and password in the login dialog box that comes up. If your workstation does not trust the SSL certificates installed on vCenter Server or your ESXi hosts, then you receive a warning message about this after you log in. When you successfully log in to your host, the hostname, the port, and your username are displayed as follows:
Name                      Port           User
-----                    ------         ------
vcenter.mishchenko.net    443           MISHCHENKODave.Mishch...
To access PowerCLI cmdlets with other tools such as the PowerGUI or the PowerShell shortcut, you run the following cmdlet:
Add-PSSnapin VMware.VimAutomation.Core
You can optionally execute the Initialize-VIToolkitEnvironment.ps1 script, which is found in the PowerCLI installation folder. This script initializes the PowerShell environment to run PowerCLI cmdlets; these cmdlets perform such actions as creating aliases and functions. The Get-VICommand cmdlet is a function defined in this script, which executes the following to return only PowerCLI cmdlets:
Get-Command -PSSnapin VMware.VimAutomation.Core
The aliases Get-ESX, Get-VC, and Get-VIServer are defined in the script to point to the cmdlet Connect-VIServer. You can edit this script to include functions and aliases that you intend to use frequently to manage your ESXi hosts.
In addition to Get-Command, another cmdlet that you will use frequently is Get-Help. This is used to display help for a cmdlet that you specify. To display help for Get-VMHost, you execute the following command:
Get-Help Get-VMHost
You can optionally add the parameters -examples to view samples for the cmdlet; -detailed to see more help information, including parameter descriptions and examples; and -full to see the entire help file for the cmdlet, including technical information about the parameters.
When you first open the PowerCLI window, you may find that it appears to be similar to the standard Windows command prompt. Common commands such as dir and cd can be executed and you can launch other applications from the PowerCLI window. But if you compare the output of the dir command run in a regular command prompt session with the output produced by PowerCLI, the differences become evident. With the output of the command from the regular command prompt, you have plain text output showing a list of files and folders. This list is difficult to manipulate should you want to perform additional tasks on the files and folders that were displayed.
When you execute the PowerShell cmdlet dir, the output is a number of objects that represent folders and directories. These objects have properties that describe the object and methods that define the actions that can be taken on the objects. The cmdlet Get-Member can be used to display the properties and methods for an object. The following command displays the members for the dir command. The output has been truncated and shows some of the actions and properties for file and folder objects. You can use the Get-Member with any of the PowerCLI cmdlets such as Get-VM.
Dir | Get-Member
   TypeName: System.IO.DirectoryInfo
Name               MemberType        Definition
------             ---------------   ---------------
Mode               CodeProperty      System.String Mode{get=Mode;}
Create             Method            System.Void Create(System.Security....
Delete             Method            System.Void Delete(), System.Void D...
CreationTime       Property          System.DateTime CreationTime {get;s ...
Exists             Property          System.Boolean Exists {get;}
Name               Property          System.String Name {get;}
  TypeName: System.IO.FileInfo
Name               MemberType        Definition
-----             --------------     --------------
CopyTo             Method            System.IO.FileInfo CopyTo(string de ...
Create             Method            System.IO.FileStream Create()
DirectoryName      Property          System.String DirectoryName {get;}
Exists             Property          System.Boolean Exists {get;}
Name               Property          System.String Name {get;}
If you execute Get-VM | Get-Member, you’ll find that many of the properties for Get-VM are similar to the properties that you see in the vSphere client. The properties include such items as the virtual machine name, the host, the configured memory, and the power state. With the PowerShell pipeline, you can pass the output of one cmdlet and direct it to be the input for another cmdlet. If you just run Get-VM, you are shown a list of virtual machines, their power state, the number of virtual CPUs, and the configured memory. If you want to start all your virtual machines, you can use Start-VM and use the output of Get-VM as the input list of virtual machines to start. Your command will look like the following:
Get-VM | Start-VM
The preceding command may be of limited use as you may not always want to start all your virtual machines; also, any virtual machines that are already running will cause an error message to be generated by Start-VM. You can use Where to filter the output generated by Get-VM before it is sent to Start-VM. To start all virtual machines that are currently powered down, you can use the following command. The output from Get-VM remains the same and a complete list of virtual machines is sent to the next cmdlet in the pipeline. But in this case, Where filters that list and its output is only a list of virtual machines that are powered off. That is the output that is then sent to Start-VM.
Get-VM | Where { $_.PowerState -eq "PoweredOff" } | Start-VM
With PowerShell, all variables start with a dollar sign ($). As you begin to script with PowerCLI, you’ll find it worthwhile to begin using variables and PowerShell supports a number of data types, including Boolean, char, date, decimal, integer, and object. When you create a variable, you don’t have to assign a data type to it. So your script could set the variable $number = "ABC", which may result in errors later in the script. To ensure that a variable is assigned only a specific type, you can define the data type when you create the variable; for example, the following variable restricts the values that can be assigned to the variable to integers:
[int]$number = 10
You can also create an array by assigning a variable to be equal to a number of objects. If you run $hosts = Get-VMHost, the variable contains a list of your hosts and all the object properties for the host object. To see the complete list of hosts, you can run $hosts. Each item in the array has a unique index number and you could display the fifth item by running $hosts[5].
The preceding example with Get-VM includes the special variable $_. The $_ symbol is an automatic variable that refers to the current object. In that example, the current object is a virtual machine and $_.name signifies the name property for that object. The sample also uses -eq as the comparison operator. When you compare expressions in PowerShell, you can use the operators found in Table 9.1.
Table 9.1. PowerShell Comparison Operators
Operator | Description |
|---|---|
| Equals |
| Not equals |
| Greater than |
| Greater than or equal to |
| Less than |
| Less than or equal to |
| Returns true if the value is a certain data type |
| Returns true if the value is not a certain data type |
| Use with a wildcard for pattern matching |
| Use with a wildcard to find nonmatching expressions |
| Finds a match using regular expressions |
| Returns true when a match is not made |
| Returns true when a collection contains a given item |
| Returns true when a collection does not contain a given item |
Note
The operators in Table 9.1 are not case sensitive. That also applies to object data and all cmdlets. If you need to compare case-sensitive data, you can prefix the comparison operator with c. For example -cmatch and -cgt perform case-sensitive comparisons.
If you’re writing reports with PowerShell, you will find that it is sometimes necessary to format the output from your scripts to produce a report that is more easily read. The default output for Get-VM may truncate the virtual machine name and the default columns displayed may not contain the data you’re looking for. The two common cmdlets that you can use to format output are Format-Table and Format-List. If you run Get-VM | Format-Table –AutoSize, PowerShell calculates the best column width to use based on the data that will be displayed. You can also use the -Property parameter to select which properties of an object to display. The following example displays a list of virtual machines and the hosts they are running on. You can alternatively use -GroupBy to group the output by a parameter, as shown in the second example.
Get-VM | FT -Property Name, Host
Name                                Host
------                              ------
WINDOWS02                           esx01.mishchenko.net
WINDOWS03                           esx01.mishchenko.net
WINDOWS01                           esx01.mishchenko.net
C:> Get-VM | FT Name -GroupBy Host

 Host: esx01.mishchenko.net
Name
------
WINDOWS02
WINDOWS03
WINDOWS01
If the number of columns you wish to display will not fit into a table format, then you can use Format-List. The output generated will be similar to the following example. To display all properties for an object, you can use Format-List *.
Get-VM | FL
Name            : WINDOWS05
PowerState      : PoweredOff
NumCpu          : 1
MemoryMB        : 1024
HardDisks       : {Hard disk 1}
CDDrives        : {CD/DVD Drive 1}
FloppyDrives    : {Floppy drive 1}
NetworkAdapters : {Network adapter 1, Network adapter 2}
UsbDevices      : {}
Host            : esx01.mishchenko.net
Id              : VirtualMachine-vm-27
Notes           :
When you first open a PowerCLI session, your first task is likely to connect to either your vCenter Server host or one of your ESXi hosts. You can check which host you’re connected to by running $DefaultVIServers. You may need to work with multiple vCenter Server hosts or ESXi hosts that are not managed by vCenter Server, in which case you can enable multisession management. The default setting for PowerCLI is to allow only a single connection at one time. If you run Connect-VIServer again in your session, your current session is closed to allow the new session to be opened. To change that behavior, you can run the following command:
Set-PowerCLIConfiguration -DefaultVIServerMode Multiple
Proxy Policy         Default Server
                     Mode
----------------     -------------------
UseSystemProxy       Multiple
Now when you connect to another host both are displayed with $DefaultVIServers. Any commands that you issue are executed on both hosts. The data is returned as one set of objects so the output of Get-VM, for example, displays a single list of virtual machines.
One of the most useful options that you can use when developing scripts is -WhatIf. In the following sample, the script is designed to stop and remove all virtual machines in a test cluster. First, an array is created containing a list of virtual machines in a cluster. Each virtual machine is then powered off if it is running and then deleted from a cluster. The great thing about PowerCLI is that a simple script can perform complex operations on a large number of objects. The danger with PowerCLI is also that you can easily perform powerful commands on the wrong objects. If the wrong cluster name is entered, then the cmdlet that deletes virtual machines could instead be run on production virtual machines. That’s where the -WhatIf option comes in handy. Rather than actually performing the action of the cmdlet, the option generates a message specifying which operation is to be performed, as shown in the following example. After you have confirmed that the script performs as expected, you can remove the -WhatIf option and rerun the script.
$VMs_to_delete = Get-Cluster -Name "Cluster02" | Get-VM
$VMs_to_delete | ForEach {
   If ($_.PowerState -eq "PoweredOn")
      {
      Stop-VM -VM $_.Name -Confirm:$False -WhatIf
      }
   Remove-VM -VM $_.Name -Confirm:$False -WhatIf
   }
What if: Performing operation 'Removing VM from inventory.' on VM 'TEST01'
What if: Performing operation 'Removing VM from inventory.' on VM 'TEST02'
What if: Performing operation "Stop-VM" on Target "VM ' TEST02'".
What if: Performing operation 'Removing VM from inventory.' on VM 'TEST03'
As you start with PowerCLI, you’ll find that you come back again and again to Get-Command to find the cmdlets that you’ll use in your scripts. On its own, Get-Command produces a very long list of cmdlets. To view only the VMware cmdlets that include network in its name, you can run the following command. You can further limit the output by piping the output to Select -First 10 to limit the list to 10 cmdlets.
Get-Command *network* -PSSnapin vmware*
As PowerShell cmdlets are comprised of a verb-noun pair, you can group the cmdlets by either the verb or noun. The following sample groups all VMware cmdlets by verb. Some of the output is truncated so you can also pipe the output to Format-List.
Get-Command -PSSnapin vmware* | Group-Object Verb | FT -AutoSize'
  | Select -First 15
Count    Name        Group
------- ------      -------
  3     Add         {Add-PassthroughDevice, Add-VMHost, Add-VmHostNtpServer}
  2     Apply       {Apply-DrsRecommendation, Apply-VMHostProfile}
  1     Attach      {Attach-Baseline}
  1     Connect     {Connect-VIServer}
  3     Copy        {Copy-DatastoreItem, Copy-HardDisk, Copy-VMGuestFile}
  1     Detach      {Detach-Baseline}
  1     Disconnect  {Disconnect-VIServer}
  1     Dismount    {Dismount-Tools}
  1     Download    {Download-Patch}
  2     Export      {Export-VApp, Export-VMHostProfile}
 75     Get         {Get-Annotation, Get-Baseline, Get-CDDrive, Get-Cluster...}
  2     Import      {Import-VApp, Import-VMHostProfile}
  1     Install     {Install-VMHostPatch}
Tip
VMware provides a poster of Power CLI 4.1 cmdlets, and it is available for download from the following URL: http://communities.vmware.com/servlet/JiveServlet/download/1597600-42488/PowerCLI-Poster-4.1.pdf.
PowerShell Drives, or PSDrives, extend the concept of drive letters into your PowerShell session. At a command prompt, you are used to navigating drives and folders and to mapping a drive to a network resource. With PSDrives, that concept is extended to other elements such as the registry, Active Directory, and the certificate store. To view the list of PSDrives, run the following command:
Get-PSDrive | FT -AutoSize
Name        Used (GB)    Free (GB) Provider           Root                  CurrentLocation
-----       ----------   --------- --------           -----                ---------------------
A                                  FileSystem         A:
Alias                              Alias
C           206.91        258.75   FileSystem         C:                    tmpdelete
cert                               Certificate
D                                  FileSystem         D:
Env                                Environment
Function                           Function
HKCU                               Registry           HKEY_CURRENT_USER
HKLM                         Registry    HKEY_LOCAL_MACHINE
Variable                     Variable
vi                           VimInventory LastConnectedVCenterServer
vis                          VimInventory
vmstore                      VimDatastore LastConnectedVCenterServer
vmstores                     VimDatastore
WSMan                        WSMan
To access the HKEY_CURRENT_USER registry hive, you enter the command cd HKCU:. You can then browse HKCU as if it were a file system and use cmdlets such as cd, dir, mkdir, and copy.
With PowerCLI, two PSDrive providers are included. The Inventory Provider (VimInventory) is designed to provide a raw inventory view of your vCenter environment. You can create a PSDrive on a managed object such as a datacenter and then manipulate objects with commands to move, rename, and delete child objects. Two inventory drives are shown in the preceding output: vi and vis. The vis drive contains the inventory of all vSphere servers to which you are connected in the current PowerCLI session. The vi drive displays the objects for the server to which you most recently connected.
If you want to create a new PSDrive, you can issue the following command. In this example, Surrey is a datacenter and CLUSTER01 is a cluster. If you execute dir within a datacenter, you will see that the child objects are vm, host, and datastore.
New-PSDrive -Name Cluster01 -PSProvider VimInventory'
  -Root "vi:SurreyhostCLUSTER01"
After you have created the PSDrive, you can access it with the command cd Cluster01:. You can view resource pools, hosts, and virtual machines in the cluster. To start a group of virtual machines that start with Windows, you can issue the following command:
dir Windows* | Start-VM
Note
It was noted earlier that the names of PowerShell cmdlets and objects are not case sensitive. One exception to this is object names accessed with the VMware PSDrive providers. When referring to objects such as a host, virtual machine, or folder, you must match the case of the name as it is displayed in the PSDrive.
The second PSDrive provider included with PowerCLI is Datastore (VimDatastore). This provides access to the datastores within your virtual environment. Two datastore PSDrives are created by default when you connect to vCenter Server or your ESXi host. The vmstore drive displays the datastores for the last host that you connected to. The vmstores drive displays all datastores for all the servers that you have connected to within that PowerCLI session. After you have accessed a datastore PSDrive, you can manipulate folders and files in the same way as you would with a regular filesystem. You can copy files and folder between datastores and even to your local drive, as shown in the following example:
vmstore:SurreyNFS1LINUX01> Copy-DatastoreItem LINUX01.vmx c: mpLINUX01.vmx
You’ll note that the Copy-DatastoreItem cmdlet is used instead of copy, which is the alias for Copy-Item. When moving objects between different providers—in this case, the VimDatastore and FileSystem providers—objects may not be compatible between different providers and Copy-Item thus generates an error.
Tip
Access to the VMware PSDrives is available only from within the PowerCLI session. When a session is started, the current provider is the Microsoft FileSystem provider. If you issue a command such as notepad script.ps1, the file is opened in Notepad, as the application is able to access the absolute path to the script file. If you execute the same command when accessing a folder within vmstore:, Notepad is able to access the file that you have referenced.
This section of the chapter deals with some of the aspects of managing virtual machines, including virtual machine creation and reporting. You have already seen a number of examples using Get-VM. The following list displays a number of cmdlets that are used to manage virtual machines:
Get-NetworkAdapter         New-OSCustomizationSpec   Set-Template

Get-VM                     New-Snapshot              Set-VM

Get-VMGuest                New-Template              Set-VMStartPolicy

Mount-Tools                New-VM                    Start-VM

Move-VM                    Remove-Snapshot           Stop-VM

New-HardDisk               Set-CDDrive               Suspend-VM

New-NetworkAdapter         Set-Network Adapter       Update-Tools
For an updated list of all cmdlets, you can check the Online Cmdlet Reference, which is found at the following URL: http://www.vmware.com/support/developer/PowerCLI/PowerCLI41/html/index.html.
Creating new virtual machines is done with the cmdlet New-VM. When you look at the options for this command, the list is somewhat overwhelming as the cmdlet may be used to create a new virtual machine, to clone an existing virtual machine, to create a virtual machine from a template, or to register a virtual machine. You can organize the parameters with the cmdlet Get-Parameter, which is available for download from http://halr9000.com/article/507. Running the following command groups the parameters for each of the previously mentioned functions for New-VM. You can use Get-Parameter to produce an easy-to-read list of options for any PowerCLI cmdlet.
.Get-Parameter.ps1 New-VM default | FT -GroupBy ParameterSet
Creating a single virtual machine with New-VM may not be a significant time saver, but by using New-VM with Import-CSV, it’s possible to create a countless number of virtual machines with minimal effort. Import-CSV is used to read a comma-delimited file into a variable. In the following sample file, the first row defines the parameters that are used within the script:
Name   NumCPU   DiskMB   MemoryMB   GuestID
App10  1        20        512       winNetEnterprise64Guest
App11  1        20        512       winNetEnterprise64Guest
App12  2        30       1024       winNetEnterprise64Guest
App13  2        20       1024       rhel6_64Guest
App14  1        15        512       rhel6_64Guest
App15  4        60       4096       rhel6_64Guest
The following script requires the $ImportFile parameter, which specifies the file to import. When you run this script, the command takes the following format:
.import.ps1 VM_list.csv
In this format, VM_list.csv is a file containing the list of virtual machines that are created by the script. Some parameters, such as those for adding a CD-ROM to the virtual machine or specifying which datastore to use, are fixed within the script. When you create scripts and decide to word-wrap a command, it is important to include the back tick operator ('), as shown in this script:
Param ( $ImportFile)
$ImportList = Import-CSV $ImportFile
$ImportList | ForEach-Object {
               New-VM -Name $_.Name'
               -NumCPU $_.NumCPU '
               -DiskMB $_.DiskMB '
               -MemoryMB $_.MemoryMB'
               -GuestID $_.GuestID'
              -Floppy:$False'
              -CD:$False'
              -ResourcePool "Production App" '
              -Datastore "Production"'
              -VMHost "esx01.mishchenko.net" '
              -RunAsync
              }
Tip
The name for the RunAsync parameter is an abbreviation of “run asynchronously.” Without this parameter, the script waits while each virtual machine in the preceding script is created. When you use –RunAsync, a task is created with vCenter Server and the task ID is returned by the cmdlet. You can use Get-Task to query the status of the task and use Wait-Task to determine whether your script requires the completion of that step before proceeding further.
If you’re using virtual machine templates and the guest customization wizard in vCenter Server to deploy new virtual machines, you can also employ that strategy from PowerCLI. To clone an existing virtual machine to a template, you can use New-Template as shown in the following example:
New-Template -VM W2K3R2_x64 -Name TEMPLATE_W2K3R2_x64 -Location Surrey
At this time, PowerCLI does not include a cmdlet to convert a virtual machine to a template, but you can easily accomplish that with the following script:
$ConvertToTemplate = Get-VM W2K3R2_x64 | Get-View
$ConvertToTemplate.MarkAsTemplate()
To deploy a new virtual machine from this template, you can issue the following command. You can use Get-Parameter (which was discussed earlier) to obtain a list of parameters that can be used when creating a new virtual machine from a template.
New-VM -Name CLUSTER03 -Template (Get-Template TEMPLATE_W2K3R2_x64) '
-VMHost esx01.mishchenko.net -RunAsync
Tip
If you plan to customize Windows XP, 2000, or 2003, you must download the appropriate Sysprep files to your vCenter Server host. You can find the appropriate locations for these files and download links at the following URL: http://kb.vmware.com/kb/1005593.
To manage and create guest operating system (OS) customization specifications, you can use the following cmdlets:
Get-OSCustomizationNicMapping           Remove-OSCustomizationNicMapping

Get-OSCustomizationSpec                 Remove-OSCustomizationSpec

New-OSCustomizationNicMapping           Set-OSCustomizationNicMapping

New-OSCustomizationSpec                 Set-OSCustomizationSpec
To apply a customization specification to a virtual machine, you can use either New-VM when creating new virtual machines or Set-VM for existing virtual machines, as shown in the following example:
Set-VM -VM App10 -OSCustomizationSpec Windows2003_x64
PowerCLI includes a number of cmdlets to manage your virtual machines after they are deployed. Those include cmdlets for managing virtual hardware, installing VMware Tools, migrating virtual machines, and managing snapshots.
Snapshots are a useful tool, especially in test or development environments and in production, to provide an easy method to reverse changes to virtual machines. PowerCLI includes the following cmdlets to manage snapshots: Get-Snapshot, New-Snapshot, Set-Snapshot, and Remove-Snapshot. To create a snapshot on a virtual machine, issue the following command. The -Memory parameter causes the memory state to be saved with the snapshot if the virtual machine is powered on, and the -Quiesce parameter instructs VMware Tools to pause disk activity momentarily while the snapshot is created.
Get-VM -Name Windows01 | New-Snapshot -Name (Get-Date) -Memory -Quiesce
To manage the name and description for a snapshot, you use Set-Snapshot. To revert a virtual machine back to a prior snapshot, you use Set-VM. In the first example that follows, the snapshots for a virtual machine are obtained and then passed to Set-VM. You are prompted to select a snapshot to revert to. The snapshots are listed from oldest to newest.
Get-VM Windows01 | Get-Snapshot | Set-VM -VM Windows01

Confirmation
Reverting VM 'WINDOWS01' to snapshot 'Pre-Upgrade'.
[Y] Yes [A] Yes to All [N] No [L] No to All [S] Suspend [?] Help
(default is "Y"):N
Confirmation
Reverting VM 'WINDOWS01' to snapshot '09%2f14%2f2010 12:20:54'.
[Y] Yes [A] Yes to All [N] No [L] No to All [S] Suspend [?] Help
(default is "Y"):Y
Removing snapshots is accomplished with Remove-Snapshot. The following example uses Sort-Object to find the oldest snapshot on a virtual machine and passes that snapshot alone to Remove-Snapshot. Removing a snapshot can be time consuming, so -RunAsync is used to obtain a task ID for the removal instead of waiting for the task to complete.
$Oldest_Snapshot = Get-VM -Name Windows01 | Get-Snapshot | Sort-Object
   -Property "Created" | Select -First 1
Remove-Snapshot $Oldest_Snapshot -Confirm:$false -RunAsync
Get-Snapshot is used to obtain snapshot information, as the preceding examples have shown. It can also be used to generate a report of all virtual machines with a snapshot. The Addday() method is used to subtract seven days from the current date so the script displays snapshots that are older than seven days. In a more complex example (which you can download from http://www.virtu-al.net/2009/06/22/powercli-snapreminder/), PowerCLI is used to query the vCenter task history and Active Directory to send an e-mail to users who have created snapshots that have not been deleted:
Get-VM | Get-Snapshot | Where-Object { $_.Created -le'
  ((Get-Date).AddDays(-7)) } | FT Name, Created, Description -GroupBy VM

  VM: WINDOWS03
Name                   Created                 Description
------                 ----------              ----------------
Patches installed      8/10/2010 9:01:47 AM
WINDOWS03_vm-22_1      9/9/2010 7:40:15 AM       VMware vCenter Update Manager ...

 VM: LINUX01
Name                   Created                 Description
------                 ----------              ---------------
LINUX01_vm-30_1        9/9/2010 7:41:39 AM      VMware vCenter Update Manager ...
A number of PowerCLI cmdlets, such as the following, interact with VMware Tools to provide access to the guest operating system. With these cmdlets, you can control the power state of the guest OS, change network settings, and even copy from and to the virtual machine without having a network connection to it.
Copy-VMGuestFile                        Restart-VMGuest

Get-VMGuest                             Set-VMGuestNetworkInterface

Get-VMGuestNetworkInterface             Set-VMGuestRoute

Get-VMGuestRoute                        Shutdown-VMGuest

New-VMGuestRoute                        Suspend-VMGuest

Remove-VMGuestRoute
Get-VMGuest can be used to retrieve information from the guest OS, including IP addresses and disk usage:
Get-VMGuest CLUSTER04 | FL *

OSFullName       : Microsoft Windows Server 2003, Enterprise Edition (64-bit)
IPAddress        : {172.16.1.134, 192.168.1.134, 192.168.1.144}
State            : Running
Disks            : {VMware.VimAutomation.ViCore.Impl.V1.VM.Guest.DiskInfoImpl,
  VMware.VimAutomation.ViCore.Impl.V1.VM.Guest.DiskInfoImpl,
  VMware.VimAutomation.ViCore.Impl.V1.VM.Guest.DiskInfoImpl,
  VMware.VimAutomation.ViCore.Impl.V1.VM.Guest.DiskInfoImpl...}
HostName         : cluster04.MISHCHENKO.NET
Nics             : {Public, Private}
ScreenDimensions : {Width=640, Height=480}
VmId             : VirtualMachine-vm-103
VM               : CLUSTER04
VmUid            : /VIServer=@vcenter:443/VirtualMachine=VirtualMachine-vm-103/
VmName           : CLUSTER04
Uid              : /VIServer=@vcenter:443/VirtualMachine=VirtualMachine-vm-103
  /VMGuest=/
GuestId          : winNetEnterprise64Guest
ExtensionData    : VMware.Vim.GuestInfo
If you want to create a report about the disks in your virtual machines and their utilization, the information you need is available with Get-VMGuest, but as shown in the preceding example, that information is not usable in its default format. If you use the vSphere MOB discussed earlier, you will find that this property should display the disk path, total capacity, and free space. You can also obtain that information by looking up the DiskInfo type at http://www.vmware.com/support/developer/PowerCLI/PowerCLI41/html/index.html. To extract that information, you can use the ExpandProperty parameter from Select-Object, as shown in the following example:
$diskinfo = Get-VMGuest Cluster04 | Select -ExpandProperty Disks
$diskinfo | FT -AutoSize
Path    Capacity       FreeSpace
------   -----------       -------------
C:      42935926784  37148037120
F:      21467947008  21399695360
M:      26839052288  26770636800
N:      26839052288  26770636800
Q:       1071627264   1063469056
The ExpandProperty parameter is also useful for string items such as IPAddress in the preceding Get-VMGuest example. The three IP addresses are contained in a single string, which makes it difficult to pass the IP addresses on to subsequent cmdlets in a pipeline or script. In the following example, three IP addresses are returned instead of a single string value:
$IPAddresses = Get-VMGuest Cluster04 | Select -ExpandProperty IPADdress
$IPAddresses
172.16.1.134
192.168.1.134
192.168.1.144
The following script uses the disk data obtained with ExpandProperty to produce a report of disk size and space utilization for virtual machines:
$VMList = Get-VM | Where { $_.PowerState -eq "PoweredOn"} | Get-View |'
                                    Where { $_.GuestHeartbeatStatus -ne "gray"}
$VMList | ForEach {
           Write-Host "Virtual Machine: " $_.Name
           $Drives = @(Get-VMGuest $_.Name | Select -ExpandProperty Disks)
           $Drives | Select-Object Path,'
               @{Name="Capacity(GB)"; Expression={"{0:n1}"'
                                                      -f ($_.Capacity/1GB)}},  '
               @{Name="% Utilized"; Expression={"{0:p0}"'
                                -f (($_.Capacity-$_.FreeSpace)/$_.Capacity)}}    '
               | FT -AutoSize
                 }

Virtual Machine: VCENTER
Path      Capacity(GB)      % Utilized
------    --------------     -------------
C:       40.0               45 %
Virtual Machine:   VMware Data Recovery
Path        Capacity(GB)    % Utilized
------      -----------     -------------
/           3.7             32 %
/boot       0.1             9 %
/SCSI-0:1   499.7           11 %
Virtual Machine:   vSphere Management Assistant (vMA)
Path               Capacity(GB)      % Utilized
------             ----------------  -------------
/                  3.3               42 %
/var/log           0.5               20 %
/boot              0.1               12 %
/var/log/syslog    9.8                1 %
The first statement in the script uses Get-VM to obtain a list of virtual machines and then filters the list for virtual machines that are running. Get-View is used to filter the list further for virtual machines that do not show a gray status for VMware Tools. This would indicate that VMware Tools is not running or installed within the virtual machine. The other status values for VMware Tools are red (no heartbeat), yellow (intermittent heartbeat), and green (the guest OS is responding normally). As Get-VMGuest relies on VMware Tools to interact with the virtual machines, this filtering is required to prevent errors in the output of the script. Get-View is an excellent tool in addition to the MOB and PowerCLI Online Cmdlet Reference to determine the properties that are available on a vCenter object.
For each virtual machine, disk information is then obtained and stored in an array. Select-Object is used to display data from the array. The Name and Expression operators are used to calculate and format the data that is displayed. The disk size information is returned as integers that would be difficult to read if displayed without changes. The Name operator specifies a new column name. Expression formats the data using "{0:n1}" -f and "{0:p0}" -f. The initial number, 0 in both cases, is used as an index marker to identify multiple formatting strings in a single statement. N and P indicate that the value is a number or percentage, and the last number specifies the number of decimal places to use.
As in the case with virtual machines, PowerCLI includes a wide range of cmdlets that enable configuration, management, troubleshooting, and reporting of your ESXi hosts and vCenter Server. PowerCLI includes cmdlets to configure and manage networking, storage, clusters, and many other aspects of ESXi and vCenter Server. In this section, you’ll look at configuring a new ESXi host, applying host profiles with PowerCLI, configuring vCenter Server alarms to use PowerCLI, and using some troubleshooting cmdlets for ESXi. For a complete guide to managing hosts with PowerCLI, check out the book Managing VMware Infrastructure with Windows PowerShell: TFM by Hal Rottenberg.
When deploying a new host, you can use host profiles, a scripting install, and the vCLI to automate aspects of the configuration for a new host. PowerCLI presents another tool to use to configure your host. The following is a sample of a script that can be used to configure a new ESXi host:
# Set variables
$user = "root"
$password = ""
$newhost = Read-Host Enter the IP address of the new ESXi host
$newpassword = Read-Host -AsSecureString Enter a new password for the root  '
   account

# Connect to the target ESXi Host
Write-Host   Connecting to ESXi server
Connect-VIServer $newhost -User $user -Password $password

# Change the password for root
Write-Host   Changing the password for root
Set-VMHostAccount $user -Password $newpasswd
# Set the hostname and domain name
$newhostname = Read-Host Enter a new hostname
$newdomainname = Read-Host Enter the host's domain name
Write-Host   Configuring the host and domain name
Get-VMHostNetwork | Set-VMHostNetwork -DomainName $newdomainname -HostName
$newhostname

# Configure DNS settings
$dns = Read-Host Enter the DNS server for the host
Get-VMHostNetwork | Set-VMHostNetwork -DnsAddress $dns
Sleep 15

# Set NTP Server
Write-Host   Configuring NTP and restarting service
$NTPServers = "0.pool.ntp.org", "1.pool.ntp.org"
Add-VMHostNTPServer -NTPServer $NTPServers -Confirm:$false
$ntpd = Get-VMHostService -VMHost $newhost | where {$_.Key -eq 'ntpd'}
Restart-VMHostService $ntpd -Confirm:$false
Set-VMHostService -HostService $ntpd -Policy "Automatic"

# Enable Active Directory Integration
$domain = Read-Host Enter the domain for the host to join
$account = Read-Host Enter an account with permissions to join the host to'
    the domain
$ADpassword = Read-Host -AsSecureString Enter the password for that account
$_AD =Get-View -Id 'HostActiveDirectoryAuthentication-ha-ad-auth'
$_AD.JoinDomain_Task($domain, $account, $ADpassword)
Sleep 60

# Assign Active Directory group administrative rights to the host
Get-VMHost $newhost | New-VIPermission -Role Admin'
   -Principal "MishchenkoESX Administrators"

# Delete the default VM port group
Write-Host   Removing the default virtual machine port group
Get-VirtualPortGroup -Name "VM Network" | Remove-VirtualPortGroup -Confirm:$false

# Create a new VMkernel port for vMotion on vSwitch0, set the vLAN for it
$vMotionIP = Read-Host Enter the vMotion IP address
$vMotionSubnet = Read-Host Enter the vMotion network subnet mask
$vSwitch = Get-VirtualSwitch -name vSwitch0
New-VMHostNetworkAdapter -PortGroup 'vMotion' -VirtualSwitch $vSwitch -IP $vMotionIP'
     -SubnetMask $vMotionSubnet -vMotionEnabled:$true
$vMotionPG = Get-VirtualPortgroup -Name 'vMotion'
Set-VirtualPortGroup -VirtualPortGroup $vMotionPG -VlanId 125
# Set vSwitch0 to use vmnic0 and vmnic1
Set-VirtualSwitch -VirtualSwitch $vSwitch -Nic vmnic0,vmnic1
# Set vMotion vmnic1 active vmnic0 standby
get-virtualportgroup -name vMotion | Get-NicTeamingPolicy |'
  Set-NicTeamingPolicy -MakeNicActive vmnic1
get-virtualportgroup -name vMotion | Get-NicTeamingPolicy |'
     Set-NicTeamingPolicy -MakeNicStandby vmnic0
# Set Management Network vmnic0 active, vmnic1 standby
get-virtualportgroup -name 'Management Network' | Get-NicTeamingPolicy | '
     Set-NicTeamingPolicy -MakeNicActive vmnic0
get-virtualportgroup -name 'Management Network' | Get-NicTeamingPolicy | '
     Set-NicTeamingPolicy -MakeNicStandby vmnic1

# Configure vSwitch1 with vmnic2, vmnic3
New-VirtualSwitch -Name vSwitch1 -Nic vmnic2,vmnic3
Get-VirtualSwitch -Name vSwitch1 | New-VirtualPortGroup -Name"DMZ" -VLANID 500
Get-VirtualSwitch -Name vSwitch1 | New-VirtualPortGroup -Name"LAN" -VLANID 400
Get-VirtualSwitch -Name vSwitch1 | New-VirtualPortGroup -Name"DEV" -VLANID 600
Sleep 15

# Reboot Host
Write-Host   Rebooting Host
Set-VMHost -state "Maintenance"
Restart-VMHost -Force:$true -Confirm:$false
Sleep 60

# Check to see if host is up
Connect-VIServer -Server $newhost -User root -Password $newpasswd
While ($? -ne $true ) {
               Sleep 30; write-host Waiting for host to respond ...;'
               Connect-VIServer -Server $newhost -User root -Password $newpasswd
               }

# Connect to vCenter and join new ESXi to it
Disconnect-VIserver $newhost
$vCenter = Read-Host Enter the network name of your vCenter Server
$datacenter = Read-Host Enter the datacenter for the ESXi host
Add-VMHost $newhost -Location $datacenter -User root -Password $newpassword
At the beginning of the script, some variables are set. To make the script dynamic, Read-Host is used to prompt the user to enter items such as the IP address for the new host. The parameter -AsSecureString is used to mask sensitive input such as passwords. The script then opens a connection to the host that was specified.
As a default installation of ESXi leaves the host with a blank password for root, the first configuration change that the script makes is to change the root password. Subsequent connections to the host in the script make use of the new password.
The script then sets the hostname, domain name, and domain name service (DNS) server for the new host. Get-VMHostNetwork and Set-VMHostNetwork can be used to query and configure a number of networking settings for ESXi, including IPv4 and IPv6 management IP addresses, the host and domain name, and the VMkernel gateway. This section of the script also uses Sleep. This pauses the script for the number of seconds specified and is used throughout the script to allow configuration changes to have effect.
The following section configures Network Time Protocol (NTP) settings on the host. After the script has set the NTP servers with Add-VMHostNTPServer, Restart-VMHostService is used to restart the NTP service to ensure that the host’s time is properly set. This is critical for the next portion of the script. The service is set to start automatically with Set-VMHostService.
The next commands in the script enable Active Directory integration on the host. As there is no PowerCLI cmdlet to enable this, Project Onyx was used to obtain the PowerShell code required to perform this action. Project Onyx is explored in detail later in this chapter. Sleep is issued again and then Set-VIPermission is used to grant an Active Directory group the Administrator role on the ESXi host.
A good portion of the script is then devoted to configuring the networking on the host. The following steps are taken:
The default virtual machine port group VM Network is deleted from
vSwitch0as this virtual switch (vSwitch) is only to be used for management purposes.The user is queried for vMotion IP address information. That input is used to create a vMotion port. The vMotion port is configured with the VLAN ID of 125.
vSwitch0is reconfigured to includevmnic1. By default, onlyvmnic0is connected tovSwitch0.Get-NicTeamingPolicyandSet-NicTeamingPolicyare used to configure the active and standby network interface card (NIC) ports for the vMotion and management traffic ports onvSwitch0.A new virtual switch is created for virtual machines and it is linked to
vmnic2andvmnic3.Three virtual machine port groups are created for various traffic types.
After the networking on the host has been configured, the script pauses before restarting the host. Before the host is restarted, it is placed into maintenance mode with Set-VMHost. Restart-VMHost is used to reboot the host.
The script then pauses on the Sleep command and afterward attempts to reconnect to the ESXi host after its reboot. If Connect-VIServer fails to connect, the While statement repeats again. This block of script could be rewritten as the following:
$i = 0
Do {
   Sleep 30; write-host Waiting for host to respond ...;'
   Connect-VIServer -Server $newhost -User root -Password $newpasswd ;$i ++}
While ($i -le 10)
The advantage of using a Do ... While loop is that it executes only a finite number of times. If a host were to fail to come back online, the script would loop endlessly until terminated. With Do ... While, additional error-handling code could be added to generate a meaningful error message and the script would be able to continue processing.
The final step of the script uses Add-VMHost to join the ESXi host to vCenter Server. You can specify any folder or datacenter for Location. The script first uses Disconnect-VIServer to close the PowerShell connection to the ESXi host. The script then opens a session with the vCenter host. As you’ll recall from earlier in the chapter, PowerCLI can be configured to connect to several vCenter and ESXi hosts simultaneously. Running the disconnect statement ensures that Add-VMHost is not executed on the ESXi host in addition to the vCenter Server host.
If you’re using Host Profiles to ensure configuration compliance of your ESXi hosts, PowerCLI includes the following cmdlets to help you automate that task:
Apply-VMHostProfile                     New-VMHostProfile

Export-VMHostProfile                    Remove-VMHostProfile

Get-VMHostProfile                       Set-VMHostProfile

Import-VMHostProfile                    Test-VMHostProfileCompliance
Configuring and managing Host Profiles using the vSphere client was discussed in Chapter 3, “Management Tools.” After you have configured one of your ESXi hosts to serve as the baseline for your profile, you can create a profile with the following statement:
Get-VMHost esx01.mishchenko.net | New-VMHostProfile -Name "DMZ Host Profile" '
     -Description "This profile is for hosts running DMZ virtual machines"
To view the profiles that have been created, you can use Get-VMHostProfile. To filter your list of profiles, you can use the -ReferenceHost parameter to display only the profiles created from certain hosts. If you have to move profiles between vCenter Server hosts, you can use Export-VMHostProfile and Import-VMHostProfile. To check whether a host is compliant with a profile, you must first attach the profile to the host. You can do that with the following command. You could substitute Get-Cluster for Get-VMHost to associate the profile with all the hosts in a cluster.
Get-VMHost esx02.mishchenko.net | Apply-VMHostProfile -AssociateOnly '
   -Profile "DMZ Host Profile"
You can then use Test-VMHostProfileCompliance to test the ESXi host. If no output is returned, then the host has passed the check. In the following example, the cmdlet reports that the host is not compliant due to a vSwitch configuration issue:
Test-VMHostProfileCompliance -VMHost esx02.mishchenko.net
VMHostId               VMHostProfileId                 IncomplianceElementList
-----------            ---------------------           ---------------------------------
HostSystem-host-9      HostProfile-hostprofile-1       {network.vswitch["key-vim-profil...
To apply a profile to a host that has failed the compliance test, you must first place it in maintenance mode with Set-VMHost. You can then run Apply-VMHostProfile again without the -AssociateOnly parameter to apply the profile. After this step has been completed, you can run Test-VMHostProfileCompliance to verify the status of the host.
Get-VMHost esx02.mishchenko.net | Apply-VMHostProfile '
   -Profile "DMZ Host Profile"
If you’re employing vCenter Server alarms, you may want to employ PowerCLI scripts to enable more complex actions to be taken in the event of an alarm. vCenter Server can currently be configured to send an e-mail alert, generate a Simple Network Management Procotol (SNMP) notification, or to run a command. The command options are limited to EXE or BAT files. To run a PowerCLI script, you must create a small batch file that when executed spawns a PowerShell process that can run your script. The batch file should contain the following commands. Note that the location of the PowerShell executable may differ from the path shown in the following example.
set POWERSHELL=C:WINDOWSsystem32windowspowershellv1.0powershell.exe -nologo
     -noprofile -noninteractive
start %POWERSHELL% -command "&"%1""
When you create the action for the alarm, you enter the path to the batch file and the name of the script as shown in Figure 9.3. If the alarm is triggered, the batch file is passed the path and filename for the script file as a parameter. The batch file then launches PowerShell and passes the script file name and path to it.

If you do use this method to run PowerCLI scripts, you need to consider how your scripts authenticate with the hosts to which they connect. The vCenter Server service typically runs with the LocalSystem account. Ideally, the scripts should not include any credentials. If you set your vCenter Server service to use an Active Directory account, you’ll be able to log in without credentials to vCenter and ESXi hosts configured for Active Directory Integration. If you need to stick with LocalSystem, then you can employ a PowerShell script called Export-Credentials, which you can access at this URL: http://halr9000.com/article/531.
If you need to perform troubleshooting on your ESXi environment, PowerCLI includes some cmdlets that can assist you with that task. Get-VIEvent is used to query vCenter Server or ESXi to retrieve events. Each action you take in your environment is recorded as an event, and searching through your event data may provide some clues to the problem you are experiencing. Events that occur are categorized with the following three types: info, warning, and error.
Run on its own, Get-VIEvent retrieves the last 100 events for your vCenter Server or ESXi host. That may not always be helpful and instead you may wish to be able to search for specific events. You can filter the output with the parameters in Table 9.2.
Table 9.2. Parameters for Get-VIEvent
Parameter | Description |
|---|---|
| Specify objects such as virtual machine, host, or resource pool. |
| Specify the start date of events you want. |
| Specify the end date of events you want. |
| Specify the user who initiated the event. |
| Limit the events to retrieve. The default value is 100 and you can retrieve up to 1000 events. |
| Specify the types of event you want to collect. The types include info, warning, and error. |
It is also possible to search by the event description. The following script creates a file in which you will find the event name, the category of the event (info, warning, or error), and a description of the event:
$report = @()
$eventMgr = Get-View EventManager
$eventMgr.Description.EventInfo | %{
$row = "" | Select Name, Category, Description
$row.Name = $_.Key
$row.Category = $_.Category
$row.Description = $_.Description
$report += $row
}
$report | Export-Csv "C:events.csv" -NoTypeInformation
If you want to filter events to find who created a virtual machine, you want to use the event VmCreatedEvent. As you examine the events generated by the preceding script, note that there are similar events for virtual machine creation such as VMClonedEvent, VMDeployedEvent, and VMRegisteredEvent. Your script should take into consideration that a task may have different event types depending on how the task is performed. After you have identified the correct event type, you can run the following script to find the user who created a virtual machine:
Get-VIEvent | Where { $_.Gettype().Name -eq "VMCreatedEvent"} '
| Select CreatedTime, UserName, FullFormattedMessage
To obtain log files from vCenter Server and ESXi, you use Get-LogType and Get-Log. Get-LogType is used to obtain a list of log types that are available on the host to which you are connecting. The first list shown is for a vCenter Server host and the second is for an ESXi host.
Key                    Summary
----                   ---------
vpxd:vpxd-28.log       vCenter server log in 'plain' format
vpxd:vpxd-29.log       vCenter server log in 'plain' format
vpxd:vpxd-alert-7...  vCenter server log in 'plain' format
vpxd:vpxd-profile...  vCenter server log in 'plain' format
vpxd-profiler:vpx...  vpxd-profiler
Key                    Summary
----                   ---------
hostd                  Server log in 'plain' format
messages               Server log in 'plain' format
vpxa                   vCenter agent log in 'plain' format
Get-Log is used to retrieve the contents of the log file. The only required parameter is –Key, which you determine from the output of Get-LogType. To retrieve the VMkernel log from an ESXi host, issue the following command:
$Log = Get-Log -Key messages
This generates the array $Log, which is an array of strings that represents the contents of the log file. Each entry within the array contains one entry from the log file. The first command can be used to display the last 20 entries in the log file. The second command searches the log for entries with word “warning.”
$Log.Entries[-1..-20]
$Log | ? { $_.Entries | Select-String warning }
Get-Log can also be used to obtain a VM-support log bundle. The following example generates a log bundle in the temp folder and uses –RunAsync, as the process can take some time:
Get-Log -Bundle -DestinationPath c: emp -RunAsync
The following section discusses three graphical tools that you can use with PowerCLI. It may seem strange to discuss graphical tools with a shell-based product, but these applications can accelerate your learning of PowerCLI and help you develop complex scripts.
Included with PowerShell 2.0 is the Integrated Shell Environment (ISE). It provides a simple editor for developing your scripts, as shown in Figure 9.4. The ISE consists of a script pane for creating and editing scripts, an output pane where the output from your scripts or commands are displayed, and a command pane where you can enter commands as you would in a regular PowerShell session.

Tip
When you’re using tools like the ISE, the VMware PowerCLI cmdlets may not be available until you run Add-PSSnapin VMware.VimAutomation.Core.
One of the benefits to using a PowerShell-aware editor is that the scripts are colored-coded to make reading much easier. You can also set breakpoints within a script. With a breakpoint, PowerShell pauses execution of the script. You can use the command pane to check the values of variables. To set a breakpoint with ISE, right-click on the command where you want the script to pause and select Toggle Breakpoint. Start the script by pressing F5. The script will pause at the breakpoint and you can query the current values of any variables that the script has defined. You can then press F5 to continue executing the script until the next breakpoint is encountered, or press one of F10, F11, or Shift+F11 to step through the individual lines of the script. To remove a breakpoint, right-click on it and select Disable Breakpoint.
VMware Project Onyx is a tool that captures Simple Object Access Protocol (SOAP) traffic between the vSphere client or a PowerCLI session and your vCenter Server host or ESXi server. The traffic can be translated to PowerShell, SOAP, C#, and JavaScript code. With this tool, you can capture your actions within the vSphere client and have them translated to PowerShell code, which you can then copy to your own scripts.
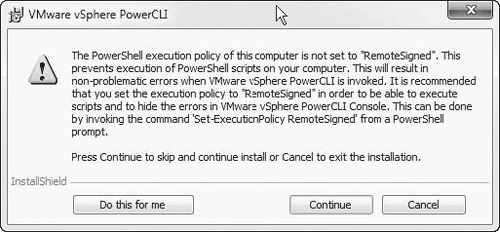
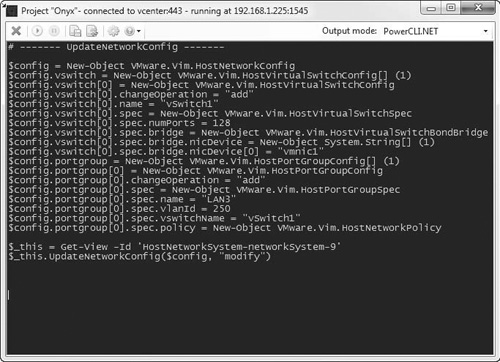
Project Onyx can be downloaded from http://www.vmware.com/go/onyx. After you have extracted the ZIP package, start Onyx.exe and accept the license agreement. On the main screen, shown in Figure 9.5, change the Output mode to PowerCLI.NET. Click the Connect icon to open a session to vCenter Server or ESXi and enter the host to establish a connection with. Optionally check the Launch a Client after Connection checkbox, select either VMware VI Client or VMware PowerCLI, and enter appropriate credentials.
When you click Start, Onyx opens a connection to your host over an SSL connection and begins to listen on port 1545 on your management computer. If you manually connect to Onyx, you should specify your hostname or IP address and port 1545 in the IP Address/Name field of the vSphere client. When you log in, you will receive an error about the traffic not being secure. This refers only to the connection between the client you use and Onyx. Communication between Onyx and vCenter or ESXi is secure. If you connect with PowerCLI, you should issue the following command:
Connect-VIServer 192.168.1.225 -Protocol http -Port 1545
Note
Some modules within vCenter, such as Update Manager or VMware vShield, may make an independent connection that bypasses Onyx. Some plug-ins such as License Reporting Manager and vCenter Hardware Status do not connect over the SSL default port and fail to connect through Onyx. Check the Plug-In Manager for the status of any plug-ins that you are using.
When you’re ready to capture your actions in Onyx, click the Start button. In the example shown in Figure 9.6, a new vSwitch has been created. Note that New-Object has been used to create the object $config, which stores the configuration settings for the new vSwitch. The task UpdateNetworkConfig has been used to create the vSwitch. You may have expected to see New-VirtualSwitch and New-VirtualPortGroup. But those cmdlets send the same underlying code to the host to create a new vSwitch. If you capture a PowerCLI session, you will see the same code captured when using those cmdlets. The PowerCLI cmdlets merely wrap that code into easy-to-use commands. For more information on the objects and methods used for the actions that you capture, you can refer to the vSphere API SDK at http://www.vmware.com/support/developer/vc-sdk/visdk41pubs/ApiReference/index.html.
While PowerCLI does include a wide range of cmdlets, they do not encompass all the actions that are available within the vSphere client. As noted earlier, there is no cmdlet to convert a virtual machine into a template. The two lines of code to accomplish that are easily captured with Onyx and you can use that code directly in your PowerShell scripts.
As you use Onyx, you may notice that it is not capturing all your actions. By default, Onyx ignores certain methods, such as those used by Get-VM. To control the methods that are displayed, click the Settings icon and edit the Ignored Methods list on the Output tab. In the Settings screen, you can also change the port that Onyx listens on and configure Onyx to mask security-sensitive commands such as the creation of users and the transmission of passwords.
PowerWF is an application that leverages Windows Workflow Foundation to provide a drag-and-drop environment for developing and debugging your PowerCLI scripts. Figure 9.7 shows a graphical representation of the virtual machine disk utilization report discussed earlier in this chapter. You can add PowerCLI and PowerShell cmdlets merely by dragging them into the script from the Toolbox pane.
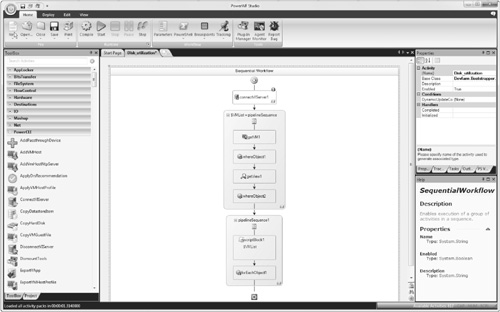
One of the best features of the product is that you can import existing PowerShell scripts. This can be a significant benefit if you’re trying to understand a complex script. As you develop your workflow, you can use PowerWF’s built-in debugger or open a PowerShell session within the application. After you have completed your workflow, you can deploy it to a number of options, including a cmdlet, a PowerShell snap-in, a standalone application, or you can deploy it for integration with Microsoft System Center.
Together, PowerShell and PowerCLI represent a powerful tool that you can use to manage your vSphere environment. You can use it to automate configuration of vCenter Server, your ESXi hosts, and virtual machines. Management tasks that may have taken hours in the vSphere client can be accomplished quickly with PowerCLI, using scripts that eliminate the risk of misconfiguration.