In Chapter 2, “Getting Started with a Quick Install,” you learned about the hardware requirements for VMware ESXi; how to perform a simple, interactive install for ESXi; and how to perform some basic configuration steps necessary to begin using the host. In this chapter, you will learn a bit more about the management tools used to manage your ESXi environment. This will include the following listed elements. This chapter does not focus on tasks that you will already be familiar with, such as creating virtual machines (VMs) or configuring virtual switches (vSwitches). Rather, it reviews elements of management that you may not be that familiar with or that have changed with the release of vSphere 4.1.
Managing a standalone ESXi host
Managing your hosts with vCenter Server
Getting started with PowerCLI and the vCLI
Managing your host with the Direct User Console Interface (DCUI)
Using third-party products to manage your hosts
In some cases, you may find yourself managing a single ESXi host, in which case you’ll connect directly to it with the vSphere client. This could be the case if you are working with a test environment, at a single server deployment in a remote site, or if your vCenter Server is unavailable for use. Whichever situation you find yourself in, you can use the vSphere client to manage and configure your host. Certain features of vSphere functionality, such as cloning and vMotion, are not available without vCenter Server, but you can still configure and manage a number of aspects on your host.
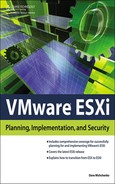
When you first connect to your host, the vSphere client displays the Home view, showing the icons in Figure 3.1. These represent the configuration and management options appropriate to single-host management. The following section reviews some of these options. As you explore the vSphere client, you may notice that several options, such as Active Directory Integration, Time Configuration, and Permissions, are not discussed. Those items are reviewed in later chapters on systems management and security.
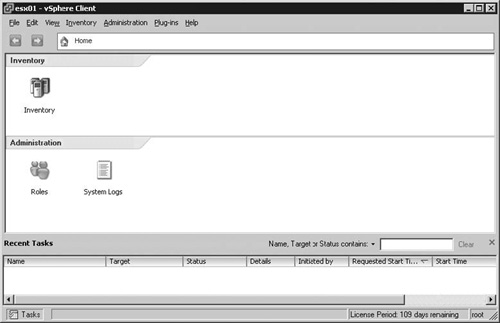
Most of the elements available to configure your ESXi host are found on the Configuration tab. These options are available when you connect to your host directly with the vSphere client or through vCenter Server. When you select the Configuration tab, the configuration options shown in Figure 3.2 are shown.
Health Status. When you select the Health Status link, the hardware status of various components of your ESXi host is shown. The data displayed on this page depends on the Common Information Model (CIM) providers that are installed with ESXi. As you’ll see in Chapter 6, “System Monitoring and Management,” you do not need to install hardware agents onto ESXi as you would with ESX.
Processors. This page displays information about the processors in your system. This includes the processor model, socket count, cores per socket, and whether Hyperthreading is enabled. If you click the Properties link, you can enable or disable Hyperthreading. A change on that screen requires a restart of the host. The Processors page shows some information about the host’s motherboard, including vendor name, model, and Basic Input/Output System (BIOS) version.
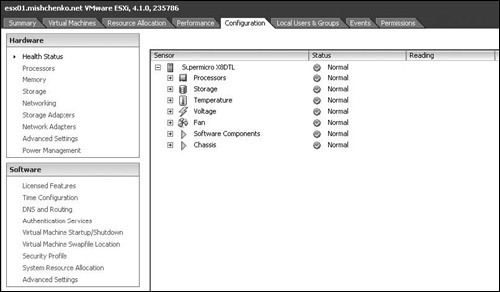
Memory. The host’s total memory is shown on this page. Also displayed is the memory allocated to system processes, such as the VMkernel, drivers, and the virtualization layer, and the memory available to VMs. The value for Virtual Machines shown on this page is more than the Total Capacity memory value shown on the Resource Allocation page. The Total Capacity value reflects the memory available for use by the guest operating systems. The Virtual Machines value includes that memory and additional memory to handle the overhead of running VMs. You will notice the absence of an option to configure memory. Figure 3.3 shows the memory page for both an ESXi and ESX host. As there is no Service Console with ESXi, there is no Properties link on that page.
Storage, Networking, Storage Adapters, and Network Adapters. These pages display the current configuration for your host’s networking and storage setup. As this book focuses on migrating from ESX to ESXi, it does not deal with end-to-end configuration of these components. But elements of configuration are discussed in later chapters dealing with security and scripting.
Advanced Settings (Hardware). On this page, you can enable VMDirectPath. The host must support Intel Directed input/output (I/O) (VT-d) or Advanced Micro Devices (AMD) Input/Output Memory Management Unit (IOMMU). If you have enabled VT-d or IOMMU in the host’s BIOS, you can select this page and click Configure Passthrough. You can then enable devices for VMDirectPath on the Mark Devices for Passthrough screen. Changes on this page require a host restart.
Power Management. VMware ESXi supports both AMD PowerNow! and Enhanced Intel SpeedStep central processing unit (CPU) power management technologies. Configuration on this page is described in the next section, “Setting a Power Management Policy.”
Licensed Features. As shown later in this section, you can configure the license key for your host on this page.
Time Configuration. On this page, you can enable Network Time Protocol (NTP) for your host. As your guest operating system may depend on the host for time synchronization, it is important to configure NTP for your host. This is discussed in Chapter 6.
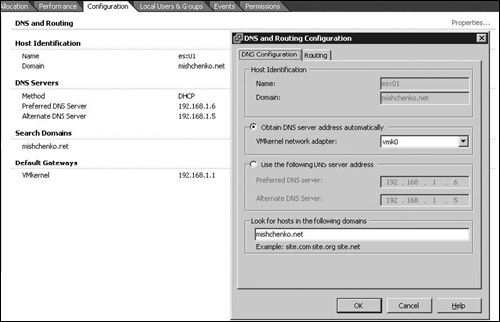
DNS and Routing. On this page, as you’ll see later in this chapter, you can configure the hostname, management interface Internet Protocol (IP) address, and other networking elements. A significant difference on this page between ESXi and ESX, as you’ll see, is the lack of any Service Console settings.
Authentication Services. With this option, you can enable Active Directory Integration. This will be discussed in Chapter 6.
Virtual Machine Startup/Shutdown. You can configure the behavior of VMs at host startup and shutdown on this screen. This can be particularly useful with a standalone host in that you would want any hosted VMs to start automatically when the host is powered on or restarted.
Virtual Machine Swapfile Location. By default, the VM swapfile is created when a VM is powered on in the same folder as the configuration (VMX) file for the VM. You can change this to another datastore for performance reasons and you can set this at the VM, host, or cluster level. If vCenter Server manages your host, you cannot configure the swapfile location when connected directly with the vSphere client.
Security Profile. On an ESX host, this page displays the settings for the Service Console firewall. As you will see later in this chapter, on ESXi this is significantly different and the page shows the services running on the host.
System Resource Allocation. On this page, you can choose between a simple and advanced view. In the simple view, you can change allocations for memory and CPU resources used by the VMkernel. With the advanced view, you can change resource allocations for specific system processes.
Advanced Settings (Software). On the Advanced Settings page, you can set a number of configuration options. Throughout this book, you will see a number of examples for both PowerCLI and the vSphere Command-Line Interface (vCLI) in which Advanced Settings are configured.
To improve CPU power efficiency and reduce power load, ESXi supports both AMD PowerNow! and Enhanced Intel SpeedStep CPU power management technologies. With this support, ESXi can change CPU frequency based on the host’s workload. When you select the Power Management option on the Configuration tab, the Technology field displays the detected power management technology. If a status of Not Available is shown and you know that your host supports one of these power modes, you should check the BIOS of the host to ensure that the feature is enabled. You can set the Power Management Policy to one of the following options:
High Performance (Default). With this option, the VMkernel will not use power.
Balanced Performance. The VMkernel will use the power management features to reduce host power consumption without negatively impacting VM performance.
Low Power. The VMkernel will aggressively reduce power use at the risk of slightly lower VM performance.
Custom. With this option, the VMkernel uses the configured Power parameters from the Advanced Settings screen to set power management characteristics. These parameters can be set with the vSphere client or using the vCLI command
vicfg-advcfg.
To configure the Power Management Policy for your host, follow these steps. Changes made to the policy do not require a host reboot.
On the DNS and Routing page, you can configure a number of networking options for the VMkernel. As noted earlier, ESXi differs from ESX in that there are no Service Console settings, as the management interface is handled by the VMkernel for ESXi. Figure 3.4 shows the summary of information for the DNS and Routing page as well as some of the options you can configure if you click Properties. On the Routing tab of the DNS and Routing Configuration screen, you can set the default gateway for the VMkernel. Later in this chapter, you will see how to configure these settings with the DCUI. As was shown in Chapter 2, you can use vCLI commands such as vicfg-vmknic to change these same settings.
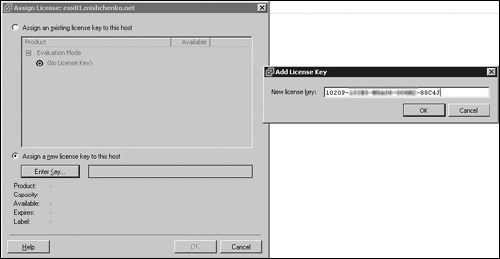
The default licensing mode for VMware ESXi after an installation is to run in evaluation mode for 60 days licensed at the vSphere Enterprise Plus licensing level. In the case of a standalone host, you must license the host before the evaluation has expired; otherwise, you no longer will be able to power on your VMs. If you have installed your ESXi host with an installation script, you may have specified a serial number to use, in which case you will not have to change the licensing for the host. Licensing your ESXi hosts with vCenter Server is covered later in this chapter.
To license your standalone host, you can follow these steps. You do not need to reboot your host after making this change.
After you have connected to the ESXi host with the vSphere client, select the Inventory icon to display the Inventory view. This view shows your host in the navigation pane along with any VMs and resource pools that you have created.
Select the host and then choose the Configuration tab.
Select the link Licensed Features and the license summary for the host will be displayed.
Click the Edit link to change the license for the host.
Click the radio button Assign a New License to This Host.
Add your license serial number in the Add License Key window as shown in Figure 3.5 and then click OK.
The Product, Capacity, and other license fields should be updated to reflect the licensed features of the license key. Click OK to close the Assign License window.
If you look at the Security Profile page for both ESX and ESXi, the architectural differences between the two products clearly emerge. Figure 3.6 shows the Security Profile page for both ESX and ESXi. With ESX, you can see the configuration of the Service Console firewall. If you select Properties, you can see a list of preconfigured services and select which traffic types to allow through the firewall.

Figure 3.6. Comparing the ESX and ESXi Security Profile page. Top: ESXi Security Profile page. Bottom: ESX Security Profile page.
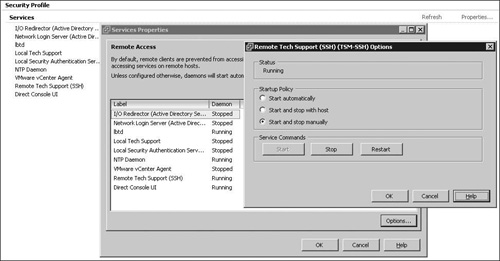
With ESXi, there is no firewall, so the Security Profile page displays a list of services that are available on the host, as shown in Figure 3.6. You can click Properties to see whether the service is running, as shown in Figure 3.7. You can then click options to start, restart, and stop the service. You can also set the Startup Policy for the service to be Start Automatically, Start and Stop with Host, and Start and Stop Manually.
Caution
You should note that the Start and Stop Manually policy behaves differently than a service on a Windows server. If you have a Windows service configured for manual startup and then restart the server, the service will not be running when the host has rebooted. In the case of the Start and Stop Manually policy, the service will continue to run until it is manually stopped. If the ESXi host is restarted, the service restarts and continues to run until you have stopped the service.
To view rudimentary information about processor and memory usage, you can use the Summary page at the ESXi host, Resource Pool, or Virtual Machine level. The Resource Allocation and Performance tabs provide more in-depth information about your host’s resource usage and allow you to fine-tune resources for best overall performance. For a thorough understanding of resource management, it is worthwhile to review the VMware vSphere Resource Management Guide.
Figure 3.8 shows the Resource Allocation tab at the host level. The CPU summary shows the total capacity available to resource pools and VMs. In this case, there are no CPU reservations set for running VMs or resource pools, so the Reserved Capacity value is zero. Thus the Available Capacity for CPU is also equal to the Total Capacity. The Memory Total Capacity value shows the total memory available for allocation to VMs. In Figure 3.8, a number of VMs are running, so a certain amount of memory is now set as Reserved Capacity, leaving the Available Capacity as the difference between those two values. When you are viewing the Resource Allocation tab at the resource pool level, the CPU and memory values reflect the reservation values configured for the resource pool. The Resource Allocation tab for a VM displays the CPU and memory usage for the VM as well as configured reservation, share, and limit values.
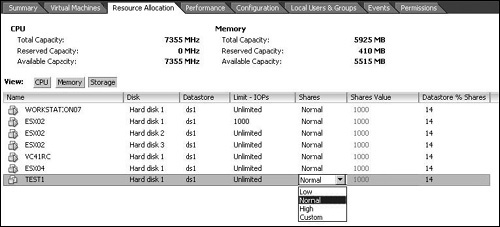
To change the values for share, limits, or reservation, you either right-click the VM or resource pool and select Edit Resource Settings or you simply fill in a value on the Resource Allocation tab, as is shown in Figure 3.8 with Shares settings on the Storage resource view.
Configuring Storage I/O Control
Storage I/O Control is a new feature of vSphere 4.1 that allows you to configure host and clusterwide storage prioritization. In the same way that limits and shares can be used for CPU and memory resources to control resource allocation during times of congestion, Storage I/O Control provides the same level of control for I/O congestion.
When Storage I/O Control is enabled for a datastore, your VMware ESXi begins to monitor the latency that is experienced during communication with the datastore. Should that latency exceed a specified threshold, the datastore is considered congested and VM I/O is controlled in accordance to the Share Disk settings for the VMs on that datastore.
There are a number of requirements to be aware of when configuring Storage I/O Control:
The ESXi host must be managed by vCenter Server to use Storage I/O Control. Although the values for Shares and Limits I/O operations per second (IOPs)—can be set with the vSphere client connected directly to the host—it is possible to enable Storage I/O Control only when the vSphere client is managing the host through vCenter Server.
Storage I/O Control is supported only on Fibre Channel and Internet Small Computer System Interface (iSCSI) storage. It is not available for Network File System (NFS) or supported for local storage.
Datastores with multiple extents are not supported.
If your storage supports automated storage tiering, you should check VMware’s storage area network (SAN) compatibility guide to ensure your system is supported for storage I/O control. If your SAN does not support the ability to move logical unit numbers (LUNs) between different types of storage such as solid-state drives (SSDs), Fibre Channel (FC), serial attached SCSI (SAS), or SATA, no special certification is required for Storage I/O Control.
To use Storage I/O Control, you first need to enable the option on your datastore. You connect your vSphere client to vCenter Server and then find the Configuration tab for the host using the datastore on which you want to enable Storage I/O Control. Select the Storage view, right-click on the datastore, and select Properties. Enable the Storage I/O Control option as shown in Figure 3.9. You can also click the Advanced icon to set a Congestion Threshold manually. The threshold takes a time value in milliseconds (ms) and the default value is 35 ms.

When you have enabled Storage I/O Control for a datastore, you can then set shares and limits for the VMs that use the datastore. Note that you can set limits for each virtual disk on the datastore. Storage I/O shares work the same way as shares for CPU and memory. If the resource is constrained, virtual disks with a higher share value than other disks will have greater access to the datastore I/O resources. You can also set a limit for a virtual disk. By default, the limit for a virtual disk is set to unlimited, but you can set it to an appropriate value in I/O operations per second (IOPS). Keep in mind that you may be measuring disk performance within the VM at megabytes per second, so you’ll have to take into account the typical I/O size used by the guest operating system to convert the disk requirements into IOPS.
You can set the shares or limit for a virtual disk on the Resource Allocation tab, as shown in Figure 3.8, or individually for a VM with the following steps:
In the vSphere Client inventory view, select the VM.
Right-click on the VM and select Edit Settings.
Select the virtual disk to update and then click on Shares. You can select among Low (500 shares), Normal (1000), High (2000), or Custom. With the Custom option, you specify the number of shares to assign to the virtual disk.
Click the Limit—IOPS column to change the disk limit. You can enter a value in IOPS.
Click OK to save your changes and to close the Virtual Machines Properties window.
The last item that this section covers is viewing the Event tab and accessing system logs when managing a standalone host. After using the vSphere client with a standalone ESXi server, you’ll have seen other configuration and management options such as setting permissions and configuring Active Directory Integration, which is covered in later chapters.
When you are managing a standalone host, the Event tab is available on the host, resource pool, and VM objects. An event can be generated by a user or host action and will occur, for example, when a user powers on a VM or when a host has lost a network connection to an iSCSI or NFS datastore.
The Event tab shows a description of the event, the type (info, warning, or error), the time of the event, the target, and, if applicable, the related task and user. If you select a specific event, the Event Details pane displays a summary of the event, as shown in Figure 3.10. In some cases, you may see a link to Ask VMware, as is shown for the NFS error in the figure. This links to a VMware Knowledge Base article that provides assistance with that particular problem. In other cases, you will see a link to Submit Error Report, in which case the data of the event is sent to VMware’s secure support servers. This data is collected to report the issue and display a Knowledge Base article should one exist for that topic. A summary of the data to be transmitted is shown on the Submit to VMware screen.

The difference between managing ESXi directly with the vSphere client and with vCenter Server is like the difference between night and day. vCenter Server adds so many features that make your life as a vSphere administrator so much easier it’s hard to deal with a standalone host after you’ve used vCenter Server. As the chapters in this book deal with topics such as security, performance, and monitoring, the features of vCenter Server will be explored in more detail. But for now, this section highlights two features of vCenter Server that help ease your management load for ESXi. These features are Host Profiles and vSphere Web Access.
Host Profiles is a new feature with vCenter Server 4.0. This feature was designed to eliminate the need to configure on a per-host basis using the vSphere client, scripts, or other tools. Once a profile is created, it can be applied to your ESXi hosts or clusters. You can then check a host or cluster for any deviations from the preferred configuration in the profile. If the host is not in compliance, you can enforce the settings in the profile to bring the host back into compliance.
To begin using Host Profiles, you start by configuring your reference host. The configuration of the host that is imported into the host profile includes items such as the following:
NFS storage configuration
Networking configuration including vSwitches, VM port groups, management IP address configuration, and vNetwork Distributed Switch setup
NTP server configuration
Management of the root password
Configuration of services found on the Security Policy page
User, group, and permission configuration
Active Directory Integration settings
To create a new host profile, you can right-click on the host and select Host Profile > Create Profile from Host. You can start with the view Home > Management > Host Profiles and then follow this process:
Click the Create Profile icon to start the Create Profile wizard.
Select the option to Create Profile from Existing Host.
Browse through your vCenter hierarchy to find the server that will serve as the reference host.
Enter a Name and Description for the new profile and click Next.
Click Finish after you have viewed the summary information for the new profile.
Note
You can also import and export Host Profiles. When you export a Host Profile with administrator passwords, they are not exported, as the data in export file is stored in clear text. When you import the profile, you are prompted to enter the passwords again. To export a profile, right-click on the profile and select Export Profile. The profile is stored in the VMware profile format (.vpf). To import a profile file, click on Create Profile on the Host Profiles view and select the Import Profile option.
Once you have created a host profile, you may want to edit it to customize the settings or make them more appropriate for deployment to many hosts. In the Host Profile view, right-click on the profile and select Edit Profile. You will see the Edit Profile window shown in Figure 3.11. If you expand the profile, you will see the subprofiles for the previously listed components. You can browse each subprofile and update policies to best match your environment. In Figure 3.11, the policy to set the management interface IP address for the hosts is set to the option User Specified IP Address to Be Used While Applying the Configuration.
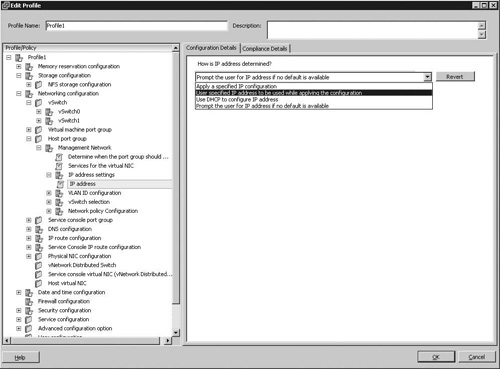
When you are editing a profile, you can also specify whether a policy will be checked for compliance. On the Compliance Details tab, you can disable the check box for that specific policy. Other policies set in the profile are still enabled for compliance unless you specifically disable them.
The next step for Host Profiles is to apply the profile to a host or cluster. When you attach a profile to a cluster, all hosts in the cluster will need to be compliant for the cluster to be compliant. As Host Profiles is not supported for VMware ESXi and ESX 3.5, you should not attach a profile to a mixed-version cluster. You can attach a profile to a cluster or host in the following ways:
In the Host Profile view, right-click on the profile and select Attach Host/Cluster.
Right-click on the host and select Host Profile > Apply Profile.
Right-click on the cluster and select Host Profile > Manage Profile.
Select the cluster’s Profile Compliance tab and click the Click Here to Attach a Host Profile link.
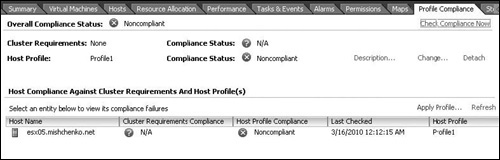
Once the profile has been attached to a cluster or host, you can check compliance of that object against the host profile. Figure 3.12 shows this process for a cluster. After the profile has been attached to the cluster, you click Check Compliance Now. Figure 3.12 shows that the cluster is noncompliant as a least one host in the cluster has been found to be noncompliant with the profile.
To correct this situation, select the noncompliant host and click on the link Apply Profile. Note that you have to place the host into Maintenance Mode before you can apply the profile. The Apply Profile wizard starts, which begins by prompting you to enter any required parameters for the profile. When configuring the profile in Figure 3.11, the policy for the management IP address was set to prompt for an IP address to be used. After entering that information, you then click Next and a list of configuration changes is generated for the host. Click Finish to apply the changes and an Apply Host Configuration task is created to update the host. Once the task has completed, the Host Profile Compliance status should change to Compliant, as will the status for the cluster if all hosts are now compliant. You need to take the host out of maintenance mode after you have completed applying the profile.
Tip
PowerCLI includes a number of cmdlets (pronounced commandlets) for managing Host Profiles. These include the cmdlets New-VMHostProfile, Test-VMHostProfile-Compliance, and Apply-VMHostProfile. Chapter 9, “Scripting and Automation with PowerCLI,” reviews the process of managing and applying host profiles with these and the other profile-related cmdlets.
Long-term users of ESX will be familiar with the Web-based management interface that has been a part of that product. This Web interface has allowed users to manage VMs easily; for example, they can gain console access without requiring the installation of the vSphere client. This is convenient for end users of VMs who might need to access the console or control the power status for a VM, but don’t need to get bogged down with running the vSphere client.
VMware ESXi has not been developed with this ability, but vCenter Server provides an Apache Tomcat–based Web service that allows for the remote management of VMs. The vCenter Web service provides support to the following Web browsers: Firefox, Internet Explorer, Mozilla, and Netscape Navigator.
When you log in to the Web Access, your access to objects is governed by the same roles and permissions that have been configured in vCenter Server. If a user does not have permission to control the power for a VM in the vSphere client, he or she will have the same restrictions in the Web client.
Some of the options for controlling a VM are shown in Figure 3.13. In this case, the login has full permission for the VM and can thus control the power status, reconfigure the virtual hardware, and manage snapshots. The user can also access the console and view alarms, tasks, and events that are related to the VM.
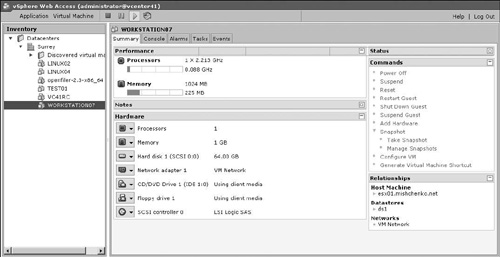
One of the commands available is Generate Virtual Machine Shortcut. This can be used to generate a URL that provides an end user with access to the VM’s console. You can customize the uniform resource locator (URL) with the following options:
Limit the Workspace View to the Console. This limits the user’s view to just the VM console. Other details such as the Events tab are hidden.
Limit View to a Single Virtual Machine. This option disables the user from viewing other VMs, as is the case with Figure 3.13.
Obfuscate This URL. This option makes the URL difficult to read or change.
The following URL is a sample created by the Generate Virtual Machine Shortcut option:
https://vcenter41/ui/?wsUrl=http://localhost:80/sdk&mo=VirtualMachine
     |vm-24&inventory=none&tabs=hide_
This option also includes the ability to create a Windows desktop shortcut.
You will notice that the sample vSphere Web Access view in Figure 3.13 does not include any information about the ESXi hosts or clusters that are running the VMs. The Web Access view does not provide any interface to manage those objects. The Datacenters object, folder objects, and child datacenter objects all display the following tabs: Summary, Alarms, Tasks, and Events. For Alarms, Tasks, and Events, all data is shown for the specific object type and all child objects. On the Summary tab, the DataCenters object and any folder objects displays a summary of the objects below it. The Summary tab for a child datacenter object does provide a useful view to gauge the overall health of your datacenter. This summary view provides the overall status for the child datacenter, the number of networks, and number of datastores. A list of datastores in this object is also shown with both the individual datastore capacities and available space for each.
For the seasoned ESX administrator, one of the significant challenges to migrating VMware ESXi is the inability to run scripts in the Service Console. As you’ve seen in the proceeding material, the functionality of the major vSphere options, such as vMotion and High Availability, is identical in both products, but you may have developed a number of console scripts that you use to manage your hosts or rely on console commands for maintenance and troubleshooting.
When VMware ESXi 3.5 was introduced, VMware also released the Remote Command-Line Interface (RCLI), which was available for Linux and Windows as well as in a virtual appliance format. The RCLI contained a number of esxcfg commands that you could use in the ESX Service Console except for the fact that the lack of complete command parity made switching to ESXi and the RCLI difficult. For example, the esxcfg commands for iSCSI configuration were not yet implemented in the RCLI and esxtop (or resxtop) was missing in the Windows RCLI. With the release of vSphere, VMware changed the name of RCLI to the vSphere Command-Line Interface and added a number of new commands to increase the vCLI’s capability as a replacement using the Service Console.
Microsoft PowerShell was first released in 2006 to replace Microsoft Windows Script Host. PowerShell is integrated with the Microsoft. NET Framework and is an extensible command shell designed to automate a wide range of Windows administrative tasks. VMware first released the VI Toolkit for Windows in 2008 to provide an easy-to-use PowerShell interface to the VMware Infrastructure application programming interface (API). The product was renamed PowerCLI in 2009 and released to provide support for VMware vSphere.
Later chapters provide more details about the installation and use of the vCLI and PowerCLI, and throughout the book there are relevant examples to accompany the equivalent graphical user interface (GUI) configuration. In the following pages, you’ll see a few simple examples of how these products can help you automate your management of VMware ESXi and assist in migrating from use of the Service Console.
The vCLI was designed to provide a common set of commands for system administration tasks for managing both ESXi and ESX hosts. For ESX administrators, this provides the opportunity to use existing management scripts with the associated risk of running commands in the Service Console.
The vCLI is available in installation packages for Linux and Windows as well as a preconfigured VMware appliance that can be imported to your host directly from VMware, as was shown in Chapter 2. Once you have one of the options installed, you are ready to start running vCLI commands. The list that follows summarizes the commands that you can use. As you’ll see from the list, VMware has started to prefix commands with vicfg-, but the prefix esxcfg- still exists for old commands. The commands are identical regardless of the prefix used, but as you create new scripts or update existing ones, it is best to begin using the vicfg- commands.
esxcli.exe                               vicfg-ntp (esxcfg-ntp)
resxtop                                  vicfg-rescan (esxcfg-rescan)
svmotion                                 vicfg-route (esxcfg-route)
vicfg-advcfg (esxcfg-advcfg)             vicfg-scsidevs (esxcfg-scsidevs)
vicfg-authconfig (esxcfg-authconfig)     vicfg-snmp (esxcfg-snmp)
vicfg-cfgbackup (esxcfg-cfgbackup)       vicfg-syslog (esxcfg-syslog)
vicfg-dns (esxcfg-dns)                   vicfg-user (esxcfg-user)
vicfg-dumppart (esxcfg-dumppart)         vicfg-vmknic (esxcfg-vmknic)
vicfg-hostops                            vicfg-volume (esxcfg-volume)
vicfg-ipsec (esxcfg-ipsec)               vicfg-vswitch (esxcfg-vswitch)
vicfg-iscsi (esxcfg-iscsi)               vifs
vicfg-module (esxcfg-module)             vihostupdate
vicfg-mpath (esxcfg-mpath)               vihostupdate35
vicfg-mpath35 (esxcfg-mpath35)           vmkfstools
vicfg-nas (esxcfg-nas)                   vmware-cmd
vicfg-nics (esxcfg-nics)
Tip
When you are running these commands on the Windows version of the vCLI, you need to add the extension .pl. The exception to this is the esxcli command.
The command syntax for the vCLI follows this pattern:
command - connection info - options
If you want to run the vicfg-vswitch command directly against your ESXi host, the command looks like the following:
vicfg-vswitch --server hostname --user login --password yourpassword options
The hostname is either the IP address or DNS name for the host, and the user and password are for an account defined locally on the host. A common option for the vCLI commands is –list, which in this case will provide a list of all vSwitches configured on the host.
You can also run the same command against your vCenter Server, but that requires that you add the --vihost option. In the following example, the hostname for the --server option will be your vCenter Server and the --vihost will be the specific ESXi host that the command will be run against:
vicfg-vswitch --server hostname --user login --password yourpassword
   -vihost hostname options
Note
The preceding examples used the password parameter. In Chapter 8, “Scripting and Automation with the vCLI,” you will learn about using session files or the vi-fastpass authentication component to remove the need to enter a password each time you execute a vCLI command.
The power of PowerShell is that it is an object-oriented scripting language rather than just one that produces text output. With the addition of VMware’s PowerCLI, the objects that you can use include number vCenter Server and host items such as VMs, Host Profiles, vSwitches, and permissions. With PowerCLI, you can build a pipeline of cmdlets that can process complex tasks within a single line of code.
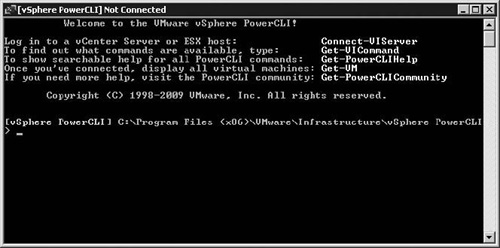
The installation of PowerShell and PowerCLI will be covered in Chapter 9. Once you have these items installed, you can begin to use PowerCLI. On the computer where you have installed PowerCLI, click Start and select All Programs > VMware > VMware vSphere PowerCLI > VMware vSphere PowerCLI. Once PowerCLI has started, you’ll see the welcome message as shown in Figure 3.14 and be ready to enter commands at the PowerShell prompt.
Tip
You may need to set the PowerShell execution policy if you start the PowerCLI shortcut and get this error: File C:Program Files (x86)VMwareInfrastructurevSphere PowerCLIScriptsInitialize-VIToolkitEnvironment.ps1 cannot be loaded because the execution of scripts is disabled on this system. Start the Windows PowerShell application and run the cmdlet Set-ExecutionPolicy RemoteSigned. You can then restart VMware vSphere PowerCLI.
To start using PowerCLI commands you’ll first want to connect to a host or vCenter Server with the Connect-VIServer command. The syntax for this command is as follows:
Connect-VIServer -Server <hostname> -User <username> -Password <password>
If you’re just starting with PowerCLI, two commands that will help are Get-VICommand and Get-Help. Get-VICommand provides a list of PowerCLI commands. You’ll find that there are quite a few cmdlets, so you can reduce that list to Get cmdlets by running the following command, which uses the Where-Object cmdlet to filter the output:
Get-VICommand | Where-Object { $_.Name -like "Get*" }
Get-Help can be used to provide help information about the various commands that are available; it is similar to the man command on a Linux system. If you run Get-Help Get-VMHost, you will see the help file for the Get-VMHost command. You can also use the switches -detailed and -example to see more information or just examples of the command.
Get-Help Get-VMHost –example
If you start to run a command, such as Get-VMHost or Get-VM, the output is fairly explanatory. If you combine these two cmdlets into a pipeline, you can query for a list of VMs running on a specific host with the following command:
Get-VMHost <hostname> | Get-VM
When you specify the hostname variable, you’ll want to use the name of your ESXi host as it appears in vCenter Server.
Now if you want to find out which VMs have snapshots, you can run this command:
Get-VMHost <hostname> | Get-VM | Get-Snapshot
Lastly, if you want to export the list of VMs with snapshots to a file, you can use the PowerShell cmdlet Export-CSV. The command you started with would now be the following:
Get-VMHost <hostname> | Get-VM | Get-Snapshot |Export-CSV
   "C:datasnapshot_report.csv"
This command produces a comma-separated value (CSV) file that you can import into any spreadsheet application.
Table 3.1 summarizes a number of common Get cmdlets that you can use to retrieve information about objects in your vCenter environment.
Table 3.1. Common Get Cmdlets Used to Query Objects in Your vCenter Server Environment
PowerCLI Cmdlet Name | vSphere Object |
|---|---|
| Cluster |
| Datastore |
| VM hard drive |
| VM network card |
| VM snapshot |
| vSwitch |
| VM |
| ESXi or ESX server |
The Direct Console User Interface (DCUI) provides a BIOS-like interface to the console of VMware ESXi. You access the DCUI either at the console of the physical host or via a remote management card such as a Dell Remote Access Card (DRAC), HP Integrated Lights-Out (iLO), or IBM Remote Supervisor Adapter (RSA) card. The DCUI can be used to interact with the host to perform tasks such as the following:
Setting the root password
Configuring the IP address and network interface card (NIC) for management traffic
Restarting the management services on the host
Reviewing system logs
Caution
By default, only the root account is set up with access to log in to the DCUI. You can change this to allow other users to log in without the root account. Care should be taken in granting access to the DCUI as it is possible to change the management network settings, change the root password, or shut down the host. Security for the DCUI is discussed in Chapter 7, “Securing ESXi.”
Table 3.2 describes the keys you can use to navigate and make changes within the DCUI.
Table 3.2. Navigating the DCUI
Key | Action |
|---|---|
F2 | View or change the host’s configuration |
F4 | Change the display to high contrast mode |
F11 | Confirm significant configuration changes |
F12 | Restart or shut down the host |
Arrow keys | Move between selection fields |
Enter | Select a menu item as well as save and exit a menu |
Spacebar | Toggle a value |
Esc | Exit without saving |
q | Exit system logs |
Alt+F1 | Access the tech support console |
Alt+F2 | Return to the DCUI screen |
Alt+F11 | View summary information for the host (ESXi version, server, CPU, and memory) |
Alt+F12 | View the VMkernel log |
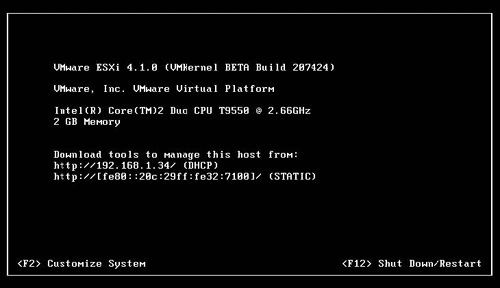
When your VMware ESXi host has booted, you will find yourself at the DCUI welcome screen, as shown in Figure 3.15. The screen displays the build of VMware ESXi that is running, as well as the detected server hardware, CPU, and memory. If your DCUI session has been active for more than one minute, the display switches to the black and white sleep mode. Press any key to activate the DCUI session. On the DCUI welcome screen, you then can press F2 to begin configuring the ESXi host or press F12 to restart or shut down the host.
To shut down or restart your ESXi host, follow this procedure:
Press F12 at the DCUI welcome screen to shut down or restart your ESXi host.
Authentication is required to perform a reboot or shutdown, so you are prompted to provide a login name and password.
After you have been authenticated, you are given the option to press F2 to shut down the host. Press F11 to restart the host or press the Esc key to cancel the operation, as shown in Figure 3.16.

When you log in at the DCUI, you are prompted for a login name and password, as shown in Figure 3.17. Note also that it is possible to configure a keyboard language to be used in the DCUI. The DCUI supports the following keyboard language layouts:
English (this choice is displayed as Default)
French
German
Japanese
Russian

Changing the keyboard language does not change the display language of the DCUI, which remains in English; the layout settings only change the layout of the keyboard input.
Caution
It is recommended to change the keyboard language used prior to setting the password for the root account. If you change the password and then modify the keyboard language, you may not be able to log in to the DCUI again if you have used a password that cannot be reproduced with the new keyboard language.
You can change the keyboard language on either the login screen shown in Figure 3.17 or with the Configure Keyboard option on the DCUI System Customization screen. To use the latter option, follow these steps:
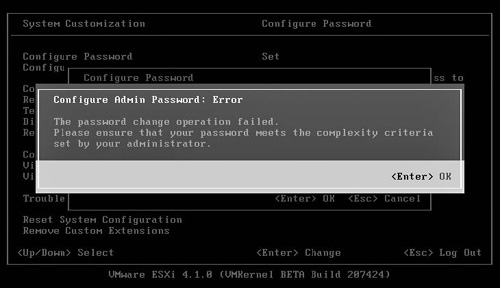
The most important task in the DCUI is to set the password for the root login. After a default installation, the password for root is blank, opening the host to the potential of unauthorized access. You can use a scripted install to remove that risk, but in cases where that is not possible, your first task in the DCUI should be to set a password for root:
On the DCUI System Customization screen, select Configure Password. If you are setting the password for the first time, you will not be able to enter anything in the Old Password field. If you are changing the password, you must enter the old password before you can switch to the New Password field.
Enter your new password, select the Confirm Password field and retype the new password.
Press Enter to save the password change or Esc to cancel.
VMware ESXi has specific password complexity requirements, which were discussed in Chapter 2. If your new password does not meet those requirements, you will receive the password error shown in Figure 3.18. Once you have set a password for the root account, the option summary for the Change Password option should have a status of Set.
To enhance the security of your VMware ESXi host, you can enable Lockdown Mode. This restricts which accounts are able to manage the host via the following host services: the vSphere API that is used by the vSphere Client, the vCLI and other API clients, Common Information Model (CIM), Tech Support Mode, and the DCUI. After you enable Lockdown Mode, no account other than vpxuser will have authentication permission or be able to perform operations directly on the host. This requires that you manage your ESXi host using vCenter Server rather than connecting directly with your management tools. Lockdown Mode is discussed further in Chapter 7.
Caution
If you are configuring a VMware ESXi host that will not be managed by vCenter Server, you should not enable Lockdown Mode. If you attempt to enable Lockdown Mode on a VMware ESXi host that is not managed by vCenter in the DCUI, the configuration change will not be accepted. Although it may appear that the change has been made, the Lockdown Mode option summary will still display a status of Disabled.
To enable Lockdown Mode, follow these steps:
On the DCUI System Customization screen, select the Configure Lockdown Mode option and press Enter.
Press the spacebar to enable Lockdown Mode and then press Enter.
Once you have enabled Lockdown Mode, the configuration change takes effect immediately. If you try to connect directly to the ESXi host with the vSphere client, you receive the following error:
You do not have permission to login to the server: <hostname>
Connecting with other management tools such as PowerCLI or vCLI scripts generates a similar error.
During the autoconfiguration phase of setup for a new VMware ESXi host, the host is set to use Dynamic Host Configuration Protocol (DHCP) for the IP address. If no DHCP servers are available, ESXi assigns itself a link local IP address on the 16.254.x.x/16 subnet. The autoconfiguration phase also creates a management interface with vmnic0 on vSwitch0. The Configure Management Network screens within the DCUI allow you to set the IP configuration for your host, DNS settings, the virtual local area network (VLAN), and vmnic to use for management traffic.
Caution
If you plan to run VMware ESXi in a high security environment, you may not be allowed to boot an unconfigured host on the network. In such a situation, you should boot ESXi for the first time with no network cables attached to the host. You can then use the following procedures to configure the IP address for the host, VLAN ID to use for management traffic if required, the root password, and the network card to use for management traffic.
When you select the Configure Management Network option, the DCUI screen displays the current IP addresses and hostname, as shown in Figure 3.19. With VMware ESXi, only a single VMkernel port can be dedicated to management traffic. When you are creating a new VMkernel connection with the vSphere client, the Connection Settings screen allows you to set properties for the port group. One of the options is Use This Port Group for Management Traffic. There are also options to enable the port group for vMotion or Fault Tolerance logging. You can also enable this option when you edit the properties for the vSwitch being used for management. If you make changes in the vSphere client, these may not be reflected in the DCUI until you have restarted the management network.
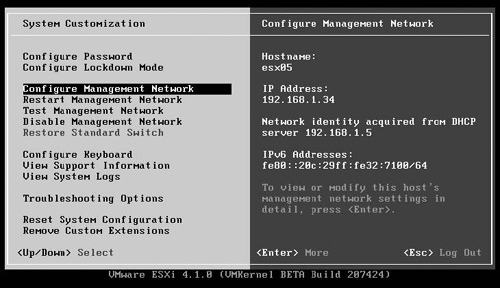
To begin making networking changes on your VMware ESXi host, select the Configure Management Network option and press Enter. You will have the following configuration options. Selecting each option will display the current settings for that option.
Network Adapters. This screen lists the network adapters that are available to the VMkernel and allows you to configure which are used with the management VMkernel port.
VLAN (Optional). A VLAN ID can be set for the management network. The default setting is none (0).
IP Configuration. On this screen, you can choose between DHCP and a static IP address as well as set a static IP address, subnet mask, and default VMkernel gateway.
IPv6 Configuration. This screen allows you to enable or disable IPv6 for the VMkernel and lets you configure IPv6 settings.
DNS Configuration. You can set the DNS settings for the VMkernel and the hostname with this option.
Custom DNS Suffixes. With this option, you can configure additional DNS suffixes, which the VMkernel uses when attempting to resolve short, unqualified hostnames.
The autoconfiguration process of using vmnic0 for vSwitch0 and the management VMkernel port may not be appropriate to your setup, or you may want to add redundancy to vSwitch0 by adding another network port. In either case, select the Network Adapters option and press Enter. The DCUI Network Adapters screen will show the list of adapters that are available to the VMkernel, as shown in Figure 3.20. The screen shows the physical Media Access Control (MAC) address for each network adapter port as well as a status of Connected or Disconnected. In the case of vmnic2 and vmnic3 in Figure 3.20, the status also appends (…). This indicates that the network port is bound to a vSwitch other than vSwitch0. If you select a network port attached to another vSwitch, you will receive a warning message that the adapter will be removed from its existing connection when you press Enter to save the change on the Network Adapters screen. However, the change will not actually take effect until you press Esc on the Configure Management Network screen. At that point, you will be prompted to apply your changes and restart the management network, as shown in Figure 3.21. If you select Yes, the changes are committed and the management network is restarted, resulting in a network disconnect for any remotely running management tools. If you select No, your changes are discarded and you return to the main DCUI System Customization screen. Alternatively, you can press Esc to return to the Configure Management Network screen to make further changes.

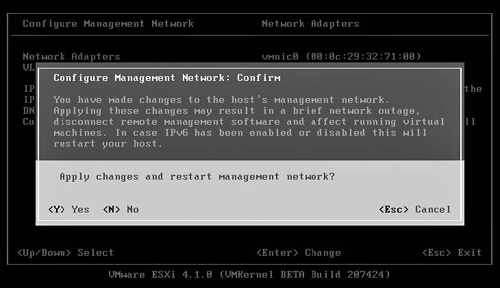
Caution
Configuration changes made to the management network require a restart of management networking. This affects remote running management tools. VMs running on the ESXi host are not impacted unless you have made a change that might remove a vmnic from an existing VM vSwitch or your network changes IP access to an iSCSI or NFS datastore storage.
The second option on the Configure Management Network menu is the VLAN setting for the management interface. VLANs can be used to create multiple Layer 3 networks (IP subnets) on the same Layer 2 network switch. VLANs provide broadcast control and basic security tools to isolate sensitive network traffic. Chapter 7 discusses VLANs further. The default VLAN ID setting for the management interface is to use no VLAN. In the vSphere client, this is the None (0) option. You can change this to be set to any value between 1 and 4095.
Note
It is possible to configure the management VMkernel port to use VLAN ID 4095. Normally you would consider VLAN 4095 on a VM port group. In that case, you would be using Virtual Machine Guest Tagging (VGT). With VGT, the guest operating system (OS) is responsible for adding or removing the VLAN tag and not the vSwitch on the ESXi host. Using VGT is useful when the number of VLANs per VM exceeds the number of virtual NICs that are assigned to it. This requires an 802.1Q VLAN trunking driver to be running on the guest (OS), and VMware ESXi would not alter tags on packets as it would pass them from the physical switch to the guest OS and back again. In the case of using VLAN ID 4095 for the management interface, the VMkernel will be able to receive all VLAN tagged frames and be able to send on any VLAN ID.
You can use the following procedure to set the VLAN ID:
On the Configure Management Network screen, select the VLAN (Optional) menu choice and press Enter.
Enter a VLAN ID and then press Enter to save the change.
Press Esc to exit the Configure Management Network screen, which will prompt you to apply the change and restart the management network.
If you need to remove the VLAN ID from the management interface, select the VLAN (Optional) menu again and delete the VLAN ID that has been configured. When you press Enter to save the change, the summary for VLAN (Optional) should display Not Set. Press Esc to exit the Configure Management Network screen and apply the change to remove the prior VLAN ID.
The third option for configuring the management network is to set the IP address for the host. The default configuration choice will be set to use DHCP to assign an IP address, subnet mask, and default gateway.
To set the IP address for the host, follow these steps:
Select IP Configuration on the Configure Management Network screen and press Enter.
Use the arrow keys to select the Set Static IP Address and Network Configuration option and press the spacebar to enable it.
Enter the IP address, subnet mask, and default gateway and then press Enter to save the change and return to the Configure Management Network screen.
The IP Configuration summary should now display a setting of Manual. Press Esc to exit the network configuration screen and to apply the configuration change.
Caution
When you set a static IP address for VMware ESXi, the DCUI will not display an error message if you have selected to use an IP address that is already in use on the network.
You can also enable an IPv6 address for the management VMkernel port. The default configuration disables IPv6 support for management traffic on the host. Your host can be configured to obtain an IPv6 address automatically if you are running a DHCPv6 server or if your network supports Router Advertisement. When you select the IPv6 Configuration option, you will see the configuration screen shown in Figure 3.22. If you want to disable IPv6 for management traffic, press the spacebar to deselect the Enable IPv6 option. This requires a restart of the host to take effect. For setting IPv6 addresses on the host, you have the following options:
Do not use automatic configuration. In this case, you will need to enter manually up to three IPv6 addresses and optionally a default gateway.
Use DHCP stateful configuration. You can use this option if you have a DHCPv6 server. With the IPv6 stateful address configuration, the DHCPv6 server maintains a list of nodes and their state to determine the availability of each IP address in the configured DHCP range.
Use Internet Control Message Protocol (ICMP) stateless configuration. With this option, the VMware ESXi host autoconfigures its own IPv6 addresses based on router advertisements.
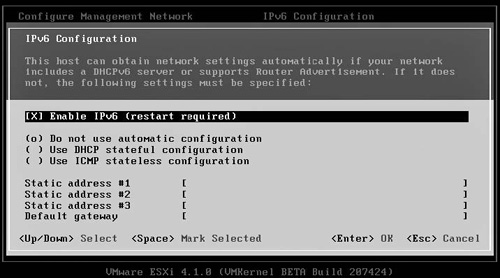
Once you have made your configuration changes, press Enter to save and exit the IPv6 Configuration screen. After you press Esc to exit Configure Management Network screen, you will be prompted to apply your change and to restart the management network.
The fifth configuration option for the management network is to set the DNS servers and hostname. The default option is to obtain DNS server addresses and a hostname automatically:
Select the DNS Configuration option and press Enter to make changes.
Select the Use the Following DNS Server Addresses and Hostname option and press the spacebar to enable it.
You then can enter the IP addresses of your primary and alternate DNS servers as well as the hostname. You can choose to leave the DNS server field blank.
Press Enter to save your changes and to exit the DNS Configuration screen.
Press Esc to exit the configuration screen and to apply your changes.
The last network configuration option is to set custom DNS suffixes. Select the Custom DNS Suffixes option and press Enter. You can enter multiple DNS suffixes, separating each with a comma or space. Press Enter to save your changes and then Esc to exit and apply your changes. As with the other Configure Management Network options, you will be prompted to restart the management network.
A restart of the management network is a required step when making a configuration change to the management VMkernel port. You may also have to perform this task should there be a problem with management network traffic to the ESXi host or if you want to renew a DHCP lease. Renewing the DHCP lease for a host may change the IP address that is assigned to that host. In such a case, any remote management tools may be unable to connect to the host. Restarting the management network may also impact the VMs running on the host.
To restart the management network, follow these steps:
On the DCUI System Customization screen, select Restart Management Network and press Enter.
Press F11 to confirm that you want to restart the management network.
The Restart Management Network screen displays the progress of the restart. Once it has completed, press Enter to return to the System Customization screen.
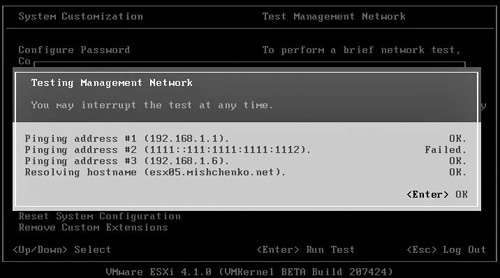
The Test Management Network option provides the interface to perform simple network connectivity tests. For a default configuration ESXi, perform the following four tests:
If you have configured an IPv6 default gateway on your ESXi host, that IPv6 address will be used for the connectivity test instead of the alternate DNS server. You can update or remove the IP addresses or hostname as required and then press Enter to start the test. The output from the test will be similar to what is shown in Figure 3.23. Besides testing IP and DNS setup issues, this option can be useful for troubleshooting iSCSI connectivity issues. With prior versions of ESX, you would need to open a console session and then test connectivity to the iSCSI SAN with both ping and vmkping, as the former would test connectivity for the service console and the latter would test connectivity for the VMkernel. As all iSCSI network traffic is handled by the VMkernel in ESXi, the ping test run in the DCUI is sufficient to test for a network problem on your iSCSI device.
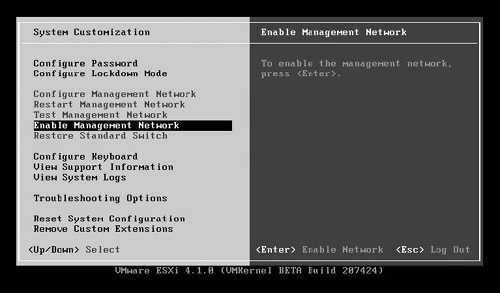
At times you may find it necessary to isolate your VMware ESXi host from vCenter Server, perhaps to troubleshoot a problem with a High Availability (HA) or Distributed Resource Scheduler (DRS) cluster. Shutting down the host or changing the IP configuration may not be a desirable option, so the Disable Management Network option provides the opportunity to remove the ESXi host from the network without making any configuration changes. Once the management network is disabled, you will be unable to access the host via the vCenter Server or use the vSphere client or other ESXi hosts. This change will not impact running virtual machines and they will continue to run when the management network is disabled.
To disable the management network, follow these steps:
On the DCUI System Customization screen, select the Disable Management Network option and press Enter.
A dialog box appears requesting that you press F11 to disable the management network.
Once you are returned to the System Customization screen, you will notice that the Disable Management Network option is now called Enable Management Network and that the other network options have been disabled, as is shown in Figure 3.24. While the management network is disabled, no remote management tools can access the host. The VMkernel networking stack will be disabled, so if you access the Tech Support Console, you will not have network connectivity to any other hosts. The main DCUI welcome screen will no longer display the configured IP address for the management network, but will rather display that you can download tools to manage the host from http://0.0.0.0.0/ (STATIC). To enable the management network again, select the Enable Management Network, press Enter, and then press F11 on the confirmation screen.
One of the new features of vSphere 4.0 is vNetwork Distributed Switches, which allow for configuration of networking at the vCenter level rather than individually on each host connected to vCenter Server. This allows for consistent configuration of vSwitches, making it easier to migrate VMs between hosts. Should you configure vNetwork Distributed Switches on your VMware ESXi host and you find that you then need to remove the configuration; the Restore Standard Switch option provides this functionality in the DCUI. You may need to perform this operation for the following reasons:
The host is no longer connected to vCenter Server and most vNetwork Distributed Switch features are unavailable to your ESXi host.
The vNetwork Distributed Switch is no longer working or needed.
The vNetwork Distributed Switch much be removed to restore connectivity to your vCenter Server but you require the host to remain accessible.
When you restore the standard vSwitch, a new virtual adapter is created and the management VMkernel port that is connected to the vNetwork Distributed Switch is moved to the new vSwitch. If your ESXi host has a standard vSwitch, the option to restore will be grayed out. To restore the standard switch, use the following process:
Select the Restore Standard Switch option on the System Customization screen and press Enter.
Press F11 to confirm the configuration change.
Once you are returned to the System Customization screen, the Restore Standard Switch option should be grayed out.
If you select the option View Support Information, the following information about the VMware ESXi host is displayed:
The server’s physical serial number.
The license number that has been configured for the host.
The SHA1 thumbprint for the Secure Sockets Layer (SSL) certificate used by the host. You can use the thumbprint to verify that you are joining the correct ESXi host to your vCenter Server as the Add Host wizard will display the SHA1 thumbprint.
If you are using ESXi Embedded or have installed a customized version of ESXi, additional support information may be shown if you press the Page Down key.
At some point, you may find that you need to review the system logs for your VMware ESXi host to troubleshoot an issue. The View System Logs menu choice provides the opportunity to view the host’s logs at the DCUI. When you select this option, you will see the four following system logs to view, as shown in Figure 3.25:
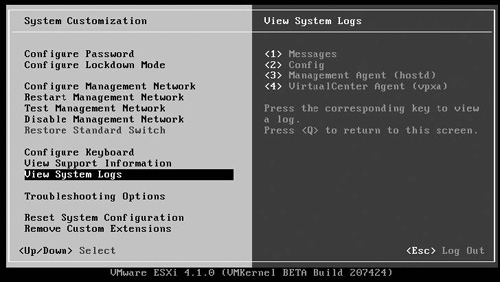
<1> Messages. With ESX, the
messagesfile is the log for the Linux-based service console. With ESXi,messagesis the log file for the VMkernel and is the equivalent file to/var/log/ vmkerneland/var/log/vmkwarningson ESX.<2> Config. This log file records the VMkernel initialization process. Once your VMware ESXi host has booted up, this log file is no longer written to. It will contain information about the modules and drivers being loaded, the initialization of the system filesystem, mounting of datastores, network initialization, and the starting of system agents. The
configlog file provides an extensive view of what happens to get your host from the initial loading of the VMkernel to a fully functioning host.<3> Management Agent (hostd). The
hostdprocess is the agent that provides API access to the VMkernel and is used by the vSphere client and other remote management applications. This option displays the log for that agent.<4> VirtualCenter Agent (vpxa). This system log file is available only on a vCenter Server–managed host. The
vpxaprocess is used to connect the host to vCenter and the log records events and errors related to vCenter communications and operations.
To view a log file, press the corresponding number key for the log. The DCUI screen will be replaced with the log file. An extensive help file can be accessed by pressing the H key. To scroll down through the log file, you can press the spacebar to move down one screen or press Enter to move down one line. You can likewise use the Page Up and Page Down keys. To perform a search of the log file, you can use the following process:
Press the slash (/) key.
Type the text you want to find. Keep in mind that the search will be case sensitive.
Press Enter.
If your search word is found, it will be highlighted in the log file. You can then press the N key to repeat the search. If you want to search backward through the file, you can type in ?<search term> instead of using the slash key and then press Shift+N to repeat the backward search. Another useful command for you to use when viewing log files is the F key, which will follow the log file as it is updated. This is the equivalent to using the tail –f command in the ESX console. You can press Ctrl+C to stop following the log file. Finally, you can press the Q key to exit the log file and to return to the DCUI System Customization screen.
Troubleshooting Mode Options is a new screen with ESXi 4.1. Through this screen, you can enable access to Local Tech Support mode or Remote Tech Support mode using Secure Shell (SSH). On the screen, you can also restart the management agents for the host. This would serve the equivalent function of running services mgmt-vmware restart on a VMware ESX host. When you select the option, the screen shown in Figure 3.26 is displayed.
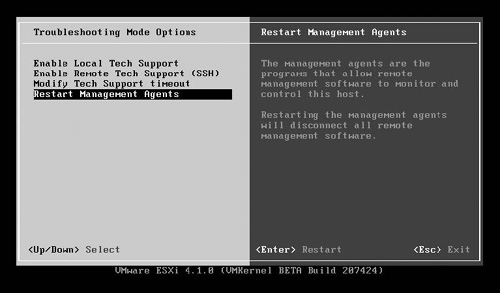
With ESXi 3.5 and 4.0, to access the console, you would press Alt+F1, type in unsupported and then press Enter to access a login screen to the console. With ESXi 4.1, that is no longer the case. To access the console, you must enable access on the Troubleshooting Mode Options screen. Select the Enable Local Tech Support option and press Enter. The option changes to Disable Local Tech Support and when you press Alt+F1 to access the console screen, you will now see a login prompt and the following warning:
Tech Support Mode is not supported unless used in consultation with
   VMware Tech Support.
You can press Alt+F2 to return to the DCUI.
With the Enable Remote Tech Support (SSH) option, you can enable SSH sessions to your host for troubleshooting remotely without needing to access the console and modify system files. Select the option and press Enter to enable SSH access. The option will change to Disable Remote Tech Support (SSH), and as with Local Tech Support mode, you can press Enter again to disable it manually.
Caution
When you disable Remote Tech Support mode existing SSH sessions will not be automatically terminated. New session attempts will receive a connection refused error, but you will be able to use an existing SSH session until you close the SSH client. For a Local Tech Support session, type in the exit command to close your session. If you don’t, your local session will remain available even after Local Tech Support mode is disabled.
To reduce the security risk of enabling Local or Remote Tech Support mode, you can enable a timeout value. When you select the Modify Tech Support timeout option and press Enter, you will be able to enter a timeout value between 0 and 1440 minutes (12 hours). If you enter 0, there will be no timeout for Local and Remote Tech Support modes and this is not a recommended setting for production systems. The default value is 10 minutes. Enter your desired timeout value and press Enter.
Note
The Troubleshooting Mode Options screen will not automatically refresh the status for Local and Remote Tech Support modes and thus the screen may show that the options need to be disabled even though they already have been. You can press the ESC key and then Enter to exit and return to the screen to refresh the enable/disable status of the support modes.
The last option on the Troubleshooting Mode Options screen is to restart the management agents. You may need to restart the agents if you are having problems accessing the ESXi host remotely. This process restarts all agents and services configured in /etc/inet.d, which includes items such as the DCUI, the hostd agent, the ntpd agent, and the sfcdb agent. If the host is a member of a High Availability cluster, the Automated Availability Manager (AAM) will also be restarted. Any remote management connection will be interrupted when you restart the management agents.
To restart the management agents on your ESXi host, use the following process:
The Reset System Configuration menu option provides a method to “reinstall” your ESXi, but in a much faster way. Within a VMware ESX environment, you would have to disconnect your SAN storage, run through the installation process, reconfigure your host, and join it to your vCenter Server again. With ESXi, you can reset the configuration and be ready to reboot your host within seconds. You don’t have to make changes to any FC SAN connections, as datastores that were attached to the host are not impacted. After you have rebooted, you can reconfigure your storage and then reregister the VMs that the host was running prior to the reset.
The reset process deletes your system configuration, sets the root password to be blank, and reboots the host. If you are using ESXi Embedded, any configuration changes made by the vendor, such as a license file, will also be deleted. It is recommended to make a system configuration backup using the vCLI command vicfg-cfgbackup before resetting the system. To reset your system configuration, use this process:
A custom VMware ESXi extension is a VMkernel driver or CIM provider that is typically provided by a third-party source. You will typically install an extension to add hardware support or to enhance monitoring of your system. An extension will typically be installed using the vCLI command vihostupdate.
Should you have a problem with an extension, the Remove Custom Extensions menu choice will allow you to remove all extensions from the system. You will not be able to remove just a single extension.
Note
If you have just installed an extension and are having problems with it, you can remove just it using the alternate boot bank. See Chapter 11, “Under the Hood with the ESXi Tech Support Mode,” for a discussion of that process.
To remove all custom extensions installed on your host, use the following process:
When you deploy VMware ESXi, vCenter Server is the primary tool that you use to manage your hosts. This section reviews some of the third-party products available for managing your data-center. A rich variety of tools and products have emerged from VMware partners and third-party developers, and the products discussed in this section represent only a fraction of the options available for you to use with ESXi. These tools range from simple and free to complex and not so free.
RVTools is a Windows .NET 2.0 application which uses the vSphere 4 software development kit (SDK) to display a wealth of information about your hosts and VM. RVTools works both with vCenter Server and standalone ESXi hosts to show information about CPU, memory, NICs, snapshots, and also every other property for your VMs and hosts. The application can be downloaded from http://www.robware.net/ and is ready for use after a very short installation process.
When you start RVTools, you enter the vCenter or ESXi host to which you are connecting, using an account that has full administrative rights. RVTools then queries the target and populates a number of tabs with information about hosts and VMs, as shown in Figure 3.27. The views are not dynamic, but you can refresh the data by selecting View > Refresh. You can select the different tabs to quickly view the information that you’re looking for. vSnapshot displays a list of VMs with snapshots. With the vDatastore tab, you can quickly get a list of all the data-stores and their access status, capacity, and free space. On the vTools tab, you can see the VMware Tools status for each VM and you can optionally select to install VMware Tools to those VMs that don’t have it installed or have an out-of-date version.
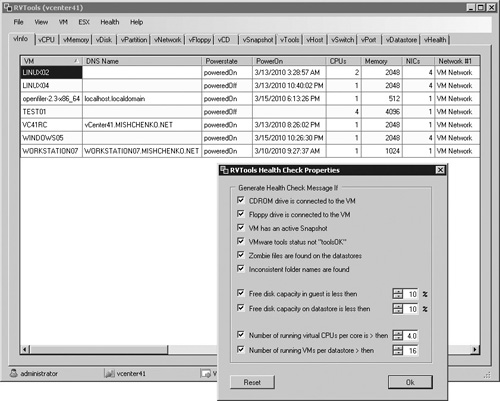
You’ll find that the most powerful feature of this product is the vHealth tab. The configuration options for the tab are shown in Figure 3.27. The Health Check Properties windows includes options to check which VMs have snapshots, free disk capacity threshold checks for VMs and datastores, and the ability to check the number of VMs per CPU core and datastore. The vHealth tab provides a summary of the objects that have failed to meet your configured thresholds and provides you with a simple checklist of potential issues you may have to address. If you want to analyze the data provided further, you can export a specific tab or all tabs to comma-separated value (CSV) files.
At some point, you’ll need to transfer files to your host or between your hosts. FastSCP provides a simple-to-use tool that will manage your file transfer with ESXi without requiring the enabling of the unsupported SSH service. The installation includes the GUI application for managing transfers, a built-in editor that will properly display ESXi files (unlike Notepad, which tends to bungle the formatting), and a Windows service to manage scheduled transfers. FastSCP can authenticate directly with your ESXi host or with vCenter. You can also manage files on Linux hosts.
When copying files, FastSCP uses space preallocation to ensure that the copied file is not fragmented. You can also enable e-mail reporting for scheduled jobs.
Veeam provides a number of other free tools, including Visio stencils and Veeam Monitor Free Edition, which provides real-time monitoring and alerting. Veeam’s commercial products include tools for backup and replication, reporting, and monitoring and a management pack for Microsoft Systems Center Operations Manager.
vSphere client plug-ins provide a method to extend the vSphere client by allowing you to create custom menus and tabs with vCenter that you can integrate with third-party applications. For example, vCenter Update Manager is provided as a plug-in and EMC provides the Storage Viewer plug-in to provide views of storage usage and configuration information. The Xtravirt vSphere Client RDP (Remote Desktop Protocol) Plug-in provides integration of the Windows Remote Desktop tool with the vSphere client.
The installation package for the plug-in can be downloaded from http://www.xtravirt.com and consists of a Microsoft Installer (MSI) package which you install on the same workstation where you have the vSphere client installed. The installation does require that Microsoft .NET Framework 3.5 be already installed. Once you have the plug-in installed you can start the vSphere client and connect to your vCenter Server host. Select Plug-ins > Manage Plug-ins and you should see the Xtravirt RDP plug-in installed and enabled.
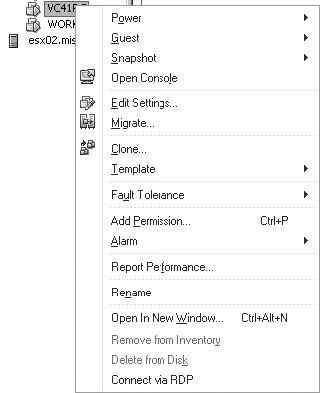
If you select the Home view and then choose Solutions and Applications > Xtravirt RDP Plugin, you can configure your RDP connection information to be used for the RDP connections that you make with this plug-in. To connect to a VM with the RDP client, simply right-click on the VM and select Connect via RDP, as shown in Figure 3.28.
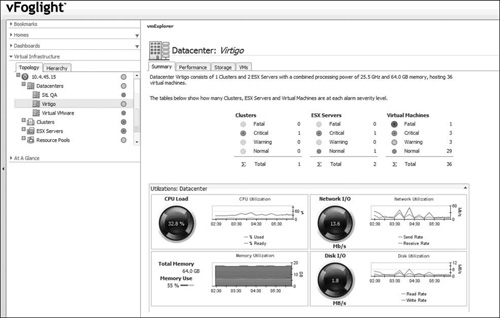
vFoglight provides an enterprise-class solution for performance monitoring, capacity, planning and chargeback. With performance monitoring, vFoglight can detect and resolve performance and availability issues for both virtual and physical servers. Capacity planning reduces the need to overallocate infrastructure components. The chargeback features of vFoglight allow you to easily ascertain which business groups and workloads are consuming resources, which allow costs to be recovered according to actual infrastructure use.
Access to the data that vFoglight collects and analyzes is available through various Web-based dashboards. The vmExplorer dashboard provides detailed views of the datacenter, clusters, hosts, resource pools, and VMs. The dashboard view in Figure 3.29 provides a summary view of a datacenter. The page displays the overall resource usage for CPU, network, memory, and disk. A table shows the number of alerts for clusters, hosts, and VMs. The other dashboards include vmMonitor and vmAlarms. vmMonitor is responsible for performance and availability monitoring. vmAlarms provides alerts capability and is augmented with expert advice for the alerts that are generated.
EVM Control is part of ManageIQ’s Enterprise Virtualization Management (EVM) suite. EVM Control provides policy-based management, security and compliance capabilities for your vCenter Server and ESXi deployment. With policy-based management of VMs, you can ensure that IT standards are enforced, improving reliability and availability.
Some of the elements of EVM Control include the following:
Logging and Auditing. You can document system changes and policy updates with the ability to report on the history of changes and transactions.
Configurable Policy Enforcement. vCenter Server and ESXi make the creation, migration, and cloning of VMs such an easy task that it becomes difficult to control what happens to a VM. With configuration policy, management policies can be applied at any point in the VM life cycle, including creation, cloning, migration, and even stopping and starting. EVM Control ensures that policies are enforced at all times and for all VMs.
Adaptive Policy Engine. EVM Control can determine the best combination of operations, security, configuration, and business policies that are appropriate to a specific VM, host, or event.
Policy Actions. A number of automated responses are available with EVM Control, including notifications, issuing warning to end users and administrators, and quarantining or disabling of noncompliant VMs.
There is a broad range of tools for managing VMware ESXi and vCenter Server. The vSphere client provides the ability to manage both standalone ESXi hosts and hosts that are part of a vCenter Server datacenter. VMware has introduced two great scripting options with the vCLI and PowerCLI. These scripting options can be used to reduce the load of repetitive and complex tasks. In addition to the management tools that VMware develops, there is a wide range of third-party tools, ranging from simple utilities to complete virtual machine life cycle management.