An essential task in maintaining any software installation is the application of patches. Firmware updates are provided periodically for ESXi to correct software bugs, implement new functionality, and remove new security risks. With ESXi 4.1, it is possible to patch your hosts with vCenter Update Manager (VUM), PowerCLI, or with the vCLI command vihostupdate. This chapter will step through the processes required to patch your ESXi hosts with these methods.
The process of installing patches for ESXi differs from that for ESX in several significant ways. Patches for ESX are released with only the necessary code changes to fix or secure a specific issue. They can vary significantly in size and more importantly have dependencies on previously released patches. Thus, it is necessary to track which patches are installed on an ESX host and ensure that all necessary patch dependencies are tested within your test environment to make certain that patches are properly installed and that dependencies do not harm your environment.
ESXi patches are released as complete firmware updates. Any patch or update release contains at least one of the following two bundles to update the following components of ESXi:
The ESXi firmware
VMware Tools ISO images
As a single ESXi patch includes all the necessary software components to run ESXi, an ESXi patch does not have any dependencies on prior patch releases. Rather, a single patch in a cumulative package contains all previously released bug and security fixes. Installing the latest patch ensures that you have all the latest updates installed on your host.
The second significant difference between patches for ESX and ESXi is the reboot requirements. With ESX, a patch may make only a minor change and not require a reboot of the host. With an ESXi patch, the firmware component will always be replaced, which necessitates a host reboot. The virtual machines running on the host will need to be stopped and the host must be placed into maintenance mode before the patch can be applied. After the patch has been applied, a reboot is required so that the new firmware version can be loaded. If your host is part of a fully automated Dynamic Resource Scheduling (DRS) cluster, the virtual machines running on the host will be migrated when the host is placed in maintenance mode. Otherwise, you can manually migrate your virtual machines with vMotion to ensure that the patch process does not interrupt their availability. For a standalone ESXi host, you must shut down any running virtual machines before placing the host in maintenance mode, so you should plan on shutting them down appropriately before applying the latest patch to the host.
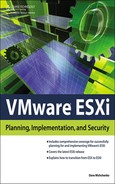
Information about the patches available for ESXi can be found at this link: http://www.vmware.com/patch/download/. On that page, you can select to view all patches for a specific product and version. If you select a product of ESXi (Embedded and Installable), a version of 4.0.0, and then click Search, a list similar to that shown in Figure 10.1 is displayed. Patch bulletins follow a specific naming convention; an example of a bulletin name is ESXi400-201005401-SG. The ending of the name signifies the type of bundle that you may download. The ending of SG means that the bundle contains security fixes, and an ending of BG indicates that the bundle provides bug fixes. With ESXi, an update release will also be listed on the patch download page and be bundled in the same format. The download for an update will have a UG suffix and be installed with the same processes described later in this chapter.
The vCLI includes the command vihostupdate, which can be used to install patches and updates on your ESXi host. You can download patches to the computer on which you have the vCLI installed or use a media depot to store the bundle files. In the case of downloading the patch file to your computer, the vihostupdate command uses the actual ZIP file as an argument for the --bundle option. If you plan to use a media depot, which can be accessed by vihostupdate with HTTP, HTTPS, or File Transfer Protocol (FTP), you have to extract the ZIP file and use the --metadata option.
If you are not using a media depot, you just run vihostupdate with the --bundle option to patch an ESXi host, as shown in this example:
vihostupdate.pl --server esx08 --install --bundle c: mpESXi400-201005001.zip
The following steps demonstrate how to patch an ESXi host using a media depot.
Open a Web browser and access the uniform resource locator (URL) http://www.vmware.com/patch/download/.
Change the product type to ESXi (Embedded and Installable) and then select the appropriate version for the host you will be patching. You can optionally select a patch classification to filter only general, security, or critical patches. Click Search to produce a list of applicable downloads.
Select the patch release you wish to download and click Download Now. As mentioned previously, the most recent patch will include all prior bug fixes, security patches, and feature enhancements.
Extract the ZIP file to your media depot. The files extracted include
metadata.zipand a folder structure containing one to three vSphere Installation Bundle (VIB) files. The VIB files will correspond to the two software components of ESXi discussed earlier in this section of the chapter.Put the ESXi host in maintenance mode, as shown in the following example:
hostops.pl --server vcenter41.mishchenko.net --operation enter_maintenance
     --host esx08.mishchenko.net
Putting host esx08.mishchenko.net in maintenance mode
Host entered maintenance mode successfully
If the host is part of a fully automated DRS cluster, any virtual machines running on the host will be migrated to other hosts in the cluster. Otherwise, you can manually migrate the virtual machines with the vSphere client or by using the
hostevacuatescript that is included with the vCLI before you issue the command. If the host cannot be put in maintenance mode, an error message is displayed informing you that certain VIBs in the patch package require the host to be in maintenance mode before the patch can be installed.Run the
vihostupdatecommand to start the patching process. As the patch is being installed from a media depot, the--metadataoption is used.vihostupdate --server esx08.mishchenko.net --install --metadata http://server02.mishchenko.net/patch/ESXi400-201005001/metadata.zip Please wait patch installation is in progress … The update completed successfully, but the system needs to be rebooted for the changes to be effective.Use the
hostopscommand again to restart the host:hostops.pl --server vcenter41.mishchenko.net --operation reboot --host esx08.mishchenko.net Rebooting host esx08.mishchenko.net…done Host 'esx08.mishchenko.net' exited maintenance mode successfullyAfter the host has been restarted, you can verify that the patch bundle has updated correctly on your host by using the
--queryoption:vihostupdate --server esx08.mishchenko.net --query -------Bulletin ID-------- -----Installed------------- --------Summary----- ESXi400-201005401-SG 2010-06-03T03:35:54 Updates Firmware ESXi400-201005402-BG 2010-06-03T03:35:54 Updates VMware Tools
vCenter Update Manager (VUM) is designed to provide a centralized and automated patching tool for vSphere administrators. With VUM, it is possible to scan and patch hosts, virtual machines, templates, and virtual appliances. Supported virtual machines for patching include Windows machines and a number of Linux distributions. It is possible to patch both running and offline guests, and VUM uses snapshots to revert virtual machines back to their prior condition should an upgrade or patch fail to install properly. VUM can also be used to update VMware Tools and the virtual hardware of virtual machines.
VUM integrates tightly with vCenter Server. The VUM server component can be installed on the same host that is running vCenter Server or on another host if you plan to patch a large number of hosts and virtual machines. If it is installed on another host, network connectivity is required with the vCenter Server. If you are using vCenter Server in vCenter Linked Mode, you need to install and register VUM for each vCenter Server, as each installation of VUM is associated with a single vCenter Server instance. The VUM client consists of a vSphere client plug-in, which must be installed on any computer that will be used to configure and manage VUM.
A typical installation of VUM requires Internet access to obtain information about patches for your hosts and virtual machines as well as to download the actual patch files. If you are deploying VUM in a secure network without Internet access, you can use the VUM Download Service on another host with access to download patch metadata and path files.
The following sections provide the necessary steps to set up and configure VUM, create a baseline, scan your ESXi hosts, and apply patches to your hosts.
Prior to running the installation program for VUM, it is necessary to set up a database that will be used by VUM and an Open Database Connectivity (ODBC) data source name (DSN) that VUM will use to connect to the database. If you have a smaller deployment of up to 5 hosts and 50 virtual machines, you can use Microsoft SQL Server Express, which can be installed and configured when you run the installation for VUM. Otherwise, you must create a database with Microsoft SQL Server or Oracle. You can use the following process to create the DSN and database for Microsoft SQL Server:
Start SQL Server Management Studio and connect to the SQL instance that will host your database for VUM.
Create a new SQL login that VUM will use to connect to the database. Set the default database for the login to be the database that you created in step 2.
The login should be updated to have the db_owner fixed database role in both the VUM database and the MSDB database.
Note
Both the installation and upgrades for VUM create and modify SQL Server scheduled jobs, which are stored in the Microsoft System Database (MSDB) database. Thus it is necessary to grant the SQL login the db_owner role for the MSDB database during those processes. Alternatively, you can grant the login the sysadmin server role. After completing the installation or upgrade, you can remove the role for the MSDB database.
Run the 32-bit ODBC Administrator application. The server component is a 32-bit application that requires a 32-bit ODBC connection. If you are installing the server component on a 32-bit server, the installation program will not be able to find a 64-bit ODBC connection, which will be created if you use the ODBC Data Source Administrator application found in Administrative Tools. The 32-bit ODBC Administrator application can be found at <Windows>SysWOW64odbcad32.exe.
Select the System DSN tab.
Click Add to start the wizard to create a new ODBC connection. Select SQL Native Client as the driver type and click Finish. Enter a name for the ODBC connection and specify the SQL Server to which to connect. Click Next to continue configuring the connection. Change the authentication setting to With SQL Server Authentication Using a Login ID and Password Entered by the User. Enter the SQL login and password you created earlier in this process, and then click Next. If you set up the login correctly, the default database should be listed as the database you created to store VUM data. Click Next to continue. Click Finish to complete creating the ODBC connection.
After you have created the ODBC connection and the database, you should review the database settings for the connection and also ensure that the database is properly maintained. This maintenance should include regular backups and ensure that indexes are regularly rebuilt to optimize database performance. You can then follow this process to install the VUM server component:
Start the VMware vCenter Installer application on the vCenter Server installation media.
Click the link to start the vCenter Update Manager product installer.
Select the appropriate language to use and click OK.
Click Next on the Welcome page to start the installation.
Review the license agreement and click Next.
Enter the connection information for your vCenter Server host and an account with vCenter Server administrative privileges. Click Next to continue.
Select the database storage option for VUM. You can choose between installing an instance of SQL Server Express and connecting to a database with the ODBC connection that you created earlier. If you select the SQL Server Express option, the installer launches a process to install SQL Server Express. Otherwise, choose the ODBC connection that you created earlier and then click Next. If you do not see the connection that you created, ensure that you used the 32-bit version of the ODBC Administrator application and then restart the VUM installer.
Enter the SQL login and password for the VUM database and click Next.
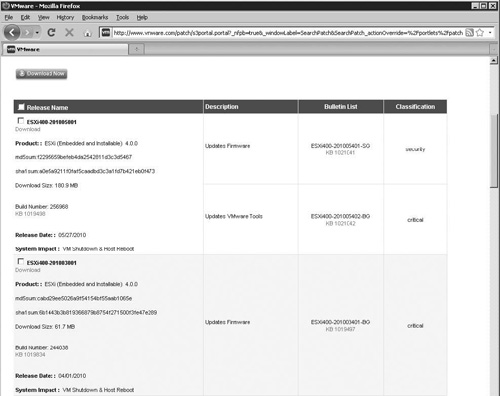
On the VMware vCenter Update Manager Port Settings screen, shown in Figure 10.2, select the network identity that vCenter Server and your hosts will use to connect to the VUM service. This can be the fully qualified domain name for the host as shown in the figure or the IP address for one of the host’s network interfaces. If you have Windows Firewall or other firewall software running on the host, you should open the ports shown to allow connectivity to the service. You may also wish to modify the ports used should your security requirements necessitate a change. You can check the box Yes, I Have Internet Connection and I Want to Configure Proxy Settings Now if the VUM service will have to use a proxy server to obtain patches for your host and virtual machines.
On the following screen, you can select the location for the VUM installation and for the patches download directory. The default location for downloading patches is
C:ProgramDataVMwareVMware Update ManagerData. You should ensure that the volume has sufficient space for storing patches for ESXi, ESX, and any guest operating systems that you will patch with VUM. A sizing estimator can be found at http://www.vmware.com/support/vsphere4/doc/vsp_vum_40_sizing_estimator.xls, which provides some information on database and disk sizing as well as database and service placement. After you have confirmed the locations, click Next.Click Install to begin the installation.
Click Finish to complete the install process.
To access VUM functionality within the vSphere client, you must enable the VUM client plug-in. This is required on any workstation that will be used to manage VUM. After VUM has been installed, you can use the following procedure to enable the plug-in:
Start the vSphere client and connect to the vCenter Server with which the VUM service is registered.
Select Plug-Ins > Manage Plug-Ins. The VMware vCenter Update Manager should be listed under Available Plug-ins, as shown in Figure 10.3.
Click Download and Install to begin installation of the plug-in.
The vCenter Update Manager Client installation begins. You can select the default options to step through the wizard and click Finish once the installation has completed.
On the Manage Plug-Ins screen, the VUM plug-in should now have a status of Enabled. You may also receive a security warning about an untrusted Secure Sockets Layer (SSL) certificate if you’re still using the default vCenter Server SSL certificates. Click Ignore to close the security warning.
Close the Manage Plug-Ins screen. Select the Home screen in the vSphere client. You should now see an Update Manager icon under Solution and Applications.

Note
If you plan to use VUM to patch Linux and Windows virtual machines, the VMware vCenter Update Manager Guest Agent will be installed within the guest operating systems. The installation of the agent occurs the first time a patch remediation is scheduled or when you start a patch scan on a powered-on virtual machine. The Guest Agent is required for scanning and remediation of a virtual machine.
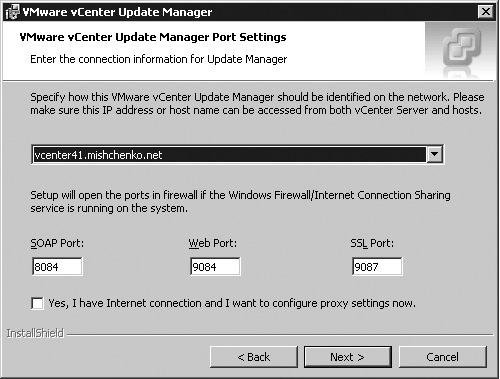
Several configuration options require review before you can begin to use VUM. From the Home page of the vSphere client, select the Update Manager icon to access the VUM screens. Select the Configuration tab to see areas of configuration, as shown in Figure 10.4. The screen displays the ports and hostname used for VUM communication. If any changes are made on this screen, it is necessary to restart the Windows service VMware vCenter Update Manager Service.
If you plan to use VUM just to update your ESXi host, it is worthwhile to edit the Patch Download Sources on the Patch Download Settings screen. By default, VUM downloads patches for ESX(i) 4.x, ESX(i) 3.x, Linux, and Windows, as shown in Figure 10.5. You will also notice a Custom patch type with a download URL of https://hostupdate.vmware.com/software/VUM/PRODUCTION/csco-main-index.xml. This patch download source allows for the downloading of patches for the Cisco Nexus 1000V virtual switch. To conserve space and bandwidth only, the VMware patch type for ESX 4x patches should be left enabled. Click Apply to save your configuration change.
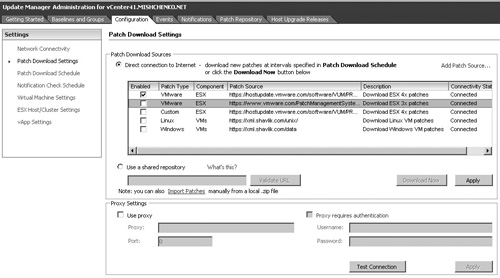
On the Patch Download Settings screen, you can also add your own third-party patch source and configure or update proxy settings that the VUM service will use to connect to the Internet. On this screen, you can also manually import patches. If you have downloaded an ESXi patch, as was done in the section “Patching ESXi with the vCLI Command vihostupdate,” you can click the Import Patches link and a wizard will guide you through the process of importing the patch into the VUM patch repository. You can also set the VUM service to use a shared repository to obtain patch files should the VUM host not have Internet connectivity. The shared repository is populated by the Update Manager Download Service, which can be installed on a host with Internet access if your security requirements prohibit the VUM host from having direct Internet connectivity. The repository can be a local directory or HTTP URL.
On the Patch Download Schedule screen, you can set a schedule for downloading software patch definitions. When setting the schedule, you can also include a notification e-mail address that is notified when VUM downloads new updates. The notification process is dependent on the e-mail notification setup in vCenter Server that was discussed in Chapter 6, “System Monitoring and Management.” On the Notification Check Schedule screen, you can schedule a job that checks for new patches as well as enables e-mail notification for when new patches are available.
The vApp Settings and Virtual Machines Settings screen relates solely to options for virtual machines and vApps. On the vApp Settings screen, you can check the option Enable Smart Reboot after Remediation. This option will ensure that the virtual machines that are part of a vApp are rebooted in such an order as to maintain startup dependencies. On the Virtual Machines Settings screen, you can control how snapshots are maintained for virtual machines that are going to be patched. The default settings are to take a snapshot of the virtual machine before patches are applied and not to delete the snapshots taken. You can choose not to take snapshots before patches are applied and also set the length of time that snapshots are kept after patches are installed.
The final configuration screen is ESX Host/Cluster Settings. Before a host can be patched, it must be placed in maintenance mode. If the host cannot be placed into maintenance mode, the default settings shown in Figure 10.6 specify that the operation will be retried another three times with a 30-minute delay between attempts. You can change the Failure Response setting to the following:

Fail Task. The attempt to patch the host will be logged as a failure and no further attempts will be made.
Retry. This is the default setting. You can set a delay period and total number of retry attempts.
Power Off Virtual Machines and Retry. All virtual machines on the host will be powered off and the host will be put into maintenance mode. The Retry Delay and Number of Retries settings will be used with this option.
Suspend Virtual Machines and Retry. The virtual machines running on the host will be suspended and VUM will retry to place the host in maintenance mode according to the retry settings.
You may also want to check the option Temporarily Disable Any Removable Media Devices That Might Prevent a Host from Entering Maintenance Mode. If your host is part of a vMotion-capable cluster, a virtual machine may not be able to migrate if it is configured with a virtual floppy or CD-ROM device that is not available on the destination host. If you check this option, those devices will be disabled, which will allow the virtual machine to be migrated to another host.
To allow a host to enter maintenance mode, it may also be necessary to disable certain features of the cluster. For example, in a High Availability (HA) cluster, the Admission Control policy may not allow a host to be placed in maintenance mode, as there would then be insufficient failover capacity in the cluster. Thus it is necessary to disable Admission Control temporarily while the host is being remediated. After the patch process is complete, Admission Control can then again be enabled. The following cluster options can be disabled to allow hosts to enter maintenance mode successfully:
Distributed Power Management (DPM)
High Availability Admission Control
Fault Tolerance (FT)
VUM uses baselines to keep hosts and virtual machines up-to-date with patches, updates, and extensions. A baseline is a collection of one or more patches, service packs, extensions, or upgrades. You can create either a host baseline or one for virtual machines and appliances. Host baselines can be one of three types: patch, upgrade, or extension. When you create baselines, you can also specify whether the baseline will be fixed or dynamic. A fixed baseline for patching an ESXi host would include a specific patch or patches and would not change over time. A dynamic baseline would include patches based on a defined criteria and change over time. As you typically want to run the latest patches on your ESXi hosts, creating a dynamic baseline is the best option for your hosts.
VUM comes with a number of predefined fixed and dynamic baselines for both host and virtual machines. For hosts, this includes the baselines Critical Host Patches and Non-Critical Host Patches. As you begin to use VUM, you may find that it is necessary to create some additional baselines, as the defaults may not meet your needs. To create a new baseline that includes only ESXi patches, use the following process:
Start the vSphere client and connect to the vCenter Server where VUM has been registered. On the Home page, select the Update Manager icon.
On the Baselines and Groups tab, click the Create link.
Enter a Name and Description for your new baseline. The Baseline Type should be set to Host Patch. Click Next to continue.
On the Patch Options screen, you can select between a Fixed and Dynamic baseline type. As this baseline should ensure that your ESXi hosts are patched to the most recent version, you should choose the Dynamic option.
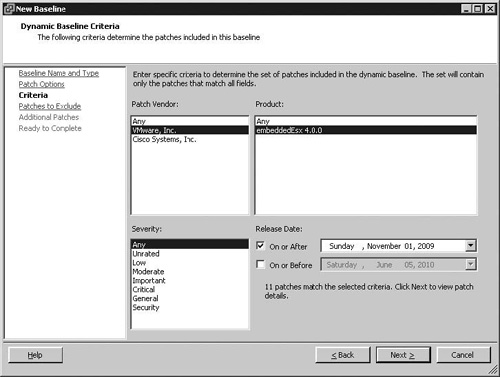
On the Criteria screen, you have a number of options to filter the patches that will be included in the baseline. The sample in Figure 10.7 has been set to a Patch Vendor of VMware, Inc., as the Cisco Nexus module is not in use, to include patches for only the embeddedEsx 4.0.0 product and to include patches with any severity rating released after November 1, 2009.
On the Patches to Exclude screen, you can remove any patches that should be permanently excluded from the baseline. As the remediation process will exclude any outdated patches from the ESXi patching process, you can click Next to continue without excluding any patches.
Click Next on the Additional Patches screen, as it is not necessary to add additional patches to the baseline.
Click Finish on the Ready to Complete screen. You may also expand the Patches to view the list of patches that are part of this dynamic baseline at the present time.
After you have created a baseline, you will be able to attach the baseline to various vCenter objects to determine which hosts are noncompliant and require patching. You will also have noticed the Baseline Groups section on the Baselines and Groups tab. Groups can be used to create a set of nonconflicting baselines. The group can then be assigned to vCenter objects to allow you to scan and remediate multiple baselines at the same time. If you create a group with both the default baselines of Critical Host Patches and Non-Critical Host Patches when that baseline group is applied on an ESXi host, it will ensure that all patches are installed to that host.
To attach a baseline to a vCenter object, you use the Update Manager tab for that object. You can attach a baseline to a specific host, but it is more efficient to attach the baseline at the cluster, datacenter, or vCenter Server levels. If you are using vCenter Server in vCenter Server Linked Mode, you will attach baselines and baseline groups to the vCenter Server with which VUM is registered. Baselines and groups are specific to the VUM instance that is registered with a specific vCenter Server. Use the following process to attach the baseline that you created at the vCenter Server level:
Start the vSphere client and connect to the vCenter Server where VUM has been registered. Select the Host and Clusters icon.
Select your vCenter Server object and then the Update Manager tab.
Click the Attach link to see the list of available baselines and baseline groups that you can attach to the vCenter Server object. Check the baseline that you created earlier and click Attach.
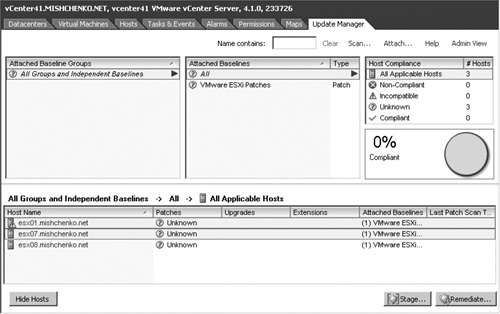
After you have attached the baseline, Update Manager summarizes the compliance to the baseline for the applicable hosts, as shown in Figure 10.8. The figure shows that three hosts have not been scanned and thus the Patches status is set to Unknown. The hosts are considered to be 0 percent compliant.
After a baseline has been attached to your hosts, the next step is to scan the hosts for compliance. You can initiate this scan manually or schedule it to run at a more convenient time. After the scan has been completed, you can determine which hosts will need to be patched. As an optional step, you can stage patches to your ESXi host. This essentially copies the patches to the host and does not require the host to be in maintenance mode to copy the patches locally. Once the host is being patched, the process will complete more quickly, as the patches are already stored locally on the ESXi host. Remediation is the final step in patching your ESXi hosts. Again, this step can be manually started or scheduled to occur at an appropriate time.
To scan your hosts manually, you can follow these steps:
Start the vSphere client and connect to the vCenter Server where VUM has been registered. Select the Host and Clusters icon.
Select your vCenter Server object and then click the Update Manager tab.
Click the Scan link.
On the Confirm Scan screen, the Patches and Extensions option will be enabled. Click Scan to begin the process.
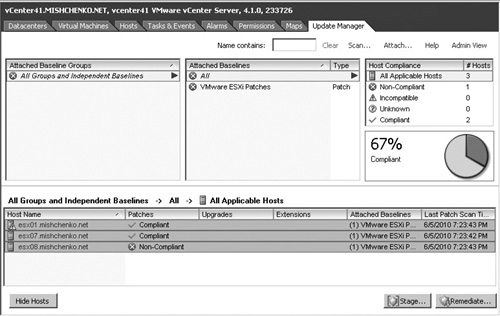
You can also right-click on the vCenter object and select Scan for Updates. If you have attached a baseline on the Update Manager tab of a parent object, any child objects to which the baseline will apply also show the baseline on the Update Manager tab as well as the status for any child objects. After the scan is complete, the Update Manager tab displays the compliance status for the hosts that you have scanned, as shown in Figure 10.9. Two of the three hosts listed are shown as being compliant. In the case of one of the hosts, it was already up-to-date with patches. The second compliant host was running ESX 4.0 and thus none of the patches in the baseline was applicable. If you are running a mixed environment of ESXi and ESX hosts, you should carefully set up your baselines so that you do not create such a false positive.
You can also easily schedule a periodic scan to ensure that all hosts are up-to-date. Use the following process:
Start the vSphere client and connect to the vCenter Server where VUM has been registered. Select the Home > Management Scheduled Tasks.
Click New in the toolbar to open the Select a Task to Schedule dialog box.
Select the option Scan for Updates and click OK.
The Schedule a Scan wizard opens. Select a Scan Type of ESX/ESXi Hosts and click Next.
Select the vCenter object to scan. This can be vCenter Server, a folder, a datacenter, a cluster, or a host.
Select the Patches option on the Update Types screen and click Next.
Enter a Task Name, Description, and Schedule for the task and click Next.
Optionally, you can check the Send Email option and then enter a notification e-mail that should be used when the task is complete. Click Next to continue.
Click Finish after reviewing the details of the new task on the Ready to Complete screen.
After your scans have been completed and you have identified the hosts that require patching, you can choose to stage the patches to the host before remediation happens. The process of staging the patches to the host essentially copies the patches to the host in advance so you can minimize the patch time later on. The host does not have to be in maintenance mode to have patches staged to it. To stage patches to a host, you can follow these steps:
Select the Update Manager tab to which you’ve attached and scanned a baseline; then click Stage. The Stage button will be grayed out if all the hosts are compliant.
The Stage Wizard starts as shown in Figure 10.10. On the Baseline Selection screen, select the baseline to use for staging and the hosts that will be staged. Click Next to continue.
On the Patch and Extension Exclusion screen, you can select which patches should not be staged. Your list may include a number of patches for ESXi that no longer apply because they have been replaced with newer versions. It is not necessary to uncheck those patches, as VUM will stage only the latest patch for the firmware, VMware Tools, and vSphere client components for ESXi. Click Next to continue.
The Ready to Complete screen displays a summary of the patches to be staged. Click Finish.

Several staging tasks are initiated for each host that the process will affect. After the patches have been copied to the ESXi hosts, the tasks should display a Completed status, as shown in Figure 10.11. The patches are uploaded to /tmp/updatecache on the hosts. If you examine the file location on your host after the staging is complete, you will find that only the most recent patches for the host have been staged. As mentioned previously, VUM does not apply any patches for ESXi that have been superseded by a newer version.
The final step in patching your ESXi hosts is to run the remediation process. You can initiate this process manually on the Update Manager tab or by right-clicking on a vCenter object and selecting Remediate. You can also schedule remediation using a process similar to the one used to schedule scanning for your hosts. To remediate the ESXi hosts that the Update Manager tab displays as being noncompliant, use the following steps:
Select the Update Manager tab to which you’ve attached and scanned a baseline, and then click Remediate. The Remediate button will be grayed out if all the hosts are compliant.
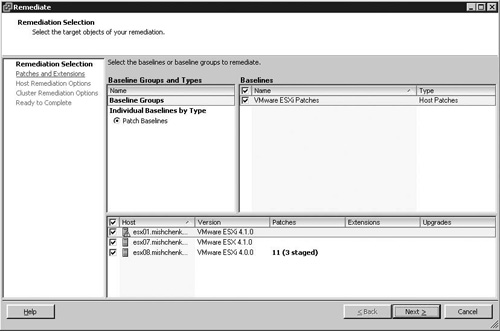
The Remediate wizard is started. On the Remediation Selection screen, select the baselines to be used for patching as well as which hosts should be patched. As shown in Figure 10.12, noncompliant hosts list the number of patches that are missing along with the number of patches that are already staged on the host. Click Next to continue the process.
You can deselect any patches on the Patch and Extension Exclusion screen. VUM automatically skips any patches for ESXi that have been replaced with newer versions. You can simply click Next on this screen.
On the Host Remediation Options screen, you can set a Task Name and Description for the remediation process. You can choose between running the task immediately or scheduling it to occur at a later date. You can also define the maintenance mode options. These are the same options as were discussed in the “Configuring vCenter Update Manager” section earlier in this chapter. Click Next to continue.
On the Cluster Remediation Options screen, you can select whether or not to disable DPM, Admission Control, or FT, as discussed in the “Configuring vCenter Update Manager” section. You also have the option to click Generate Report to see a list of configuration changes that will be made by the Host and Cluster Remediation Options.
On the Ready to Complete screen, you can review the settings to be used and then click Finish to start the remediation process.
A number of tasks are generated to begin the installation of patches. Any impacted hosts are placed in maintenance mode. After the patches have been installed and the host rebooted, the remediate task takes the hosts out of maintenance mode. If the patches have been completed successfully, the Update Manager tab should now show the impacted hosts as compliant with the patch baseline that you created.
As mentioned earlier, it is also possible to schedule a remediation task. Select Home > Management > Scheduled Tasks and then click New Task to start the wizard to create a new scheduled task. Select a type of remediation and the wizard that is used will be the same that you used to start the previously described remediation process manually. You should note that unlike the Scan task, which can be scheduled to occur regularly, when you create a remediation task, it can be scheduled to run only once.
The vSphere Host Update Utility
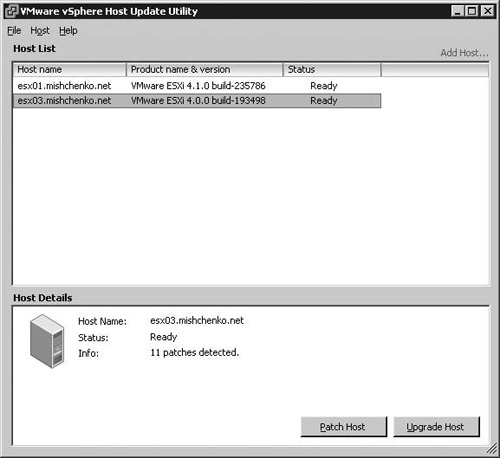
The Host Update Utility was included with the vSphere client installation for versions 3.5 and 4.0. This utility could be used to connect directly to an ESXi 3.5 or 4.0 host and apply patches as shown in Figure 10.13. The tools could also be used to upgrade an ESXi host from version 3.5 to 4.0. This utility is no longer included with the vSphere client. You can use vihostupdate from the vCLI as an alternative for patching standalone ESXi hosts.
PowerCLI provides two methods to patch VMware ESXi. The cmdlet Install-VMHostPatch can be used to patch hosts directly. You can use this cmdlet as part of a script to automate the patching of your hosts. VMware has also released the vCenter Update Manager PowerCLI. The VUM PowerCLI installs cmdlets that enable you to interact with your Update Manager installation.
The Install-VMHostPatch cmdlet can be used to install patches that are located on your management server, on a Web server, or on the filesystem accessible to your ESXi hosts. When you use the -LocalPath or -WebPath options, the patch contents are copied to your ESXi host. Your host may not have sufficient free space for the largest ESXi patches, so it is best to upload the patch to a datastore and then use the -HostPath parameter.
In the following example, an ESXi host is updated from version 4.0 Update 1 to Update 2 with the patch copied to a datastore accessible by the host:
Download the patch from VMware and extract the contents to a folder on your management server.
Start a PowerCLI session with vCenter Server or your ESXi host.
Use the following commands to access the datastore. The first command accesses the datastore provider, the second accesses the appropriate datacenter, and the last accesses the datastore.
cd vmstore:
cd Surrey
cd NFS1
Run the following commands to create a folder on the datastore and then to copy the contents of the patch folder to the datastore. The
-Recurseoption instructs cmdlet to copy the entire contents of theESXi4.0U2folder.mkdir Patch cd Patch copy-datastoreitem C: mpESXi4.0U2 . -Recurse
Use the
Set-VMHostcmdlet to put the host in maintenance mode. For a host that is part of a fully automated DRS cluster, you can add the-Evacuateoption to migrate virtual machines from the host.Set-VMHost -VMHost esx10.mishchenko.net -State Maintenance -Evacuate
Run the
Install-VMHostPatchcmdlet to update the host. When the host has completed installing the patch, the following warning message is displayed:Install-VMHostPatch -VMHost esx10.mishchenko.net -HostPath /vmfs/volumes/NFS1/ESXi4.0U2/metadata.zip WARNING: The update completed successfully, but the system needs to be rebooted for the changes to be effective.Issue the following command to restart the host:
Restart-VMHost -VMHost esx10.mischenko.net
After the host has rebooted, you can take it out of maintenance mode with the
Set-VMHostcmdlet:Set-VMHost -VMHost esx10.mishchenko.net -State Connected
If you’re patching a number of hosts, you can easily embed these commands into a single script to patch all your hosts. If you’re not using a DRS cluster, you can use the Move-VM cmdlet to migrate virtual machines between hosts with vMotion.
The vCenter Update Manager PowerCLI provides a number of cmdlets for managing your VUM installation. The VUM PowerCLI is available for download from http://www.vmware.com/go/powercliupdate. Both PowerShell and PowerCLI must be installed before you run the installation. The cmdlets included with vSphere 4.1 are listed in Table 10.1.
Table 10.1. vCenter Update Manager PowerCLI Cmdlets
Cmdlet | Description |
|---|---|
| Attaches baselines to |
| Detaches baselines from the specified inventory objects. |
| Downloads new patches into the Update Manager repository. |
| Displays the baselines specified by the provided cmdlet parameters. |
| Obtains compliance data for the specified object. |
| Retrieves all available patches or those specified. |
| Retrieves patch baselines. |
| Creates a new patch baseline. |
| Remediates an inventory object against the specified baselines. |
| Deletes the specified baselines. |
| Scans objects for baselines attached to them. |
| Modifies the properties of a patch baseline. |
| Initializes staging of a patch that allows you to download patches from Update Manager to your ESXi hosts without applying the patch. |
In the following example, a new baseline will be created to patch ESXi hosts in a cluster called Cluster01:
Begin the process by creating a new baseline. The following example creates a dynamic baseline for ESXi 4.0:
New-PatchBaseline -Dynamic -Name "ESXi Patches" -TargetType Host
     -SearchPatchProduct "embeddedEsx 4.0.0"
Attach the baseline to the cluster:
Attach-Baseline -Entity (Get-Cluster 'CLUSTER01')
     -Baseline (Get-Baseline 'ESXi Patches')
Scan the cluster to determine compliance with the attached baseline:
Get-Cluster -Name CLUSTER01 | Scan-Inventory
Query the compliance of hosts within the cluster with the following command. The output shows that the host is not compliant.
Get-Compliance -Entity (Get-Cluster 'CLUSTER01')

Entity                     Baseline               Status
------                     ---------              -------
esx10.mishchenko.net       ESXi Patches           NotCompliant
Use the
Remediate-Inventorycmdlet to install patches to the ESXi host. Before performing remediation on a cluster, you must temporarily disable the DPM, HA Admission Control, and FT features on the cluster. After the remediation task is complete, the features will be automatically reenabled.Remediate-Inventory -Entity (Get-Cluster 'CLUSTER01') -Baseline (Get-Baseline 'ESXi Patches') -ClusterDisableDistributedPowerManagement:$true -ClusterDisableHighAvailability:$true -ClusterDisableFaultTolerance:$true
Once you execute the remediation task, you will find a number of new tasks in vCenter Server, including reconfiguring the cluster, putting the host in maintenance mode, and patching the host. After the process is complete, the host and cluster are returned to their prior states.
In some cases you may have hosts at remote sites with low bandwidth connections. It may not be desirable to send patches to those hosts during business hours. vCenter Server does not currently include the capability to schedule a stage patch job, but you can schedule Stage-Patch with a third-party tool. The main parameter for Stage-Patch is -Entity and this can be a host, cluster, or datacenter. The cmdlet also accepts the parameters -Baseline which you can use to filter the patch baselines that should be used, and -ExcludePatch to specify which patches to exclude from staging.
Maintaining any software system requires patching to ensure that the system stays secure. The vCLI and PowerCLI include the necessary commands to patch your ESXi hosts. This chapter has shown the process for using each tool. The process can be easily automated to patch a large number of hosts. With Update Manager, you have an automated patch system for keeping your hosts up-to-date and you can further automate Update Manager with vCenter Update Manager PowerCLI.