
Chapter 5. Sounds
In this chapter, you will learn how to create realistic sounds for your game. You can download, purchase, or record the sound effects necessary for your game. Just as it was important to learn how to manipulate graphics, I will show you how you can edit your sound effects and export them into a format best suited for an iPhone game.
What Is Sound?
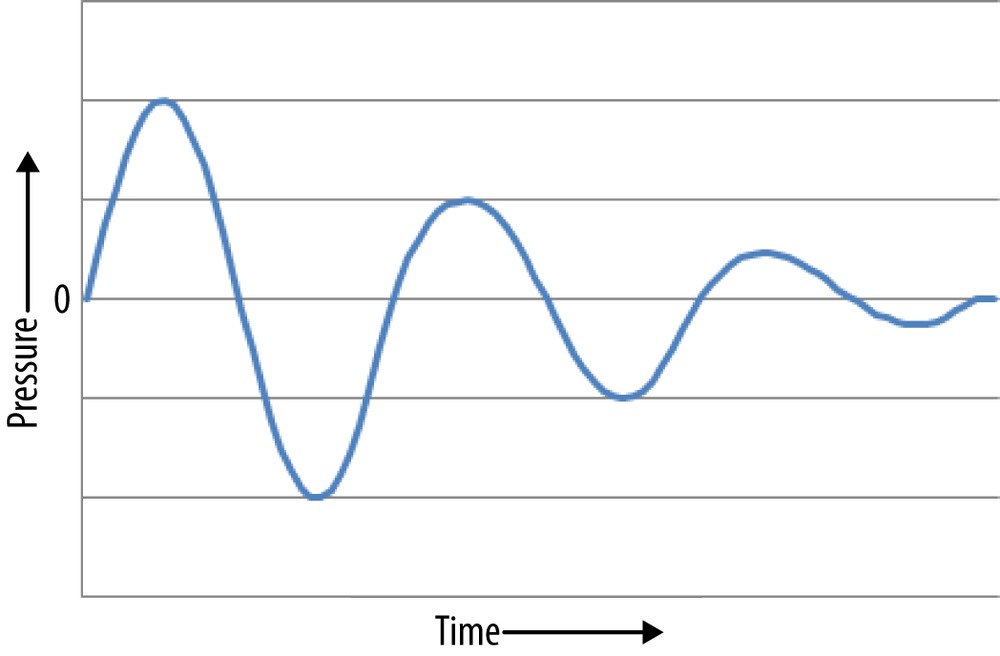
Sound is a form of energy, similar to that of light and electricity, and is created when air molecules vibrate. You might have heard of the term “sound waves,” and that is because sound moves through the air in a wave pattern. These waves are created from differences in air pressure, as shown in Figure 5-1. Think of when you clap your hands, you basically create differences in air pressure, which causes sound waves to be emitted. When the sound waves reach your ears, they are interpreted by your brain, and then you recognize the sound as clapping. In the case of air hockey, we want our sounds to be recognized as those that we might hear while playing on a real air hockey table.
Digital Recordings
Sound is recorded using a microphone, which has a small membrane that is free to vibrate. The air vibrations are converted into electrical waves, such that when higher pressure is measured it produces higher voltage. The electrical waves can then be recorded onto either an analog device such as a tape recorder, or to a digital device such as a personal computer. Analog devices convert the electrical signal into a magnetic signal to be stored on tape. Personal computers equipped with a sound card (and they all have one these days) convert the electrical signal into a digital recording. Remember the sound files you added to the Paddles game? Those were obviously digital recordings that you intergrated into the game, but what exactly does that mean?
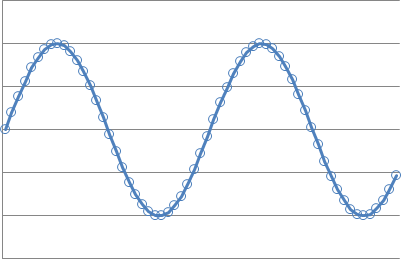
A digital recording is a stream of discrete numbers that represents an analog signal. In the case of sound, the numbers will refer to snapshots of electric voltage coming from our microphone. These snapshots, if taken thousands of times per second, will give a good approximation to the original sound wave, as shown in Figure 5-2. There are two factors that affect the quality of a digital recording, and they are sample rate and sample format.
Sample rate is how often a snapshot is taken per second. Higher sample rates allow the digital recording to accurately record higher frequencies of sound. The sampling rate should be at least twice the highest frequency you want to record. Given that humans can’t hear above 20,000 Hz, a sample rate of at least double that amount will result in a high quality recording. The standard audio CD uses 44,100 Hz as the sample rate.
Sample format refers to how big of a number is being used to represent a single sample. Remember, a single sample is just a number that represents a position on the wave, and the sample format is how big or small that number can be. The higher the sample size used will result in a more dynamic range with softer softs and louder louds. You might have heard of two common formats which are 8 and 16 bits. This refers to how many bits are being used to represent a single sample. CD audio is stored as 16-bit samples, which provides 216 or 65,536 possible sample values. Using an 8-bit format will reduce the amount of storage space required by half and only provide 28 or 256 possible sample values. The 8-bit format greatly reduces the sound quality and I do not recommend using it.
The sound recorder that I use can record in a 24-bit format, which provides 1,677,7216 different values, but personally I can’t really tell the difference between 16- and 24-bit formats. There is a much more noticable difference in quality going from 8 to 16, than from 16 to 24. But it is still good practice to keep your master sound files in the highest quality format possible, and export the sounds in a format that is best supported by the hardware. Sounds a little like the advice given in the graphics chapter right?
File Formats
There are many sound file formats supported by iOS. Sound files act as containers for the sound data and include a description of the sound samples so that they may be properly read for playback. This information includes whether the sound data is mono or stereo, the format or size of each sample, and the sample rate. There can be additional metadata, such as the type of compression or codec that was used or even album artwork and artist information. The type of compression used can be lossy or nonlossy formats. You probably remember our discussion on lossy and nonlossy when it came to graphic image formats, and sound is no different.
The source code currently uses the AudioServicesPlaySystemSound function, which requires the file format to be packaged in a .caf, .aif, or .wav file. This function allows for the sound to be in either a PCM or IMA4 (IMA/ADPCM) format. PCM stands for Pulse Code Modulation, which is the technical way of describing how analog sound is digitally represented as a series of numbers in the digital audio file. The important thing to know about PCM is that it is uncompressed, which also means it is nonlossy. You can safely edit the sound file over and over without losing sound quality. This also means that because compression is not used, it will take up the most storage space. IMA4 is a simple type of sound compression that can reduce file sizes by almost 3 times their original size. This can be important if you have lots of sound files and want to reduce your application size.
Note
An extremely useful tool on the Mac is afconvert, which converts audio files into many different sound formats. If you are having issues with the playback of your sound files, you can use this tool to create a new sound file that is supported on the iOS device. For example:
afconvert -f caff -d LEI16@44100 -c 1 input.wav output.caf
This will convert the input.wav file into a caff-formatted file with a sample format of 16-bit little endian integers and a sample rate of 44,100 Hz. The output file created will be named output.caf and have no playback issues on an iOS device.
You will typically use the PCM format for all your sound effects, and a compressed format for background music. Music can take up a lot of space in your application, and because of that it is best to use a compressed format like MP3 or AAC. In order to play back sounds in these formats, you will need to use a more capable class that supports streaming and compression, such as the AVAudioPlayer. Streaming is a good thing for music because we don’t want to load an entire song into memory. Instead, the sound file is read in chunks such that music playback is not interrupted and the memory footprint remains very small. The compressed formats can also be decoded with the help of the hardware, which means it requires less from the CPU. The more processes that can be handled outside of the CPU will give your program more cycles to handle other things such as game logic, which ultimately helps to achieve higher frame rates. This is why using a sound format that requires software decoding is not preferred.
Note
Hardware-assisted decoding can only operate on one single compressed file at a time. If you mix multiple compressed formats for playback, every file played after the first one will require software-based decoding and put more strain on the CPU. If you allow iPod music to play inside your game, it receives priority over your application and will receive the hardware-assisted decoding. The bottom line is keep your music compressed and in a format that allows for hardware-assisted decoding to reduce CPU strain, and do not mix iPod music if your game is also playing compressed audio.
Creating Sounds
There are a couple ways to obtain sounds for your game. You can download free sounds from the Internet, pay for a sound effect library, or even record the sounds yourself. If you are downloading sounds, you should make sure the license does in fact permit you to use the sounds in your application. Some licenses do not permit commercial use, so it is important to review the type of license and read over any terms of use prior to downloading or purchasing.
Downloading Sounds
A great website to visit is http://freesound.org/, which has a huge collection of free sounds that are licensed under the Creative Commons Sample Plus license. This license allows you to use the sounds in a commercial application as long as you attribute the creator of the file. You can preview sounds directly from the website, but if you want to download the file you will need to create a free account. This also works nicely because the website tracks every sound file you download, which helps you to properly give credit to the person who created the sound. This website does not include songs or compositions, so if you want that in your game you will have to look elsewhere.
One of my favorite ways to create music is using GarageBand that comes free on Mac OS X. It includes many loops that can be used in your game. You can also use the audition feature to pick a genre of music and select different types of instruments that you want in your song. It will create a starter song for you that you can edit and make unique. It can be a lot of fun, and I recommend trying that if you’re looking for a decent free option for music or background beats. I used a few trance-style loops from Garage Band in my Glow Burst game. The loops were small enough that they could be loaded into memory using OpenAL, which allowed me to dynamically change the pitch of the sound. This allowed me to speed the music up as time elapsed, adding a little more intensity to the game. The player not only had the pressure of watching a timer bar but also could hear it with the music speeding up.
Note
OpenAL stands for Open Audio Library and is a cross-platform sound API that is supported on all iOS devices. It supports mixing multiple sounds together, three-dimensional positioning of sounds, and even adjusting pitch and other characteristics. OpenAL is a great library to use when you need total control over the playback of sounds.
Another option for getting music into your game is purchasing royalty-free music. The websites http://www.partnersinrhyme.com/ and http://www.musicloops.com/ have a large selection of music available at reasonable rates. Those sites also have a very flexible license agreement, but as always be sure to read over the restrictions to make sure the license will meet your needs.
Recording Sounds
In order to create your own sounds of air hockey you will need a digital sound recorder or a microphone connected directly to your computer. You will also need a couple of props. In my case, I had a friend let me borrow their air hockey table pieces, which included two paddles and a puck. If you don’t have these items available, you could always use something similar such as a coffee mug for the paddle, and a hard plastic coaster for the puck. You just need objects that will make similar sounds.
One of my apps that I thought had really good sounds was called App Ocean. This was a physics simulation where apps drop into an ocean. You hear them splash in, and you also hear them hit the bottom of the ocean and other apps. In order to create those sound effects, I recorded dice dropping into a cup of water. You heard the splash of the water, and then you heard the collision when it hit the bottom of the cup. It worked out really well and only took a couple minutes of my time to record. Another common sound effect you might need are guns and explosions. I once brought my recorder to a gun range and just left it recording on a table. It captured a lot of different sounds that I can use as is, or after applying effects such as pitch shifting—which I used to morph gunshot sounds into powerful explosions. It can be a lot of fun creating your own sounds, and even give you an excuse to get out of the house.
When it comes time to actually do the sound recording, make sure you do so in a quiet place if possible. Always leave at least a second of silence before and after the recording. I will show you how to trim away this silence in a bit but just remember the microphone can actually “hear” better than your ears can. This is why it is important not to turn off the recording too early, and even more important to make sure nobody is talking and minimize the use of noisy equipment. My recorder picks up so much ambient noise that I sometimes have to turn off things like the house air conditioner or shut down computers that have a noisy fan. Take a recording of complete silence and give it a listen to see if there is any noise in the playback. You can then make adjustments to make it as quiet as possible.
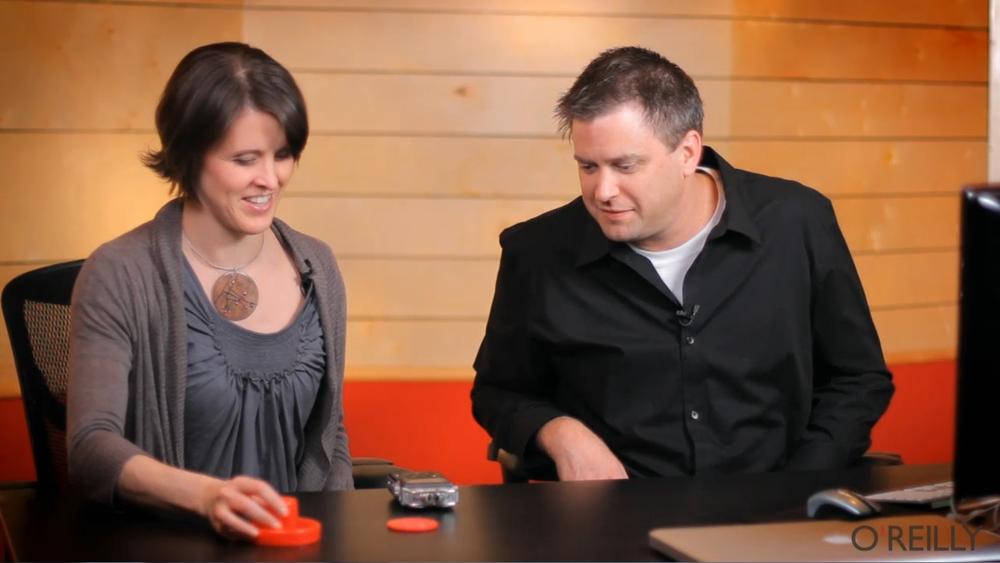
I suggest picking up a basic field recorder to do your recordings. That way you will be mobile and can easily get the microphone into the best position. On the set of the O’Reilly Breakdown series, I used my field recorder with the help of Courtney Nash to record the paddle sounds (see Figure 5-3). Make sure to configure your recorder so that the recording will be done with at least a 44 kHz sample rate and 16-bit sound format. This is the same format you will find with CD audio. Most recording devices or software will record in the best possible format so you might not even have to make adjustments. The most important part of recording is watching your levels. Distortion can be created if your levels get too high or go above the maximum level. The other issue is the level being too soft, as that will add a lot of noise especially when you normalize the sound (we will discuss normalization later).
You want to record three sounds for the air hockey game:
The puck hitting the wall
The paddle striking the puck
The puck dropping into the goal
Start the recorder and place the microphone or device on the table so you can record the game objects. We will record the sound of the puck hitting the wall. Take the puck, coaster, or whatever you’re using to represent the puck and tap it on the table a few times. Make sure to get pretty close to the microphone, but keep a close eye on the levels, as you don’t want it to be so close that it distorts. Record this sound multiple times, each at a slightly different angle and position. You want a lot of different options so you can pick the best one to use during the edit process. Take the paddle object and slide it into the puck such that the puck slides away from the microphone. Again, take a few recordings so you have options, and make sure not to make any noise before or after the recording. The sound effect should be a nice smooth sliding sound that fades away from the microphone. Now drop the puck on the table at an angle so hopefully it spins around before coming to a stop. This will be the score sound when the puck drops into the goal. As before, make sure to record multiple versions so you can pick the best one.
Once you have recorded all three sounds each with several variations you can stop the recording. Transferring the sound files to the computer is usually accomplished by connecting the supplied USB cable from the device to the computer and accessing it like an external drive. If you used a software program to record your sounds, make sure to save a backup copy so you can always revert to the original if needed. If you are prompted to pick a sound format to save in, always choose a nonlossy format such as uncompressed PCM. Never use a lossy format such as MP3 to save your master recording.
You will now learn how to edit this recording into three short sound effects for use in the game.
Editing Sounds
In this section, you will use Audacity, which is an open source tool for recording and editing sounds. Download a free copy of Audacity at http://audacity.sourceforge.net/, which can be installed on Windows, Mac OS X, and Linux operating systems. I will show you how to use Audacity to crop, trim, normalize, and fade out each sound effect.
I always keep a master copy of my sound recording that will never be modified. This allows you to start over during the editing process. The first thing you need to do is make a copy of your master audio file and open it with Audacity. You will now be presented with a graph of your wave form audio. Put on a set of headphones and listen to your audio. It is important to use headphones instead of listening with speakers because you will be able to hear things much clearer. I have made the mistake of just using desktop speakers—it can lead to mistakes in editing, or leaving in background noise that can only be heard with headphones. We want our sound to not include any unwanted noises such as people talking, pops, or distortion.
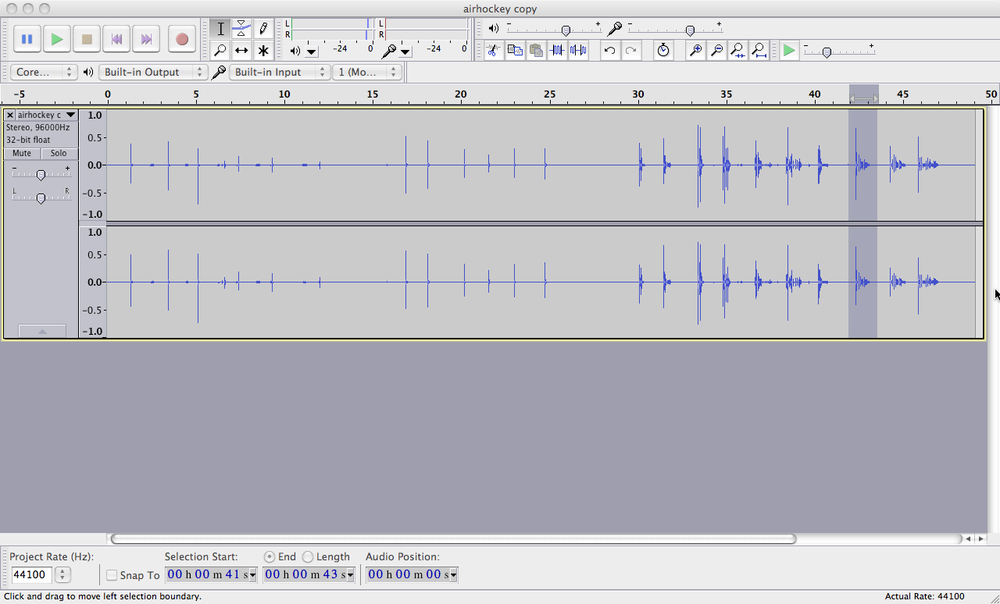
As shown in Figure 5-4, I highlighted the sound that I found the most pleasing for the score sound effect. I could hear the puck land on the table and roll around along the edges and it sounded great. It also looks great in terms of the graph, as it was uniform and had good levels. It wasn’t too loud where it would distort, and not too low where you could hear other noise. Once you have isolated your favorite scoring sound, change the selection to all the audio before it starts. Make sure to keep a little bit of silence before the sound starts and either hit the Delete key or select Edit→Delete from the menu. Press the play button from the toolbar or the space key to hear the sound from the beginning, which should start with the sound you wanted. Now select right before the next sound starts, leaving plenty of silence after the clip, and highlight all the way to the end. Press Delete again and you will have our sound effect completely isolated with silence padded on both ends. Press Command-F or select View→Fit in Window so that the entire clip will fill the window, making it easier to see the sound data points. At this point you should be able to play the sound and it will be the only sound effect heard. There should be plenty of silence such that the clip does not abruptly stop during the playback. If you trimmed too close to the sound you can also undo your edits and try again, using Command-Z or selecting Edit→Undo from the menu.
You want the audio to play immediately, which means you need to really dig into the start of the sound and delete as much as possible. A simple way to do this is by selecting the first portion of the sound and pressing Command-E to zoom in to the entire selection, or by selecting View→Zoom to Selection from the menu. I suggest doing this a few times until you can zoom in far enough to see both silence and the start of the audio wave, as shown in Figure 5-5. If you cut into the sound too much, it might create a popping sound since the sound wave would not flow smoothly from the start. Place the cursor on top of silence but pretty close to the start of the audio. Now select Edit→Select Left of Playback Position from the menu. You will be prompted to specify where to select, which you should leave set to 0 hours, 0 minutes, 0 seconds to specify the start. Click OK and now all the audio before the cursor will be selected. Press the Delete key to remove this audio. Now press Command-F to fit the entire sound clip in the window.
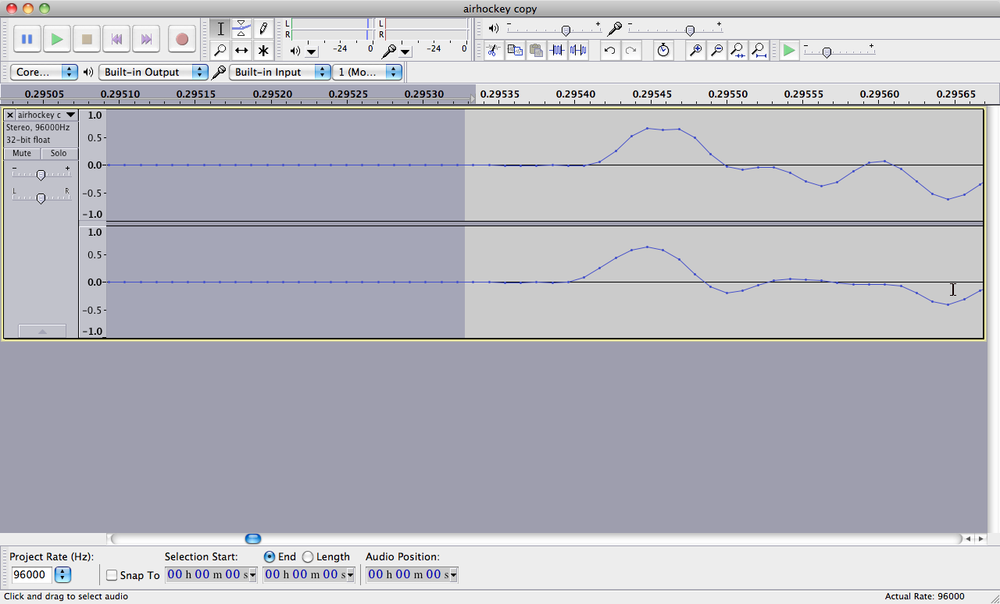
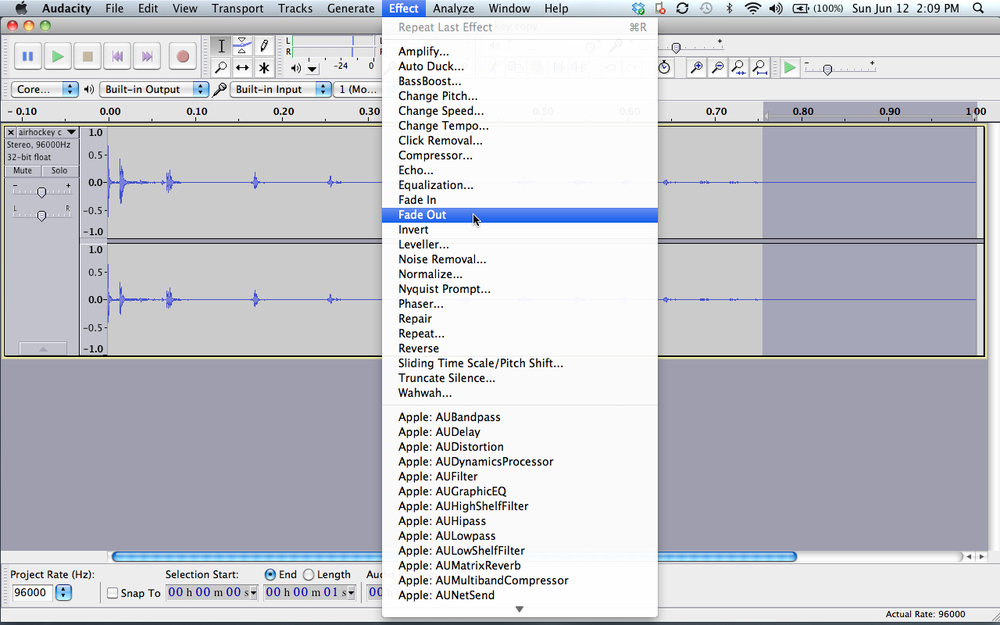
Play the audio back so you can determine where the sound stops and silence begins. In my case, it was around the one second mark, which is a good length for this sound effect. I selected everything from this position to the end and then deleted it. The sound clip was left completely isolated and trimmed, which provides for quicker playback. Just to make sure the clip ends on silence, highlight a portion of the audio near the end and select Edit→Fade Out from the menu, as shown in Figure 5-6. This will make sure the sound does not abruptly stop but rather smoothly fades away. In my case, I ended up selecting about 0.25 seconds of audio at the end to fade out. There is no hard rule on what works best, so you might want to try a few different durations. The goal is to always start the sound effect as quickly as possible from silence, and then fade out the sound near the end so no artifacts exist.
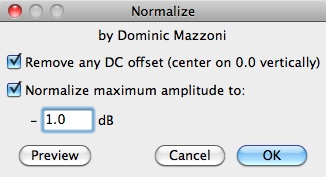
The final touch you want to do is normalize the audio. This will make sure all of our sound effects are of the same sound level. It would be great if all our recordings had the same levels, but it is impractical to think you can achieve that in the recording process alone. Normalizing your audio will make the levels peak to the same amount, which will keep all of the sound effects consistant across the board. The entire sound clip will be scaled to a new maximum amount. Select Effect→Normalize from the menu, which will prompt you to specify the maximum amplitude. I recommend using something less than the maximum amount of 0 dB. Change the maximum amplitude to be –1 dB, as shown in Figure 5-7. This will give a little headroom that should help out if this sound ever needs to be mixed with others. For now, you just want all the sounds to have the same maximum level.
Now you need to export the sound so it can be used by the game. Select File→Export from the menu and save the file format to be a WAV-signed 16-bit PCM. Now repeat all these steps for our paddle and wall collisions. Verify that all the files you exported are named score.wav, wall.wav, and paddle.wav. Open each of them in Audacity and verify they are in the proper format and are fairly short in length.
You have finished recording and editing the sounds necessary for the air hockey game. Now you just need to copy and replace the existing sounds from our Paddles game into our Air Hockey project. You will need to use Finder to copy and replace the existing sound files. You can quickly open Finder to the existing sounds by Command-clicking on one of the sound files in the project, and selecting Show in Finder from the pop-up. Build and run the game with the new sounds and make sure they all play back correctly. You might need to do a clean build in case the previous sounds were not updated during the build process. Hopefully you will find that the game looks, plays, and now sounds realistic.