
Chapter 6. Computer AI
In this chapter, I will show how to create a computer player that can play a decent game of air hockey. I will investigate the different behaviors of a human player in order to come up with a strategy that the computer can follow. This logic will tweaked to allow for different difficulty levels of play. Multiple levels of play will allow people to start at an easier level so they can learn how to play and then progress up in difficulty. The first thing you will need to do is create a title screen for the game so the player can choose to play against the computer or play the two player mode that has already been implemented.
Computer Player Menu
You have only been using one view controller that is in charge of the gameplay. You will now introduce a new view controller to manage the title screen. You need to create a new view controller just like you did for the Paddle and Puck objects, by Control-clicking the Paddles folder in the Navigator and selecting New File... from the pop-up menu. Instead of selecting the NSObject subclass, you will select UIViewController instead, and then click Next. Name the Class TitleViewController, make sure the “Targeted for iPad” option is not checked, “With XIB for user interface” is checked, and then click Next. Make sure the new class is being created in the same location as all the other files and click Create. Xcode has created TitleViewController.h, TitleViewController.m, and TitleViewController.xib files and added them to the project.
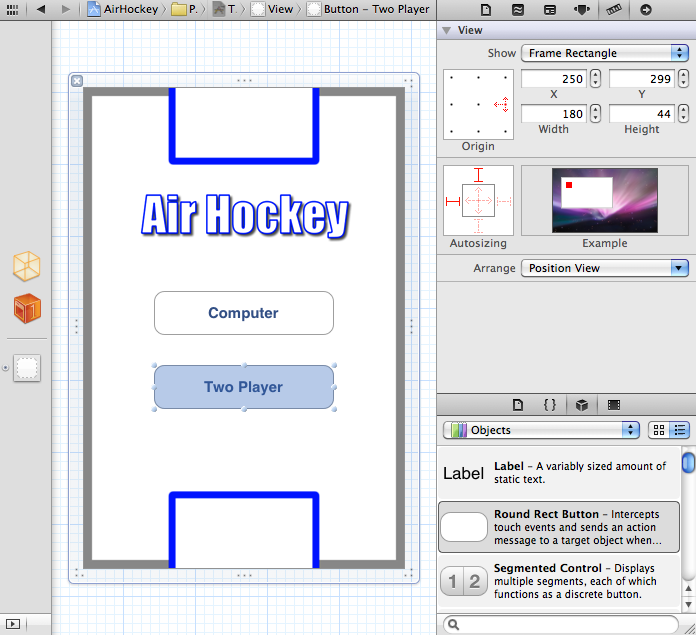
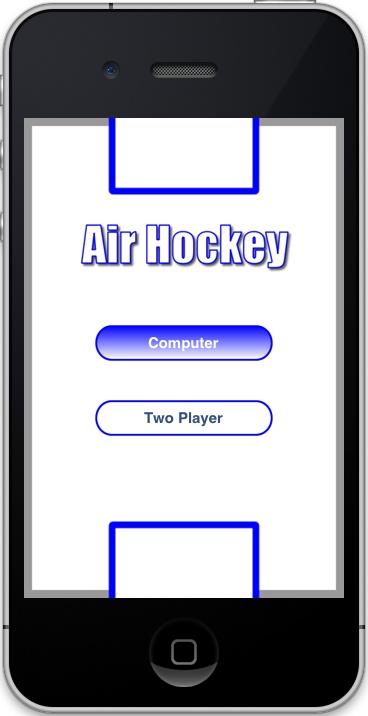
You will now design the title view by using the title image that you created in Chapter 3, along with buttons to select between two player or computer mode. Select the TitleViewController.xib file in the Project Navigator to display the file in the Interface Builder editor. Make sure the Utility pane is open so you can get access to the inspectors, and then select the Attributes Inspector. As you did with the Paddles game, change the Status Bar under Simulated Metrics to None. Click on the Size Inspector and adjust the view height to be 480, which represents the full screen without the status bar. Using the Media Library, drag over the Title.png file into the main view. Align the image view so that it fills the entire view. Switch over to the Objects Library and drag two Round Rect Buttons onto the view and position them into the center of the screen. Change the button text on the top button to “Computer” and the bottom button to “Two Player.” Change both button sizes to be 180×44, which match the button image sizes you created in Chapter 3. The default buttons will appear as shown in Figure 6-1.
Buttons will always be in one of four different states: normal, highlight, selected, and disabled. The button properties such as title text, title color, and background image are set to a specific button state. The buttons that you already created represent the normal and highlighted states. The other states, selected and disabled, are not going to be used. The selected state only really applies to segment controls where you have selected a specific item that will remain selected until you change it. The disabled state does not allow for the button to be pressed and will typically be grayed out to show this. The buttons on the title screen will never be disabled so this state is also not needed.
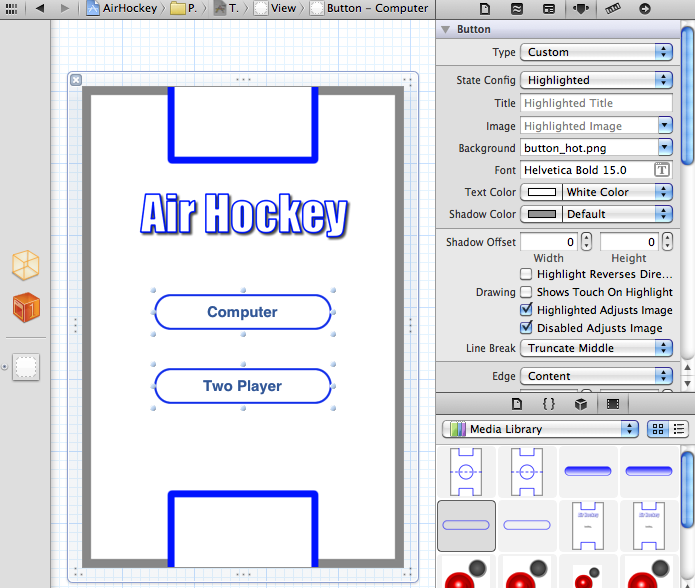
Select both of the buttons by clicking on the Computer button, then press and hold the Command button while clicking on the Two Player button. Now that both buttons are selected, you can edit their properties at the same time. Change the Type of button to Custom. With the State Config set to Default, change the Background image dropdown to button.png. You will leave the Text Color set to the default blue color. Now switch the State Config to Highlighted, and change the Background image to button_hot.png. The Text Color of the button should stay White Color for the Highlighted state so it can be easily read against the blue gradient background. The buttons should now appear with the background of the button.png image, as shown in Figure 6-2. The title view, when displayed, will toggle between the two button images when tapped.
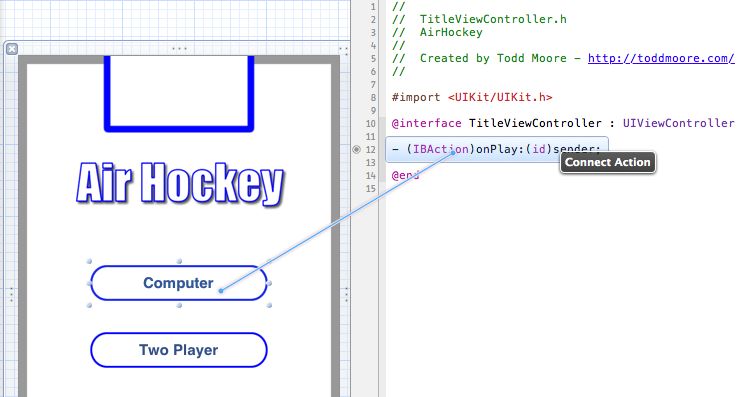
Create a new action outlet from the Two Player button to the TitleView Controller header file and name the new method onPlay. You could create a new function for the Computer button, but I’d rather use the Tag property to pass along an integer value to the same method. The only thing you really need to tell the view controller is if the computer should be playing or not. So you can just set the Tag variable to specify if the computer is playing or not. A value of 0 will mean that the computer is not playing and a value of 1 means the computer is playing. In order to do this, create an action from the Computer button to the existing onPlay method as shown in Figure 6-3.
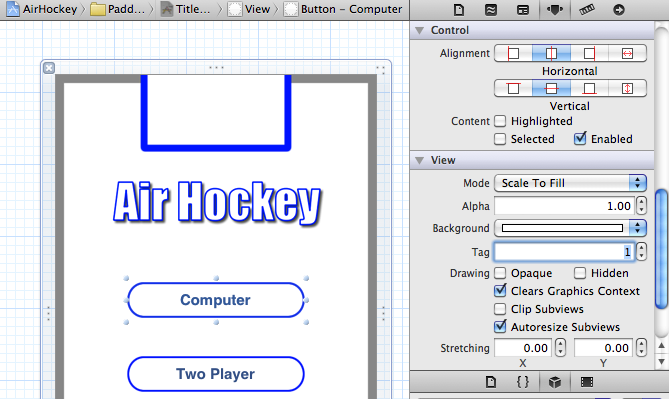
Bring up the Attributes Inspector for the Computer button and enter a value of 1 for the Tag property, as shown in Figure 6-4. The default tag value is 0, which means the Two Player button is already good to go. The onPlay method passes along the sending control when it is tapped, so you can use that parameter to query for the Tag value. This will allow you to know which button was pressed, based on the Tag number, while reusing the same method to handle starting the game.
Now you need to change the app to launch the new title view controller instead of the previous game controller. The application delegate is responsible for creating the PaddlesViewController and assigning it to the viewController property. You want to modify it such that the TitleViewController is created initially instead of the PaddlesViewController.
You need to update the PaddlesAppDelegate.h file to use the TitleView Controller class. In order to do this, you need to add a class declaration under the existing PaddlesViewController declaration so that it appears as follows:
#import <UIKit/UIKit.h>

@class PaddlesViewController;
@class TitleViewController;
Now change the viewController property from a PaddlesViewController to a TitleViewController, so that it appears as follows:
@property (strong, nonatomic) TitleViewController
*viewController;
Open up the PaddlesAppDelegate.m file so you can import the new TitleViewController class definition. Add the following to the existing import statements:
#import "TitleViewController.h"
Modify the didFinishLaunchingWithOptions method to create a TitleViewController and assign it to the viewController property. The method should be modified to appear as follows:
- (BOOL)application:(UIApplication *)application
    didFinishLaunchingWithOptions:(NSDictionary *)launchOptions
{
    self.window = [[[UIWindow alloc]
                  initWithFrame:[[UIScreen mainScreen] bounds]]
                  autorelease];
    // Override point for customization after application launch.
    self.viewController = [[[TitleViewController alloc]
                          initWithNibName:@"TitleViewController"
                          bundle:nil] autorelease];
    self.window.rootViewController = self.viewController;
    [self.window makeKeyAndVisible];
    return YES;
}
The application delegate will now instantiate a TitleViewController not the PaddlesViewController. But before you can run the application, you need to modify the application delegate so that it does not call the pause and resume methods on the viewController. This would cause a crash since the viewController is now a TitleViewController and not a PaddlesViewController. Modify the following application delegate methods so the pause and resume calls are commented out:
- (void)applicationWillResignActive:(UIApplication *)application
{
    //[self.viewController pause];
}

- (void)applicationDidBecomeActive:(UIApplication *)application
{
    //[self.viewController resume];
}
Build and run the application. You should notice that the title view controller is displayed. Tap on each button to make sure the background of the button is toggled between the normal and hot image, as shown in Figure 6-5.
The button actions have not been implemented to do anything yet, so you will work on that next. You need to create a couple methods in the application delegate that will allow playing of the game, and another method to show the title screen once the game finishes. You also need to add a new property to the PaddlesViewController so you know if the computer is playing or not. Add the following computer property to the PaddlesViewController interface:
@property (assign) int computer;
Add the following synthesize statement at the top of the PaddlesViewController.m file:
@synthesize computer;
You also need to add a new property to the application delegate that will hold the PaddlesViewController object when the game is started. Open the PaddlesAppDelegate.h file and add the following property to the list of existing properties:
@property (strong, nonatomic) PaddlesViewController *gameController;
Add declarations for showTitle and playGame methods in the application delegate header:
- (void)showTitle;
- (void)playGame: (int) computer;
The playGame method will allocate a new PaddlesViewController object, pass along the computer parameter, and then present the view controller modally. This will display the game on top of the existing title view controller. You will implement the showTitle method by dismissing the modally presented game controller. Add the following code into the application delegate implementation file:
- (void)showTitle
{
    // dismiss the game controller
    if (self.gameController)
    {
        [self.viewController dismissModalViewControllerAnimated:
                                                            NO];
        self.gameController = nil;
    }
}
- (void)playGame: (int) computer
{
    // present the game over the title
    if (self.gameController == nil)
    {
        self.gameController = [[[PaddlesViewController alloc]
                     initWithNibName:@"PaddlesViewController"
                                    bundle:nil] autorelease];
        self.gameController.computer = computer;

        [self.viewController presentModalViewController:
                        self.gameController animated:NO];
    }
}
Now you need to make a call to play the game when the buttons are tapped in the title view controller. Open the TitleViewController.m file and add the following import statement so you can access the application delegate and the new methods that were added:
#import "PaddlesAppDelegate.h"
You need to modify the onPlay implementation to get the application delegate and call the playGame method with the computer property. The sender object that is passed into the onPlay method needs to be cast into a UIButton control so the tag property can be accessed. Remember, you set the Computer button to have a tag value of 1. You can simply pass along the tag variable of the button to the playGame method. Modify the contents of the onPlay method to be the following:
- (IBAction)onPlay:(id)sender
{
    PaddlesAppDelegate *app = (PaddlesAppDelegate*)
        [UIApplication sharedApplication].delegate;
    UIButton *button = (UIButton*) sender;
    [app playGame: button.tag];
}
Run the game; notice it allows going from the title screen into a new game. However, once the game finishes, it does not return to the title screen. Open the PaddlesViewController.m implementation file and import the application delegate so you have access to call its methods, specifically the showTitle method:
#import "PaddlesAppDelegate.h"
Modify the code so when the alert view is dismissed, it will call the application delegate showTitle method versus just creating a new game. Modify the alertView:didDismissWithButtonIndex method so it appears as follows:
- (void)alertView:(UIAlertView *)alertView
             didDismissWithButtonIndex:(NSInteger)buttonIndex
{
    // message dismissed so reset the game and start animation
    alert = nil;

    // check if we should go back to title
    if ([self gameOver])
    {
        PaddlesAppDelegate *app = (PaddlesAppDelegate*)
            [UIApplication sharedApplication].delegate;
        [app showTitle];
        return;
    }

    // reset round
    [self reset];

    // start animation
    [self start];
}
Play the game again and make sure that it returns to the title screen after the game finishes. Now you need to add back the previous pause/resume logic, but this time you need to make sure that the game is actually playing. Obviously, if the title screen is displayed, there is nothing to pause or resume:
- (void)applicationWillResignActive:(UIApplication *)application
{
    // pause the game if active
    if (self.gameController)
    {
        [self.gameController pause];
    }
}

- (void)applicationDidBecomeActive:(UIApplication *)application
{
    // resume the game if active
    if (self.gameController)
    {
        [self.gameController resume];
    }
}
Make sure the pause/resume logic works by testing the screen lock on both the title screen and game screen. You should notice that, when in the title view, the pause and resume logic is ignored, and when playing the game, the game will pause and resume correctly.
Now you have a new title screen and the buttons to specify whether you want to play the computer player. Those buttons pass the computer value to the application delegate, which then passes it into the paddle view controller by setting the computer property. This allows the PaddlesViewController to know if the computer should be controlling one of the paddles.
Computer Player
Now for the fun part: you get to design a computer player from scratch. I find this to be the most interesting part of building any game, because you get the opportunity to model human behavior. How do you make a computer appear human? Or maybe a better question to ask is how do you make the computer seem less robotic? You will start this journey exactly the way I approached the problem, and that is by first creating the most basic computer player possible.
Basics
The most basic of computer players would simply just move the paddle around. Nothing more than that. And because the Paddle object is already geared to animate incremental steps of movement, it won’t be very difficult. In the PaddlesViewController implementation, add the following method above the animate method:
- (void) computerAI
{
    // move paddle1 to a random position within player1 box
    float x = gPlayerBox[0].origin.x + arc4random() %
              (int) gPlayerBox[0].size.width;
    float y = gPlayerBox[0].origin.y + arc4random() %
              (int) gPlayerBox[0].size.height;
    [paddle1 move: CGPointMake(x,y)];
}
The computerAI method will just pick a random spot within the player box to move the paddle. Add the following code to the top of the animate function, so that when the computer is playing, it will call the computerAI method:
// check for computer player
if (computer)
{
    [self computerAI];
}
Build and run, then select the Computer player button from the title screen. You should notice that the paddle is now controlled by the computer, and it appears to be moving it in a berserk fashion. This is because the paddle is assigned a new position every frame of animation. This causes the paddle to shake very quickly because the code does not allow the paddle to arrive at its destination before a new random position is assigned. A quick fix to this is to monitor the speed of the paddle, and only assign a new position if the paddle is not moving. Modify the computerAI method to wait until the active speed of paddle1 has been reduced to 0:
- (void) computerAI
{
    if (paddle1.speed == 0)
    {
        // move paddle1 to a random position within player1 box
        float x = gPlayerBox[0].origin.x + arc4random() %
                  (int) gPlayerBox[0].size.width;
        float y = gPlayerBox[0].origin.y + arc4random() %
                  (int) gPlayerBox[0].size.height;
        [paddle1 move: CGPointMake(x,y)];
  }
}
Now the movements of the computer paddle has been downgraded from berserker to just a little crazy. At least the paddle now makes it to its destination before picking another position. There is one small issue you might have noticed, and that is you can still control the computer player’s paddle by touching the top half of the screen. It’s not very fair to be allowed to interfere with the computer’s paddle. You should only allow control over the top paddle when the computer is not playing (computer == 0). Since the movement logic requires that a touch be assigned to a paddle, you only need to focus on the touchesBegan method. Modify the touchesBegan method to the following:
- (void)touchesBegan:(NSSet *)touches withEvent:(UIEvent *)event
{
    // iterate through our touch elements
    for (UITouch *touch in touches)
    {
        // get the point of touch within the view
        CGPoint touchPoint = [touch locationInView: self.view];

        // if paddle not already assigned a specific touch then
        // determine which half of the screen the touch is on
        // and assign it to that specific paddle
        if (paddle1.touch == nil && touchPoint.y < 240 &&
computer == 0)
        {
            touchPoint.y += 48;
            paddle1.touch = touch;
            [paddle1 move: touchPoint];
        }
        else if (paddle2.touch == nil)
        {
            touchPoint.y -= 32;
            paddle2.touch = touch;
            [paddle2 move: touchPoint];
        }
    }
}
You have just created an extremely simple—but very dumb—computer player. I want to take a step back in the next section and think about how to make a better computer player.
Human Model
Think about how you play the game of air hockey and all of the different decisions and behaviors you will typically make. The easiest state to understand is that of defense. You do not want the other player to score a point against you, so you will position the paddle in a way that makes it more difficult for the opponent to score. The next obvious state is offense, where you have the puck on your side of the table and it is under your control. At this point you will try and hit a powerful shot and hopefully score a point. I’ll dive into these states in a bit, but for now I want you to think about a couple other states that might not be so obvious.
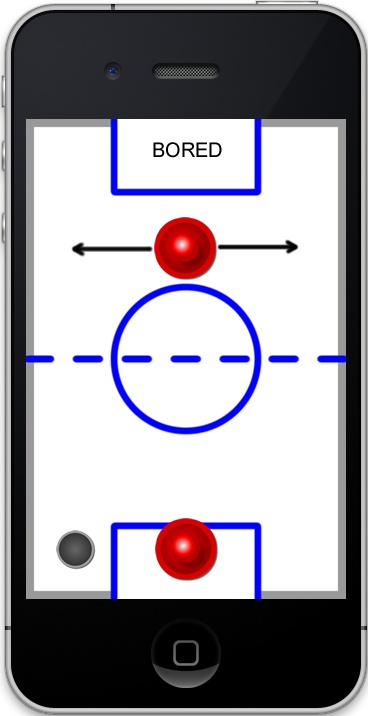
What about when the opponent has the puck and they aren’t really doing anything? The opponent could be analyzing the board for the best shot possible. Maybe they will be creative and put together an angle shot. Maybe they just want to try for the best direct shot. What do you usually do when someone is holding on to the puck? Just sit still and let them prepare their shot? Not usually. You will move your paddle around into different positions so preparing for a good shot becomes more difficult. You want them to just take the shot, and not spend a lot of time preparing. Or maybe you are just bored and wished they would hurry up. Either way, you’ll probably move your paddle around on the table. You already have the code that randomly moves the paddle around, so this will become the logic used in the bored state, as shown in Figure 6-6.
You also don’t start in an offense, defense, or bored state, but usually in a state that makes a decision. Where is the puck? Should you go into defense or offense? Do you just wait and see what the other player does? The board needs to be analyzed and a decision on what to do next needs to be made. And maybe you will just decide to wait a little longer before a real decision is made. This will be the state that the computer will always fall back on after going into one of the other states. This will be the wait state for the computer. It will wait a random amount of time and then make an informed decision about what state it will go into next.
Define all the different states the computer can be in by adding an enumeration into the PaddlesViewController header. Add the following line of code after the import statements and before the interface definition:
enum { AI_WAIT, AI_BORED, AI_DEFENSE, AI_OFFENSE };Add a state variable inside the interface definition that will keep track of the active state the computer player is in. This will initially be set to 0, which is the AI_WAIT state:
int state;
At the start of every round, you need to reset the computer state back into the wait state. Add the following code into the reset method:
// reset computer AI
state = 0;
You will now create a basic implementation of the computer wait state. The first thing you will check is if the paddle is moving. Once the paddle comes to rest, the computer will start picking random numbers. Once the computer finds a specific number it will take action. This is basically how you will make the computer wait. It will just keep picking numbers until it gets the right one. Once it has picked the winning number, the computer will then be allowed to make a decision. It doesn’t really matter what number it picks just as long as it is a specific one in the total range of random numbers. I decided to check if the random value picked was the number 1, and if so, the computer will decide on a new state to go into. For now, you will just have the computer enter into the bored state, but later on you will expand it to all the different states. Add the following to the top of the computerAI method:
if (state == AI_WAIT)
{
    // wait until paddle has stopped
    if (paddle1.speed == 0)
    {
        // pick a random number between 0 and 9
        int r = arc4random() % 10;

        // if we pick the number 1 then we go into a new state
        if (r == 1)
        {
              state = AI_BORED;
        }
    }
}
Why do you have the computer picking random numbers? The computer can obviously make quicker decisions than a human can, so you are making the computer player waste a few cycles before it makes a decision on which state it should go into. It also adds a bit of unpredictability to when the computer will enter a new state. Adding unpredictability to computer logic is always good, as it makes it more challenging for the player to figure out what the computer will do next.
Take the existing code that moves the paddle into a random position and make that the implementation of the bored state. The code after the wait state logic should be altered as follows:
// computer is bored and moves to random position
else if (state == AI_BORED)
{
    if (paddle1.speed == 0)
    {
        // move paddle into a random position within the
        // player1 box
        float x = gPlayerBox[0].origin.x + arc4random() %
                          (int) gPlayerBox[0].size.width;
        float y = gPlayerBox[0].origin.y + arc4random() %
                         (int) gPlayerBox[0].size.height;
        [paddle1 move: CGPointMake(x,y)];
        state = AI_WAIT;
    }
}
Now you should think about how the defensive state should be implemented.
Defense
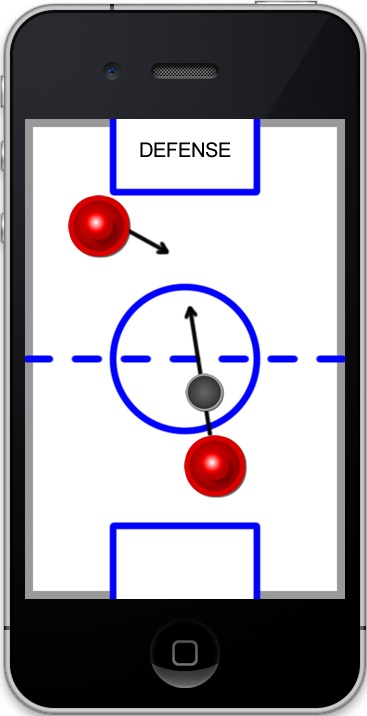
I already discussed that the defensive state should make it difficult for the other player to score. But when does the computer take on a defensive position? Most likely when the other player has control of the puck, and definitely when the puck has been struck and is moving towards the top half of the table. What do you usually do when you are playing defensive? A good defense position, just like in soccer, is to put your paddle between the goal and the puck, as depicted in Figure 6-7. This prevents a straight-on shot making it difficult to get an easy point. It is also smart to pull the paddle back a little toward the goal to reduce chances of an angled shot, sneaking by the paddle. Pulling the paddle backwards can also help cushion the puck if it hits the paddle, which will hopefully keep it on the side of the table so you can then go into an offensive strategy. This logic will be the AI_DEFENSE state for the computer player.
You will modify the AI_WAIT state to check if the puck is moving towards the top of the screen, and if so it will go into the AI_DEFENSE state. In the defensive state, you will initially create unbeatable logic by placing the paddle between the goal and the incoming puck. You will move the paddle along the y-axis to the halfway point between the goal and the puck. You will also position the paddle in the same x-axis position as the puck. Once the puck speed has slowed down enough, the computer will go back to the AI_WAIT state.
if (state == AI_WAIT)
 {
     // wait until paddle has stopped
     if (paddle1.speed == 0)
     {
         // pick a random number between 0 and 9
         int r = arc4random() % 10;

         // if we pick the number 1 then we go into a
         // new state
         if (r == 1)
         {
             // if puck is heading towards us at a good rate
             // then go into defense
             if (puck.speed >= 1 && puck.dy < 0)
             {
                 state = AI_DEFENSE;
             }
             else
             {
                 state = AI_BORED;
             }
         }
     }
 }
 else if (state == AI_DEFENSE)
 {
     // move to the puck x position and split the difference
     // between the goal
     [paddle1 move: CGPointMake(puck.center.x,
                                puck.center.y / 2) ];

     if (puck.speed < 1)
     {
         state = AI_WAIT;
     }
 }
 // computer is bored and moves to random position
 else if (state == AI_BORED) ...
Go ahead and play the game at this point, and you should notice that the computer moves the paddle directly behind the puck when it goes into a defensive state. This looks a little bit robotic, in that the paddle is placed at the exact same location along the x-axis as the puck. I also noticed that sometimes the paddle stays in defensive position too long, especially when the puck has bounced off the paddle and is heading back towards the other goal. Let’s modify the code so that it positions the paddle at an offset towards the center of the goal and also leaves the defensive state once the puck is heading back the other direction. I decided to offset the paddle toward the goal center by as much as the puck’s width. This will help make the computer player look a little more natural. Modify the defensive implementation to the following:
// move to the puck x position and split the difference
// between the goal
float offset = ((puck.center.x - 160.0) / 160.0) * 40.0;
[paddle1 move: CGPointMake(puck.center.x - offset,
                           puck.center.y / 2) ];

if (puck.speed < 1 || puck.dy > 0)
{
    state = AI_WAIT;
}
The defensive strategy might be a little too good, as there really is no way to score if the computer is in that state. The only chance you can score is if it takes it a really long time to make a decision or it just went into a bored state, giving you a little time to make a shot. The game wouldn’t be fun if you couldn’t sneak a point even when the computer was playing defense, and one solution is to tweak the maximum speed that the paddle can move while in this state. This will allow you to shoot the puck by the computer player even if it is playing solid defense. Add the following line into the AI_DEFENSE logic:
paddle1.maxSpeed = MAX_SPEED / 3;You need to reset the maximum speed back to the default once you go back into the wait state and the paddle has stopped moving. Add the following to the AI_WAIT logic, right before the picking of the random number:
paddle1.maxSpeed = MAX_SPEED;At this point the computerAI method should appear as follows:
- (void) computerAI
{
    if (state == AI_WAIT)
    {
        // wait until paddle has stopped
        if (paddle1.speed == 0)
        {
            paddle1.maxSpeed = MAX_SPEED;

            // pick a random number between 0 and 9
            int r = arc4random() % 10;

            // if we pick the number 1 then we go into a
            // new state
            if (r == 1)
            {
                // if puck is heading towards us at a good rate
                // then go into defense
                if (puck.speed >= 1 && puck.dy < 0)
                {
                    state = AI_DEFENSE;
                }
                else
                {
                    state = AI_BORED;
                }
            }
        }
    }
    else if (state == AI_DEFENSE)
    {
        // move to the puck x position and split the difference
        // between the goal
        float offset = ((puck.center.x - 160.0) / 160.0) * 40.0;
        [paddle1 move: CGPointMake(puck.center.x - offset,
                                   puck.center.y / 2) ];

        if (puck.speed < 1 || puck.dy > 0)
        {
            state = AI_WAIT;
        }
        paddle1.maxSpeed = MAX_SPEED / 3;
    }
    // computer is bored and moves to random position
    else if (state == AI_BORED)
    {
        if (paddle1.speed == 0)
        {
            // move paddle into a random position within the
            // player1 box
            float x = gPlayerBox[0].origin.x + arc4random() %
                              (int) gPlayerBox[0].size.width;
            float y = gPlayerBox[0].origin.y + arc4random() %
                             (int) gPlayerBox[0].size.height;
            [paddle1 move: CGPointMake(x,y)];
            state = AI_WAIT;
        }
    }
}
Play the game with the new defensive state and you will notice it plays a much better game of air hockey. It is now much harder to score against the computer player. Even though the defense and bored states actually make for a better computer player, there still seems to be something missing. The computer rarely takes a shot unless it goes into the bored state and picks a random position on the board that collides with the puck. An offensive state needs to be added so the computer will go for the puck and take the shot when the time is right.
Offense
What makes for a good offensive strategy? Maybe you try and find a good angle shot that has a decent chance of getting in. Or maybe you just hit it as hard as possible not allowing for the opponent to prepare for the shot. When do you take the shot? Usually when you have control of the puck, which means, you wait until the puck has slowed down where you can hit it with a little more accuracy. So the computer should wait until the puck is on its side and not moving very fast before it takes a shot. This will be the AI_OFFENSE state for the computer player.
That part of the strategy seems obvious, but then I started thinking about how the computer should hit the puck. I pulled out a piece of paper and drew a few ideas down that might make for a good strategy. What if I calculated every angle that the paddle could hit the puck and simulate it out so the computer would know where the puck ended up. From there, I could rate the results such that if the puck scored a point it would rate that outcome higher than if a point wasn’t scored. If the puck scored in your own goal then it could rate that very low. If you hit the back wall near the goal then that could be ranked higher than just hitting the player’s paddle. I wanted to create a list of shots that were ranked by how good the shot resulted in. That would make for a pretty smart computer player, and then you could scale it back from there.
I started coding this strategy up for offense, and it is one of the reasons I created the Puck object, so it could be used to simulate out all the different possibilities. The Puck object can be modified so it can track the current puck position without using the view object. That way you could have multiple Puck objects that the computer used for simulation, and they wouldn’t conflict with the current puck image on the screen. That wouldn’t be a difficult modification and I initially went down this path to see what would happen. My first issue was how do I perform these calculations based on where the computer paddle is located. In order to get the proper angle, the paddle has to be moved into position first, and if the puck is moving then this information will get out of date quickly. I also assumed that if every single angle that the puck could be struck was simulated, that it might be too intense of a calculation and cause the game to lag. I needed a better solution that didn’t require having to move the paddle into a specific angle to strike the puck and didn’t require a lot of calculations.
My next idea was to pick a few random places that the paddle could hit the puck and then simulate that out to make a good decision. This would reduce the number of calculations, and also not require that the puck be put into a better position. You could just simulate it out from where the current puck and paddle were located. I decided this approach was much easier to implement and I started coding it up. The puck and paddle objects were modified so they could be simulated out without moving a view object. I ran a few tests and realized that the way the simulation was done, by calling the animate method per each frame, was just too slow to use for the computer simulations. You could tell when the computer ran its calculations the frame rates dropped. There was too much going on inside the animate method and it caused the game to lag. I needed an even simpler solution that didn’t require a lot of processing power.
Sitting back in my chair, I decided my initial approach to offense was a horrible first approach. I spent a lot of time building this huge complicated system that required tons of calculations and processing power. Why would that be my step one? That’s not how I typically code. I like to code in small increments so that I can see actual progress along the way. I think maybe I was just excited to come up with a really clever solution, rather than sticking to a simple approach that could be built upon.
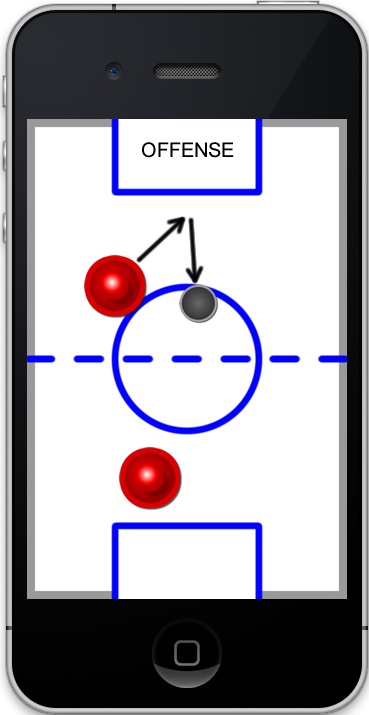
I painfully scrapped all my work and decided to think about using a simple solution. What is the absolute simplest method for an offensive strategy? Why not just hit the puck? That certainly would be the easiest approach possible to run with initially. All I needed to do was add to the decision logic so that if the puck is on the computer’s side and the speed of the puck is slow enough, then it would change into the offensive state. The offense state would just move the paddle to the center position of the puck. It’s simple: let’s just hit the puck!
Modify the decision logic in the AI_WAIT state to include this logic for moving into the offense state:
...
            // if we pick the number 1 then we go into a
            // new state
            if (r == 1)
            {
                // if puck is on our side and not moving fast
                // go into offense. if puck is heading
                // upwards with some speed go into defense.
                // otherwise get bored

                if (puck.center.y <= 240 && puck.speed < 1)
                {
                    state = AI_OFFENSE;
                }
                else if (puck.speed >= 1 && puck.dy < 0)
                {
                    state = AI_DEFENSE;
                }
                else
                {
                    state = AI_BORED;
                }
            }
...
Now you will add in the logic to just hit the puck when in the offense state. After you move the paddle to the puck’s position, you will go back into the wait state. Add the following code to handle the AI_OFFENSE state:
...
    else if (state == AI_OFFENSE)
    {
        [paddle1 move: puck.center];
        state = AI_WAIT;
    }
    else if (state == AI_DEFENSE)
...
Now let’s build and play the game and see how the offensive behavior of just hitting the puck works out. In my testing, I noticed that the computer will sometimes be in a defensive position, block the puck, wait until the puck slows, and then strike it. That was pretty cool to see, and it certainly appeared to have a human-like quality. On the other hand, when the puck gets behind the computer paddle, it will just blindly hit the puck in the wrong direction, sometimes sending the puck into the wrong goal. That’s not a normal behavior and something you will fix a little later. Another problem that I noticed was sometimes the puck gets stuck in the corner for a little while, and the computer keeps trying to hit it but it doesn’t move, so it hits it again, and so on. This results in the paddle just sitting on top of the puck and since the puck has nowhere to go, the paddle just keeps trying to hit it. If you haven’t seen this condition occur, you can recreate it by simply placing the puck in the top left corner each round. Add the following code into the reset method to demonstrate the issue:
// test puck trap issue
viewPuck.center = CGPointZero;
Run the application again and you will see that sometimes the computer paddle gets trapped in the corner with the puck. This means the game would get stuck in a state where it could never finish, and that’s not good. You need for the computer to move the paddle out of the way after it takes the shot. If you think about a human player, they will usually strike the puck, and pull back anyway. You could easily add the logic to move the paddle out of the way once it strikes it. Another way to solve the issue would be to test for the intersection of both the paddle and puck at the start of the AI_WAIT loop and then go into the AI_BORED state if that occurs. The objects usually won’t be intersecting at the beginning of the computerAI method because the implementation of collision detection will reposition the objects so they are not overlapping. This doesn’t always occur, however, because of the walls. So you could just check in this method if they are intersecting and then go into a bored state to correct. Another quick solution is instead of going into the AI_WAIT state from offense (which would result in going to offense again), you could set it to go directly into the AI_BORED state so the paddle moves to a random position. I decided to go with checking for intersection inside the AI_WAIT state, as it should offer the most protection against any type of trap condition. Add this to the top of the AI_WAIT logic:
    if (state == AI_WAIT)
    {
        // fix to handle computer trapping puck into the corner
        if ([paddle1 intersects: viewPuck.frame])
        {
            // go into a bored state so paddle moves to
            // random position
            state = AI_BORED;
            return;
        }
...
Test it again and you will notice that the computer paddle does in fact move away from the puck when it gets trapped. You may have noticed that this condition sometimes puts the computer paddle in position to score against itself. It might make sense to create a new state so when this trap condition occurs you can minimize the chances of this happening. I decided to focus on making the offensive behavior a little bit smarter than just going right for the puck. In the end, a smarter strike should help with the trap condition as well. Now that the trap problem has been solved, go ahead ahead and remove the debug code to place the puck in the top left corner.
Let’s focus next on this issue where the computer blindly strikes the puck even if it is in front of it. In order to improve this, I want to make the offensive behavior have two parts to it. The first part will position the paddle in a striking position, and the second part will do the strike as it is coded now. Let’s add a new state called AI_OFFENSE2 to the enum definition at the top of the header file:
enum { AI_WAIT, AI_BORED, AI_DEFENSE, AI_OFFENSE, AI_OFFENSE2 };The striking of the puck will be set to AI_OFFENSE2, and you will add a new AI_OFFENSE that moves the paddle into a random position behind the puck. This will help set up a better shot by making sure the paddle is behind the puck. Modify the offensive code to be handled in two parts as follows:
else if (state == AI_OFFENSE)
{
    // pick a new x position between -64 and +64
    // of puck center
    float x = puck.center.x - 64 + (arc4random() % 129);
    float y = puck.center.y - 64 - (arc4random() % 64);
    [paddle1 move: CGPointMake(x,y)];
    state = AI_OFFENSE2;
}
else if (state == AI_OFFENSE2)
{
    if (paddle1.speed == 0)
    {
        // strike it
        [paddle1 move: puck.center];
        state = AI_WAIT;
    }
}
Play the game and notice that the computer now sometimes hits an angled shot rather than just going straight for the puck. This makes it much more difficult to predict where the computer will take the shot. Another thing you may have noticed is the computer usually hits the puck before you do at the start of the round. This isn’t very fair since you might have just dismissed the message dialog to start the game and may have not even have grabbed your paddle yet. It would be great if the computer would delay the first hit until you started moving your paddle, or at least wait a random amount of time before taking the initial shot. Let’s add a new starting state that will handle this logic. Add the AI_START state to the beginning of the enumeration so that the computer player will always start in this state at the beginning of every round:
enum { AI_START, AI_WAIT, AI_BORED, AI_DEFENSE, AI_OFFENSE,
       AI_OFFENSE2 };
Now let’s add starting logic that waits a random amount of time before going into the AI_WAIT state. It will also go into the AI_WAIT state if it notices the player’s paddle has moved, which is reported when the player’s paddle speed is greater than 0. Add the following logic to the top of the computerAI method before the AI_WAIT logic:
if (state == AI_START)
{
if (paddle2.speed > 0 || (arc4random() % 100) == 1)
{
state = AI_WAIT;
}
}
else if (state == AI_WAIT)
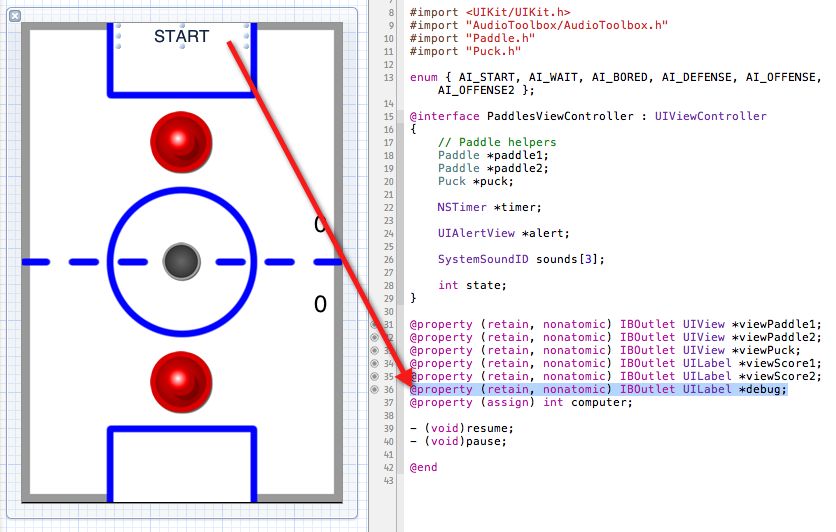
...There are now 6 different computer states, which makes it difficult to know the active state the computer is currently in. You could modify each state handler and write a log message that tells you when the computer enters a new state. However, the states can change pretty quickly, making it difficult to keep an eye on both the computer’s behavior and the current state. If you played it on device it would be even more difficult, as you can’t really look at two different screens at the same time. In order to solve this, you will add a debug label to the top of the screen to display the active computer state.
Using interface builder, modify the PaddlesViewController.xib interface file and put a label at the top of the screen, as shown in Figure 6-9. Make sure the width is the size of the goal box, text color is black, and the alignment is centered. Create a property for the label and name it “debug.” Now you will modify each state handler to update the label so the computer state is displayed on the screen. This will help validate all the current logic, and if you decide to add more states to the computer logic, it will help for that purpose, too.
Here is the entire computerAI function with the debug label updated:
- (void) computerAI
{
    if (state == AI_START)
    {
        debug.text = @"START";

        if (paddle2.speed > 0 || (arc4random() % 100) == 1)
        {
            state = AI_WAIT;
        }
    }
    else if (state == AI_WAIT)
    {
        // fix to handle computer trapping puck into the corner
        if ([paddle1 intersects: viewPuck.frame])
        {
            // go into a bored state so paddle moves to
            // random position
            state = AI_BORED;
            return;
        }

        // wait until paddle has stopped
        if (paddle1.speed == 0)
        {
            debug.text = @"WAIT";

            paddle1.maxSpeed = MAX_SPEED;

            // pick a random number between 0 and 9
            int r = arc4random() % 10;

            // if we pick the number 1 then we go into a
            // new state
            if (r == 1)
            {
                // if puck is on our side and not moving fast
                // go into offense. if puck is heading
                // upwards with some speed go into defense.
                // otherwise get bored
                if (puck.center.y <= 240 && puck.speed < 1)
                {
                    state = AI_OFFENSE;
                }
                else if (puck.speed >= 1 && puck.dy < 0)
                {
                    state = AI_DEFENSE;
                }
                else
                {
                    state = AI_BORED;
                }
            }
        }
    }
    else if (state == AI_OFFENSE)
    {
        debug.text = @"OFFENSE";

        // pick a new x position between -64 and +64
        // of puck center
        float x = puck.center.x - 64 + (arc4random() % 129);
        float y = puck.center.y - 64 - (arc4random() % 64);
        [paddle1 move: CGPointMake(x,y)];
        state = AI_OFFENSE2;
    }
    else if (state == AI_OFFENSE2)
    {
        debug.text = @"OFFENSE2";

        if (paddle1.speed == 0)
        {
            // strike it
            [paddle1 move: puck.center];
            state = AI_WAIT;
        }
    }
    else if (state == AI_DEFENSE)
    {
        debug.text = @"DEFENSE";

        // move to the puck x position and split the difference
        // between the goal
        float offset = ((puck.center.x - 160.0) / 160.0) * 40.0;
        [paddle1 move: CGPointMake(puck.center.x - offset,
                                   puck.center.y / 2) ];

        if (puck.speed < 1 || puck.dy > 0)
        {
             state = AI_WAIT;
        }
        paddle1.maxSpeed = MAX_SPEED / 3;
    }
    // computer is bored and moves to random position
    else if (state == AI_BORED)
    {
        if (paddle1.speed == 0)
        {
            debug.text = @"BORED";

            // move paddle into a random position within the
            // player1 box
            float x = gPlayerBox[0].origin.x + arc4random() %
                              (int) gPlayerBox[0].size.width;
            float y = gPlayerBox[0].origin.y + arc4random() %
                             (int) gPlayerBox[0].size.height;
            [paddle1 move: CGPointMake(x,y)];
            state = AI_WAIT;
        }
    }
}
In the next section, you will add different levels of difficulty to the computer player.
Computer Difficulty
You will now create easy, medium, and hard difficulty levels for the computer player. The way I like to approach the computer difficulty is to adjust the characteristics of the existing logic to make it easier or harder. A lot of times, you can just tweak the numbers behind the logic itself. It also helps to have the difficulty setting as a numeric value, such as an integer, so you can use it directly in the equations for computer behavior. You probably remember that the computer property is currently an integer and not just a Boolean or string value. The reason was so you could easily add support for difficulty without having to change much, especially within the interface itself.
The title view currently has two buttons to pick between computer or two-player mode. You are using the same method to handle both selections, with the only difference being that the Tag variable of the button is 0 for two players and 1 for computer. You can just set computer difficulty using the same method by changing the computer player button to be three buttons. Each computer button will have an incrementing Tag value for difficulty. You will assign a Tag value of 1 for easy, 2 for medium, and 3 for hard. The great thing about this is you can use the exact same onPlay handler. The value of the tag property is simply passed along to the application delegate, and then to the PaddlesViewController, so no extra coding will be required.
Open up the PaddlesViewController.xib file and copy and paste the Computer button twice. Rename the Computer button labels to say “Easy,” “Medium,” and “Hard,” and lay them out as shown in Figure 6-10. Using the Attributes Inspector, set the Tag property for the Easy button to 1, Medium button to 2, and Hard button to 3. And that is all you have to do, as the action outlet was copied to the new buttons. How simple was that?

All of the buttons should continue to work with the computer difficulty buttons just playing against the current computer logic. The only difference is now the computer property represents more than just that the computer is playing, it also includes how difficult the computer player should be. You can probably think of a few things that you can do to scale the difficulty of the computer, such as slowing the paddle down or delaying how long it takes the computer to make a decision. You will use those techniques and a few others to give a different playing experience for each level picked. I will now tackle each computer state, one at a time, and tweak it to use the computer property to scale difficulty.
Look at the AI_START state and see what could be adjusted for computer difficulty. It makes sense to have the harder computer player come out of the starting state faster than the easy player. It currently picks a random number to decide when to move into the AI_WAIT state, so you could reduce the total amount of numbers that it picks from to speed things up on average. Modify the start condition to be as follows:
if (state == AI_START)
{
    debug.text = @"START";

    if (paddle2.speed > 0 ||
       (arc4random() % (100/computer)) == 1)
    {
        state = AI_WAIT;
    }
}
Notice that all I’m doing is dividing the available pool of random numbers by the computer property. No need to worry about division by zero (which would crash the program) since computer will always be 1 or greater in this method. Now when you are playing easy mode, it will use 100 as the value, medium will use 50, and hard will use 33. You can hopefully see why it’s nice to keep difficulty as a numeric value, so you can very easily integrate the value within the computer logic. You could easily have had a whole series of conditional statements checking if you were playing easy, medium, or hard, and then providing completely different logic for each one. But hopefully you will agree that this is a much simpler approach and ultimately leads to less code. And less code means fewer bugs.
Let’s look at the AI_WAIT code now and see what can be adjusted. Just like you did for the start condition, you can adjust the total pool of random numbers to pick from so the computer will make quicker decisions when playing the harder levels. You are currently picking from a total of 10 numbers. If you divide that number by the computer level like you did before, that would result in 10, 5, and 3 for easy, medium, and hard, respectively. I decided to use 12, 8, and 4 instead, so that the medium and hard levels were not drastically more difficult. I also felt that the easy level could be a little slower at making decisions than the current computer behavior. Modify the range of random numbers to the following:
int r = arc4random() % ((4 - computer) *4);
The next part of code you want to modify is when to go into the offensive state. You probably have noticed when playing the game that it takes a while for the computer to strike the puck. This is because it waits until the puck is almost stopped. The computer player would be more difficult if you allowed it to take a shot when the puck was travelling at faster speeds. This would increase the speed at which the computer takes shots, which ultimately means the gameplay will be faster. You will modify the minimum puck speed requirement of 1 to be the computer level. This means that the puck speed will have to be less than 1 for easy, less than 2 for medium, and less than 3 for hard level. Another change you can make is when you are in easy mode, you could skip the AI_OFFENSE state, and go straight into AI_OFFENSE2 so it takes the shot. This means easy mode will not reposition the paddle before taking the shot, so it will be more predictable and make more mistakes. The medium and hard levels will continue to reposition the paddle randomly behind the puck by going into the AI_OFFENSE state. Change the offensive decision code to the following:
...
               if (puck.center.y <= 240 && puck.speed < computer)
               {
                   if (computer == 1) state = AI_OFFENSE2;
                       else state = AI_OFFENSE;
               }
...
Let’s take a look at the AI_OFFENSE state and see what can be modified. This state positions the paddle randomly behind the puck before it strikes. You just modified the code so that only medium and hard levels use this state. When not playing the hard level, let’s slow down the paddle movement to half of the max speed. Modify the offense-state code as follows:
...
    else if (state == AI_OFFENSE)
    {
        debug.text = @"OFFENSE";

        if (computer < 3) paddle1.maxSpeed = MAX_SPEED / 2;

        // pick a new x position between -64 and +64
        // of puck center
        float x = puck.center.x - 64 + (arc4random() % 129);
        float y = puck.center.y - 64 - (arc4random() % 64);
        [paddle1 move: CGPointMake(x,y)];
        state = AI_OFFENSE2;
    }
...
The AI_OFFENSE2 state strikes the puck at maximum speed. Modify it so that only the hard level hits the puck at max speed. You will set the easy level to only strike at 1/2 the max speed and change medium level to strike at 3/4 of max speed. Modify the code as follows:
...
    else if (state == AI_OFFENSE2)
    {
        debug.text = @"OFFENSE2";
        if (computer == 1)
        {
            paddle1.maxSpeed = MAX_SPEED / 2;
        }
        else if (computer == 2)
        {
            paddle1.maxSpeed = MAX_SPEED * 3/4;
        }
        // strike it
        [paddle1 move: puck.center];
        state = AI_WAIT;
    }
...
The AI_DEFENSE state positions the paddle between the goal box and the puck. Modify the code so that it moves the paddle into position faster for the medium and hard levels. You will keep the easy level at 1/3 of maximum speed, and then adjust medium to 2/5 and hard to 1/2 of max speed.
...
    else if (state == AI_DEFENSE)
    {
        debug.text = @"DEFENSE";
        // move to the puck x position and split the difference
        // between the goal
        float offset = ((puck.center.x - 160.0) / 160.0) * 40.0;
        [paddle1 move: CGPointMake(puck.center.x - offset,
                                   puck.center.y / 2) ];
        if (puck.speed < 1 || puck.dy > 0)
        {
            state = AI_WAIT;
        }
        if (computer == 1)
        {
            paddle1.maxSpeed = MAX_SPEED / 3;
        }
        else if (computer == 2)
        {
            paddle1.maxSpeed = MAX_SPEED * 2/5;
        }
        else if (computer == 3)
        {
            paddle1.maxSpeed = MAX_SPEED / 2;
        }
    }
...
The AI_BORED state picks a random position within the player box and moves the puck into it. You can change the paddle speed to make it take longer to move to the random position, which of course makes it easier to allow the player to sneak a shot into the goal. You can also make the rectangle that is used to pick that random position to be smaller and closer to the goal box. This will make the position selected more defensive and more difficult to score against. Modify the handling of the bored state to be as follows:
else if (state == AI_BORED)
{
    if (paddle1.speed == 0)
    {
        debug.text = @"BORED";

        // change paddle speed based on level
        paddle1.maxSpeed = 3 + computer;

        // inset the rectangle if medium (20) or hard (40)
        int inset = (computer - 1) * 20;

        // move paddle into a random position within the
        // player1 box
        float x = (gPlayerBox[0].origin.x + inset) +
                  arc4random() %
                  (int) (gPlayerBox[0].size.width - inset*2);
        float y = gPlayerBox[0].origin.y +
                  arc4random() %
                  (int) (gPlayerBox[0].size.height - inset);

        [paddle1 move: CGPointMake(x,y)];
        state = AI_WAIT;
    }
}
You now have three different computer players each with different characteristics. Play the game on each level and take notice of the current computer state and the movements that the computer player makes. Hopefully you will find that it is easier to win on the easy level, and that the hard level gives you a pretty good challenge. If that is not the case then you can always go back and make adjustments to the numbers. There is no right answer but I encourage you to let others determine if the game is difficult or not. As the developer, you know the code behind the game, so it can be difficult to judge if things are easy or not. Always let others play the game and get as much feedback as possible before launching it in the App Store. Chances are your friends will bring up the same concerns as others who download your game. It is best to come out of the gate with the best product possible.
Once you are satisfied with the computer logic, you should take out the debug message at the top of the screen. You could remove it completely, although you may want to use it again in the future, so let’s just make it invisible instead. If you ever want to add more computer states or even adjust the current implementation, using the debug message can be an invaluable tool. In order to make the message invisible, add the following to the viewDidLoad method:
debug.hidden = YES;
You now have a completed iPhone game that supports both two-player and computer modes. The computer mode supports multiple difficulty levels that you can progress through. All that is left is submitting it for review and hopefully getting it approved for distribution in the App Store. I’ll cover that in the next chapter.