
Chapter 3. Graphics
Graphics are extremely important to any game, which is why I have created a whole chapter on how to create and use them in your game. If one of your goals is to have your game featured in iTunes (and it should be) then you need to make sure your game makes the iPhone or iPad look visually stunning. Apple features apps that make their hardware look great. Do you think Angry Birds would be one of the most popular games of all time if they didn’t have cute birds and pigs? What if they decided to save time and money by using white rectangles? No, that obviously wouldn’t have worked. When it comes to getting graphics for your game, you have a few options available to you:
Do it yourself: Create the graphics on your own—and this chapter is here to help! I usually always try to create my own graphics before trying anything else. If it is more complicated than my skill level, I’ll pick one of the below options. The more you try to do your own graphics, the better you will get at it.
Buy it: You can purchase stock photos and illustrations from websites like www.istockphoto.com or www.shutterstock.com. This option won’t cost as much as paying someone to create the graphics from scratch and you may be able to find something close to what you need. I’ve used this approach on numerous occasions and will typically do a few tweaks to make the artwork more unique. And by that I mean adjust the shape and colors where possible or combine it with other pieces of artwork. There are many times when you will find portions of different pieces of art that can be combined together. It isn’t difficult to layer multiple pieces together to create the artwork you had in mind.
Pay someone: This will probably take the most time and also cost the most. If you go this route be sure to specify before any work is done that you want the original files so you can make changes if needed down the road. It is always easier to make small modifications yourself. For example, resizing an image, adding transparency, or exporting to different image formats is something that is very typical and you should be able to handle it. Working with a graphic designer can also consume a lot of time, so make sure that if you have deadlines that the designer is well aware of this up front and is able to commit to your timeline. A lot of times you end up going back and forth on the design and if you are being charged by the hour then the costs could get pretty high. I always try to nail down a basic design first before any work has started.
Another option that works well for logos and icons is to hold a graphics contest. At the website http://gfxcontests.com/ you can create a contest describing what type of graphic you’re looking for and multiple designers will compete for your specified prize money (typically $100). I’ve seen this approach used before and it worked great. It allows you to provide feedback to the designers while the contest is underway so they can rework their designs to better fit your needs. It can be a lot of fun and when the contest is over you get to pick the winning entry.
Another option you could try is contacting a local college and look for students that are learning graphics design. Someone there would love to get the exposure and credit of having their work featured in an iPhone game. This way you can get yourself graphics on the cheap and also help a student out by building their portfolio and even promoting their name and website in the credits of your game.
This chapter will show how you can create your own game graphics so you can save time and money. You are going to create a game of Air Hockey, so you’ll need to create a puck, two paddles, and an air hockey table to play on. You also need artwork for the application icon that is displayed in both the App Store and on the device after installation.
Introduction
There are lots of tools you can use to create graphics, including free tools such as the open source Gimp program (www.gimp.org) and Inkscape (http://inkscape.org/). There are also paid tools such as one of Adobe’s (www.adobe.com) many products: Illustrator, Fireworks, and Photoshop. I have found that the Adobe products are what most graphic designers use and prefer, which may be enough of a reason to go ahead and purchase. This way if you ever need to hire out for graphics, you will be able to keep and edit their work using the same file format.
One of my favorite programs that I use to create graphics is Adobe Fireworks. It combines a lot of the features of Adobe Photoshop and Adobe Illustrator into what I find to be a simpler interface. I’ll start the lesson using this program. Even though it’s not free, you can still download a full-functioning trial version from the Adobe website to see if you like the product. If you already have another program you want to use then you might still be able to follow along, as most drawing programs have similar features and concepts.
Bitmaps and Vectors
Adobe Fireworks supports editing both vector and bitmap graphic formats. It is important to know the differences between both formats. For our purposes, you will find the bitmap format to be much more limiting than the vector format. So what is the difference?
Bitmap graphics are composed of pixels arranged in a grid. Each pixel in a bitmap can be assigned a unique color. The iPhone screen is just a rectangular grid of pixels. All of the game images you will use in the air hockey game will be bitmaps. However, during the editing process it is much preferred to use vectors.
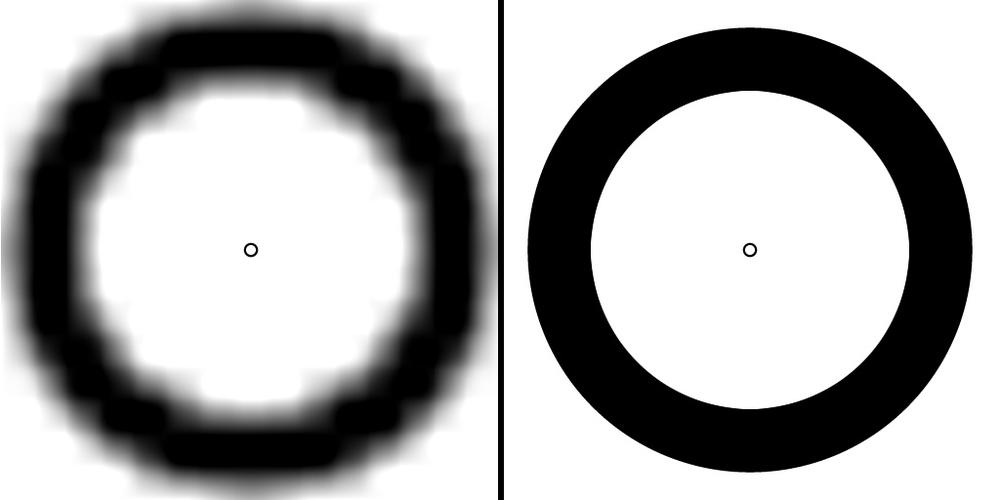
So what is a vector? It is basically a math equation used to describe a shape. Because it is an equation, it can be scaled to any size without loss in resolution. This is the biggest difference between vectors and bitmaps. If you looked at a bitmap and a vector side by side at the same resolution of the same shape then you wouldn’t be able to tell the difference. However, if you were to scale the images, especially if you make them larger, then the difference becomes very apparent. In order to illustrate this, I created a small circle on a canvas of size 16×16 pixels and saved it as a bitmap and a vector. I then scaled both images up to a size of 512×512, as shown in Figure 3-1. You should quickly notice that the bitmap on the left has become very blurry when scaled up, while the vector on the right has maintained its perfect shape.
At the end of the day, you will always use bitmap images in your iPhone applications, but that doesn’t mean you should keep the artwork files as bitmaps. It is very easy to export from a vector format into a bitmap format. But once you are in a bitmap format, you can’t go back into a vector format without recreating the shapes. Therefore, it is always best to keep and edit your artwork as vectors and scale and export as needed.
When I first started creating games, I created all my artwork as bitmaps, thinking I would never need to go back and modify them. I didn’t know that the iPad would be coming out and I didn’t know that the iPhone would eventually get a Retina display either. I couldn’t just scale up my bitmaps, as it would not add any additional detail. So in order to support these devices and their higher resolutions I had to recreate my artwork. This was painful because I had already designed it and now I had to recreate what I already did but at a higher resolution. Nobody likes having to throw away or recreate their work, especially me. If I would have stored my work as vector graphics, then when it came time to update and resize my images it would have been extremely simple. Just remember that it is always best practice to keep your artwork in a format that can scale in case you need to support different resolutions down the road.
Another reason that I didn’t start with a vector-based editor was because I already had Adobe Photoshop installed on my computer. I wanted to get my game out the door as quick as possible and didn’t want to spend extra time learning something new. It was just easier to use the software that I already had installed, but that kind of thinking isn’t the best long-term strategy. I now always create images using a vector-based editor like Adobe Illustrator or Fireworks. However, you may find yourself in a situation where you want to use real photos, and if that case then I recommend always purchasing or creating the artwork at a much larger size than you need. You can always scale the images down if needed and bitmaps always scale down better than they scale up.
Image Formats
It is important to know a little about the different image formats that you can use in an iPhone application. Some image formats support transparency which are portions of the bitmap that are not drawn. Transparency is supported in the PNG format. Some image formats do not allow for transparency, such as the popular JPEG format. JPEG works better for photographs and PNG works better for illustrations, sprites, and basically everything other than photographs. You are probably always going to use the PNG format for your iPhone game, as it is the preferred format on the iOS platform. It is accelerated by the platform, which makes it the quickest to draw. Speed is always an important factor. But sometimes the size of your application can be an important factor.
JPEG is really good at reducing the file size of photographs and will typically be much smaller than the PNG image format. I have used the JPEG format when I needed to get an application under a certain size. Applications currently can only be downloaded over the cellular network if they are under 20 megabytes in size. If apps are larger than this, they have to download over a WiFi connection. This usually isn’t that big of a deal but if you find your application sits just barely over the 20 megabyte limit, you might convert some of your larger image files into JPEG. This can only be done for images that do not have transparency, such as full screen background images.
JPEG also is a lossy format which means it can lose detail from the original image. If you open, modify, and save JPEG images over and over, then each time it is saved, the image would lose a little more detail and quality. There are usually settings that can be adjusted as to how much quality the JPEG image will keep, which affects the overall file size. PNG is completely different in that it is a non-lossy format. This means the image will always be the same quality no matter how many times it is modified.
Retina Display
Apple released the iPhone 4 in June of 2010 and with it came a brand new display technology. The screen was the same 3.5 inch size as previous generations but they managed to quadruple the number of pixels used on the screen. The previous iPhone had a 320×480 display at 163 ppi (pixels per inch). The iPhone 4 has a 960×640 display at 326 ppi. Apple calls the technology Retina Display because they claim the display has higher detail than the human eye can perceive. There has been a lot of discussion whether that statement was marketing fluff or not, but at the end of the day no one can deny the display looks amazing, especially when comparing it to older devices. Regardless of how Apple marketed their new display, it was very clear why they went this route and it was really App Store focused.
Device | Portrait | Landscape | Pixels per inch |
iPhone 4, iPhone 4S, and iPod touch 4th Generation | 640×960 pixels | 960×640 pixels | 326 ppi |
iPad and iPad 2 | 768×1024 pixels | 1024×768 pixels | 132 ppi |
Older iPhone and iPod touch devices | 320×480 pixels | 480×320 pixels | 163 ppi |
At the time iPhone 4 was launched there were already over 200,000 applications in the App Store. Apple didn’t want their App Store to become fragmented by a new display resolution. They definitely wanted to make sure existing applications would run perfectly without modification. It would have been impossible to have developers update all their applications to support a completely different resolution between the time the iPhone 4 was announced to the time it was officially launched. The solution Apple came up with was simple, if you want to support the Retina display then update your app, but if you don’t want to bother then iOS will just scale your application to twice the size when your app runs. The pixels displayed in your application would effectively be doubled so that it would fill the entire screen and the application didn’t even need to know about it.
Apple decided the easiest design approach would be to change the units of the screen from 320×480 pixels to 320×480 points. The difference being that on high resolution displays like the iPhone 4 there would be two pixels per point. On previous devices there would be a one-to-one relationship between pixels and points. Keeping the dimensions the same ensured compatibly of all the applications that already existed in the App Store. Even though Apple encouraged developers not to hard code screen sizes most of us did anyway. Instead of checking the UIScreen object for the width and height of the window or querying the UIWindow for the frame size, developers just went on their happy way assuming the width and height would never change. Source code was littered with hard coded positions and sizes so this was another motivation for Apple to keep the width and height the same exact numbers.
It’s great that Apple maintained backwards compatibility for apps, but now the question is how do you take advantage of this high resolution display? Apple came up with a very simple way to support the higher resolution screens: just add an additional image at twice the size and the system will use it when the app runs on high resolution devices. If you had an image that was 40×40 then all you need to do is include another image at 80×80. If you had a full screen image at 320×480, then just include another one at 640×960. Apple modified the platform to check for the existence of higher resolution images using a simple filename convention (see Table 3-2).
Standard resolution image | <ImageName><device_modifier>.<filename_extension> |
High resolution image | <ImageName>@2x<device_modifier>.<filename_extension> |
The <ImageName> and <filename_extension> are the typical ways that you name an image file. The <device_modifier> portion is optional but will contain either ~ipad or ~iphone. This allows for providing different versions of the same image for the iPhone and iPad, which becomes important if you are creating a universal application (one app that runs on both devices). The inclusion of the @2x modifier specifies an image at twice the resolution over the standard size.
Note
At the time of this writing, the iPad and iPad 2 do not have a high resolution display. However, with the inclusion of @2x and the device modifier, the platform supports both iPhone/iPad and standard/high resolution images in a single universal application.
For example, if you created an image named Title.png that was 320×480 in size, then you could create another image named [email protected] that is twice the resolution or 640×960 in size. If you included both images in the same location of your application bundle, anytime the application loaded Title.png on a high resolution device, it would check for the existence of [email protected] and use that version if available. Standard resolution devices continue to use the original image file. If the high resolution image is not available then the original image is just scaled up. All this logic is done for you within iOS, which makes it easy to support Retina display and usually without having to write any additional code.
In the following section, you will create two versions of each image to support both standard and high resolution graphics. You will also create a series of game icons for display in iTunes and your application.
Creating Images for an Air Hockey Game
You will now spend time creating the images needed for the air hockey game. I did the following work using Adobe Fireworks for the PC. If you are running the Mac version of Fireworks, it will look almost identical. And if you’re not using Fireworks then hopefully you can still follow along, as these concepts should be similar across other image editors.
Making the Puck Image
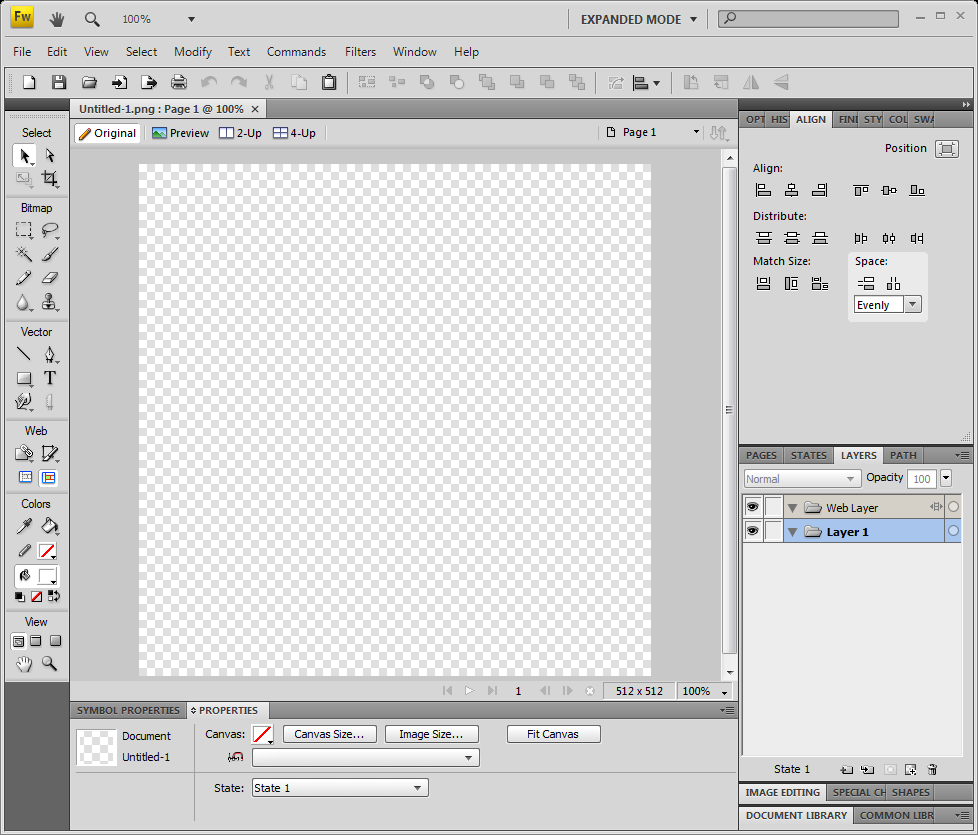
The first thing you will create is a puck, which just so happens to be the easiest of the three images you need to create. Launch Fireworks and create a new image of size 512×512 and make sure the background is transparent, as shown in Figure 3-2. You need to use transparency because the puck will be circular and in the game you want the air hockey table to be visible in the areas that are outside of the puck circle.
Make sure the Tool pane is available, which is usually displayed on the left side of the window. If you do not see this pane in the main window then select Window→Tools from the menu. Inside the Tool pane there are different groups of tools. Find the Ellipse tool under the Vector group and select it. This tool is shared by the Rectangle, Ellipse, and Polygon tools so you may need to hold down the mouse button on the button to change it to the Ellipse shape. You can also press the U key to toggle between Polygon, Ellipse, and the Rectangle shape tool.
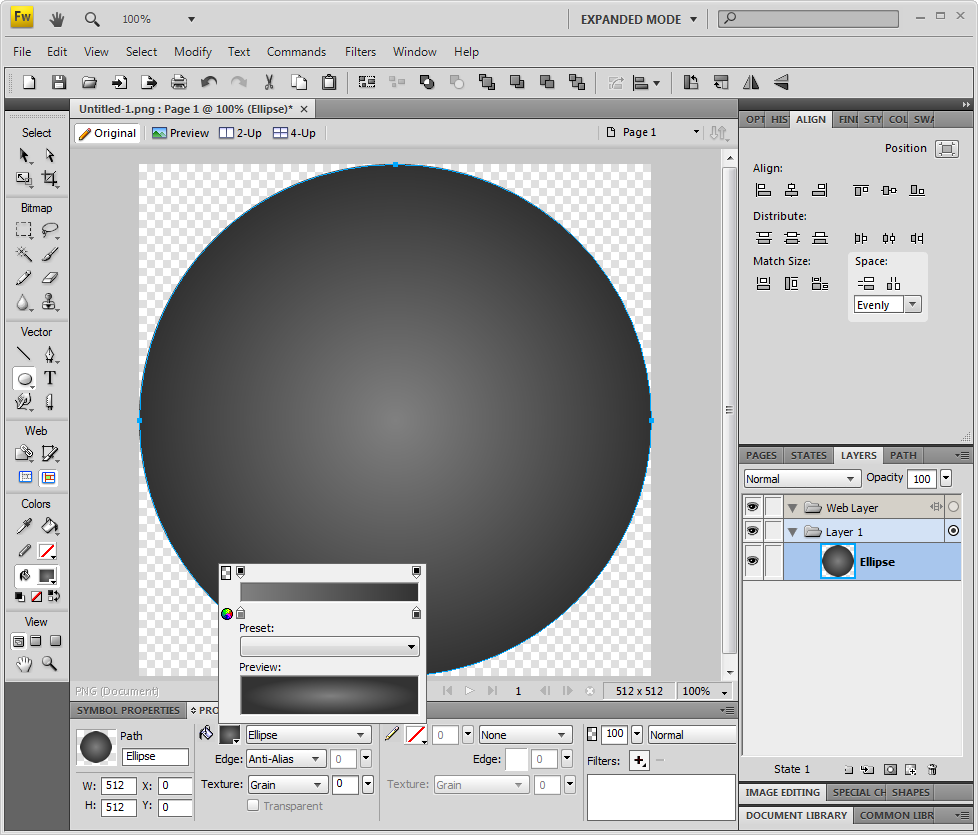
Draw an ellipse of any size on the canvas and then, in the Properties pane at the bottom of the screen, change the width to 512, height to 512, X to 0, and Y to 0. You now have a perfectly centered circle that takes up the entire canvas. Change the Fill category to Gradient/Ellipse, which will fill the circle with a two-color gradient. Click on the fill color and set the Preset to “White, Black”—which will fade from solid black at the edge of the circle to solid white in the middle of the circle. Although this gives you a gradient that is pretty close to what you want, the white is too bright and needs to be set to a darker color. Click on the fill color box, which will bring up a pop-up that lets you specify the two colors to use in the gradient. There are two small boxes below the gradient bar that allow you to change the specific colors. Click on the box located on the left side of the gradient bar. A new color palette view will appear that lets you select the new color. You can use the eyedropper tool to pick up a color or you can type in a specific hexadecimal color code.
Note
Hexadecimal color codes specify 3 colors: RGB (Red, Green, Blue), with each color represented by two hexadecimal digits (0-F). The color is specified in the format #RRGGBB where R is red, G is green, and B is blue. Each color component value is specified between 00 and FF with 00 being the darkest intensity and FF being the brightest intensity. All the components get combined to create the final color.
Change the hexadecimal value from #FFFFFF, which represents the color white, to #A0A0A0, which lowers the intensity to a light gray color. Now change the ending gradient color by clicking on the box located on the right side of the gradient. Change the value from #000000 to #333333, which will change the ending gradient color from black to a darker gray. The gradient now starts with a light gray color and fades into a darker gray color, as shown in Figure 3-3.
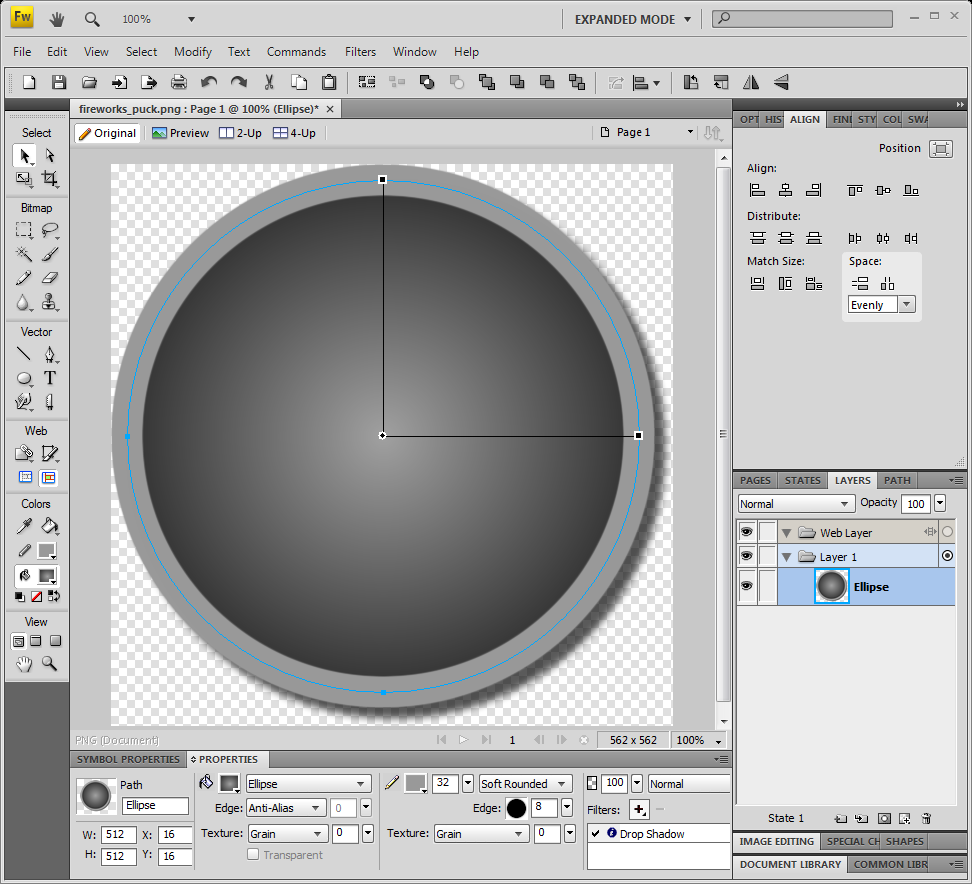
Now lets add a stroke line to the puck, which will use a brush to draw an outline around the puck. Click the stroke color and specify #999999, which results in a gray that falls between the gradient you just specified. Change the stroke line width to 32 pixels and change the Stroke category to Soft Rounded line. Change the Edge to be 8 pixels and leave the location of stroke relative to path set to centered. You will notice that the stroke line is now being drawn off the canvas. If you were to export this image now, it would have the top, left, right, and bottom edges of the circle clipped off, which is not what you want. A little trick that you will use to fix this is the Fit Canvas operation. This operation can be found in the Modify→Canvas menu or in the properties of the canvas itself. Just click outside of the puck object but on the canvas and that will bring up the canvas properties. Click on the Fit Canvas button and the canvas will now adjust so that it contains the entire puck. This is a very handy operation and you will be using it a lot so the image isn’t accidentally clipped.
Now you will put the final touches on the puck by adding a drop shadow to it. This will give the puck a little bit of depth so it doesn’t look so flat. Click on the Filters add button (which has a plus icon on it). Open the Shadow and Glow pop-up and select Drop Shadow. Modify the distance to 16, transparency to 65%, Softness to 8, and Angle to 315. You will notice that the drop shadow is getting clipped by the canvas again. Just as you did before, you want to click on the Fit Canvas button from the canvas properties. The image has grown in dimensions because of the stroke line and drop shadow (see Figure 3-4). But there is no need to worry about the size too much because everything you just did is stored as a vector, which means you can scale it to any size without issue.
The puck is looking good, so now is a good time to save your work by clicking File→Save from the menu. Find a suitable location to save your work, such as your Desktop or in your Documents folder. I usually store all my artwork under a new folder with the same name as my Xcode project. In this case, I created a folder named “AirHockey” under my Documents folder and saved all the artwork there. If I ever need to update the application’s artwork, I’ll know exactly where I kept the original artwork. It really does help to keep everything organized and under a single folder based on the application name. Name the file fireworks_puck.png and click Save. Now you might be thinking this is just a regular PNG image file that you just saved, but it actually contains more than just an image.
Fireworks adds extra data to the PNG file that other applications can’t read, such as information on vectors and effects. Other applications such as your browser or another bitmap editor will read the PNG file as a standard bitmap image. However, when you open this file in Fireworks, it will use that extra information to bring back your vector and layer information. So the Fireworks PNG file is really more than just a bitmap image, and although this PNG file would render fine in the iPhone game, you really don’t want to use the Fireworks version because it will increase the overall application size. And you don’t want the application size to be bigger than it needs to be right? Right.
You need to export the image to a new PNG file that does not have this extra information. Click File→Image Preview... from the main menu and under the Options tab change the format to PNG 32. This gives you an image file with transparency and uses 8 bits for each color channel (red, green, blue). It also includes 8 bits for the alpha channel, which specifies the level of transparency of each pixel. This format is also known as RGBA, and because each channel is 8 bits that gives you a total of 32, which is why Fireworks calls it PNG 32. Selecting the PNG 24 format takes away the alpha channel leaving only red, green, and blue for a total of 24 bits. This creates a slightly smaller file, and if your image is not using transparency then this format would be acceptable.
Click the File tab and Scale the image to 40×40 pixels. Click the Export button and name the file puck.png. This is the image you will load for the puck in the iPhone game. You might notice the image file is much smaller than that of the fireworks_puck.png file you already saved. This is because you decreased the image size, which in turn reduces the number of pixels needed in the bitmap. You also removed the extra information that Fireworks stores in the PNG file when you export. This is a true bitmap file without any extra stuff and it is sized down to the dimensions you need it to be in the game.
Note
The Image Preview screen supports scaling the image to not only smaller but also larger sizes. However, you should never scale images up, as it performs the resize as if it were a bitmap. The vector information is not used during the resize operation, which will produce less quality than actually resizing the vector first and then exporting to bitmap. You can easily see this by taking a smaller vector-based image and exporting it to a much larger size. The final result would be very blurry. Resizing bitmaps to smaller sizes will always yield much better results.
You also want to export another version of the puck image for high resolution Retina displays. Use the Image Preview again to export the puck at 80×80 but this time name the file [email protected]. This leaves you with a standard resolution image named puck.png of size 40×40 and a high resolution image named [email protected] of size 80×80. You will be doing this for all images you create.
Making the Paddle Image
Now that the puck is finished, turn your attention to creating the air hockey paddle. The paddle is actually very similar to the puck except that it will be red and have a handle that allows one to grab and move it across the table. Take the fireworks_puck.png file, which should still be open, and save it to a new file named fireworks_paddle.png. Notice I am adding “fireworks_” to all the files that include the extra Fireworks data. This allows me to easily find the Fireworks image files if changes ever need to be made. You would never want to start with editing an exported image because it does not include the vector and style information.
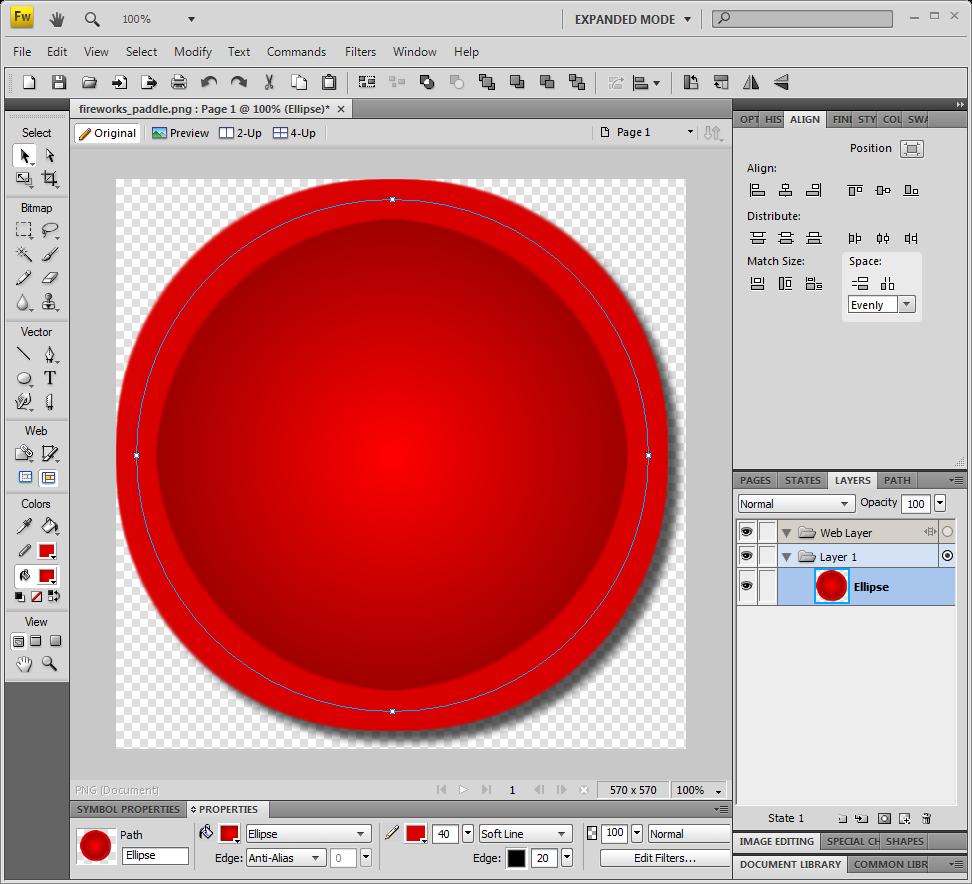
The first thing you want to do is change the colors to red. Click the puck object to view properties of the object and then change the fill color. Click on the left color box under the gradient to adjust the starting color. Select the brightest red color from the color spectrum or type #FF0000 into the hexadecimal field. Now click on the ending gradient color and type #330000 into the hexadecimal field. This leaves you with a nice red gradient starting with bright red in the center and fading to a darker red near the edges.
Click on the stroke color and change that from a gray color to a red color by specifying #D90000 as the hexadecimal color value. Change the stroke width to 40 pixels and the stroke style to Soft Line. Adjust the edge value to be 20. As shown in Figure 3-5, this creates a good base for the paddle. Now you need to create the handle.
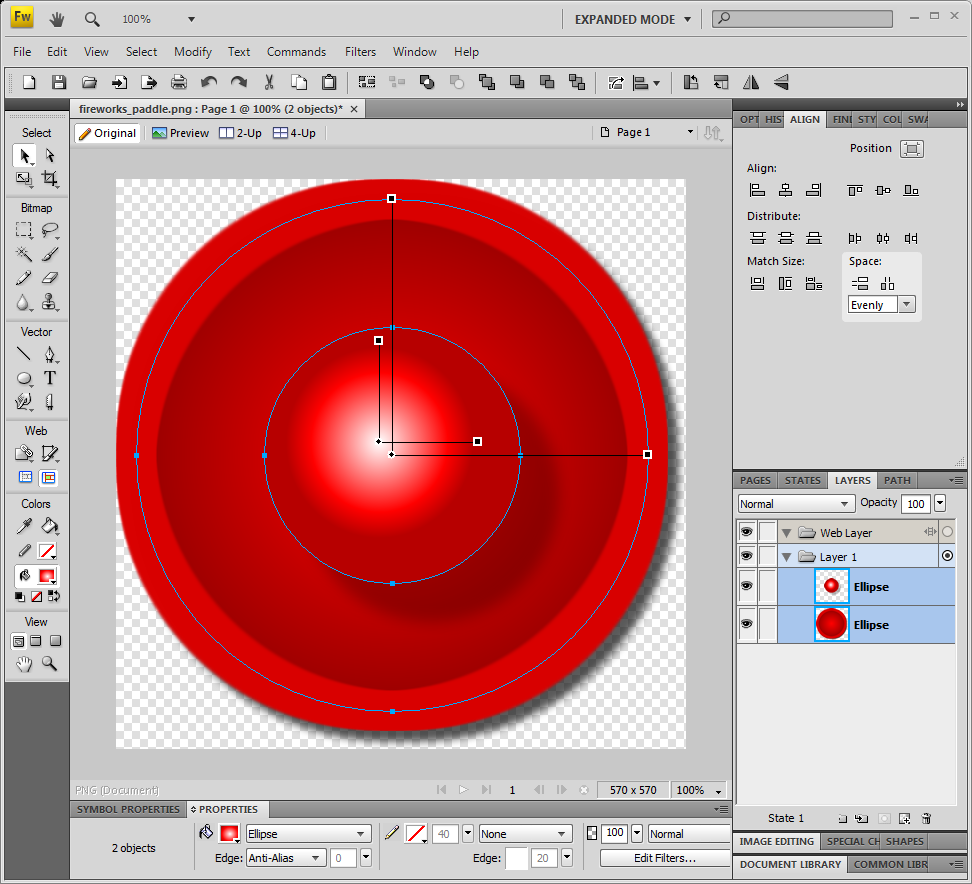
Create a new circle by selecting the Ellipse tool again and drawing a circle that is smaller than the base circle. You will notice that the new circle appears in its own layer in the Layers panel. If you ever need to select this object you can use the Layer pane to select exactly the object you want. This becomes even more important when you have lots of objects within your image. With the new handle selected, use the Properties panel to change the size to 256×256. Switch over to the Pointer tool and make sure the layer containing the smaller circle has been selected. Because of the drop shadow, you will notice that the base object is slightly off center. Drag the handle into the center of the base object, which is slightly up and to the left from the canvas center. You will see smaller horizontal and vertical dashed lines appear when it becomes aligned to the base object.
Now you need to remove the stroke line and modify gradient of the handle. Make sure the smaller circle is selected and then change the stroke color to be transparent. This will prevent the stroke line from being drawn. Now click on the fill color so you can adjust the gradient. I want to create a light-glare effect at the top of the handle, with it fading into bright red, and then slowly fading out the color found right at the start of the base. This requires creating a three-color gradient from white, to bright red, to dark red. Move the bright red color box located on the left side to about three-quarters the way over so it is now on the right side. Then click in the far left spot where the box used to be to insert a new color. Change the new color to white, which is #FFFFFF. Now click on the dark red color located on the far right of the gradient and change the color to #990000.
Let’s give the handle a drop shadow to give the paddle a 3-D look. With the handle selected click on the Add filters button in the properties window. Select the Shadow and Glow menu and then the Drop Shadow effect. In the drop shadow pop-up, adjust the distance to 56, opacity to 25%, softness to 16, and keep the angle set at 315. You might be wondering how I came up with these numbers and it really is the result of experimentation. I recommend you try adjusting all the different settings so you can get the feel of how drop shadows work. I think you will find that adding drop shadows can take a boring flat image and really give it a sense of depth.
The last touch I want to do is move the white glare of the handle so that it is a little off center. The way drop shadows are arranged imply that the light source is coming from the top left of the screen. It makes sense to move the white glare so that it strikes the paddle handle from the top left as well. If you click on the handle, you will see that the gradient center point, which is located in the center of the object, can actually be moved. This point determines the starting location of the gradient. Drag it a few pixels towards the top left of the object, but don’t go too far so that the gradient would be cut off. As shown in Figure 3-6, your paddle should appear as though a light source is hitting the top left of the handle and casting shadows to the bottom right. Even though the paddle was created using 2-D shapes, using drop shadows and a custom gradient has given it a 3-D appearance.
Now export the image using Preview Image and set the format to PNG 32, sized to 64×64, and name the file paddle.png. This will be the image used for both paddles in the game. Export a high resolution version of the paddle by changing the size from 64×64 to 128×128 and naming it [email protected]. Save and name the Fireworks file as fireworks_paddle.png and then close the file.
Making the Air Hockey Table
The next step is to create a background image that will represent the air hockey table. Create a new image with a size of 640×960 and set the canvas color to white. You now have a white surface that represents the top of the air hockey table.
Let’s create an outer wall for the table by selecting the Rectangle tool and drawing a rectangle on the screen. Modify the properties so the size is the same as the canvas, 640×960, and is positioned at 0,0. Change the fill color to transparent, stroke color to #999999, and stroke tip size to 16. Change the stroke type to be a Hard Line and change the location of the stroke to be inside the object.
Select the Ellipse tool and create a new circle in the middle of the screen. In the properties window change the size to 288×288 and position it at 176,336. The fill color should still be set to transparent and the size set to 16. Change the stroke style to Soft Rounded and make sure the stroke location is centered. Change the stroke color to bright blue, which is #0000FF.
Now you need to add two goal boxes to the air hockey table. Create a rectangle on the screen and modify the size to be 288×288 and set the fill color to white. The fill color is important because you want to remove the hard wall edge where the goal boxes will be at the top and bottom. This could be done using a mask on the wall rectangle but it is even easier to just set the fill color to white so that the walls are painted over when covered with the goal box. To see what I mean, drag the goal box up to the top and you will notice that the wall is removed as the white fill color of the goal box covers it up. Modify the position of the goal box to be 176, –142. This will put the box half off the screen and half on the screen, which will create a nice opening in the wall. Copy and paste this object into a new goal box and move it to the bottom. Change the position of the new goal box to 176, 814. You now have two goal boxes added with breaks in the wall so the puck can slide on through.
Now you will add a dashed line across the center that will serve as a guide for telling which side of the table the puck is on. Select the line tool and draw a line across the center of the screen. Modify the properties to change the size to 640×1 and the position to 2, 480. You should still have the color set to bright blue and the tip size at 16 pixels. Now change the stroke category to Basic Dash. Open up the Advanced Properties and change the On variable to 50 and Off to 32. This will paint the dash with 50 pixels on and 32 pixels off. I played with the numbers until the dashed line did not intersect the circle and the left and right sides were a mirror image of each other (see Figure 3-7).

Now that you have the air hockey table drawn, you should export it as a high resolution image by naming it [email protected]. Make sure the size says it is 640×960 before exporting the image. Now export a standard resolution image with a size of 320×480 and name it background.png. While you are working within this file you should go ahead and create a title and splash screen.
The background, title, and splash screen will all be very similar to each other so you don’t need to create new files for each. You can add new layers into the image and toggle their visibility when needed. Since the title screen will eventually show a series of menu actions, it will be good to hide the dashed line and circle. In the Layers pane, you can toggle visibility by clicking on the eye icon located to the left of each layer item. Click and disable the visibility for both the center circle and dashed line.
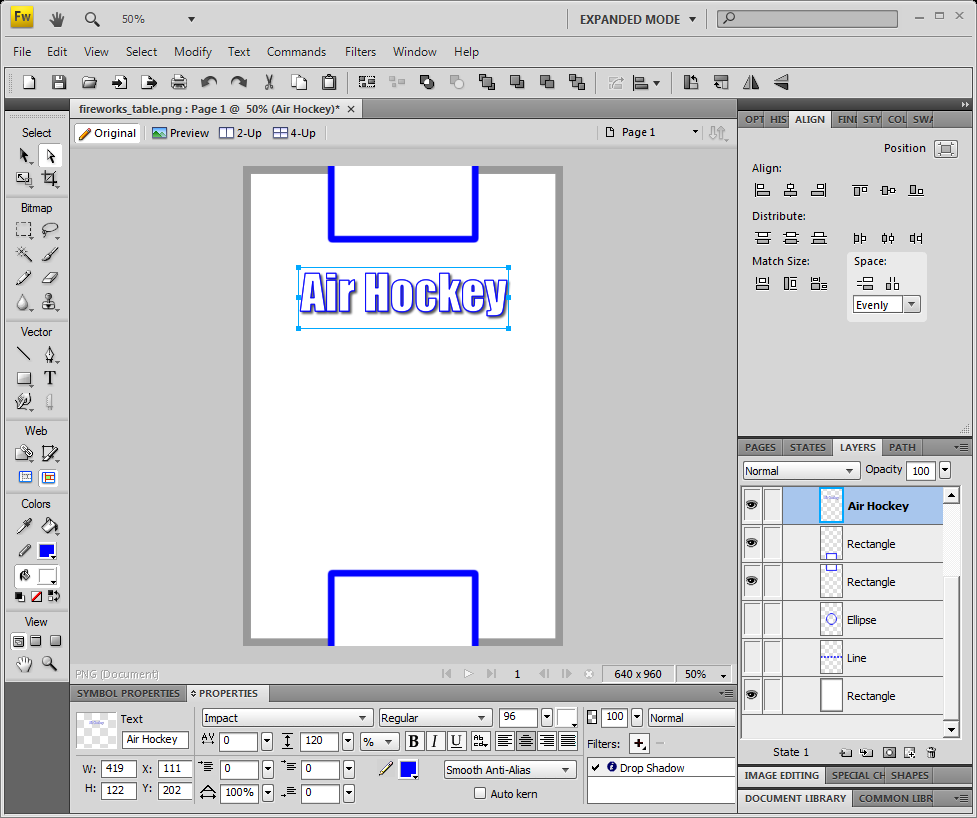
Now click on the Text tool in the Vector group. I picked the font “Impact” of size 96 but you may need to use another font if you do not have it installed on your system. I changed the fill color to be white and the stroke line color to be blue. I also changed the stroke tip size to be 3. This will create a nice solid blue line around the text. Click in the canvas and type “Air Hockey” as the title. Put it near the top of the screen so you have plenty of space below it to add menu items. The menu items will come later and will be done using Interface Builder. Now add a drop shadow as you did before with a distance of 7, transparency of 65%, softness of 4, and angle of 315. The image should appear similar to Figure 3-8.
Bring up the Image Preview screen so you can export this image. Change the format to PNG 24 since the image is not using transparency. Export the image as Title.png of size 320×480 and [email protected] of size 640×960. Now that the title screen is done let’s quickly make the splash image. Add a new text item that says “Loading...” into the center of the screen. Change the font size to 40 and the stroke color to black. Also change the stroke tip size to 1 pixel. The shadow will be the same. Drag the label into the center of the screen, using the guides as reference, so it appears similar to Figure 3-9.
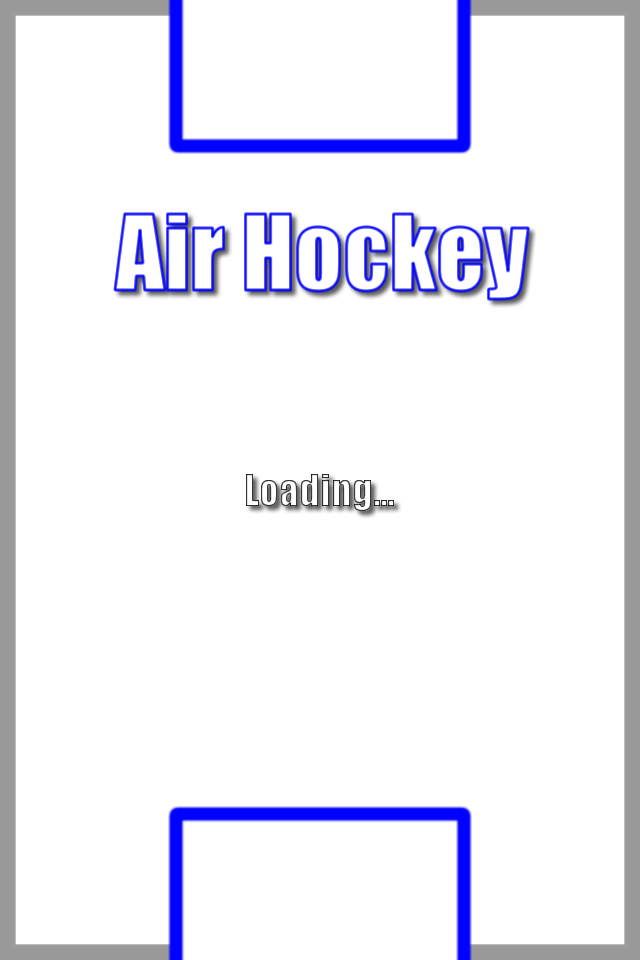
Bring up the Image Preview screen so you can export this image. Keep the format set to PNG 24 and export the splash screen as Default.png of size 320×480 and [email protected] of size 640×960. Save the Fireworks file as fireworks_background.png in case you need to make changes to the title or splash screen at a later time. The title screen will eventually have buttons that when pressed will allow you to play the game, so you will create that next.
Buttons
Interface Builder lets you use standard rounded-rectangle buttons, but they are very generic looking. It is always best to create your own button images rather than using the default buttons provided. It will also help keep the look of the game consistent, making for a better experience. You will create two button images, one normal, and one hot. The normal image is displayed when it is not being touched, and the hot image is displayed when the user touches the button. Having these two images will provide visual feedback that the button is being pressed.
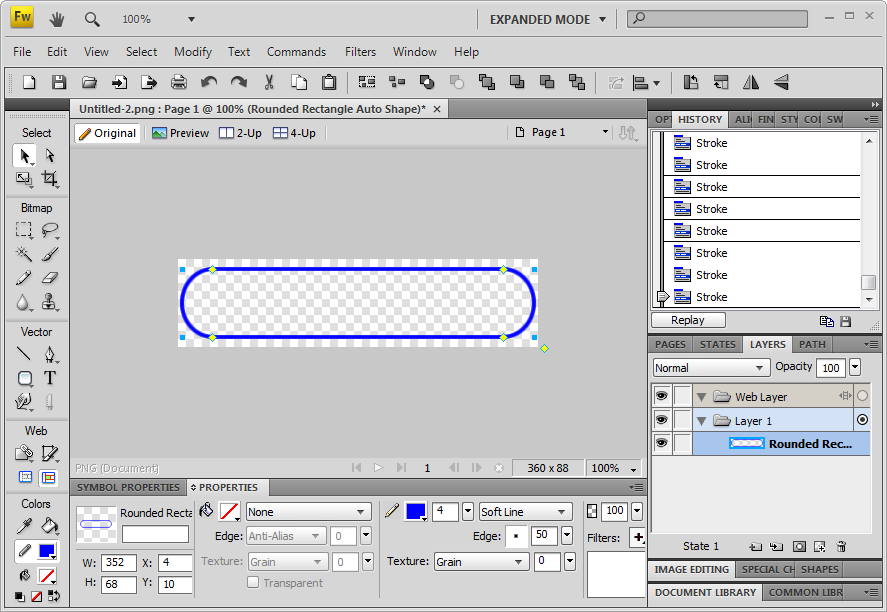
Create a new file that is sized to 360×88 pixels and has a transparent background. Select the Rounded Rect vector tool and then draw one so that it fills most of the canvas. Leave a little margin around the button. I set the shape to have the origin at 4,10 and the size set to 352×68. You will notice there are a lot of adjustments you can make to the rounded rectangle, including the standard size adjustments, but also the roundness of the corners. In my case, I made the corners as rounded as they could be so that both ends were semicircles. Grab the inner diamond controls to adjust the corner roundness. Now that you have a nice button shape, modify the fill color to be transparent, and the stroke color to be bright blue. Set the stroke tip size to be 4 pixels and the stroke category to be Soft Line. This will make for a normal button that is not pressed, as shown in Figure 3-10.
Bring up the Image Preview screen and set the format to PNG 32 so you can maintain the transparency. Make sure the image is sized to 100% and name it [email protected] for the Retina high resolution image. Now size the image to 50% and name it [email protected] for the standard resolution image.
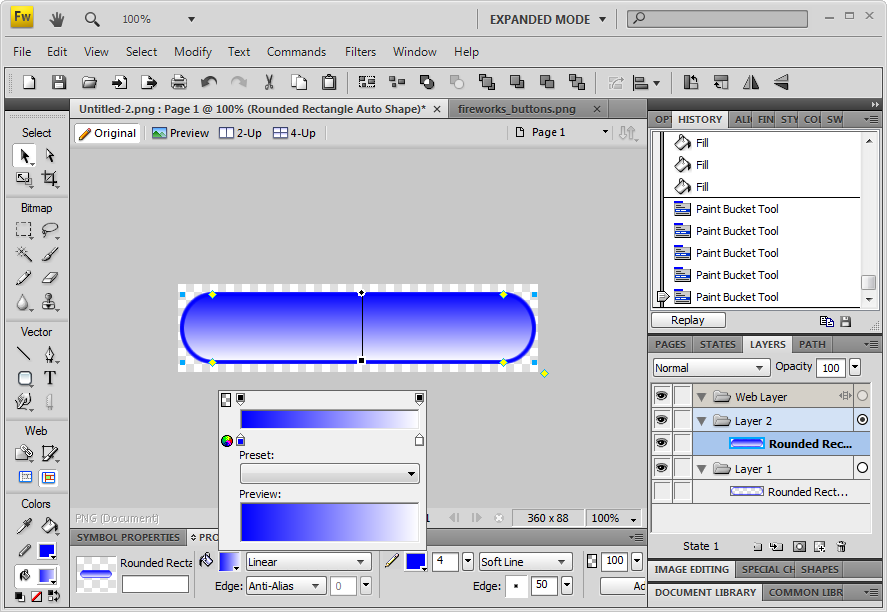
In the layers view make a duplicate layer, which will be the hot button. Hide the previous layer by deselecting the eye next to the layer. Change the fill category of the round rectangle in the new layer to be a Linear Gradient. Change the gradient to go from bright blue to white. You may need to adjust the position and rotation of the gradient such that it starts from a blue color at the top of the button and fades into a white color at the bottom of the button, as shown in Figure 3-11.
Bring up the Image Preview screen and export the two images, [email protected] sized at 100%, and button_hot.png sized at 50% the original size. You have finished creating the buttons so you can save the Fireworks file as fireworks_buttons.png in case you need to modify them later.
Review Game Images
You just finished all the in-game artwork so now it is time to double check that everything you created is correct. Review the list of images in Table 3-3 and verify that your images are the correct size (if specified) and name. If there are any images that are not correct, open up the associated Fireworks file and export them again.
Filename | Description |
fireworks_puck.png | Fireworks puck image with vector information. This file is the one used for editing. |
puck.png | Puck image with size of 40×40. |
High resolution puck image with size of 80×80. | |
fireworks_paddle.png | Fireworks paddle image with vector information. This file is the one used for editing. |
paddle.png | Paddle image with size of 64×64. |
High resolution paddle image with size of 128×128. | |
fireworks_background.png | Fireworks air hockey background image with vector information. Includes splash and title screens. This file is the one used for editing. |
background.png | Air hockey background image with size of 320×480. |
High resolution version of background.png with size of 640×960. | |
title.png | Air hockey background image without dashed line and circle. Size is 320×480. |
High resolution title image of size 640×960. | |
Default.png | Splash screen that displays while the app is loading and is 320×480 in size. |
High resolution splash screen image with size of 640×960. | |
fireworks_buttons.png | Fireworks file containing button graphics. This file is the one used for editing. |
Normal button image with size of 180×44. | |
High resolution normal button image with size of 360×88. | |
button_hot.png | Hot-button image with size of 180×44. |
High resolution hot-button image with size 360×88. |
That was a lot of work and I wish I could say you were done at this point. But you just have one more thing to do: create the application icon.
Application Icon
An application icon is needed for both iTunes and the application itself. The icon is very important because it is usually the first thing people will see in the App Store. Many times people will just make a judgment call based on only the application name and the icon. Therefore, the icon should convey what your game is about and hopefully pull in people wanting more information, such as the application description, screenshots, and customer reviews. I typically wait until all the in-game artwork has been created before creating the application icon because you can usually reuse a lot of it. This is exactly what I’m going to do to create an icon.
Create a new image in Fireworks with a white background of size 512×512. Drag the fireworks_paddle.png file onto the canvas. You will notice the vector objects get imported into the image. Now let’s shrink the size of the paddle so it fits into the bottom left corner. You will use free transform to resize the object. Make sure that both layers of the paddle are selected. Click Modify→Transform→Free Transform from the menu or press Control-T. A square outline appears around both circles and you can grab any of the corners to resize. Grab the top right corner and shrink it down until the width and height is about 288×288. Move the paddle so that it is located in the bottom left corner with a little margin.
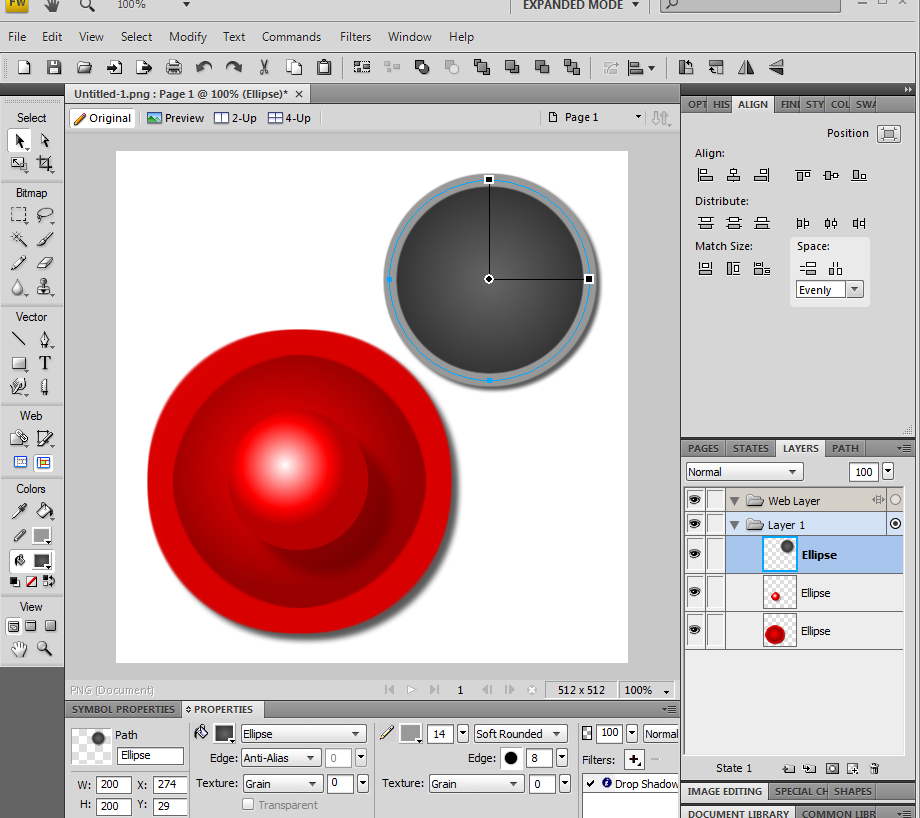
Now drag the fireworks_puck.png file onto the canvas and with the layer selected use the free transform tool again. Grab the bottom left edge and resize it until it is around 180×180. The sizes don’t need to be exact, just close enough. The icon should appear as shown in Figure 3-12.
Go ahead and save your work as fireworks_icon.png. If you ever need to update the application icon, this is the file you will use. The application icon is now complete and you need to export it into a lot of different sizes. iTunes now requires an icon that is sized 512×512: when the original iPhone was released you only needed an application icon sized at 57×57. Now with the new high resolution display on the iPhone and the iPad screen size there are a lot more sizes that you should include in the application bundle. Use the data shown in Table 3-4 and export the icon to all of these dimensions with the specified filename.
Size | Description | |
Icon.png | 57×57 | Standard resolution iPhone icon required for iPhone or universal applications. |
114×114 | High resolution iPhone icon used on iPhone 4 and iPod touch 4th generation devices. Not required for an iPad-specific application. Optional but strongly encouraged if building iPhone or universal applications. | |
Icon-72.png | 72×72 | iPad icon that is required if building a universal or iPad-specific application. |
iTunesArtwork | 512×512 | Image used in iTunes, but it can also be included in the application. It does not include the PNG file extension when it is included with the application. Fireworks will always save the image with the PNG extension so you need to rename the file from outside of the Fireworks application to remove the extension. |
Icon-Small.png | 29×29 | This icon is optional and appears in Spotlight when displaying application search results. |
58×58 | High resolution icon used in search results. | |
Icon-Small-50.png | 50×50 | iPad icon used in search results. |
Congratulations, you have finished all your graphics work and now can move on to integrating them into a new game of air hockey.
Application Integration
You will start a new project from the existing Paddles application, drop in the images that were just created, and then get everything plugged into Interface Builder. This will be the fastest way to get the Air Hockey game up and running, as you will be able to reuse a lot of the code that was already written for the Paddles game.
Project Creation
In order to copy the existing paddles game into a new project, I suggest using Finder and locate the existing Paddles project. If you already have it open in Xcode, you can Control-click on the project file and select Show in Finder from the pop-up. Go up to the parent folder so the entire Paddles folder is selected which contains the Paddles.xcodeproj file. Select File→Duplicate from the main menu to create a “Paddles copy” folder. Rename this folder to “AirHockey” and then open the Paddles project in this new folder.
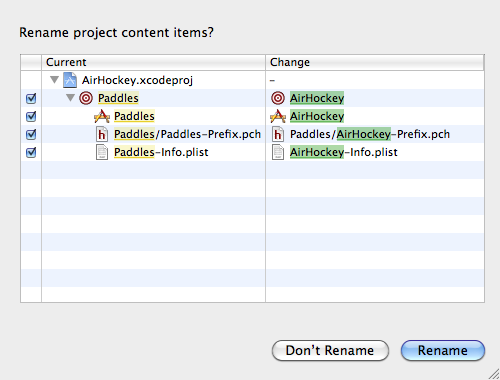
In Xcode, make sure the Paddles project file is selected in the project navigator. Single-click on the Paddles project name; this will allow you to rename it. You can also do this from the File Inspector in the Utility pane. Change the name from Paddles to AirHockey. You will be prompted with all the items that will be renamed. Click the Rename button to accept, as shown in Figure 3-13.
Note
You may get prompted by Xcode to take automatic snapshots before project renaming and similar operations. This will allow you to roll back to a specific snapshot when major operations are done to the project. I recommend that you enable this feature. You can access and restore your snapshots from the Organizer under the Projects tab.
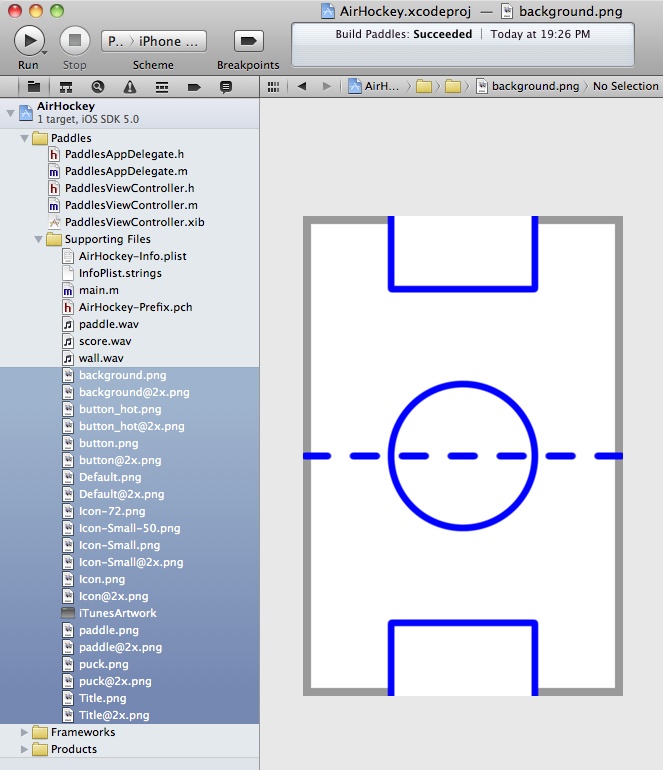
Now you have a new project you can work with. If you run the application, you will notice that the name of the application has changed to AirHockey. Go ahead and drag all of the graphics you exported from Fireworks into the project. When prompted, specify that you want to copy the images into the project. The project listing should now appear as shown in Figure 3-14. Now that the images are included in the application bundle, you can access them using Interface Builder.
Interface Builder and Images
You will now take various images and drag them into Interface Builder. Open up the PaddlesViewController.xib file and make sure the Utility pane is visible on the right side. Now switch over to the Media Library, which is next to the Object Library that you have already used. You will see all of the images listed that were just added to the project.
Before you integrate the artwork, delete the previous game pieces that were created as normal views with a white background. You want to remove everything except the root view and the two score labels, so remove the paddles, the puck, and the middle line view. You can do this by highlighting the objects in Interface Builder and pressing the Delete key.
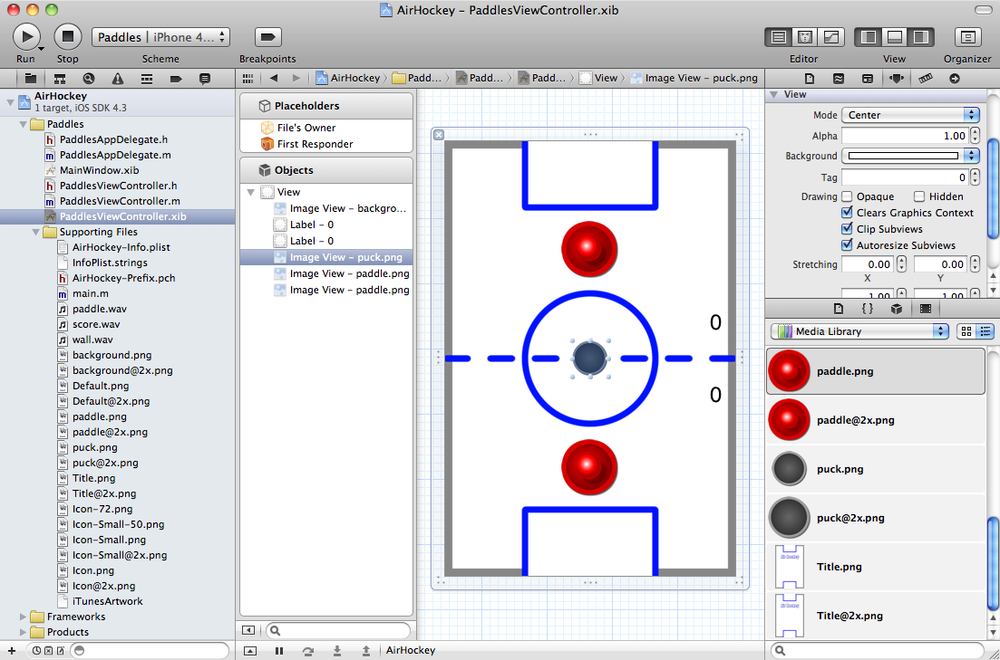
Now drag the background.png image from the Media Library over into the editor. Make sure you do not drag the [email protected] image or any of the other Retina images over. You only work with the standard resolution images in Interface Builder, as the high resolution images are loaded by the system automatically when needed. Notice that a UIImageView object is created with the correct size of the image already specified. Using the Media Library is more convenient than dragging over a UIImageView from the Object Library, specifying the filename, and then setting the correct size dimensions. In the Object hierarchy pane, you need to move the background image view to the top of the list so the score labels will be visible again. Finally, select the score labels and change the text color to black so you can see them against the white background.
Now drag over the puck and place it into the center of the background. Drag two paddle images over and arrange them between the goal box and the middle circle, as shown in Figure 3-15. In the view hierarchy, verify that the order is background image, score labels, puck, and paddles. This is important so the puck slides over the scores as if they are embedded in the table, and the paddles are drawn on top of the puck if there is ever a collision. Now that all the pieces are laid out and correctly ordered, you can plug the existing view objects into the view controller.
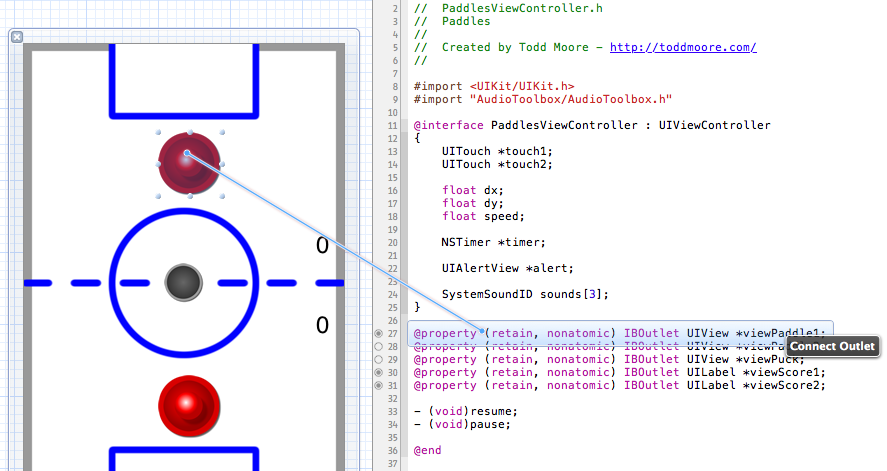
Bring up the secondary assistant so the PaddlesViewController.h file is displayed next to Interface Builder. Control-click on the top paddle and connect it over to the existing viewPaddle1 property definition, as seen in Figure 3-16. Do the same so the puck is connected to the viewPuck property and the bottom paddle is connected to the viewPaddle2 property. The score labels should still be connected to viewScore1 and viewScore2. Now that you have connected all the objects, the game should function as it did before—but now with shiny new graphics.
Build and Run
Build and run the game in the Simulator. You will notice that the animation and collision still works even with the different sizes of the new images. Of course, this is not the game you are going for, but at least it has the look you want. When you run the application, make sure the following things work:
The icon is now displayed in the Simulator.
Splash screen is displayed when the app is loading.
Background, scores, puck, and paddles are all displayed.
Switching to the iPhone 4 Simulator shows Retina display graphics. This can be done from the Simulator menu by selecting Hardware→Device→iPhone (Retina).
The graphics displayed in the Retina iPhone Simulator should be the @2x images you created. If not, you should verify that those images were dragged into the project file.
The Paddles game has just been given a face-lift and everything still functions as it did before. In the next chapter, you will spend time improving the paddle logic and puck physics.