
Chapter 9. Picture Your Photos On the iPod
WHO WANTS TO SHARE TREASURED PHOTOS WITH FRIENDS WHEN they’re in the cracked plastic picture sleeves of an overstuffed wallet? If you have an iPod Touch, Nano, or Classic, you can transfer your prized shots from your computer to your ‘Pod and display them on a glossy color screen wherever you happen to be.
And if you have an iPod Touch running Apple’s iOS 5 software, you can share photos in more ways than ever: You can tweet them out to your Twitter followers, zip them to other iOS 5 users as iMessages, or go retro and send them as good old-fashioned email attachments.
The picture-perfect fun doesn’t stop there, either. This trio of ‘Pods can create slideshows of your images right there in the palm of your hand. And as with many previous iPod models, you can plug any of the 2011 iPods (save the Shuffle) into a TV set so you can see your stills on a big living-room screen. This chapter shows you how to do everything but microwave the popcorn.
Set Up: Get Ready to Put Photos on Your iPod
TO MOVE PICTURES TO your ‘Pod, you need a computer loaded with iTunes and an iPod outfitted with a screen—sorry, Shuffle owners, the photos thing is just not happening for you.
Even with a photos-compatible iPod in tow, you need a couple of other things to make your pictures portable:
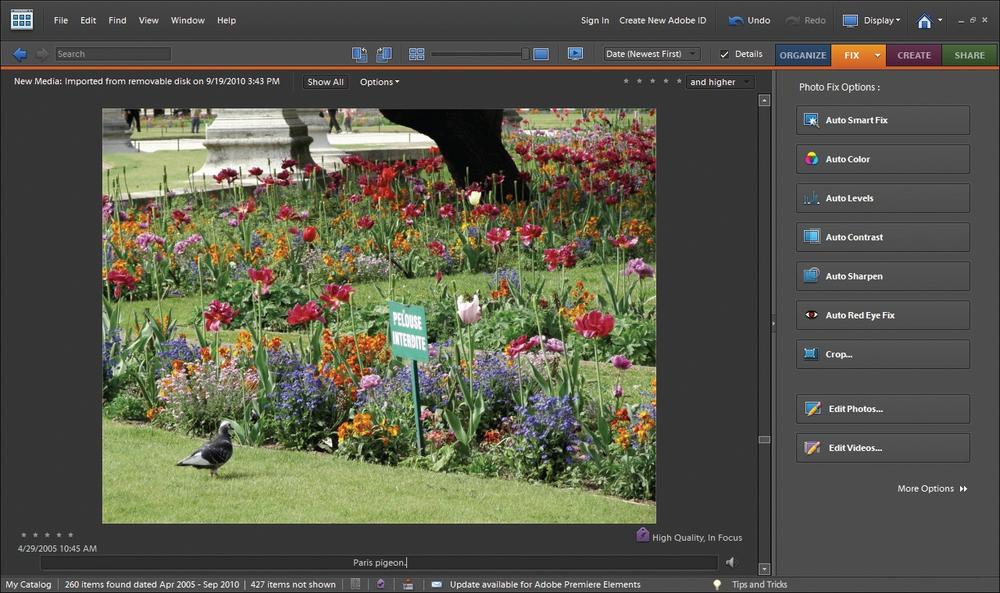
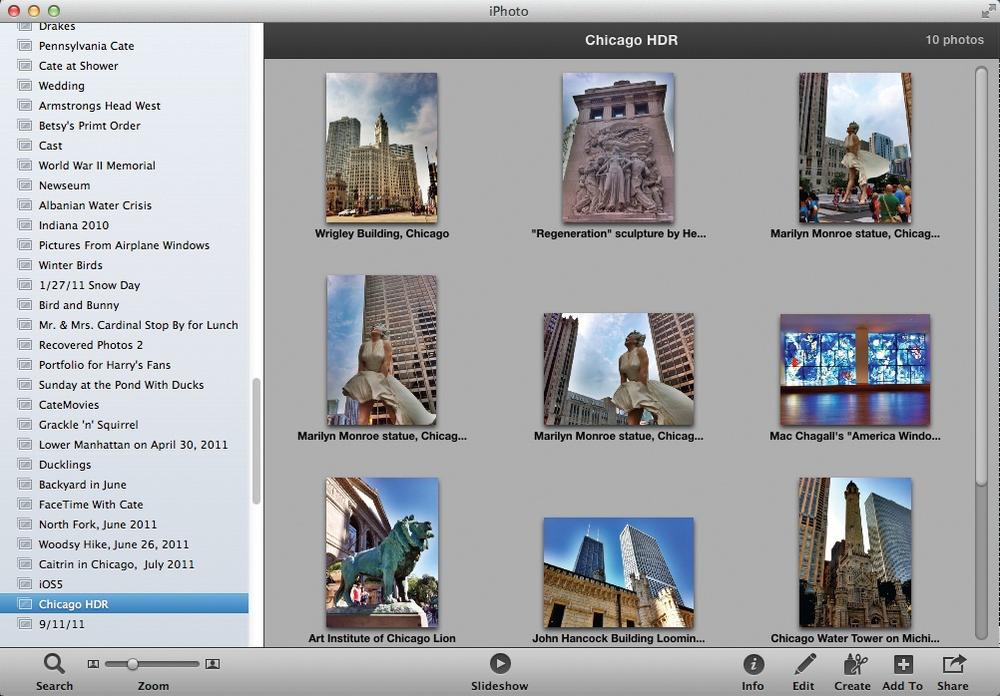
Compatible photo software for your Windows PC or Mac, or a folder of photos on your hard drive. iPods can sync with several popular photo-management programs that you may already use. Windows mavens can grab pictures from Adobe Photoshop Elements 3.0 or later. On the Mac, there’s Aperture or iPhoto 6 or later. You can also transfer pictures from a folder on your computer, like the Pictures (or My Pictures) folder on a Windows system, the Mac’s iPhoto Library folder (for those who haven’t upgraded past iPhoto 6), and even the Mac OS X Pictures folder.
Digital photographs in the proper format. iTunes plays well with the photo formats used by most digital cameras, web pages, and email programs, as well as a few other file types. Windows users can display JPEG, GIF, TIF, BMP, PSD, SGI, and PNG pics on your iPod. On the Mac, JPEG and GIF files, along with images in the PICT, TIFF, BMP, PNG, JPEG 2000, SGI, and PSD formats work just fine. (If you have iPhoto 5 or later, you can also sync MPEG-4 videos over to your iPod Touch.)
There are a couple of other things to remember when you add images to your iPod. For one, you can’t import pictures from one of those photo CDs from the drugstore or from a backup disc you made yourself. Photos you store on DVDs or CDs won’t cut it, either. iTunes needs to pull photos directly from your hard drive. The solution in both cases? Transfer your pics from the disc to your computer so they’re ready for your iPod.
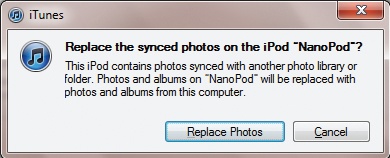
When it comes to photos, the iPod allies itself with just a single computer. That means that, unlike manual music management, where you can grab songs from several different computers, you can synchronize pictures only between one iPod and one computer. If you ignore the warning box (pictured here) and try to load photos from a different computer, iTunes replaces all your iPod’s existing photos with the pictures from that new machine. Ouch.
You also can’t dump photos directly into the iPod from your digital camera—you need to go through iTunes. (There used to be a handy gadget called the iPod Camera Connector that siphoned photos from your camera’s memory card to the iPod’s hard drive, but it doesn’t work on modern iPods, nor does Apple’s iPad Camera Connection Kit. One can only hope that a variation of this device comes out for the iPod Touch/iPhone one of these days.…)
Get Pictures onto Your iPod
OKAY, SO YOU’VE GOT your screen-outfitted iPod and a bunch of pictures in an iTunes-friendly format on your hard drive. How do you get those photos from your drive to your iPod? The same way you transfer music—through iTunes. First, you need to set your preferences in iTunes and on the iPod so they can sync the photos you want to carry around, like so:
Connect your iPod to your Windows PC or Mac with the iPod’s USB cable (or use iTunes Wi-Fi Sync on the iPod Touch, as Set Up and Sync Your Touch With iTunes explains).
Once your iPod shows up in the iTunes Source list, click its icon to select it.
In the iTunes tabs for your iPod, click the one for Photos.
Turn on the checkbox next to “Sync photos from” and then choose your photo-storage folder or photo-management program; that lets iTunes know where to find your pics. You can copy over every image or just the albums (sets of pictures) you select.
Click Sync (or Apply, if this is your first time syncing photos).

Tip
If you own a Touch and use the Places feature in iPhoto ‘09 or later to embed GPS location data into your photos (also known as geotagging), you can see your pictures represented by pins on a map by tapping Photos→Places; tap a pin to see the pic.
If you don’t use a photo-management program and you just want to copy a folder of photos from your hard drive to your iPod, select “Choose folder” from the menu and navigate to the desired folder. Then select whether you want to sync just the photos in that folder, or include the photos tucked away in folders inside your chosen folder.
If you use a photo-management program, select it, and then select the “All photos and albums” option to have iTunes haul every single image in your photo program’s library over to your iPod. If you don’t want to copy over those bachelorette-party snaps, opt for “Selected albums” and choose only the folders you want from your photo program. (Of course, you need to make sure those party pics aren’t in any of those folders.)
If you use a Mac with iPhoto ‘09 or later and take advantage of the program’s face-recognition feature, you can also sync photos according to who’s in the pictures. Just scroll down the photo-sync preferences page to the Faces area and turn on the checkboxes next to the names of your favorite people. You can sync iPhoto Events (typically, photos taken on the same day) here as well.
Whenever you connect your iPod to your computer, iTunes syncs the photo groups you designate, adding any new pictures you stored in the groups since you last connected. During the process, iTunes displays an “Optimizing…” message in its status window, like the one shown here.

Don’t let the term “optimizing” scare you: iTunes hasn’t taken it upon itself to touch up your photographic efforts. The program simply creates versions of your pictures that look good on anything from your tiny iPod screen to your big TV screen (in case you want to connect your iPod to it). Then it tucks all those copies away on your hard drive before adding them to your iPod.
Want to get certain albums or photos off of your iPod? Reconnect it to iTunes, go back to the Photos tab, deselect the albums you no longer want, and then sync up. If you want to banish individual pictures, remove them from your desktop album and sync. On the iPod Touch, you can delete photos in the Camera Roll album by tapping ![]() , selecting the images to go, and then tapping Delete.
, selecting the images to go, and then tapping Delete.
Tip
Want to take a snap of some cool thing you see on your Touch’s screen? Hold down the Home button and then press the Sleep/Wake button as though it were a camera shutter. The resulting screenshot lands in Photos→Camera Roll. You can transfer the pic back to your computer the next time you sync. In fact, if your computer has a photo-organizing program that senses a connected digital camera, it will likely leap up and offer to pull in the Touch’s shots, just as it would digicam photos.
View Photos on the iPod Touch
WITH ITS BIG COLOR screen, the iPod Touch shows off your photos better than other iPods—and lets you have more fun viewing them because it’s literally a hands-on experience.
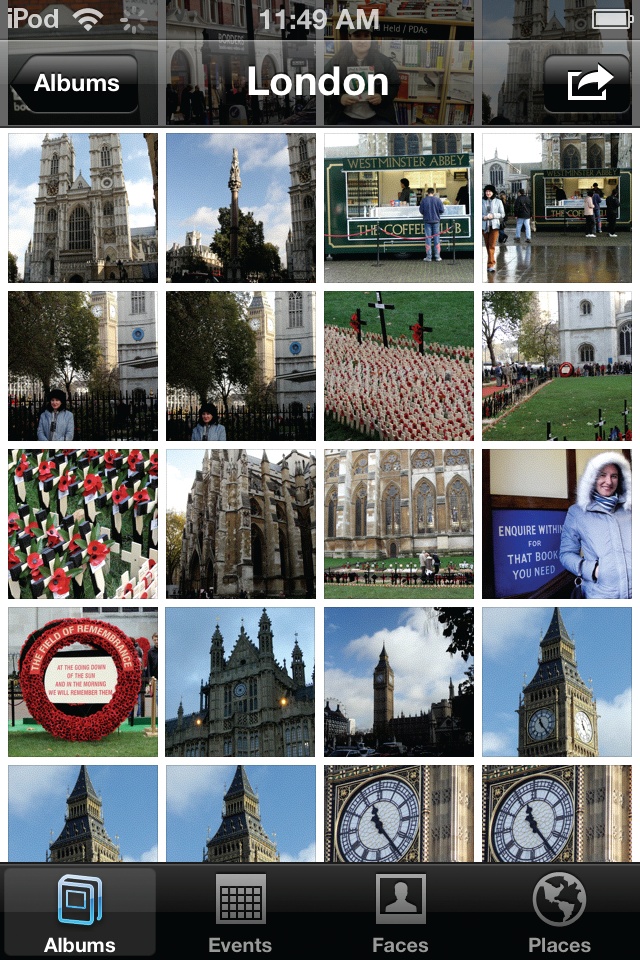
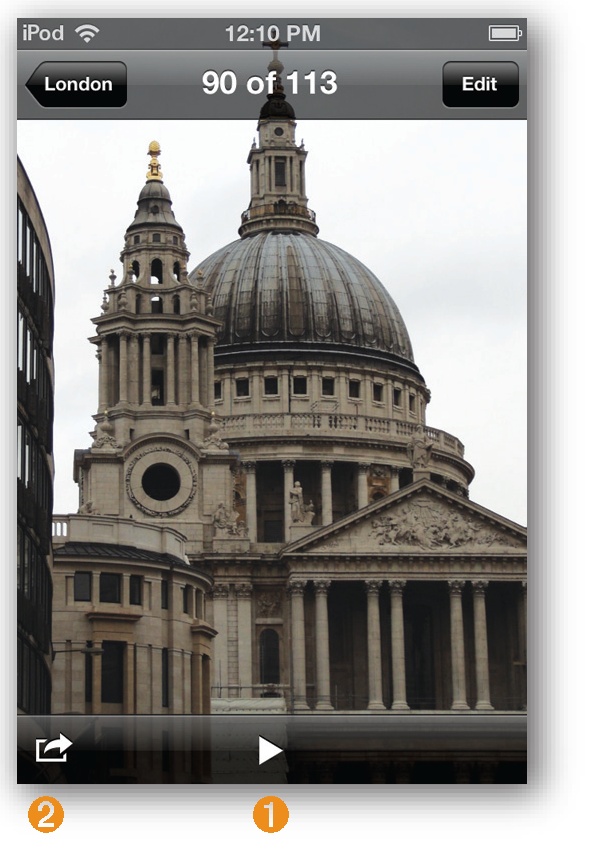
To see the pictures synced from your computer, tap the Photos icon on the Home screen. Tap the buttons in the bottom row to see photos grouped by Albums, Events, Faces, or Places. Tap an album title, name, or place to see thumbnails of those photos. To get back to your library, tap the Albums (or whatever) button at the top-left of the screen.
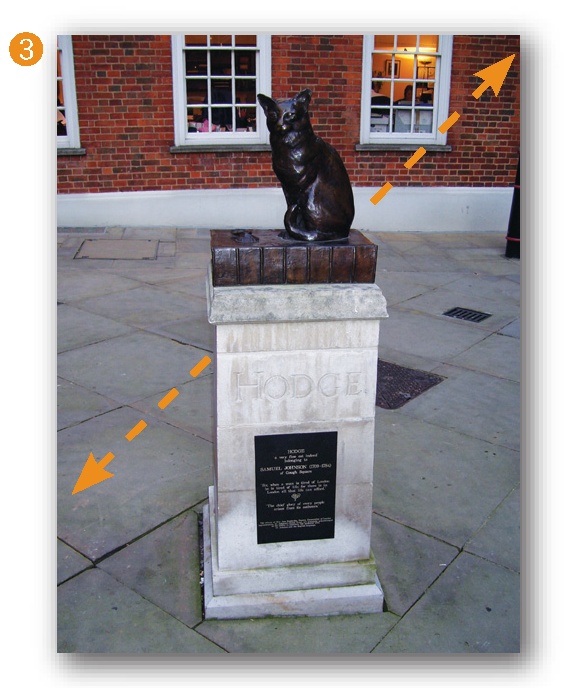
To see a full-screen version of a picture, tap its thumbnail image. The Touch displays photo controls for a few seconds; tap the photo to make them go away (tap it again to make them reappear). Double-tap a photo to magnify it. You can also rotate the Touch so that horizontal photos fill the width of the screen instead of getting letterboxed. (When you tap the Edit button in the top-right corner of a photo, you can also make basic fixes to your pics, like cropping out unwanted parts or taming red-eye in your subjects. Snap and Edit Photos with the Camera has the details.)
Here are some other things you can do with your photos on the Touch:
Tap the triangle icon at the bottom of a full-frame photo to start a slideshow. You can pick a transition style and music track here, and tap Start Slideshow to begin. Play Slideshows on Your iPod has more on the settings.
To set a photo as the wallpaper for your Touch (you know, that background picture you see when you wake the Touch from a nap), tap
 in the lower-left corner. Then tap Use As Wallpaper. This icon also calls up buttons that let you email photos or send them as iMessages (Use iMessage) over the Touch’s WiFi connection, share pictures with your Twitter followers (User Twitter), and assign a photo to someone in your Touch contacts list. And, if you have a printer that works with Apple’s AirPrint technology (Print From Your iPod Touch), you can even make a color print of the photo.
Spread and pinch your fingers onscreen (one of those fancy Touch moves described in Chapter 3) to zoom in and out of a photo. Drag your finger around the screen to pan across a zoomed-in photo.
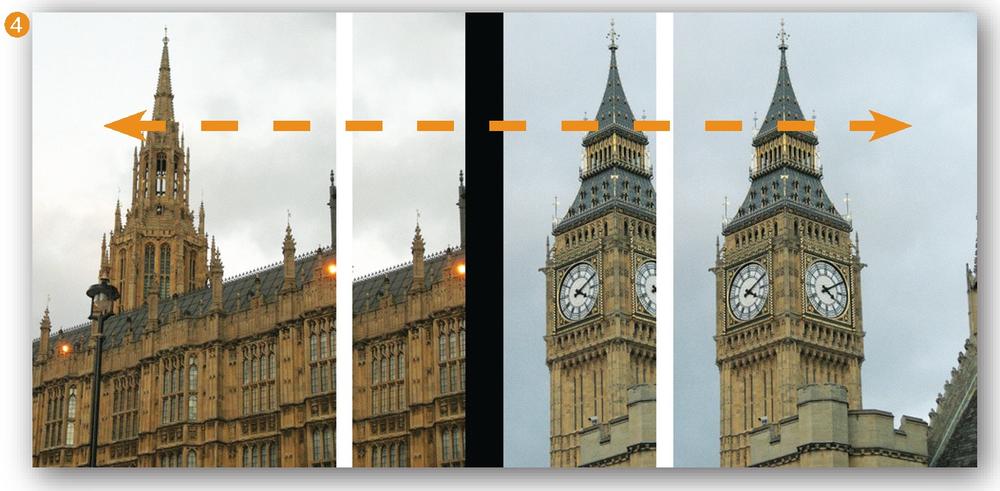
Flick your finger horizontally across the screen in either direction to scroll through your pictures at whizzy speeds. You can show off your vacation photos really fast this way (your friends will thank you).

As mentioned earlier, tapping ![]() with a single photo onscreen attaches that image to an email message; tapping the same icon from the thumbnails screen lets you attach multiple photos to a message. Tap the thumbnails of all the pics you want to send, address your email, type a note if you like, and then tap Send.
with a single photo onscreen attaches that image to an email message; tapping the same icon from the thumbnails screen lets you attach multiple photos to a message. Tap the thumbnails of all the pics you want to send, address your email, type a note if you like, and then tap Send.
View Photos on the iPod Nano or Classic
ONCE YOU GET YOUR photos freed from the confines of your computer and onto your Nano or Classic, you probably want to show them off to friends and relatives—or admire them yourself when you’re stuck on a train or traveling far away from home. Here’s how to get a palm-sized picture show:
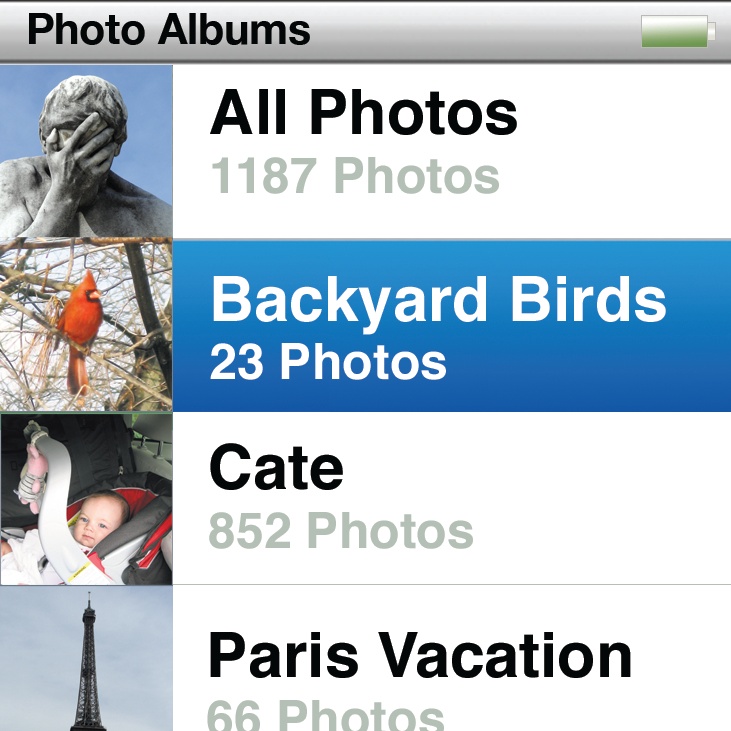
iPod Nano. Tap the Photos icon on the Nano’s Home screen to call up a list of your photo albums, along with an “All Photos” option. Select an album and flick up or down to see all the thumbnails in it. Tap a thumbnail to see a pic full-screen (well, as full-screen as you can get on a 1.5-inch-square screen where your photos will be letterboxed unless you zoom in on them). Flick your finger on the screen from right to left to glide through the images. Double-tap a picture to zoom in and out of it; if you loaded Faces on your Nano through iPhoto ‘09 or later, the zoom centers on the face. To see more of a photo while you’re zoomed in, drag your finger on the screen to pull a different part of the picture to the center.
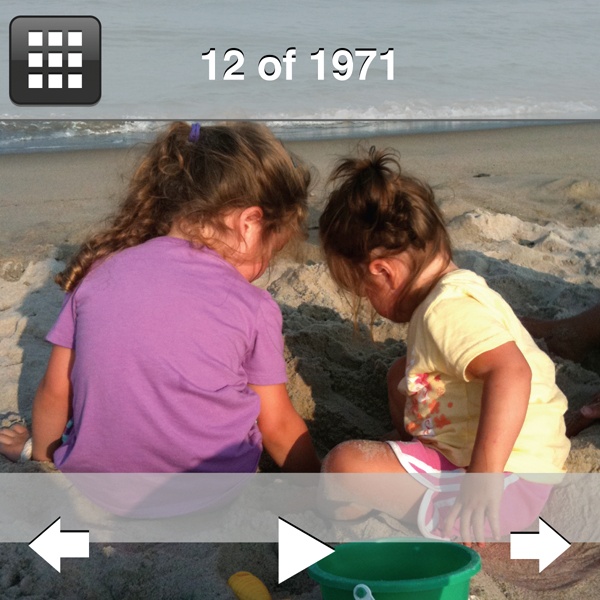
You can tap the screen once to call up the navigation controls, which give you a
 button that starts an automatic slideshow (Play Slideshows on Your iPod), and
  and
and  arrows so you can advance through an album at your own pace. The control bar also has a small square grid icon in the top-left corner; tap it to go back to your list of albums.
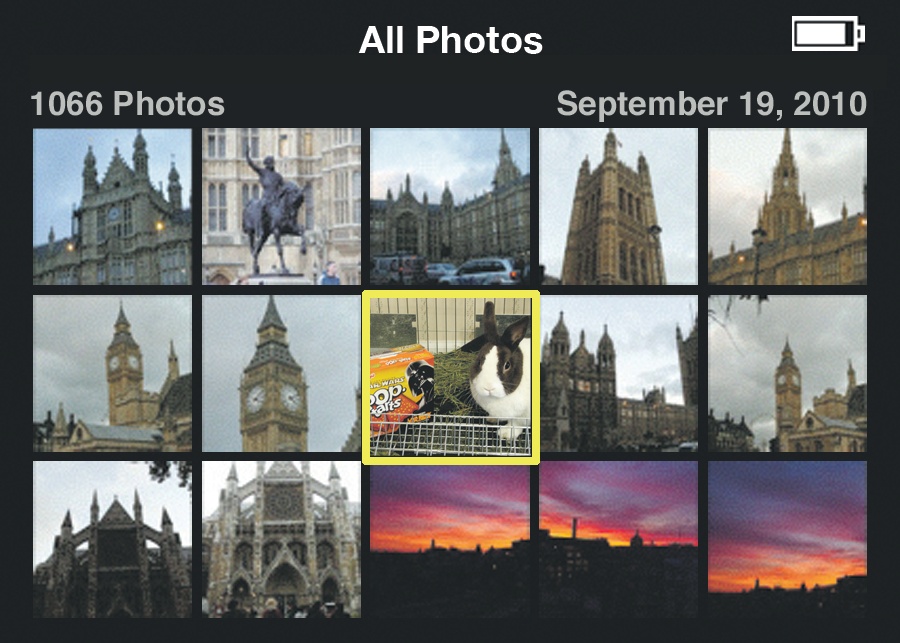
iPod Classic. Choose Photos→All Photos (or select an album) from your Classic’s main menu to see a screen of thumbnail images. Use the scroll wheel to maneuver the little yellow highlight box, and then zoom along the rows until you get to the pic you want. If you have hundreds of pee-wee pics, tap the Previous and Next buttons to advance or retreat through the thumbnails by the screenful. Highlight a photo and press the center button to call up a large version of it.
Press the Previous and Next buttons—or scroll the click wheel—to move through pics one by one. Press Menu to return to the full album.

Digital Photographer Alert: Store Full-Quality Photos on Your iPod
WHEN ITUNES OPTIMIZES YOUR photos for iPodification, it streamlines the images a bit instead of transferring the big, full-resolution files. But if you want the high-res photos, you can copy them over to your Nano or Classic—good news if you’re an avid photographer and want to haul a big, print-ready photo collection from one machine to another. (But not so good news if you’re a Touch owner, because you can’t use your iPod as an external drive unless you get a third-party program like TouchCopy, as mentioned on Copy Your Music from iPod to iTunes.)
Nano and Classic users can follow these steps:
Connect your Nano or Classic and select it in the iTunes Source list. Make sure you’ve set up your iPod as a portable hard drive (see The iPod as Portable Hard Drive for details). The short version: In your iPod’s Settings page in iTunes, click the Summary tab and then turn on the “Enable disk use” checkbox.
Click the Photos tab in the iTunes window.
Turn on the “Include full-resolution photos” checkbox.
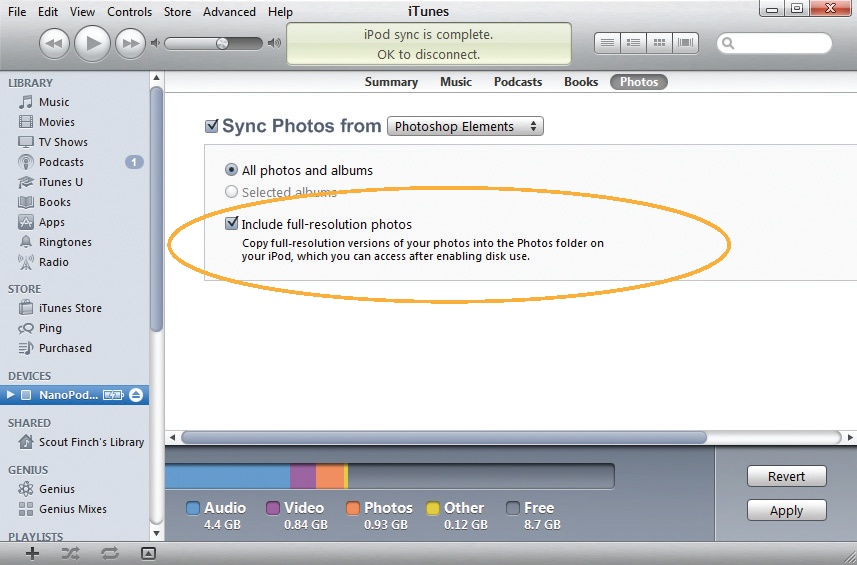
After you sync, full-resolution copies of your photos sit happily in the Photos folder on your iPod’s hard drive. (The Photos folder also includes a subfolder called Thumbs that’s full of iPod-optimized images in special .ithmb format; you can safely ignore these.) Since your iPod is now pulling double duty as a flash drive, you just need to connect it to another computer, open its icon, and copy the full-res photos over to the second computer.
Play Slideshows on Your iPod
A PHOTO SLIDESHOW TAKES all the click-and-tap work out of showcasing your images, freeing you up to admire your pictures without distraction. To run a slideshow on an iPod, you need to set up a few things, like how long each photo appears onscreen and what music accompanies your trip to Disneyland.
Slideshow Settings on an iPod Touch or Nano
To customize the way photos slide by on your Touch, press the Home button and then tap Settings→Photos. The Nano has similar menu items, but in a different order. On either iPod, you have these options:
How long each picture stays onscreen. Tap the time shown to get a menu of choices, which includes 2, 3, 5, 10, or 20 seconds per shot.
The transition between photos. The Nano gives you a choice of animated effects, like a folding-paper Origami transition and the “Ken Burns” setting that slowly pans across a photo (a technique the documentary director popularized in his films). As mentioned on View Photos on the iPod Touch, the Touch keeps its choice of Hollywood-style dissolves, wipes, and ripples ready to select when you tap the
button on a selected photo in the album.

You can also choose to have the iPod shuffle your photos in random order, or repeat a slideshow when it ends, so that it loops until you manually stop it.
The iPod Touch photo settings, shown here, also hold a switch you can flip to turn on the Photo Stream feature of Apple’s iCloud service. Jump ahead to Share and Stream Photos With iCloud to learn more.
Tip
If you wrangle your picture collection in iPhoto ‘09 or later on the Mac, you can export your intricately crafted and scored iPhoto slideshows as little movies sized up just for the iPod—and put them right into iTunes. Select a slideshow in iPhoto and click the Export button. In the “Export your slideshow” box, turn on the checkbox for Mobile or Medium (the preferred settings for iPod Touch and Classic viewing, respectively) and make sure you turn on the checkbox next to “Automatically send slideshow to iTunes.” Click the Export button. To actually complete the transfer, connect your iPod to your computer and then click the Movies tab on the iPod’s Preferences screen in iTunes. Select the slideshow and sync away.
Slideshow Settings on the iPod Classic
YOU SET SLIDESHOW OPTIONS on the Classic by choosing Photos→Settings. You’ll see a slew of options ready to shape your slideshow experience.
Use the Time Per Slide menu to set how much time (from 2 to 20 seconds) each photo stays onscreen. (During the show, you can also go to the next image with a tap of the click wheel.)
Use the Music menu to pick a song from your iPod’s playlists to serve as the soundtrack for your show (assuming you want one). You may even want to create a playlist in iTunes to use with a particular slideshow.
As with music tracks, you can shuffle the order of your photos and repeat the slideshow. You can also add fancy transitions by choosing Photos→Settings→Transitions. You get to pick from several dramatic photo-changing styles, including effects that let you zoom out and fade to black.
To make sure your slideshow plays on your iPod’s screen, turn the TV Out setting to Off, which will direct the video signal to your iPod. (Turn the page if you want to project your slideshow on a TV.) Alternatively, you can select Ask, so that each time you start a slideshow, the iPod inquires whether you intend to display it on the big or small screen.

Once you get your settings just the way you want them, select the album or photo you want to begin with, and then press the Play/Pause button on the click wheel to start the show. Press the Play/Pause button during playback to temporarily stop the show, and press it again to continue.
The show’s time per slide, music, and transitions should all match the settings you chose. All you have to do now is sit back, relax, and enjoy your handiwork, not only in taking great photos, but in picking great slideshow effects as well.
Note
The tiny iPod Nano doesn’t include a slideshow music option in its Settings menu. To get a soundtrack going for Nano Theater, go to the Home screen, tap the Music icon, and then tap up a song or playlist. When the music starts, jump back to Photos and start your slideshow. It’s a little clunky, but then again, you’re watching a slideshow on a screen that’s about the size of four postage stamps, so your viewing experience is not exactly immersive theater. But if you want to share that slideshow on the big screen, turn the page. Comparatively, it’ll feel like watching the show on an IMAX screen.
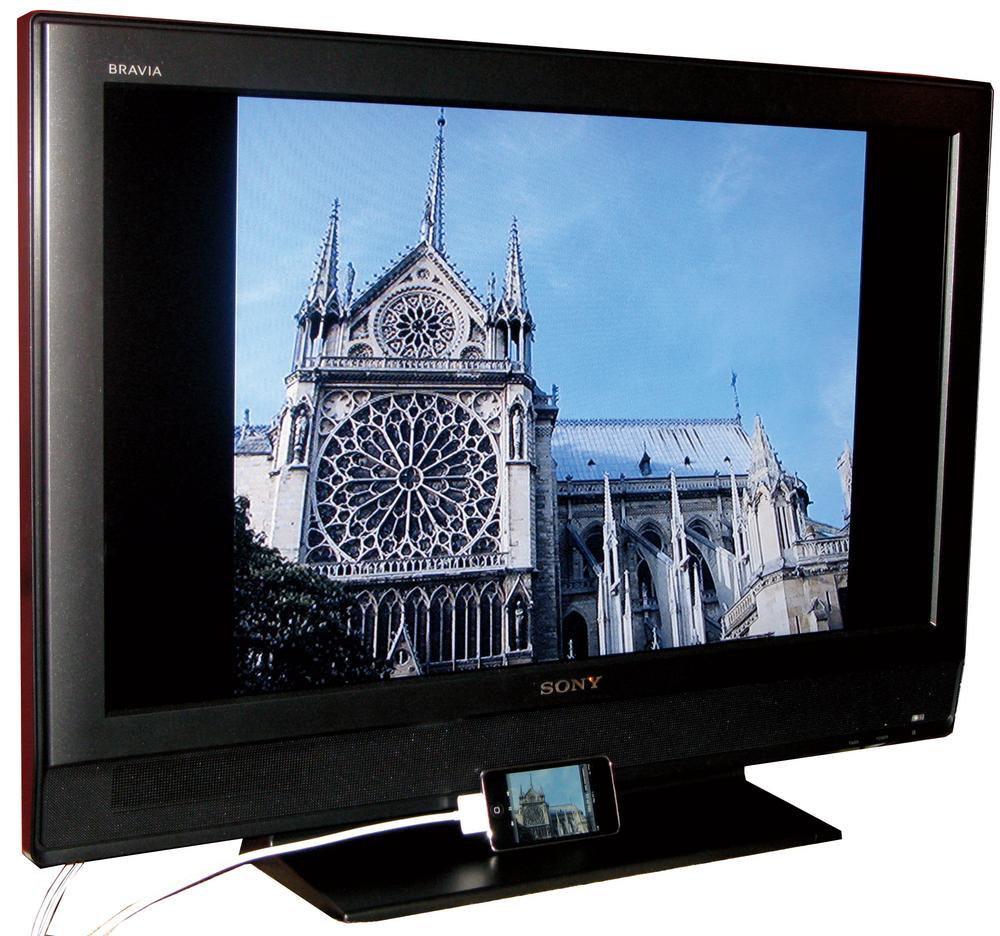
Play Slideshows on Your TV
TO SEE YOUR DIGITAL goodies on the big screen, you first need to connect your iPod to your TV. Flip back to the previous chapter if you need help doing that (you need a special AV cable, for example). Once you make the iPod-TV link, you need to adjust a few more things on your iPod.
For the iPod Touch and 2010/2011 Nano
Connect your iPod to the TV with an AV cable. When you connect an AV cable to the Touch or Nano, your slideshow automatically appears on your TV instead of on your iPod. Touch owners who also have a second-generation Apple TV can ditch the cable and connect with AirPlay (View Video and Photos with Apple TV).
On the Nano, choose Settings→Photos→TV Signal and select your local television broadcast standard. If you’re in North America or Japan, choose NTSC. If you’re in Europe or Australia, choose PAL. (The Touch takes care of this on its own.)
Turn on your TV and select your iPod as the video source. You tell your TV to use the iPod as the input signal the same way you tell it to display the signal from a DVD player or game console. Typically, you press the Input or Display button on your TV’s remote to change from the live TV signal to a new video source.
On the iPod, navigate to the album you want. Tap the photo you want to start with, and then tap the Play triangle at the bottom of the screen to begin your show.
For the iPod Classic and Older Video Nanos
Choose Photos→Settings→TV Out→On. The On option tells your iPod to send the slideshow out to a TV screen instead of playing it on its own screen. (You can change your iPod’s Ask setting so that it always asks you which screen you want to use; see Slideshow Settings on the iPod Classic.) If you have a Classic or older Nano and use one of Apple’s AV cables, TV Out gets set to On automatically.
Select your local television broadcast standard. If you’re in North America or Japan, choose Photos→Settings→TV Signal→NTSC. If you’re in Europe or Australia, choose Photos→Settings→TV Signal→PAL. If you’re in an area not listed above, check your television’s manual to see what standard it uses or search the Web for “world television standards.”
Turn on your TV and select your iPod as the video source. You select the input for the iPod’s signal the same way you tell your TV to display a signal from a DVD player or game console. Typically, you press the Input or Display button on your TV’s remote to change from a live TV signal to a new video source.
Now, cue up a slideshow on the iPod and press the Play/Pause button. Your glorious photographs—scored to the sounds of your selected music, if you wish—appear on your television screen. (Because television screens are horizontal displays, vertical shots end up with black bars along the sides.)
Your pre-selected slideshow settings control the show, though you can advance through it manually with your thumb on the click wheel. If you have the iPod Universal Dock, you can also pop through shots with a click of its tiny white remote control. Although just one photo appears at a time on the TV, if you’re driving the iPod Classic, your iPod displays not only the current picture, but the one before and after it as well, letting you narrate your show with professional smoothness: “OK, this is Shalimar before we got her fur shaved off after the syrup incident…and here she is later.”
Note
As explained in the previous chapter, the type of iPod you have dictates the equipment you need so you can display photos and videos on your TV. First-generation video iPods that came out between 2005 and 2006 can use the older iPod AV cable that connects through the headphone port or Line Out jack on an iPod dock. Newer Touches, Nanos, and Classics connect through the Apple Universal Dock, the Apple Composite AV Cable, the Apple Component AV Cable, or a compatible third-party offering. In any case, it’s going to cost you a few bucks.
Share and Stream Photos With iCloud
Just think about all the possible ways to take digital photos, especially if you have an iPod Touch, an iPhone, and an iPad. You might have a digital camera, too. Luckily, iCloud’s Photo Stream feature ensures that you’ll always have a copy of all your pictures on all your iOS devices and on your computer. Now you don’t have to be embarrassed when you pull out your Touch to show the girls in the book club a picture of your new niece, only to remember you actually took the photo with your iPad, which is sitting on the desk at home.
With Photo Stream in action, iCloud stores the last 1,000 pictures you’ve taken for 30 days, which should give you plenty of time to sync your pics across all your devices and, most importantly, to your desktop computer, which serves as the archive for your gallery. So, while iCloud holds only your last thousand shots up in the sky, all your pictures are permanently stored on your Windows PC or Mac—which probably has a bit more storage space than your iPod Touch.
To use Photo Stream, you have to activate it on your Touch, on your other iOS devices, and on your desktop computer. If you didn’t turn on Photo Stream when you set up your Touch (Set Up and Activate the iPod Touch), go to the Home screen and tap Settings→iCloud→Photo Stream→On. Repeat this step on all the iOS 5 devices that you want to paddle along in the Stream. (You can also turn Photo Stream on by tapping Settings→Photos→Photo Stream→On.)
Once your iOS devices are ready, you need to bring your computer into the Photo Stream mix so it can serve as the archive.
Photo Stream for Windows Users
If you use a Windows PC, you first need to install the iCloud software for Windows (Use iCloud on Your Computer). Once you do, choose Start→Control Panel→Network and Internet→iCloud. When the box opens, type in your iCloud user name and password. Next, turn on the checkbox next to Photo Stream and click Options.
In the box that appears (shown right), you need to designate two folders on your computer for Photo Stream’s personal use. The first is a folder for downloads—iCloud stores the photos you snap or save to your iPod’s Camera Roll here. Next, you need to pick an upload folder—photos you put here get pulled up to iCloud and copied around to the Photo Stream album on your Touch and other iOS 5 devices (which get smaller JPG copies of the photos).
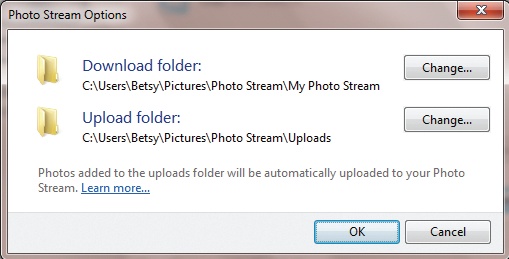
By default, iCloud sets up a Photo Stream folder in your Windows Pictures library, in a subfolder called My Photo Stream (for downloads) and one called Uploads. You can click the Change button next to either folder to pick a different name. Click OK when you’re done and ready to start streaming photos.
Photo Stream for Mac OS X Users
Apple makes things a bit easier for its own operating system and computers. You just need to use the most recent version (and update) of its iPhoto ‘11 or Aperture programs for organizing and editing pictures. To turn on Photo Stream in either Mac program, click the Photo Stream icon in the left panel and then click the Turn On Photo Stream button that appears in the window.
To see the Photo Stream preferences in iPhoto (and adjust them if needed), choose iPhoto→Preferences→Photo Stream. In the Preferences box, like the one below, turn on the checkbox next to Enable Photo Stream. You can also turn on checkboxes next to Automatic Import (which lets iPhoto include Photo Stream images in its Events, Photos, Faces, and Places albums) and Automatic Upload (which pushes the photos you import from your camera’s memory card up to iCloud; the iCloud server then sends smaller JPG versions of your camera’s big chunky files to all your waiting iOS 5 devices).

IPhoto Stream on the Apple TV
If you’ve fully stocked your house with Apple hardware, you probably have an Apple TV connected to your television set so you can take advantage of AirPlay (View Video and Photos with Apple TV). Like AirPlay, Photo Stream only works on second-generation Apple TVs (the one that looks like a thick black drink coaster). And if you’ve had the box for a while, you may need to update its software. From the main screen, use the remote and surf to Setttings→General→Update Software, then download and install any updates available.
To see your streamed photos on your TV set, switch over to your Apple TV. On the main menu screen, use the remote control to slide along to Internet→Photo Stream, log in if asked, and enjoy the show on your HDTV.