Implementing the data access layer of an application has been cumbersome for quite a while. Too much boilerplate code had to be written. Domain classes were anemic and not designed in a real object-oriented or domain-driven manner. The goal of the repository abstraction of Spring Data is to reduce the effort required to implement data access layers for various persistence stores significantly. The following sections will introduce the core concepts and interfaces of Spring Data repositories. We will use the Spring Data JPA module as an example and discuss the basic concepts of the repository abstraction. For other stores, make sure you adapt the examples accordingly.
Let’s take the
Customer domain class from our domain that will be persisted to an arbitrary
store. The class might look something like Example 2-1.
A traditional approach to a data access layer would now require you to at least implement a repository class that contains necessary CRUD (Create, Read, Update, and Delete) methods as well as query methods to access subsets of the entities stored by applying restrictions on them. The Spring Data repository approach allows you to get rid of most of the implementation code and instead start with a plain interface definition for the entity’s repository, as shown in Example 2-2.
As you can see, we extend the Spring
Data Repository interface,
which is just a generic marker interface. Its main responsibility is to
allow the Spring Data infrastructure to pick up all user-defined Spring
Data repositories. Beyond that, it captures the type of the domain class
managed alongside the type of the ID of the entity, which will come in
quite handy at a later stage. To trigger the autodiscovery of the
interfaces declared, we use either the <repositories /> element of the
store-specific XML namespace (Example 2-3) or the related @Enable…Repositories
annotation in case we’re using JavaConfig (Example 2-4). In our sample case, we will use
JPA. We just need to configure the XML element’s base-package attribute with our
root package so that Spring Data will scan it for repository interfaces.
The annotation can also get a dedicated package configured to scan for
interfaces. Without any further configuration given, it will simply
inspect the package of the annotated class.
Example 2-3. Activating Spring Data repository support using XML
<?xml version="1.0" encoding="UTF-8"?><beans:beansxmlns:beans="http://www.springframework.org/schema/beans"xmlns:xsi="http://www.w3.org/2001/XMLSchema-instance"xmlns:jpa="http://www.springframework.org/schema/data/jpa"xsi:schemaLocation="http://www.springframework.org/schema/beanshttp://www.springframework.org/schema/beans/spring-beans.xsdhttp://www.springframework.org/schema/data/jpahttp://www.springframework.org/schema/data/jpa/spring-jpa.xsd"><jpa:repositoriesbase-package="com.acme.**.repository"/></beans>
Both the XML and JavaConfig
configuration will need to be enriched with store-specific infrastructure
bean declarations, such as a JPA
EntityManagerFactory, a
DataSource, and the like. For other stores,
we simply use the corresponding namespace elements or annotations. The
configuration snippet, shown in Example 2-5, will now cause the Spring Data
repositories to be found, and Spring beans will be created that actually
consist of proxies that will implement the discovered interface. Thus a
client could now go ahead and get access to the bean by letting Spring
simply autowire it.
With our
CustomerRepository interface set up, we are
ready to dive in and add some easy-to-declare query methods. A typical
requirement might be to retrieve a Customer by its
email address. To do so, we add the appropriate query method (Example 2-6).
The namespace element will now pick up the interface at container startup time and trigger the Spring Data infrastructure to create a Spring bean for it. The infrastructure will inspect the methods declared inside the interface and try to determine a query to be executed on method invocation. If you don’t do anything more than declare the method, Spring Data will derive a query from its name. There are other options for query definition as well; you can read more about them in Defining Query Methods.
In Example 2-6, the query can be
derived because we followed the naming convention of the domain object’s
properties. The Email part of the query method name actually
refers to the Customer class’s
emailAddress property, and thus Spring Data will
automatically derive select C from Customer c where c.emailAddress =
?1 for the method declaration if you were using the JPA module. It
will also check that you have valid property references inside your method
declaration, and cause the container to fail to start on bootstrap time if
it finds any errors. Clients can now simply execute the method, causing
the given method parameters to be bound to the query derived from the
method name and the query to be executed (Example 2-7).
The interface we just saw had a simple query method declared. The method
declaration was inspected by the infrastructure and parsed, and a
store-specific query was derived eventually. However, as the queries
become more complex, the method names would just become awkwardly long.
For more complex queries, the keywords supported by the method parser
wouldn’t even suffice. Thus, the individual store modules ship with an
@Query annotation,
demonstrated in Example 2-8, that takes
a query string in the store-specific query language and potentially
allows further tweaks regarding the query execution.
Here we use JPA as an example and manually define the query that would have been derived anyway.
The queries can even be externalized into a properties
file—$store-named-queries.properties,
located in META-INF—where
$store is a placeholder for
jpa, mongo,
neo4j, etc. The key has to follow the convention of
$domainType.$methodName. Thus, to back our
existing method with a externalized named query, the key would have to
be Customer.findByEmailAddress. The
@Query annotation is not needed if named
queries are used.
The query derivation
mechanism built into the Spring Data repository infrastructure,
shown in Example 2-9, is useful to
build constraining queries over entities of the repository. We will
strip the prefixes findBy, readBy, and
getBy from the method and start parsing the rest of it. At
a very basic level, you can define conditions on entity properties and
concatenate them with And and Or.
The actual result of parsing that
method will depend on the data store we use. There are also some general
things to notice. The expressions are usually property traversals
combined with operators that can be concatenated. As you can see in
Example 2-9, you can combine property
expressions with And and Or. Beyond that, you also get support for
various operators like Between,
LessThan, GreaterThan, and Like for the property expressions. As the
operators supported can vary from data store to data store, be sure to
look at each store’s corresponding chapter.
Property expressions can just refer to a direct property of the
managed entity (as you just saw in Example 2-9). On query creation time, we
already make sure that the parsed property is a property of the
managed domain class. However, you can also define constraints by
traversing nested properties. As seen above,
Customers have Addresses
with ZipCodes. In that case, a method name
of:
List<Customer>findByAddressZipCode(ZipCodezipCode);
will create the property
traversal x.address.zipCode. The resolution algorithm
starts with interpreting the entire part (AddressZipCode) as a property and checks the
domain class for a property with that name (with the first letter
lowercased). If it succeeds, it just uses that. If not, it starts
splitting up the source at the camel case parts from the right side
into a head and a tail and tries to find the corresponding property
(e.g., AddressZip and Code). If it finds a property with that
head, we take the tail and continue building the tree down from there.
Because in our case the first split does not match, we move the split
point further to the left (from “AddressZip,
Code” to “Address,
ZipCode”).
Although this should work for
most cases, there might be situations where the algorithm could select
the wrong property. Suppose our Customer class
has an addressZip property as well. Then our algorithm
would match in the first split, essentially choosing the wrong
property, and finally fail (as the type of
addressZip probably has no code property). To
resolve this ambiguity, you can use an underscore ( _ ) inside your method name to manually
define traversal points. So our method name would end up like so:
List<Customer>findByAddress_ZipCode(ZipCodezipCode);
If the number of results returned from a query grows significantly, it
might make sense to access the data in chunks. To achieve that, Spring
Data provides a pagination API that can be used with the repositories.
The definition for what chunk of data needs to be read is hidden behind
the Pageable interface
alongside its implementation PageRequest. The
data returned from accessing it page by page is held in a
Page, which not only contains the data
itself but also metainformation about whether it is the first or last
page, how many pages there are in total, etc. To calculate this
metadata, we will have to trigger a second query as well as the initial
one.
We can use the pagination
functionality with the repository by simply adding a
Pageable as a method parameter. Unlike
the others, this will not be bound to the query, but rather used to
restrict the result set to be returned. One option is to have a return
type of Page, which will restrict the
results, but require another query to calculate the metainformation
(e.g., the total number of elements available). Our other option is to
use List, which will avoid the additional
query but won’t provide the metadata. If you don’t need pagination
functionality, but plain sorting only, add a Sort
parameter to the method signature (see Example 2-10).
Example 2-10. Query methods using Pageable and Sort
Page<Customer>findByLastname(Stringlastname,Pageablepageable);List<Customer>findByLastname(Stringlastname,Sortsort);List<Customer>findByLastname(Stringlastname,Pageablepageable);
The first method allows you to pass
a Pageable instance to the query method to dynamically add
paging to your statically defined query. Sorting options can either be handed into the method by
the Sort parameter explicitly, or embedded in the
PageRequest value object, as you can see in Example 2-11.
So far, we have seen repository interfaces with query methods derived from
the method name or declared manually, depending on the means provided by
the Spring Data module for the actual store. To derive these queries, we
had to extend a Spring Data–specific marker interface:
Repository. Apart from queries, there is
usually quite a bit of functionality that you need to have in your
repositories: the ability to store objects, to delete them, look them up
by ID, return all entities stored, or access them page by page. The
easiest way to expose this kind of functionality through the repository
interfaces is by using one of the more advanced repository interfaces that
Spring Data provides:
RepositoryA plain marker interface to let the Spring Data infrastructure pick up user-defined repositories
CrudRepositoryExtends
Repositoryand adds basic persistence methods like saving, finding, and deleting entitiesPagingAndSortingRepositoriesExtends
CrudRepositoryand adds methods for accessing entities page by page and sorting them by given criteria
Suppose we want to expose typical
CRUD operations for the
CustomerRepository. All we need to do is
change its declaration as shown in Example 2-12.
The
CrudRepository interface now looks
something like Example 2-13. It contains
methods to save a single entity as well as an
Iterable of entities, finder methods for a
single entity or all entities, and delete(…) methods of
different flavors.
Each of the Spring Data modules
supporting the repository approach ships with an implementation of this
interface. Thus, the infrastructure triggered by the namespace element
declaration will not only bootstrap the appropriate code to execute the
query methods, but also use an instance of the generic repository
implementation class to back the methods declared in
CrudRepository and eventually delegate
calls to save(…),
findAll(), etc., to that instance.
PagingAndSortingRepository (Example 2-14) now in turn extends
CrudRepository and adds methods to allow
handing instances of Pageable and
Sort into the generic
findAll(…) methods to actually access entities
page by page.
To pull that functionality into the
CustomerRepository, you’d simply extend
PagingAndSortingRepository instead of
CrudRepository.
As we’ve just seen, it’s very easy to pull in chunks of predefined functionality by extending the appropriate Spring Data repository interface. The decision to implement this level of granularity was actually driven by the trade-off between the number of interfaces (and thus complexity) we would expose in the event that we had separator interfaces for all find methods, all save methods, and so on, versus the ease of use for developers.
However, there might be scenarios in which you’d like to expose only the reading methods (the R in CRUD) or simply prevent the delete methods from being exposed in your repository interfaces. Spring Data now allows you to tailor a custom base repository with the following steps:
Create an interface either extending
Repositoryor annotated with@RepositoryDefinition.Add the methods you want to expose to it and make sure they actually match the signatures of methods provided by the Spring Data base repository interfaces.
Use this interface as a base interface for the interface declarations for your entities.
To illustrate this, let’s assume
we’d like to expose only the findAll(…)
method taking a Pageable as well as the
save methods. The base repository interface would look like Example 2-15.
Note that we additionally annotated
the interface with @NoRepositoryBean to
make sure the Spring Data repository infrastructure doesn’t
actually try to create a bean instance for it. Letting your
CustomerRepository extend this interface
will now expose exactly the API you defined.
It’s perfectly fine to come up with
a variety of base interfaces (e.g., a
ReadOnlyRepository or a
SaveOnlyRepository) or even a hierarchy
of them depending on the needs of your project. We usually recommend
starting with locally defined CRUD methods directly in the concrete
repository for an entity and then moving either to the Spring
Data–provided base repository interfaces or tailor-made ones if
necessary. That way, you keep the number of artifacts naturally growing
with the project’s complexity.
So far we have seen two categories of methods on a repository: CRUD methods and query methods. Both types are implemented by the Spring Data infrastructure, either by a backing implementation or the query execution engine. These two cases will probably cover a broad range of data access operations you’ll face when building applications. However, there will be scenarios that require manually implemented code. Let’s see how we can achieve that.
We start by implementing just the functionality that actually needs to be implemented manually, and follow some naming conventions with the implementation class (as shown in Example 2-16).
Example 2-16. Implementing custom functionality for a repository
interfaceCustomerRepositoryCustom{CustomermyCustomMethod(…);}classCustomerRepositoryImplimplementsCustomerRepositoryCustom{// Potentially wire dependenciespublicCustomermyCustomMethod(…){// custom implementation code goes here}}
Neither the interface nor the implementation class has to know
anything about Spring Data. This works pretty much the way that you
would manually implement code with Spring. The most interesting piece of
this code snippet in terms of Spring Data is that the name of the
implementation class follows the naming convention to suffix the core
repository interface’s
(CustomerRepository in our case) name
with Impl. Also note that we kept both the interface as
well as the implementation class as package private
to prevent them being accessed from outside the package.
The final step is to change the declaration of our original repository interface to extend the just-introduced one, as shown in Example 2-17.
Example 2-17. Including custom functionality in the CustomerRepository
publicinterfaceCustomerRepositoryextendsCrudRepository<Customer,Long>,CustomerRepositoryCustom{…}
Now we have essentially pulled the API exposed in
CustomerRepositoryCustom into our
CustomerRepository, which makes it the
central access point of the data access API for
Customers. Thus, client code can now call
CustomerRepository.myCustomMethod(…). But how
does the implementation class actually get discovered and brought into
the proxy to be executed eventually? The bootstrap process for a
repository essentially looks as follows:
The repository interface is discovered (e.g.,
CustomerRepository).We’re trying to look up a bean definition with the name of the lowercase interface name suffixed by
Impl(e.g.,customerRepositoryImpl). If one is found, we’ll use that.If not, we scan for a class with the name of our core repository interface suffixed by
Impl(e.g.,CustomerRepositoryImpl, which will be picked up in our case). If one is found, we register this class as a Spring bean and use that.The found custom implementation will be wired to the proxy configuration for the discovered interface and act as a potential target for method invocation.
This mechanism allows you to easily implement custom code for a dedicated repository. The suffix used for implementation lookup can be customized on the XML namespace element or an attribute of the repository enabling annotation (see the individual store chapters for more details on that). The reference documentation also contains some material on how to implement custom behavior to be applied to multiple repositories.
As of version 3.0, the Spring Tool Suite (STS) provides integration with the Spring
Data repository abstraction. The core area of support provided for Spring
Data by STS is the query derivation mechanism for finder methods. The
first thing it helps you with to validate your derived query methods right
inside the IDE so that you don’t actually have to bootstrap an
ApplicationContext, but can eagerly detect
typos you introduce into your method names.
Note
STS is a special Eclipse distribution equipped with a set of plug-ins to ease building Spring applications as much as possible. The tool can be downloaded from the project’s website or installed into an plain Eclipse distribution by using the STS update site (based on Eclipse 3.8 or 4.2).
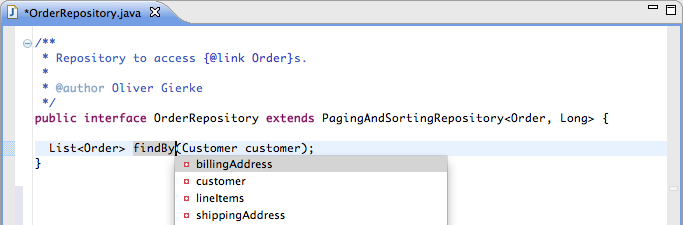
As you can see in Figure 2-1, the IDE detects that
Descrption is not valid, as there is no such property
available on the Product class. To discover these
typos, it will analyze the Product domain class
(something that bootstrapping the Spring Data repository infrastructure
would do anyway) for properties and parse the method name into a property
traversal tree. To avoid these kinds of typos as early as possible, STS’s
Spring Data support offers code completion for property names, criteria
keywords, and concatenators like And
and Or (see Figure 2-2).

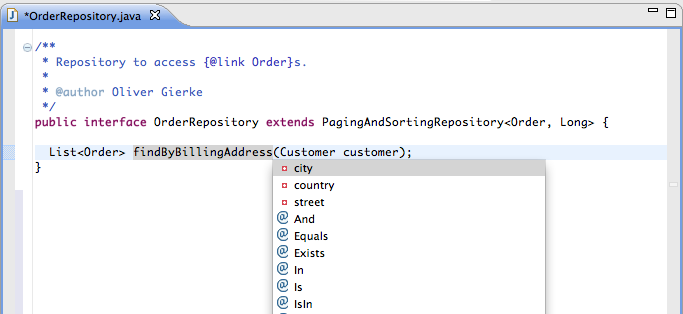
The Order
class has a few properties that you might want to refer to. Assuming we’d
like to traverse the billingAddress property, another
Cmd+Space (or Ctrl+Space on Windows) would trigger a nested property
traversal that proposes nested properties, as well as keywords matching
the type of the property traversed so far (Figure 2-3). Thus,
String properties would additionally get Like proposed.
To put some icing on the cake, the Spring Data STS will make the repositories first-class citizens of your IDE navigator, marking them with the well-known Spring bean symbol. Beyond that, the Spring Elements node in the navigator will contain a dedicated Spring Data Repositories node to contain all repositories found in your application’s configuration (see Figure 2-4).
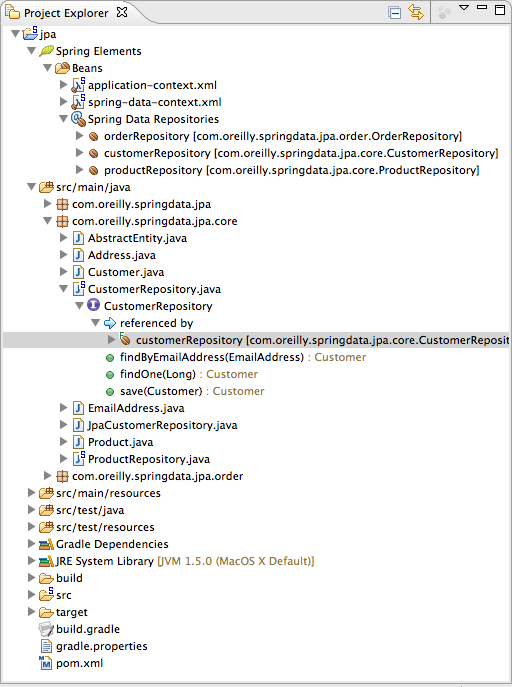
As you can see, you can discover the repository interfaces at a quick glance and trace which configuration element they actually originate from.
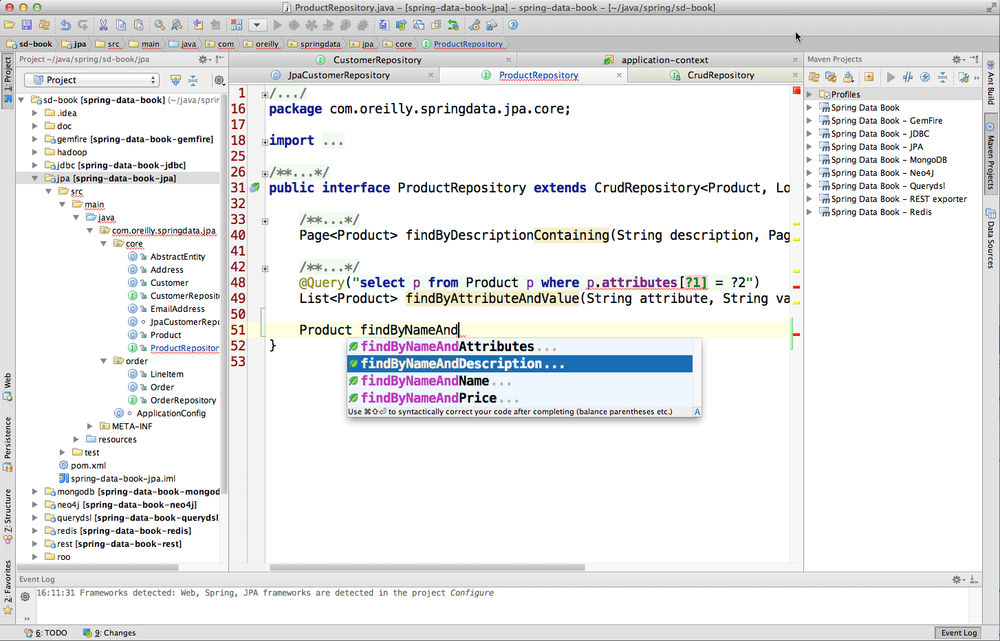
Finally, with the JPA support enabled, IDEA offers repository finder method completion derived from property names and the available keyword, as shown in Figure 2-5.