Chapter 10. Text
Creating Text Fields
Setting Text Field Attributes
Selecting Text
Formatting Text
Formatting with HTML and CSS
Triggering ActionScript from HTML Links
Loading HTML and CSS
Text Layout Framework
What’s Next?
Working with text can be a basic affair, such as displaying a simple text string in a default text field, or as complex as your needs require, perhaps creating individual text fields for every character in a string to build an animated text effect. Learning how to create and manipulate text objects at runtime with ActionScript can increase flexibility and make it much easier to reuse code from project to project.
In this chapter, we’ll focus mostly on how to display, populate, and format text data. We’ll discuss two kinds of text: the traditional Flash Platform text technology, available for many years and newly christened Classic text; and text created using the Text Layout Framework (TLF)—a significantly more robust text technology introduced with Flash Player 10. TLF offers improved typographical control, support for multiple columns, flowing text among multiple linked containers, and more.
We’ll cover:
Creating Text Fields. Text fields can be created with ActionScript like any display object, freeing you from the Flash Properties panel and allowing you to create fields on the fly.
Setting Text Field Characteristics. How you set up your text field will determine how the field will appear and function.
Selecting Text. You can select segments of text using ActionScript by specifying the start and end of a selection block.
Formatting with TextFormat. Text can be formatted easily by creating a formatting object that can be applied to one or more text fields at any time, including partial content of these fields.
Formatting with HTML and CSS. It’s also possible to use a limited subset of supported Hypertext Markup Language (HTML) and Cascading Style Sheets (CSS) features to format and style your text globally or on a field-by-field basis.
Triggering ActionScript from HTML. In addition to standard links in HTML text that might open a website, you can also use links to trigger ActionScript. This makes it easier to use HTML data to control your project and provides another way of dynamically triggering functions. For example, rather than creating buttons to drive an interface, a text field could contain links to serve the same purpose.
Push Yourself. Concluding this chapter is an example of how to load HTML and CSS data from external files, and an introduction to the Text Layout Framework (TLF).
Creating Text Fields
Creating text fields dynamically is as simple as creating any other display object, and we’ll be using this method in most of the examples in this chapter. The code that follows creates a text field and adds it to the display list. It also uses the text property to populate the field, as seen in the text_field_1.fla source file.
1vartxtFld:TextField=new TextField() 2 txtFld.text="Hello Skinny"; 3addChild(txtFld);
Without your setting additional properties of the field, default values will shape most of its characteristics. These defaults are fairly straightforward, such as black text, dimensions of 100 × 100 pixels, no field styling (such as background or border use), and single-line display without text wrapping. In other words, no assumptions are made by ActionScript about the way you want to display the text.
By default, a text field created with ActionScript will be a dynamic field type. This type supports programmatic control, in contrast to the static field type you might create by hand using Flash Professional’s Text tool. Later on we’ll show you how to create an input text field type, which also supports user input at runtime.
Setting Text Field Attributes
It’s almost certain that you’ll need to customize text fields to suit your needs, so we’ll modify a typical set of properties to demonstrate the most common adjustments made to a field. Whether you need fields that simply display text or accept input at runtime, ActionScript offers ample control over the appearance and functionality of a text field. It’s a simple matter to control color, wrap text, limit acceptable input characters, and more.
Dynamic Text Fields
Dynamic text fields are the go-to field type because they support ActionScript control but not user input. When displaying text in typical scenarios, for example, you’re unlikely to want the user to edit your content. This first example can be found in the text_field_2.fla source file, and includes syntax for setting the most common properties of a text field. If you’ve been reading this book linearly, you’ve used several of these properties in the Hello World! examples as well as a few other exercises in past chapters. Collecting the properties here, however, will help you focus on them in the context of other text manipulations.
Lines 1 and 2 create a text field and position it at (20, 20), while lines 3 and 4 set the width of the field to 200, and automatically size the height of the field to fit its content, while justifying left. This means the field will remain 200 pixels wide, but will resize from the upper-left corner to whatever height is required to accommodate all the text you add to the field.
1vartxtFld:TextField=new TextField(); 2 txtFld.x= txtFld.y= 20; 3 txtFld.width= 200; 4 txtFld.autoSize=TextFieldAutoSize.LEFT; 5 txtFld.border=true; 6 txtFld.borderColor= 0x000033; 7 txtFld.background=true; 8 txtFld.backgroundColor= 0xEEEEFF; 9 txtFld.textColor= 0x000099; 10 txtFld.multiline=true; 11 txtFld.wordWrap=true; 12 txtFld.selectable=false; 13 14for(vari:Number= 0; i < 25; i++) { 15 txtFld.appendText("word"+String(i) +" "); 16 } 17 18addChild(txtFld);
Lines 5 through 9 enable and set the color of the border, background, and text of the field. By default, a field is transparent with black text. To show a border or background of any color, the corresponding properties must first be enabled, as shown in lines 5 and 7. Once enabled, the default colors of the border and background are black and white, respectively. Line 6 sets the field’s border to a dark blue, and line 8 sets its background to light blue. Finally, line 9 sets the color of the text to a medium blue.
Lines 10 through 12 control text behavior. Line 10 supports more than one line of text (allowing carriage returns or line feeds in the text, for example), and line 11 supports wrapping text to the next line. Line 12 prevents the user from selecting text within the field. Even if a field is of dynamic type, rather than input type, the user can still select and copy text by default. However, you may not want a text field to allow selection, or you may not want the mouse cursor to switch to the corresponding I-beam text edit cursor that comes with the selection process. In these cases, set the selectable property to false.
Lines 14 through 16 populate the field using a for loop. This loop puts multiple occurrences of the text “word” into the field, adding the loop counter number to the text as it goes, ending with a space each time through the loop. The result will be “word0 word1 word2 ” and so on. The appendText() method is used to add text to the field incrementally.
Note
The appendText() method executes faster than using the += compound operator (txtFld.text += "new value") and is recommended for this purpose.
This is a simple example that fills a text field quickly with minimal code, but adding new text to a populated field is quite common. You may want to build a list based on user selections, for example. Imagine a to-do list application in which a user can create a running list by adding new items when needed. Without appending text to the end of a list, every new item would replace all current items. In fact, you’ve already added text incrementally in previous chapters, including the opening script of Chapter 3 when you animated the string, “Hello World!”.
Input Text Fields
To allow the user to input text in a field at runtime, all you need to do is to set the field’s type property to INPUT using the TextFieldType class. Using default input field properties will suffice for things like a user typing a name or email address into a form. For more specific tasks, additional features are available.
Consider, for example, a password field. When entering passwords, you usually want to obscure the password by replacing its characters with symbols. You may also want to limit input in a field to a specific number of characters or range of allowable input. To demonstrate, consider the following script, seen in the text_field_3.fla source file:
1vartxtFld:TextField=new TextField(); 2 txtFld.x= txtFld.y= 20; 3 txtFld.width= 100; 4 txtFld.height= 20; 5 txtFld.border= txtFld.background=true; 6 txtFld.type=TextFieldType.INPUT; 7 txtFld.maxChars= 10; 8 txtFld.restrict="0-9"; 9 txtFld.displayAsPassword=true; 10addChild(txtFld); 11stage.focus= txtFld;
Lines 1 through 4 and line 10 create, position, and size the field, and add it to the display list. Line 6 sets the field to an input field, and lines 7 through 9 define the password-related behavior. The maxChars property limits the number of characters that can be entered. The restrict property limits the valid characters that can be entered. These characters can be expressed individually or in ranges, such as the 0 through 9 number range used in this example. For example, you could allow uppercase and lowercase letters, the dollar sign ($) and underscore (_), and numbers 0 through 5, this way:
txtFld.restrict="A-Za-z$_0-5";
Line 9 performs the task of automatically switching the typed character for an asterisk at runtime to hide the password. Finally, line 11 gives the field focus so the user can begin typing without first selecting the field with the mouse.
Note
If you have trouble using the Backspace/Delete key when testing your movie in Flash Professional, it’s not because the restrict property prohibits its operation. This is a function of keyboard behavior in Flash’s built-in player. You can either test in a browser or disable keyboard shortcuts via the Control menu while in the player. This will remove the functional limitation on the Backspace/Delete key. Just remember to reenable keyboard shortcuts when returning to Flash.
Selecting Text
Your control over text and text fields is not limited to styling or input. You can also track user selections or even select portions of a field programmatically and replace its content.
The following example, found in the text_field_4.fla source file, uses the button creation class discussed in Chapter 8 to create two buttons that allow you to select and replace a word of text. The first block of code consists only of material discussed previously in this and prior chapters. Line 1 imports the RoundRectButton class, lines 3 through 11 create and setup a dynamic text field, and lines 12 through 28 create two buttons and add event listeners to trigger the functions at the end of the script.
Note
You can select text content with code when using either dynamic or input text fields.
1importcom.learningactionscript3.ui.RoundRectButton; 2 3vartxtFld:TextField=new TextField(); 4 txtFld.x= txtFld.y= 20; 5 txtFld.width= 500; 6 txtFld.autoSize=TextFieldAutoSize.LEFT; 7 txtFld.multiline=true; 8 txtFld.wordWrap=true; 9 txtFld.selectable=false; 10 txtFld.text="Lorem ipsum dolor sit amet, elit, sed."; 11addChild(txtFld); 12 13varselBtn:RoundRectButton = createButton("Select"); 14 selBtn.x= 300; 15 selBtn.y= 20; 16 selBtn.addEventListener(MouseEvent.CLICK, onSelectWord, 17false, 0,true); 18addChild(selBtn); 19 20varrepBtn:RoundRectButton = createButton("Replace"); 21 repBtn.x= 300; 22 repBtn.y= 60; 23 repBtn.addEventListener(MouseEvent.CLICK, onReplaceWord, 24false, 0,true); 25addChild(repBtn); 26 27functioncreateButton(labl:String):RoundRectButton { 28return newRoundRectButton(110, 20, 10, 2, 0x000099, 29 labl, 0xFFFFFF); 30 }
The new functionality is introduced in the pair of functions shown below. The first function, onSelectWord() in lines 31 through 34, defines the selection behavior. Line 32 selects characters bound by indices 6 and 11. Counting characters begins with 0, and the setSelection() method includes the first character up to, but not including the last character. So, in this example, the second word, “ipsum,” is selected. Setting the alwaysShowSelected property in line 33 to true ensures that the selection highlight remains visible even when the field no longer has focus. When false (the default), the selection highlight will disappear when the user interacts with any other part of the SWF.
31functiononSelectWord(evt:MouseEvent):void{ 32 txtFld.setSelection(6, 11); 33 txtFld.alwaysShowSelection=true; 34 }
The onReplaceWord() function replaces the selected word with another. The first line is a form of error check that ensures that a selection has been made. This prevents an error if the user clicks the second button before making a selection with the first button. The error is avoided by checking that the start and end of the current selection are not equal.
If, as a hypothetical example, you selected the first five characters of text in any field, the start of the selection would be different from the end of the selection. If, however, you made no selection, both values would be 0, and if you just clicked in the field without selecting any text, both values would reflect the caret, or text edit cursor, location. Either way, both values would be the same, allowing you to use this information to confirm an attempted selection.
If this error check passes, line 37 uses the replaceSelectedText() method to replace the previously selected text with the string argument of the method.
35functiononReplaceWord(evt:MouseEvent):void{ 36if(txtFld.selectionBeginIndex!= txtFld.selectionEndIndex) { 37 txtFld.replaceSelectedText("LOREM"); 38 } 39 }
Note
It’s also possible to select text field content interactively using mouse input. See the companion website, http://www.LearningActionScript3.com, for more information, specifically the post “Parsing Text Data with Mouse Interaction.”
Formatting Text
Now that you can create, style, and populate text fields, as well as select their contents, you’re ready to learn how to format the text the field contains. This is accomplished with another class called TextFormat. The process is to set up a TextFormat instance that controls all the desired formatting, and then apply that object to all or part of a field.
You can apply the object in two ways: by establishing it as the default format for the field, affecting all future input or by applying it on a case-by-case basis, affecting all or part of existing text. Only the application of the format varies in these cases. Creating the TextFormat instance is unchanged. In the upcoming example, we’ll create a source file that uses a format to style future text, and then we’ll modify that file to style text after it’s been added to the field.
Establishing a format for new text
In the following code, found in the text_format_1.fla source file, lines 1 through 7 create the format. It’s instantiated in line 1, and settings for font, color, size, leading (line spacing), left and right margins, and paragraph indent are established.
The font property is the name of the font you wish to use. The following syntax shows the use of a device font—a font that must be in the operating system of the user’s device (computer, handheld) to display correctly. System fonts can be specified by name, such as “Verdana,” but there’s no certainty that a user will have that particular font installed. To account for this variance, Flash Player can work with a user’s operating system to specify its default font (whatever that may be) in one of three categories.
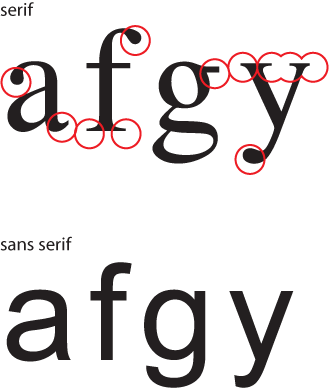
Using “_serif” for the font property will use a font with serifs—the flourishes usually found at the top and bottom of most characters, as shown in Figure 10-1. Typically this means Times or Times New Roman, but anyone can customize an operating system, so the actual font used isn’t guaranteed. All that’s reasonably sure to happen is that a serif font will be chosen. Using “_sans,” as in the following script, will specify a sans-serif font (without serifs), such as Arial or Helvetica. Finally, using “_typewriter” will specify a fixed-width font, in which all characters share the same width to ensure that they line up nicely. This usually means that Courier or Courier New will be used.
The color property is a hexadecimal color value in the 0xRRGGBB format. The size, leftMargin, and rightMargin properties are measured in pixels. The leading property is also measured in pixels but is based on the space between lines, rather than including the line height as in some typography-centric applications. For example, if you wanted 10-point type on 12-point leading, size would be set to 10 and leading would be set to 2. Finally, indent indents the first line of every paragraph by a measure of pixels.
Note
The blockIndent property (not used in this example), will indent the entire paragraph rather than the first line—typical when formatting block quotes in text display.
1vartxtFmt:TextFormat=new TextFormat(); 2 txtFmt.font="_sans"; 3 txtFmt.color= 0x000099; 4 txtFmt.size= 10; 5 txtFmt.leading= 4; 6 txtFmt.leftMargin= txtFmt.rightMargin= 6; 7 txtFmt.indent= 20;
Lines 8 through 13 create and setup a text field. Lines 14 though 18 apply the format to the field. Line 14 uses the defaultTextFormat() method to format future text. This must be applied while the field is empty, or it will have no effect. Lines 16 through 18 use a for loop and the appendText() method to add 25 words to the field, and line 19 adds the field to the display list.
8vartxtFld:TextField=new TextField(); 9 txtFld.x= txtFld.y= 20; 10 txtFld.width= 200; 11 txtFld.autoSize=TextFieldAutoSize.LEFT; 12 txtFld.multiline=true; 13 txtFld.wordWrap=true; 14 txtFld.defaultTextFormat= txtFmt; 15 16for(vari:Number= 0; i < 25; i++) { 17 txtFld.appendText("word"+String(i) +" "); 18 } 19addChild(txtFld);
Applying a format to existing text
If you need to format existing text, you must use the setTextFormat() method. This method can apply a TextFormat instance to an entire field just like the defaultTextFormat property, but only after the text has been added to the field. To format an entire field, the only argument you must supply to the method is the format you want to use:
txtFld.setTextFormat(txtFmt);To format selected text within the field, you can add two additional arguments to the method call, specifying the characters to be formatted. The first integer value is the starting character index and the second integer value is one more than the last character index. In other words, the span includes the character at the first index, but not the character at the second index.
The text_format_2.fla source file demonstrates this by adding the following new five lines of code to the prior example. Lines 20 through 23 create a new format that will style the changed text as red, bold, and underline, and lines 25 and 26 format the first and last word in the field. Line 25 formats from character 0 up to 5, to include “word0.” Line 26 uses the text field property length to determine the number of characters in the field and uses that value for the last index. The first index is 7 characters less to include the last characters added to the field, “word24 ”—created by line 17 of the last example in the Establishing a format for new text section.
Note
Remember that character counting starts with 0 and the length property tells you how many characters are actually in the field. So, if a text field contains five characters, the indices of the characters would be 0, 1, 2, 3, and 4, and the length of the field would be 5.
The setTextFormat() method uses an ending index one higher than the characters you want to format in order to support the use of the length property in the method’s last argument.
20vartxtFmt2:TextFormat=new TextFormat(); 21 txtFmt2.color= 0xFF0000; 22 txtFmt2.bold=true; 23 txtFmt2.underline=true; 24 25 txtFld.setTextFormat(txtFmt2, 0, 5); 26 txtFld.setTextFormat(txtFmt2, txtFld.length-7, txtFld.length);
Adding text after using setTextFormat()
One important issue is worthy of note when adding text to a field after applying a format with setTextFormat(). Using the recommended appendText() method to add text to a field will maintain the formatting of the last character as expected. Using the compound assignment operator (+=) to add text, however, will reset the field to its default text format. As a proof of concept, add the following lines to the end of the current example (or look at text_format_3.fla), and test your file twice, using each line in turn.
27 txtFld.appendText("new"); 28//txtFld.text += "new";
Using the first line, the extra word, “new” will be red, bold, and underlined because that’s the format when the text was added. Commenting out line 27 and using line 28, however, will remove all the red, bold, underline formatting from the field because the field will revert to its default format.
Note
As a nicety, Flash Professional will warn you that using the compound assignment operator (+=) is slower than using the appendText() method.
Tab Stops
Another handy feature made possible by the TextFormat class is tab stops. If you find formatting text columns difficult using the Flash Professional interface, you’ll be relieved to find how easy it can be to create simple columns with tab stops using ActionScript. The next example uses the TextFormat class to set two tab stops so that text including tab characters will line up at these stops, forming columns. See file text_format_4.fla to try this yourself.
Note
At the end of this chapter, we’ll show you a way to create true column-based layouts using a new Flash Platform text technology. Unlike simple tab-based columns, text using this technology can flow into columns, wrap from one column to the next, and adjust when the text is changed.
Let’s get to the code. The first 13 lines of this script include only previously discussed material—creating and configuring TextFormat and TextField objects. We didn’t include the tab stops in the format initially, because we want to show you how to edit and use a TextFormat object after it’s been created. Take a look at the setup first, and then we’ll discuss the application of the tab stops:
1vartxtFmt:TextFormat=new TextFormat(); 2 txtFmt.font="_sans"; 3 txtFmt.size= 10; 4 txtFmt.leading= 4; 5 txtFmt.leftMargin= txtFmt.rightMargin= 6; 6 7vartxtFld:TextField=new TextField(); 8 txtFld.x= txtFld.y= 20; 9 txtFld.width= 400; 10 txtFld.autoSize=TextFieldAutoSize.LEFT; 11 txtFld.border= txtFld.background= true; 12 txtFld.multiline= txtFld.wordWrap= true; 13 txtFld.defaultTextFormat= txtFmt;
Lines 14 through 17 populate the field, txtFld, which you just set up in lines 7 through 13. Notice the inclusion of the escape character in line 15. Its backslash prevents this character from being understood as the letter “t.” Instead, it’s interpreted as a tab. Another escape character,
, appears in line 16. In this case, the “n” is a new line character, moving the new text insert point down to the next line in the field. Therefore, each time through the loop, new text is added on a new line.
All we need to do now is add our tab stops to ensure that the columns line up nicely. These are applied in line 20, using an array of pixel values to indicate the location of each tab stop. We applied this property later, in line 20, for demonstration purposes. You may go back and edit a TextFormat instance at any time. After you make such a change, however, you must reapply the format to the text field, as seen in line 21, for the change to be reflected in the field.
14for(vari:Number= 0; i < 10; i++) { 15 txtFld.appendText("product: "+String(i) +" in stock: "16 +"yes "); 17 } 18addChild(txtFld); 19 20 txtFmt.tabStops= [120, 200]; 21 txtFld.setTextFormat(txtFmt);
Using Embedded Fonts
Up to this point, we’ve been using system fonts in our examples. When a custom font is required, you must embed that font to ensure that it displays properly on all machines. Embedding adds just enough vector information to the SWF for the Flash Player to display the font, even if it’s not in a user’s operating system. The embedding process has changed through the evolution of Flash Professional, so we’ll cite versions where appropriate.
Flash Professional CS3 and CS4
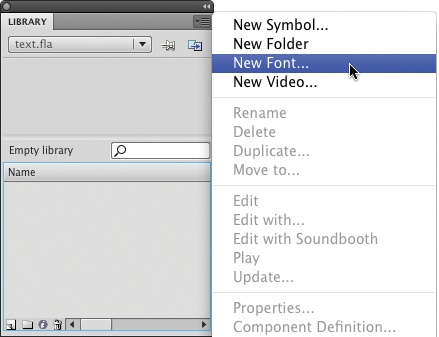
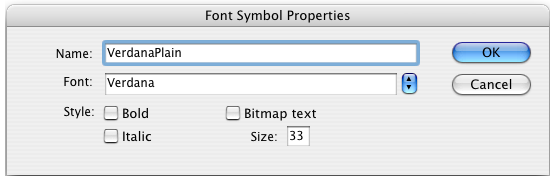
The first step to embedding a font in Flash Professional CS3 or CS4 is to create a new font symbol from the Library panel’s menu, seen in Figure 10-2. In the resulting Font Symbols Properties dialog—Figure 10-3 (CS3) and Figure 10-4 (CS4)—choose the font and font style you wish to embed.
In Flash Professional CS3, you select the bold, italic, or combination bold/italic styles by using the checkboxes below the font name (see Figure 10-3). In Flash Professional CS4, support for font families was introduced. You select these styles using the font family’s dedicated bold, italic (oblique), or bold/italic font in the Style menu. Older fonts that don’t have individual style variants may support the checkboxes for faux bold and italic found below the Style menu.
Note
Flash Professional CS3 did not support proper style fonts, instead decorating a plain version of the font with faux styles by strengthening or skewing the outlines (for bold and italic, respectively).
Each font symbol can style text in a preset manner only: plain, bold, italic, or a combination thereof, and they can’t be combined at runtime. So, to include separate bold and italic font styles, for example, you need a font symbol for bold and a font symbol for italic.
As with other symbols, such as movie clips, we need to use a linkage class to instantiate a font symbol. So the name of the symbol itself should be useful and descriptive, but need not follow any specific conventions. When creating a linkage class, on the other hand (using the same Library menu shown in Figure 10-2), the class name should follow the same naming conventions applied to other classes throughout earlier chapters. For example, the name should contain no spaces and start with a capital letter. Figure 10-4 shows a class name for the font symbol in the exercise we’re building, VerdanaPlain.
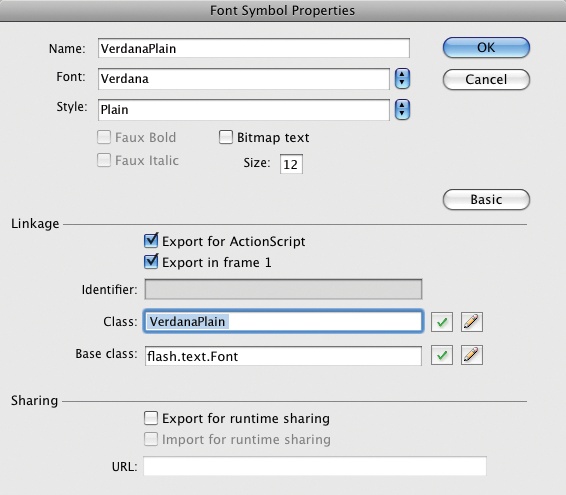
In both Flash Professional CS3 and CS4, the Linkage information can be found in the Font Symbol Properties dialog, accessed from the Library menu after the Font symbol has been created.
Flash Professional CS5
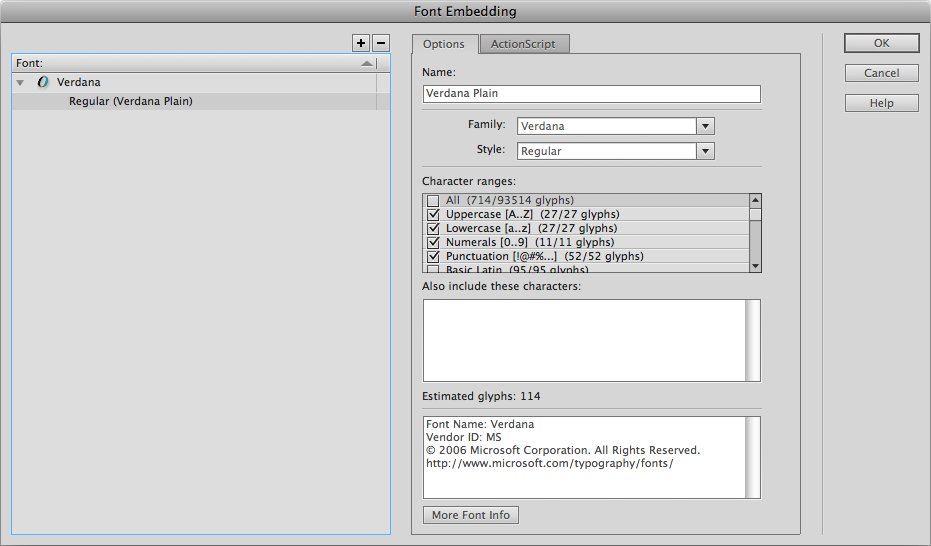
The process for embedding fonts in Flash Professional CS5 has been improved and simplified. All of the steps discussed in the CS3/CS4 section are accessed in one dialog box in version CS5. This dialog box is accessed by the Text✓Font Embedding menu command. Figure 10-5 shows the Options tab of this dialog box. At the top, selecting a font is similar to the process used in CS4, choosing a name, picking a family, and selecting a style.
As of CS5, however, you can specify which glyphs (characters) should be embedded with the font, just like you can when you embed fonts into a specific text field using the Flash Professional Properties panel. This allows you to select only a subset of the glyphs in a particular font family, which reduces file size. In Figure 10-5, only uppercase, lowercase, numerals, and punctuation characters are being embedded.
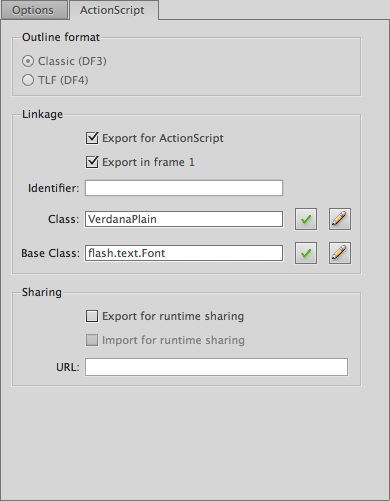
Next to the Options tab in the dialog box is the ActionScript tab, as shown in Figure 10-6. Under this tab, you can export for ActionScript use and set a linkage class name, as is possible in previous versions of Flash Professional. At the top of this dialog box, you’ll notice an Outline format section with options for Classic and TLF text. Classic text includes dynamic and input text fields, and TLF is a new text field type that stands for Text Layout Framework, which we’ll discuss at the end of the chapter. If you embed an OpenType or TrueType font, you can choose the appropriate outline format for the kind of field you intend to use: Classic for Classic text fields, and TLF for Text Layout Framework fields.
Regardless of which version of Flash Professional you use, you end up with the same thing at this point: a Font Symbol that can be instantiated at runtime using ActionScript.
ActionScript
Once your symbol has been embedded and given a linkage name, you’re ready to use it in a TextFormat instance. The following code, found in the embed_font.fla source file, uses embedded fonts and the VerdanaPlain font symbol created in the previous sections. Line 1 instantiates the font symbol, and line 4 applies the embedded font to the font property of the text format. This is a very important step because it can be counterintuitive. You can’t set the property to the class or instance reference from line 1, and you can’t use a string, like “Verdana.” You must specify the fontName property of the font symbol instance. Finally, line 14 sets the embedFonts property to true.
1varverdanaPlain:Font=newVerdanaPlain(); 2 3vartxtFmt:TextFormat=new TextFormat(); 4 txtFmt.font= verdanaPlain.fontName; 5 txtFmt.size= 8; 6 txtFmt.bold=true; 7 8vartxtFld:TextField=new TextField(); 9 txtFld.x= txtFld.y= 20; 10 txtFld.width= 300; 11 txtFld.defaultTextFormat= txtFmt; 12 txtFld.text="Hello World!"; 13 txtFld.selectable = false; 14 txtFld.embedFonts=true; 15addChild(txtFld);
Using Custom Anti-Aliasing
Once you use an embedded font, you can take advantage of custom anti-aliasing options. By setting the antiAliasType property to ADVANCED using the AntiAliasType class, you can control the thickness of the text (using a range of −200 to 200, thinner to thicker) and its sharpness (using a range of −400 to 400, blurrier to sharper). Custom anti-aliasing can be used on any type size and is one way to achieve an effect that is more pronounced than a plain font, but not quite as strong as a bold font. It’s also good for softening the edges of fonts to better meld with background art, and it’s particularly useful for improving the legibility of small type sizes.
The following code, when added to the example in the prior section, will adjust the text to maximum thickness and a little less sharp. This adaptation is found in the embed_font_custom_anti-alias.fla source file.
1 txtFld.antiAliasType=AntiAliasType.ADVANCED; 2 txtFld.thickness= 100; 3 txtFld.sharpness= −100;
Note
Although it may sound strange, assets are often easier on the eye when their edges are softened a bit. It’s quite common, for example, to apply a very slight blur to shapes, text, and even video (during the compression process). There are a few ActionScript features that will do this for you automatically, such as the image smoothing option, which will soften images by a preset amount.
How different people see text is too varied to rely on a single preset of this kind, so ActionScript’s custom anti-aliasing features allow you to tweak the appearance of the text to your liking.
Note
The embed_font_custom_anti-alias_click.fla source file adapts this further by toggling between custom anti-alias settings with a mouse click. It applies a subtle setting to show the improved legibility that custom anti-aliasing can bring to small font sizes.
Formatting with HTML and CSS
The TextFormat class is great for case-by-case uses. But managing a large ActionScript project this way might become unwieldy if several formats are required and all must be manually applied. An alternative to this approach is to use HTML and CSS to style the project globally.
Note
This material assumes you are familiar with HTML and CSS. For more information, see http://en.wikipedia.org/wiki/HTML and http://en.wikipedia.org/wiki/CSS for background and additional resource links.
Hypertext Markup Language (HTML)
Flash supports a limited subset of HTML tags, as seen in Table 10-1.
HTML Tag | Notes |
| Supported attributes include: |
| Bold version of font must exist to work. |
| Italic version of font must exist to work. |
| Underlines text. |
| Supported attributes include: |
|
|
|
|
| All lists are bulleted; ordered and unordered qualifiers are ignored. |
| Supported attributes include: |
| Supported attributes include: |
| Used to apply a limited subset of |
To use HTML in a text field, you need only switch from using the text property to using the htmlText property. For example, the following code will put the word “ActionScript,” in bold, into a text field:
txtFld.htmlText="<b>ActionScript</b>";
If you are seeing unexpected results, you should look closely at Table 10-1 for anything that might vary from what you have written, and to ensure Flash-specific requirements have been fulfilled for a particular tag to function. For example, it should make sense that line breaks (through use of <p> or <br> tags) require a multiline field, because you can’t have a line break if more than one line isn’t supported. However, it may not be obvious that <ol> and <ul> have no effect on list items, resulting in bullets for all lists.
Note
The efficient appendText() method does not work with HTML, so you must use traditional compound addition (+=) to append HTML text to a field.
CSS
ActionScript also supports a limited subset of CSS properties, as seen in Table 10-2. Style sheets require a bit more setup than just using the htmlText property to populate fields. We’ll begin by demonstrating how to create style objects with code, and then the last section of the chapter will describe how to load both the HTML and CSS data from external files.
The process of building a style sheet involves creating an instance of the StyleSheet class, and then adding styled objects for each tag or class to the instance. For each tag or class, you create a custom object to which the relevant CSS properties are added. Once complete, each object is associated with the tag or class and added to your style sheet using the setStyle() method.
In the following example, seen in html_css.fla, line 1 creates the style sheet, lines 3 through 21 create styles for the body HTML tag, heading CSS class, byline CSS class, and a (anchor) HTML tag respectively. Finally, lines 23 through 26 add each style to the css instance of the StyleSheet class.
1varcss:StyleSheet=new StyleSheet(); 2 3varbody:Object=new Object(); 4 body.fontFamily="Verdana"; 5 body.textIndent= 20; 6 7varheading:Object=new Object(); 8 heading.fontSize= 18; 9 heading.fontWeight="bold"; 10 heading.textIndent= −20; 11 heading.letterSpacing= 1; 12 heading.color="#FF6633"; 13 14varbyline:Object=new Object(); 15 byline.fontSize= 14; 16 byline.fontStyle="italic"; 17 byline.textAlign="right"; 18 19vara:Object= newObject(); 20 a.color="#990099"; 21 a.textDecoration="underline"; 22 23 css.setStyle(".heading", heading); 24 css.setStyle(".byline", byline); 25 css.setStyle("body", body); 26 css.setStyle("a", a);
The remainder of the script creates and sets up a text field, and then populates it with HTML. Remember, the appendText() method will not work when using the htmlText property. Instead, you must use the compound assignment operator for addition.
More importantly, however, we must stress that the style sheet must be applied before the HTML is added to the field. If you don’t follow this rule, the style sheet won’t be applied. In this example, the style sheet is applied in line 33, before the HTML is added to the field beginning at line 34.
27vartxtFld:TextField=new TextField(); 28 txtFld.x= txtFld.y= 20; 29 txtFld.width= 500; 30 txtFld.autoSize=TextFieldAutoSize.LEFT; 31 txtFld.multiline=true; 32 txtFld.wordWrap=true; 33 txtFld.styleSheet= css; 34 txtFld.htmlText="<body>"; 35 txtFld.htmlText+="<span class='heading'>ActionScript 10.0 AddsTime Travel</span><br><br>"; 36 txtFld.htmlText+="<span class='byline'>by Walter Westinghouse</span><br><br>"; 37 txtFld.htmlText+="<p>January 1, 2015. The rumors swirling aroundthe tech community recently have been confirmed today as lead FlashPlayer engineer, Dr. Eldon Tyrell, announced that ActionScript 10.0will support time travel. Ever since the concept of time travel waspopularized by H. G. Wells in 1895, humans have yearned for theability to travel through time, and now it's a reality.</p><br>"; 38 txtFld.htmlText+="<p>Flash Player QA lead Roy Batty, agreed."We're happy to add this feature to human BioChips everywhere usingthe standard Express Install Opt-In process. Flash Player has longbeen a leader in bringing immersive experiences to humans. Justsearch <a href="http://www.google.com" target="_blank">Google</a> for your favorite feature and you'll likely find that it'ssupported."</p><br>"; 39 txtFld.htmlText+="<p>Users of the antiquated "desktop computing"model can't take advantage of this feature, nor can users of therecently standardized HTML5.</p>"; 40 txtFld.htmlText+="</body>"; 41addChild(txtFld);
Escaping quotation marks
Finally, note that lines 38 and 39 contain quotes within quotes. This would ordinarily be a problem because the second quotation mark would balance the first quotation mark and close a string. Typically, prematurely closing a string will cause a syntax error of some kind, but it virtually always results in unexpected behavior.
However, this file has no problem because the nested quotes have been escaped just like the tab and new line characters in the Tab Stops section of this chapter. The backslashes, when used as part of a string, prevent the characters from functioning like quotation marks and make them behave instead like any other character. It’s also possible to nest single quotes within double quotes when a double-quote is not required. This is demonstrated in lines 35 and 36.
Triggering ActionScript from HTML Links
In addition to supporting standard HTML links, ActionScript can trigger functions from anchor tags. Simply replace the Internet protocol http:// with event: and ActionScript will fire a TextEvent.LINK event that can trigger a listener function.
Note
If you are familiar with prior versions of ActionScript, the event: protocol replaces the asfunction: protocol.
The following example, seen in text_event_link.fla, shows both a conventional http:// link and ActionScript event: link in action. The traditional link is in line 10. The ActionScript event: link is in line 12. The link is still constructed using the anchor tag and href attribute but, instead of pointing to a URL, a string is specified—in this case, “showMsg.” An event listener is added to the field in line 11, listening for the TextEvent.LINK event.
When a user clicks the conventional link, the normal behavior ensues automatically. Flash Player launches or switches to the default browser and navigates to the site. However, when the user clicks the “Show Message” link, the listener traps the event and calls the linkHandler() function, passing the link information into the argument. To demonstrate one way to handle many links, a conditional queries the text passed in from the event. If the incoming text matches a specific string, the listener traces a message to the Output panel.
1vartxtFmt:TextFormat=new TextFormat(); 2 txtFmt.size= 18; 3 txtFmt.bullet=true; 4 txtFmt.color= 0x990099; 5 6vartxtFld:TextField=new TextField(); 7 txtFld.autoSize=TextFieldAutoSize.LEFT; 8 txtFld.multiline=true; 9 txtFld.defaultTextFormat= txtFmt; 10 txtFld.htmlText = "<a href='http://www.google.com'>Search</a>"; 11 txtFld.htmlText = "<br />"; 12 txtFld.htmlText += "<a href='event:showMsg'>Show Message</a>"; 13 txtFld.addEventListener(TextEvent.LINK, linkHandler, 14 sfalse, 0,true); 15addChild(txtFld); 16 17functionlinkHandler(evt:TextEvent):void{ 18if(evt.text=="showMsg") { 19trace("Dynamic links are useful"); 20 } 21 }
Now we come again to a point where you should stretch the mental muscles and try to take what you’ve learned one step further. The first topic of this section will give you a peak at what we’ll be covering in Chapter 13: loading external assets. You’ll learn how to load and apply external HTML and CSS files.
The second topic of this section will give a brief overview of the new Text Layout Framework that brings some advanced typographic support to ActionScript. We’ll list a few pros and cons of this new technology and then show you a few examples of how to use TLF fields that differ from uses of ordinary text fields.
Loading HTML and CSS

This exercise uses the same HTML, CSS, and some of the ActionScript from the prior HTML and CSS example but loads the content from external files. We’ll discuss loading again in Chapter 13, but here we’ll just focus on loading text files.
The assets you’ll need for this exercise are included with the source code from the companion website, but here are the setup files in case you wish to recreate them on your own. The following files should go in the same directory as your host .fla file. In case you want to try the sample files, they’re found in the LoadHTMLCSS_Example directory of the source archive, and the FLA uses the class as a document class.
HTML (demo.html)
<body>
    <p class='heading'>ActionScript 10.0 Adds Time Travel</p>
    <p class='byline'>by Walter Westinghouse</p>
    <p>January 1, 2015. The rumors swirling around the tech
       community recently have been confirmed today as lead
       Flash Player engineer, Dr. Eldon Tyrell, announced that
       ActionScript 10.0 will support time travel. Ever since
       the concept of time travel was popularized by
       <a href="event:author of early science fiction novel,
       The Time Machine">H. G. Wells</a> in 1895, humans have
       yearned for the ability to travel through time, and now
       it's a reality.
    </p>
    <p>Flash Player QA lead Roy Batty, agreed. "We're happy to
       add this feature to human BioChips everywhere using the
       standard Express Install Opt-In process. Flash Player has
       long been a leader in bringing immersive experiences to
       humans. Just search <a href="http://www.google.com"
       target="_blank"> Google</a> for your favorite feature and
       you'll likely find that it's supported."
    </p>
    <p>Users of the antiquated "desktop computing" model can't
       take advantage of this feature, nor can users of the
       recently standardized HTML5.
    </p>
</body>
Note
When text resides in an external file and you’re not assigning strings to variables in ActionScript, nested quotes are typically not a problem and don’t have to be escaped with a backslash character.
body {
    font-family: Verdana;
    text-indent: 20px;
}

.heading {
    font-size: 18px;
    font-weight: bold;
    text-indent: −20px;
    letter-spacing: 1px;
    color: #FF6633;
}

.byline {
    font-size: 14px;
    font-style: italic;
    text-align: right;
}

a:link {
    color: #000099;
    text-decoration: underline;
}

a:hover {
    color: #990099;
}
ActionScript (LoadHTMLCSS_Eample.as)
Loading HTML and CSS from external files requires use of the URLLoader and URLRequest classes. The loading process is the same for both HTML and CSS, so we’ll focus on one and discuss the other briefly. You’ll also use the Event.COMPLETE event to continue after the loading is complete.
Lines 1 through 12 set up the class by creating the package, importing required classes, and creating the class. Lines 14 through 17 create four private properties that reference two loaders, the CSS data, and a text field used to display a definition when the user clicks on a term in a link.
1package{ 2 3import flash.display.MovieClip; 4import flash.events.Event; 5import flash.events.TextEvent; 6import flash.net.URLLoader; 7import flash.net.URLRequest; 8import flash.text.StyleSheet; 9import flash.text.TextField; 10import flash.text.TextFormat; 11 12public classLoadHTMLCSS_Exampleextends MovieClip{ 13 14private var_cssFile:URLLoader; 15private var_htmlFile:URLLoader; 16private var_css:StyleSheet; 17private var_definitionField:TextField;
The constructor sets up the CSS loading, so we’ll focus on that in detail. Line 19 creates an instance of the URLLoader class that you can monitor. Lines 20 through 22 add a listener to that instance, which calls the onLoadCSS() function when the load is complete. Line 23 creates an instance of the URLRequest class for the URL that points to our external CSS file. A URLRequest object is used for all loads and allows for consistent handling of URLs throughout ActionScript 3.0. Line 24 loads the CSS.
18//constructor19public functionLoadHTMLCSS_Example() { 20 _cssFile =new URLLoader(); 21 _cssFile.addEventListener(Event.COMPLETE, onLoadCSS, 22false, 0,true); 23varreq:URLRequest=new URLRequest("demo.css"); 24 _cssFile.load(req); 25 }
When the CSS document loads, the function in the following code block is called. Line 28 creates a new StyleSheet instance, and line 29 parses the CSS data sent to the listener function. Note the use of the data property to retrieve this information from the event’s target (in this case, the cssFile instance responsible for the loading). The style sheet is now ready to be applied, but neither the HTML nor the text field exist yet.
Next on the to-do list is the exact same procedure for the HTML file. Line 30 creates the URLLoader instance, a listener is added to the instance in lines 31 and 32, a URLRequest instance is created in line 33, and the file is loaded in line 34.
Note
Even though the req variable appears in the constructor function, it can be reused without concern because declaring a variable inside a function makes the variable local to that function.
26//loading style sheet27private functiononLoadCSS(evt:Event):void{ 28 _css =new StyleSheet(); 29 _css.parseCSS(evt.target.data); 30 _htmlFile =new URLLoader(); 31 _htmlFile.addEventListener(Event.COMPLETE, onLoadHTML, 32false, 0,true); 33varreq:URLRequest=new URLRequest("demo.html"); 34 _htmlFile.load(req); 35 }
Once the HTML is fully loaded (triggering the listener function in the following code block), it’s put into the htmlString variable (line 38). In line 40, a text field is created that will hold the body copy from the story in the loaded HTML. Lines 41 through 52 do nothing that we haven’t already covered, but it warrants repeating that the CSS is applied before the HTML is added to the field (lines 47 and 48, respectively). Also, a listener is added to trap any link-based ActionScript triggered by an HTML anchor tag’s event: protocol. This event will be used to show a definition of a term clicked on in the main body text.
Lines 54 through 57 create a TextFormat instance to format any definition displayed, and lines 59 through 66 create the field to hold that definition. The last thing the function does is clean up a bit by removing the listeners from the two URLLoader instances, because everything has loaded successfully at that point in the code.
The last functions in the class, onTextEvent() places the definition sent by any event: link click to the _definitionField text field.
36//loading html37private functiononLoadHTML(evt:Event):void{ 38varhtmlString:String= evt.target.data; 39 40varstoryField:TextField=new TextField(); 41 storyField.x= storyField.y= 20; 42 storyField.width= 500; 43 storyField.height= 330; 44 storyField.multiline=true; 45 storyField.wordWrap=true; 46 storyField.selectable=false; 47 storyField.styleSheet= _css; 48 storyField.htmlText= htmlString; 49 storyField.addEventListener(TextEvent.LINK, 50 onTextEvent, 51false, 0,true); 52addChild(storyField); 53 54vardefinitionFormat:TextFormat=new TextFormat(); 55 definitionFormat.font="_sans"; 56 definitionFormat.size= 12; 57 definitionFormat.italic=true; 58 59 _definitionField =new TextField(); 60 _definitionField.x= 20; 61 _definitionField.y= 360; 62 _definitionField.width= 500; 63 _definitionField.height= 20; 64 _definitionField.mouseEnabled=false; 65 _definitionField.defaultTextFormat=definitionFormat; 66addChild(_definitionField); 67 68 _cssFile.removeEventListener(Event.COMPLETE, 69 onLoadCSS); 70 _htmlFile.removeEventListener(Event.COMPLETE, 71 onLoadHTML); 72 } 73 74private functiononTextEvent(evt:TextEvent):void{ 75 _definitionField.text= evt.text; 76 } 77 } 78 }
With this exercise as a basis for future work, you can control the text formatting for very large projects by applying a project-wide CSS document to every applicable text field. This also makes your development process much easier because you can edit the external CSS file and its styles will be updated everywhere the file is used. The document in Figure 10-7 was created using external HTML data and formatted using a CSS document.

Text Layout Framework
Integrated in Flash Professional CS5 and Flash Builder 4, a new text mechanism called Text Layout Framework (TLF) brings unprecedented control over type to the Flash Platform. TLF requires Flash Player 10 and the following are just a few of things that TLF offers:
Added character styles including subscript, superscript, underline, strikethrough, case conversion, enhanced leading, ligatures, highlight color, and more.
Added paragraph styles including multicolumn support with gutter width, last line justification options, enhanced margins and indents, paragraph spacing, padding, and more.
Text flow across multiple linked text containers.
Support for alpha and rotation transformations when using device fonts.
Support for 3D rotation, color effects, and blend modes without first placing the field into a movie clip or sprite.
Support for right-to-left text for languages like Arabic and Hebrew.
Support for bidirectional text, or right-to-left text that can contain elements within it that flow left-to-right. This is important for embedding English words or numbers within Arabic or Hebrew text, for example.
Along with TLF’s extensive feature set comes complexity. We want to stress that we consider TLF to be an intermediate to advanced feature, depending on how deeply you want to delve into its inner workings. Documentation, in particular, is still in its infancy. However, we thought it important to discuss TLF in this book because it offers several useful text features not supported by the traditional Flash Platform text technology (now called Classic text, and covered throughout this chapter).
Note
TLF was first introduced to Flash Professional users in beta format as a component for Flash Professional CS4 and to other ActionScript editors (such as Adobe’s Flash Builder 4 and Powerflasher’s FDT) via the beta version of the Flex 4 SDK.
At the time of this writing, it’s still available on Adobe Labs: http://labs.adobe.com/technologies/textlayout/. However, there is no guarantee that it will remain available for Flash Professional CS4, nor is it certain that the beta release is stable enough to use in production.
If you are interested in using TLF, we recommend using Flash Professional CS5, Flash Builder 4, or another editor built around the release version of the Flex 4 SDK.
For basic use, the ActionScript syntax for creating and manipulating TLF fields is very similar to that of Classic text fields, so we’ll avoid straight repetition wherever possible. For the following exercises, we’ve chosen a practical subset of TLF’s features that are likely to be useful in a variety of situations and apply to the widest range of possible users. We’re just discussing the tip of the proverbial iceberg, however. Please consider this section an introduction to TLF—a trial run that will, at best, encourage you to explore additional capabilities and, at minimum, provide you with a set of code blueprints that you can adapt for your own use.
Rotating device fonts
Using Classic text fields, rotating a field will cause device fonts to disappear. The workaround for this issue is to embed the font in your SWF—after which the text will display correctly. The problem is, every font symbol you embed contributes to file size, and adding TLF fields to your files requires only a one-time file size increase for each user (which we’ll discuss at the end of this section). So, if you intend to use many device fonts, or even several variants of a small number of device fonts, you may be better served by using TLF.
The following code, found in the tlf_rotation.fla source file demonstrates rotation of both Classic and TLF text fields. The Classic field is positioned at x, y coordinates (20, 20), and the TLF field is placed at (100, 100). In the former case, the rotation causes the device font text to disappear. However, the same device font used in the TLF field remains visible.
1import fl.text.TLFTextField; 2 3vartxtFld:TextField=new TextField(); 4 txtFld.x= txtFld.y= 20; 5 txtFld.text="Hello World!"; 6 txtFld.rotation= 45; 7addChild(txtFld); 8 9vartlfFld:TLFTextField=new TLFTextField(); 10 tlfFld.x= tlfFld.y= 100; 11 tlfFld.text="Hello World!"; 12 tlfFld.rotation= 45; 13addChild(tlfFld);
Improved typographic controls
In many ways, the core of the Text Layout Framework is the TextFlow class (contained in the flashx.textLayout.elements package provided by Adobe) and its TextFlow markup syntax. TextFlow markup is a bit like a cross between XML and HTML. It’s structured like XML but has predefined tags and attributes, and controls display features. Manipulating this class is your ticket to improved typographic control, columnar layout, and more.
Although you can populate a TextFlow instance incrementally using string input, it requires creating each paragraph, span, and so on individually with a collection of classes and a fair amount of additional syntax. Sometimes it’s simpler to write the TextFlow content as one string containing markup syntax, which is structured much like HTML. Understanding the syntax is not difficult, but explaining HTML-style syntax is outside the scope of this book.
Note
See the post “Building a TLF TextFlow” at the companion website for an example of writing TextFlow content incrementally.
Unfortunately, no clear documentation of the TextFlow markup syntax currently exists. At the time of this writing, Adobe recommends an understanding of TextFlow markup tags (Table 10-3) to learn how to structure the content and consulting the documentation of the TextLayoutFramework class (http://help.adobe.com/en_US/FlashPlatform/reference/actionscript/3/flashx/textLayout/formats/TextLayoutFormat.html) to learn how to lay out and format the content within the field.
Element | Notes |
| A division of text; can contain only |
| A paragraph; can contain any element except |
| A break character; text continues on the next line but does not start a new paragraph |
| A hypertext link (anchor); can contain |
| A run of text in a paragraph; cannot contain other elements |
| An image in a paragraph element |
| A tab character; (not included in this chapter’s examples) |
| A run of horizontal text, used within vertical text (such as Japanese) used, for example, to include English text within Japanese text. can contain the |
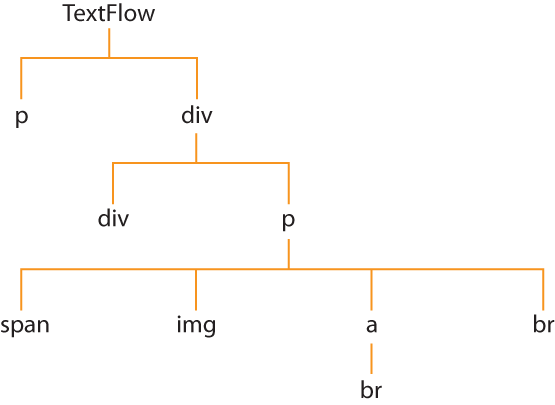
Figure 10-8 shows the hierarchical relationship among TextFlow elements, which is also illustrated in the following sample markup structure.
<div>
    <p>
       text<br />
       <a>link text</a>
    </p>
    <p>
       <span>text</span><br />
       <img />
    </p>
</div>
Div elements (div) can be used to organize copy into separate sections and commonly apply block styling that might apply to multiple paragraphs. Paragraph elements (p) are used (unsurprisingly) to define discrete paragraphs and contain paragraph-wide styling. They need not be limited to text, however. It’s common, for example, to enclose images (img) or lists of links (a) in paragraph tags, as shown previously. Span elements are used to style segments of a paragraph because they don’t force a line break. Finally, if a line break (br) is desired, you can add them anywhere within a paragraph or link element.
Note
Elements without a balancing closing tag, such as img and br, must be applied as self-closing tags to conform to XML specifications. This means you must add a slash as the last character inside the tag: <br />.
Table 10-4 describes a selection of TextFlow formatting options, all of which are used in the following example.
Element | Notes |
| Font family; can contain a comma-separated list of font families; the first font in the list found will be used. |
| Font size from 1 to 720, or |
| Font weight; values include |
| Font style; values include |
| Case; values include |
| Underline; values include |
| Color in string hexadecimal format (#FF0000 for red, for example). |
| Character strike-through; values include |
| Text alignment; values include |
| Opacity from 0 to 1 and |
| Letter spacing in pixels or percent of font size (with % symbol), and |
| Character rotation; values include |
| Leading in pixels (−720 to 720), percent of font size (−1000 to 1000, with % symbol), or |
| Distance from baseline in pixels (−1000 to 1000) percent of font size (−1000 to 1000 with % symbol), |
| Aligns baseline of specified text to baseline; values include |
The following code is found in the tlf_typography.fla source file. It demonstrates many of the most common formatting options used in a TextFlow string, including some of those listed in Table 10-4. This example shows the simplest way to apply a TextFlow string to a TLFTextField class instance. The field’s tlfMarkup property will automatically populate the field’s internal TextFlow instance without first having to process the incoming string. Figure 10-10 shows the outcome of this file.
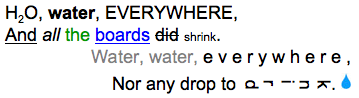
Note
The text in this example is a modified excerpt of “The Rime of the Ancient Mariner” by Samuel Taylor Coleridge.
1import fl.text.TLFTextField; 2 3vartlfTxt:TLFTextField=new TLFTextField(); 4 tlfTxt.x= tlfTxt.y= 100; 5 tlfTxt.width= 350; 6 tlfTxt.multiline=true; 7 tlfTxt.wordWrap=true; 8 tlfText.selectable= false; 9addChild(tlfTxt); 10 11 tlfTxt.tlfMarkup="<TextFlow xmlns='http://ns.adobe.com/textLayout/2008' fontFamily='Arial' fontSize='18'><div><p>H<spanbaselineShift='subscript' alignmentBaseline='descent'>2</span>O, <span fontWeight='bold'>water</span>, <span typographicCase='uppercase'>everywhere</span>,<br /><spantextDecoration='underline'>And</span> <span fontStyle='italic'>all</span> <span color='#009900'>the</span> <a href='http://en.wikipedia.org/wiki/The_Rime_of_the_Ancient_Mariner'>boards</a> <span lineThrough='true'>did</span> <span fontSize='12'>shrink</span>.</p></div><p textAlign='right'><span textAlpha='0.5'>Water,water,</span> <span trackingRight='5'>everywhere</span>,<br/><span lineHeight='150%'>Nor any drop to</span> <spantextRotation='rotate90' baselineShift='10'>drink</span>. <imgwidth='10' height='16' source='water_drop.jpg' /></p></TextFlow>";
One side effect of this approach, however, is that the TextFlow instance is tied to the field. In the last example of the chapter, we’ll look at an alternative approach that creates an independent TextFlow instance first, and then translates a string to populate it.
Note
If when testing your file you get no errors but the text does not display, check the syntax of your TextFlow string. Look for single tags that are not self-closing (<br>, for example), tags that are not balanced (such as a <span> with no </span>), incorrect or misspelled format properties, and improperly nested tags (such as text within a <div> rather than within a <p> inside that <div>).
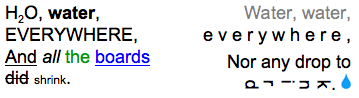
Columnar layout
The following code, found in tlf_columns.fla, builds on the prior source file. Adding this code to the end of the prior example provides a simple demonstration of columnar layout. Arranging TLF text in columns requires direct manipulation of a TextFlow instance. In the prior example, however, working directly with a TextFlow instance was not required, thanks to the field’s tlfMarkup property. This code demonstrates a simple way of gaining access to a populated TLF field’s TextFlow instance through its textFlow property:
12//addition to previous example13import flashx.textLayout.elements.TextFlow; 14 15vartlfTextFlow:TextFlow= tlfTxt.textFlow; 16 tlfTextFlow.columnCount= 1; 17 tlfTextFlow.columnGap= 30; 18 19stage.addEventListener(MouseEvent.CLICK, onClick,false, 0,true); 20functiononClick(evt:MouseEvent):void{ 21if(tlfTextFlow.columnCount== 1) { 22 tlfTextFlow.columnCount= 2; 23 }else{ 24 tlfTextFlow.columnCount= 1; 25 } 26 tlfTextFlow.flowComposer.updateAllControllers(); 27 }
Line 13 adds an import statement for the TextFlow class. Line 15 creates a TextFlow instance by referencing the field’s textFlow property. All that remains is to set the columnCount and, optionally, the columnGap properties. In this example, a mouse click will change the column count at runtime to demonstrate the automatic reflow of text. Line 16 sets the initial number of columns to 1, to match the appearance of the prior example. Line 17 sets the gap between columns to 30 pixels. This has no immediate effect on the layout of the text.
Note
Although code is consolidated in this book into logical blocks, import statements can be moved to the top of the collected script if you prefer. This optional edit will organize all your import statements in one place for clarity but will not affect the file in any other way.
However, lines 19 through 27 create a mouse click listener and add it to the stage. With each mouse click, the conditional beginning in line 20 checks the number of columns in the field and toggles between 1 and 2 columns. Finally, Line 26 instructs the flow composer (which controls the flow of text) of the TextFlow instance to update the text flow of the field. Because the field is already populated, the layout reflows between 1 and 2 columns on the fly. Figure 10-11 shows the two-column layout of the file.
Flowing text across multiple containers
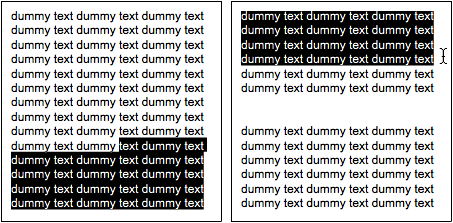
The last example of the chapter is the most advanced and demonstrates one of TLF’s most powerful features: the ability to flow text across multiple containers. This is called linked text, or threaded text, because the text is not broken apart when populating more than one text field. Instead, it flows through linked text fields, threading its way through your layout. This is further demonstrated with selectable linked text and the ability to scroll within a field while selecting text—just like you can in a text editor.
One of the first things you’re likely to notice, is that this script contains no direct reference to TLF text fields. Instead, it uses the concept of TLF containers—sprites or movie clips that are automatically populated with TLF text by Flash Player. This approach is very powerful because it means that anywhere you can create a sprite, you can fill it with TLF text, and even link it up as part of a chain of TLF text.
For example, you could create many text fields across the stage and size them all to accommodate one line of text. You could then link them together, flow “The Rime of the Ancient Mariner” through them, and animate them up and down like undulating waves of water. Best of all, you can easily reflow the text along the linked chain whenever required.
The following code is found in the tlf_containers.fla source file. Lines 1 through 6 import all the classes required to complete this exercise.
1import flashx.textLayout.compose.StandardFlowComposer; 2import flashx.textLayout.container.ContainerController; 3import flashx.textLayout.container.ScrollPolicy; 4import flashx.textLayout.conversion.TextConverter; 5import flashx.textLayout.edit.SelectionManager; 6import flashx.textLayout.elements.TextFlow;
Lines 8 through 16 fill the field with text. Lines 8 through 12 create a string of TLF markup. Lines 9 and 12 open and close the TextFlow content, and lines 10 and 11 use the dummyText() function (found in lines 49 through 55) to fill the two paragraphs with dummy text.
Lines 14 through 16 demonstrate how to create an independent TextFlow instance. They use the TextConverter class’s static method importToFlow() to convert the TextFlow markup into layout format. Not only does this allow you to separate the TextFlow from a text field for easy reuse, but it’s also particularly important here because we’re not making direct use of a TLF text field.
7//create TextFlow instance8vartextMarkup:String= 9"<TextFlow xmlns='http://ns.adobe.com/textLayout/2008'>"+ 10"<p>"+ dummyText() +"</p><br />"+ 11"<p>"+ dummyText() +"</p>"+ 12"</TextFlow>"; 13 14vartextFlow:TextFlow= 15TextConverter.importToFlow(textMarkup, 16TextConverter.TEXT_LAYOUT_FORMAT);
Lines 18 through 25 do nothing more than create sprites for cosmetic purposes. They will lie under the TLF containers to provide a border for each. This process uses the borderedBox() function, in lines 57 through 63, to draw borders into the sprites.
Note
It’s possible to draw directly into TLF containers, but if they are designed to scroll, they may cover one or more sides of the border. By placing self-contained border objects beneath the TLF containers, this issue is avoided.
17//create border shapes for cosmetic purpose18varbox1:Sprite= borderedBox(); 19 box1.x= box1.y= 10; 20addChild(box1); 21 22varbox2:Sprite= borderedBox(); 23 box2.x= 240; 24 box2.y= 10; 25addChild(box2);
Lines 27 through 44 set up containers for the TLF text. Lines 27 through 29, and 31 through 34, create two sprites and position them side by side. Lines 36 through 39 turn these sprites into TLF containers using the ContainerController class. The containers and the width and height of each are passed to the class constructor. The class then does everything required to support TLF text display, all automatically.
The last part of the container code occurs in lines 41 through 44. These lines link the containers together and ready them for TLF text. Line 41 adds a new StandardFlowComposer instance to the TextFlow object’s flowComposer property. Lines 42 and 43 add the two containers to the flow composer using the addController() method, and line 44 updates all the controllers, flowing the text among them.
26//create TLF containers27varcontainer1:Sprite=new Sprite(); 28 container1.x= container1.y= 20; 29addChild(container1); 30 31varcontainer2:Sprite=new Sprite(); 32 container2.x= 250; 33 container2.y= 20; 34addChild(container2); 35 36varcontrollerOne:ContainerController= 37new ContainerController(container1, 200, 200); 38varcontrollerTwo:ContainerController= 39new ContainerController(container2, 200, 200); 40 41 textFlow.flowComposer=new StandardFlowComposer(); 42 textFlow.flowComposer.addController(controllerOne); 43 textFlow.flowComposer.addController(controllerTwo); 44 textFlow.flowComposer.updateAllControllers();
Finally, lines 46 and 47 control the selection and scrolling options. Line 46 populates the interactionManager of the TextFlow with a SelectionManager instance. The interactionManager controls how a user can interact with a container. It can enable selection, editing, or both. In this case, the resulting TLF containers will allow users to select, but not edit, their content.
Line 47 concludes our discussion by enabling vertical scrolling, but only for the second container. Because the two containers are linked and selectable, users will be able to select text across both containers. Because the second container is scrollable, dragging your mouse through the text will scroll up or down as long as content exists outside the bounds of the container in that direction. Figure 10-12 shows the result of this exercise, with a selection in progress.
45//enable selection and scrolling46 textFlow.interactionManager=new SelectionManager(); 47 controllerTwo.verticalScrollPolicy=ScrollPolicy.AUTO; 48 49 function dummyText():String{ 50varstr:String=""; 51for(vari:int= 0; i < 60; i++) { 52 str +="dummy text "; 53 } 54returnstr; 55 } 56 57 function borderedBox():Sprite{ 58varsp:Sprite=new Sprite(); 59varg:Graphics= sp.graphics; 60 g.lineStyle(1, 0x000000); 61 g.drawRect(0, 0, 220, 220); 62returnsp; 63 }
Distributing SWFs that use TLF
TLF is significantly different from Classic text when it comes to distributing your SWFs. TLF works as a runtime shared library (RSL)—an external archive of code (and sometimes assets) that must be distributed with your SWF.
Note
Although technically a component, this is virtually transparent to the Flash Professional CS5 user. TLF is tightly integrated into the Properties panel and, unlike other components, does not need to be in the Library of your FLA before it can be used.
When you publish your file, you will notice in the same directory as your SWF, that a document with the extension .swz has been created. This is the extension for a compressed runtime library. At the time of this writing, the file is called textLayout_1.0.0.595.swz, but the numbers used in this filename may change with future releases.
Unlike the classes and packages that are compiled into your SWF when you publish your projects, runtime shared libraries remain external. They must be distributed with your SWFs, and their location relative to your SWF should be maintained. For example, if the RSL is in the same directory as your SWF, this should be true when distributing your project, as well.
In the case of the TLF, Flash Player will attempt to download the RSL from the Adobe website, but it’s still a good idea to keep your own copy with your SWF in case the Adobe site is unavailable.
As external files, runtime shared libraries must be downloaded by the user, so using TLF adds about 160K to your overall project size. The good news is that you need to download each RSL only once. For example, if you create 10 projects that use TLF, and a reader views all 10 projects, the first project will initiate the download of the TLF RSL, but all remaining projects will use the library already on the reader’s hard drive.
Note
When authoring a TLF project, Flash Player will attempt to connect to the Internet to retrieve the RSL from Adobe’s site. If you do not have an active connection, you will see an error something like this: “Error opening URL 'http://fpdownload.adobe.com/pub/swz/crossdomain.xml‘.” If you then activate a connection later, your code will work without this error.
TLF also causes a problem when a parent SWF loads a child SWF that uses a TLF text field. We’ll discuss this in Chapter 13 when we discuss loading external assets.
What’s Next?
Text is fundamental to most ActionScript projects, and this chapter should give you the starting knowledge you need to explore text usage further. Once you’ve become more comfortable with using text (including tasks like displaying and formatting), start to delve deeper into the raw data that makes up text. Look at strings and break them into their constituent parts. Learn how to build and parse the paragraphs, words, and characters you see every day. Try to think of imaginative ways of generating, deconstructing, and otherwise manipulating text, such as combining string methods and properties with arrays and other ActionScript elements.
In the next chapter, we’ll look at many ways of using sound in ActionScript, including:
Understanding the new granular components of sound management, including individual sound channels and a global sound mixer
Playing, stopping, and pausing internal and external sounds
Controlling the volume and pan of sounds
Working with microphone input
Parsing data from sounds, including ID3 tags from MP3 files
Visualizing frequency amplitudes