Chapter 2. Core Language Fundamentals
Jump Right In
Miscellaneous Basics
Variables and Data Types
Operators
Conditionals
Loops
Arrays
Vectors
Functions
Custom Objects
this and parent
Absolute Versus Relative Addresses
Put It All Together
What’s Next?
ActionScript 3.0 is a complete rewrite of the language—so much so that ActionScript 3.0 doesn’t even share the same Flash Player code base as prior versions of ActionScript. But that’s all behind the scenes. The truth is that all versions of ActionScript to date have quite a bit in common. This is because ActionScript is based on a scripting language standard (called ECMA-262) that grew from the success of JavaScript, and ongoing versions of ActionScript are as backward-compatible as possible in an effort to support legacy projects.
Of course, each new update to ActionScript introduces new features and, because the decision was made to create ActionScript 3.0 from scratch, an opportunity presented itself to tidy up a few messy things that lingered from previous versions. Among these improvements are tightening up and requiring best practices that had been optional, and restructuring how events and graphical assets are handled (the Event Model and Display List, respectively). All of this progress, however, didn’t steamroll over the standard upon which ActionScript is based, and most of the language fundamentals remain intact.
With the intention to focus on new ActionScript 3.0 features later on, we want to cover some of the more commonly used fundamentals up front. We do not intend to ignore these ideas throughout the rest of the book. However, we hope to explain them in sufficient detail here and spend less time on them as we proceed.
This book doesn’t assume that you’re well versed in any prior version of ActionScript, but its size and purpose requires that we assume a basic understanding of general scripting concepts. If you haven’t already, please look over the Preface for a good idea of whom this book is for, as well as a few alternative references if you need more background information.
If you’re already comfortable with ActionScript and are reading this text as an introduction to version 3.0, you may want to skim this chapter. In any case, you can refer to it as a point of reference when an underlying programming concept needs further explanation.
You can also look at the source files, which can be downloaded from the companion website at http://www.LearningActionScript3.com. As we have not yet discussed some of the essentials of ActionScript required to manipulate assets, we’ll use a common testing and debugging technique to display text while reviewing each example.
In these pages, we’ll look at the following topics:
Jump Right In. Add core logic to your Hello World! example with a conditional, a loop, and random number generation.
Miscellaneous Basics. This section includes a few essential items and techniques used throughout this book that don’t necessarily warrant sections of their own.
Variables and Data Types. Information must be stored in containers called variables if it is to be recalled for later use, and declaring which type of data will be stored in each variable can help Flash check for errors during development.
Operators. ActionScript uses characters called operators, such as plus (+) and less than (<), that combine, compare, or modify values of objects, properties, or expressions.
Conditionals. Often, when a decision must be made in the course of a script’s execution, a conditional is used to evaluate an outcome. We’ll look at the
ifandswitchconditional statements.Loops. When you must execute an instruction multiple times, it is sometimes handy to do so within a loop structure. We’ll look at the commonly used
forandwhileloops and also at alternatives to explicit loops, including frame and timer events.Arrays. Although a basic variable can contain a single value only, it is frequently efficient, or even necessary, to store more than one value at a time. Imagine a shopping list, for example, with several items written on a single piece of paper rather than many individual paper slips. In ActionScript, you can use an array to store several values in a similar manner.
Functions. Functions are essential to just about any programming language, and allow you to execute code only when you are ready to do so and reuse that code efficiently.
Custom Objects. A custom object is essentially an advanced kind of variable that allows you to store lots of information as well as to consistently and easily retrieve it.
thisandparent. Thethiskeyword is used as a shorthand reference, much like a self-referential pronoun, typically referring to the current object or scope of a script. Similarly,parentrefers to an object immediately higher up in the ActionScript family tree, if you will. These ideas will become clearer in context, but understanding how these keywords work can save you much repetitive typing and reduce the need for more complex references in your scripts.Absolute versus Relative Addresses. ActionScript can reference objects using absolute paths, such as starting from the root timeline and including every object between it and your destination, or relative paths, such as going up to a parent and down to a sibling, no matter where you are.
Again, this chapter is not meant to act as the only reference to bring you up to speed if you have absolutely no experience with ActionScript. It will likely serve the bulk of your needs, but other basics—such as reviewing where scripts are created in Flash Professional or another application—require a text dedicated to the editor of your choice.
Note
As the Preface mentioned, we recommend Learning Flash CS4 Professional by Rich Shupe (O’Reilly) for a starter book on the Flash interface and Essential ActionScript 3.0 by Colin Moock (O’Reilly) for a more complete ActionScript 3.0 resource. The latter is decidedly an intermediate to advanced reference but, at nearly three times the size of this volume, it is also substantially more comprehensive.
For the most part, this chapter—along with the context and supplemental explanations presented in subsequent chapters—should provide you with enough to understand the topics and to get the sample exercises working.
Jump Right In
Before we cover some of the fundamental structure and logic of ActionScript 3.0, let’s write another script to help get the feel of the language and build a little confidence. Specifically, we’ll build on the Hello World! exercise from Chapter 1 to introduce some of the material explained in detail in this chapter. We’ll give you a brief explanation here and then expand on each relevant topic as you read on. Create a new ActionScript 3.0 FLA file and type the following code into frame 1 using the Actions panel. You can compare your work with the hello_world_if_loop.fla source file.
1varstr:String="Hello World!"; 2 3if(Math.random() < 0.5) { 4vartxtFld:TextField=new TextField(); 5addChild(txtFld); 6 txtFld.text= str; 7 }else{ 8for(vari:int= 0; i < 3; i++) { 9trace(str); 10 } 11 }
Line 1 creates a variable and tells the ActionScript compiler that it will contain a String, which is simply text. Telling the compiler what kind of data you intend to put into a variable will help it warn you if something attempts to manipulate the data in an incompatible way later on—such as trying to treat text as if it were a number.
The if statement in line 3 does what its name implies. It tests to see if something is true and, if so, executes the code within its braces. In this case, the braces are balanced on line 7, but the statement continues with an else. This means that if the test is false, the next set of instructions, balanced with the last brace on line 11 (lines 8 through 10), is executed. The test in this example, added to show how easy it can be to randomize an outcome in ActionScript, is whether a random number is less than 0.5. Math.random() will create a random number between 0 and 1.
If that number is less than 0.5, the first block of code (lines 4 through 6) will execute. This code creates a text field, makes it visible by adding it to the display list, and puts the contents of the variable into the field—just as you saw in Chapter 1. If the test fails, the second block (lines 8 through 10) will execute. This code is a loop that will run through three times, tracing the value of the string to the Window✓Output panel.
We’ll explain the syntax of this script in greater detail as this chapter progresses, but if you test your movie using Control✓Test Movie, you’ll see the result immediately. Based on the random number selection, you’ll either see text on the stage or in your Output panel. You can test your movie repeatedly to see various outcomes. Now, let’s dig in to some language fundamentals!
Miscellaneous Basics
Some basic topics don’t require a section devoted to their discussion, but should still be mentioned due to their use throughout the book. For example:
- Case sensitivity
ActionScript 3.0 is a case-sensitive language, so you have to be careful with capitalization. For example, the keyword
trueis all lowercase. If you typeTRUEorTrue, in the same context, you will get an error.- Use of the semicolon (;)
The official use of the semicolon in ActionScript is to execute more than one statement on a single line. This is rare in the average script, but we will look at this technique when discussing loops. The semicolon is also used to indicate the end of a line. This is not typically required, but it is recommended for clarity and to ease any possible transition into learning other languages in which the semicolon at the end of a line is required.
- Use of
trace() As a means of getting quick feedback in an example, or as a testing and debugging technique when writing scripts,
trace()can be very helpful. This instruction places text into the Output panel of the Flash Professional interface. As such, this is an option that is available only when creating your file, and has no use in your distributed SWF. ActionScript 3.0’s version oftrace()supports tracing multiple items at once by separating them with commas. These items are then traced with a space separating the content. Typing the following into a script, for example, will display “Learning ActionScript 3.0 Shupe Rosser” in Flash Professional’s Output panel:trace("Learning ActionScript 3.0","Shupe","Rosser");
Note
Throughout this book, code samples will be presented in full color. Most ActionScript editors, including Flash Professional, can apply colors, based on your preference, to specific ActionScript structures. As the average reader of this book is likely to use Flash Professional, we have adopted the default color scheme used by that application. Other editors may use different colors, but you will rapidly adjust to any such differences. In this context, key ActionScript terms are in blue, strings (or text values) are in green, comments are in gray, and more basic elements, (such as parentheses, semicolons, and the like) are in black. Anything that is not already predefined in ActionScript, such as names of variables that we create, will also be in black.
Variables and Data Types
Variables are best described as containers into which you place information for later recall. Imagine if you were unable to store any information for later use. You would not be able to compare values against previously described information (such as user names or passwords), your scripts would suffer performance lags due to unnecessarily repeating calculations, and you wouldn’t be able to carry any prior experiences through to the next possible implementation of a task. In general, you wouldn’t be able to do anything that required data that your application had to “remember.”
Variables make all this and more possible. In the most basic terms, you need only create a variable with a unique name and then populate it with a value. However, for an ActionScript 3.0 compiler to know you are creating a variable, rather than mistyping some other ActionScript keyword, you must also declare the variable using the var keyword. A simple example is remembering the number 1 with the following:
var myVariable = 1;Keep in mind that variable names:
Must not contain spaces
Should not already be a keyword or reserved word in the ActionScript language specification
Should not start with a number
Can include only alphanumeric characters along with the dollar sign ($) or underscore (_)
To help ensure that you are using variables (and other ActionScript language elements) appropriately, ActionScript can check your efforts and warn you when you go awry. Not every mistake can be detected, of course, but every little bit helps. For example, your ActionScript compiler can warn you if you try to perform a mathematical operation on a passage of text. Dividing the text “Flash” by 17, for example, doesn’t make much sense, and it really helps when you are told of such errors.
To make this possible, you must use what is called data typing when you write your code. That is, you must tell the compiler that a variable will contain a specific type of data. To accomplish this, you must follow your variable name with a colon (:) and then the type of data that you want to store in that variable. For example, to data type the previous sample code write:
varhorizontalLocation:Number= 4.5;
This insures that any type of number, be it positive or negative, whole number or decimal value, is the only type of data that can ever be stored in horizontalLocation. (In just a few moments, we’ll show you what would happen if you tried to put something other than a number into this variable.)
ActionScript supports several basic data types including, but not limited to, those listed in Table 2-1.
Data type | Example | Description |
|
| Any number, including floating-point values (decimals) |
|
| Any integer or whole number |
| Unsigned integer or any nonnegative whole number | |
| Text or a string of characters | |
| Values true or false | |
| The basic structure of every ActionScript entity, typically used to store multiple name-value pairs of data |
In addition to these basic data types, it’s very common to store variable references to ActionScript objects, such as a movie clip, text field, or sound, and to use type checking to make sure your code contains fewer errors. For example, the following instruction places a MovieClip into the variable logo. The data type insures that the compiler will warn you if you do anything with this variable that is not compatible with the MovieClip type.
varlogo:MovieClip=new MovieClip();
Let’s revisit our horizontalLocation variable and see what happens if we try to perform an operation on it that is incompatible with the Number data type. Here’s an example of trying to reassign the variable to a String:
horizontalLocation = "ActionScript";Having told the compiler to expect only numbers in this variable, this will yield the following error:
1067: Implicit coercion of a value of type String to an unrelated type Number.
This means your code is trying to change a value of type Number to a value of type String, without first explicitly telling the compiler you want to do so. The compiler warns you about this because you may not have intended to change the data type and it wants a clearer instruction before allowing the switch. While this is usually a huge benefit, you may sometimes want a type change to occur. In these cases, you just need to be more direct by casting the data.
Casting
Casting is the overt act of telling the compiler to treat a value of one data type as if it’s a value of another data type. When discussing type conversion previously, we showed that trying to assign a String to a variable with a Number data type would cause an error. This is pretty clear when you’re trying to overwrite a variable called horizontalLocation, which contains a value of 1, with a new value of “ActionScript.”
But what if you want to assign the text “300” to that variable? For example, what if you want to create a horizontal location value from something a user typed into a text field? Although text entered into a text field originates as having a data type of String, you need to be able to tell the compiler to treat that information as having a data type of Number.
There are two ways to cast data, both shown here, and both with pros and cons.
horizontalLocation =Number("300"); horizontalLocation ="300" as Number;
The first example, using the format type(data), is simple and, best of all, will generate an error if you try to cast to an incompatible data type. On the other hand, it could be confusing because it resembles other ActionScript syntax that we’ll discuss a bit later (such as the name of a function or instantiation of a class). There are also isolated cases where this approach won’t work because it conflicts with syntax reserved for another purpose. For example, later in this chapter we’ll discuss arrays (objects designed to contain multiple values), and you’ll learn that the Array() syntax creates a new array. As such, this form can’t be used to cast data to an array.
The second example, using the format data as type will work where the prior syntax fails, but it won’t generate an error if the casting fails. Instead, it will simply return null as the resulting value.
Note
Our personal preference is to use the type(data) form of casting because we want to take advantage of the error reporting to correct any problems. If a resulting error points to a conflict with this format, we then switch to data as type for specific needs.
You can check whether an object is of a certain type using the is operator.
varuserName:String="Aubrey";trace(userNameis String);//traces true to the Output panel
Strict Mode
Once you start data typing your variables, you can be warned of related errors when your application runs or, better yet, when you compile your file—such as when testing your movie in Flash Professional. Whether you check for errors at runtime or when compiling your code is determined by your ActionScript compiler’s Strict Mode setting.
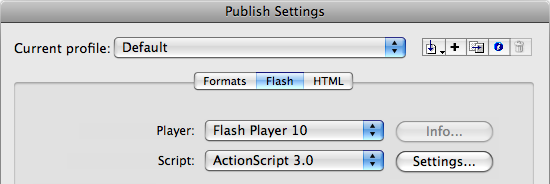
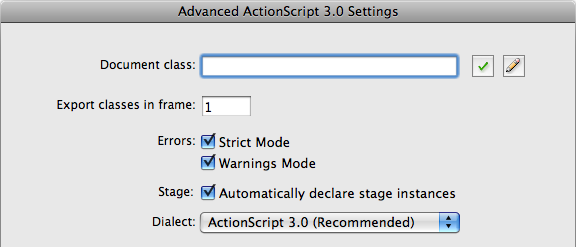
In Flash Professional, the Strict Mode setting is on by default and is a per-file preference, rather than an application preference. As such, it’s found in the Publish Settings of each file (File✓Publish Settings). Flash Professional CS5 users will find shortcuts to this destination in the File menu (File✓ActionScript Settings) and in the Publish section of the Properties panel. In the Flash option at the top of the Publish Settings dialog is a pull-down menu that lets you choose which version of ActionScript to use in each file. Next to that menu is a Settings button, as seen in Figure 2-1. Clicking this button will reveal the Strict Mode option in the Advanced ActionScript 3.0 Settings dialog, as seen in Figure 2-2.
If Strict Mode is enabled, you will be notified of errors when you compile your file as well as when your SWF is running. If you disable Strict Mode, you will rely solely on runtime error warnings to catch mistakes. We recommend keeping Strict Mode enabled because the compiler will not only help you catch problems as you code, but will even try to tell you where the problem is in your scripts.
Operators
Operators are characters that dictate how to combine, compare, or modify values of objects, properties, or expressions. Table 2-2 lists most of ActionScript 3.0’s operators, focusing on the operators you’re likely to use when working with this book’s examples.
Arithmetic | ||
| addition | Adds numeric expressions. |
| subtraction | Negates or subtracts numeric expressions. |
| multiplication | Multiplies two numeric expressions. |
| division | Divides two numeric expressions. |
| increment (1) | Adds 1 to a numeric expression. |
| decrement (1) | Subtracts 1 from a numeric expression. |
| modulo (2) | Calculates remainder of expression1 divided by expression2. |
Assignment | ||
| assignment | Assigns value at right of operator to variable, array element, or object property at left of operator. |
Arithmetic compound assignment | ||
| addition assignment (3) | Assigns expression1 the value of expression1 + expression2. |
| subtraction assignment | Assigns expression1 the value of expression1 – expression2. |
| multiplication assignment | Assigns expression1 the value of expression1 * expression2. |
| division assignment | Assigns expression1 the value of expression1 / expression2. |
| modulo assignment | Assigns expression1 the value of expression1 % expression2. |
Comparison | ||
| equality (4) | Tests two expressions for equality. |
| inequality | Tests for the exact opposite of the equality ( |
| greater than | Compares two expressions and determines whether expression1 is greater than expression2; if so, the result is true. |
| greater than or equal to | Compares two expressions and determines whether expression1 is greater than or equal to expression2; if so, the result is true. |
| less than | Compares two expressions and determines whether expression1 is less than expression2; if so, the result is true. |
| less than or equal to | Compares two expressions and determines whether expression1 is less than or equal to expression2; if it is, the result is true. |
Logical | ||
| AND (4) | Tests two expressions to see if both are true. |
| OR | Tests two expressions to see if either is true. |
| NOT | Inverts the Boolean value (truth) of a variable or expression. |
| as | Casts data to left of operator as data type to right of operator. |
| is (5) | Evaluates whether an object is compatible with a specific data type. |
String | ||
| concatenation (6) | Concatenates (combines) strings. |
| concatenation assignment | Concatenates value to right of operator. Assigns string1 the value of string1 + string2. |
You’re probably familiar with many of ActionScript 3.0’s arithmetic, assignment, and comparison operators. Other operators may be new to you, and many will be explained and used throughout the coming chapters. Here are some quick notes referred to in Table 2-2 covering some of the operators you may be less familiar with:
Increment and decrement operators add 1 to or subtract 1 from an expression. For example,
i++is the same as sayingi = i + 1. They come in postfix (i++) and prefix (++i) flavors. The difference between them is that the postfix version alters the value of the variable after a related expression is evaluated, and the prefix version alters the value before the expression is evaluated. This can be seen by tracing both operators at work:vari:int= 0;trace(i++);//0trace(i);//1varj:int= 0;trace(++j);//1trace(j);//1In the first example, the postfix increment operator is used within a
trace()statement. Because the postfix flavor of the operator increments after the statement is executed, the first trace is 0 and the second is 1. The prefix flavor of the operator increments before thetrace()statement is executed, so both traces show the value of 1.Modulo calculates the remainder of a division, not how many times the numerator goes into the denominator. In other words,
4 % 2is 0 because 2 goes into 4 two times, and leaves no remainder. However,5 % 2is 1 because 2 goes into 5 two times and leaves a remainder of 1.Compound assignment operators work a bit like increment and decrement operators, but they are not restricted to altering an expression by a value of 1. Instead, they alter the original based on whatever is to the right of the equal sign. For example,
10 += 5is 15 and is equivalent to saying10 = 10 + 5.Note the difference between the assignment operator (
=, a single equal sign) and the comparison equality operator (==, a double equal sign). The first assigns a value to an expression; the second tests whether two values are equal. Both comparison and logical operators are discussed later in the Conditionals section of this chapter.The
asandisoperators are discussed earlier in the Casting section of this chapter.When used in the context of strings, the plus symbol (
+) is a concatenation operator, which joins two strings together. The expression"Sally" + "Claire"evaluates to “SallyClaire”.Note
Additional ActionScript 3.0 operators can be found at http://www.adobe.com/livedocs/flash/9.0/ActionScriptLangRefV3/operators.html.
Arithmetic Operator Precedence
Arithmetic and arithmetic compound assignments are evaluated in order of precedence. Multiplication, division, and modulo are executed first, and addition and subtraction are executed second. For example, 1 + 2 / 3 + 4 is equivalent to five and two-thirds because the division is evaluated before the addition.
Parentheses can alter the order of precedence by evaluating their contents first. Changing the previous expression to (1 + 2) / (3 + 4) is equivalent to three-sevenths because the addition is evaluated before the division.
Conditionals
You will often need to make a decision in your script, choosing to do one thing under one circumstance and another thing under a different circumstance. These situations are usually handled by conditionals. Put simply, a test asks whether a condition is met. If the condition is met, the test evaluates to true and specific code is executed accordingly. If the condition is not met, either no further action is taken or an alternate set of code is executed. We’ll now take a look at the if and switch conditional structures.
You can try this code for yourself, or look at the conditionals.fla source file from the chapter archive found in the Downloads section of the companion website. This section provides multiple examples of conditionals to teach the logic behind their use. For an additional practical example, revisit the opening of this chapter, which uses a conditional to perform one of two tasks based on a random number value.
if
The most common form of the conditional is the if statement. The statement’s basic structure is the if keyword, followed by parentheses in which the conditional test resides, and braces that contain the code that is executed when the statement evaluates to true. The first three lines in the following example create and populate a set of variables. These variables will be used for this and subsequent examples in this section, but will not be repeated.
varnum:Number= 1;varstr:String="hello";varbool:Boolean=false;if(num == 1) {trace("num equals 1"); }
To evaluate the truth of the test inside the parentheses, conditionals often make use of comparison and logical operators. A comparison operator compares two values, such as equals (==), less than (<), and greater than or equal to (>=), to name a few. See Table 2-2 for more examples of operators.
Note
The test in this example uses a double equal sign. This is a comparison operator that asks, “Is this equal to?” This distinction is very important because the accidental use of a single equal sign will cause unexpected results. A single equal sign is an assignment operator and assigns the value on the right side of the equation to the object on the left side of the equation. Because this assignment naturally occurs when an assignment operator is used, the test will always evaluate to true.
Logical operators allow you to build complex tests by combining multiple conditional expressions. The AND (&&), and OR (||) operators allow you to combine two or more tests into one. They allow you to ask if “this and that” are true, if “this or that” is true. The NOT (!) operator will negate the results of a test, or ask if “this” is not true. Table 2-3 is a Boolean truth table that shows several possible outcomes of conditional tests. The first two columns represent the initial outcome of two separate conditional tests, a and b. Using our given variables, these columns might represent the questions, “is num equal to 1?” and “is str equal to ‘hello'?” The rows show various permutations of true and false results of these tests. Column 3 shows the effect of the NOT operator, negating the results for test b. Columns 4 and 5 show the results of using the AND and OR operators on the outcomes in each row.
a | b | !b | a && b | a || b |
true | true | false | true | true |
true | false | true | false | true |
false | true | false | false | true |
false | false | true | false | false |
Looking at some ActionScript syntax, the following snippet uses the AND operator and will evaluate to false because only one of the conditions is true. When using the AND operator, both conditions must be true. As a result, nothing would appear in the Output panel.
if(num == 1 && str =="goodbye") {trace("both tests are true"); }
In the next example, the test will evaluate to true, because one of the two conditions (the first) is true. As a result, “one test is true” will be traced.
if(num == 1 || str =="goodbye") {trace("one test is true"); }
Finally, the following would also evaluate to true, because the NOT operator correctly determines that bool is not true. (Remember, that every if statement, at its core, is testing for truth.)
if(!bool) {trace("bool is not true"); }
The logical NOT operator should not be confused with the != comparison operator. The NOT operator reverses the truth of a test (returning false where true was expected, or true instead of false); the != operator is the reverse of the == operator, and tests whether something is “not equal to” a value. The following will evaluate to false because num does equal 1, and nothing will be traced.
if(num != 1) {trace("num does not equal 1"); }
Additional power can be added to the if statement by adding an unconditional alternative. That is, an alternative set of code is executed any time the main test fails, without a need for any additional evaluation. This is accomplished by adding an else to the if block. With the following new code added to the previous example, the last trace will occur:
if(num != 1) {trace("num does not equal 1"); }else{trace("num equals 1"); }
Finally, the statement can be even more flexible by adding a conditional alternative (or an additional test) to the structure. To add another test, you must add an else if section to your conditional. In this example, the second trace will occur:
if(num == 2) {trace("num does not equal 1"); }else if(num == 1) {trace("num equals 1"); }
The if statement requires one if, only one optional else can be used, and any number of optional else if tests can be added. In all cases, however, only one result can come from the structure.
Consider the following example, in which all three results could potentially execute—the first two because they are true, and the last because it is an unconditional alternative:
if(num == 1) {trace("num equals 1"); }else if(str =="hello") {trace("str equals 'hello'"); }else{trace("other"); }
In this case, only “num equals 1” (the first option) would appear in the Output panel. Because only one result is possible from an if statement, the first time a test evaluates to true, the conditional is exited and the script continues. If you need more than one execution to occur when using if statements, you need to use two or more conditionals. The following structure is based on the prior example in which all tests evaluate to true. However, because the code has been broken into two separate if statements, the first and second traces will occur.
if(num == 1) {trace("num equals 1"); }if(str =="hello") {trace("str equals 'hello'"); }else{trace("other"); }
Logical Operator Precedence
When more than one logical operator is used, they are evaluated in a particular order. NOT is evaluated first, then AND, and finally OR. For example, considering the expression a && b || c, the expression would evaluate as, “are both a and b true?” and then “is either the outcome of the a && b test or c true?” Because of operator precedence, the following expression would evaluate the same way: c || a && b. That is, the operators are not evaluated from left to right. In this last example, a && b would still be evaluated first, and the outcome of that test would be compared with c.
It’s possible to build more complex conditional tests by overriding this precedence with parentheses. Table 2-4 contains all the possible outcomes of three tests in the first three columns. Column 4 checks the outcome of two tests, using operator precedence. Column 5 tests the outcome of the same tests, but gives the OR test precedence using parentheses.
switch
An if statement can be as simple or as complex as you need. Long if structures can be difficult to read, however, and are sometimes better expressed using the switch statement. In addition, switch has a unique feature that lets you control which results are executed—even when a test evaluates to false—and can be a simpler way to execute multiple results.
Imagine an if statement asking if a variable is 1, else if it’s 2, else if it’s 3, else if it’s 4, and so on. A test like that quickly becomes difficult to read, so use switch instead:
switch(num) {case1 :trace("one");break;case2 :trace("two");break;case3 :trace("three");break;default:trace("other");break; }
A switch statement begins with an expression in the parentheses of its first line. Because this is an expression, rather than a test, it does not have to evaluate to true. For example, the contents of the parentheses could be 5 + 5. Possible results of the expression are included in as many case statements as necessary. If the result of the expression matches the contents of a particular case statement, the instructions following the colon of that case are executed. Each break statement prevents any subsequent instructions from executing once a test is successful. We’ll talk more about break in just a moment.
Meanwhile, the example code asks: is it the case that num equals 1 is true? Is it the case that num equals 2 is true? This continues with all remaining case statements. The equivalent of an unconditional alternative (or else, in an if statement) is default. In other words, this is the default response in the event that no case evaluations are true.
The result of the example is that the word “one” appears in the Output panel because num is equal to 1 and a break follows the trace() statement.
Now back to the break feature. Use of break is optional and, when you don’t use break, the next instructions will execute regardless of the outcome of the case evaluation. That is, the next instruction will execute even if the prior case already evaluated to true and even if the following case evaluates to false.
For example, note the absence of break in the first case of the following code. This structure will trace both “one” and “two” to the Output panel, even though the first evaluation is true, and even though num does not equal 2.
switch(num) {case1 :trace("one");case2 :trace("two");break; }
This break feature does not exist with the if statement and, if used with care, makes switch an efficient alternative to a more complex series of multiple if statements. Switch statements must have one switch and one case, an optional unconditional alternative in the form of default, and an optional break for each case and default. The last break is not needed, but may be preferred for consistency.
Note
If you need to evaluate the truth of more than one expression in a switch structure, you can restructure it by swapping the result and expression between switch and case. That is, you can place a single result, true, in the switch statement, and each expression in the case statements. The following example can be found in the switch_2.fla source file.
switch(true) {casenum == 1 :trace("one");break;casestr =="hello":trace("two");break;casebool :trace("three");break; }
Loops
It is quite common to execute many repetitive instructions in your scripts. However, including them line by line, one copy after another, is inefficient as well as difficult to edit and maintain. Wrapping repetitive tasks in an efficient structure is the role of loops. A programming loop is probably just what you think it is: it goes through the structure and then loops back to the start and does it again until its task is concluded. There are a few kinds of loops, and the type you choose to use can help determine how many times your instructions are executed. The examples in this section can be found in the loops.fla file, which is downloadable from the companion website. This section explains two kinds of loops: for and while. The first for loop example will look familiar from the opening of this chapter.
for Loop
The for loop executes its contents a finite number of times of your choosing. For example, you may wish to create a grid of 25 movie clips or check to see which of 5 radio buttons has been selected. The first example here uses a for loop to trace content to the Output panel three times.
To loop through a process, as in the case of our three traces, you must first start with an initial value, such as 0, so you know you have not yet traced anything to the Output panel. The next step is to test to see whether you have exceeded the limit you set (in this case, 3). The first time through the loop, 0 does not exceed the prescribed limit. The next step is to trace the content, and the final step is to increment your initial value, registering that you’ve traced the desired content once. The process then starts over until, ultimately, you exceed the limit of the loop. The syntax for a basic for loop is as follows:
for(vari:int= 0; i < 3; i++) {trace("hello"); }
The first thing you may notice is the declaration and typing of the counter, i. This is a common technique because the i variable is often used only for counting and is therefore created on the spot and not used again. If you have already declared and typed the counter previously, that step can be omitted. (This is true in the next example, as these code passages are in the same source file.)
Next is the loop test. The counter variable must have a value that is less than the limit, in this case 3, for the loop to execute. Finally, the double plus sign (++) is the increment operator and is equivalent to i = i + 1, or adding 1 to the current value of i.
The result is three occurrences of the word “hello” in the Output panel. The first time through the loop the value of i is 0, that value is less than 3, a trace occurs, and i is incremented by 1. The second time through the loop, i is 1, that value is less than 3, a trace occurs, and i is again incremented. This continues until the value of i fails the loop test. The third time through the loop i is incremented to a value of 2. The fourth time through, the loop test fails because 3 is not less than 3, and the loop concludes.
If desired, you also can count down by reversing the values in the test, starting with a maximum initial value, and then decrementing the counter. In other words, instead of starting with 0 start with 3, then test to be sure i is greater than 0, and decrement by subtracting 1 each time through the loop using the decrement operator (--) (which is equivalent to i = i - 1). Here’s the code:
for(i = 3; i > 0; i--) {trace("hello"); }
Note
As stated earlier, the variable i is intentionally not declared (using the var keyword) in this loop because it is in the same source file as a loop that previously declared i. Once a variable has been declared in a scope, it need not be declared again. If it is declared a second time, a duplicate variable declaration warning will be displayed.
while Loop
The other kind of loop that you are likely to use is a while loop. Instead of executing its contents a finite number of times, a while loop executes as long as something remains true. As an example, consider a very simple case of choosing a random number.
To create a random number, use the syntax Math.random(). Just like the MovieClip class discussed in Chapter 1, Math is a class, or collection of code. It contains instructions for performing mathematical tasks, including picking a random number. This method always generates a decimal number greater than or equal to 0 and less than 1. So, let’s say you wanted to choose a random number greater than or equal to 0.5. Because of the random factor in this exercise, you may end up with the wrong choice several times in a row. To be sure you get a qualifying number, you can use this code:
varnum:Number=Math.random();while(num < 0.5) {trace(num,"is less than 0.5"); num =Math.random(); }trace("final num:", num);
Starting with a default value of 0, num will be less than 0.5 the first time into the loop, so the contents of the loop are executed. A random number is then put into the num variable and, the structure loops back to test the new value. The loop will continue to execute as long as the random numbers chosen are less than 0.5. When that test fails, because a number chosen is greater than or equal to 0.5 (and, although not material to the test, less than 1 by restrictions of the Math.random() method) the loop concludes.
Note
Use while loops with caution until you are comfortable with them. It’s very easy to accidentally write an infinite loop (a loop with no exit), which will cause your code to loop continuously within the while code block, stopping any further execution of your program. Here is a significantly simplified example of an infinite loop:
varflag:Boolean=true;while(flag) {trace("infinite loop"); }
As you may notice, the flag variable is never changed, and therefore remains true, so the loop can never fail.
It’s also possible to write an infinite for loop, typically by reassigning the value of the loop counter inside the loop:
for(vari:int; i < 3; i++) {trace("infinite loop"); i = 0; }
If you get caught in an infinite loop, Flash Player fortunately will timeout (after 15 seconds, by default) and abort the script.
A Loop Caveat
It’s very important to understand that loop structures, although compact and convenient, are not always the best method to use to achieve a repetitive outcome. This is because loops are very processor-intensive. Once a loop begins its process, nothing else will execute until the loop has been exited. For this reason, you may be wise to avoid for and while loops when you require interim visual updates.
In other words, when a for or while loop serves as an initialization for a process that is updated only upon the loop’s completion (such as creating a grid of 25 movie clips), you are less likely to have a problem. The script enters the loop, 25 clips are created, the loop is completed, a frame update can then occur, and you see all 25 clips.
If you want each of the 25 clips to appear one by one, however, those interim visual updates cannot occur while the processor is consumed by the for or while loop. In this situation, another type of looping—one that does not interfere with the normal playhead updates—is desirable. Two such loops, frame and timer loops, are commonly used for this purpose. A frame loop is not a defined ActionScript structure, but rather simply a repeating frame event, executing an instruction each time the playhead is updated. A timer loop is similar, repeating a timer event, but is not tied to the frame tempo. Instead, an independent timer triggers a timer event at a set frequency.
In both cases, the events occur in concert with any other events in the ordinary functioning of the file, so visual updates, as one example, can continue to occur. Both frame and timer loops will be explained, complete with examples, in Chapter 3. The first exercise in that chapter is a great example of using a frame event as an alternative to a loop.
Arrays
Basic variables can contain only one value. If you set a variable to 1 and then set that same variable to 2 in the following line of code, the value would be reassigned, and the value of the variable would be 2.
However, there are times when you need one variable to contain more than one value. Think of a hypothetical set of groceries, including 50 items. The standard variable approach to this problem would be to define 50 variables and populate each with a grocery item. That is the equivalent of 50 pieces of paper, each with one grocery item written on its face. This is unwieldy and can be created only at authoring time—at which point the process is fixed—and you’d have to recall and manage all variable names every time you wanted to access the grocery items.
In real life, you handle the problem by writing a list of 50 grocery items on one piece of paper. You can add to the list while at the store and cross each item off once it is acquired, and you only have to manage one piece of paper. In ActionScript, you handle the problem by creating an array, the code equivalent of that sheet of paper.
Creating an array is quite easy. Like many objects in ActionScript 3.0, you can create an array using the new keyword—either prepopulating the array with a comma-separated list of items, or as an empty array that you intend to populate at runtime. You can also create an array by wrapping your list of items in brackets. Creating an empty array with brackets requires only an empty set of brackets. Both techniques are illustrated here:
varneedToBuy:Array=new Array("eggs","flour","milk");varimpulseItems:Array=new Array();varneedToBuy2:Array= ["eggs","flour","milk"];varimpulseItems2:Array= [];
An array of comma-separated values is called a linear array because it contains a series of items in linear order. Whether the array is prepopulated or empty, you can add to, or remove from, the array at runtime. For example, you can add a value to an array using the push() method, which pushes the value into the array at the end.
Note
A method is an action performed by an object—in this case adding something to an array—and will be discussed in detail in the next chapter.
The push() method is a handy way to add something to an array because it also tells you how long the new array is, and you can choose to use that information or ignore it. In the following example, the second line of code uses push() without any regard for the feedback the method returns. All that matters is adding the item to the end of the array. The second time push() is used, however, the entire statement is placed inside a trace(). As a result, when push() returns a value of 2 to indicate that there are now two items in the array, that value will be traced. Finally, the resulting array is displayed in the last executed instruction.
varcake:Array=new Array(); cake.push("sugar");trace(cake);// sugar appears in the Output paneltrace(cake.push("vanilla"));// 2 appears in the Output paneltrace(cake);// sugar,vanilla appears in the Output panel
Note
We’ll further discuss the idea of ActionScript returning values upon receiving instructions when we get to functions later in this chapter.
You can remove an item from the end of an array in a similar manner, using the pop() method. This method also returns a value that you may wish to use but, instead of returning the new length of the array, it returns the item removed from the array.
The next code passage continues the previous example, in which the last value of cake was “sugar, vanilla”. The first line removes the last item in the array and, because it does so from within the trace() statement, the removed item appears in the Output panel. Finally, the entire array is then traced.
trace(cake.pop());// vanilla appears in the Output paneltrace(cake);// the final one-item array, sugar, is traced
Note
Methods (like push() and pop()) are added to the end of objects (the cake variable) with a dot separating the two words. This is the syntax used to navigate the ActionScript object model, and is sometimes referred to as dot syntax or dot notation. This describes a parent-child relationship among the objects.
Consider an example where you may wish to check the width of a movie clip that is inside another movie clip. The first, or most senior item in this familial chain is the container movie clip, or parent. Let’s call it mc1. A reference to the child clip nested inside, called mc2 in this example, follows, and the width property concludes the statement:
mc1.mc2.width;This dot syntax will be used in virtually every example for the rest of the book, and it will soon become quite easy to understand just what each object references along the way.
You can add values to or retrieve values from locations within the array by using brackets and including the index, or position, of the array item you need. To do so, you must understand that ActionScript uses what are called zero-based arrays. This means that the first value is at position 0, the second is at position 1, the next at position 2, and so on. As an example, to retrieve the existing third value from an array, you must request the item at index 2:
varnewArray:Array= ["chocolate","lemon","red velvet"];trace(newArray[2]);//"red velvet" appears in the Output panel
To determine the number of items in an array, use the length property:
trace(newArray.length);//"3" appears in the Output panel
Note
A property describes an aspect of an object—in this case how long the array is, or how many items it contains—and will be discussed in detail in the next chapter.
You can also create arrays inside arrays. These are typically called multidimensional arrays and are used to create multiple levels of data. A typical database is a multidimensional array because it is a list of records (such as users), each of which contains fields (such as name, phone, email). If such a database had three records, it would be equivalent to one array of three arrays.
Creating this arrangement is as simple as using an inner array as a value for one of the indices of the outer array. You can do this at the outset, or add it using push()—both of which are demonstrated here:
varmdArray1:Array= ["a","b", ["c","d"]];varmdArray2:Array= ["e","f"]; mdArray2.push(["g","h"]);
To access values in a multidimensional array, you must use multiple brackets to go into the nested arrays. For instance, continuing the prior example to retrieve the first item in the array mdArray1, you need only the standard single bracket syntax:
trace(mdArray1[0]);//traces "a" to the Output panel
However, to access the values in the nested array requires two components. First, you must identify the nested array as the third item of mdArray1 (at index 2). Then you must reference the item within that nested array with another pair of brackets. So, to retrieve “c”, which is the first item in the nested array, the syntax is as follows:
trace(mdArray1[2][0]);//traces "c" to the Output panel
This makes sense, if you think about it in steps, because not only is mdArray1 an array requiring bracket syntax to retrieve an item therein, but mdArray1[2] is also an array requiring its own brackets to retrieve an item.
Note
There is another kind of array, called an associative array, which is often used interchangeably with custom objects. We’ll discuss both in the Custom Objects section later in this chapter.
Vectors
Vectors (not to be confused with the precise lines, curves, and shapes created by such object-drawing tools as Adobe Illustrator) are typed arrays. Arrays like those in the previous section can contain data of any type. The following example array includes a String, Number, and Boolean:
vararr:Array=new Array(); arr[0] ="avocado"; arr[0] = 2; arr[0] =true;
A vector, however, can contain data of only one type, which is determined at the time the vector was created. Although vector syntax may look a little odd at first, its principle uniqueness is the addition of the data type to the vector creation process. The following example vector contains only integers.
varvec:Vector.<int> =new Vector.<int>(); vec[0] = 1; vec[0] = 2; vec[0] = 3;
If you try to add an incompatible data type to a vector, you will receive a type coercion error. The following example tries to add a String to the integer vector from the previous snippet:
vec[3] ="guacamole"//Error 1067: Implicit coercion of a value of type String// to an unrelated type int.
From a syntax and use perspective, vectors function the same way arrays do. Vector syntax is typically identical to array syntax. However, because they can contain only one data type, they support more restrictive error checking. When working with vectors, you can be certain that any data you retrieve will be the correct data type for your needs, and any data you add will be checked to be sure it conforms to the desired type. In addition, vectors can be significantly faster than arrays—particularly with large data sets.
Note
One thing to remember about data type checking when populating vectors is that content added with the push() method will be type checked at runtime. For this reason, you should use bracket syntax when adding elements to a vector, as in the example in this section, to receive the benefits of compile-time error checking.
Functions
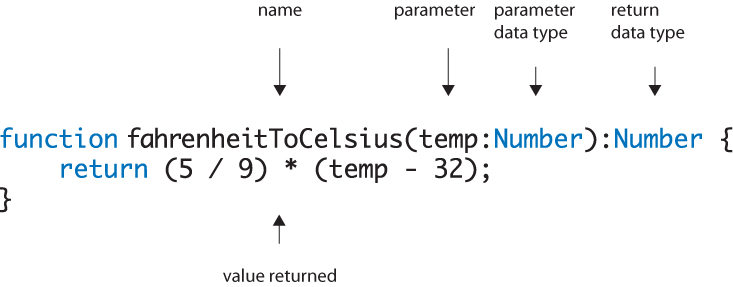
Functions are an indispensable part of programming in that they wrap code into blocks that can be executed only when needed. They also allow code blocks to be reused and edited efficiently, without having to copy, paste, and edit repeatedly. Without functions, all code would be executed in a linear progression from start to finish, and edits would require changes to every single occurrence of any repeated code. We’ll look at functions in three parts: minimal structure, use of arguments, and returning values. Figure 2-3 identifies examples of each of the parts of a function that we’ll discuss.
Creating a basic function requires little more than surrounding the code you wish to trigger at will with a simple syntax that allows you to give the block of code a name. Triggering that function later requires only that you call the function by name.
The following syntax shows a function that traces a string to the Output panel. The function is first defined and then, to illustrate the process, immediately called. (In a real-world scenario, the function is usually called at some other time or from some other place, such as when the user clicks a button with the mouse.) The actual output is depicted in the comment that follows the function call, without any added quotation marks. This code can be found in the functions_simple.fla source file.
Note
Commenting your code to explain as much about what it does as is practical can help you greatly if you return to a project after a prolonged absence. It’s also vital to projects with multiple programmers and when distributing your code to others, like clients or the public.
You can comment a single line of code using two slashes (//), and multiple lines of code using a balanced pair of slash-asterisk (/*) and asterisk-slash (*/).
//single-line comment/*multi-linecomment*/
functionshowMsg() {trace("hello"); } showMsg();//hello
If reusing code and executing code only when needed were the only advantages of functions, you’d already have a useful enhancement to the linear execution of ActionScript, because it would allow you to group your code into subroutines that could be triggered at any time and in any order. However, you can do much more with functions to gain even greater power.
Local Variables
For example, you can define a variable that exists only inside a function. These are called local variables because they are local to the function. The syntax to declare and use the variable is the same; to make it local, simply declare the variable inside the function. These variants on the prior example can be found in the functions_local_var.fla source file.
functionshowMsg() {varmsg:String="hello";trace(msg); } showMsg();//hello
If you tried to trace the value of msg at the end of this script, you would receive an error because ActionScript thinks it doesn’t exist outside the function. The following syntax is what the same example might look like using a variable that is available to the entire script, not just a single function:
varmsg2:String="hello";functionshowMsg2() {trace(msg2); } showMsg2();//hello
Declaring msg2 outside the function means it is not local to showMsg2(). In this case, tracing msg2 at the end of the script would successfully show “hello” in the Output panel of Flash Professional.
Note
Unlike some other languages, ActionScript 3.0 does not support block-level local variables. That is, declaring a variable within a logical block, such as a conditional or loop, does not confine the life of that variable to the block itself. In ActionScript 3.0, variables are either accessible to an entire script or restricted to a function, depending on where they’re declared.
Parameters and Arguments
Even when defining a local variable to hold content, your function is still “hard-wired.” That is, it can’t change from the effect of some outside influence. Let’s say you need to trace ten different messages. To do that without any new features, you’d have to create ten functions and vary the string that is traced inside each function.
However, this can be more easily accomplished with the use of parameters and arguments—words that are often used interchangeably but that have a subtle distinction. Parameters are like local variables in that they exist only inside a function, but they are easier to use because they do not have to be declared. Instead, you just place them inside the function’s parentheses and use them inside the function as you see fit. Arguments are the values that are passed into those parameters. By passing data into a function, you can vary its execution.
When using parameters, it is a great idea to use the same data typing practices as you would with variables, so the ActionScript compiler knows how to react and can notify you of errors. Simply follow the parameter name with a colon and data type. The same rules that apply to naming variables, apply to naming parameters. Furthermore, because parameters are local to a function, you can reuse parameter names in different functions without ill effect. Just be sure not to confuse yourself!
In the following example, the function no longer traces “hello” every time it is called. Instead, it traces whatever text is sent into the function. To send data in, you need only include the data in the parentheses used when calling the function.
functionshowMsg(msg:String) {trace(msg); } showMsg("goodbye");//goodbye
You can even use multiple parameters separated by commas and pass multiple arguments to the function. To avoid errors, the order of the arguments must match the order of parameters. This example expands on the previous code by adding a second parameter. In this case, the function uses the plus operator (+) to concatenate, or join, strings together.
functionshowMsg2(msg:String, user:String) {trace(msg +", "+ user +"!"); } showMsg2("Welcome","Sally");//Welcome, Sally!
Default values can also be supplied for a parameter. This makes sending an argument into the parameter optional because, if no value is sent, the default will be used. When using parameter default values, you must place them at the end of the parameter list so they always follow any parameters for which values are required. For example, the following code requires a message but the user name is optional. As a result, user must appear after msg in the order of parameters.
functionshowMsg3(msg:String,user:String="User") {trace(msg +", "+ user +"!"); } showMsg3("Welcome","Claire");//Welcome, Claire!showMsg3("Welcome");//Welcome, User!
The code in this section is in the functions_parameters.fla source file.
Returning a Value from a Function
Finally, it is also possible to return a value from a function, increasing its usefulness even further. Having the ability to return a value to the script from which it was called means you can vary both the input and output of a function.
The following examples are used to convert temperature values from Celsius to Fahrenheit and Fahrenheit to Celsius. In both cases, a value is sent into the function and the result of a calculation is returned to the script. The return value is sent back to the exact same location as the function call.
For instance, in the first of the two following cases, the return keyword returns the value to the inside of a trace() statement, which consequently traces the result. In the second case, the return keyword returns the value to the right side of an equation, thereby populating a variable. This mimics real-life usage in that you can immediately act upon the returned value or store and process it at a later time. In both cases, the actual trace is shown as a comment. This code can be found in the functions_return.fla source file.
functioncelciusToFarenheit(temp:Number):Number{return(9 / 5) * (temp + 32); }trace(celciusToFarenheit(20));//68functionfarenheitToCelcius(temp:Number):Number{return(5 / 9) * (temp - 32); }vartemperature:Number= farenheitToCelcius(68);trace(temperature);//20
Note
Values are returned from a function immediately, so any code inside the function that appears after the return statement is not executed.
Note that when returning a value from a function, you should also declare the data type of the return value. This is achieved the same way you type data in variables or parameters—with a colon followed by the data type. This time, the data type is placed between the closing parenthesis of the function’s declaration and its opening curly brace. This position symbolizes output, rather than input, of the function.
Once you get used to this practice, it is best to specify void as a return data type to indicate when your function does not return a value. By telling the ActionScript compiler that nothing should be returned (by using void as a data type), it can warn you if you inadvertently add a return statement later.
Custom Objects
After working with ActionScript for just a short while, you will realize that you are immersed neck-deep in objects—whether you’re using procedural or object-oriented programming. In addition to the numerous objects that are already predefined in the ActionScript language (such as movie clips, text fields, sounds, and more), you can create your own objects and give them properties—the adjectives of the ActionScript world, describing an object’s general characteristics, the way you might describe a movie clip’s width, location, rotation, and so on.
To demonstrate this, we’ll create a custom object called villain, and give it properties for health, armor, and lives. None of these terms—villain, health, armor, or lives—are already part of the ActionScript language. However, the syntax for using custom objects conforms to the same dot syntax used throughout ActionScript, so it will seem like those properties have always been there. The following snippet creates an object, and then creates and populates properties:
varvillain:Object=new Object(); villain.health = 100; villain.armor = 100; villain.lives = 3;
These values can be called up at any time, by querying the properties the same way they were created.
trace(villain.health);//100
Note
You will use objects later in the book, in Chapter 10 when working with cascading style sheets and in Chapter 12 when working with video.
Objects and Associative Arrays
Another way to create a custom object is type its properties and values explicitly at the time of definition:
varobj:Object= {msg:"Hello", user:"Jodi"};
This structure is sometimes also called an associative array because it associates a value with a property (also called a key in this context). The object syntax to retrieve a key value is the same as described in the prior section. Using associative array syntax, you substitute a string of the key, in place of the integer index used with linear arrays. Both of the following examples trace “Hello”:
//object syntaxtrace(obj.msg);//associative array syntaxtrace(obj["msg"]);
You can find both object examples in the custom_objects.fla source file.
this and parent
Although potentially a bit nebulous when you’re starting with ActionScript, this can be your friend. It is essentially a self-referential pronoun and is shorthand for “whichever object or scope you’re working with now.” Scope is the realm or space within which an object lives. For example, think of a movie clip inside Flash’s main timeline. Each of these objects (the movie clip and main timeline) has a unique scope, so a variable or function defined inside the movie clip will not exist in the main timeline, and vice versa.
It is easiest to understand the usage of this in context, but here are a couple of examples to get you started. If, from the current scope, you wanted to check the x location of a movie clip with the instance name mc, you might say:
this.mc.x;
Conversely, if you wanted to send the main timeline to frame 2, but do so from within the movie clip, you might say:
this.parent.gotoAndStop(2);
The latter example uses the parent keyword, which refers to the object that is immediately above the current scope in the object hierarchy. In this case, it refers to a movie clip (or main timeline) in which another movie clip resides, and this will be discussed a wee bit more in the following section.
In both cases, this is a reference point from which you start your path. It’s very common to drop the this keyword when referencing properties and methods in the current scope. Many programmers include the keyword for clarity, but it’s also sometimes particularly useful or even required—such as when some ActionScript editors color various parts of your script for improved legibility. In any case, keeping this in your code will help you remember that you’re referencing an object—a concept easy to forget if you frequently omit the friendly pronoun.
Note
Depending on how you set up your file, it is often necessary to specifically declare what kind of parent you are referencing. For example, you may need to explicitly say the parent is a movie clip before you can work with its timeline. A little more background is probably needed to grasp this, as covered in detail in the Clarifying or Changing the Data Type of a Display Object section of Chapter 4.
Absolute Versus Relative Addresses
Much like a computer operating system’s directory, or the file structure of a website, ActionScript refers to the address of its objects in a hierarchical fashion. You can reference an object address using an absolute or relative path. Absolute paths can be easy because you most likely know the exact path to any object starting from the top of your application—such as Flash Professional’s main timeline. However, absolute paths are quite rigid and will break if you change the nested relationship of any of the referenced objects. Relative paths can be a bit harder to call to mind at any given moment, but they are more flexible. Working from a movie clip and going up one level to its parent and down one level to a child will work from anywhere—be that in the root timeline, another movie clip, or nested even deeper—because the various stages aren’t referenced by name.
Table 2-5 and Table 2-6 draw analogies to uses found in more familiar computer operating system and website analogies.
Put It All Together
To end this chapter, let’s look at a script that brings together much of what we’ve discussed to create a randomizing sentence builder. This code can be found in the build_a_sentence.fla source file. To begin, lines 1 through 7 create a series of arrays of adjectives, nouns, and verbs, imagined by my children, Sally and Claire.
Lines 9 through 22 define the buildASentence() function, which takes the adjective, noun, and verb arrays as arguments. Lines 10 through 12 store the number of items in each array, and then the conditional in lines 13 through 15 check to make sure there is at least one item in each array. If any array has 0 items, a warning is returned in line 14 and the function is at an end.
Lines 17 through 19 create a random number between 0 and 2. The Math.random() method generates a random number between 0 and 1, which is then multiplied by the length of each array. The resulting numbers will be used in line 21 as indices to retrieve values from the arrays that were passed into the function. Because array indices must be integers, we must round the random number created.
However, a random number between 0 and 3 might round to a value of 3. Traditional rounding techniques round up when the number is 0.5 or above, and round down for anything under 0.5. So, value of 2.9 would round up to 3. In this case, you’d receive an error because only items 0, 1, and 2 exist in the array. There is no fourth item (that would be retrieved with an index of 3). To skirt this possibility, we force the rounding operation to round down, using the Math.floor() method, allowing only numbers 0, 1, and 2.
Note
Here are some examples of the rounding features of the Math class, with the results listed as comments following each method:
Math.round(0.8);//1Math.round(0.2);//0Math.floor(0.8);//0Math.floor(0.2);//0Math.ceil(0.8);//1Math.ceil(0.2);//1
The Math.round() method rounds up when the value is 0.5 and above and down when the value is below 0.5. Math.floor() always rounds down, and Math.ceil() (short for ceiling) always rounds up to the nearest whole number.
The function then ends by returning a sentence. It combines “The ”, a random adjective, a space, a random noun, a space, a random verb, and “ away!” and returns it to the caller of the function. We’ll look at that process, after the code.
1varadjsSally:Array= ["hairy","funny","bouncy"]; 2varnounsSally:Array= ["daddy","mommy","sister"]; 3varverbsSally:Array= ["drove","swam","ran"]; 4 5varadjsClaire:Array= ["tall","snuggly","clean"]; 6varnounsClaire:Array= ["duck","birdy","chipmunk"]; 7varverbsClaire:Array= ["ran","jumped","tip-toed"]; 8 9functionbuildASentence(adj:Array, noun:Array, verb:Array):String{ 10varaCount:int= adj.length; 11varnCount:int= noun.length; 12varvCount:int= verb.length; 13if(aCount == 0 || nCount == 0 || vCount == 0) { 14return("not enough words provided"); 15 } 16 17vara:int=Math.floor(Math.random() * aCount); 18varn:int=Math.floor(Math.random() * nCount); 19varv:int=Math.floor(Math.random() * vCount); 20 21return"The "+ adj[a] +" "+ noun[n] +" "+ verb[v] +"away!"; 22 } 23 24for(vari:int= 0; i < 3; i++) { 25varsallySays:String= buildASentence(adjsSally, nounsSally, verbsSally); 26trace(sallySays); 27 28varclaireSays:String= buildASentence(adjsClaire, nounsClaire, verbsClaire); 29trace(claireSays); 30 }
To call the function, we use a for loop in lines 24 through 30. The loop executes 3 times, calling the function with Sally’s arrays (line 25) and Claire’s arrays (line 28). The function returns a sentence in each line, and the loop then traces the results in lines 26 and 29. The results are random, but here is a sample:
The funny mommy drove away!
The snuggly birdy ran away!
The funny sister swam away!
The tall duck tip-toed away!
The hairy daddy swam away!
The clean chipmunk jumped away!
What’s Next?
Ideally, we’ve provided just enough background (or review) of key ActionScript fundamentals to now focus on topical syntax. Although we won’t entirely ignore basic elements within the scripts of future chapters, we will spend more time describing the collective goal of a script, and highlighting new issues introduced or updated by ActionScript 3.0.
Next, we start off the ActionScript 3.0-specific material with a look at the three essential building blocks of most ActionScript objects: properties, methods, and events. Events are one of the most significantly changed elements of ActionScript with the introduction of version 3.0.
In the next chapter, we’ll discuss:
The descriptive properties, such as
width,height,location,alpha(opacity),rotation, and more, of each object that define its major characteristicsThe actions you may exert on objects, or that objects may take on other objects, in the form of methods
The events issued by the user or aspects of your program or environment and, perhaps more directly, the reactions to those events