
Get things organized before your team starts to program. Programming often gets complicated, and we’re not talking about just the complexity of the work. Testing your programs requires keeping detailed records, and you can implement steps now, before a single NXT-G programming block is placed, to help your team stay organized and reduce confusion during the programming process.
During the course of building, programming, and testing a robot, your team will most likely build up a large collection of programs, some of which are specific to a single Robot Game mission and others for running multiple missions. Over time, the team will modify and combine the programs, moving and deleting entire sections of programming.
If you don’t have a good way to track your work, the programs quickly end up as a big mess. That mess isn’t just confusing though: It poses a danger to the success of your missions if you lose track of important programs. This chapter focuses on some indispensable housekeeping chores to build your programming arsenal. Examples include naming programs, using version numbers, and backing up your data, just to name a few.
If you’re just not certain where or how to start programming, we offer a structured way to begin. We also cover flowcharts in this chapter, because a team sometimes needs a method not only for organizing existing programs, but also for organizing its thoughts and observations about the various missions before programming actually begins.
When you begin to create programs, save them with descriptive filenames that tell you something about each particular program so they are easy to find when you’re digging through your program folder. For example, rather than call a program push7.rbt, written for the second mission of Building Team A’s robot, use a more descriptive name, such as RobotAMission2Final.rbt.
From the filename RobotAMission2Final.rbt, we can infer that the program is probably designed for Robot A’s approach to Mission #2 (these would be your naming conventions, not FLL’s). The word Final suggests that, working or not, this is the finished version of the program.
Implementing an easy-to-understand file-naming system will save lots of time as the competition season moves forward. Whatever you do, decide on a file-naming system, and make certain that all the team members understand how to use it. Consider assigning the role of Program and Data Manager to a team member who will make certain that the program collection is properly named, tracked, and backed up (as discussed in Chapter 6).
Try the following conventions to see if they make organizing your programs a little easier.
If you are testing multiple robots, label each one; for example, BotA, BotB, and BotC. Once you select a single robot, remove this label from filenames. Teams could even develop labels for using specific attachments such as BotA-Att1 or BotC-Att4. The key is to create labels that every team member can easily remember and understand.
Number all of the FLL missions, or give them short names. Make certain all the participants are in agreement on how to refer to each mission to avoid confusion. Examples include M1, Mission3, LiftBarrels, and DragCar.
When you create a program, you can safely assume that you will make changes as you test the program, and the team should track these updates accordingly. One method is to append v1.0 (version 1.0) to the end of the original filename. Then, when you make a change to the program, save it using a new filename with an updated version number, such as v2.0 (version 2.0). Don’t ever overwrite a previous version of a program; archiving earlier versions of a program allows you to return to a previous version of a program if you find that a later version contains too many errors to fix.
Another option is to add status words to the end of a program name. Status words are short descriptions of a program’s success or failure and might include Failed, Test, Final, and Old. Combine status words with version numbers for more descriptive filenames.
When naming your files, combine all of the above conventions to create longer, more descriptive names, rather than abbreviated ones. You can always rename the programs as competition nears so the shorter names are visible on the NXT LCD screen.
Examples of good program names that use the above conventions include the following:
BotAM4v2.0.rbt
RobotCM5Final.rbt
RobBAtt3Mission3.rbt
RobAM2and4Test.rbt
Back up your programs and data. If your computer’s hard drive fails, having a backup system in place will allow you to recover all of the team’s hard work, including the robot’s programs. Your team probably stores permission forms, worksheets, interview transcripts, and more in digital form (text documents, PowerPoint slide shows, and so on). If you don’t back up this information and it is lost, your team could be out of the competition if time is short and the team can’t recreate the work quickly enough.
Fortunately, backing up your programs and data has never been easier, whether you back up to a CD or DVD, a USB flash drive, or an online service.
The following suggested procedure ensures that your data is well protected:
Create a folder on a computer called FLL Backups to store all the team’s data.
After each team gathering at which any type of computer work is done, make a copy of all the team’s files to date, place them in a subfolder of FLL Backups, and name that subfolder using the current date (for example, March_16).
Copy all the contents of the FLL Backups folder to a flash drive or a writable CD/DVD.
Ideally, your team should use only a single computer or laptop to hold all its files, but this is rarely possible. Team members often work at home or in smaller groups when time permits. Because of this, files tend to be scattered among multiple computers. A Program and Data Manager can gather all the team files by email, USB flash drive, or various other ways and collect them on one machine.
Whatever method your team decides to use to protect its data, be sure to use it; a good backup plan is worthless if you don’t implement it.
Note
Many teams purchase and create a team website from a web-hosting service, which often provides enough space to use as file storage for the team. Ask your hosting service about setting up an FTP service (and how to use it) and the software required to allow team members to store their individual work files. Storing your files with a web-hosting service is another way to back them up and keep them in one place that all the members can access. Another option is to purchase online backup storage space from services such as S3 by Amazon (http://aws.amazon.com/s3). Services such as this allow you to upload your data to storage servers and charge you by the megabyte or gigabyte of stored data, but it’s typically affordable and easy to use.
After examining the competition mat and models, the team members typically understand what their robot must do; the challenge is programming the robot to accomplish its missions. The best way to begin is with a plan. Our recommended approach is to use flowcharts to structure the programs before actually beginning to write any programs.
Flowcharts are a graphical way of organizing the structure of a robot’s program. You can find much more information on websites covering flowcharts using a simple Google search with keywords of flowchart and tutorial. A good website to start from is http://www.hci.com.au/hcisite2/toolkit/flowchar.htm, which contains one method for creating flowcharts, but this chapter demonstrates our flowchart method by creating a simple mission for the robot to perform. We show how to convert the mission description to a flowchart and then convert the flowchart to an actual NXT-G program.
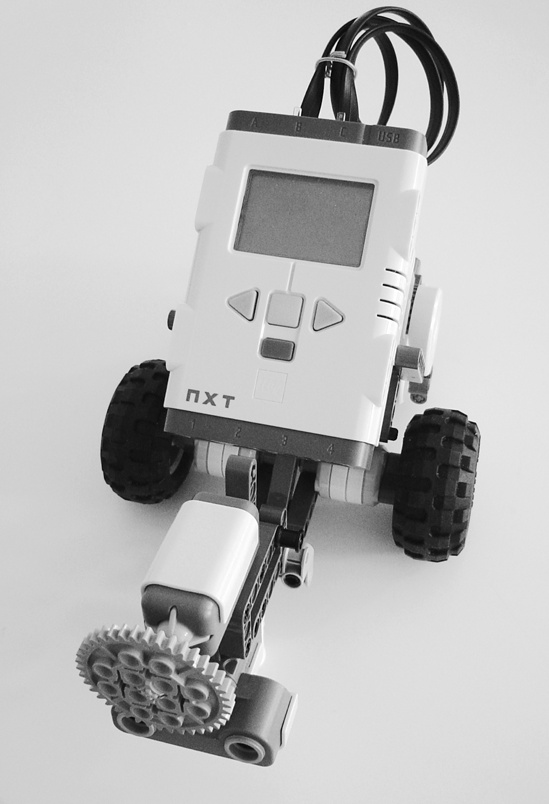
Figure 13-1 shows the simple TriBot robot equipped with one Ultrasonic Sensor and one Touch Sensor.
For this mission, place the TriBot on the floor between two small boxes approximately 3 feet (1 meter) apart, with the TriBot facing one of the boxes. When the program starts, the robot should roll forward and stop when it is within 3 inches (7.62 cm) of the box. Again rolling forward, when the Touch Sensor is triggered, the robot should stop, rotate 180 degrees, roll forward, and stop within 3 inches (7.62 cm) of the second box. The robot’s final movement will be to roll forward and stop when the second box triggers the Touch Sensor. Then the robot calculates the approximate distance (using degrees rotated) between the two boxes and displays the figure on the LCD screen.
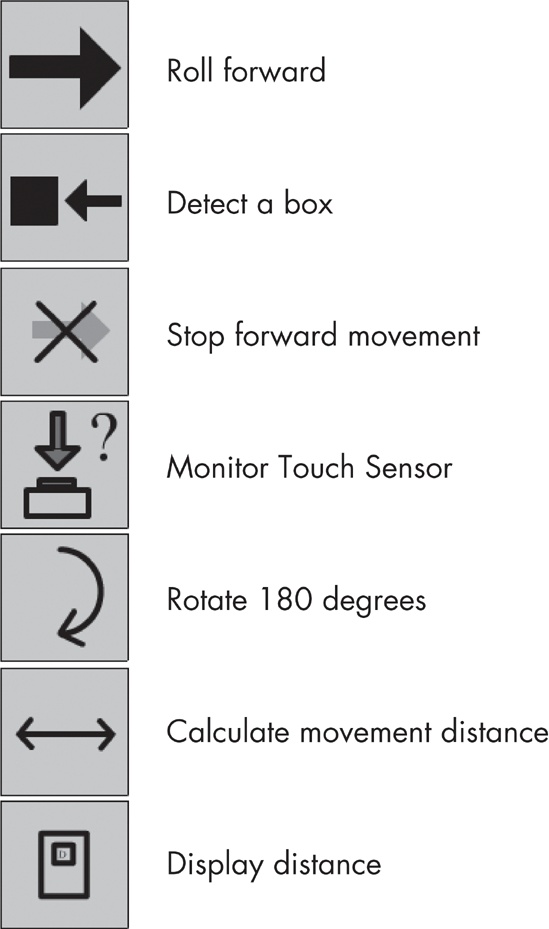
The next step is to break the mission down into individual actions by identifying every action of the robot and listing each action, as the following shows:
Roll forward.
Detect a box.
Stop forward movement.
Monitor Touch Sensor.
Rotate 180 degrees.
Calculate movement distance.
Display distance.
The robot will perform some of these actions more than once (such as detecting boxes 1 and 2) and will perform others only once (such as displaying the distance).
Having identified the individual actions, we describe each action, including any sensors, motors, or other special requirements needed to perform the action. (This often requires some brainstorming and discussion by the team; the more team members that participate, the less likely that something will be overlooked.)
The following is our sample mission actions with descriptions:
Roll forward We might want to test to determine the optimal speed for the motors to rotate. Although the speed might not matter, it’s a good idea to check to be certain.
Detect a box Use the Ultrasonic Sensor to detect the first box. Mount the sensor low so it doesn’t miss the box.
Stop forward movement Use the Brake setting instead of Coast for more accuracy.
Monitor Touch Sensor You may need to add a bumper to the Touch Sensor to ensure that it finds the second box (find information on bumpers in Chapter 10). Have the robot roll slowly toward the box.
Rotate 180 degrees We need to calculate the correct number of rotations so the robot turns exactly 180 degrees.
Calculate movement distance Monitor the number of rotations of one of the motors from the time it completes its rotation of 180 degrees until the second box triggers the Touch Sensor. For more accuracy, measure the distance from the first box to the back of the wheels, and add that value to the degrees/rotations it will take the robot to move to the second box.
Display distance Measure the wheel’s circumference to help calculate the actual distance traveled.
Don’t skimp on the descriptions. The more information the team provides, the easier it will be to create the flowchart and actual NXT-G program. You will see why in the next section.
Next, convert each action into a small icon. Be as creative as you like or keep it simple, but have fun. Figure 13-2 shows the icons we created for our actions.
As you can see, the icons are nothing fancy; they simply need to represent the individual actions we identified from the robot mission description.
Print the icons on paper and cut them out, or use them in a graphics program. Following the mission description, place your icons, left to right, in the order described by the mission, as Figure 13-3 shows. (If you run out of space on a line, just wrap the icons to the next line.)
Note
You should add your own captions below the icons to explain what is happening in your mission descriptions, as Figure 13-3 shows.
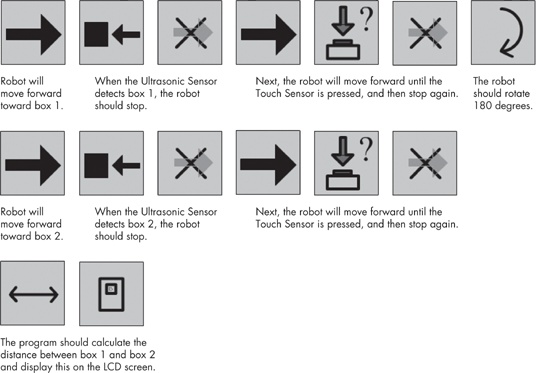
Guess what? You just created a flowchart by converting the written mission description to graphic form. All that’s left is to convert the flowchart to NXT-G and test it with a robot. The next section shows a partial conversion of this flowchart into an NXT-G program.
Now we convert our icons into the actual NXT-G blocks required for the new program. At this point, we assume that anyone involved in programming the robot is familiar with using the NXT-G software. A good understanding of each NXT-G programming block is required; to convert an icon to its matching NXT-G block, you must know not only which NXT-G block to add to the program, but also how to configure it.
Note
Programmers should build the sample robots and complete the tutorials that come with the NXT-G software. Consult the Help documentation included with the NXT-G software for assistance on accessing the tutorials.
To convert the icons, first open the NXT-G software. Begin by examining our icons and determining the proper NXT-G block (or blocks) to add to mirror the behavior described by each icon.
In the first part of our program, step 1, the robot moves forward until the Ultrasonic Sensor detects a box (step 2), at which point the robot stops (step 3). This sequence of events is programmed using a combination of Move and Wait blocks as Figure 13-4 and Figure 13-5 show. First we added a Move block and configured it for Unlimited movement. This means the robot will roll forward until stopped (by an object, or in this case, the Ultrasonic Sensor detecting a box). In Figure 13-5, notice that we configured the block to wait until the Ultrasonic Sensor detects something (box 1) less than 3 inches in front of the robot.
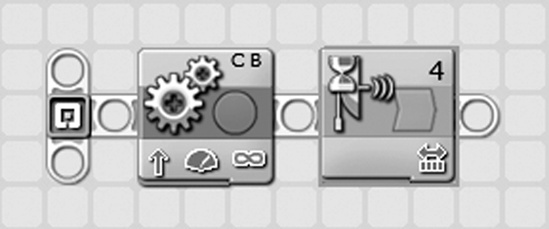
Once the Ultrasonic Sensor is triggered, the Wait block stops “waiting” and lets the program continue. Figure 13-6 shows that after the Ultrasonic Sensor is triggered, the robot needs to stop (step 3).
To perform this action, we drop in another Move block configured to stop the motors, as Figure 13-6 shows.
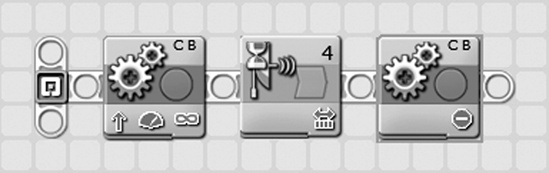
Next, we want the robot to roll toward box 1 until it triggers the Touch Sensor (step 4). Our notes on this action tell us that we want the robot to roll slowly toward box 1 to keep from pushing the box. Accomplish this with another Move block (Figure 13-7) configured to move at a slower speed (lower power).
Next, we want the robot to roll forward until the Touch Sensor is triggered (step 4). Use another Wait block that will “wait” until the Touch Sensor is pressed, as Figure 13-8 shows.
Once the Touch Sensor is triggered, the robot should stop again (as it did earlier in step 3), as Figure 13-9 shows.

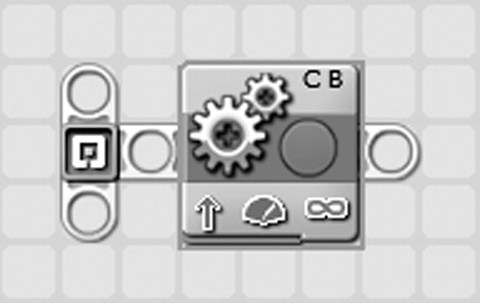
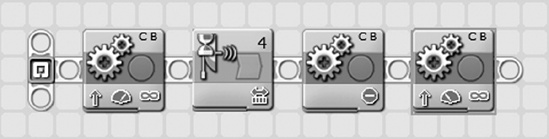
Referring to our numbered flowchart actions, in step 5, the robot should rotate 180 degrees and face box 2. To accomplish this, use a Move block as Figure 13-10 shows, and drag the Steering Control all the way to the right (motor B).
Note
During testing, we would experiment with the degrees value to get the proper rotation, but for now we’ll use a value of 500 degrees as a placeholder (to be tweaked later).

With the robot facing box 2, we realize the program is missing a step. During the programming phase, your team will frequently find that it has overlooked something. Remember that one of the mission objectives was to measure the distance between the two boxes. In our example, we forgot to include a way to record the distance traveled by the robot. We need a way for the robot to track the number of degrees that the robot’s motors rotate between box 1 and box 2. Later we can convert degrees to inches (or centimeters) to determine the distance traveled.
Note
If you print out your icons and place them on a tabletop, it’s very easy to modify your flowchart by shifting icons left and right. Of course, you could also do the same on your computer.
To add this step, add a new icon indicating that the robot should begin tracking the motors’ degrees to the flowchart, as Figure 13-11 shows.
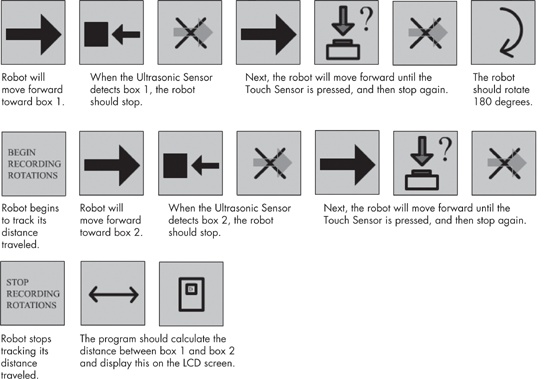
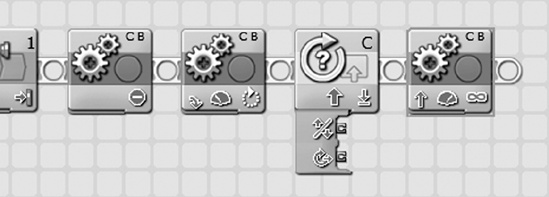
How will we track this value? Assuming the programmers are familiar with all the NXT-G blocks and their functions, they will probably determine that the best block for this job is the Variable block. If we examine our flowchart carefully, we can see that we need to store two different values: value 1, for the degrees rotated from box 1 to the point the Ultrasonic Sensor detects box 2, and value 2, for the degrees rotated before the Touch Sensor detects box 2. In Figure 13-11, Variable blocks represent the icons for Start Recording Rotations and Stop Recording Rotations.
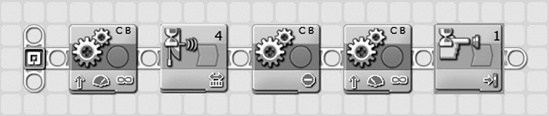
Having modified the flowchart in Figure 13-11, return to the program. To track the number of degrees a motor rotates, use a Rotation Sensor block. First place a Rotation Sensor block in our program (Figure 13-12), and configure it to record rotations for motor C (or just as easily set it for motor B). Also configure it to reset the counter so that the rotations will be recorded starting from 0.
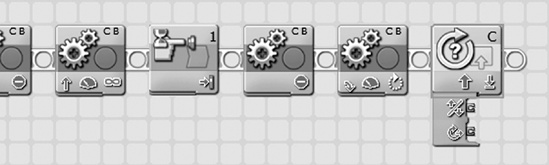
Figure 13-12. The Rotation Sensor block allows us to track the number of degrees of rotation for motor C.
Next, add a Move block, and configure it as Figure 13-13 shows. This Move block will start the robot moving toward box 2 while the Rotation Sensor inside motor C keeps track of how many degrees it rotates.
Your team’s programmers can complete the remaining conversion of the flowchart icons to NXT-G blocks. We hope you’re convinced that methods such as this one can be useful for breaking down complicated tasks (such as FLL missions). Once you understand those simple tasks, it’s just a matter of finding the proper NXT-G blocks to make those tasks happen.
Note
Download the complete program for this chapter’s mission, titled ch13mission.rbt, at http://thenxtstep.com/book/downloads/.
There is a lot more to flowchart design than we cover here. We hope you see that a little preplanning before actual hands-on programming occurs can save considerable time in the long run. By examining your robot’s required actions on the competition mat, the team can develop a “map” to help guide the programming.
Note
We haven’t even scratched the surface for creating icons for every NXT-G block (such as the Loop or Switch blocks). Your programmers might experiment with developing different types of icons for each sensor, motor, and NXT-G block, or they may simply create the icons as they need them.
This chapter covers quite a bit. We hope that we show how preparation can save time and reduce stress. Programming is complicated enough without having to worry about hunting down lost programs, figuring out which program is the most current version, or even puzzling over how to start a complex mission.
At this point, your team should have its filename procedures in place and a data backup plan ready to go. You also have a strategy for dissecting missions and for developing a flowchart to use to map out the programming. Chapter 14 walks you through moving from flowchart to NXT-G program.