
Chapter 5. Response
Code that responds to input from the mouse, keyboard, and other devices has to run continuously. To make this happen, place the lines that update inside a Processing function called draw().
Once and Forever
The code within the draw() block runs from top to bottom, then repeats until you quit the program by clicking the Stop button or closing the window. Each trip through draw() is called a frame. (The default frame rate is 60 frames per second, but this can be changed.)
Example 5-1: The draw() Function
To see how draw() works, run this example:
defdraw():# Displays the frame count to the Console"I'm drawing"frameCount
You’ll see the following:
I'm drawing
1
I'm drawing
2
I'm drawing
3
...
In this example program, the print statements write the text “I’m drawing” followed by the current frame count as counted by the special frameCount variable (1, 2, 3, …). The text appears in the Console, the black area at the bottom of the Processing editor window.
Example 5-2: The setup() Function
To complement the looping draw() function, Processing has a function called setup() that runs just once when the program starts:
defsetup():"I'm starting"defdraw():"I'm running"
When this code is run, the following is written to the Console:
I'm starting
I'm running
I'm running
I'm running
...
The text “I’m running” continues to write to the Console until the program is stopped.
In a typical program, the code inside setup() is used to define the starting values. The first line is always the size() function, often followed by code to set the starting fill and stroke colors, or perhaps to load images and fonts. (If you don’t include the size() function, the Display Window will be 100×100 pixels.)
Now you know how to use setup() and draw(), but this isn’t the whole story. There’s one more location to put code—you can also place variables outside of setup() and draw(). If you create a variable inside of setup(), you can’t use it inside of draw(), so you need to place those variables somewhere else. Such variables are called global variables, because they can be used anywhere (“globally”) in the program. This is clearer when we list the order in which the code is run:
Example 5-3: Global Variables
The following example puts it all together:
x=280y=-100diameter=380defsetup():size(480,120)fill(102)defdraw():background(204)ellipse(x,y,diameter,diameter)
Follow
Now that we have code running continuously, we can track the mouse position and use those numbers to move elements on screen.
Example 5-4: Track the Mouse
The mouseX variable stores the x coordinate, and the mouseY variable stores the y coordinate:

defsetup():size(480,120)fill(0,102)noStroke()defdraw():ellipse(mouseX,mouseY,9,9)
In this example, each time the code in the draw() block is run, a new circle is drawn to the window. This image was made by moving the mouse around to control the circle’s location. Because the fill is set to be partially transparent, denser black areas show where the mouse spent more time and where it moved slowly. The circles that are spaced farther apart show when the mouse was moving faster.
Example 5-5: The Dot Follows You
In this example, a new circle is added to the window each time the code in draw() is run. To refresh the screen and only display the newest circle, place a background() function at the beginning of draw() before the shape is drawn:

defsetup():size(480,120)fill(0,102)noStroke()defdraw():background(204)ellipse(mouseX,mouseY,9,9)
The background() function clears the entire window, so be sure to always place it before other functions inside draw(); otherwise, the shapes drawn before it will be erased.
Example 5-6: Draw Continuously
The pmouseX and pmouseY variables store the position of the mouse at the previous frame. Like mouseX and mouseY, these special variables are updated each time draw() runs. When combined, they can be used to draw continuous lines by connecting the current and most recent location:

defsetup():size(480,120)strokeWeight(4)stroke(0,102)defdraw():line(mouseX,mouseY,pmouseX,pmouseY)
Example 5-7: Set Thickness on the Fly
The pmouseX and pmouseY variables can also be used to calculate the speed of the mouse. This is done by measuring the distance between the current and most recent mouse location. If the mouse is moving slowly, the distance is small, but if the mouse starts moving faster, the distance grows. A function called dist() simplifies this calculation, as shown in the following example. Here, the speed of the mouse is used to set the thickness of the drawn line:

defsetup():size(480,120)stroke(0,102)defdraw():weight=dist(mouseX,mouseY,pmouseX,pmouseY)strokeWeight(weight)line(mouseX,mouseY,pmouseX,pmouseY)
Example 5-8: Easing Does It
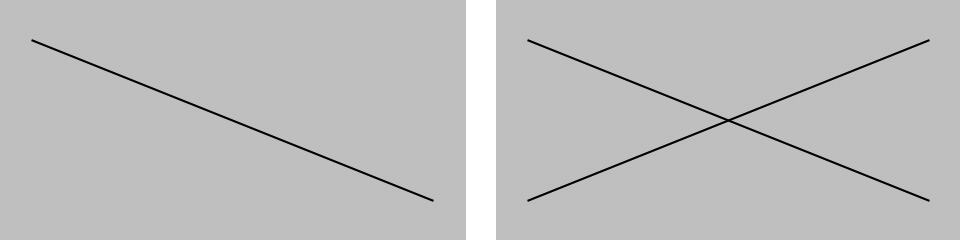
In Example 5-7, the values from the mouse are converted directly into positions on the screen. But sometimes you want the values to follow the mouse loosely—to lag behind to create a more fluid motion. This technique is called easing. With easing, there are two values: the current value and the value to move toward (see Figure 5-1). At each step in the program, the current value moves a little closer to the target value:
x=0.0easing=0.01defsetup():size(220,120)defdraw():globalxtargetX=mouseXx+=(targetX-x)*easingellipse(x,40,12,12)targetX,x
The value of the x variable is always getting closer to targetX. The speed at which it catches up with targetX is set with the easing variable, a number between 0 and 1—a small value causes more of a delay than a larger value. With an easing value of 1, there is no delay. When you run Example 5-8, the actual values are shown in the Console through the print statement. When moving the mouse, notice how the numbers are far apart, but when the mouse stops moving, the x value gets closer to targetX.

Figure 5-1. Easing changes the number of steps it takes to move from one place to another
All of the work in this example happens on the line that begins x +=. There, the difference between the target and current value is calculated, then multiplied by the easing variable and added to x to bring it closer to the target.
You may have noticed the global keyword on the first line of the draw() function. We’ll discuss the purpose of this keyword in “Modifying Global Variables”.
Example 5-9: Smooth Lines with Easing
In this example, the easing technique is applied to Example 5-7. In comparison, the lines are more fluid:
x=0.0y=0.0px=0.0py=0.0easing=0.05;defsetup():size(480,120)stroke(0,102)defdraw():globalx,y,px,pytargetX=mouseX;x+=(targetX-x)*easingtargetY=mouseYy+=(targetY-y)*easingweight=dist(x,y,px,py)strokeWeight(weight)line(x,y,px,py)py=ypx=x
Modifying Global Variables
As explained earlier, a variable is global if the first time you assign a value to the variable occurs outside of a function (e.g., outside of draw and setup). You can use a global variable anywhere in your program without worries, as long as you’re only using the variable’s existing value in statements and expressions. However, if you want to change the value of a global variable from within a function (like draw() or setup()), you have to perform an extra step: include the global keyword as the first line in your function, with the name of the variable you want to change after the keyword. Here’s what it looks like:
x=0defdraw():globalxx=x+1ellipse(x,height/2,10,10)
If you want to modify multiple variables in the same function, put a comma-separated list of the variable names after the global keyword:
x=0y=0defdraw():globalx,yx=x+1y=y+1ellipse(x,y,10,10)
The global keyword exists in Python to make your life easier. It prevents you from absentmindedly creating a new variable in your draw() function (or any other function) that has the same name as a global variable, and overwriting the value in that global variable as a result.
If you forget to include the global keyword, your program might fail in various ways. You might get an “Unbound Local Error,” which is Python’s way of saying that you’re attempting to use the value of a variable before having assigned a value to it. Alternatively, you might get no syntax errors at all, but your program’s behavior will be strange: things that you intended to move will stay still. If either of these things happen, check to ensure that you’ve used the global keyword appropriately.
Click
In addition to the location of the mouse, Processing also keeps track of whether the mouse button is pressed. The mousePressed variable has a different value when the mouse button is pressed and when it is not. The mousePressed variable is a data type called boolean, which means that it has only two possible values: True and False. The value of mousePressed is True when a button is pressed.
Example 5-10: Click the Mouse
The mousePressed variable is used along with the if statement to determine when a line of code will run and when it won’t. Try this example before we explain further:

defsetup():size(240,120)strokeWeight(30)defdraw():background(204)stroke(102)line(40,0,70,height)ifmousePressed==True:stroke(0)line(0,70,width,50)
In this program, the code inside the if block runs only when a mouse button is pressed. When a button is not pressed, this code is ignored. Between the if keyword and the colon at the end of the line, there is a test expression that is evaluated to True or False:
iftest:statements
When the test expression evaluates to True, the code inside the block is run; when the expression evaluates to False, the code inside the block is not run.
The == symbol compares the values on the left and right to test whether they are equivalent. This == symbol is different from the assignment operator, the single = symbol. The == symbol asks, “Are these things equal?” and the = symbol sets the value of a variable.
Warning
It’s a common mistake, even for experienced programmers, to write = in your code when you mean to write ==. The Processing software won’t always warn you when you do this, so be careful.
Alternatively, the test in draw() can be written like this:
ifmousePressed:
Boolean variables, including mousePressed, don’t need the explicit comparison with the == operator, because they can be only True or False.
Example 5-11: Detect When Not Clicked
A single if block gives you the choice of running some code or skipping it. You can extend an if block with an else block, allowing your program to choose between two options. The code inside the else block runs when the value of the if block test is false. For instance, the stroke color for a program can be white when the mouse button is not pressed, and can change to black when the button is pressed:

defsetup():size(240,120)strokeWeight(30)defdraw():background(204)stroke(102)line(40,0,70,height)ifmousePressed:stroke(0)else:stroke(255)line(0,70,width,50)
Example 5-12: Multiple Mouse Buttons
Processing also tracks which button is pressed if you have more than one button on your mouse. The mouseButton variable can be one of three values: LEFT, CENTER, or RIGHT. To test which button was pressed, the == operator is needed, as shown here:
defsetup():size(120,120)strokeWeight(30)defdraw():background(204)stroke(102)line(40,0,70,height)ifmousePressed:ifmouseButton==LEFT:stroke(255)else:stroke(0)line(0,70,width,50)
A program can have many more if and else structures (see Figure 5-2) than those found in these short examples. They can be chained together into a long series with each testing for something different, and if blocks can be embedded inside of other if blocks to make more complex decisions.

Figure 5-2. The if and else structure makes decisions about which blocks of code to run
Location
An if structure can be used with the mouseX and mouseY values to determine the location of the cursor within the window.
Example 5-13: Find the Cursor
For instance, this example tests to see whether the cursor is on the left or right side of a line and then moves the line toward the cursor:

x=0.0defsetup():globalxsize(240,120)x=width/2defdraw():globalxbackground(204)offset=0ifmouseX>x:x+=0.5offset=-10ifmouseX<x:x-=0.5offset=10# Draw arrow left or right depending on "offset" valueline(x,0,x,height)line(mouseX,mouseY,mouseX+offset,mouseY-10)line(mouseX,mouseY,mouseX+offset,mouseY+10)line(mouseX,mouseY,mouseX+offset*3,mouseY)
To write programs that have graphical user interfaces (buttons, checkboxes, scrollbars, etc.), we need to write code that knows when the cursor is within an enclosed area of the screen. The following two examples introduce how to check whether the cursor is inside a circle and a rectangle. The code is written in a modular way with variables, so it can be used to check for any circle and rectangle by changing the values.
The test expressions in these if statements require further explanation. The expressions (mouseX > x and mouseX < x) are examples of relational expressions: expressions that compare two values with a relational operator. The most common relational operators are:
|
> |
Greater than |
|
< |
Less than |
|
>= |
Greater than or equal to |
|
<= |
Less than or equal to |
|
== |
Equal to |
|
!= |
Not equal to |
The relational expression always evaluates to True or False. For instance, the expression 5 > 3 is True. We can ask the question, “Is five greater than three?” Because the answer is “yes,” we say the expression is True. For the expression 5 < 3, we ask, “Is five less than three?” Because the answer is “no,” we say the expression is False. When the evaluation is True, the code inside the block is run, and when it’s False, the code inside the block is not run.
Example 5-14: The Bounds of a Circle
For the circle test, we use the dist() function to get the distance from the center of the circle to the cursor, then we test to see if that distance is less than the radius of the circle (see Figure 5-3). If it is, we know we’re inside. In this example, when the cursor is within the area of the circle, its size increases:

x=120y=60radius=12defsetup():size(240,120)ellipseMode(RADIUS)defdraw():globalradiusbackground(204)d=dist(mouseX,mouseY,x,y)ifd<radius:radius+=1fill(0)else:fill(255)ellipse(x,y,radius,radius)

Figure 5-3. Circle rollover test. When the distance between the mouse and the circle is less than the radius, the mouse is inside the circle.
Example 5-15: The Bounds of a Rectangle
We use another approach to test whether the cursor is inside a rectangle. We make four separate tests to check if the cursor is on the correct side of each edge of the rectangle, then we compare each test and if they are all True, we know the cursor is inside. This is illustrated in Figure 5-4. Each step is simple, but it looks complicated when it’s all put together:

x=80y=30w=80h=60defsetup():size(240,120)defdraw():background(204);ifmouseX>xandmouseX<x+wandmouseY>yandmouseY<y+h:fill(0)else:fill(255)rect(x,y,w,h)
The test in the if statement is a little more complicated than we’ve seen. Four individual tests (e.g., mouseX > x) are combined with the logical AND operator, written with the keyword and, to ensure that every relational expression in the sequence is True. If one of them is False, the entire test is False and the fill color won’t be set to black. This is explained further in the reference entry for and.

Figure 5-4. Rectangle rollover test. When all four tests are combined and true, the cursor is inside the rectangle.
Type
Processing keeps track of when any key on a keyboard is pressed, as well as the last key pressed. Like the mousePressed variable, the keyPressed variable is True when any key is pressed, and False when no keys are pressed.
Example 5-16: Tap a Key
In this example, the second line is drawn only when a key is pressed:
defsetup():size(240,120)defdraw():background(204)line(20,20,220,100)ifkeyPressed:line(220,20,20,100)
The key variable stores the most recent key that has been pressed. The key variable holds a string value whose length is 1. Unlike the boolean variable keyPressed, which reverts to False each time a key is released, the key variable keeps its value until the next key is pressed. The following example uses the value of key to draw the character to the screen. Each time a new key is pressed, the value updates and a new character draws. Some keys, like Shift and Alt, don’t have a visible character, so when you press them, nothing is drawn.
Example 5-17: Draw Some Letters
This example introduces the textSize() function to set the size of the letters, the textAlign() function to center the text on its x coordinate, and the text() function to draw the letter (these functions are discussed in more detail in “Fonts”):

defsetup():size(120,120)textSize(64)textAlign(CENTER)defdraw():background(0)ifkeyPressed:text(key,60,80)
Example 5-18: Check for Specific Keys
In this example, we test for an H or N to be typed. We use the comparison operator, the == symbol, to see if the key value is equal to the characters we’re looking for:

defsetup():size(120,120)defdraw():background(204)ifkeyPressed:ifkey=='h'orkey=='H':line(30,60,90,60)ifkey=='n'orkey=='N':line(30,20,90,100)line(30,20,30,100)line(90,20,90,100)
When we watch for H or N to be pressed, we need to check for both the lowercase and uppercase letters in the event that someone hits the Shift key or has the Caps Lock set. We combine the two tests together with a logical OR, using the or keyword. If we translate the second if statement in this example into plain language, it says, “If the h key is pressed OR the H key is pressed.” Unlike with the logical AND (the and keyword), only one of these expressions need be True for the entire test to be True.
Some keys are more difficult to detect, because they aren’t tied to a particular letter. Keys like Shift, Alt, and the arrow keys are coded and require an extra step to figure out if they are pressed. First, we need to check if the key that’s been pressed is a coded key, then we check the code with the keyCode variable to see which key it is. The most frequently used keyCode values are ALT, CONTROL, and SHIFT, as well as the arrow keys, UP, DOWN, LEFT, and RIGHT.
Example 5-19: Move with Arrow Keys
The following example shows how to check for the left or right arrow keys to move a rectangle:
x=215defsetup():size(480,120)defdraw():globalxifkeyPressedandkey==CODED:# If it's a coded keyifkeyCode==LEFT:# If it's the left arrowx-=1elifkeyCode==RIGHT:# If it's the right arrowx+=1rect(x,45,50,50)
This example illustrates the elif keyword, short for “else if.” This keyword allows you to write an if structure that checks to see if more than one expression evaluates to true, flowing down to the next condition if the first condition evaluates to false. Translated into plain English, the inner if structure in this example translates as “if the keyCode is LEFT, then decrease x by one; otherwise, if the keyCode is RIGHT, then increase x by one.” You can use multiple elifs in one if structure, and if structures with elifs can include a final else clause as well.
Map
The numbers that are created by the mouse and keyboard often need to be modified to be useful within a program. For instance, if a sketch is 1920 pixels wide and the mouseX values are used to set the color of the background, the range of 0 to 1920 for mouseX might need to move into a range of 0 to 255 to better control the color. This transformation can be done with an equation or with a function called map().
Example 5-20: Map Values to a Range
In this example, the location of two lines are controlled with the mouseX variable. The gray line is synchronized to the cursor position, but the black line stays closer to the center of the screen to move further away from the white line at the left and right edges:

defsetup():size(240,120)strokeWeight(12)defdraw():background(204)stroke(102)line(mouseX,0,mouseX,height)# Gray linestroke(0)mx=mouseX/2+60line(mx,0,mx,height)# Black line
The map() function is a more general way to make this type of change. It converts a variable from one range of numbers to another. The first parameter is the variable to be converted, the second and third parameters are the low and high values of that variable, and the fourth and fifth parameters are the desired low and high values. The map() function hides the math behind the conversion.
Example 5-21: Map with the map() Function
This example rewrites Example 5-20 using map():
defsetup():size(240,120)strokeWeight(12)defdraw():background(204)stroke(102)line(mouseX,0,mouseX,height)# Gray linestroke(0)mx=map(mouseX,0,width,60,180)line(mx,0,mx,height)# Black line
The map() function makes the code easy to read, because the minimum and maximum values are clearly written as the parameters. In this example, values for mouseX between 0 and width are converted to a number from 60 (when mouseX is 0) up to 180 (when mouseX is equal to width). You’ll find the useful map() function in many examples throughout this book. (If you’re an experienced Python programmer, you’ll recognize that Processing’s map() function is different from Python’s built-in map() function. This difference is discussed in “Built-In Function Names”.)
Robot 3: Response
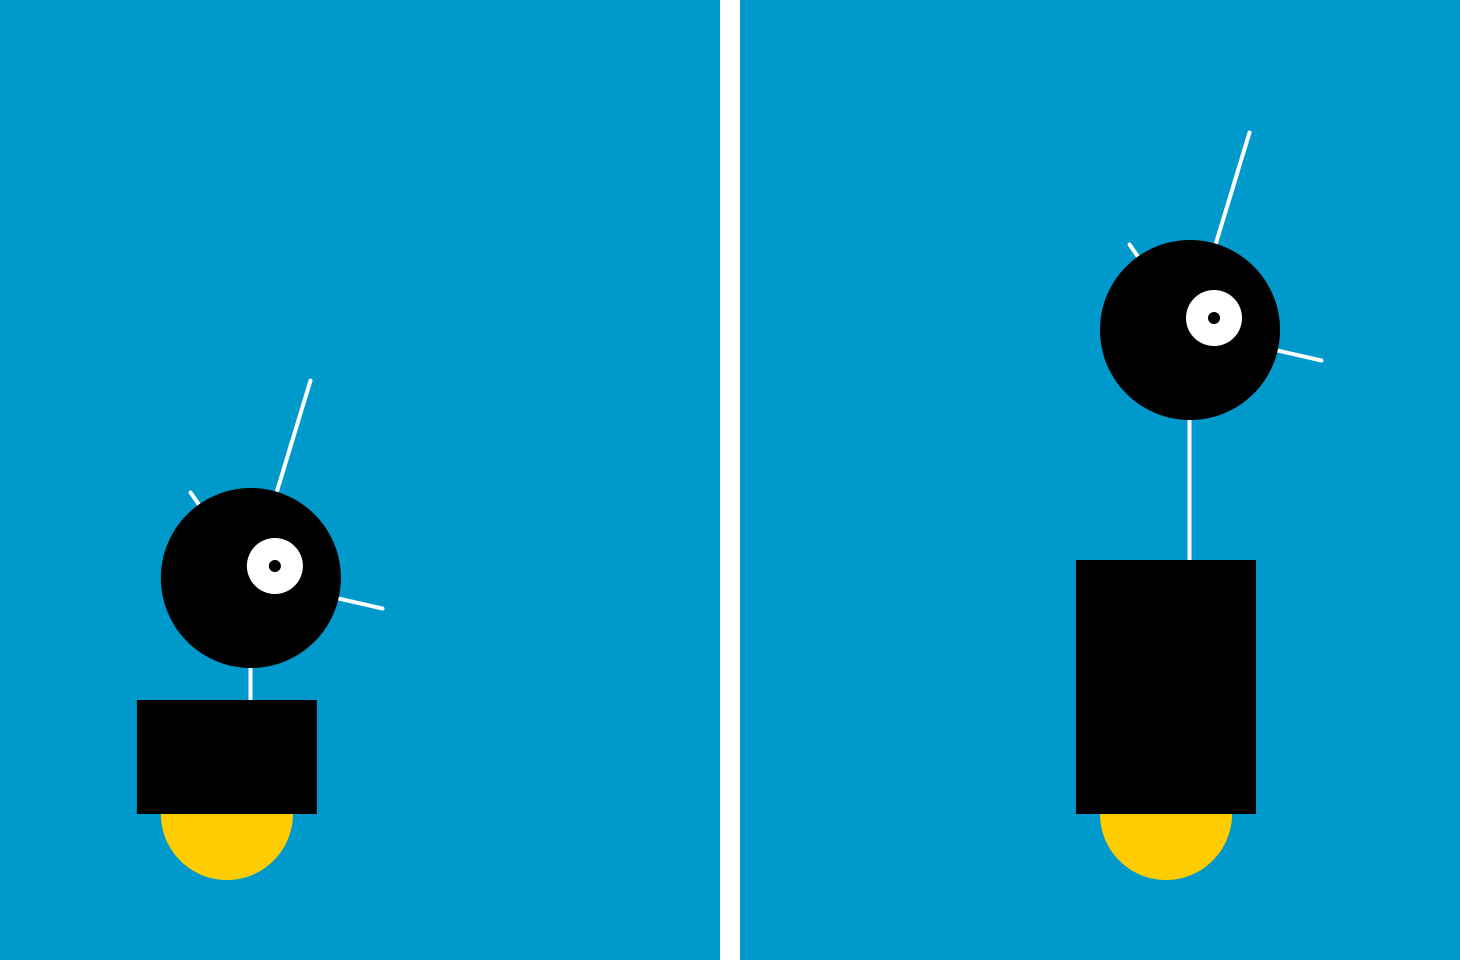
This program uses the variables introduced in Robot 2 (see “Robot 2: Variables”) and makes it possible to change them while the program runs so that the shapes respond to the mouse. The code inside the draw() block runs many times each second. At each frame, the variables defined in the program change in response to the mouseX and mousePressed variables.
The mouseX value controls the position of the robot with an easing technique so that movements are less instantaneous and feel more natural. When a mouse button is pressed, the values of neckHeight and bodyHeight change to make the robot short.
x=60.0# x coordinatey=440.0# y coordinateradius=45# Head radiusbodyHeight=160# Body heightneckHeight=70# Neck heighteasing=0.02defsetup():size(360,480)strokeWeight(2)ellipseMode(RADIUS)defdraw():globalxtargetX=mouseXx+=(targetX-x)*easingifmousePressed:neckHeight=16bodyHeight=90else:neckHeight=70bodyHeight=160ny=y-bodyHeight-neckHeight-radiusbackground(0,153,204)# Neckstroke(255)line(x+12,y-bodyHeight,x+12,ny)# Antennaeline(x+12,ny,x-18,ny-43)line(x+12,ny,x+42,ny-99)line(x+12,ny,x+78,ny+15)# BodynoStroke()fill(255,204,0)ellipse(x,y-33,33,33)fill(0)rect(x-45,y-bodyHeight,90,bodyHeight-33)# Headfill(0)ellipse(x+12,ny,radius,radius)fill(255)ellipse(x+24,ny-6,14,14)fill(0)ellipse(x+24,ny-6,3,3)