
Until now, the JavaScript code on our web pages has run as soon as the page is loaded, pausing only if we include a call to a function like alert or confirm. But we don’t always necessarily want all of our code to run as soon as the page loads—what if we want some code to run after a delay or in response to something the user does?
In this chapter, we’ll look at different ways of modifying when our code is run. Programming in this way is called interactive programming. This will let us create interactive web pages that change over time and respond to actions by the user.
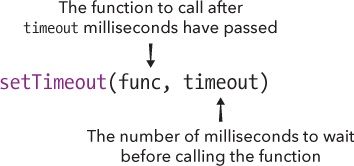
Instead of having JavaScript execute a function immediately, you can tell it to execute a function after a certain period of time. Delaying a function like this is called setting a timeout. To set a timeout in JavaScript, we use the function setTimeout. This function takes two arguments (as shown in Figure 10-1): the function to call after the time has elapsed and the amount of time to wait (in milliseconds).
The following listing shows how we could use setTimeout to display an alert dialog.
➊ var timeUp = function () {
    alert("Time's up!");
  };

➋ setTimeout(timeUp, 3000);
  1
At ➊ we create the function timeUp, which opens an alert dialog that displays the text "Time's up!". At ➋ we call setTimeout with two arguments: the function we want to call (timeUp) and the number of milliseconds (3000) to wait before calling that function. We’re essentially saying, “Wait 3 seconds and then call timeUp.” When setTimeout(timeUp, 3000) is first called, nothing happens, but after 3 seconds timeUp is called and the alert dialog pops up.
Notice that calling setTimeout returns 1. This return value is called the timeout ID. The timeout ID is a number that’s used to identify this particular timeout (that is, this particular delayed function call). The actual number returned could be any number, since it’s just an identifier. Call setTimeout again, and it should return a different timeout ID, as shown here:
setTimeout(timeUp, 5000);
2
You can use this timeout ID with the clearTimeout function to cancel that specific timeout. We’ll look at that next.
Once you’ve called setTimeout to set up a delayed function call, you may find that you don’t actually want to call that function after all. For example, if you set an alarm to remind you to do your homework, but you end up doing your homework early, you’d want to cancel that alarm. To cancel a timeout, use the function clearTimeout on the timeout ID returned by setTimeout. For example, say we create a “do your homework” alarm like this:
  var doHomeworkAlarm = function () {
    alert("Hey! You need to do your homework!");
  };
➊ var timeoutId = setTimeout(doHomeworkAlarm, 60000);
The function doHomeworkAlarm pops up an alert dialog telling you to do your homework. When we call setTimeout(doHomeworkAlarm, 60000) we’re telling JavaScript to execute that function after 60,000 milliseconds (or 60 seconds) has passed. At ➊ we make this call to setTimeout and save the timeout ID in a new variable called timeoutId.
To cancel the timeout, pass the timeout ID to the clearTimeout function like this:
clearTimeout(timeoutId);Now setTimeout won’t call the doHomeworkAlarm function after all.
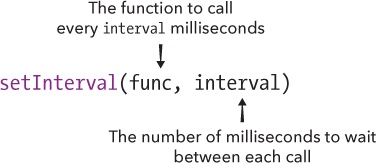
The setInterval function is like setTimeout, except that it repeatedly calls the supplied function after regular pauses, or intervals. For example, if you wanted to update a clock display using JavaScript, you could use setInterval to call an update function every second. You call setInterval with two arguments: the function you want to call and the length of the interval (in milliseconds), as shown in Figure 10-2.
Here’s how we could write a message to the console every second:
➊ var counter = 1; ➋ var printMessage = function () { console.log("You have been staring at your console for " + counter+ " seconds"); ➌ counter++; }; ➍ var intervalId = setInterval(printMessage, 1000); You have been staring at your console for 1 seconds You have been staring at your console for 2 seconds You have been staring at your console for 3 seconds You have been staring at your console for 4 seconds You have been staring at your console for 5 seconds You have been staring at your console for 6 seconds ➎ clearInterval(intervalId);
At ➊ we create a new variable called counter and set it to 1. We’ll be using this variable to keep track of the number of seconds you’ve been looking at your console.
At ➋ we create a function called printMessage. This function does two things. First, it prints out a message telling you how long you have been staring at your console. Then, at ➌, it increments the counter variable.
Next, at ➍, we call setInterval, passing the printMessage function and the number 1000. Calling setInterval like this means “call printMessage every 1,000 milliseconds.” Just as setTimeout returns a timeout ID, setInterval returns an interval ID, which we save in the variable intervalId. We can use this interval ID to tell JavaScript to stop executing the printMessage function. This is what we do at ➎, using the clearInterval function.

As it turns out, we can use setInterval to animate elements in a browser. Basically, we need to create a function that moves an element by a small amount, and then pass that function to setInterval with a short interval time. If we make the movements small enough and the interval short enough, the animation will look very smooth.
Let’s animate the position of some text in an HTML document by moving the text horizontally in the browser window. Create a document called interactive.html, and fill it with this HTML:
<!DOCTYPE html>
<html>
<head>
    <title>Interactive programming</title>
</head>

<body>
    <h1 id="heading">Hello world!</h1>

    <script src="https://code.jquery.com/jquery-2.1.0.js"></script>

    <script>
    // We'll fill this in next
    </script>
</body>
</html>
Now let’s look at the JavaScript. As always, put your code inside the <script> tags of the HTML document.
➊ var leftOffset = 0;

➋ var moveHeading = function () {
➌   $("#heading").offset({ left: leftOffset });

➍   leftOffset++;

➎   if (leftOffset > 200) {
      leftOffset = 0;
    }
   };

➏ setInterval(moveHeading, 30);
When you open this page, you should see the heading element gradually move across the screen until it travels 200 pixels; at that point, it will jump back to the beginning and start again. Let’s see how this works.
At ➊ we create the variable leftOffset, which we’ll use later to position our Hello world! heading. It starts with a value of 0, which means the heading will start on the far left side of the page.
Next, at ➋, we create the function moveHeading, which we’ll call later with setInterval. Inside the moveHeading function, at ➌, we use $("#heading") to select the element with the id of "heading" (our h1 element) and use the offset method to set the left offset of the heading—that is, how far it is from the left side of the screen.
The offset method takes an object that can contain a left property, which sets the left offset of the element, or a top property, which sets the top offset of the element. In this example we use the left property and set it to our leftOffset variable. If we wanted a static offset (that is, an offset that doesn’t change), we could set the property to a numeric value. For example, calling $("#heading") .offset({ left: 100 }) would place the heading element 100 pixels from the left side of the page.
At ➍ we increment the leftOffset variable by 1. To make sure the heading doesn’t move too far, at ➎ we check to see if leftOffset is greater than 200, and if it is, we reset it to 0. Finally, at ➏ we call setInterval, and for its arguments we pass in the function moveHeading and the number 30 (for 30 milliseconds).
This code calls the moveHeading function every 30 milliseconds, or about 33 times every second. Each time moveHeading is called, the leftOffset variable is incremented, and the value of this variable is used to set the position of the heading element. Because the function is constantly being called and leftOffset is incremented by 1 each time, the heading gradually moves across the screen by 1 pixel every 30 milliseconds.
As you’ve seen, one way to control when code is run is with the functions setTimeout and setInterval, which run a function once a fixed amount of time has passed. Another way is to run code only when a user performs certain actions, such as clicking, typing, or even just moving the mouse. This will let users interact with your web page so that your page responds according to what they do.
In a browser, every time you perform an action such as clicking, typing, or moving your mouse, something called an event is triggered. An event is the browser’s way of saying, “This thing happened!” You can listen to these events by adding an event handler to the element where the event happened. Adding an event handler is your way of telling JavaScript, “If this event happens on this element, call this function.” For example, if you want a function to be called when the user clicks a heading element, you could add a click event handler to the heading element. We’ll look at how to do that next.
When a user clicks an element in the browser, this triggers a click event. jQuery makes it easy to add a handler for a click event. Open the interactive.html document you created earlier, use File▸Save As to save it as clicks.html, and replace its second script element with this code:
➊ var clickHandler = function (event) {
➋   console.log("Click! " + event.pageX + " " + event.pageY);
  };
➌ $("h1").click(clickHandler);
At ➊ we create the function clickHandler with the single argument event. When this function is called, the event argument will be an object holding information about the click event, such as the location of the click. At ➋, inside the handler function, we use console.log to output the properties pageX and pageY from the event object. These properties tell us the event’s x- and y-coordinates—in other words, they say where on the page the click occurred.
Finally, at ➌ we activate the click handler. The code $("h1") selects the h1 element, and calling $("h1").click(clickHandler) means “When there is a click on the h1 element, call the clickHandler function and pass it the event object.” In this case, the click handler retrieves information from the event object to output the x- and y-coordinates of the click location.

Reload your modified page in your browser and click the heading element. Each time you click the heading, a new line should be output to the console, as shown in the following listing. Each line shows two numbers: the x- and y-coordinates of the clicked location.
Click! 88 43
Click! 63 53
Click! 24 53
Click! 121 46
Click! 93 55
Click! 103 48
Browser Coordinates
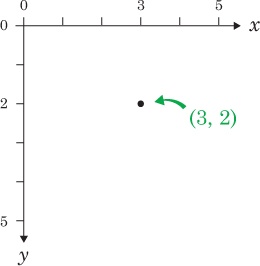
In the web browser and in most programming and graphics environments, the 0 position of the x- and y-coordinates is at the top-left corner of the screen. As the x-coordinate increases, you move right across the page, and as the y-coordinate increases, you move down the page (see Figure 10-3).
The mousemove event is triggered every time the mouse moves. To try it out, create a file called mousemove.html and enter this code:
  <!DOCTYPE html>
  <html>
  <head>
      <title>Mousemove</title>
  </head>

  <body>
      <h1 id="heading">Hello world!</h1>

      <script src="https://code.jquery.com/jquery-2.1.0.js"></script>

      <script>
➊       $("html").mousemove(function (event) {
➋         $("#heading").offset({
           left: event.pageX,
           top: event.pageY
          });
         });
       </script>
   </body>
   </html>
At ➊ we add a handler for the mousemove event using $("html") .mousemove(handler). In this case, the handler is the entire function that appears after mousemove and before </script>. We use $("html") to select the html element so that the handler is triggered by mouse movements that occur anywhere on the page. The function that we pass into the parentheses after mousemove will be called every time the user moves the mouse.
In this example, instead of creating the event handler separately and passing the function name to the mousemove method (as we did with our clickHandler function earlier), we’re passing the handler function directly to the mousemove method. This is a very common way of writing event handlers, so it’s good to be familiar with this type of syntax.

At ➋, inside the event handler function, we select the heading element and call the offset method on it. As I mentioned before, the object passed to offset can have left and top properties. In this case, we set the left property to event.pageX and the top property to event.pageY. Now, every time the mouse moves, the heading will move to that location. In other words, wherever you move the mouse, the heading follows it!
In this chapter, you learned how to write JavaScript that runs only when you want it to. The setTimeout and setInterval functions are great for timing code to run after a delay or at certain intervals. If you want to run code when the user does something in the browser, you can use events like click and mousemove, but there are many others.
In the next chapter, we’ll put what you’ve just learned to good use to make a game!
Here are a few challenges to explore more ways to use interactive programming.
#1: FOLLOW THE CLICKS
Modify the previous mousemove program so that instead of following your mouse, the heading will follow just your clicks. Whenever you click the page, the heading should move to the click location.
#2: CREATE YOUR OWN ANIMATION
Use setInterval to animate an h1 heading element around the page, in a square. It should move 200 pixels to the right, 200 pixels down, 200 pixels to the left, 200 pixels up, and then start again. Hint: You’ll need to keep track of your current direction (right, down, left, or up) so that you know whether to increase or decrease the left or top offset of the heading. You’ll also need to change the direction when you reach a corner of the square.
#3: Cancel an Animation with a Click
Building upon Challenge #2, add a click handler to the moving h1 element that cancels the animation. Hint: You can cancel intervals with the clearInterval function.
#4: MAKE A “CLICK THE HEADER” GAME!
Modify Challenge #3 so that every time a player clicks the heading, instead of stopping, the heading speeds up, making it harder and harder to click. Keep track of the number of times the heading has been clicked and update the heading text so it shows this number. When the player has reached 10 clicks, stop the animation and change the text of the heading to “You Win.” Hint: To speed up, you’ll have to cancel the current interval and then start a new one with a shorter interval time.