
![]()
RESTful Web Services
This chapter explains the principles that conquer the enterprise integration world. It’s about Representational State Transfer, or REST.
The evolution of distributed systems didn’t stop with remoting and web services. SOAP allowed high decoupling, which solved a major problem of remoting technologies. As a successor of remoting technologies, SOAP web services were adopted by big enterprise companies. Cooperation between distributed development teams was enhanced, because SOAP web services rely on contracts. A well-defined XSD/WSDL contract can help avoid ambiguities or sanitize poor communication between developers on the client side and those on the server side.
But after some time, many people started to experience problems with SOAP web services. First, developing SOAP web services is not trivial. SOAP’s complexity started to create a bigger and bigger bottleneck for developing enterprise applications. Even if SOAP provided rich possibilities for complex requirements, it turned out to be overkill in most cases. This slowed development and made maintenance more expensive.
The next highly criticized aspect of traditional web services is the XML payload it relies on. Even when computation capacities were multiplied every few years, users started to expect lower and lower latency. But XML is verbose, and SOAP completely relies on the XML exchange format. So when lightweight exchange formats started to pop up (most notably, JSON), SOAP couldn’t take advantage of them.
Parallel to the SOAP web services track, a different school of web service development was evolving. This approach is REST (which is only two years younger than SOAP). Although SOAP gained a wider adoption at the beginning, people started to realize that REST has more advantages.
REST was born in a dissertation by Roy Fielding named “Architectural Styles and the Design of Network-Based Software Architectures.” He codified a few architectural concepts for distributed computing based on the Hypertext Transfer Protocol and defined a new term for these concepts: Representational State Transfer (REST).
By definition, REST operates over HTTP. In fact, it promotes HTTP as an application protocol—as opposed to SOAP, which uses HTTP as a transport protocol only. The SOAP framework uses HTTP under the hood to transfer SOAP messages. A SOAP developer doesn’t need to know about HTTP features, because that developer is using higher-level SOAP abstractions. REST uses an HTTP programming model, on the other hand; the developer needs to implement HTTP, because it drives the communication contract between the client and the server.
But REST is not a protocol; it’s a set of architectural concepts. Therefore, these concepts can be used with other non-HTTP protocols.
REST gained popularity because it’s much more lightweight than SOAP. No strict contract is involved. Without strict rules, developers have more space to fulfill business requirements. At the same time, they are dealing with a simpler programming model, because REST doesn’t rely on schema.
A second big advantage is the ability to operate on top of various exchange formats. REST can take advantage of some lightweight XML alternatives. An extremely popular one nowadays is JavaScript Object Notation (JSON), invented by Douglas Crockford. As its name suggests, it was created primarily for the JavaScript language. But its simplicity and lightweight aspects quickly became popular across all major programming platforms.
Over time, it became clear that REST is a better approach than SOAP in most cases. Today, REST is the obvious winner. However, in some cases, using SOAP still makes perfect sense. For example, a need for statefulness or transactions would probably shift SOAP into a better position than REST. Keep in mind that SOAP and REST are not opposites. Each is useful in different cases.
REST Principles
As noted previously, Roy Fielding codified REST in his dissertation. This architectural style uses the following principles to simplify the development and operation of distributed systems.
REST’s basic principle is the decoupling of client/server communication and the separation of their concerns into manageable sets of requirements. For example, the client should be exclusively responsible for the presentation layer. Server concerns include persisting data and hiding persistence details from the client. When communication occurs via a unified interface, any side of the communication can be replaced. For example, you can replace the persistence storage type on the server without affecting the client side. Or you can replace the rendering engine on the client without affecting the server. This significantly enhances the modularity of an enterprise system.
Most SOAP services perform actions on top of resources (for example, booking a flight). So these services are designed to be verb-centric: both the type of resource (noun) and the type of action (verb) are important for the contract between the client and server.
Roy Fielding decided to simplify this verb-centric approach for REST web services. He recognized that we want to perform mostly create, read, update, and delete (CRUD) actions. And all of these are already contained in the Hypertext Transfer Protocol he helped to create: GET, POST, PUT, and DELETE. So he significantly simplified one dimension of the web services space because he removed the need to design verbs. This makes designing REST services easier, because we need to identify only the resources (or nouns) in our system. Actions are already defined by CRUD operations.
Identifying resources (or a domain model) within our application and exposing them via a constant set of actions creates a uniform interface. Manipulation of resources (the domain model) is done via the well-defined operations of HTTP. To be able to manipulate a resource, it has to have a unique identifier (for example, a URI). Not only does the resource itself need to be identifiable, but also the instance of certain resources. Fielding also goes further and specifies that messages about the resource need to contain all the information needed to manipulate the resource, regardless of any previous messages about it. So messages should contain all the information needed to perform any of the CRUD operations on top of the resource instance.
![]() Note It is important to understand the difference between a uniform resource identifier (URI) and a uniform resource locator (URL). A URI is a text representation used to identify a resource (examples include http://lkrnac.net/about, ../../file.txt, file.txt, and /users). A URL specifies the location of a resource on the network (for example, http://lkrnac.net/about). So a URL is also a URI, but not the other way around. In other words, a URL is a special type of URI.
Note It is important to understand the difference between a uniform resource identifier (URI) and a uniform resource locator (URL). A URI is a text representation used to identify a resource (examples include http://lkrnac.net/about, ../../file.txt, file.txt, and /users). A URL specifies the location of a resource on the network (for example, http://lkrnac.net/about). So a URL is also a URI, but not the other way around. In other words, a URL is a special type of URI.
Another crucial REST principle is strict statelessness. The server doesn’t store any information about clients in sessions. We compensate for this lack of state on the server by including all needed user-specific data for each request. This simplifies implementation on the server side, because the server doesn’t need to hold state in memory for all connected clients. Avoiding longer-lived sessions also saves a lot of server resources, because all objects needed to serve the request can be released immediately after the response is sent back to the server. This is a slight downside of REST communication, because sending all state transition information from the client to the server and back increases network bandwidth consumption.
Each request also has to contain data to perform authentication or authorization. Because the server doesn’t know anything about the clients and their state, the client must fulfill authorization or authentication constraints in each request. On the other side, stateful communication is mostly implemented by generating session tokens after authentication occurs. If this token is stolen by an attacker, it can be abused for a limited amount of time, until the session is closed or times out. But with stateless communication, authentication credentials or authorization tokens don’t expire in a short amount of time. The attacker has a wider window for performing serious attacks. This is a slight security downside of REST communication and shows how crucial it is to use encrypted HTTPS protocols instead of plain HTTP.
State not only consumes resources on the server (as Roy Fielding described in his dissertation), but also complicates clustering. When a user session isn’t stored in any of the server nodes, it doesn’t really matter to which server node user requests are routed, because any node can serve the request. Therefore, the stateless nature of web services is nowadays one of the main requirements.
To see how the presence of state in an application can complicate clustering, let’s consider the scenario in Figure 4-1.

Figure 4-1. Example of clustering problems with stateful application
Let’s consider that Node1 in our example has a cache for storing records in memory. It’s not stateless, because it’s storing data (even if for only a short time). The first request reads the record from Database Node1 via Node1 and stores the record into cache. The next request updates the same record via Node2 in Database Node2. Let’s also consider that our database cluster is replicated across all database nodes, so the record also is updated in Database Node1. Finally, the third request reads the record from Node1 again, but this time it doesn’t read the record from Database Node1, but rather from internal cache. In this case, the record doesn’t reflect the change from request 2. Therefore, request 3 reads an inconsistent record.
Similar problems occur if we store state in a session on the server or we use Hibernate as a second-level cache in any of the nodes. Hibernate using a second-level cache expects that only our application is accessing the database. Therefore, if we want to cluster an application that relies on Hibernate’s second-level cache, we need to host it on a separate server, and all nodes of our application need to be configured to use it as a second-level cache.
This problem of storing state is common in enterprise applications. Ideally, each application node should be stateless. But sometimes it makes sense to cache data when there isn’t a strict requirement for data consistency. A good example is caching OAuth authentication tokens to save round-trips to the OAuth server. These tokens generally don’t change. They expire after a certain time, so it is OK to cache them until they expire.
There also are ways to use clustering for server nodes that hold state in session. Load balancers can be configured to route traffic to a node where the session is stored. This mechanism is called a sticky session. But it complicates load balancer configuration and decreases the ability to effectively route traffic based on the actual load. The sticky session mechanism can be useful for persistent HTTP connections (keep-alive). These are used to boost latency of web services, because the HTTP connection remains open and the initial handshake doesn’t need to occur for every request, which can be slightly more expensive in the case of HTTPS communication.
Statelessness also enables us to easily hide layered architecture from the client. Clients don’t have a clue whether they’re talking to one physical machine or a distributed cluster. This is a huge advantage for architects, because it allows them to iteratively scale toward a more robust, secure system without exposing these changes.
Fielding’s thinking about handling application state goes further, to a constraint called hypermedia as the engine of application state, or HATEOAS). For state transitions, the client uses only hypermedia contained in the payload from the server. The client’s knowledge of the service infrastructure and the structure of resources should be minimalized. Therefore, it’s expected that the client can discover most information from the server’s responses (for example, via URIs to resources).
A further advantage of REST that Fielding points out is cacheability. Because stateless communication can be cached, we can boost the performance and scalability of web applications. Of course, caching resources doesn’t always make sense, because doing so would make state transitions impossible. Therefore, it is crucial that the server can explicitly or implicitly mark a response as cacheable.
You may notice that these principles are generic and fairly limited. REST turned out to be a concise and maintainable approach for developing web services, because developers don’t need to understand a lot of complicated details, as with the SOAP protocol. But it allows for similar interoperability, because HTTP and JSON (as the major REST transport format) have good support across all significant programming languages. A limited number of possible operations allowed for the creation of various frameworks, which can generate REST APIs based on the domain model. One example from the Spring world is Spring Data REST, where developers need to specify only JPA entities. The rest of the application, including the web layer, will be created using REST conventions.
When an application follows all REST principles, it is commonly called RESTful. But remember that REST is not a protocol, standard, or framework. So nothing can stop us from dropping any of its principles when there is a good reason to do so. But in that case, we can’t call our application RESTful anymore.
Even though it may seem like REST is suitable for nearly everything, it’s not. Using HTTP as an application protocol can improve performance, because we operate on lower layers. But we are forced to do one HTTP call per one CRUD operation for one resource instance. Sometimes use cases require various CRUD operations for various resource instances. Doing a lot of HTTP calls for such use cases can introduce performance problems for an application. Such situations are good candidates for dropping some REST principles.
For example, say a client needs to read user information (such as an e-mail address and name) alongside user actions. Following pure REST principles, we would design two resources: for example, user and userAction. But for performance reasons, we might want to consider aggregating these two resources into one response, so the client would need to perform only one HTTP call instead of two.
Another example is a requirement to implement a real-time chat feature into our REST application. In this case, we would probably use WebSockets to implement an endpoint fulfilling this non-CRUD bidirectional communication. But all other endpoints could still follow REST principles.
HTTP Overview
The Hypertext Transfer Protocol (HTTP) was designed for distributed systems to exchange hypertext data. It sits on the application layer of the Open Systems Interconnection (OSI) model.
![]() Note The OSI model is a standardized, layered model for designing communication systems. It is beyond the scope of this book. A good place to start exploring it is its Wikipedia page: http://en.wikipedia.org/wiki/OSI_model.
Note The OSI model is a standardized, layered model for designing communication systems. It is beyond the scope of this book. A good place to start exploring it is its Wikipedia page: http://en.wikipedia.org/wiki/OSI_model.
HTTP is the main protocol that drives the World Wide Web (WWW), and therefore is probably the most widely used application protocol on the planet. As its name suggests, it was designed for exchanging hyperlinks, which are logical links between documents on the Web. Communication between the client and the server is initiated by the client sending an HTTP request message to the server. The server processes the request and sends back an HTTP response.
So there are two types of HTTP messages: request and response. Listing 4-1 and Listing 4-2 show examples of each one.
![]() Note For testing HTTP applications (including REST), I find handy the Chrome plug-ins DHC - REST/HTTP API Client (https://chrome.google.com/webstore/detail/dhc-resthttp-api-client/aejoelaoggembcahagimdiliamlcdmfm) and Advanced REST Client (https://chrome.google.com/webstore/detail/advanced-rest-client/hgmloofddffdnphfgcellkdfbfbjeloo/). A more sophisticated tool often used for testing is SoapUI (www.soapui.org). The free version is powerful enough for testing REST endpoints, but the UI is not modern. A similar tool is Apache JMeter (https://jmeter.apache.org/), but it’s targeted more toward performance testing. For troubleshooting and sniffing HTTP communication, including inspecting raw HTTP messages, I suggest Zed Attack Proxy, or ZAP, (www.owasp.org/index.php/OWASP_Zed_Attack_Proxy_Project). It is an Open Web Application Security Project (OWASP) subproject used for penetration testing, but is also useful for developing REST APIs.
Note For testing HTTP applications (including REST), I find handy the Chrome plug-ins DHC - REST/HTTP API Client (https://chrome.google.com/webstore/detail/dhc-resthttp-api-client/aejoelaoggembcahagimdiliamlcdmfm) and Advanced REST Client (https://chrome.google.com/webstore/detail/advanced-rest-client/hgmloofddffdnphfgcellkdfbfbjeloo/). A more sophisticated tool often used for testing is SoapUI (www.soapui.org). The free version is powerful enough for testing REST endpoints, but the UI is not modern. A similar tool is Apache JMeter (https://jmeter.apache.org/), but it’s targeted more toward performance testing. For troubleshooting and sniffing HTTP communication, including inspecting raw HTTP messages, I suggest Zed Attack Proxy, or ZAP, (www.owasp.org/index.php/OWASP_Zed_Attack_Proxy_Project). It is an Open Web Application Security Project (OWASP) subproject used for penetration testing, but is also useful for developing REST APIs.
The structures of the request and response messages are similar and effectively differ only in the first line. These are the parts of the HTTP message as described by the Hypertext Transfer Protocol:
- Initial line
- In a request message, this is a request line containing the following:
- HTTP method
- Hostname with target URL
- HTTP version
- In a response message, this is a status line containing the following:
- HTTP version
- Status code
- Status message
- In a request message, this is a request line containing the following:
- Headers
- Empty line
- Optional body of the message
An important piece of information embedded in the response message is the HTTP status code. It has the form of a three-digit number and should inform the client about the result of processing the request. In some cases, the status is about server health. For convenience, status codes are separated into groups of a hundred:
- 100+ Informational: Informs the client that the service didn’t finish processing the request and that a full response will come later.
- 200+ Success: Informs the client that the request was received, understood, accepted, and processed by the server.
- 300+ - Redirection: Informs the client that further action is needed to process the request. Such scenarios are commonly used for URL redirection.
- 400+ - Client errors: Informs the client that an error occurred, and it was most probably caused by the client sending an incorrect request. Such an error generally can be fixed by the client. The server must provide enough information about the error, so the client can figure out the problem.
- 500+ - Server errors: Informs the client about a server error that can’t be fixed by client intervention. Such errors often indicate that the server application is down or irresponsible.
Not all the error codes within these intervals are occupied. Inventors of HTTP were thinking ahead and left enough space in the error codes for further revisions of the protocol—including future statuses that could be introduced, or custom statuses that could be introduced by an application using HTTP.
![]() Note Listing HTTP status codes is beyond the scope of this book. A useful resource for inspecting these status codes and their contracts is atwww.restapitutorial.com/httpstatuscodes.html. This resource contains citations from the HTTP specification as well as from Wikipedia.
Note Listing HTTP status codes is beyond the scope of this book. A useful resource for inspecting these status codes and their contracts is atwww.restapitutorial.com/httpstatuscodes.html. This resource contains citations from the HTTP specification as well as from Wikipedia.
Some groups of status codes require specific headers in the response. For example, when the status code is 201 Created (indicating that the resource was successfully created by request), the response should include the Location header, so the client knows where to find the created resource.
Headers of the HTTP message are optional. Various types of HTTP headers exist:
- Request headers (standard and nonstandard)
- Response headers (standard and nonstandard)
- Custom headers
The first two categories of headers are used by the server or client to control various aspects of communication. Some headers inform a counterpart (for example, what content type the user accepts or which browser type it is using). Other headers have a deeper function within communication (for example, can turn on compression of the payload or control caching).
![]() Note A list of default HTTP headers is beyond the scope of this book. Wikipedia provides a nice overview of HTTP headers: http://en.wikipedia.org/wiki/List_of_HTTP_header_fields.
Note A list of default HTTP headers is beyond the scope of this book. Wikipedia provides a nice overview of HTTP headers: http://en.wikipedia.org/wiki/List_of_HTTP_header_fields.
Custom headers are intended to be used by business logic.
HTTP Methods Used by REST
We mentioned that REST principles rely on a limited number of operations that can be performed against the resource instance. These operations are commonly called CRUD, as noted previously. HTTP (used as the application protocol in the REST world) contains methods for performing these operations.
An important parameter of HTTP methods is idempotency: the HTTP call will have the same effect if the same request is sent various times. This principle is not HTTP specific and can be applied to various use cases, including in mathematics. For example, multiplying any number by 1 is an idempotent operation, because any number can be multiplied by 1 many times with the same result. Another math example is logical OR with a true value. Examples from the computer world include reading a record from a database or updating a record in a database.
However, it is not guaranteed that a sequence of various idempotent actions will have the same result. For example, a sequence of DB reads of the same record can be nonidempotent if we also execute an update of the same record in the meantime.
The next important parameter of HTTP methods is safety. A safe method doesn’t have side effects; It doesn’t change the state of the application when an operation is performed. For example, reading a record from a database doesn’t have any side effects because the persisted state in the database remains the same.
The following are HTTP methods used in REST services for performing CRUD operations:
GET:
- Used for reading the resource representation
- Idempotent operation, because recurrent reading should return the same result
- Safe operation, because reading the resource shouldn’t change the state of the application
- Read-only nature of GET drives the fact that it is cacheable
- Request shouldn’t contain a body
- Response should contain a representation of the resource in the message body
- Commonly used response success statuses:
- 200 OK—resource read was successful
- 204 No Content—resource does not exist
- Creates a new instance of the resource based on a generic resource URL
- Nonidempotent operation, because a recurrent request should create a new resource
- Should send back a Location header in response, to identify the created resource instance
- Unsafe operation, because recurrent creation changes the state, by creating new resource instances
- Request should contain a representation of the resource in the message body
- Response typically doesn’t contain a body
- Commonly used response success statuses:
- 201 Created—resource creation was successful
- Used for updating or creating a resource instance specified by a concrete URI
- Idempotent operation, because it doesn’t create a new resource instance every time. The first time, it creates a new instance; subsequently, it updates the same instance. So each request has the same effect.
- Unsafe operation, because it changes the state of the application
- Request should contain a representation of the resource in the message body
- Response typically doesn’t contain a body
- Commonly used response success statuses:
- 200 OK—resource was updated
- 201 Created—resource was created
DELETE:
- Releases instance of the resource based on a given URI
- Idempotent operation, because all requests for deleting the same resource instance have the same result—the resource instance is released.
- Unsafe operation, because it changes the state of the application
- Request or response of this type shouldn’t contain a body
- Commonly used response success statuses:
- 200 OK—resource was deleted
- 204 No Content—resource doesn’t exist
HEAD:
- Similar to GET, but it reads headers without the body
- Idempotent and safe operation
- Is also cacheable
- Request or response of this type shouldn’t contain body
- Commonly used response success statuses:
- 200 OK—resource read was successful
- 204 No Content—resource does not exist
![]() Note A full list of HTTP method types can be found on Wikipedia: en.wikipedia.org/wiki/Hypertext_Transfer_Protocol#Request_methods.
Note A full list of HTTP method types can be found on Wikipedia: en.wikipedia.org/wiki/Hypertext_Transfer_Protocol#Request_methods.
Developers have to bear in mind that the safety and idempotency parameters of these HTTP methods are fulfilled only when the HTTP standard is followed. Unfortunately, a lot of applications are implemented without these parameters in mind or by breaking HTTP contract rules. Such applications break the HTTP contract and therefore can’t be called RESTful.
Implementing all methods for each resource isn’t necessary. For example, some resources are read-only based on application requirements, so the server doesn’t need to handle POST/PUT/DELETE. Therefore, the server should send HTTP status code 405 Method Not Allowed, if such a request is performed against a read-only resource.
Support for developing REST applications is represented in Java by a standard API, which is part of Java Enterprise Edition (JEE) standards. Its name is Java API for RESTful Web Services, or JAX-RS (https://jax-rs-spec.java.net). Like all APIs from JEE, JAX-RS is not an implementation of REST support. It’s a standard abstraction. For running and using this API in production, a JEE-compliant application server or at least a server that conforms to the JAX-RS standard is needed.
A similar approach is used across all the APIs provided by JEE. Each API’s abstraction can have various implementations. The JEE standard was created to unify the surface layers of Java application servers provided from different vendors. Migration from one JEE-compliant server to another is much easier when most of their APIs are the same. In addition, leveraging JEE APIs allows for reuse of experience and JEE API knowledge, which decreases the learning curve for developers migrating to a different application server.
So when we want to use JAX-RS, we also need an application server or a lightweight runtime implementing this API. As JAX-RS is an abstraction on top of servlets, we have to use it with a servlet container. Here are the main application servers or runtimes implementing JAX-RS:
- Jersey: A reference implementation of JAX-RS APIs. Can be used alone and is also shipped by Oracle as part of the GlassFish JEE application server.
- Apache CXF: Framework for SOAP and REST web services with JMS, OSGi, and CORBA support.
- RESTEasy: Implementation of JAX-RS that can run on any servlet container. Can be used alone or with JBoss Application server.
- Restlet: Open source JAX-RS implementation, which can integrate with various Java technologies and frameworks.
- WebSphere Application Server: Full JEE-compliant commercial solution from IBM.
- WebLogic Server: Full JEE-compliant commercial solution from Oracle.
- Apache Tuscany: Provides REST support alongside wider support for the Service Component Architecture (SCA) specification.
The main surface of the JAX-RS API consists of various annotations for declaring Java REST endpoints. We have annotations for declaring the following:
- URL mapping—@Path
- HTTP method binding—@GET, @HEADER, @POST, @PUT, @DELETE
- Content type handling
- @Produces: Content types being produced by endpoint
- @Consumes: Content types that can be consumed by endpoint
- Data extraction from the HTTP message
- @QueryParam: Parses the parameter value from the query part of the URI
- @PathParam: Parses the parameter value from the URI
- @HeaderParam: Parses the HTTP header
- @DefaultValue: Specifies the default value if the parameter binding is not found
- @Context: Retrieves the entire context of the request or response (for example, @Context HttpServletRequest httpRequest)
- @CookieParam: Retrieves the cookie value into the method parameter
- @FormParam: Retrieves the form value into the method parameter
With these annotations, we have powerful control over parsing and handling HTTP message metadata. For handling the HTTP message payload itself, JAX-RS integrates with various payload serialization libraries. So for converting Java objects into JSON, XML, and other formats and back, JAX-RS can integrate with main libraries such as Jackson (JSON serialization library) or JAXB 2 (XML serialization library). In the majority of cases, we don’t need to call these libraries directly, because JAX-RS (or more precisely, the implementation of JAX-RS we are using) uses them under the hood.
Common Classes Used in Examples
Let’s dive into a simple example. Because this book is about Spring, we are going to integrate JAX-RS with Spring. But first we need to introduce the domain for all the examples in this chapter. A simple model POJO is shown in Listing 4-3 .
This is a simple class with simplified modeling of the User object. Properties of this simple POJO should store an e-mail address and user’s name. Such a simplified model is enough to demonstrate REST API development.
In some examples, we will need to compare the equality of User objects. Historically, we would override Object.hashCode and Object.equals methods to fulfill the Java hash code and equality contract.
But our implementation uses the third-party library Lombok (https://projectlombok.org). Lombok is a handy productivity library that aims to eliminate some verbose parts of the Java language. The hashCode and equals methods are generated by the @EqualsAndHashCode annotation. Because we need to use only the email property in the equality contract, we specify it in the annotation parameter of. If we don’t specify it explicitly, Lombok will use all the properties of User POJO in the hash/equality contract.
Moreover, Lombok helps us to generate getters and setters for all properties in the User class via the @Data annotation.
![]() Note Object.equals and Object.hashCode are fundamental principles to understand in object-oriented Java programming: equal objects must have equal hash codes. Proper implementation ensures that objects are treated equally and handled properly in Java collections. Incorrect implementation can lead to confusing bugs. Implementation of hashCode and equals can be verbose and error prone; developers can introduce a lot of problems. Most of them are gathered in these Stack Overflow answers: http://stackoverflow.com/questions/27581/what-issues-should-be-considered-when-overriding-equals-and-hashcode-in-java. Therefore, I strongly recommend looking into the Lombok library (http://projectlombok.org/features/EqualsAndHashCode.html) when overriding the Object.hashCode and Object.equals contract.
Note Object.equals and Object.hashCode are fundamental principles to understand in object-oriented Java programming: equal objects must have equal hash codes. Proper implementation ensures that objects are treated equally and handled properly in Java collections. Incorrect implementation can lead to confusing bugs. Implementation of hashCode and equals can be verbose and error prone; developers can introduce a lot of problems. Most of them are gathered in these Stack Overflow answers: http://stackoverflow.com/questions/27581/what-issues-should-be-considered-when-overriding-equals-and-hashcode-in-java. Therefore, I strongly recommend looking into the Lombok library (http://projectlombok.org/features/EqualsAndHashCode.html) when overriding the Object.hashCode and Object.equals contract.
Listing 4-4 shows the second class that will be used in most of the REST examples.
The UserRepository class is annotated with the @Repository annotation to indicate that it’s a Spring bean sitting on the persistence layer. To simplify the examples, there is a simple in-memory cache for User objects defined as Map<Integer, User>. But such caching is not suitable for production use. Caching and persisting application state should be handled by specialized databases or in memory grids that are battle tested for such purposes. Also this particular usage breaks the stateless REST principle. But for simplicity, let’s pretend that this class is calling a persistence layer for storing User objects. We are interested in the web layer anyway.
First, the getAllUsers method returns a map of all users stored in this cache. The returned map is encapsulated in an unmodifiable wrapper, so that we are sure its instance won’t be replaced during the application run. The getUser method returns a single User object based on a given identifier. To highlight the error-handling features, we don’t support -1 and the user identifier and throw UnsupportedOperationException.
The addUser method is little more complicated. It uses an identifier counter called userSequence to assign a unique identifier to the newly created User object and increases its value afterward. The updateOrAddUser method accepts the identifier and User parameters and replaces or adds this instance into the map slot represented by the identifier. The deleteUser method simply removes the object from the map.
The last method from this class is getUsersInterval. It reads a collection of users based on a given interval of identifiers. This isn’t a realistic use case, but it helps demonstrate some features of Spring MVC mappings. The reading logic uses Java 8. First, we convert the map into a stream and apply filtering. Values filtering is based on a lower and upper bound of identifiers. After filtering, we collect the results into a map and wrap the values into an unmodifiable map. This gives us a filtered collection of users.
Another problem with this implementation is the singleton bean scope of UserService. Fields/cache/state in a singleton is always dangerous from a multithreading point of view. We can easily have various requests being handled by our application at the same time. These requests are served in separate threads. In this situation, various threads could be accessing this in-memory cache at the same time. We need to make this class thread-safe, so we made all access methods to our cache synchronized. It isn’t an effective method of caching, but as we mentioned, it is just for example purposes.
You may ask, why not use ConcurrentHashMap as a map implementation and exclude synchronization?. But remember that the addUser method consists of two actions that should be atomic (adding to the map, and reading and increasing the sequence). With the ConcurrentHashMap approach without synchronization, this wouldn’t be atomic and could lead to thread-unsafe scenarios. For example, two threads could use the same sequence number to store different objects, and thus we would lose one of them.
Listing 4-5 shows the next class heavily used in the examples.
This is a simple pass-through wrapper for UserRepository. We include it to follow the most common three-layer application model (web/service/persistence layer).
Listing 4-6 shows the last class we will use across all REST examples: a class holding the URL constant.
This class is defined as final and has a private constructor for disallowing instantiation and inheritance of this class. It contains a constant that represents the root REST resource mapped in examples. The constant helps us reuse the same string literal various times.
JAX-RS Endpoint
After defining the service layer (pretending that it is reading/writing our User objects from/into the battle-tested and reliable persistence storage), we can jump into the REST API examples. Listing 4-7 shows the JAX-RS endpoint implementation.
The @Path annotation binds the UserResource class to the /users URI. When the request with the root URI /users hits our application, it will be served by this class. The @Component annotation declares the UserResource class as a Spring singleton bean. In the constructor, we inject UserService, which is used for persisting User objects.
Four methods handling the GET, POST, and DELETE HTTP methods follow. The getUsers() method reads the collection of all users and returns it to the consumer. It produces a JSON content type, which means the response will contain the HTTP header Content-Type equal to the value application/json. This header should inform the consumer about the payload format. The @Produces annotation also indicates to the underlying JAX-RS implementation (which in this case is Jersey) to use the Jackson JSON serialization library. It converts the collection of User objects into a JSON array payload structure.
Next, the getUser(int identifier) method reads the concrete User object with the @GET annotation also. This concrete object is identified by the URI path parameter identifier. So the URI /users/1 should perform a read operation of the user instance with identifier 1. To parse the identifier from the URI, we use the @PathParam annotation. A prerequirement for this parsing is the specification of the placeholder in the path binding, where the @Path annotation has the placeholder /{id} declared. Any URI part after /users/ will be mapped onto the parameter identifier, annotated by the @PathParam("id"). The annotation parameter id binds identifier to the path placeholder /{id}. The return value object User is converted to a JSON payload by the Jackson library under the hood.
The postUser method is bound to the POST HTTP method. The @Consumes annotation indicates that this endpoint expects a JSON payload. The message body is converted by the Jackson JSON serializer library into a User object and injected into the method as a parameter. After passing this object into the lower layer to store it, we need to send a message to the consumer with HTTP status code 201 Created and the Location header of the newly created object. For such an HTTP response creation, the javax.ws.rs.core.Response factory is used. It can cover most of the common HTTP responses as well as custom status codes. The Location header is defined as with a uri parameter of a response creation Response.created(uri).build() call.
The putUser method handles the PUT HTTP method. It is responsible for the creation or update of the given User record. This record is received as a JSON payload and converted into the method parameter User. The second parameter of this method is the identifier, which is extracted from the URL similarly to the getUser method. To perform the mentioned action, it delegates a request to the service layer via the userService.updateOrAddUser call. If everything goes well, it sends back HTTP status 400 OK.
The deleteUser method maps to the DELETE HTTP method with the help of the @DELETE annotation. It combines the mentioned approaches to parse the URL parameter and construct the response message with HTTP status code 200 OK. It calls the UserService.deleteUser method to release a given instance of the user.
Registering the UserResource bean into an Inversion of Control container is not enough for Spring and JAX-RS integration. Every such bean needs to be registered into a Jersey resource configuration, shown in Listing 4-8.
The EndpointRegister class is annotated with Spring’s @Component annotation and extends org.glassfish.jersey.server.ResourceConfig. This represents the Spring and Jersey integration. The endpoint beans should be registered in the constructor of this class. In this case, it’s only the UserResource bean.
Listing 4-9 is the main class responsible for starting this example as a Java application.
We use the Spring Boot project to easily host our application in an embedded Tomcat servlet container. This is a relatively new and convenient way to run Spring applications. The @SpringBootApplication annotation gathers various Spring annotations under one umbrella. It triggers component scanning in the package where the annotated class is declared and its subpackages (the equivalent of @ComponentScan). It also covers the @EnableAutoConfiguration Spring Boot annotation, which inspects the classpath for JAR dependencies and registers some sensible default beans . In this case, we are using the JAX-RS implementation, Jersey. Therefore, it starts the embedded Tomcat container. The class is extended from SpringBootServlerInitializer, which takes care of our servlet configuration. By default, it maps all endpoints to the root URL /. In the main method, we have the call SpringApplication.run with the Spring configuration class as a parameter. So the RestJaxrsApplication class is used as a Spring configuration and also the main class of our application.
Listing 4-10 covers the Spring Boot properties. These help us configure the embedded Tomcat container with port 10401 and initiate Spring’s JAX-RS integration and configure Jersey for hosting servlets.
After running the RestJaxrsApplication class from a Java application, we can execute the HTTP REST request against our server. We can use the Chrome plug-in DHC - REST/HTTP API Client (https://chrome.google.com/webstore/detail/dhc-resthttp-api-client/aejoelaoggembcahagimdiliamlcdmfm) for this purpose. Figure 4-2 shows the POST request executed against this running application.
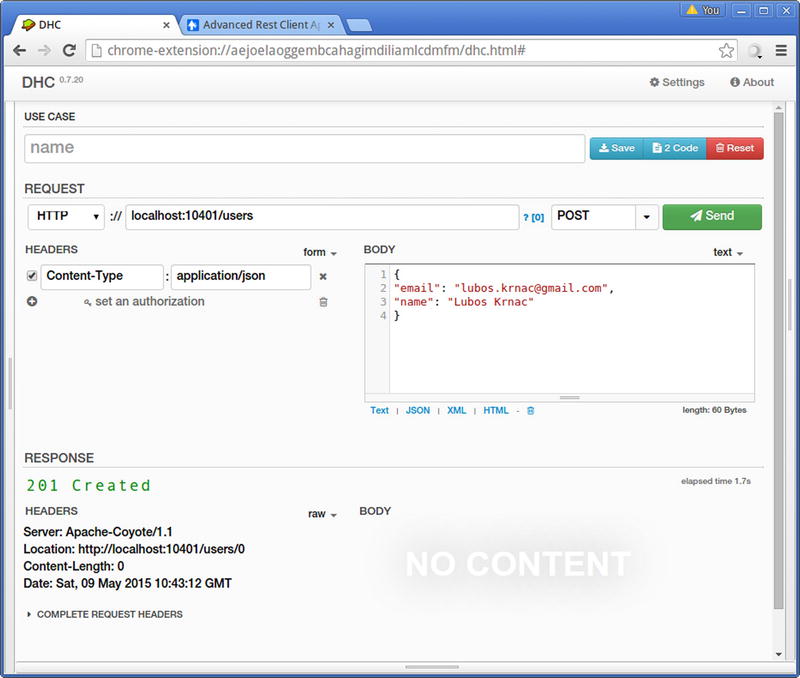
Figure 4-2. HTTP POST request against JAX-RS example
In the first half of the DHC - REST/HTTP API Client screen, we need to specify the request we want to send. In this case, we need to specify the URL of our REST endpoint, which is http://localhost:10401/users. Next we need to pick the HTTP method (POST, in this case), and finally, specify the JSON payload in the body section we want to send to the server.
After clicking the Send button, the response appears below if everything is configured properly. In this case, the server indicates that the resource instance was created and also sends us the Location HTTP header. This gives us a full URL of the created resource instance. It also shows us the ID assigned to this user. In this case, it is 0.
Figures 4-3, 4-4, and 4-5 show similar actions with the HTTP GET, PUT, and DELETE methods.

Figure 4-3. HTTP GET request against JAX-RS example

Figure 4-4. HTTP PUT request against JAX-RS example

Figure 4-5. HTTP DELETE request against JAX-RS example
This Spring and JAX-RS integration provide a full-fledged approach to developing REST web services. It is supported by the Spring ecosystem even if Spring provides its own alternative APIs.
Spring MVC
Spring MVC is a central module for Spring web support. Its contracts are competitors to JAX-RS abstractions. As the name of this Spring module suggests, it wasn’t originally designed for developing REST services. But APIs for the Model-View-Controller (MVC) style of architecture have been suitable enough to also cover REST concerns since Spring Framework version 3.0. It is a double win, because developers used to MVC APIs can easily switch to REST endpoint development, and vice versa.
JAX-RS is targeted toward application-to-application communication. So we can communicate with the REST server from a client developed in any major programming platform, including JavaScript in the browser. But sometimes we may need to use plain HTML as a consumer of our endpoint. An important fact about HTML is that it supports only GET (for example, when a user clicks a web page link) and POST (for example, when a user submits an HTML form) HTTP methods. The problem is the missing DELETE, PUT, and HEADER HTTP methods, in the case of plain HTML. This would be a significant problem for JAX-RS, as it doesn’t expect such a restricted environment.
Spring MVC supports browsers as REST clients with a technique called HTTP method conversion. The main idea behind this concept is to use HTML forms to perform a POST with a hidden form parameter. This parameter should specify the desired HTTP method being performed, which may be DELETE, HEADER, or PUT instead of POST. On the server side, we can then register the servlet filter that will convert the HTML POST request into an HTTP request defined by the hidden form input parameter. But this feature is beyond the scope of this book.
Another difference between Spring MVC and JAX-RS is in client-side API support. JAX-RS introduced a client-side API in version 2.0. This version of JAX-RS is part of the standard Java EE 7. So if we are running older Java EE editions, we don’t have native JAX-RS client API support. And enterprise companies often get stuck on Java EE 5 or 6, mainly because of the licence costs for expensive Java EE application servers, as an upgrade can be major investment for a company. With Spring MVC, you can use client-side APIs even within older Java EE application servers, because the Spring Framework is lightweight and easily pluggable into any Java EE platform.
A significant advantage of the Spring MVC module over JAX-RS is support for testing. The Spring MVC testing module provides powerful fake constructs that allow for the integration or unit testing of the server and client side. These constructs allow testing of mappings out of the servlet container. This is a huge benefit in continuous integration.
A significant feature that puts the Spring MVC API into a better position, when considering REST programming models, is content negotiation. With Spring MVC, this feature is embedded into the framework out of the box. But JAX-RS doesn’t have standard support for content negotiation; therefore, developers need to rely on nonstandard JAX-RS implementations they are using or implement it explicitly.
Finally, JAX-RS has a disadvantage in the fact that it’s standard, because Spring is able to iterate quicker and provide new features faster. Spring provides much richer possibilities for HTTP message mappings onto Java controllers and models. It also allows much wider possibilities for custom configurations (for example, message converters). These are possible reasons why the Spring MVC API adoption is higher than that of JAX-RS.
Configuring Spring MVC for REST
Spring MVC is an abstraction on top of Java servlets. So we need a servlet container in order to run the Spring MVC application. The most important class for integrating Java servlet technology is org.springframework.web.servlet.DispatcherServlet. This class is responsible for routing HTTP messages to the correct Java logic based on declarative mappings.
Spring MVC relies heavily on mapping annotations. To turn on this programming model, we need to declare in a Spring configuration that we are using Spring MVC. This can be done in two ways:
- <mvc:annotation-driven> XML element of Spring’s namespace (www.springframework.org/schema/mvc)
- @EnableWebMvc annotation
![]() Note The Spring MVC module covers a wide range of features for templating views, handling errors, using locales and themes, integrating with security frameworks, and more. All these features provide enough material for a book of its own (such as Spring REST by Balaji Varanasi and Sudha Belida, Apress, 2015). We highlight the main features useful for REST in this chapter. Anything else is beyond the scope of this book and can be found in the reference documentation (http://docs.spring.io/spring/docs/current/spring-framework-reference/htmlsingle/#mvc).
Note The Spring MVC module covers a wide range of features for templating views, handling errors, using locales and themes, integrating with security frameworks, and more. All these features provide enough material for a book of its own (such as Spring REST by Balaji Varanasi and Sudha Belida, Apress, 2015). We highlight the main features useful for REST in this chapter. Anything else is beyond the scope of this book and can be found in the reference documentation (http://docs.spring.io/spring/docs/current/spring-framework-reference/htmlsingle/#mvc).
The XML configuration for enabling Spring MVC support is shown in Listing 4-11.
This configuration uses two namespaces: context and mvc. The first one is used for component scanning of Spring beans, including controllers that will be mapped to HTTP URLs. The second namespace is used for enabling MVC support. The equivalent Java configuration is shown in Listing 4-12.
The Spring context is configured with three annotations. The @Configuration annotation specifies the configuration bean. The @ComponentScan annotation orders Spring to do component scanning in the current package and subpackages. With this annotation, we don’t need to specify the base package where the component scanning should be performed, because it starts from the current package. This is more maintainable; we can’t forget to update the base package for component scanning if the package is renamed or moved. Finally, @EnableWebMvc turns on Spring MVC annotations and configures various default beans for Spring MVC support.
When we have a Spring configuration, it needs to be plugged into a servlet configuration. Listing 4-13 contains an example of an XML servlet descriptor configuration.
Here we specify a servlet with the name rest-service and the implementation class DispatcherServlet. This servlet implementation is provided by Spring and handles all the routing support (and much more). DispatcherServlet needs to know which Spring context should be bound to this servlet object. Therefore, we specify the servlet initialization parameter contextConfigLocation, and point it to the Spring configuration file rest-service-config.xml. If we didn’t specify this parameter, Spring would try to find [servlet-name]-servlet.xml in the WEB-INF folder.
Next, the load-on-startup parameter tells the servlet container to load this servlet instance when the servlet container starts rather than wait for the first request. If we used lazy initialization, initializing the servlet would prolong the response time of the first request. Because the Spring load time can be measured in seconds, this is a significant performance hit for an initial request.
Finally, we map our servlet to the URL. In this case, it is the root-level URL /. A similar Java configuration looks like Listing 4-14.
Spring tries to find implementations of the AbstractAnnotationConfigDispatcherServletInitializer class on the classpath and register it into the servlet container. This servlet initializer helper enables use of the DispatcherServlet out of the box. So our job is to override three methods to specify the servlet mapping, root, and servlet context. As we have only this servlet in our application and are not using separation in the servlet and context mapping, we specify the servlet configuration class and leave the root configuration class unused.
Running the Spring application within the servlet container would correctly initialize the servlet even without the web.xml configuration, as this mechanism is using Servlet 3.0 Java configuration under the hood.
The last configuration example in Listing 4-15 is a new and modern approach.
This class uses the Spring Boot convention instead of the configuration approach to spin up the application as a JAR. The single SpringBootApplication annotation is powerful. It looks into JAR dependencies on the classpath and applies a common configuration based on these JAR dependencies. So when we have a spring-boot-starter-web library as a JAR dependency, Spring boot will do the following:
- Initialize embedded Tomcat
- Register a servlet with this Spring configuration mapped to the / URL
- Turn on MVC (@EnableWebMvc under the hood)
- Scan the package and subpackages for Spring components and register them into the Inversion of Control container
So with this configuration class, we can replace the servlet and Spring configuration. Simplifying the configuration is a significant advantage of the Spring Boot project. Such an application can be started from the command line via the standard Java command java –jar 0404-rest-boot-server.jar.
The main Spring MVC concepts are similar to JAX-RS concepts, but annotations and their structures are slightly different. Spring MVC uses these annotations:
@Controller
- Is a class-level annotation
- Declares that the class is handling HTTP requests
- Creates a Spring bean, which is a candidate for component scanning
@RequestMapping
- As a class-level annotation, specifies the base HTTP mapping configuration for all methods handling HTTP requests within the class
- As a method-level annotation, specifies the method-level HTTP configuration narrowing down the base/class level @RequestMapping configuration
- Provides a flexible mapping of Spring beans and their methods onto the URL with the use of parameters. Each of these attributes can be used at the method as well as the class level:
- value: Maps the method to a URI or URL pattern. If both class- and method-level annotations are used, the final mapping URI is concatenated.
- method: Specifies the HTTP method being handled.
- consumes: Specifies the content type that can be consumed.
- produces: Specifies the content type that can be produced.
- headers: Specifies the mapping based on headers. Supports wildcards for the headers Accept and Content-Type.
- params: Specifies the mapping based on the query parameters of the request. Alongside equality mappings (queryParam=value), it also can use a nonequality mapping (queryParam!=value), or that parameter shouldn’t be present in the request (!queryParam).
- Spring provides powerful mappings based on the following:
- URI parameters (for example, /users/{id})
- URI patterns with regular expressions (for example, /users/{id:\d*})
- URI patterns with wildcards (for example, /users/**)
@RequestBody
- Used for annotating method parameters in order to access the payload of the HTTP request
@PathVariable
- Maps the URI template variable onto the method parameter
- Annotation attribute is not necessary if the URI pattern name is the same as the annotated parameter
@RequestParam
- Maps the query parameter onto the method parameter
- Annotation attribue is not necessary if the query parameter name is the same as the annotated parameter
@RequestHeader
- Maps the HTTP header onto the method parameter
@ResponseBody
- Used for annotating methods. Specifies that the return value of the method will be converted into the body of the HTTP response.
- This annotation distinguishes between REST and MVC usage.
- Supports content negotiation (based on the Accept header); the client can request a certain format of the payload (for example, XML, JSON), and Spring will use the appropriate marshaler library (for example, JAXB 2, Jackson).
@RestController
- Convenience annotation combining the @Controller and @RequestBody annotations
- Introduced in Spring 4.0
@ResponseStatus
- Hard-codes the response of the method to a particular HTTP response status code
@ExceptionsHandler
- Is used for handling exceptions that bubble up to @Controller, where it is specified
- Exception types handled by exceptions handler are specified as annotation attributes
- Is handy for translating exceptions into specific HTTP status codes
Lower-level Abstraction Injection
With these annotations, we can inject various lower-level HTTP message abstractions into our controller methods. But Spring also provides annotation-free injections. If, for some reason, we need to access lower-level abstractions of the HTTP message, Spring can inject these types:
- Servlet doesn’t necessarily need to use HTTP, so these abstractions don’t contain HTTP-specific data.
- Most generic message abstractions conform to the Java Servlets API.
- javax.servlet.ServletRequest is the interface that represents an abstraction for the servlet request.
- javax.servlet.ServletResponse is the interface that represents an abstraction for the servlet request.
Java EE HTTP Message Abstractions
- HTTP subinterfaces of javax.servlet.ServletRequest and javax.servlet.ServletResponse.
- These interfaces provide a message payload in the form of InputStream.
- javax.servlet.http.HttpServletRequest is the interface that represents an abstraction for the HTTP request.
- javax.servlet.http.HttpServletResponse is the interface that represents an abstraction for the HTTP response.
Spring HTTP Message Abstractions
- These interfaces provide a message payload converted into generic type T.
- Generic type T specifies the Java type of the payload.
- org.springframework.http.HttpEntity<T> is the interface that represents an abstraction for the HTTP request provided by Spring.
- org.springframework.http.ResponseEntity<T> is the interface that represents an abstraction for the HTTP response provided by Spring. Contains fields for headers, body, and HTTP status.
- org.springframework.http.RequestEntity<T> is the interface that represents an abstraction for the HTTP request provided by Spring. Contains fields for HTTP headers, body, URI, and HTTP method.
To inject one of these HTTP message abstractions, we don’t need to use any annotations. We just need to use them as parameters of the method handling the HTTP requests (annotated by @RequestMapping).
String MVC CRUD Example
Listing 4-16 provides an example of a simple HTTP mapping that uses Spring MVC annotation. This example uses the service and model POJO from Listings 4-3 and 4-4.
The @Controller annotation tells Spring that this class is handling HTTP requests. The @RequestMapping annotation maps this class to the base URI /users. In the constructor, we inject the UserService, which is the class from Listing 4-4.
The getUsers method is mapped to the HTTP GET method, because this is specified in its method-level @RequestMapping annotation. So getUsers will handle all GET requests for URI /users, because the value parameter is missing in the method-level @RequestMapping. Therefore, the basic URI specified in the class-level @RequestMapping annotation is used. The method itself reads all the User objects stored in UserService. The @ResponseBody annotation indicates that the return value should be serialized into HTTP transport format, which is a conversion from Collection<User> into a JSON array in this case. JSON is used by default because it is the most used transport format in HTTP messages nowadays. We will dive into an example that can narrow down this configuration later.
The second web method is getUser. As its name suggests, it should read a single user. Therefore, the consumer needs to specify which User object he is interested in. This is done via the URI parameter id specified as the parameter /{id} in the @RequestMapping annotation. The final URI mapping of this method will be /users/{id}, because the method-level @RequestMapping is combined with class level 1. With the help of the @PathVariable annotation, the placeholder value {id} from the URI is injected into the identifier parameter. The method reads the user based on the injected identifier and returns the User object. This object will be converted into JSON by default with the help of the @ResponseBody annotation.
The third method handling web requests is postUser. Similar to the getUsers method, postUser is mapped to the /users endpoint and handles the POST HTTP method. The HTTP message payload is converted into the User object. This is driven by the @RequestBody parameter annotation. The second parameter of this method is the UriComponentBuilder instance, which will help the user create the Location header to fulfill the HTTP contract, which indicates that the server should respond with the location of the created resource instance for the POST HTTP message. So the method creates the user, reads the created user identifier, creates the HTTP Location header, and constructs the response. To construct the HTTP response with a custom header and 201 Created HTTP status, we use the ResponseEntity<Void> Spring abstraction. The @ResponseStatus annotation also declaratively defines that the status of the response will always be 201 Created. The generic type Void is used to create the empty HTTP message body.
The putUser method handles the PUT HTTP method. The @ResponseStatus annotation ensures that it returns the HTTP status 200 OK, but only if no exception was thrown from underneath the logic. putUser uses the mentioned approaches to extract the identifier and user objects from the incoming request. The implementation calls the updateOrAddUser method of userService, which will create or replace the User object in our repository.
Next, the UserController method deletes the user. Again, we need to specify the ID of the user instance to delete it. The @RequestMapping annotation and placeholder mapping are similar to the getUser method. But in this case, we didn’t need to specify the attribute of @PathVariable, because the name of the attribute is the same as the placeholder. The method doesn’t return any value, which is by default translated into an HTTP response with an empty body and the status code 200 OK.
The last method represents an exception handler for all the UnsupportedOperationException errors. When such an error occurs and bubbles up to any of the @RequestMapping methods in UserController, this method would be invoked. This approach is useful for translating application exceptions into responses with specific HTTP status codes. In this case, we translated the UnsupportedOperationException into 400 Bad Request.
This example (0404-rest-boot-server) has the configuration file application.properties in the folder src/main/resources. There is only one configuration entry, server.port=10404, which tells Spring to bind the embedded Tomcat container to port 10404. Figure 4-6 shows the POST communication example, which uses DHC - REST/HTTP API Client again.

Figure 4-6. Spring MVC POST communication example
For the subsequent GET request for the resource /users/0, we get the output shown in Figure 4-7.

Figure 4-7. Spring MVC valid GET communication example
Next we explore the invalid GET request. If we try to read the resource /users/-1, UserRespository (from Listing 4-4), the system throws an UnsupportedOperationException. This exception is handled in UserController. handleUnsupportedOperation, because it is configured as @ExceptionHandler for the UnsupportedOperationException exception type. This is shown in Figure 4-8.

Figure 4-8. Spring MVC invalid GET communication example
Figures 4-9 and 4-10 show the PUT and DELETE requests and responses for our Spring MVC REST example.

Figure 4-9. Spring MVC PUT communication example

Figure 4-10. Spring MVC DELETE communication example
Spring version 4.x introduced the new annotation @RestController. Use of this annotation is shown in Listing 4-17.
If we compare this class to the controller in Listing 4-16, we would notice slight differences. The class is using the @RestController annotation instead of the @Controller annotation. The second difference is that we don’t need to annotate return values from getUsers and getUser with the annotation @ResponseBody. By default, Spring MVC tries to find return values from the web methods view belonging to this controller. This is because Spring MVC was originally used for the Model-View-Controller style of web applications, where it also handles templating of views. As the functionality of the Spring MVC module was extended to handle REST concerns, we need to be able to specify that the return value should be converted into an HTTP payload.
So the @RestController annotation is a slight convenience shortcut for combining the @Controller and @ResponseBody annotations. But it significantly enhances the semantic characteristics of the web layer, because is clearly differentiates REST endpoints from MVC endpoints.
Spring MVC REST with Headers and Query Parameters
Let’s shuffle our requirements a little bit and dive into Spring MVC mapping features:
- The first one was already mentioned in Listing 4-4, where we created the option to read users based on the interval of user identifiers.
- We want to version our REST API to be prepared for eventual breaking changes in the future. This version of the API will be stored in the HTTP header.
![]() Note Versioning the REST API is a big topic, because it affects the API contract with the consumer and therefore needs to be carefully designed. The client can use various approaches to indicate the API version within the REST request: store the version in the URI, in the custom HTTP header, or in the content type. There is no clear winning approach because each has its advantages and disadvantages. This broad topic is beyond the scope of this book. In our example we used a custom header, because it allows us to highlight the Spring MVC HTTP header parsing and mapping features.
Note Versioning the REST API is a big topic, because it affects the API contract with the consumer and therefore needs to be carefully designed. The client can use various approaches to indicate the API version within the REST request: store the version in the URI, in the custom HTTP header, or in the content type. There is no clear winning approach because each has its advantages and disadvantages. This broad topic is beyond the scope of this book. In our example we used a custom header, because it allows us to highlight the Spring MVC HTTP header parsing and mapping features.
- The example covering these requirements would be more readable if it were split into various listings. The first part of this example is shown in Listing 4-18.
This listing shows the imports class signature with the constructor and method handling GET requests. Most of these constructs should already be familiar from previous examples. The only new element here is the new @RequestMapping attribute produces. It defines that the method will be mapped only to requests that expect a JSON response body format. This consumer’s requirement involves HTTP content negotiation and is driven by the HTTP header Accept. The second part of the example is shown in Listing 4-19.
![]() Note Content negotiation is beyond the scope of this book. I suggest starting an investigation on this wiki page: https://en.wikipedia.org/wiki/Content_negotiation.
Note Content negotiation is beyond the scope of this book. I suggest starting an investigation on this wiki page: https://en.wikipedia.org/wiki/Content_negotiation.
The @RequestMapping annotation has various attributes. The method attribute specifies the HTTP method that the annotated method is mapped to. The consumes attribute indicates that we are handling only JSON content. So the request must contain Content-Type: application/json in order to be routed to this method. The annotation attribute headers has the value version=1, which indicates that only requests with an API version equal to 1 will be routed to this logic.
postUser has three parameters. The first two, user and uriBuilder, were already covered in Listing 4-16. The last parameter, version, is annotated with @RequestHeader, which reads the HTTP header with the name version and injects it into this parameter.
The implementation verifies that the version of API is 1 and returns the HTTP status 400 Bad Request if not. If the version is 1, the implementation stores the User object and returns a response with the status 200 OK and the Location header. Checking the header in the implementation of the postUser method is not necessary, because the mapping annotation attribute headers is configured to consume only requests with version 1. But the code shows us how the @RequestHeader annotation can extract HTTP headers.
Listing 4-20 is the last piece of the Spring MVC server-side examples.
The @RequestMapping annotation for the putUser method is annotated in a similar fashion as the putUser method from Listing 4-16. The difference is the headers attribute, which also ties this method to handle only requests with the HTTP header version: 1.
Parameters of the putUser method are also slightly different from Listing 4-16. Alongside the path variable extraction, there is also a new parameter called request of type RequestEntity<User>. This is the Spring representation of the HTTP request, where the body is marshaled into the type User. Spring converts the User type from the request body and wraps this object into RequestEntity<User> and injects it into the request parameter. We can use this object to inspect various attributes of the request, such as the HTTP method, headers, and URI.
In this case, we extracted the header version and used it to verify that the HTTP request with the correct version was routed into this logic. Again, such a check is not necessary, because the mapping based on headers="version-1" takes care of excluding other versions. But it shows an alternative to extracting the HTTP request metadata.
Testing Spring MVC REST APIs
Spring has a strong focus on testability. Because the Spring MVC is one of the most widely used Spring abstractions, it is of course not an exception. The concept behind testing the Spring MVC APIs is to perform fake HTTP requests to test the controller and verify the response. Even if this testing code is not running in a servlet container, the controller behaves the same way as it were registered to DispatcherServlet.
The central class of Spring MVC testing support is org.springframework.test.web.servlet.MockMvc. It is the final class used for sending fake requests and recording and verifying expected responses. With MockMvc, the developer doesn’t need to create a lot of objects to fulfill complicated HTTP use cases, but rather can implement less-verbose chaining constructs.
- The method defined in the class org.springframework.test.web.servlet.MockMvc
- Used for sending requests
- Uses the MockMvcRequestBuilders parameter as a helper for sending HTTP requests such as GET, PUT, POST, PUT, and DELETE
- The MockMvcRequestBuilders methods return helper MockHttpServletRequestBuilder for handling a wide-range of HTTP communication
- HTTP headers
- Content creation and negotiation
- Query parameters
- Encoding and locale handling
- Session management (which is not targeted toward stateless REST)
- Method defined in the interface org.springframework.test.web.servlet.ResultActions
- Provides support for chaining constructs during verification, because it also returns ResultActions
- Therefore, we can include as many expectations as needed for the following:
- Verification of HTTP headers
- Verification of the message body based on content parsing (for example, in XML/JSON format)
- Verification of HTTP status code
- Method defined in the interface org.springframework.test.web.servlet.ResultActions
- Provides support for returning the MvcResult object, which can be used for subsequent verifications outside the andExpect call chain
- Method in the interface org.springframework.test.web.servlet.ResultActions
- Uses MockMvcResultHandlers.print() for printing responses
The MockMvc instance can be created by the factory class MockMvcBuilders in two ways:
- Create the MockMvc instance based on Spring’s context instance, MockMvcBuilders.webAppContextSetup(WebApplicationContext context), which is handy for creating Spring integration tests. With this approach, we generally want to test Spring’s configuration with all its dependencies together.
- Create the MockMvc instance based on one or more controller classes, MockMvcBuilders.standaloneSetup(Object... controllers), which is handy for creating controller unit tests. This approach can test the controller or group of controllers in isolation by mocking their dependencies.
Spring testing support allows for extreme variability in our testing, but at the same time allows creation of a targeted unit or integration tests. We can have short tests focusing on important aspects of our HTTP REST communication. Such powerful support is missing for JAX-RS abstractions. This factor often simplifies the decision process when Spring MVC and JAX-RS abstractions are considered for REST-based projects.
MockMvc Integration Test Example
The Spring MVC integration test example for the application using the controller in Listing 4-16 is large, which makes it hard to present in one listing. Therefore, we split it. Listing 4-21 shows the imports and test class configuration.
As you can see in the imports section, this example uses a lot of classes—primarily because of the variability that the Spring MVC test module provides. Design of this Spring module is not trivial. But as you will explore in subsequent examples, it is easy for developers to use. This is a good example of Spring’s team member qualities. Testing HTTP possibilities is a complicated problem, but Spring solves it elegantly.
The test class is annotated by the WebAppConfiguration annotation, which indicates that we are using the WebApplicationContext implementation of the Spring ApplicationContext abstraction for testing. The ContextConfiguration annotation specifies which Spring configuration class is being tested.
By default, Spring keeps the testing context open in memory. So various tests can reuse the same context and speed up integration test suites by avoiding context initialization before each test. But remember that our UserService isn’t truly stateless, and we don’t want test methods affecting each other. Therefore, we need to initiate a fresh context for each method. This is ensured by the class-level annotation @DirtiesContext. By default, this annotation would create a Spring context from scratch for the whole test class. But with the ClassMode.AFTER_EACH_TEST_METHOD attribute, we initiate a new context for each test method.
The TestNG framework is used for testing. Therefore, for the Spring integration test, we need to use the AbstractTestNGSpringContextTests parent also provided by the Spring framework. The FULL_USER_URL constant enables test methods to not repeat the same String literal. The mockMvc variable is used in every test method for sending HTTP requests and verification.
Next, the class-level variable injects the Spring context instance created for the integration test. This instance is the one used by the application when running in the servlet container. The init method uses the MockMvcBuilders helper to initiate the mockMvc object before each test method, which is declared by the TestNG’s BeforeMethod annotation.
The createTestRecord method helps us to create the JSON Spring representation of the user model used for sending requests. It will be used by various test methods in subsequent test example listings.
MockMvc Example for POST
Let’s start with the POST version (see Listing 4-22).
All testing methods are annotated with org.testng.annotations.Test, which marks the method as a test, similar to JUnit. In the method body, we create the testing record. Then we use the mockMvc class-level property to perform the POST operation against our URI. This is testing the URI mapping of the controller. We also use MockHttpServletRequestBuilder chaining for sending the JSON content type with the created JSON payload. This chained call will simulate the POST request against the controller in Listing 4-13. The result of this operation is stored in a local variable called mvcResult, which is used for retrieving and verifying the response status.
The next test method covers testing of the GET request (see Listing 4-23).
At first, we use mockMvc to POST the testing record. This is needed because we use a clean sheet for each test method provided by the @DirtiesContext annotation. Testing the Spring context involves storing objects into UserService, so we need to POST the resource instance before testing GET. Next, the mockMvc call retrieves the testing resource instance. It specifies the URI with the identifier path variable and the Accept HTTP header to indicate that the client wants to consume JSON.
Then we chain-print the response to the console. Printing can be useful for troubleshooting purposes in case of continuous integration errors. The verification phase of the test is next. We make sure that the response status is correct and that the JSON payload contains the expected elements. The payload verification uses JSONPath Spring wrappers. JSONPath is a library for parsing the JSON payload. So it has to be on the classpath. This is another example of how Spring effectively uses third-party open source libraries to provide powerful APIs.
When we execute this test method, andDo(print()) prints the output shown in Listing 4-24.
Such output is handy for troubleshooting HTTP communication. The next method, in Listing 4-25, tests a multi GET request.
Similar to the single GET test in Listing 4-23, we first POST the testing records. Then we use mockMvc to perform the GET method without the ID placeholder in the URI, which means we want to read all stored records. Then we use chained JSONPath verifications to ensure that the expected records were included in the response.
The PUT version is shown in Listing 4-26.
In this test, we send the PUT request to the URI /users/0 with the test record and expect the response 200 OK.
The next part of the REST integration testing example covers HTTP DELETE. It is shown in Listing 4-27.
First, we post the testing record. Subsequently, we test the DELETE operation with the identifier path parameter. Next, the request against the controller is for verifying that the testing resource was deleted. We expect the body to be empty, because the null of the User object is translated into an empty string body.
MockMvc Negative Testing Example
MockMvc Spring constructs can be also used for negative testing, as shown in Listing 4-28.
We send the GET request to read /users/-1 resource. We know from Listing 4-16 that this user identifier should cause a 400 Bad Request response, which is verified accordingly.
This example highlights the abilities of the Spring MVC test module to perform integration tests against the whole application.
It make also sense to test the Spring controller in isolation. Such unit testing is supported by the Spring MVC test module. The unit test example is split into various listings. The first part is shown in Listing 4-29.
The TestNG unit test doesn’t need to have any class-level annotations or Spring annotations. First, we declare constants for the repetitive literals. The createTestUser method creates an instance of the User object for testing, and the createTestRecord method creates a similar representation in plain JSON format.
MockMvc Example for POST
The test method in Listing 4-30 covers testing the POST request.
The UserService mock is needed for verification of POST behavior in our controller. As the constructor injection is used for autowiring the UserController’s dependencies, we just need to create a testing object via its constructor and pass in the UserService mock via the constructor’s parameter. When we have our testing instance of UserController configured, we can create MockMvc based on the userController instance. This also helps test declarative annotation mappings of the controller.
Later in the test preparation phase, we record the desired behavior in the userService mock. In this case, we create a test User object and use it as a parameter for the userService.addUser() call. This call should return the identifier of the stored record assigned by the service.
The next statement performs the POST request in a similar way as in the integration test in Listing 4-22, with the content type JSON and payload created by the helper method createTestRecord. This fake POST request returns the MvcResult instance.
In the verification phase of the test, we make sure that the correct HTTP status code was returned and that interactions on the userService are as expected. An interesting verification is verifyNoMoreInteractions, which makes sure that there wasn’t anything unexpected performed against our userService mock.
MockMvc Example for GET
Unit testing of a single GET is shown in Listing 4-31.
For a simple GET test, we also create the userService mock, and create the controller and MockMvc instance. The difference is in the expected behavior recorded in the userService mock. In this case, we expect to return the User object based on a given identifier. Sending a GET request and verification is the same as for the single GET integration test in Listing 4-23. Next, Listing 4-32 shows multi GET unit testing.
In this case, we can’t use Mockito.verifyNoMoreInteractions(userService) for verification, because we’re using a technique called stubbing. This means that we recorded the behavior of the userService.getUser(TESTING_ID) call into the mock. But we didn’t verify that it really happened, because we verified the desired return value via andExpect verifications. Mockito keeps track of verifications, and in this case we have one unverified interaction. This is the reason we can’t use Mockito.verifyNoMoreInteractions(userService); otherwise, the test would fail.
Creation of the mock, controller, and mockMvc is similar to the previous examples. This UserService mock should return a collection of all testing records. Sending the request and verification was used the same way in the integration test.
We didn’t use Mockito.verifyNoMoreInteractions(userService) for the same reason as in Listing 4-31.
MockMvc Example for PUT
Listing 4-33 shows the PUT version.
MockMvc Example for DELETE
The last unit test method, shown in Listing 4-34, is for DELETE.
To test DELETE, we need to make sure that the controller called userService.deleteUser() with the correct identifier as a parameter. Therefore, we don’t need to record any behavior into the mock in this case. The behavior of the code under test is recorded in the mock instance, and it is enough to verify the UserService call. We also verify that there aren’t any unexpected interactions with the userService mock.
MockMvc Negative Testing Example
Listing 4-35 shows the negative tsting example.
The last server unit test shows a possible approach to testing error conditions of the server REST code. We create userController with the userService mock as a parameter again. Then we record in the userService mock to throw an exception when the consumer asks for identifier -1.
After performing the expected request with the -1 identifier in the URI, we expect the response to have the status 400 Bad Request and a dummy error message.
Consuming REST
So far, we have focused on the server side of REST communication. But Spring also supports client-side access from the Java client application. The main class for client access to REST services is org.springframework.web.client.RestTemplate. You should create its instance via the constructor. It contains methods for performing all the REST-related HTTP methods, as shown in Table 4-1.
Table 4-1. RestTemplate Methods
|
HTTP Method |
RestTemplate Method |
Explanation |
|---|---|---|
|
DELETE |
delete |
Delete objects based on a given URI. |
|
POST |
postForLocation |
Post object and read location of it. |
|
postForObject |
Post object and expect its instance as a response. | |
|
postForEntity |
Post object and expect a response of ResponseEntity<T> type. Generic type T is the type of the response payload. | |
|
HEAD |
headForHeaders |
Read headers based on a given URL and return the HttpHeaders object. |
|
GET |
getForObject |
Read the object based on a given URL. |
|
getForEntity |
Read the ResponseEntity<T> instance based on a given URI. Generic type T is the type of the response payload. | |
|
OPTIONS |
optionsForAllow |
Return the value of the Allow header for a given URI. |
|
PUT |
put |
Perform the PUT of a given object against a given URI. |
|
Any HTTP method |
exchange |
Perform any HTTP method against a server and exchange HttpEntity<T> and ResponseEntity<T> instances. |
For most of these methods, marshaling and unmarshalling is needed. RestTemplate abstracts out the marshalling libraries and provides a conversion directly into/from Java types. For this purpose, it uses message converters for major formats such as JSON, XML, GSON, and RSS. It is also able to detect converter libraries such as Jackson, JAXB, GSON, and Rome on the classpath and to register appropriate converters automatically.
If built-in converters are not enough, we can register custom converters with the RestTemplate.setMessageConverters(List<HttpMessageConverter<?>>) method. When there are various converters, RestTemplate uses the first appropriate one for the given content type. Such behavior enables handling content negotiation without much effort.
The last notable feature of the RestTemplate class is error handling. By default, the class translates server (HTTP status codes 5xx) and client (HTTP status codes 4xx) errors into checked exceptions on the client by default. But if we don’t want this behavior, we can override the error handler with our implementation by using RestTemplate.setErrorHandler(ResponseErrorHandler).
We are going to explore basic use of this class in an example. But first we need to show the configuration of the client application in Listing 4-36.
The @Configuration and @ComponentScan annotations are standard for Spring. They declare the Spring configuration class that should perform a component scan for the current package and its subpackages. We register just one bean here, and that is the RestTemplate instance used for sending and receiving HTTP messages to the server. We register it in the configuration class as a separate bean because it will help us with testing in later examples. Listing 4-37 shows use of this REST client bean.
The Component annotation marks this class as a Spring bean so it can be component scanned. The url constant defines the address of the REST server. Then we define the restTemplate property, which is used for constructor injection of the bean registered in Listing 4-36.
The createUser method uses the restTemplate.postForLocation call to perform a POST request against our REST server. In this call, we pass in the User object to be converted into the JSON payload of the message. The return value from this call is the URI object, which was returned from the server as the Location header of the created resource instance.
The getUser method performs the GET request for the concrete resource instance. The call restTemplate.getForObject takes two parameters: the URL of the resource to read, and the type that the response payload will be converted into. The created POJO is returned as the return value.
The getUsers method performs a GET request also, but in this case we read all the resource instances and convert the response payload into a collection of User objects. The restTemplate.getForObject call can handle only arrays, because the collection has a generic type, and it is impossible for the Spring framework to figure out this generic type because it is erased on runtime. So if we would like Spring to convert it into a List.class type, it can’t cast it to List<User>.
The updateOrCreateUser method does exactly what its name suggests, based on a given identifier and User object. identifier is parsed from the URI, and user is converted from the HTTP request body.
The deleteUser method fires the DELETE request of the resource identified by the given identifier.
Finally, we use the RestTemplate.exchange call in the getUserExchange method. It effectively has same result as the getUser method. But it highlights how we can use RestTemplate to cover more-generic HTTP communication, where the HTTP method is passed as a parameter. We also need to pass a representation of the HTTP request of type RequestEntity<Void> as a parameter. The generic type Void represents the type of the body. Obviously, this means that the GET request doesn’t have a body. As a return value, we receive from the server Spring’s representation of the HTTP response of type ResponseEntity<User>. The generic type User again represents the type that the body of the message would be converted into.
If any of these methods receive HTTP status 4xx or 5xx, RestTemplate will throw an unchecked exception, which would penetrate into the code using this UserClient bean.
By default, Spring translates 4xx HTTP status codes into HttpClientErrorException and 5xx status codes into HttpServerErrorException. Both are unchecked exceptions. We don’t need to handle such exceptions explicitly, because they are children of RuntimeException.
But sometimes this default RestTemplate error-handling behavior might not fit our requirements. Fortunately, we can easily change the default exception handling and register a custom error handler with the RestTemplate.setErrorHandler call.
To explore it’s use, let’s pretend that we must translate all server errors into our custom exception. This example is shown in Listing 4-38.
We extend CustomException from RuntimeException to have the exception unchecked, as it is good Java practice. The constructor takes the error message and calls the parent constructor with the message parameter also. This is the simplest example of a custom application-specific exception. Configuration of the RestTemplate bean is shown in Listing 4-39.
This time, we don’t just create the RestTemplate instance with all the default dependencies. We use the RestTemplate.setErrorHandler method to implement our own custom error handler. This implementation is wrapped into an anonymous inner class of type ResponseErrorHandler.
Because the anonymous inner class is of type ResponseErrorHandler, it must implement two methods. The hasError method should indicate whether the ClientHttpResponse instance is erroneous. As this is our custom implementation, we should decide when the response should trigger an error. In this case, we decide to throw an exception when the HTTP response indicates server error 5xx.
The second method of the custom error handler is handleError. This one is designed to perform the desired action when an error happens. In this case, we want to throw our CustomException with the error message received from the server.
Client-Side Testing
The great testability story of the Spring Framework is also provided for the REST client-side code. The concept is to create a fake server based on the RestTemplate instance used for the REST client code. This mock server records expected requests and sends fake responses to the client-side code under test. The fake server is represented by the class org.springframework.test.web.client.MockRestServiceServer.
An instance of the mock server is created by the MockRestServiceServer.createServer factory method, which takes the RestTemplate bean as a parameter. It has to be the same RestTemplate instance as used for performing the REST request in the code under test.
MockRestServiceServer has two methods, expect and verify, which are used for testing. The expect method records the expected behavior in the fake server. It is used for chaining the request expectations and recording the expected response that will be returned to the testing client logic. expect returns instances of the ResponseActions interface, which provide two methods:
- andExpect
- Takes org.springframework.test.web.client.RequestMatcher as a parameter, which allows for recording expected content, headers, the HTTP method, and URI.
- org.springframework.test.web.client.match.MockRestRequestMatchers is the abstract class containing the factory methods requestTo, header, content, jsonPath, xpath, and anything that produces instances of RequestMatcher and can be used for constructing comprehensive request expectations.
- andRespond
- Takes org.springframework.test.web.client.ResponseActions as a parameter, which allows for defining content, HTTP status, and headers for the response.
- org.springframework.test.web.client.response.MockRestResponseCreators is an abstract class containing the factory methods withSuccess, withCreatedEntity, withNoContent, withBadRequest, withUnauthorizedRequest, withServerError, and withStatus that produce instances of ResponseCreators and can be used for recording comprehensive HTTP responses in the fake server.
The verify method is used to verify the behavior recorded by the expect method.
The example of this client-side testing concept is split into various listings to enhance readability. First, Listing 4-40 shows the imports, constants, and properties of the test.
The ContextConfiguration annotation specifies which Spring configuration will be used for testing. In this case, we test the client side from Listing 4-37. The test class is extended from AbstractTestNGSpringContextTests, which is the Spring helper for TestNG integration testing.
In the test class, we first specify a few constants that will be used during testing, including two string payloads for representing the resource JSON representations. Two injected properties follow; one is restTemplate, created in the configuration class in Listing 4-37. The second injected bean is our testing client code UsersClient.
The fake server instance is declared in the mockServer variable and initiated in the init method by the MockRestServiceServer.createServer(restTemplate) call. Listing 4-41 shows testing of the POST request.
First, we create the testing URI. Then we use mockServer to record the URI with the payload and HTTP method of the expected request message. We also record the fake server response with the location header and success HTTP status code. MockRestResponseCreators.withCreatedEntity is designed to simulate response 201 Created and send back the Location header. That is why you would see this construct mostly for testing POST requests.
Creation of the testing User object follows. This object is posted to the fake server by the testing logic usersClient.createUser. After we have set up for the test, we can execute this testing logic. It should return the URI location of the created object.
In the verification phase of the test, we compare the returned location with the expected one. We also need to use mockServer.verify() to make sure that the recorded request occurred as expected. The test in Listing 4-42 covers a single GET.
The expected GET request against the URI /users/0 is recorded into the fake server. We also send back a JSON representation of the object belonging to the testing identifier 0. The testing logic usersClient.getUser should return the User object for the given testing identifier.
In the verification phase, we verify that the request was sent properly from the testing logic and also verify that the received object contains the fields we expect. Listing 4-43 tests GET of multiple records.
We expect the GET request against the /users URI. The fake response is a JSON array of two records. The testing logic (usersClient.getUsers) doesn’t take any parameters in this case. But it should return a collection of all User objects. All is, in this case, the two objects we sent in the fake JSON response.
Verification again includes a request check. Finally, we verify that the returned collection contains the expected User objects. Listing 4-44 tests for PUT method.
Similar to previous tests, we expect a PUT request with particular content in the request body against /users/0 URI. The expected response of the fake server is 200 OK.
The method under test is UsersClient.updateOrCreateUser. The identifier and User object are passed to the testing method as parameters.
At the end of the test, we need to call mockServer.verify, to make sure that the client logic behaves as we expect. Next, Listing 4-45 contains the HTTP DELETE client test.
The recorded request in mockServer is now DELETE against the URI /users/0. The fake response is sent back with HTTP status 200 OK. The testing logic should remove the User object with ID 0. The verification phase checks that the request was sent according to our expectations.
The last test method in this integration test is testing error handling, in Listing 4-46.
We expect the GET request against the /users/-1 resource URI, and the response should be 400 Bad Request. After calling the testing method getUser, we expect HttpClientErrorException to be thrown.
Such testing can also be used for unit testing; the testing methods would be almost exactly the same. The only difference is in the construction of the testing object and class signature. This unit test is shown in Listing 4-47.
The rest of the client-side unit test example is the same as Listings 4-41 through 4-46.
Consuming REST Asynchronously
RestTemplate calls against the REST server block the caller thread on the client side. This may not be suitable sometimes. We might need to not block the caller thread on the client side. Such a requirement is often referred to as a fire and forget scenario.
In the days before Spring 4, Spring developers were forced to use explicit asynchronous programming for such use cases. Spring’s @Async annotation is good for this. The Spring 4 release introduced a new class, AsyncRestTemplate, which handles these asynchronous scenarios by registering callbacks or using the Java Feature implementation ListenableFuture.
To explain this use in an example, we need to extend our domain. We still need to consume a remote REST API that provides user information, as in the previous examples. But let’s have an additional requirement to read user actions from separate storage and aggregate them into one object. Listing 4-48 shows this aggregated model class.
We again use the Lombok project to generate boilerplate getters and a constructor with parameters. The aggregated model class UserInfo contains an instance to the User object and a collection of user actions. For simplicity, a user action is represented by the String type. Listing 4-49 shows an implementation of the user’s action repository.
To keep the example simple, we return dummy values. This class is not of deep interest anyway. We want to explore an asynchronous REST call. This is present, because we need to perform an action while the REST API call is executed asynchronously. Listing 4-50 shows the Spring configuration of this asynchronous example.
ClientConfiguration is annotated as a standard Spring configuration. @Configuration defines Spring’s configuration class, and @ComponentScan performs a scan for Spring’s beans within the current package and its subpackages.
This configuration registers only one bean of type AsyncRestTemplate. By default, Spring uses the SimpleAsyncTaskExecutor thread pool implementation for asynchronous beans. But this implementation doesn’t reuse threads from the thread pool, and therefore it’s not suitable for production usage.
We use the Java Executors factory to create a thread pool with a fixed number of threads in the pool. When we wrap this Executor implementation into ConcurrentTaskExecutor, we can register it as a thread pool used by our instance of AsyncRestTemplate. The AsyncRestTemplate instance will be reusing a thread instance from this thread pool for asynchronous REST calls. Listing 4-51 shows example usage of AsyncRestTemplate.
This Spring bean is annotated with @Service to indicate that it’s sitting on the service layer. The first statement defines the SLF4J constant for logging. This is a standard construct for a Java application.
Then we specify the REST service URL that will be called from this service and define dependencies. We have two dependencies: UserActionsRepository and AsyncRestTemplate. These two beans will be used to asynchronously aggregate data into the UserInfo object. They are injected by constructor injection.
The first method is the private logElapsedTime, used for logging time measurements.
The second method, getUserAsync, is responsible for executing an asynchronous REST call by calling asyncRestTemplate.getForEntity. This call performs a GET request against the REST server and returns the ListenableFuture<ResponseEntity<User>> type. This call kicks off a REST call in a separate thread, and we can retrieve a response via this return value wrapped into the ListenableFuture abstraction.
As we are interested in timings of this call, we register a callback into the futureResult return value that logs elapsed time of the asynchronous REST call. The last statement in this method returns a futureResult instance so that it is used for retrieving the REST server response.
The last method, getUserInfo, is the main and the only public method of this service, where aggregation happens. First we store the start time for time measurements. Then we call the private method getUserAsync and pass parameters identifier and start time, so that it can retrieve the User object asynchronously and log the elapsed time. When we get the futureResult instance, the REST call is being performed in the background. Our thread can focus on retrieving user actions from userActionsRepository.
When we have the userActions collection, we can call futureResult.get. This call blocks this thread until the asynchronous REST call finishes if it is still progress. If the asynchronous REST call is already finished, futureResult.get returns a response immediately. When we have the User object and user actions, we can aggregate them into the UserInfo object.
To test this application, we need to run code from Listing 4-52.
Annotation @Slf4j is more of Lombok’s “syntactic sugar” for defining logger instances. It uses the current class as a parameter for retrieving the logger from the logger factory. In the main method, we start ClientConfiguration as the Spring Boot application and get Spring’s context instance as the return value.
The context instance is used for retrieving the AsyncRestTemplate and UserInfoService beans. We use the AsyncRestTemplate instance to create the testing user object on the server.
Then we execute our userInfoService.getUserInfo call and log the name we received from the server.
When we run this asynchronous example, we see results similar to Listing 4-53. Of course, a server needs to handle our requests for the endpoint http://localhost:10405/users. In this case, we can use project 0405-rest-restcontroller-server as the server, because it is handling all the requests we need to test client logic against.
As you can see, the User Service call was executed in a separate thread and took 25 milliseconds (ms). The User Actions repository call took 4 ms. And overall execution took 25 ms. So it is obvious that these two calls were executed in parallel.
Summary
This chapter explained the benefits of the REST architecture style as compared to remoting or SOAP. You learned about the main concepts of REST, such as its uniform interface, statelessness, hypermedia, resource representation, and caching.
This chapter also provided a quick overview of HTTP. We covered its message structure and the main HTTP methods suitable for REST communication. Next you explored the JAX-RS approach to developing REST services and learned how to integrate it with Spring in a short example.
Subsequently, the chapter presented Spring MVC features. Examples of how to configure and route messages should provide a decent foundation for REST development with Spring MVC. We also covered server-side integration and unit-testing support and examples. The last sections were about client-side support and how to test it.