
![]()
This chapter explains how to reliably send and receive JMS messages with local JMS transactions and explicit or implicit acknowledge modes. While explaining the main messaging concepts in the preceding chapter, we skipped one of the most important aspects of messaging communication: reliability. The Java Message Service communicates in most cases via a network. And networks commonly fail. Therefore, if we rely on messaging communication, we need to make sure that this communication is fault-tolerant.
This concept is similar to data persistence, because persisting data needs to be reliable and fault-tolerant also. You may be familiar with ACID principles from the data persistence world. This acronym stands for these principles:
- Atomicity: The whole transaction is committed, or no change is performed.
- Consistency: A state transition is done from one valid state into another valid state.
- Isolation: A partial change by transaction doesn’t affect any other transactions.
- Durability: A change by transaction, once completed, remains persistent.
All these principles come into play because we are storing state into a database. But the Java Message Service also stores state. In fact, JMS providers often also persist messages on hard drives and act like a special kind of temporary document store that sends or removes messages from a JMS destination. Therefore, ACID principles make perfect sense for JMS communication.
JMS Reliability Mechanisms
To achieve ACID parameters of messaging, the Java Message Service protocol provides various mechanisms. All of them are centered around javax.jms.Session. With JMS 2.0, this responsibility was transferred to the javax.jms.JMSContext abstraction. We can think of both abstractions as a unit of work that can keep track of all the actions performed against it.
For reliable delivery of messages to/from the JMS server, the JMS standard provides two supporting concepts: message acknowledgement and local transactions. Here is list of all the possible JMS reliability modes:
- Acknowledge modes: Make sense only for reception of messages and don’t affect sending
- AUTO_ACKNOWLEDGE: Messages are acknowledged automatically with sending or reception.
- CLIENT_ACKNOWLEDGE: Client needs to explicitly call Message.acknowledge() to acknowledge sending or reception.
- DUPS_OK_ACKNOWLEDGE: Messages are acknowledged automatically in batches. Duplicates are possible, and the application needs to handle them.
- Transaction support: The application needs to explicitly call commit() or rollback() for javax.jms.Session or javax.jms.JMSContext. Transacted behavior applies to JMS message reception as well as to sending.
When a message is acknowledged on the JMS destination, it means that the client has finished its processing and that the action can be reflected in the JMS server. Acknowledge message during read marks the message as delivered and discards the message from the queue. So message reception is performed in these three steps:
- Client receives the message
- Client processes the message
- Client acknowledges the message (which can be done implicitly or explicitly, depending on the acknowledge mode)
Bear in mind that automatic acknowledging of messages doesn’t work atomically across various messages. It is suitable only in scenarios where we can’t rely on ACID characteristics for a batch of messages.
In CLIENT_ACKNOWLEDGE mode, the JMS client is responsible for acknowledging messages explicitly. This is done via a call to Message.acknowledge(). From this API, it may look like each message needs to be acknowledged separately, but that’s not the case with this mode. The acknowledgement action is done against the session; therefore, the Message.acknowledge() call acknowledges all not-acknowledged messages consumed in the current session. So, for example, we can read 10 messages within the same session and acknowledge them with a single Message.acknowledge().
We may also consider using JMS local transactions, performing various actions against javax.jms.Session or javax.jms.JMSContext and at the end of our logical transaction explicitly committing or rolling back all the work done against them. This is a similar concept to transaction support of relational databases. Both JMS resources provide the explicit methods commit() and rollback() for this purpose.
JMS local transactions can be used as umbrellas for JMS message reception and sending, whereas acknowledging of messages is handled only during message reception.
Java JMS Transaction Examples
![]() Note Acknowledging javax.jms.Message would be the same for Spring as well as for pure Java JMS. Implicit acknowledge modes (AUTO_ACKNOWLEDGE and DUPS_OK_ACKNOWLEDGE) are handled automatically, and explicit CLIENT_ACKNOWLEDGE mode is handled by calling javax.jms.Message.acknowledge(). Therefore, we will not focus on pure Java JMS acknowledge examples.
Note Acknowledging javax.jms.Message would be the same for Spring as well as for pure Java JMS. Implicit acknowledge modes (AUTO_ACKNOWLEDGE and DUPS_OK_ACKNOWLEDGE) are handled automatically, and explicit CLIENT_ACKNOWLEDGE mode is handled by calling javax.jms.Message.acknowledge(). Therefore, we will not focus on pure Java JMS acknowledge examples.
Our first example covers the JMS 1.1 API with synchronous reception and transacted writing and reading of JMS messages. It also covers having to process various messages under one transaction. Listing 6-1 shows how we configure a connection against the JMS provider.
This configuration is the same as we used in the previous chapter to configure the JMS 1.1 example. It uses a HornetQ configuration of the JNDI initialContext instance to look up instances of queue and connection. These two are JMS objects suitable for connection to a JMS provider. queue is created based on JNDI lookup of the /queue/ExpiryQueue and connectionFactory instance based on /ConnectionFactory. These are configured by default for HornetQ server. This configuration is located in the file config/stand-alone/non-clustered/hornetq-jms.xml.
Private instances of queue and connection objects are exposed to the outside world via getters generated by Lombok. @Getter is responsible for that.
The close method will close resources that need to be released—namely, JNDI initialContext and JMS connection. The JmsConfigurable class participates in the AutoClosable contract, which represents the try-with-resources Java 7 feature. With a special try block, the close() method will be automatically called by Java as if it were part of the finally block.
Listing 6-2 shows configuration of the sender.
This class has two properties of type javax.jmsSession and javax.jms.MessageProducer, which are initialized in the init() method based on the given parameters javax.jms.Connection and javax.jms.Queue. Notice that the session object is created from the connection instance by the connection.createSession() call. The first parameter in this method means that we are turning on transacted support, and the second means that we are going to use SESSION_TRANSACTED acknowledge mode.
The sendMessage method in this case takes two String parameters that should be sent to the JMS server. We create two TextMessage types from session and send them via messageProducer.send() calls. Before we commit, both messages are not visible to other JMS sessions opened against queue. Only call session.commit() commits the JMS transaction and makes it available for processing by other sessions opened against the JMS destination.
Sending messages and commits is backed up by the try-catch block. If an error occurs during the sending or commit phase, the transaction is rolled back by calling session.rollback().
Listing 6-3 shows implementation of the reader class.
The reader class has two properties of type javax.jms.Session and javax.jms.MessageConsumer that are initialized via the init() call. Parameters of this method are the JMS objects connection and queue, similar to the reader example in Listing 6-2. These are used to create messageConsumer and the transacted session.
The readMessage() method reads TextMessage from the queue with a time-out and returns the received text. Again, after this call, the message can be used by JMS client logic, but the message isn’t discarded from the queue until a session.commit() call is performed. Committing the transaction can be accomplished by the finishReading() method. Bear in mind that the sender and reader use separate sessions against our queue. So the messages are visible for the reader session only after the sender commits the messages for the sender session.
The last rollbackReading() call performs a rollback against the session object, in case we would like to revert all the reading against the queue.
This implementation obviously expects that the transaction will be handled by logic using this reader class. Listing 6-4 explores the main class of this example.
This class has only a main method where all the work is done. It is uses the try-with-resources feature to make sure that the JMS connection will be properly released after the JMS execution. In the body, we first initialize the JMS connection and start it. Next we create and initialize a messageSender instance we already explored in Listing 6-2 and send two simple messages into the JMS queue. Notice that the commit is part of the messageSender.sendMessages() call; therefore, our transaction is applied to the queue after this call and messages are readable by other JMS sessions.
Subsequently, we create a messageReader instance and initialize it. Reading of the two messages that follow is reflected in this logic and logged into the console, but when we call messageReader.rollbackReading(), both messages remain in the queue and can be picked up by other transactions.
Therefore, the next two messageReader.readMessage() calls call the same values and log them to the console again. After this logic, we finally commit the transaction, and messages are discarded from the JMS queue. Listing 6-5 shows partial output of the console when we run this example.
We can see that after rollback, messages remain in the queue and are available for the next transacted read in the main method. This behavior is similar to the transacted behavior of relational databases. So we can easily group our messages into a unit of work, which will have ACID characteristics.
Our second pure Java JMS example combines the JMS 2.0 API with a message listener and local JMS transactions. The first class we explore from this example is the listener of the messages in Listing 6-6.
This message listener again uses SimpleService to delegate the message. SimpleService was defined in example project 0500-jms-common in Listing 5-11 of the previous chapter. This class logs given text to the console.
An interesting fact is that an instance of JMSContext is passed via the constructor. This is because we expect this JMSContext instance to be transacted and we need to be able to perform a commit against it after the read. This is done in the onMessage() method by calling jmsContext.commit().
The logic in the onMessage() method is wrapped into a try-catch block, which rolls back via the jmsContext.rollback() call and logs the error message if any error occurs. The next class from this example covers the JMS configuration in Listing 6-7.
This JMS configuration class is created via a constructor that takes a SimpleService instance via the constructor and stores it in a class-level variable. It will be used for creation of the SimpleMessageListener instance.
The init() method is used for initializing JMS resources. First of all, we create a JNDI initialContext instance with HornetQ JNDI properties. This instance is used to look up JMS resources, queue and ConnectionFactory. Again, their values are already configured for the HornetQ server by default.
JMS 2.0 allows creation of JMSContext out of the ConnectionFactory object. To separate the sender and listener contexts, we create two transacted instances called readContext and writeContext. readContext will be used for asynchronous reading from the JMS destination, and writeContext will be used for sending messages. Both are stored in class-level variables, because we need to use them or close them later. At the end of the init() method, we create SimpleMessageListener and register it into readContext as the listener.
The last method of this class is close(). It is part of the try-with-resources contract of Autoclosable and releases the JNDI initialContext and both JMS contexts. The sender part of this example is shown in Listing 6-8.
The class is similar to the pure Java JMS 2.0 example in the previous chapter. The difference is the sendMessage() method, which uses the jmsContext.commit() call to confirm the transacted unit of work, which in this case is sending one message. Sending and committing the message is wrapped into the try-catch block, which ensures that the transaction is rolled back if an error occurs. The last class of this example is shown in Listing 6-9.
This class creates JmsConfiguration in the try-with-resources block, to ensure that the JNDI and JMS resources are released. It also is used for initialization and retrieving the JMS resources. Last, we call messageSender.sendMessage() to send a simple message to the listener. Listing 6-10 shows the output we can see when we run this application.
Common Classes for Spring JMS Examples
The following sections show examples of various JMS configurations, with success and failure scenarios to highlight how we can easily get into trouble with JMS. At the end, we mention standard and recommended usage of Spring JMS reliability mechanisms. Therefore, the following examples shouldn’t be used as templates without understanding the consequences.
Before we start diving into JMS transactional support, we should explain the classes that are used in the Spring JMS examples in this chapter. To highlight how Spring JMS cooperates with database access, we will be using a relational database. To keep the example simple and focused, we will be using the H2 database engine. It is often used for testing Spring applications accessing relational storage.
Listing 6-11 shows a simple repository class.
We mark this Spring bean with the @Repository annotation to highlight that it sits on the persistence layer and is used as a data access object. This class depends on the standard Spring JdbcTemplate bean. This is Spring’s standard mechanism for JDBC access. The JdbcTemplate bean will be created by each example and injected into this common bean.
Examples are Spring Boot–based. When we use @EnableAutoConfiguration or @SpringBootApplication annotations, Spring Boot will automatically try to configure defaults of our application. The difference between these two annotations is that @SpringBootApplication is a shortcut annotation covering @EnableAutoConfiguration, @Configuration, and @ComponentScan.
So with one or the other, if we have an H2 database engine dependency on the classpath, Spring Boot automatically creates DataSource and JdbcTemplate beans and registers them into its IoC container. So we aren’t going to see any other database-related bean in the Spring examples of this chapter because Spring Boot configures JdbcTemplate for us. This is a relatively new and convenient way of configuring modern Spring applications: just use Spring Boot defaults and change them only if requirements force us to.
When we have JdbcTemplate injected via constructor injection, we need to initialize the database table. The @PostConstruct annotation ensures that the initDbTable() method will be called at the end of the initialization phase of the application, after all the Spring beans are created and properly injected into each other. So it is a convenient place to initialize our database table. In this case, we drop the old table and re-create a fresh one.
This obviously isn’t something we would do in production, but initialization of the DB schema for our Spring application isn’t within the scope of this book. Therefore, let’s swallow this strange initialization for explanatory purposes.
The database table used for storing our data will have the name TEXT_TABLE and will contain only one text column, TEXT. Again, we keep it simple, because we are interested in DB transactions and their cooperation with JMS transactions or acknowledge modes.
The persistText() method stores the given text into the database, and the containsText() method performs a check of whether the given text is present in the database. Listing 6-12 shows the service-layer bean belonging to SimpleRepository.
SimpleService uses Lombok’s @Slf4j annotation for logging purposes. It generates the logger constant log entry for us. @Service enables component scanning of this class as a Spring bean and also highlights its presence on the service layer of the application. There is a single dependency for this class injected via constructor injection. It is our SimpleRepository for DB access.
This service bean provides only two methods, processText() and isProcessed(), which are used by simpleRepository.persistText() and simpleRepository.containsText() because processing the message would persist it into our DB store within the examples.
The last class, common to all the Spring JMS examples in this chapter, is the JMS sender in Listing 6-13.
This JMS sender class is similar to what we saw in the previous chapter. It just injects a jmsTemplate instance via constructor injection.
The message is sent to the messageQueue destination via the send() method. The difference from the Chapter 5 Spring JMS examples is usage of the @PostConstruct annotation. Previously, we used scheduling for sending messages as it was handy for describing delays in synchronous reception in the previous chapter.
This chapter focuses on the reliability of JMS message delivery. @PostConstruct is a better fit for sending a single message after the Spring context is initialized, which is better suited to highlighting acknowledge and transactional characteristics.
We already mentioned that one of the mechanisms for ensuring reliable JMS message delivery is JMS acknowledge modes. The first one is called AUTO_ACKNOWLEDGE, whereby JMS message action reception is immediately reflected in the JMS destination and changes are immediately visible to other JMS sessions open against the related JMS destination. It is the default JMS acknowledge mode, so it is used if we don’t configure JMS resources otherwise.
So with successful reception, the message is immediately marked as delivered and discarded from the JMS destination. Reception is considered successful after return from the MessageConsumer.receive() call or after successful completion of the MessageListener.onMessage() call. The only exception to the three-phase JMS message reception (receive/process/acknowledge) is synchronous reception via JMS 2.0 JMSContext in AUTO_ACKNOWLEDGE mode. This reception merges receiving and acknowledging into one step, which is followed by processing on the client.
But with Spring, there is an important gotcha when we use JMS listeners. To remind Spring constructs of JMS message listening, there are two types of listener containers: SimpleJmsListenerContainerFactory and DefaultJmsListenerContainerFactory.
SimpleJmsListenerContainerFactory , introduced in Spring 4.1, is used for creating the SimpleMessageListenerContainer bean. This listener container type uses standard JMS asynchronous features under the hood and registers a direct JMS listener against the JMS destination. Therefore, AUTO_ACKNOWLEDGE mode has behavior as defined by the JMS standard: the message is acknowledged/discarded from the destination after a successful call of the listener method.
On the other hand, DefaultJmsListenerContainerFactory is a factory class for DefaultMessageListenerContainer. It also was introduced in Spring 4.1. For reception of JMS messages, it uses a long-polling mechanism. Under the hood, Spring uses synchronous reception with a time-out in an infinite loop. When time-out occurs, Spring immediately performs another MessageConsumer.receive() call. This emulates asynchronous JMS message processing. In fact, this reception can be better performing; therefore, this type of listener container is used by default by Spring and Spring Boot. But the downside of this approach is immediate acknowledgement of the JMS message before execution enters the listener method. Therefore, DefaultJmsListenerContainerFactory is better suited for use with transactions (which will be explained later).
Interestingly, with these two listener containers, we get totally opposite AUTO_ACKNOWLEDGE behavior when listening to JMS messages.
With a successful send, the message is immediately available for reception. Sending of the message is considered successful after completion of the MessageProducer.send() call.
The JMS client implementation acknowledges each message one by one under the hood. So it is automatic that an additional action is performed against the JMS destination. Therefore, this acknowledge mode can be slower than other modes, because they typically perform acknowledge calls less often.
As this is the default acknowledge mode, it was used in all the examples in the previous chapter describing nontransacted features of Spring JMS. The following example is similar to examples in Chapter 5, but in this case we will also be storing messages in the H2 database. Listing 6-14 shows the main class of this example.
The @SpringBootApplication annotation is a convenient shortcut for the group of @Configuration, @ComponentScan, and @EnableAutoConfiguration annotations. @Configuration marks this class as a Spring configuration.
@ComponentScan performs scans of the current package and its subpackages for Spring beans. Because the 0600-jms-tx-common project is a dependency of this example project (0603-auto-acknowledge-listener-success), this scan will also load and register SimpleRepository and SimpleService beans from Listings 6-12 and 6-13 into our context.
@EnableAutoConfiguration will make Spring Boot scan the classpath for known dependencies and apply a common default opinionated configuration based on libraries present on the classpath. In this case, (example project 0603-auto-acknowledge-listener-success), we have the H2 database engine on the classpath, so Spring Boot automatically configures the DataSource bean as a connection gateway to the H2 DB engine and JdbcTemplate bean for performing JDBC operations against it. This JdbcTemplate bean is then injected into SimpleRepository.
The second support initialized by @EnableAutoConfiguration is JMS. Because project 0603-auto-acknowledge-listener-success contains the HornetQ broker dependency on the classpath, Spring Boot automatically initializes the embedded instance of this JMS provider and configured access to it via the JmsTemplate bean. We just need to inject JmsTemplate in our beans and use it.
This configuration approach will be used by all Spring examples in this chapter. In the main method, we just call SpringApplication.run() to execute this Spring Boot configuration as a Java application.
Listing 6-15 shows the JMS listener for this example.
This class should be familiar, because all of the constructs were already described in the previous chapter. We cover it here because this implementation ensures the correct reception of the message. It is important to remember that Spring Boot creates DefaultJmsListenerContainerFactory for this listener automatically; therefore, when we are about to call simpleService.processText(), the JMS message is already being acknowledged and discarded from the JMS destination.
To explore this JMS reception scenario, we use the sequence diagram in Figure 6-1.

Figure 6-1. Sequence diagram of AUTO_ACKNOWLEDGE scenario with DefaultJmsListenerContainerFactory ( file sequence.uml in folder uml-Diagrams of example project 0603-auto-acknowledge-listener-success)
This sequence diagram shows that the acknowledgement is done before the SimpleMessageListener.readMessage() method is called, because DefaultJmsListenerContainerFactory is using long polling. With this mechanism, the message is acknowledged before Spring calls the listener method.
After entering the listener method code, the success scenario flows through SimpleService, SimpleRepository and stores the message in our database table, TEXT_TABLE.
![]() Note All the sequence diagrams in this chapter were created by an excellent open source project called PlantUML (plantuml.com). It provides an easy-to-grasp domain-specific language (DSL) for creating various UML diagrams. It’s a different approach from classical UML editors (UMLet, Enterprise Architect, Visio), which enable higher productivity, because we developers are more efficient at writing code than dragging, resizing, and connecting rectangles and arrows. It also has good integration with most IDEs and editors as well as different programming tools (see plantuml.com/running.html for more info).
Note All the sequence diagrams in this chapter were created by an excellent open source project called PlantUML (plantuml.com). It provides an easy-to-grasp domain-specific language (DSL) for creating various UML diagrams. It’s a different approach from classical UML editors (UMLet, Enterprise Architect, Visio), which enable higher productivity, because we developers are more efficient at writing code than dragging, resizing, and connecting rectangles and arrows. It also has good integration with most IDEs and editors as well as different programming tools (see plantuml.com/running.html for more info).
Success behavior is what each developer strives for when implementing JMS with database support. But the real world isn’t always so friendly to our good intentions. With AUTO_ACKNOWLEDGE mode, messages can easily get lost if we use DefaultJmsListenerContainerFactory with the same main and sender class as we showed for the success scenario. The long polling mechanism this listener container factory uses forces it to acknowledge the message right after the reception.
As Spring Boot’s default implementation of a listener container factory is DefaultJmsListenerContainerFactory with AUTO_ACKNOWLEDGE mode configured, we don’t need to register special beans as a JMS configuration. The listener is shown in Listing 6-16.
In this case, we don’t simulate an error after persisting the message. We simulate it in a method called preprocess() before the simpleService.processText() call. Figure 6-2 shows the behavior after running this example.

Figure 6-2. Sequence diagram of message lost scenario with listener and AUTO_ACKNOWLEDGE mode (file sequence.uml in folder uml-diagrams of example project 0605-auto-acknowledge-listener-lost)
As Spring uses long polling, synchronous reception with a time-out is used in an infinite loop under the hood to simulate asynchronous behavior. Synchronous reception is by JMS definition autoacknowledged straight after the return from the MessageConsumer.receive() call. This is because we are using a DefaultJmsListenerContainerFactory implementation for the listener container.
Therefore, when our listener calls the preprocess() method, the message is already acknowledged. The exception in preprocess() stops processing in the listener before the message is persisted. But the message was already discarded from the destination and is lost.
Lost Message with Synchronous Reception
Example 0606-auto-acknowledge-sync-lost explains how AUTO_ACKNOWLEDGE mode in combination with synchronous reception can also lead to message loss. Again, the main and sender classes of this example are exactly the same as in Listings 6-13 and 6-14. Listing 6-17 shows the JMS configuration.
This configuration class registers the JmsTemplate bean, which has one nondefault property, receiveTimeout. By default, the receive time-out is 0, which means infinite waiting if no messages are available for read. We should specify the receive time-out, if we want to make sure that our reading thread won’t be stuck, forever waiting for a message.
The JmsConfiguration class also enables scheduling via the @EnableScheduling annotation, which will be used to initialize a synchronous read of the JMS message, which is shown in Listing 6-18.
This reader class is similar to synchronous examples from the previous chapter. It defines a Spring component with the Lombok logging capability enabled by the @Slf4j annotation. It injects two dependencies via constructor injection. JmsTemplate is used for reception of messages, and SimpleService is our bean for processing and persisting messages.
Message reception is done by the readMessage() method, which is kicked off by the Spring scheduling feature. We picked a long fixed rate of scheduling because we want the read to occur once. Notice that the preprocess() call is placed between the jmsTemplate.receiveAndConvert() call and simpleService.processText() to simulate errors that can occur between synchronous reception and persisting the message. Figure 6-3 shows this behavior with a sequence diagram.

Figure 6-3. Sequence diagram of message lost scenario with synchronous reception and AUTO_ACKNOWLEDGE mode (file sequence.uml in folder uml-diagrams of example project 0606-auto-acknowledge-sync-lost)
The behavior is similar to the previous example. The only difference is that we explicitly ask to receive, and in the previous example, Spring did it for us under the DefaultJmsListenerContainerFactory hood. In fact, from the JMS provider point of view, both examples are synchronous.
As we have mentioned, with CLIENT_ACKNOWLEDGE mode, the client is responsible for explicitly acknowledging one or a batch of messages. If we use client acknowledging in batches, we decrease the number of calls against the JMS provider server, and therefore can save some bandwidth.
But Spring’s design of JmsTemplate acknowledges the message before is it returned to our logic. Therefore, CLIENT_ACKNOWLEDGE mode works for synchronous message reception with Spring exactly the same way as if we were using AUTO_ACKNOWLEDGE. Therefore, it doesn’t make practical sense to configure JmsTemplate with this mode. Spring’s documentation doesn’t explicitly state why such behavior is in place, so we avoid any speculation about it.
The first Spring example using CLIENT_ACKNOWLEDGE mode highlights a success scenario. Our common main and listener classes are in use again. Listing 6-19 shows the JMS configuration.
In this configuration class, we register the jmsListenerContainerFactory bean for defining listener behavior. The instance of it needs to be based on the injected connectionFactory, created automatically by Spring Boot features, and to have CLIENT_ACKNOWLEDGE mode configured. Listing 6-20 shows the implementation of the listener.
In the listener, we acknowledge the message after the processing/persisting to indicate success. The behavior of this success is described in Figure 6-4. This diagram shows smooth and straightforward calls down to the persistence layer and successful acknowledgement.

Figure 6-4. Sequence diagram of success scenario with CLIENT_ACKNOWLEDGE mode (file sequence.uml in folder uml-diagrams of example project 0607-client-acknowledge-listener-success)
A failure scenario with CLIENT_ACKNOWLEDGE will show how it is possible to process the same message twice. All the classes have the same implementation as from the CLIENT_ACKNOWLEDGE success scenario, except for the listener class shown in Listing 6-21.
This listener class looks familiar, as it is similar to listeners used in the previous chapter.
One unusual property in this class is errorSimulated. This variable is used for highlighting erroneous behavior, which could happen in the real world for various reasons. In this case, we store it in this singleton bean (which should ring a bell for every responsible developer). Of course, storing state in a singleton bean shouldn’t be used for production purposes, because it represents a global state that is not thread safe.
But for our purposes, it is essential, because we want to fail the message reception to highlight what would happen with JMS and database integration. errorSimulated is used in the private method postprocess() to simulate an error for the first received message. The first hit of this method also further disables error simulation. It is useful for highlighting a scenario in which processing the first message can fail and the second attempt could be successful.
This pattern will be used for error simulation across various failure examples in this chapter.
In this message reception logic, we simulate an error in the private method postprocess(), which is called right after persisting the message but before the explicit message.acknowledge() call. After execution of this example, the sequence shown in Figure 6-5 will happen.

Figure 6-5. Sequence diagram of duplicate message scenario in CLIENT_ACKNOWLEDGE mode (file sequence.uml in folder uml-diagrams of example project 0608-client-acknowledge-listener-duplicate)
The message is received and persisted, but not acknowledged, because the postprocess() method throws an error. So the JMS destination makes sure that according to the JMS contract, this message will be redelivered. After the second persistence call, postprocess() won’t throw a second error as per our example and will let the message be explicitly acknowledged.
Obviously, this is behavior we don’t want to have in our application, unless our persistent store is idempotent. Idempotency was described in Chapter 4. In this case, if the database would insert the message when it doesn’t exist and update it when it already exists, we could perform any of the simpleService.processText() duplicate calls without affecting the consistency of state in the database.
But storage in our example is not idempotent; therefore, a duplicate simpleService.processText() call is a problem.
This acknowledge mode lazily acknowledges messages automatically. This means that JMS is in charge of doing so. The downside of this approach is that the client can get duplicate messages while using this mode, because messages are acknowledged in bulk by the JMS server. So when acknowledgement is not in the client’s hands, there’s no guarantee that the message will be delivered exactly once. Therefore, this mode is most suitable when the client is idempotent (can handle duplicate messages).
If a message is redelivered a second time, it will have the JMSRedelivered message header set to true. So we can ask whether a message was redelivered by calling Message.getJMSRedelivered() and acting according to our requirements.
As the acknowledgement with DUPS_OK_ACKNOWLEDGE mode is specific to the JMS provider implementation, it is hard to reproduce a duplicate scenario for our example. Therefore, we cover only a success scenario, in which we show only the JMS configuration class in Listing 6-22. Other classes are exactly the same as for the success scenarios, without error simulation.
In this case, jmsListenerContainerFactory uses DUPS_OK_ACKNOWLEDGE mode. The sequence diagram of this example is shown in Figure 6-6.

Figure 6-6. Sequence diagram of success scenario with DULS_OK_ACKNOWLEDGE mode (file sequence.uml in folder uml-diagrams of example project 0609-dups-ok-acknowledge)
After receiving and persisting the message, the JMS provider acknowledges it at a point convenient to the JMS provider. This option is useful for enabling various JMS destination handling optimizations that the JMS provider might want to put in place in order to make JMS communication more efficient.
Local JMS Transactions with Spring
Acknowledge modes are not the only way to make sure that our messages are delivered reliably. The JMS standard allows us to use transacted features, similar to ACID transactions common for relational databases.
We already covered how to use local JMS transactions with pure Java JMS APIs. Now we are going to explore how to use them with Spring. This support can be turned on JmsTemplate by setting setSessionTransacted() to true and setSessionAcknowledgeMode() to Session.SESSION_TRANSACTED.
For this support, Spring expects the presence of a transaction manager bean. Therefore, it doesn’t make sense to use JmsTemplate (for message sending and synchronous message reception) with transacted behavior without the transaction manager. Use of the transaction manager will be shown later in this book.
But we can use local JMS transactions without any transaction manager while listening to messages. In this case, we can configure setSessionTransacted() to true and setSessionAcknowledgeMode() to Session.SESSION_TRANSACTED for any of these JMS listener supporting beans:
- Container listener implementations
- SimpleMessageListenerContainer—Creates a listener container, with pure asynchronous JMS reception, where the listener is registered to the JMS destination and the JMS server initiates the reception of the message. It is handy if we plan to use a listener with CLIENT_ACKNOWLEDGE or AUTO_ACKNOWLEDGE mode.
- DefaultMessageListenerContainer—Creates a listener container, where Spring makes synchronous calls with a time-out in a loop under the hood, so that the message is read as soon as it appears at the JMS destination. This mechanism is handy when we are using JMS transaction support and is the only support that can work with distributed transactions (covered in the next chapter).
- Container listener factory implementations, introduced in Spring 4.1 and enables annotating JMS listener methods with @JmsListener
- SimpleJmsListenerContainerFactory—Factory for SimpleMessageListenerContainer
- DefaultJmsListenerContainerFactory—Factory for DefaultMessageListenerContainer
To show use of local JMS transactions with Spring, we can reuse the main and sender classes common in the Spring JMS examples in this chapter. We can also have the same listener implementation as that of the success scenarios in this chapter (for example, in Listing 6-14). The only difference is the JMS configuration shown in Listing 6-23.
This registers the DefaultJmsListenerContainerFactory bean with the name jmsListenerContainerFactory and sets the sessionTransacted property to true and sessionAcknowledgeMode to Session.SESSION_TRANSACTED to enable local JMS local transaction support. Similar support can be achieved with XML configuration, as shown in Listing 6-24.
In this case, we use Spring’s XML namespace, jms, to specify the listener container. The local JMS transaction is enabled by setting the acknowledge attribute to the transacted value. The rest of this configuration should be familiar from the previous chapter. The connection-factory reference is mandatory. The listener points to the JMS destination with the name messageQueue, and the listener method simpleMessageListener.readMessage(). The behavior of this example is shown in Figure 6-7.

Figure 6-7. Sequence diagram of success scenario with SESSION_TRANSACTED mode (file sequence.uml in folder uml-diagrams of example project 0610-transacted-listener-success)
This is straightforward. Spring commits the message for us automatically, after the listener finishes execution. Therefore, we can’t receive various messages in a single transaction with the local JMS transaction + Spring combination.
As with acknowledge modes, reception of a local JMS transaction can go wrong. Imagine the main and sender classes from the Spring JMS examples in this chapter combined with the JMS configuration from the previous example (Listing 6-24) and the listener from Listing 6-25.
In fact, we’ve seen such a listener in Listing 6-21, in the duplicate scenario listener in AUTO_ACKNOWLEDGE mode. The behavior is shown in Figure 6-8.
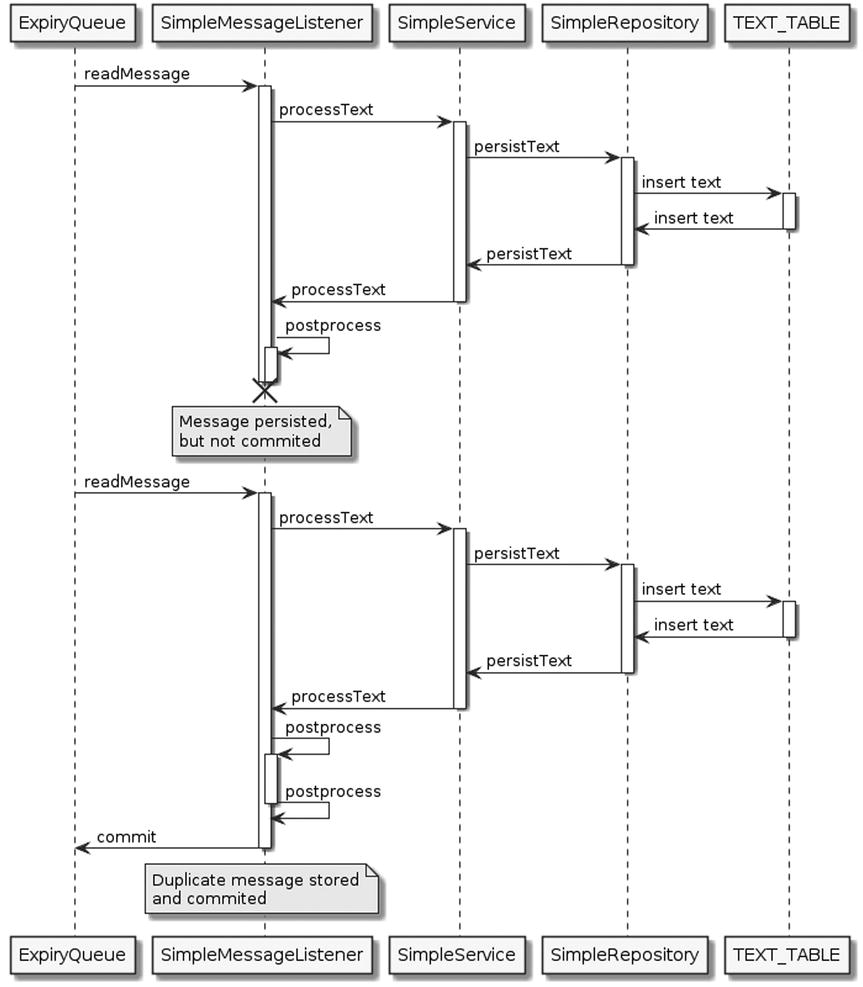
Figure 6-8. Sequence diagram of duplicate message scenario with SESSION_TRANSACTED mode (file sequence.uml in folder uml-diagrams of example project 0611-transacted-listener-duplicate)
The problem is that the message is stored into the DB, and after that, postprocess throws an exception before committing the first message. On redelivery, the same message is stored into the database a second time.
Spring also provides the possibility of handling JMS transactions via its transaction demarcation features, using the @Transactional annotation. Such support is possible when we register the JmsTransactionManager bean as a manager for Spring transactions. In such a case, Spring ignores JMS native acknowledge modes and transactional configuration. This support works for JMS 1.1 as well as for JMS 2.0.
JmsTransactionManager can be used for a single ConnectionFactory, as it binds JMS Connection/Session/JMSContext to the thread. This configuration can be handy for a thread-bound Session per ConnectionFactory.
It is recommended to combine this transaction manager with CachingConnectionFactory, which was shown in the previous chapter.
An example of JmsTransactionManager that starts with JMS configuration is shown in Listing 6-26.
First of all, we create and register the JmsTransactionManager bean based on a connectionFactory instance injected by Spring. The second bean is DefaultJmsListenerContainerFactory, also based on the same connectionFactory object as shown in the previous examples. But now we also inject and configure transactionManager into the listener container factory to enable Spring transactional features on top of this listener container factory.
Listing 6-27 shows a listener implementation for this example.
We used a transaction demarcation feature for the listener method readMessage(). The preprocess() method called before simpleService.processText() simulated an error for the first received message. For subsequent messages, no error is simulated. The sequence diagram for this behavior after running the example is shown in Figure 6-9.

Figure 6-9. Sequence diagram of JmsTransactionManager example (file sequence.uml in folder uml-diagrams of example project 0613-jms-transaction-manager)
When the first message is received and an exception from preprocess() is thrown, JmsTransactionManager rolls back the transaction created on message reception. That causes redelivery of the message. The second preprocess() call doesn’t throw an exception, and the message is, on second attempt, persisted and committed afterward.
Notice that if we simulated an error in postprocess() after message persistence, the result would be a duplicate message in the database again. But we’ll skip this example because we already covered a duplicate scenario with JMS transactions.
Even with all the reliability mechanisms we’ve mentioned, some scenarios can still cause message loss or duplication. Spring can’t abstract out all the problems of JMS integration with other transactional storage options, but tries to decrease the possibility of failure.
Therefore, using SimpleMessageListenerContainer or SimpleJmsListenerContainerFactory is recommended if our JMS message reception is based on acknowledge modes, especially AUTO_ACKNOWLEDGE. If we use transactions for JMS for message reception, the best-suited implementation is DefaultMessageListenerContainer or DefaultJmsListenerContainerFactory.
There is another option that we haven’t mentioned, which provides ACID characteristics across various transacted data stores. Based on distributed JTA transactions, this option is described in the next chapter. However, it is resource intensive and widely considered a significant performance killer. Therefore, every programmer should try to avoid it if possible. Fortunately, options exist for ensuring that no lost messages or duplicates occur without distributed transactions. But first, we need to take into account various considerations.
First, we need to know whether the target storage is idempotent—whether it can handle duplicate messages without creating an inconsistent state. When storage is idempotent, we can use any of the duplicate scenario examples from this chapter, and your integration between JMS and the database would be safe.
A more complicated situation arises when we don’t have such smart storage that can detect duplicates. Handling this scenario is explained in the next example. We reuse the common main and sender implementations and JMS configuration based on JmsTransactionManager from the previous example in Listing 6-27. The listener of this example is shown in Listing 6-28.
Into the transacted listener method readMessage, we inject the text of the message and the javax.jms.Message instance. A message instance is needed for a call to message.getJMSRedelivered(), which is used to find out whether this message is a redelivery. There is also a new private method called processIfNeeded().This method first verifies whether the message is already processed; if not, the method would call simpleMessage.processText() to persist it.
So here is the full logic: If the message is redelivered, process it only if needed; if not, just process it. You may ask: ”Why don’t we always call processIfNeeded() without bothering about the message.getJMSRedelivered() check?” The reason is simple. Checking whether the message was already processed is one additional, usually expensive, call to the external system, and message redelivery is so rare that we can eliminate wasting the majority of these calls by simply checking whether the message was redelivered before checking whether it was processed/persisted.
Let’s explore the behavior in the sequence diagram in Figure 6-10.

Figure 6-10. Sequence diagram of the first example for handling duplicates (file sequence.uml in folder uml-diagrams of example project 0614-handle-duplicates-error-after)
If a message is being delivered for the first time, message.getJMSRedelivered() returns false and sends execution to the else section where it’s persisted. Next, the postprocess() method is called, which simulates an error. At this stage, the message is processed, but not committed to the JMS destination.
Therefore, the message is redelivered again to our listener. But in this case, message.getJMSRedelivered() is true, so our logic calls processIfNeeded(). The message was already processed, so persisting is skipped, the message listener call finishes, and the message is committed.
Let’s also check what would happen if the error were simulated before persisting the message. Consider Listing 6-29.
Notice that the error is in this case simulated before the simpleService.processText() call in the listener method readMessage(). The sequence diagram of this scenario is shown in Figure 6-11.

Figure 6-11. Sequence diagram of first example for handling duplicates (file sequence.uml in folder uml-diagrams of example project 0615-handle-duplicates-error-before)
After receiving the message for the first time, message.getJMSRedelivered() returns false; preprocess() in the else section then throws the message. Processing of the readMessage() method is unsuccessful, and the message is rolled back without persisting.
After redelivery of the message, message.getJMSRedelivered() returns true, so the processIfNeeded() method is called. In this case, we check that simpleService.isProcessed() is false; we then call simpleService.processText(). At the end, we also have exactly one message persisted, as desired.
Summary
This chapter explained that JMS messaging has various mechanisms for handling secure message delivery. We listed all the delivery acknowledgment and transactional modes offered by the JMS API and highlighted how verbose the use of this API can be.
Than we explored how to use these with Spring and covered various success and failure scenarios, because if we are not careful, messages can easily become lost or duplicated in the system we are integrating JMS with.
We also highlighted that we can’t get ACID characteristics across various transactional systems without use of distributed transactions. But we also explained how this can be elegantly handled without them. Therefore, we now know how to handle JMS integration with other transactional storage, reliably avoiding resource-expensive distributed transactions.