![]()
Understanding Azure Storage and Databases
The computer storage pendulum has swung from people asking, “What would I do with all that storage?” about a decade ago to people now using personal storage media in amounts once only possible for the largest organizations in the world. As you are probably well aware, the average smartphone today has as much storage in it as a PC did in 1997. Data has proliferated in type, size, and audience over the last few years. This data proliferation over the last decade has jokingly been referred to as “datageddon.” Data storage and data management have become a real challenge for organizations worldwide, as they struggle to keep up with webcam, voice, e-mail, transaction, and other data feeds that they are required to retain as part of their business’s intellectual property or work product.
This chapter discusses the various types of storage available in Microsoft Azure. Azure Storage refers to long-term disk storage, not cache or RAM, which is closer to the processor and resides within the hosts running the virtual machines. Another key differentiator is that not all storage is created equal. There are capabilities to be considered, such as drive-access speed and redundancy. Because Azure is created to meet the needs of the enterprise, the type of storage used is enterprise grade as well. Therefore, at a minimum, these are physically 15K spindles and solid-state drives (SSDs) deployed in locally and geographically redundant setups.
Azure Storage is elastic, meaning it can grow and shrink with you, and you’re only billed for what you are currently using. Even if a storage account or disk is provisioned at a substantially larger size than what is actually used, only the blocks used are counted for billing purposes.
Azure Storage is available from anywhere there is an Internet connection, like the rest of Azure. Many services already use Azure Storage, such as the Microsoft Windows Server 2012 native backup utility and the Microsoft System Center Data Protection Manager 2012. Azure Storage also uses a system that automatically load-balances your storage based on traffic, just like the most expensive storage area networks (SANs) on the market today. All of these Azure Storage capabilities can be provisioned quickly, and you can have customers up and running using them in about five minutes.
Azure Storage Services: Terms and Concepts
Microsoft’s Azure Storage service is available in all Azure datacenters. In general, several types of Azure Storage options are available; they are defined after you create an Azure Storage account, with the exception of databases and StorSimple. The different types of storage are depicted in Figure 7-1.
- Azure Storage accounts: An Azure Storage account must be used to create blobs, tables, queues, or file storage services.
- BLOB (binary large object) storage: Blobs are generally used to store files accessed via a browser using the HTTP/HTTPS GET and POST methods.
- SQL databases: A SQL database is a type of storage used for structured data. But instead of managing a SQL server, Azure SQL Database is an alternative for consuming the database without having to manage the SQL server that is providing the service. This is different from consuming SQL Server as an IaaS, because in the latter scenario, you still need to manage and maintain the SQL Servers in IaaS.
- Queues: As the name implies, a queue provides messaging and communication between different applications. Queue storage provides such a mechanism without having to maintain a separate messaging bus.
- Tables: Azure Table Storage is a NoSQL key-value store that is useful for applications that must store large amounts of non-relational data without schemas. This is different from Azure databases in that table storage does not provide any way to represent relationships between data. It is a low-cost way to provide a fault-tolerant store for structured data that may not require the complexities of a relational database. For more information about the differences between Azure Table Storage and Azure SQL Database, see https://msdn.microsoft.com/library/azure/jj553018.aspx.
- File storage: File storage provides the ability to access files via standard SMB 2.1.
- Hybrid storage (StorSimple): Microsoft acquired StorSimple, which is a storage solution that deploys on-premises 2U devices that use cloud storage for overflow, backup, and archiving capabilities. The StorSimple device is an ISCSI unit with SSDs and traditional drives for fast, low-latency access to frequently used files.

Figure 7-1. Types of Azure storage
Before going into the details of the different types of storage, it is important to note that with the exception of StorSimple and Azure SQL Database, all storage types are created from an Azure Storage account. The Azure Storage account in turn determines certain characteristics for the storage, such as whether the storage is locally redundant or georedundant, and whether the storage is based on standard hard drives or SSDs.
Azure Storage is generally provisioned on enterprise-class spinning hard drives. For higher performance, Azure offers Premium Storage. Premium Storage is provisioned on SSDs. As a result, Premium Storage delivers high-performance, low-latency disk support for I/O intensive workloads.
Locally redundant storage (LRS), which is the base-level redundancy for storage, ensures that hardware is provisioned on three separate replicas in the same datacenter. This guarantees that no localized hardware failure results from an interruption in data services.
Georedundant storage (GRS) takes LRS storage in one datacenter and replicates it to LRS in another datacenter that is more than 500 miles away. This ensures true georedundancy. Thus if an entire datacenter becomes unavailable, there is no interruption to data services because the second datacenter can continue providing services. Technically, GRS has six replicas of the data (LRS × 2).
CREATING AN AZURE STORAGE ACCOUNT
The following exercise walks you through the steps required to create an Azure Storage account. As part of this exercise, you see the different Azure Storage accounts and the storage types that each Azure Storage account supports:
![]() Note Premium Storage is only offered as an LRS option and only supports page blobs, whereas non-Premium Storage provides LRS and GRS options and supports block and page blobs as well as tables and queues.
Note Premium Storage is only offered as an LRS option and only supports page blobs, whereas non-Premium Storage provides LRS and GRS options and supports block and page blobs as well as tables and queues.
- Go to the new Azure Management Portal at https://portal.azure.com.
- Click New, select Data + Storage, and then select Storage, as shown in Figure 7-2.

Figure 7-2. Creating an Azure Storage account
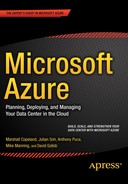
- Provide a name for the Azure Storage account, and then click the Pricing Tier option, as shown in Figure 7-3.
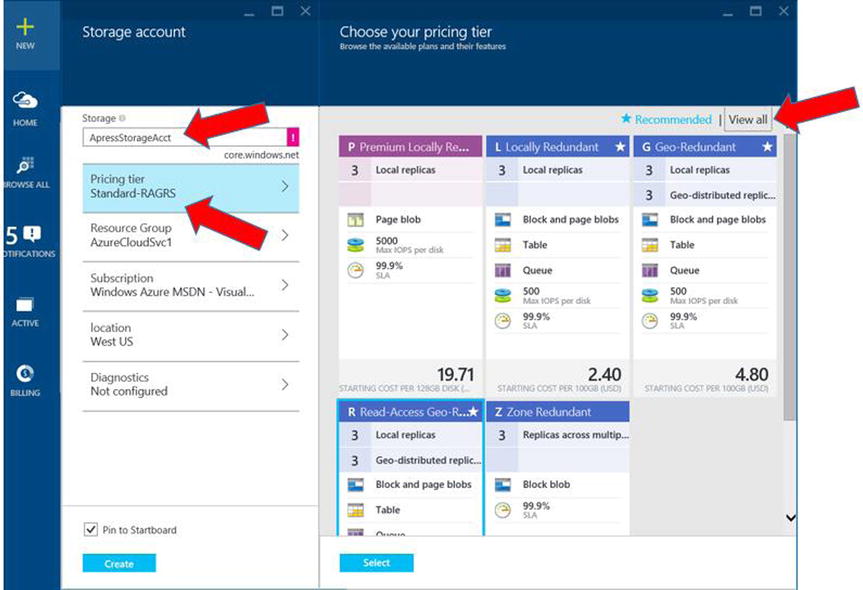
Figure 7-3. Selecting the Azure Storage account type via the Pricing Tier option
- Click View All at upper right to see all available Azure Storage accounts, also shown in Figure 7-3.
- Click Select to choose the pricing tier. Note the different types of accounts. For example, Premium Storage is only available in LRS and only supports page blobs with a 99.9% SLA, as shown in Figure 7-4. After selecting the type of account, click Create to create the Azure Storage account.
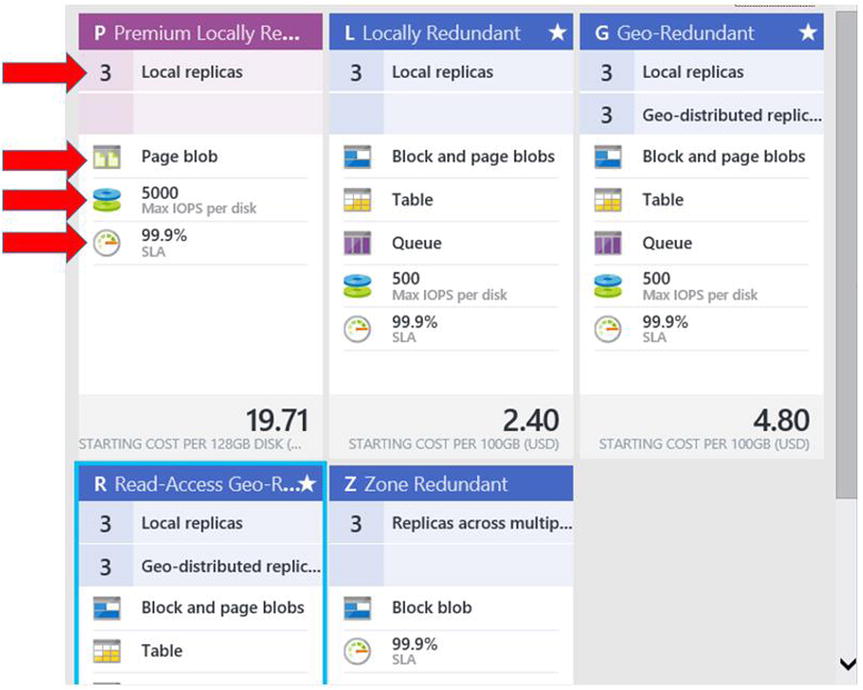
Figure 7-4. Characteristics of the different Azure Storage accounts
Now that you have created an Azure Storage account, you can use it to build block or page blobs, tables, queues, and file storage.
Queues are used primarily for messaging between services and applications. Azure Queue is part of the Azure Storage family of services and uses REST-based protocols such as GET and PUT to transfer messages.
Azure provides two types of queue methods: Azure queues and service bus queues. Although both methods are messaging services, they have different features and capacities in terms of message size, maximum queue size, and message time-to-live (TTL). Application and service developers primarily use Azure queues, which are beyond the scope of this book. For detailed information about Azure queues and service bus queues, and the appropriate use-case scenarios for each, visit https://azure.microsoft.com/en-us/documentation/articles/service-bus-azure-and-service-bus-queues-compared-contrasted. You can also find a detailed discussion of Azure Queue storage at http://azure.microsoft.com/en-us/documentation/articles/storage-dotnet-how-to-use-queues.
Azure File storage offers shared storage for applications using the standard Server Message Block (SMB) 2.1 protocol. Azure VMs and cloud services can share file data across application components via mounted shares, and on-premises applications can access file data in a share via the Azure File storage API. Azure VMs can connect to Azure Storage by simply mounting the file storage as a shared drive via the SMB protocol. Multiple clients can access the file storage via SMB simultaneously.
You can also achieve high-performance, low-latency file storage by building the file storage on the new Azure Premium Storage, which is based on SSD drives.
Azure Blob storage is designed for storing unstructured data, such as data from backups, rich content such as images and streaming video or audio, text, or binary data. It is designed to be accessed over the HTTP or HTTPS protocol, which makes it ideal for anywhere access over the Internet. Because Azure Blob storage uses the HTTP/HTTPS standards, many third-party solutions use this storage option to offload the data that they generate.
![]() Note Although Azure Blob storage is usually accessed via a URL using the HTTP/HTTPS protocol, you can also access the contents via a number of APIs/SDKs that the Azure Team has created. These include .NET, Java, PHP, Ruby, and Python. For comprehensive documentation on using these SDKs/APIs, visit http://azure.microsoft.com/en-us/documentation.
Note Although Azure Blob storage is usually accessed via a URL using the HTTP/HTTPS protocol, you can also access the contents via a number of APIs/SDKs that the Azure Team has created. These include .NET, Java, PHP, Ruby, and Python. For comprehensive documentation on using these SDKs/APIs, visit http://azure.microsoft.com/en-us/documentation.
The following are the core concepts of Azure Blob storage:
- There are two types of blobs:
- Block blob: Comprises data blocks that are identified by their unique block ID. Blocks can be of different sizes, with a maximum of 4 MB per block. There is a maximum size of 200 GB for block blobs. As such, block blobs are ideal for large, efficient uploads; hence their use in backups. Files of up to 64 MB can be written in single-write operations.
- Page blob: As the name implies, essentially a collection of 512-byte page files. A page blob can grow to a maximum size of 1 TB.
- You may define a blob as a block or page blob at the time of creation, but once it has been created, the blob type cannot be changed.
- All blobs reflect committed changes immediately.
- Blobs can be duplicated in a snapshot.
- To limit the risk of a blob being unintentionally overwritten, you can lease it for exclusive write access. When you do so, a lease ID is generated. Henceforth, any write requests that do not include the current or correct lease ID are not allowed to modify the blob’s existing contents.
- Management of Azure Blob storage is done through an Azure Storage account, covered in the next section of this chapter.
- Azure Blob storage must reside in containers, which are groupings of Azure blobs. Containers can have unlimited blobs; likewise, Azure Storage accounts can contain an unlimited number of containers.
- Blobs are addressable using the following URL format: http://<storageaccount>.blob.core.windows.net/<container>/<blob>.
Figure 7-5 illustrates the concepts and relationships of the different Azure Blob components.

Figure 7-5. Azure Blob components and access via HTTPS URL
In addition to accessing Azure Blob storage through the browser, Microsoft also makes available a free Azure Storage Explorer through CodePlex. Azure Storage Explorer is a graphical user interface (GUI) application that provides user-friendly access to Azure Blob storage. You can download the Azure Storage Explorer at http://azurestorageexplorer.codeplex.com.
![]() Note Azure Storage performance metrics, such as IOPS and disk bandwidth, for the various VM sizes are available on the Azure Documentation site: https://azure.microsoft.com/en-us/documentation/articles/storage-premium-storage-preview-Portal.
Note Azure Storage performance metrics, such as IOPS and disk bandwidth, for the various VM sizes are available on the Azure Documentation site: https://azure.microsoft.com/en-us/documentation/articles/storage-premium-storage-preview-Portal.
Azure Storage Analytics
It is sometimes helpful to analyze how storage is being used. This is especially useful for optimizing the use of storage and finding opportunities to lower the cost of consumption or for troubleshooting purposes.
Azure Storage Analytics logs the access and actions of users accessing Azure Storage: for example, users storing content in Azure. Azure Storage Analytics then analyzes the logs to provide metrics data for a storage account.
To use Azure Storage Analytics, you must enable it individually for each service. You do so from the Azure Management Portal; for details, see Chapter 13. You can also enable Storage Analytics programmatically via the REST API or the client library.
The aggregated data is stored in a well-known blob (for logging) and in well-known tables (for metrics), which may be accessed using the Azure Table service APIs or through the Azure Management Portal. Storage Analytics has a 20 TB limit on the amount of stored data that is independent of the total limit for your storage account.
Storage Analytics logs detail information about successful and failed requests. This information can be used to monitor individual requests and to diagnose issues with a storage service. Requests are logged on a best-effort basis. Log entries are created only if there is storage service activity. For example, if a storage account has activity in its Blob service but not in its Table or Queue services, only logs pertaining to the Blob service are created.
Azure Storage Analytics is not enabled by default and can only be turned on by the storage account owner. Each write operation performed by Storage Analytics is a billable activity in addition to the amount of storage used to store metrics data.
All logs are stored in block blobs in a container named $logs, which is automatically created when Storage Analytics is enabled for a storage account. The $logs container is located in the blob namespace of the storage account, such as http://<accountname>.blob.core.windows.net/$logs. This container cannot be deleted once Storage Analytics has been enabled, although its contents can be deleted.
![]() Note At the time of this writing, capacity metrics are only available for the Blob service. Capacity metrics for the Table service and the Queue service will be available in future versions of Storage Analytics.
Note At the time of this writing, capacity metrics are only available for the Blob service. Capacity metrics for the Table service and the Queue service will be available in future versions of Storage Analytics.
Azure Import/Export Service
The Azure Import/Export service allows you to transfer data to and from Azure by shipping hard disk drives. In scenarios with large amounts of data, shipping it via the Import/Export service may be faster and more cost effective than electronically transferring the data over the network or Internet. The hard disk drives that are shipped to or from Microsoft datacenters are encrypted.
Azure SQL Database
Azure SQL Database is a relational database-as-a-service type of storage for structured data.
![]() Note Azure SQL Database is based on Microsoft SQL Server database technology. This should not be confused with the similar Azure Table storage offering, which is a NoSQL datastore that allows authenticated requests for structured data. Because the concepts and capabilities in Azure SQL Database and Azure Table are similar, this chapter only covers Azure SQL Database. For information specifically about Azure Table storage, visit https://azure.microsoft.com/en-us/documentation/articles/storage-dotnet-how-to-use-tables.
Note Azure SQL Database is based on Microsoft SQL Server database technology. This should not be confused with the similar Azure Table storage offering, which is a NoSQL datastore that allows authenticated requests for structured data. Because the concepts and capabilities in Azure SQL Database and Azure Table are similar, this chapter only covers Azure SQL Database. For information specifically about Azure Table storage, visit https://azure.microsoft.com/en-us/documentation/articles/storage-dotnet-how-to-use-tables.
The benefit of using the Azure SQL Database service is the ability to spin up and consume a relational database quickly; it can then easily be replicated for georedundancy without all the infrastructure deployment and management normally required. When you are considering whether to use Azure SQL Database for a solution, it is important to understand the SQL Server features that are not available. However, Azure SQL Database should be able to meet the needs of most solutions that require a relational database in the back end.
CREATING AND USING AN AZURE SQL DATABASE
The following exercise walks you through the steps required to create and access an Azure SQL database. You also use the new Azure Portal that is currently in preview:
![]() Note You see in the Portal that you can create other types of databases, such as MySQL. Although this exercise is based on a SQL database, the concepts and steps are similar.
Note You see in the Portal that you can create other types of databases, such as MySQL. Although this exercise is based on a SQL database, the concepts and steps are similar.
- Go to the new Azure Management Portal at https://portal.azure.com.
- Click New, select Data + Storage, and then select SQL Database, as shown in Figure 7-6.
Figure 7-6. Create a new Azure SQL database from the Portal
- Provide a friendly name for the SQL database. If your organization has multiple subscriptions, it is a good practice to change the subscription with which this SQL database is associated before making any other changes. At the bottom of the list, click Subscription to select the correct subscription for this database, as shown in Figure 7-7.

Figure 7-7. Selecting the correct subscription
- Select the Pricing Tier menu, and choose the database type you wish to deploy. For this exercise, we selected Basic (5 DTUs), which has a maximum size of 2 GB.
- Select Server, and then click Create A New Server, as shown in Figure 7-8. Provide information for the server name, server admin login password, and datacenter region where the database should be created. Click OK when you have finished configuring the database server, and then click Create to have Azure create the database.
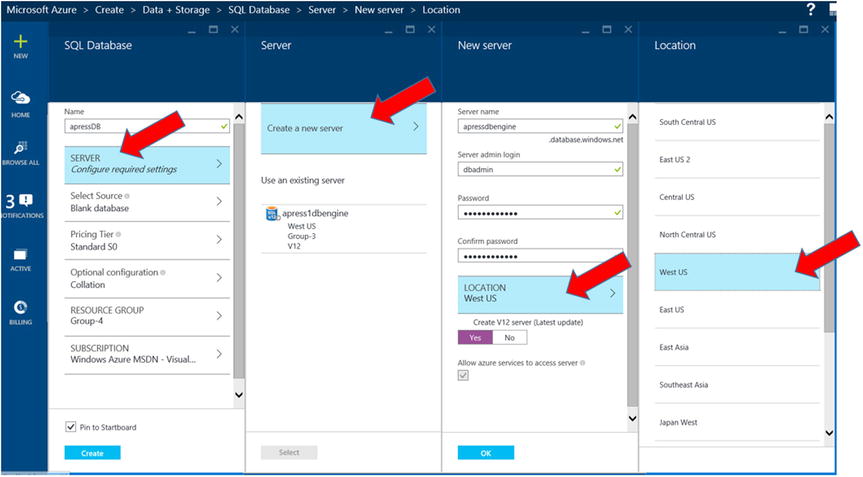
Figure 7-8. Configuring the database server
- You are returned to the home page of the Portal. The status and progress of creating the new database are displayed on one of the tiles.
- When the database has been created, you should automatically be directed to the SQL Database configuration screen, as shown in Figure 7-9. You can also get to the configuration screen by selecting the database from the Browse All menu option. Note that the status of the database is Online, and therefore it is ready for use.
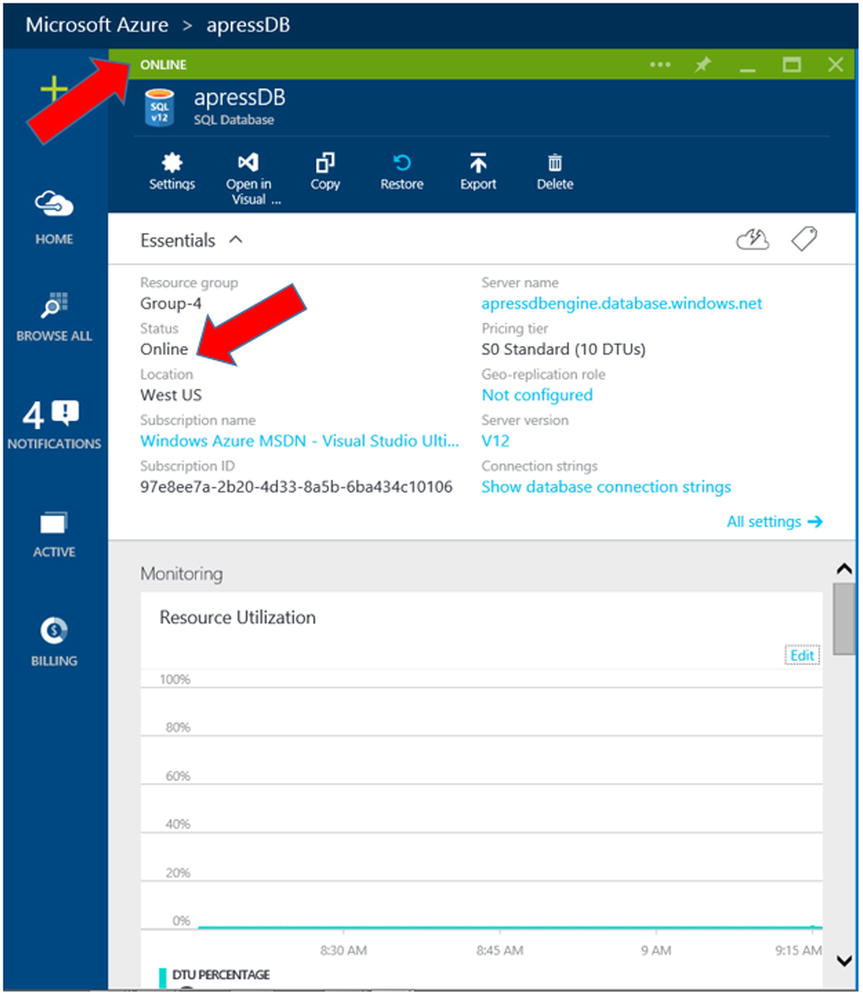
Figure 7-9. Viewing the database properties
- As shown in Figure 7-10, click Settings to review and configure additional settings for the database, such as auditing and georeplication. This exercise does not go through all of these settings, because they are self-explanatory.
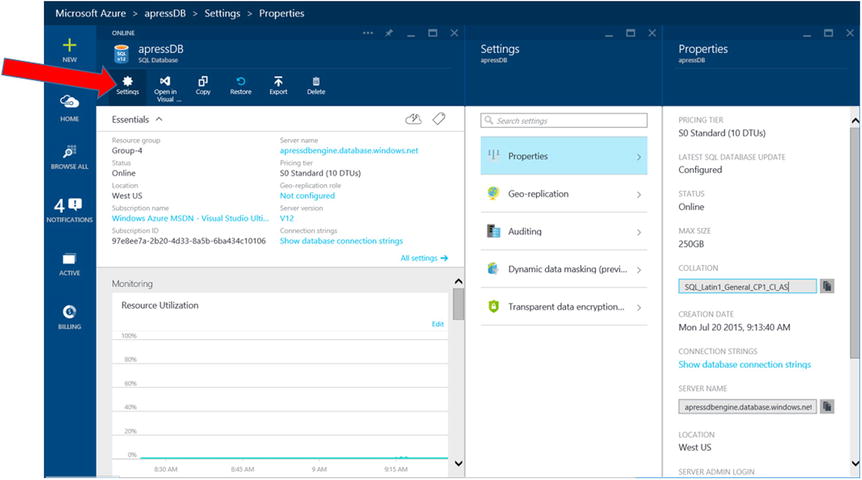
Figure 7-10. Configuring additional database settings
- By default, the firewall settings for this database server would not allow you to connect to it directly from your client. In order to configure firewall settings so that you can connect to the database, click the server name and then select Show Firewall Settings, as shown in Figure 7-11.

Figure 7-11. Configuring the database server firewall settings
- The client IP address of the machine you are using to access this configuration should be detected. You have the option to add this IP to allow access by clicking Add Client IP; you can also specify ranges of IP addresses. Click Add Client IP, as shown in Figure 7-12. The IP address should be added to the access list.

Figure 7-12. Adding the client IP address to the access list
- Click Save to save the settings. The Portal says it may take up to five minutes for the settings to take effect, but it should happen immediately. If you have added the IP address to the access list and saved the settings but are still unable to connect to the database directly, wait a few minutes and then try again.
 Note It is important to save your firewall settings. It is not uncommon for administrators to add IP addresses to the access list and see them appear on the access list, as shown in Figure 7-9, but not save the settings. The firewall settings are not effective until you click Save.
You can now connect to the database to create tables and add data. Like any database, you can access it via a database-management tool like SQL Server Management or Visual Studio, or programmatically via database connection strings. The next part of this exercise show you the available connection strings and then demonstrates how to use Visual Studio to connect to the database:
- From the SQL Database menu, click Show Database Connection Strings, as shown in Figure 7-13. Notice that there are four connections strings from which to choose, depending on what type of application you are developing. There is also a handy clipboard option that allows you to copy the connection string.
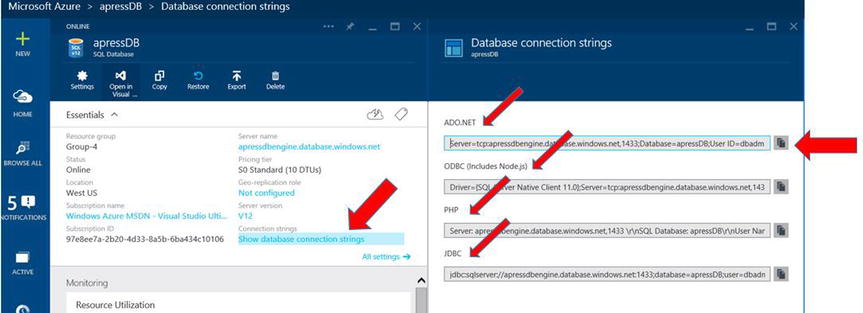
Figure 7-13. Azure SQL Database connection strings
- Click Open In Visual Studio, as shown in Figure 7-14. Then select the option that is most applicable to your scenario. If you already have Visual Studio installed, you may need to get the latest update so that Visual Studio can connect to an Azure SQL database. Otherwise, you will get an error message that says Visual Studio does not recognize the database type. If you do not have Visual Studio, select one of the other options in order to connect to an Azure SQL database.

Figure 7-14. Download Visual Studio updates.
For this exercise, we downloaded and installed the updates for Visual Studio 2013.
- Launch Visual Studio.
- Click Tools from the menu, and select Connect To Database, as shown in Figure 7-15.
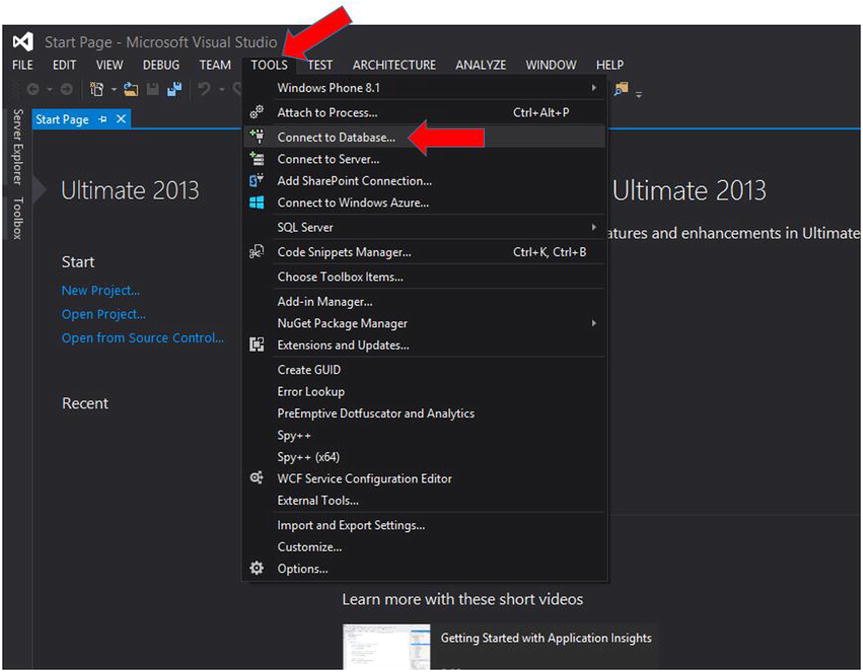
Figure 7-15. Connecting to a database from Visual Studio
- Select Microsoft SQL Server as the data source, and uncheck Always Use This Selection, as shown in Figure 7-16. Click Continue.

Figure 7-16. Selecting a data source in Visual Studio
- From the Azure Management Portal, copy the server name, as shown in Figure 7-17.
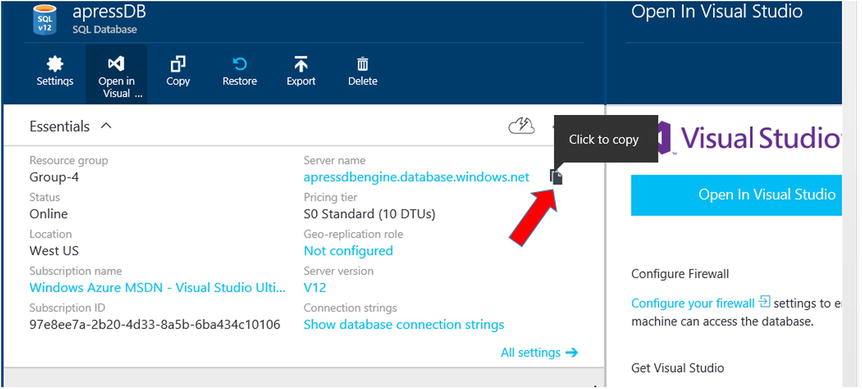
Figure 7-17. Copying the Azure SQL database server name
- Paste the server name into the Visual Studio Add Connection dialog box, select Use SQL Server Authentication, and provide the required credentials, as shown in Figure 7-18.

Figure 7-18. Testing the database connection
- Click Test Connection to confirm that a successful connection to the database can be made, as also shown in Figure 7-18.
- Click OK to close the dialog box indicating that the test connection succeeded.
- Click OK again to close the Add Connection window.
- A new database connection is now established. If you expand Data Connections, you should see the Azure SQL database server, as shown in Figure 7-19. Expand it, right-click Tables, and select Add New Table.
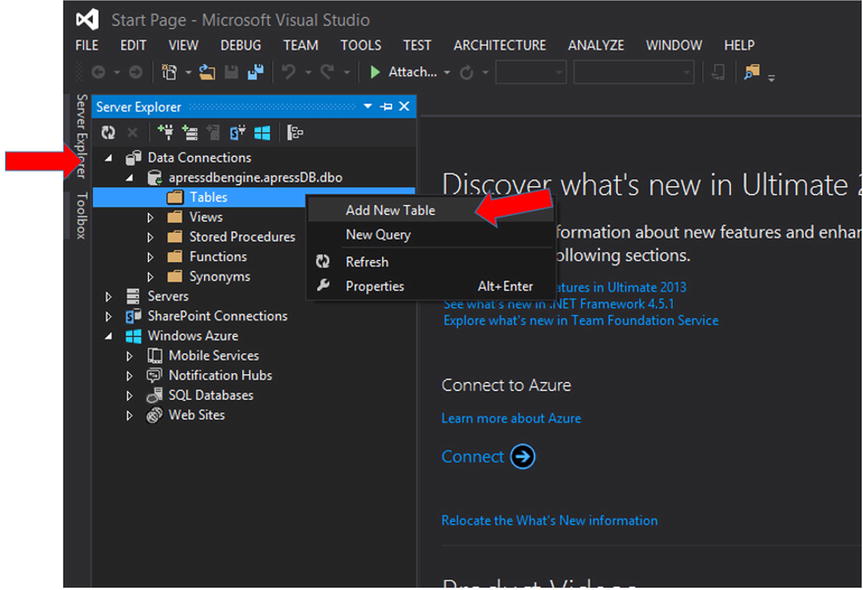
Figure 7-19. Creating a new table in an Azure SQL database
This concludes the exercise—managing databases and development are beyond the scope of this chapter. In this exercise, you saw how an Azure SQL database is created and how to access it via Visual Studio.
StorSimple
StorSimple is a hybrid on-premises and cloud storage solution. It consists of a 2U rackmount appliance that has SSDs, hard drives, and the ability to use Azure as a storage source. Figure 7-20 is a schematic of the rear panel of a StorSimple 8100 storage appliance.
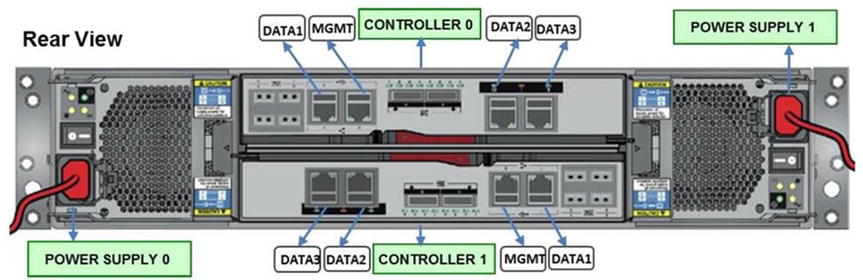
Figure 7-20. Rear schematic of a StorSimple 8100 series storage appliance
The idea behind StorSimple is the need for high-speed, low-latency access to frequently used data—hence the local storage on the appliance. Then, as data ages out, the StorSimple device moves the data from higher-speed local SSDs to the traditional hard drives that are also still on the appliance. Finally, once the device has reached 95% of capacity, as the data ages out even more, the content is moved to Azure storage. If the file is accessed after it has been moved to Azure storage, it is “promoted” back into the on-premises local StorSimple SSDs, and the aging process starts over. This entire process is transparent to the administrator and end user. It is depicted in Figure 7-21.

Figure 7-21. How StorSimple’s aging process for files works
A StorSimple-specific storage account known as the StorSimple Manager is used to configure StorSimple. The StorSimple Manager is an extension of the Azure Management Portal. At the time of this writing, the new Preview Portal does not yet support the creation of a StorSimple Manager, so you need to use the Azure Portal. When you purchase StorSimple, this option becomes available, as shown in Figure 7-22. Also, at the time of this writing, Microsoft provides an onboarding service for StorSimple customers. As part of the service, Microsoft helps customers configure the StorSimple Manager and the appliance.
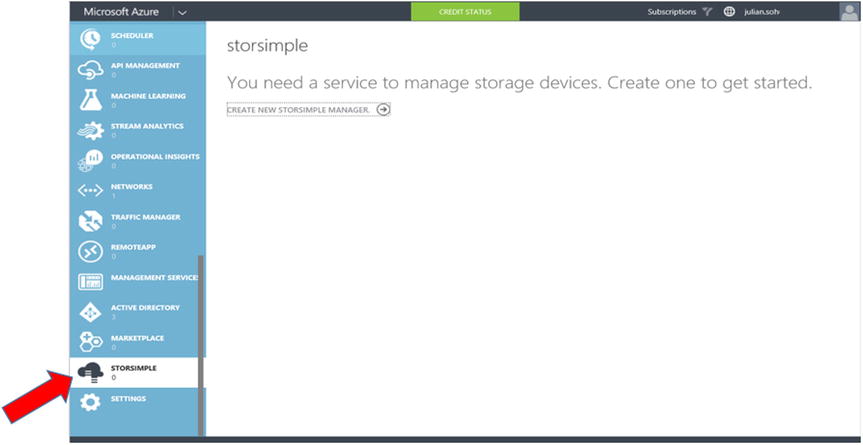
Figure 7-22. Enabling the StorSimple Manager
![]() Note At the time of this writing, the current hardware appliance versions for StorSimple are the 8000 series. The 7000 series of appliances is deprecated and superseded by the 8000 series, although the former can still be used with Azure. In some cases, such as Azure Government (MAG), only the 8000 series appliances are supported. StorSimple 5000 series hardware is no longer supported. For more information about StorSimple, visit http://azure.microsoft.com/en-us/documentation/services/storsimple.
Note At the time of this writing, the current hardware appliance versions for StorSimple are the 8000 series. The 7000 series of appliances is deprecated and superseded by the 8000 series, although the former can still be used with Azure. In some cases, such as Azure Government (MAG), only the 8000 series appliances are supported. StorSimple 5000 series hardware is no longer supported. For more information about StorSimple, visit http://azure.microsoft.com/en-us/documentation/services/storsimple.
StorSimple 8000 appliances provide automatic compression and de-duplication, so there is nothing for an administrator to configure with respect to these capabilities. The appliances have 10 GB Ethernet connections and come in two versions:
- StorSimple 8100: Provides 15 TB to 40 TB of storage on the appliance, depending on the level of compression achieved. The SSD on the 8100 is 800 GB in size. The maximum available storage that an 8100 appliance can handle, including Azure storage, is 200 TB.
- StorSimple 8600: Provides 40 TB to 100 TB of storage on the appliance, depending on the level of compression achieved. The SSD on the 8600 is 2 TB in size. The maximum available storage that an 8600 appliance can handle, including Azure storage, is 500 TB.
Summary
This chapter introduced the different types of Azure Storage accounts. These accounts determine certain hardware and deployment characteristics, such as LRS versus GRS, and standard HDDs versus high-performance SSDs.
Building on an Azure Storage account, you can define block blob, page blob, or file storage. You can also use storage accounts to create table and queue storage.
You were also introduced to relational databases as a service in the form of Azure SQL Database. But other non-SQL relational databases as a service, like MySQL, are also available.
Finally, you visited StorSimple as a hybrid on-premises and cloud storage solution. StorSimple is a unique solution that takes advantage of the best of on-premises and cloud storage.
The next chapter covers how to extend your network into Azure.