![]()
Getting Started with Azure Virtual Machines
Introducing Azure Virtual Machines
Running numerous web sites from different customers on a single server has been well understood for the past 15 years or so, and it has been the mainstay of hosting providers worldwide. This model of web hosting allowed small businesses and individuals to create cost-effective online presences. In the last 10 years, however, emulating hardware to allow entire computer operating systems (OSs) to run has enabled hosting scenarios that, without virtualization, would previously have been too costly. Virtual machines (VMs) emulate the hardware required to run computer OSs. The VMs discussed in this book are all system virtual machines, not process virtual machines; process VMs are part of a detailed software development conversation. Only OSs supported on virtual hardware architecture can be run in a VM. Microsoft uses only x64 hardware for their hosts; hence any x86/x64 workload can run on the VMs running on these hosts. These VMs are also frequently referred to as guests. A VM is basically a software version of a computer’s hardware onto which you can install an OS; the host slices its resources across all the VM guests it has running. For more information about VMs and how their abstraction works, see http://en.wikipedia.org/wiki/Virtual_machine. You can also download a copy of Microsoft’s “Virtualization for Windows: white paper at http://download.microsoft.com/download/8/6/2/862032E0-9D03-4AB5-B033-E6022A6186B1/VirtualizationforWindows_a_Technology_overview.pdf.
Microsoft Hyper-V, released in June 2008, is a native or bare-metal Type 1 hypervisor, which means that it runs directly on the host hardware. Type 1 hypervisors don’t exhibit the performance issues, vulnerabilities, and configuration challenges associated with Type 2 hypervisors, which run on a host OS (as another service) such as Windows Server or Linux. A comparison of Type 1 versus Type 2 hypervisors includes information regarding processes running in Ring 0; for more details, download the Microsoft Hyper-V white paper at https://www.microsoft.com/en-us/server-cloud/solutions/virtualization.aspx. Microsoft Azure uses as special OS built on Windows Server 2008 Type I hypervisors, called the Microsoft Azure OS; it runs the fabric layer of Azure. Microsoft calls Azure’s hypervisor Microsoft Azure Hypervisor. Microsoft’s Azure Fabric Controller controls all the scaling and reliability tasks needed in the environment. A frequent question is, “What is the difference between Hyper-V and Microsoft Azure Hypervisor?” Microsoft Distinguished Engineer Hoi Vo provides the answer at http://azure.microsoft.com/blog/2009/01/29/design-principles-behind-the-windows-azure-hypervisor:
- Efficient: Push work to hardware as much as possible. Any percentage gain once multiplied to tens of thousands of machines will be very significant for us. Consequently we can bet on new processor features to save CPU cycles for the hosted application.
- Small footprint: Any features not applicable to our specific cloud scenarios are removed. This guarantees that we do not have to worry about updating or fixing unnecessary code, meaning less churning or required reboots for the host. All critical code paths are also highly optimized for our Windows Azure scenarios.
- Tight integration: The Windows Azure Hypervisor is tightly optimized with the Windows Azure kernel. This is required to achieve the level of scalability and performance we want for our stack.
Azure VMs currently allow Microsoft customers to enable server-computing scenarios out of Microsoft’s public or government Azure datacenters. Microsoft only supports x64 guest OSs in Azure. Azure datacenters are frequently referred to as Microsoft’s public or government clouds. Customers can provision VMs from scratch using a variety of templates or even upload their own servers built on-premises in Azure into a VM. Azure datacenters allow Microsoft customers to control the networking, virtual hard disks, CPU, and memory resources allocated to any VM that they provision. Azure becomes an extension of the customer’s datacenter infrastructure by providing computing, storage, and memory resources on demand. These resources can be scaled up or down as the customer’s needs change. Auto-scaling and load-balancing VMs are a click away for a workload. This is the dynamic datacenter, with services scaling up and down as workloads demand and provisioning automatically as workloads or services require the infrastructure.
This chapter takes you through VM configuration and sizing, how to build and connect to VMs, and how to upload your own on-premises servers to Azure, regardless of the current hypervisor or physical server hardware.
Virtual Machine Configurations
Azure VMs include Windows and Linux VMs, both of which have Basic and Standard tiers. The key difference between the tiers is that the Basic tier lacks both auto-scaling and load-balancing capabilities. The same size VMs are available in both tiers, so if these capabilities are required, use the Standard tier. The Standard tier has different sizes of VMs broken out into series according to their configurations: A-series, D-series, DS-series, and G-series.
A-series is a basic, cost-effective option. D-series VMs should be considered by any business that needs to run applications that demand higher computing power and take advantage of faster disk performance. These VMs provide faster processors; the virtual cores (vCores) are approximately 60% faster than the A-series, and both the local disk and the temporary drive (D: on Windows) use a solid-state drive (SSD).
DS-series VMs can use Premium storage, which provides high-performance, low-latency storage for I/O-intensive workloads. These VMs use SSDs to host a VM’s disks and offer a local SSD disk cache.
G-series VMs offer the biggest size and best performance, and they run on hosts with Intel Xeon E5 V3 family processors. These VMs are named for the world’s most famous monster lizard, due to their size.
Sizing a VM correctly is important because its size has the greatest influence on its price. Size also affects the VM’s processing, memory, and storage capacity. Storage costs are calculated separately based on pages used in the storage account. The following tables show the sizes and capacities offered by each series as of the time of this writing for US-based VMs. As time goes on, Microsoft will update these series specs and prices. For a complete breakdown by OS and Azure datacenter locations, refer to the Azure pricing guide at http://azure.microsoft.com/en-us/pricing/details/virtual-machines/#Windows.
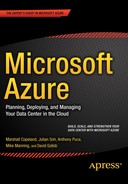
A-series
The Basic tier is an economical, general-purpose option for development workloads, test servers, and other applications that don’t require load-balancing, auto-scaling, or memory-intensive VMs, as listed in Table 6-1.
Table 6-1. A-series Basic VMs*
*Prices include Windows Server licensing fee but not sales tax. Monthly Pay-As-You-Go estimates are based on 744 hours of continuous use.
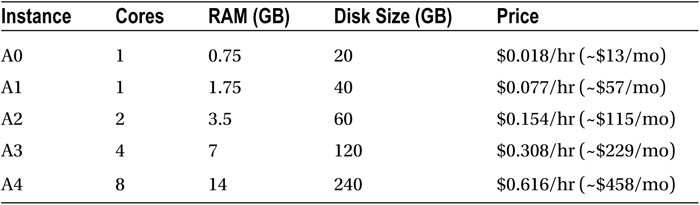
The Standard tier offers the most flexibility. It supports all VM configurations and features, as itemized in Table 6-2.
Table 6-2. A-series Standard VMs*
*Prices include Windows Server licensing fee but not sales tax. Monthly Pay-As-You-Go estimates based on 744 hours of continuous use.
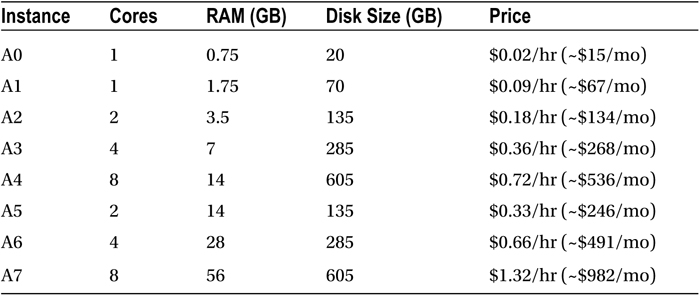
D-series VMs offer up to 112 GB of memory, utilize solid-state drives, and have faster processors than the A-series. The D-series can be used for more than Azure VMs; they can also be used for web or worker roles when you architect Azure Cloud Services. D-series VMs are ideal for high-performance, demanding workloads.
A variant of the D-series, called the DS-series, is specifically targeted for Premium Storage. The pricing and billing metrics for the DS sizes are the same as the D-series, as listed in Table 6-3.
Table 6-3. D-series Standard VMs*
*Prices include Windows Server licensing fee but not sales tax. Monthly Pay-As-You-Go estimates based on 744 hours of continuous use.
G-series
G-series VMs are performance-optimized with the latest CPUs, memory, and storage, as detailed in Table 6-4. They feature the latest Intel Xeon processor E5 v3 family with two times more memory and four times more SSDs than the D-series. G-series VMs are the most powerful VMs available in Azure.
Table 6-4. G-series Standard VMs*
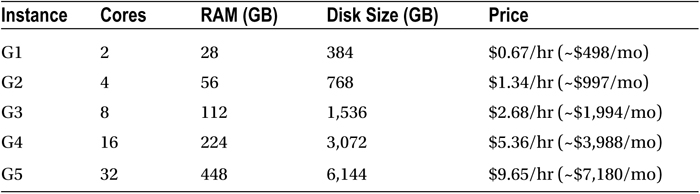
*Prices include Windows Server licensing fee but not sales tax. Monthly Pay-As-You-Go estimates based on 744 hours of continuous use.
Network-optimized VMs are only available in select datacenters. (See Table 6-5 for details.) These VMs add a 40Gbit/s InfiniBand network (a high-performance computing standard for high throughput and low latency), with Remote Direct Memory Access (RDMA) technology. They are ideal for Message Passing Interface (MPI) applications, high-performance clusters, modeling and simulations, video encoding, and other computing- or network-intensive scenarios.
Table 6-5. A-series Network Optimized VMs*

*Prices include Windows Server licensing fee but not sales tax. Monthly Pay-As-You-Go estimates based on 744 hours of continuous use.
Compute-intensive VMs are only available in select datacenters. (See Table 6-6 for details.) These VMs feature Intel Xeon E5 processors for high-performance clusters, modeling, simulations, and anything else that requires the highest level of computation today.
Table 6-6. A-series Compute-Intensive VMs*

*Prices include Windows Server licensing fee, but not the sales tax. Monthly Pay-As-You-Go estimates based on 744 hours of continuous use.
IP Addresses for Azure Virtual Machine and Cloud Service
Every Azure VM is automatically assigned a free virtual IP (VIP) address. For an additional charge, you can also get the following:
- Instance-level public IP addresses: These make a VM directly addressable by assigning it a public IP (PIP) address. Instance-level PIP addresses cost $0.004/hour per IP (about $3/month per IP based on 744 hours usage). You can assign up to five instance-level IP addresses per subscription.
- Reserved IP addresses: You can also reserve static PIP addresses for your VM. Reserved IP addresses allow you to reserve a public virtual IP address in Azure, which you can then associate with a new Cloud Service. The reserved IP address is sticky, meaning once it’s associated with the Cloud Service, it won’t change unless you decide to disassociate it. In a VM scenario, the reserved IP address remains associated with your Cloud Service even when all the VMs in the Cloud Service are stop/deallocated. At this time, you can’t reserve an IP address for a Cloud Service that you have already created.
Virtual Machine Concepts
Virtual machines are a software version of computer hardware on which you can install OSs and which you can configure and use just as you would a traditional computer where the OS is running on actual hardware. Because the OS is separated from the hardware by a hypervisor, many challenges that used to exist no longer do, such as when the life of an OS was tied to the hardware on which it was installed or when a hardware failure caused a server to be rebuilt. VMs can run wherever there is a hypervisor, even with different CPU types. There is no dependency on the hardware.
You can create OS templates specifically for various server sizes as needed. Each template can have a specific number of virtual CPUs (vCPUs), RAM (vRAM), network interface cards (vNICs), and virtual hard disks (VHD or vDisk) sizes, which can be drives, disks, and images. All but the A8 and A9 VMs support only one vNIC. A8 and A9 support two vNICs.
Virtual CPUs, or cores, are allocated when you select the size of the VM. The number of cores allocated to an Azure VM and the amount of vRAM allocated are coupled; that is, you cannot choose one without having the other preselected. This means you should consider the situation where you need a certain number of cores but a differing amount of RAM. A2/Medium is an example where two cores may be enough, but 3.5GB RAM is not. Choosing A3Large is the next option, at four cores with 7GB RAM. RAM is usually more important than the number of cores. History has proven that most systems are not constrained by CPUs, but by RAM.
Just like the RAM on a physical box, vRAM is the maximum amount of memory that a VM can use at any point in time. The amount of vRAM allocated to a VM can be changed while a VM is running, but a restart of the VM is required for the change to take effect. vRAM sizes in Azure range from 768MB, or 0.75GB, to 448GB, or 0.44TB, as of this writing.
Once an Azure VM is created, you can change the VM instance size in two ways: through the Azure Management Portal or using PowerShell.
CHANGING A VM’S SIZE THROUGH THE AZURE MANAGEMENT PORTAL
To change the VM’s size through the Azure Management Portal, follow these steps:
- Log in to your Microsoft Azure Management subscription using the Portal.
- Choose the Virtual Machines option, and then select the VM whose size you want to change.
- With the VM highlighted, select the Configure tab on the web page. Use the Virtual Machine Size drop-down list to select the new VM size.
- Click Save to make the new VM size a permanent change.
CHANGING A VM’S SIZE VIA POWERSHELL
Perform the following steps to use PowerShell:
- Create a PowerShell script using the following standard code (note that this stock PowerShell script requires you to edit some of the variables):
<#
.DESCRIPTION
This simple PowerShell scrip is used to create a function that can be used with the standard PowerShell commands and pass in the parameters needed for the function to change the VM size.
.NOTES
    Variables to pass from the PowerShell command to the function include:
    MyAzureVM
    NEWVM-SIZE
.WORK FLOW
    PowerShell cmdlets used in the PROCESS include
    Get-AzureVM = New Variable for the SERVICE
    The parameter passed to Get-AzureVM is SName (service name)
    PowerShell Update-AzureVM is then used to update the NEW SIZE of the VM
.SECURITY
    Any input needs to be validated to prevent a "buffer overflow" or other security attack
    The ValidateNotNULL is necessary to make sure a parameter was passed. However,
    additional security validation steps would be required for production
#>
Function SetNEWAzureVMSizing{
     [CmdletBinding()]
     param(
         [parameter(Mandatory=$true)]
          [string]$MyAzureService,
          [parameter(Mandatory=$false)]
          [ValidateNotNullOrEmpty()]
          [string]$SName=$MyAzureService,
          [parameter(Mandatory=$true)]
          [string]$NEWVM-SIZE
     )
     PROCESS{
         Get-AzureVM –MyAzureService $ServiceName –Name $SName |
             Set-AzureVMSize $NEWVMSIZE |
             Update-AzureVM
     }
}
SetNEWAzureVMSizing –MyAzureService "<the-vm-name-to-change>" –NEWVM-Size "Small" - Edit the value of <the-vm-name-to-change> with the name of the specific VM.
- Enter the new value of NEWVMSize for the parameter you want. The value must be a valid parameter such as small, medium through A7.
- Save this PowerShell function and run it, passing in the necessary parameters.
Virtual hard disks are often referred to as VHDs. Microsoft’s VHD files include both VHD and VHDX formats. VHDs use the Windows Server 2008 and Azure file format only, (VHDX is not supported in Azure today, however, that may change in the future) whereas VHD and VHDX can use the Windows Server 2012 format.
If your VHD is a dynamic disk, convert it to a fixed disk first and then upload it. To do this, use Hyper-V Manager or the PowerShell cmdlet convert-vhd. Once you have uploaded a VHD, you can use it as a source to create a new VM; or, if it contains data, you can attach it to a VM as a data disk. For a step-by-step walkthrough, see the Azure blog post “How to Attach a Data Disk to a Windows Virtual Machine,” at http://azure.microsoft.com/en-us/documentation/articles/storage-windows-attach-disk.
Microsoft Hyper-V supports three types of VHDs in either file format:
- Fixed disks: These are usually thought of as providing the best performance. 100% of the size is allocated on the disk. These VHDs take the longest to migrate or back up because all blank space contained within the VHD (also known as white space) is written to the disk. This is the only VHD type supported in Azure.
- Dynamically expanding disks: These are known as auto-growing or thin-provisioned VHDs. They provide the best balance of performance and size. With the VHDX file format, performance is close to that of pass-through storage to a SAN. With the VHD format, there is a performance hit; however, in most cases this is negated by the portability of the file because the size is limited to the data written to the VHD.
- Differencing disks: This type of VHD is used in a parent-child relationship with another disk. It is great for testing changes such as a service pack or application install where the changes may need to be reverted. It is also good for application package testing when the user/admin needs to return to the state that existed prior to the install. Differencing disks and snapshots incur large performance penalties due to the nature of the reads being split across multiple files, and so forth. These are ideally suited for test/dev scenarios where performance is less of a priority than recovery.
![]() Note At the time of this writing, Azure only supports fixed VHD files.
Note At the time of this writing, Azure only supports fixed VHD files.
VHD files are stored as page blobs in Azure. Blobs can be copied across storage accounts, allowing administrators to choose where they reside. You can use existing VHDs that contain an OS or VHDs that contain data by uploading the VHD to an Azure storage account. Use the Add-AzureVHD PowerShell cmdlet, available via the Azure PowerShell module, to upload a VHD to an Azure storage blob. If you don’t have the Azure PowerShell module, you can download it from the Downloads page at WindowsAzure.com. For a step-by-step walkthrough, see the Azure blog post “Create and Upload a Windows Server VHD to Azure,” at http://azure.microsoft.com/en-us/documentation/articles/virtual-machines-create-upload-vhd-windows-server.
![]() Note If you already own licenses for the software in a VM, it is cheaper to upload your existing images because the gallery images include the OS license costs in the hourly/monthly rate.
Note If you already own licenses for the software in a VM, it is cheaper to upload your existing images because the gallery images include the OS license costs in the hourly/monthly rate.
Sometimes you may need more details about specific topics. The Azure disk drives have not changed, so you can refer to this older blog post to review Windows Azure drives, disks, and images: http://blogs.msdn.com/b/windowsazurestorage/archive/2012/06/28/exploring-windows-azure-drives-disks-and-images.aspx.
All Azure VMs have at least two VHDs: one for the OS and one that is temporary. Additional data disks can be added to any Azure VM. Figure 6-1 shows the disks residing within an Azure VM.
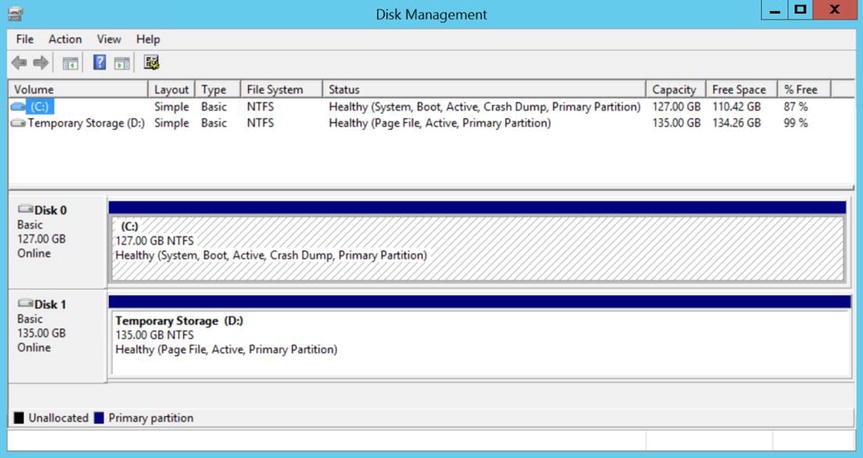
Figure 6-1. Azure IaaS VM Disk Management console
All of these disks are located in an Azure Storage account specified by the administrator or auto-generated by the portal as part of the provisioning process. Pay attention to where storage accounts and/or VMs are created. Most customers prefer to have the VMs reside in an Azure datacenter close to where the organization and/or users reside.
Every VM created in Azure has the OS installed on the system disk, which is configured as a SATA disk, labeled as C:, with a maximum size of 127GB. Whenever Azure stores data, such as VHDs in blob storage, the data is replicated in triplicate in the region selected during creation. This is done for redundancy in Azure in order to meet the required SLAs, and it does not serve as a backup for customers. If a customer chooses to geo-replicate this data, it is stored in another datacenter as part of the region you select that is more than 400 miles away, again in triplicate.
Figure 6-1 shows the Temporary Storage disk, which is auto-generated as part of the provisioning process and always labeled drive D:. On Linux VMs, this Temporary Storage disk is typically configured as /dev/sdb, and it is formatted and mounted to /mnt/resource by the Azure Linux Agent.
![]() Note Do not store data on the temporary disk! This disk provides temporary storage for applications and processes only.
Note Do not store data on the temporary disk! This disk provides temporary storage for applications and processes only.
As shown in Figure 6-1, data disks are VHDs that are attached to any VM in order to store data that you need to retain. Data disks are registered as SCSI drives; hence they can be hot-swapped and labeled with a specific letter identifier that you choose. The size of the VM is the limiting factor on the number of data disks you can attach and the type of storage you can use to host the disks. Each data disk has maximum capacity of 1TB.
The operating system VHD and data disk VHD each have a host caching setting that can improve performance in some circumstances. In other cases, the host caching setting may degrade performance. Note that the default setting is Off for host caching for the read and write operations for data disks, and the default setting is On for read and write operations for the operating system VHD. To change the host caching setting, use the Set-AzureDataDisk cmdlet or the Set-AzureOSDisk cmdlet.
You can find the disks that are attached to a VM by using either the dashboard or the VM’s Disks page in the Azure Management Portal, as shown in Figure 6-2.
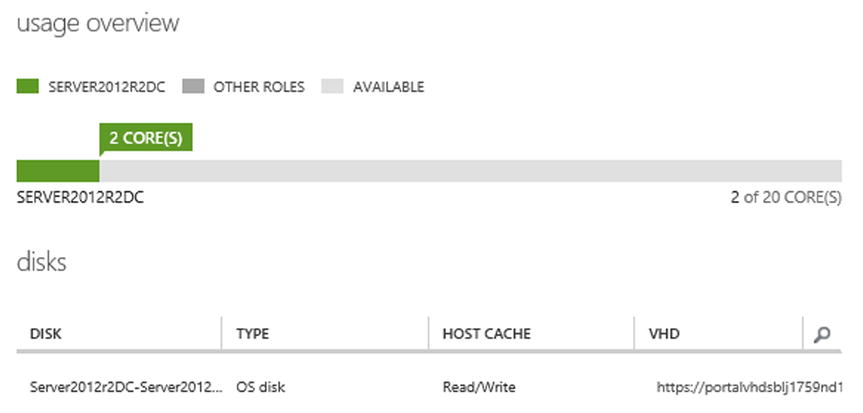
Figure 6-2. Azure Management Portal VHD details
Or, if you are using the new Azure Management Portal, the disks appear as shown in Figure 6-3.
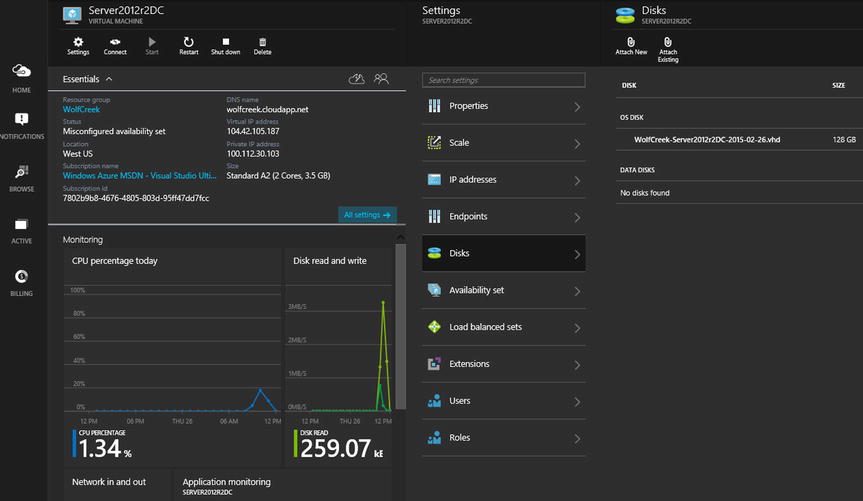
Figure 6-3. New Azure Management Portal VHD details
You can also use the Disks page of the Virtual Machines section of the portal to see all the disks deployed in your tenant, regardless of whether they are attached to a VM, as shown in Figure 6-4. This is an easy way to identify items that weren’t cleaned up.

Figure 6-4. Azure Management Portal VM disk details
Or if you are using the new Azure Management Portal, the screen looks like the one in Figure 6-5.
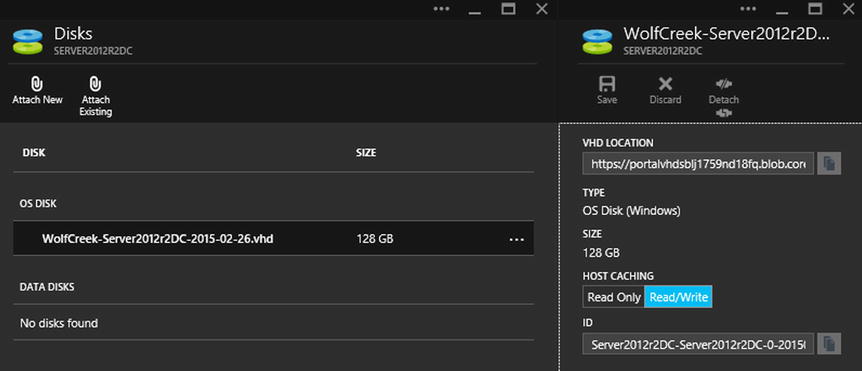
Figure 6-5. New Azure Management Portal VM disk details
You can delete disks through the Azure Management Portal, but the disks must first be detached from the VMs with which they are associated, as shown in Figure 6-6. Disks may also be deleted at the same time a VM is deleted, streamlining the process.
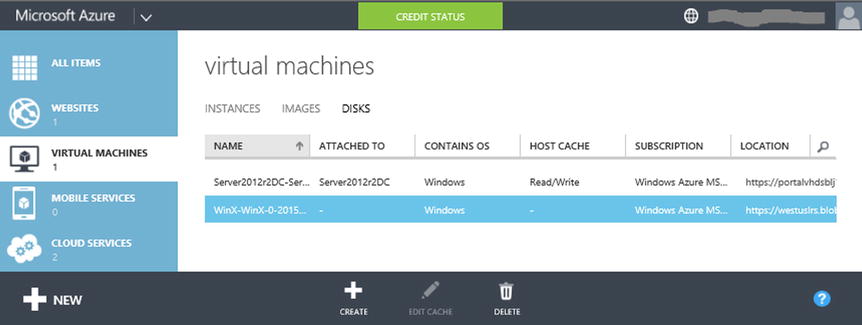
Figure 6-6. Azure Management Portal VM disk deletion
Azure offers Premium Storage: high-performance, low-latency disk for I/O-intensive workloads running on Azure DS-series VMs. Premium Storage requires a Premium Storage account and is locally redundant, meaning there are three copies of the data. You also have the option to attach multiple Premium Storage disks to your VM. Your VMs can have up to 32TB of storage and achieve 50,000 input/output operations per second (IOPS) with extremely low latencies for read operations. Premium Storage is currently available only for VMs.
Virtual network interface cards (vNICs or vmNICs) provide connectivity to resources in the Azure Cloud Service in which the VM lives and the virtual network the VM is connected to by default. All but the A8 and A9 VMs support only one vNIC. A8 and A9 support two vNICs. Resources outside the Azure Cloud Service, whether in the same tenant or from the World Wide Web, must communicate with the VM via Azure endpoints, which should not be confused with Azure service endpoints. Azure endpoints are published ports that enable port forwarding on a firewall to allow traffic on that port into the system inside the firewall. Azure service endpoints determine whether your application is deployed to and managed by the global Azure platform, Azure operated by 21Vianet in China, or a private Azure platform. You can find more information on configuring Azure service endpoints at https://msdn.microsoft.com/en-us/library/azure/dn268600.aspx.
When a VMs is created using the Azure Management Portal, VM endpoints for Remote Desktop, Windows PowerShell Remoting, and Secure Shell (SSH) are automatically created, as you see later in this chapter when you create a VM. An important point for network communication is the fact that in the same Cloud Service or virtual network, individual VMs can automatically communicate with each other without the need for additional network changes. To communicate with systems on the Internet or on other virtual networks, a VM must use endpoints. Endpoints allow inbound network traffic to the VM. Think of endpoints like port forwarding on a firewall; they are how you allow traffic to reach the VM in Azure. Each VM endpoint has a public port and a private port:
- The Azure load balancer uses the public port to listen for incoming traffic to the VM from the Internet.
- The private port is used by the VM to listen for incoming traffic, typically destined for an application or VM service.
After you create an endpoint, you can use an access control list (ACL) to define rules that permit or deny the incoming traffic to the public port of the endpoint based on its source IP address. If the VM is in an Azure virtual network, you should use network security groups instead of ACLs. For more information on creating VM endpoints and managing the ACLs on them, refer to http://azure.microsoft.com/en-us/documentation/articles/virtual-machines-set-up-endpoints.
Microsoft Azure Virtual Network, not to be confused with Azure VM vNICs, is one of the several networking services available in Azure. Microsoft Azure Virtual Network allows customers to set up hybrid networks, extending their on-premises datacenter to Azure. By using the Azure VPN Gateway, customers can quickly connect their on-premises datacenter with the cloud. The VPN Gateway is just one of many methods for connecting on-premises to Azure; any of the connectivity methods allow VMs running in Azure to be joined to on-premises domains and connect to on-premises resources. For more information on extending your datacenter into Azure and available connectivity options, see Chapter 8.
Determining Your Virtual Machine Sizing
Earlier, this chapter discussed the different sizes of VMs available in Azure. VM size is the most significant factor that affects the price per hour to run that VM. Although it is easy to say you should select A-series VMs for most workloads, some workloads warrant higher levels of computing power, memory, or disk I/O. For example, whenever you are using SQL Server Enterprise Edition, you should select a VM with at least four or eight vCPUs or cores.
As VMs increase in size, so does the number of disks attached, resulting in higher disk I/O. Microsoft calculates 300 IOPS per disk for basic VMs and 500 for standard VMs. Multiply 300 by the number of disks, and you get the supported I/O of each disk that a VM can handle: for example, an A3 Basic VM has 8 disks, which will support 2,400 maximum IOPS. For a full list of the number of disks per VM and the supported disk I/O, see https://msdn.microsoft.com/en-us/library/azure/dn197896.aspx.
Be careful not to duplicate the hardware specs that you have in production in Azure from a sizing perspective. This statement may cause alarm, but one of the many benefits of Azure is the elasticity of resources. Conventional thinking for architecting solutions in a public cloud do not apply in this case:
- Azure can grow with the workload as needed. There is no need to architect for an end state or worst-case scenario. In other words, you don’t need to build out 20 servers for a solution that may only need a few in the first year.
- Azure supports the auto-scaling of VMs to support high-demand spikes.
- Nowadays, CPU resources are over-allocated to many workloads, and carrying that architecture into Azure only increases the hourly/monthly cost with no added benefit.
- Storage is infinite, and you only pay for what you use, so current disk sizes don’t matter—what’s used on those disks is all you are billed for.
- RAM on physical systems includes drivers that won’t be carried over to a VM in Azure. VMs use less memory than physical systems in general due to the generic Hardware Abstraction Layer (HAL) and lack of many unnecessary drivers or applets for the hardware.
Microsoft released the Microsoft Azure Cost Estimator Tool, which you can download at www.microsoft.com/en-us/download/details.aspx?id=43376. This 12MB tool lets you sample a single system or a number of systems, such as all the servers needed for a line-of-business (LOB) application. The Azure Cost Estimator Tool samples all the systems selected at the same time, so usage and resource needs can be accurately assessed. It then compares the hardware specs and resource usage, including disk I/O and network egress traffic, and recommends a VM size for each system sampled. This is a great way to know whether the existing workload is running on a system that is over-engineered for it.
The Azure Cost Estimator Tool prompts you, as shown in Figure 6-7, when an update is available. It is important to be aware of such updates, because they not only provide you with the latest VM options, but also include the latest pricing for the VMs and associated resources in multiple currencies. Remember, whenever you are comparing costs projected in the Azure Cost Estimator Tool, you are comparing the costs of the workload in Azure with on-premises running costs (hardware, power, cooling, building, security, and systems management among others).
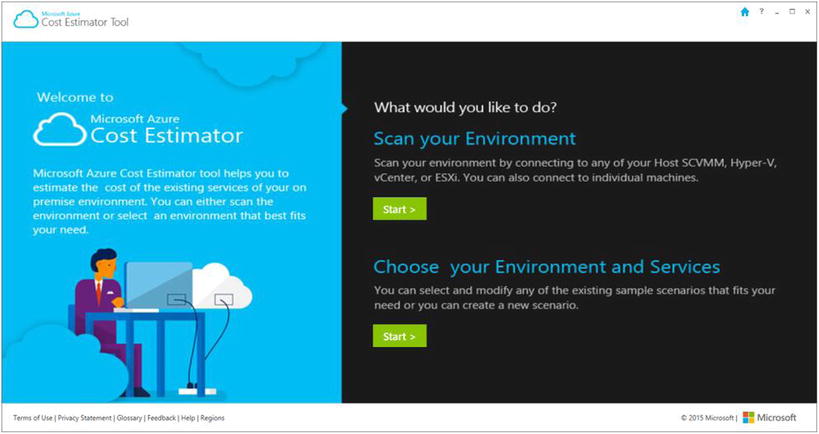
Figure 6-7. Azure Cost Estimator Tool Home Page
The Azure Cost Estimator Tool allows you to sample both physical and VMs, regardless of whether the VMs run on VMware or Microsoft. The VMs or physical systems can run Windows or various flavors of Linux OS, and the tool can sample their usage. No agent is required—the Azure Cost Estimator Tool, as shown in Figure 6-8, polls the systems remotely across the LAN or WAN from any system running Windows Vista SP2 or higher. Collection intervals can be set to a variety of days or weeks, all the way up to 31 days. As the collection window is lengthened, the collection frequency is shortened. For example, if your profiling duration is for 4 weeks, the maximum scanning frequency is every 12 hours.
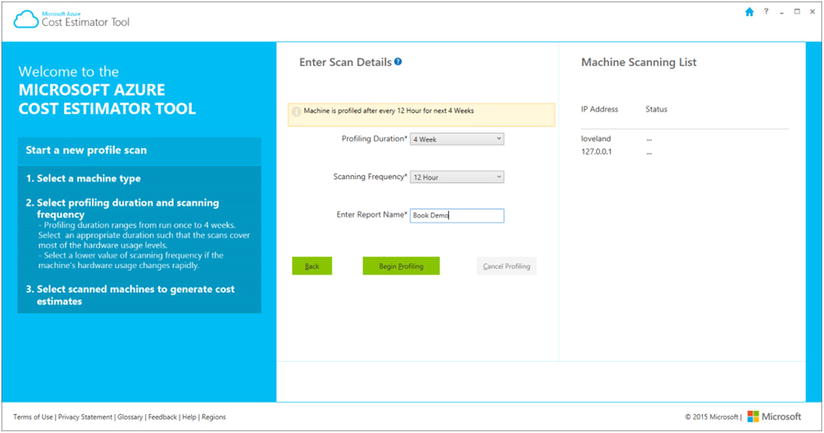
Figure 6-8. Azure Cost Estimator Tool server selection
Once the profiling is completed, the tool provides a report of the data sampled, as shown in Figure 6-9. To obtain and evaluate the cost to run a system in Azure, select the system in the report.
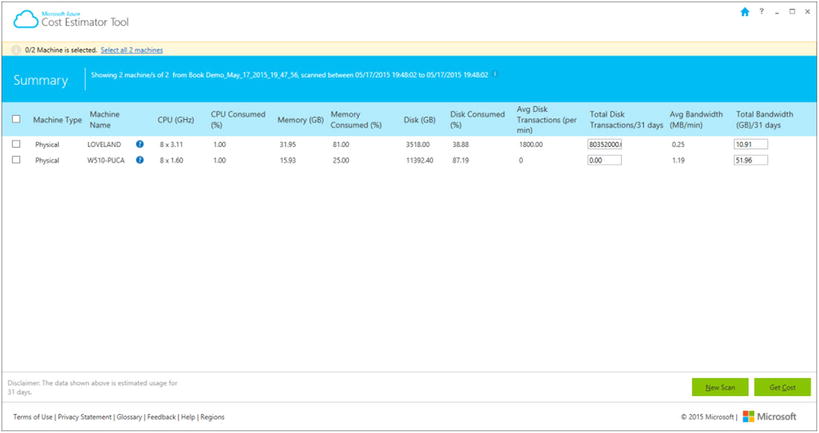
Figure 6-9. Azure Cost Estimator Tool server profiling summary
Figure 6-10 shows that the Azure Cost Estimator Tool selected an A4 VM, most likely due to the number of cores in the target system. Also note that the tool sees all the storage that the system has allocated to it at the current time. In the figure, it combines the locally used SSD storage and the Micro SD card used storage for the total.
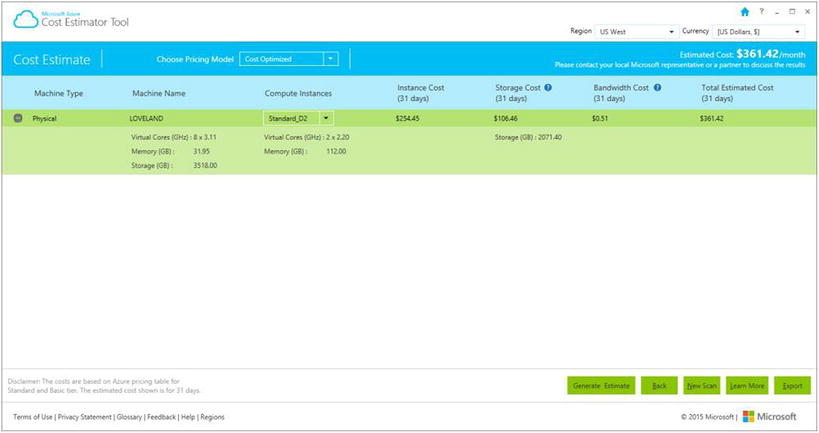
Figure 6-10. Azure Cost Estimator Tool cost estimate
You can export the results of the tool for a single server or a number of servers in the Excel .csv format.
If System Center 2012 Operations Manager (SCOM) is deployed, you can import the Microsoft System Center 2012 Virtual Machine Manager (SCVMM) Management Pack (MP) from http://www.microsoft.com/en-us/download/confirmation.aspx?id=29679. This Management Pack has a report entitled “Virtualization Candidates,” shown in Figure 6-11, which basically collects the same data you see in the Azure Cost Estimator Tool. This is another way to use existing performance data that is collected by System Center to make educated sizing decisions as you evaluate migration candidates. You can use the SCVMM MP even if SCVMM is not deployed. It is simply a method to use an existing report with many of these data points. The report can be used on any systems, physical or virtual, as long as they have a SCOM agent on them.
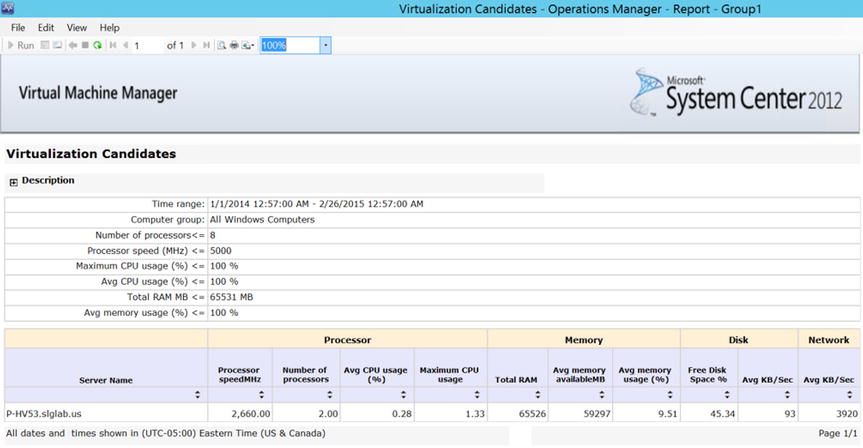
Figure 6-11. Microsoft System Center 2012 R2 Operations Manager virtual machine manager report
Determining the Operating System
When you deploy VMs from the Azure Gallery, you can choose from a large list including the OS and disk images of platform technologies such as SQL Server, BizTalk, Dynamics, and Oracle that are already installed. When deploying these image files, it is important to understand that the license costs for the OS and the associated technology in the VM are included in the hourly running rate. The Azure calculator details these costs; see http://azure.microsoft.com/en-us/pricing/calculator/?scenario=full. You can use licenses that you already own only if you upload your own image files.
In this section, you learn how to build a VM from scratch both in the current Azure Management Portal and also in the new Portal. You use VMs in the Azure Gallery, because doing so provides more configurable options than performing a quick create.
BUILDING A VIRTUAL MACHINE IN THE CLASSIC PORTAL
In these steps, you use the classic Azure Portal to create a VM:
- Log in to the classic Azure Management Portal at https://manage.windowsazure.com. (the Azure Preview Portal URL is https://portal.azure.com and is used in another exercise later in this chapter).
- Scroll all the way down the left side of the Portal, and select New.
- Select Compute
 Virtual Machine From Gallery to start the VM Creation Wizard; see Figure 6-12.
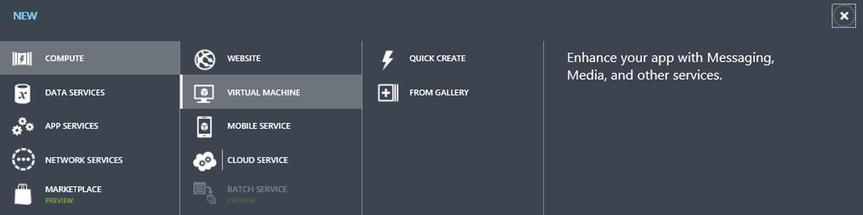
Figure 6-12. Azure VM creation
- Choose which VM to create, as shown in Figure 6-13. Many different OSs are available, including many distributions of Linux. (Note: The number and types of images are updated often, and the specific types of images available to use depend on the type of Azure subscription. For example, an Azure subscription using MSDN provides different images than an Azure subscription enabled with an Enterprise Agreement.)
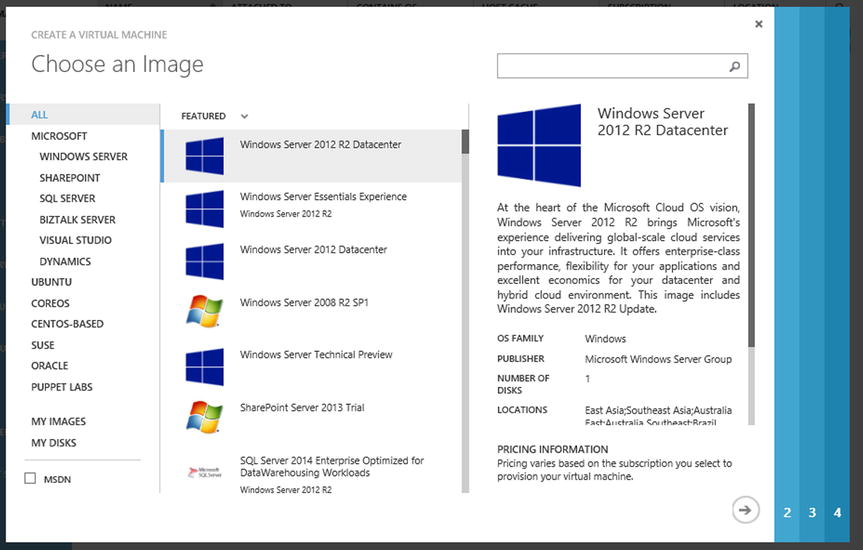
Figure 6-13. Azure VM OS selection
- Because this is your first VM, select Windows Server 2012 R2 Datacenter, as shown in Figure 6-13. Click the arrow at bottom right to continue to the next screen of the wizard.
- In this screen of the VM wizard, you enter some required parameters:
- Enter a unique VM name, and write it down for reference.
- Select the VM size using the drop-down. (The cost of the VM compute time is associated with the size of the VM. This is made clearer in the next exercise using the Preview Portal.)
- The New User Name is the administrator account used to log in to the VM once it is created. Every VM is required to have a New User Name; however, Administrator is not allowed.
- Note the Version Release Date. Microsoft and its partners, who provide disk images for the Azure Gallery, update the images routinely to keep them current with patches and various updates.
Figure 6-14 shows ApressDemo for the VM name, and the VM size is set to A1. Click the arrow at bottom right to continue.
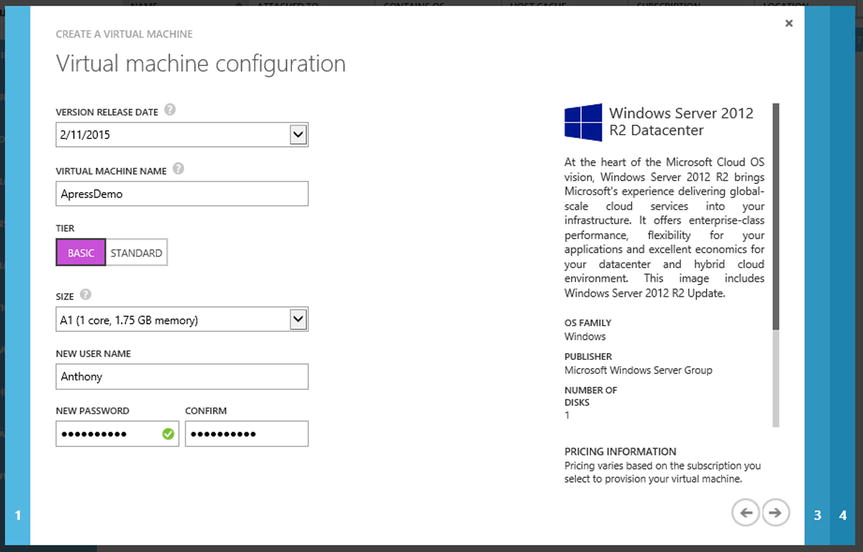
Figure 6-14. Azure VM size and account configuration
- In this step, several additional parameters are required. Because this is your first VM, a new Cloud Service is created; just like the VM name, the DNS name for the Cloud Service must be unique. This is because this name is a public DNS namespace. You connect through the Internet to your VM through the Cloud Service. Later you learn how to make the necessary network changes to remove the Internet access and connect only from a site-to-site or point-to-site VPN.
- Select the region where you want to build the Cloud Service and place this new VM. Leave the default settings for the other options, as shown in Figure 6-15. Notice in the figure 6-15 that you are selecting a preconfigured storage account in the West US using locally redundant storage. Also note the default ports that are open for the VM endpoints. Do not delete these as part of the provisioning process unless you have some other way of connecting to the VM. Deleting these as part of the provisioning process is the equivalent of painting yourself into a corner, and you will not be able to connect to the VM. Click the arrow at bottom right to continue.
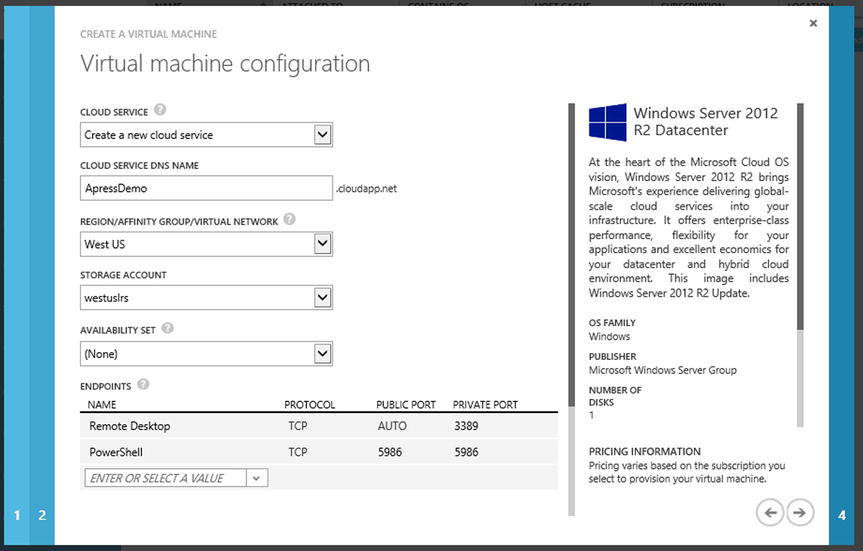
Figure 6-15. Azure VM storage and networking configuration
- The final page of the VM Wizard provides additional options that you should consider. The first option recommended, as shown in Figure 6-16, is to install the VM agent on this new VM. This agent provides remote PowerShell capabilities to change user passwords and IP addresses if necessary. The security extensions you select may depend on your choice for antimalware and antivirus. In this example VM, the extension for the Microsoft Antimalware option is selected. Click the check mark at bottom right to create this VM.
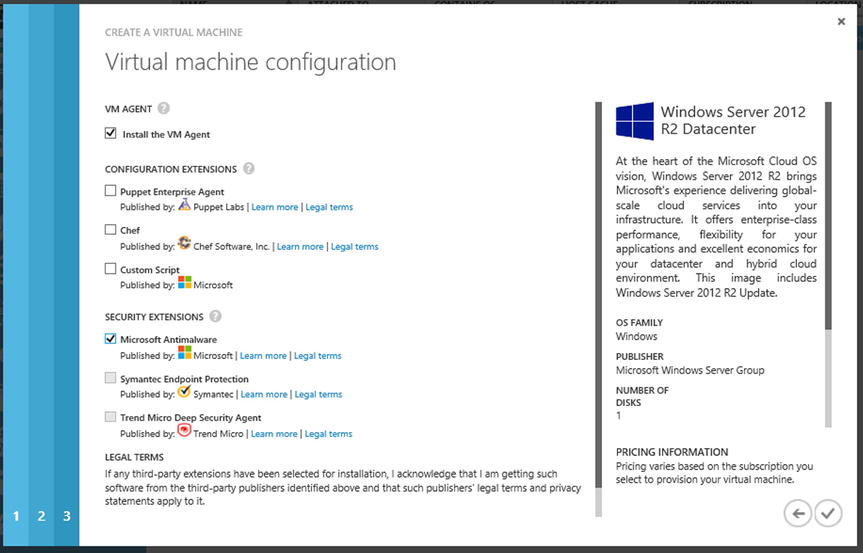
Figure 6-16. Azure VM extensions configuration
- Your VM should be created in as little as six to eight minutes. Select the Virtual Machines service view in the Azure Portal to view the provisioning of your VM (see Figure 6-17). You cannot connect to the VM until it has been completely created.
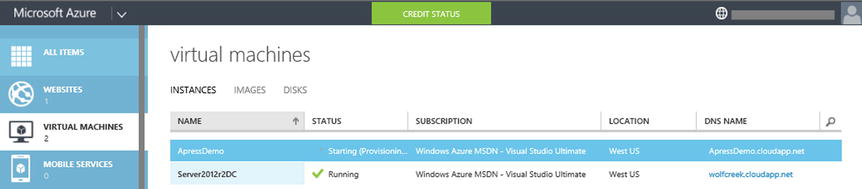
Figure 6-17. Azure VM provisioning
LOGGING ON TO YOUR NEW VIRTUAL MACHINE
Once your VM has been completely provisioned, you can log on to test it or continue with customization. (This exercise should be completed from a computer running a Windows OS or that supports a Microsoft Desktop Remote app.) Follow these steps:
- From the Classic Azure Portal, click the Virtual Machines service view.
- Select the VM that you just provisioned, as shown in Figure 6-18.
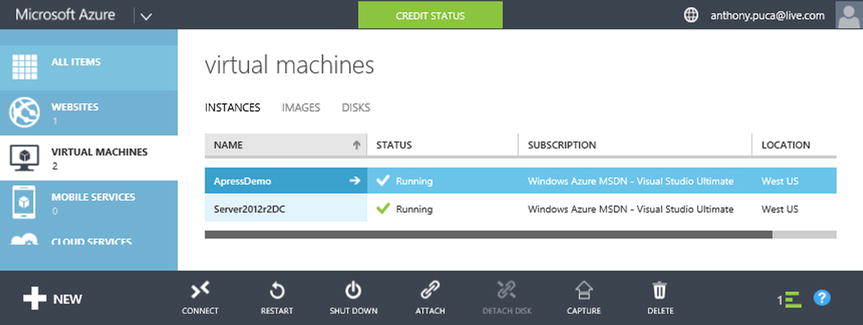
Figure 6-18. Connecting to an Azure VM for the first time
- At the bottom of the page, click Connect to start the automatic creation of a Remote Desktop Connection.
- The Remote Desktop Connection is created with all the necessary parameters to allow a connection from your Windows system to the newly created VM. The default connection for Windows VMs uses Remote Desktop Protocol (RDP). You should see a dialog box similar to the one shown in Figure 6-19.

Figure 6-19. An Azure VM remote desktop prompt
- Click the Connect button to continue.
- Type the username and password created in step 6 of the previous exercise, and click OK to continue to connect using the Remote Desktop Connection.
- Click Yes to verify the identity of the VM.
- You are now able to log in to the VM and configure it as needed. Note that the VM is named as you configured it in step 6 of the previous exercise, but it is in a workgroup. The fully qualified domain name (FQDN) in the Remote Desktop title bar, shown in Figure 6-20, is how you resolve connecting to the VM until it is joined to a Microsoft Windows domain.
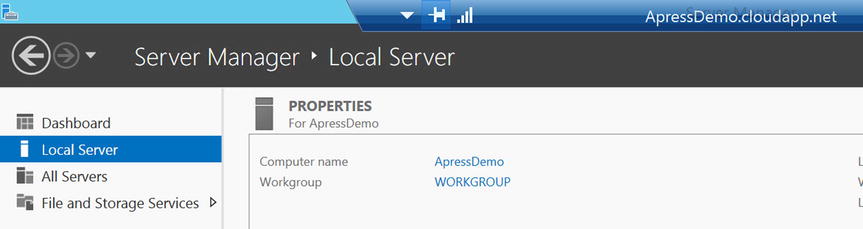
Figure 6-20. An Azure VM Server Manager console
BUILDING A VIRTUAL MACHINE IN THE NEW PREVIEW PORTAL
You need to become familiar with the new Azure Preview Portal and how to complete tasks like creating VMs. (The Preview Portal is scheduled to become the only portal in Azure; however, not all the Azure services are provided through the Preview Portal at the time of this writing.)
Create a new VM in Azure using the new Preview Portal by following these steps:
- Log in to the Azure Preview Portal at https://portal.azure.com, as shown in Figure 6-21.
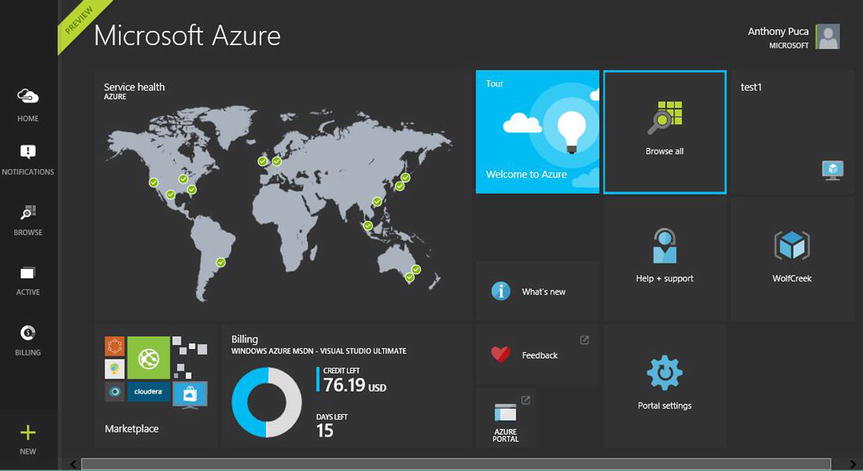
Figure 6-21. The new Azure Management Portal
- To start the creation of the new VM, select the New option at bottom left in the Preview Portal. Your screen should look similar to Figure 6-22.
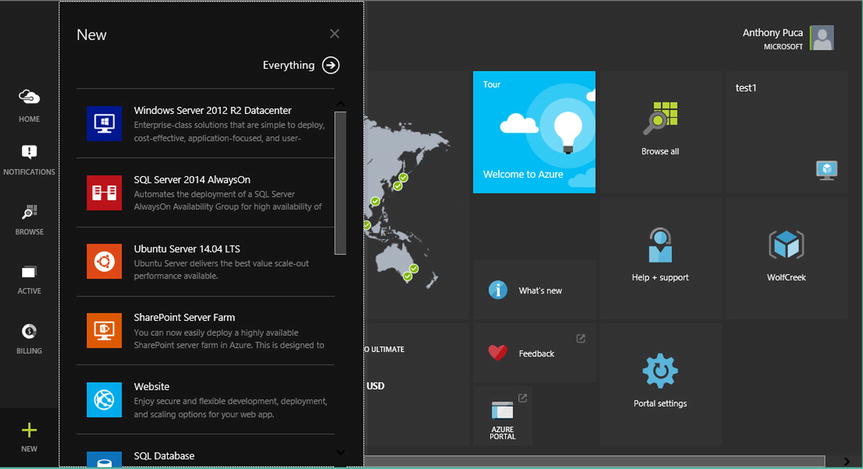
Figure 6-22. Provisioning a VM in the Azure Preview Portal
- The Azure Preview Portal uses a windowing view called blades that provide a better perspective of the overall work being performed. Notice the new blade in Figure 6-22. Click Windows Server 2012 R2 Datacenter, and the screens shown in Figure 6-23 will be displayed. (The steps are similar to the previous exercise in which you created a VM in the Azure Classic Portal.) Enter your username and a strong password, select your location, select your VM series and size, and then click Create.
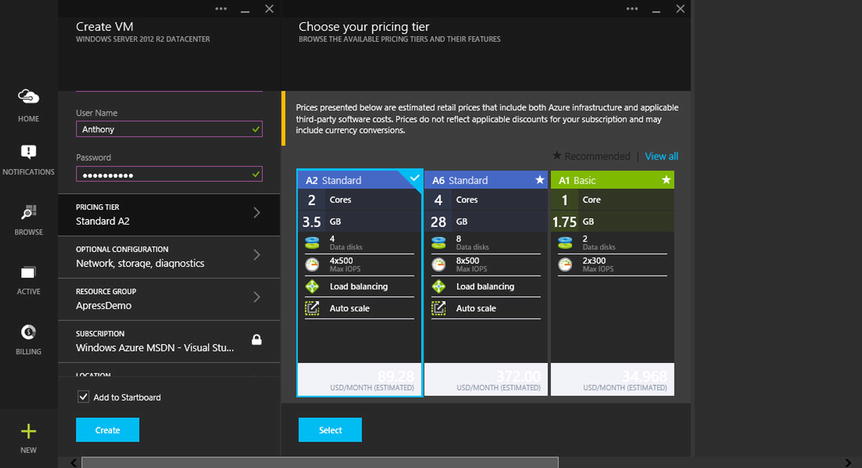
Figure 6-23. Configuring the VM settings in the new Azure Management Portal
Just like the previous exercise, New User Name refers to the local administrative account that will be created for you to manage the VM; this is just like the Windows 7, 8, and 10 desktop deployment experience where you are not allowed to use the local Administrator account. Create a strong password for this account. You need this user name and password to log on to the VM when the provisioning is completed. (When using the Preview Portal, you can see the cost of the VM size using the information in the blades.)
LOGGING ON TO YOUR NEW VIRTUAL MACHINE
Now that you have created a new VM using the Azure Preview Portal, you can log on to test it or complete the configuration. (This exercise should be completed from a computer running a Windows OS.) Follow these steps:
- You should already be logged in to Azure from the Preview Portal at https://portal.azure.com.
- Click your VM on the Startboard, as shown in Figure 6-24. If you need to find it, click Browse and then click Virtual Machines.
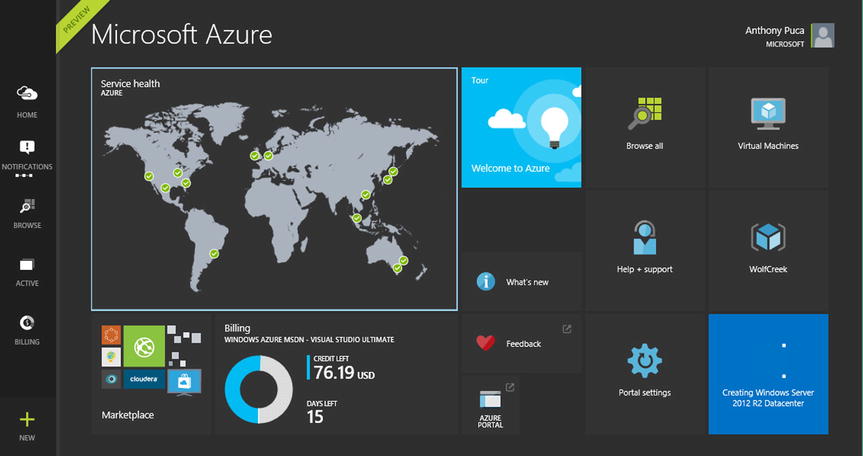
Figure 6-24. Provisioned VM status on the new Azure Management Portal Startboard
- Select your VM from the list, as shown in Figure 6-25.
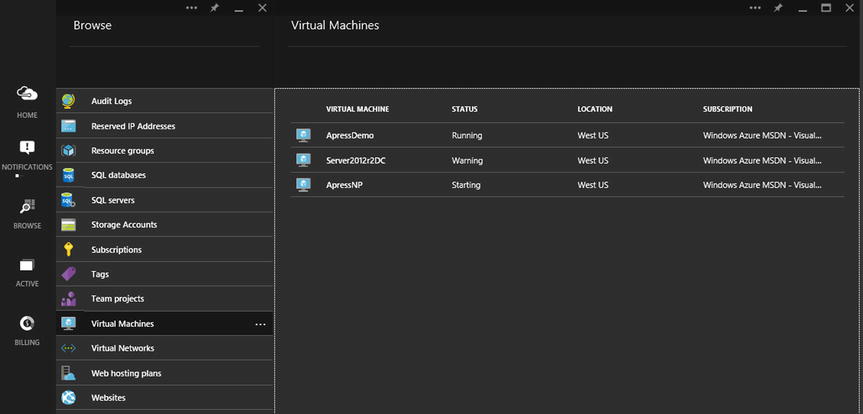
Figure 6-25. VM list in the new Azure Management Portal
- On the Virtual Machines blade, shown in Figure 6-26, click Connect at upper right. (Note that in the previous exercise to create a VM using the Azure Classic Portal, the Connect option was at the bottom of the page.)

Figure 6-26. VM details in the new Azure Management Portal
- Just as in the previous exercise, you need to click Open or Save to use the Remote Desktop Protocol file that was automatically created for this specific VM. You should see a Remote Desktop Connection window, as shown in Figure 6-27.
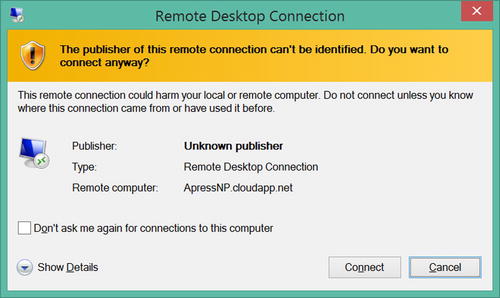
Figure 6-27. VM Remote Desktop Connection prompt
- Click Connect to proceed with connecting to the VM.
- Type the user name and password of the administrative account that you created in step 3 of the previous exercise for the VM, and then click OK.
- You see a prompt to identify the VM: click Yes to continue.
- Now you are able to log in to the new VM and configure it as necessary. Note that the VM is named as you configured it in step 3 of the previous exercise, but it is in a workgroup. The FQDN in the Remote Desktop title bar, shown in Figure 6-28, is how you resolve connecting to the VM until it is joined to a domain.
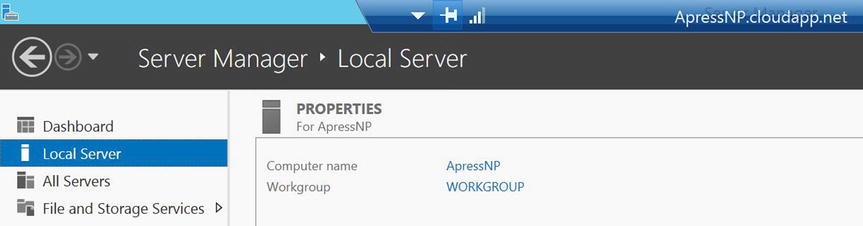
Figure 6-28. An Azure VM Server Manager Console
Azure currently has a default and maximum limit of 50 VMs per Cloud Service. A VM must be in a Cloud Service; if there isn’t one already created for the VM, one is created automatically. Cloud Services currently have a default of 50 VMs per subscription, with a maximum of 200 Cloud Services per subscription. There is a default and maximum limit of 150 input endpoints per Cloud Service to allow communication to the VMs in the Cloud Service from external sources. Input endpoints are like PIPs for VMs. VM-to-VM communication in the same Cloud Service doesn’t require input endpoints. There is currently a default and maximum of 25 input endpoints per Cloud Service. For more information on VM limits, see http://azure.microsoft.com/en-us/documentation/articles/azure-subscription-service-limits.
Microsoft Azure Virtual Machines, Networking, Cloud Service Support, and SLAs
Azure offers various support plans. Free billing and subscription management support is included with Azure subscriptions. Flexible support plans start at $29–$1,000/month. Azure support can also be added to Microsoft Enterprise Agreements as Premiere Support. For more information on Microsoft Azure Support, visit http://azure.microsoft.com/en-us/support/plans.
In order for Microsoft to provide a guarantee via service-level agreement (SLA), you must have more than one Azure service in specific configurations. The Azure web site states the following: “You deploy two or more role instances in different fault and upgrade domains for Cloud Services, your Internet-facing roles will have external connectivity of at least 99.95% of the time. For all Internet-facing Virtual Machines that have two or more instances deployed in the same Availability Set, Microsoft also guarantees that you will have external connectivity at least 99.95% of the time. For Virtual Networks, Microsoft guarantees a 99.9% Virtual Network Gateway availability.” For more information on Azure SLAs, visit http://azure.microsoft.com/en-us/support/legal/sla.
For current Azure status, refer to http://azure.microsoft.com/en-us/status/#current. A sample Azure status report is shown in Figure 6-29.
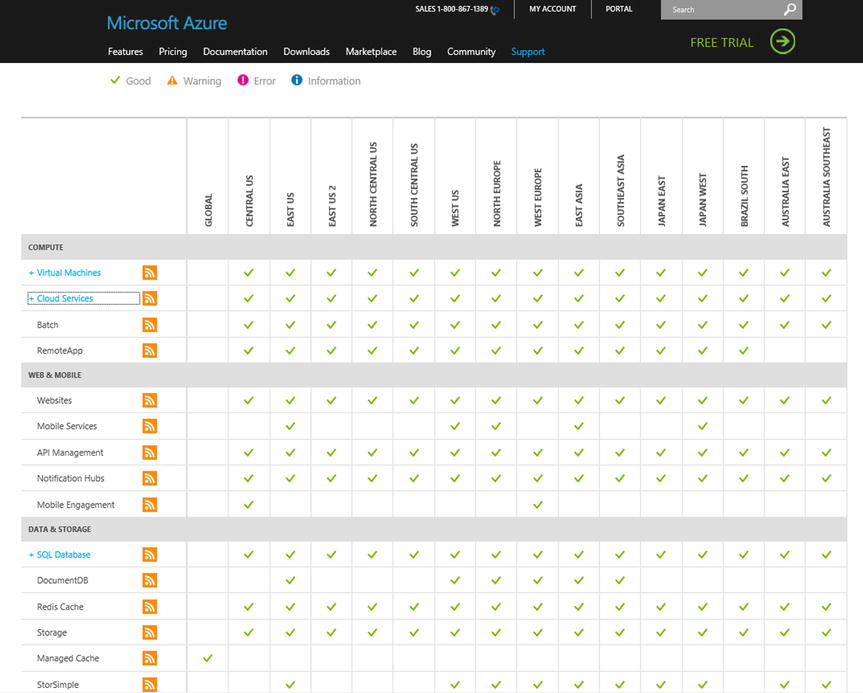
Figure 6-29. Azure status web page
Summary
As you have learned in this chapter, deploying VMs in Azure is simple. Analyzing your environment with the tools available today is also quite easy, and it will help you determine the sizes you need in Azure. Whether you use a credit card, an MSDN subscription, or the free Microsoft Azure Trial, or add Azure to your Select or Enterprise Agreement, it couldn’t be easier to extend your datacenter beyond the constraints it has today.
The next chapter goes into much more detail regarding storage options in Azure. It addresses the cost, features, and performance differences between the various types of storage.