![]()
Migrating Your Virtual Machines to Azure
The Microsoft Azure Virtual Machines (VMs) service can be used to help remove development or migration blockers of applications that depend on on-premises resources that require VMs. With Azure VMs, you can quickly migrate an existing application that currently runs on an on-premises VM. Additionally, you can connect different application models, such as web sites or Cloud Services web roles (VMs that have IIS installed) and worker roles (VMs that don’t have IIS installed on them) with VMs, as discussed in Chapter 6.
This chapter explores how to determine which migration methods are best for your organization as well as some of the considerations involved when using Azure VMs. You also learn about establishing a migration life cycle for the applications in Azure. Finally, you see two methods for migrating your VM to Azure.
Migration Considerations when Using Azure Virtual Machines
When looking at a migration from on-premises applications to Azure, it’s important to plan each of the migration phases carefully. A typical migration from on-premises to Azure includes an analysis phase, an application-migration phase, a data-migration phase, a testing and optimization phase, and an operations and management phase.
It’s unreasonable to believe that you can shift masses of application data from on-premises to the Azure cloud without taking into account several migration factors. Whether you’re considering a migration from a physical machine or an existing on-premises VM, or you’re migrating VMware VMs or Amazon Web Services (AWS) workloads into Azure, you must first consider the application patterns and whether using a VM is the right choice. Applications or workloads that can easily use Azure Virtual Machines are as follows:
- Non-mission-critical database applications
- Development or test environments for database applications
- Backup solutions for on-premises database applications
- Applications or web sites that can scale on-demand easily in response to peak loads
- Database applications that will be deployed to SQL Server in VMs instead of using the Azure SQL Database service
This chapter does not go into specific details of how to move a SQL database. We recommend that you follow the detailed documentation regarding moving the database and data to a VM in Azure by visiting the Migrate a database to SQL Server on an Azure VM at this link: https://azure.microsoft.com/en-us/documentation/articles/virtual-machines-migrate-onpremises-database/.
One of the best features of Azure is the ability to move your on-premises servers easily into Azure and run them on Azure VMs. The biggest benefit of this feature is that you won’t incur a lot of downtime to relocate your existing infrastructure to the cloud.
Azure has tools that enable you to migrate your existing Hyper-V, VMware, and AWS server workloads into Azure VMs. There are many tools that can be used for different purposes, such as migrating your organization’s base server images so that you can create new Azure VMs that match your existing on-premises server builds.
This section introduces you to a few different methods for migrating your existing servers into Azure, whether they are running on VMware or Hyper-V in your existing datacenter or in another cloud service.
Azure only supports the virtual hard disk (VHD) format for disks connecting to Azure VMs. To move your physical servers into Azure, you need first to create VHDs of your existing physical disks so that they can be uploaded. Sysinternals offers a free tool for doing this, called Disk2vhd. Mark Russinovich, the Azure chief technology officer, wrote it.
Disk2vhd converts physical disks to the VHD format while the server is running. It uses the Windows Volume Snapshot technology to create a point-in-time snapshot of the disks you are converting. You can download Disk2vhd from https://technet.microsoft.com/en-us/sysinternals/ee656415.aspx.
CREATING A VHD FROM A PHYSICAL SERVER
Creating a VHD from a physical server is a quick and easy process, thanks to the free Disk2vhd tool. Follow these steps to create your VHD:
- Download Disk2vhd, and launch the executable.
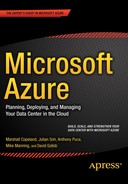
- When the tool opens, make sure the Use Vhdx option is unchecked (because Azure VMs don’t support this format), and click the ellipse button at the end of the VDH File Name field to select a location to save your file. Name your file something that will be meaningful to the server to which you are converting, so it is easily identifiable, as shown in Figure 12-1.
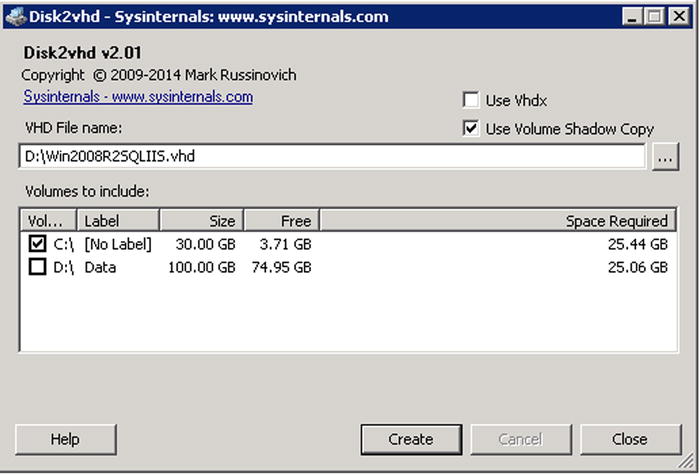
Figure 12-1. Setting the Disk2vhd parameters
- Select the physical disk that you want to convert, and click Create. Keep in mind that the size of the disk you are converting for uploading into Azure must fit within the disk size allowed, based on the VM size to which you are migrating. For a list of VM sizes, see “Sizes for Virtual Machines” at https://azure.microsoft.com/en-us/documentation/articles/virtual-machines-size-specs.
As shown in Figure 12-2, the snapshot image is created and saved to the location you chose. The creation process is usually pretty quick.
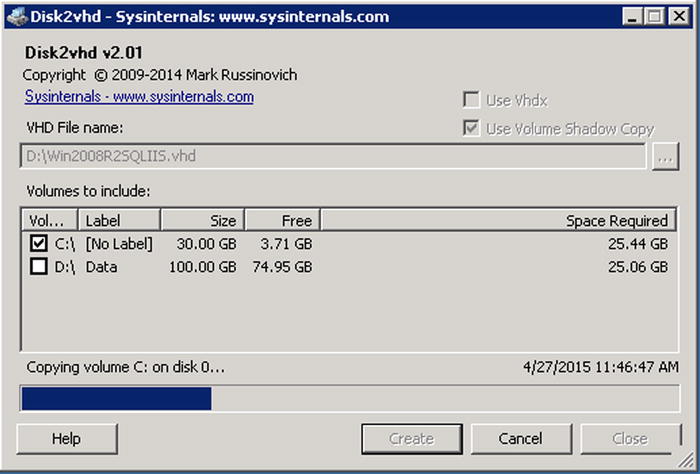
Figure 12-2. The VHD is being created
- When the VHD creation is complete, the tool informs you that the VHD was exported successfully, as shown in Figure 12-3. Click the Close button to exit the tool.
Figure 12-3. The VHD creation is complete
- Open Windows File Explorer, and browse to the location to which you saved the VHD in order to verify that it has been created, as shown in Figure 12-4.
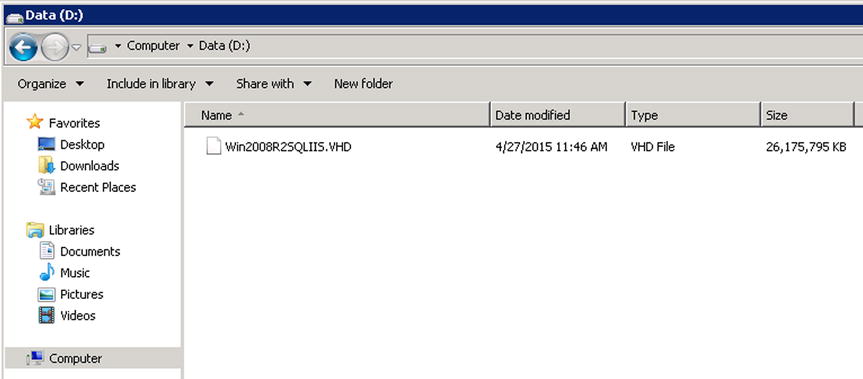
Figure 12-4. Viewing the VHD file in Windows File Explorer
Migrating Virtual Machines from Amazon Web Services to Azure
If your organization is currently utilizing Amazon Web Services (AWS) IaaS offerings to run production or lab VMs, you may be looking to move those VMs over to Azure. Moving VMs from AWS to Azure requires a number of manual steps; there is no method at present to move VMs automatically. Microsoft is currently previewing an Azure feature that will allow you to replicate VMs from other services, like AWS and VMware, which we touch on in the final section of this chapter. For now, however, VMs must be migrated manually, as demonstrated in the following exercise.
PREPARING THE AWS VM
The first step in preparing your VM to move from AWS to Azure is to create a VHD of the existing disks on your server:
- Make VHDs of your server by following the steps in the earlier exercise “Creating a VHD from a Physical Server.”
- Once your VHDs are created, you need to upload them to AWS S3 storage. Before you can do so, you need to install the AWS PowerShell cmdlets on your server. You can download AWS PowerShell at http://aws.amazon.com/powershell.
- To upload the files to AWS S3 storage, a storage bucket is required. If you don’t have an existing storage bucket, open Windows PowerShell as an Administrator and create one with the following AWS PowerShell cmdlets:
Set-ExecutionPolicy RemoteSigned
Import-Module AWSPowerShell
Set-AWSCredentials -AccessKey AKIAIDQHZBB3FPPB7EAA -SecretKey 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
New-S3Bucket -BucketName vmupload -Region us-west-2b
After running the cmdlets, you’ll see that the bucket is created, as shown in Figure 12-5.
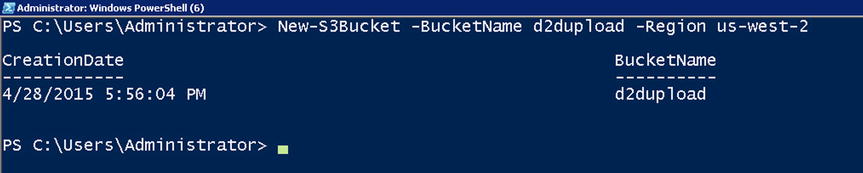
Figure 12-5. Creating a storage bucket in AWS
- Upload your VHD to AWS storage with a cmdlet similar to the following example and as shown in Figure 12-6, replacing the parameters with your own names and locations:
Write-S3Object -BucketName d2dupload -File D:Win2008R2SQLIIS.VHD -Key Win2008R2SQLIIS -CannedACLName Private -Region us-west-2
Figure 12-6. Uploading the VHD into AWS storage
- You can browse your AWS storage to see the uploaded file in your new storage bucket, as shown in Figure 12-7.

Figure 12-7. Viewing the VHD in the AWS storage bucket
DOWNLOADING THE VHD FILE
Now that your VHD file has been uploaded to AWS, you need to download it onto your Hyper-V host, where you’ll convert it to a fixed disk and install the Hyper-V integration service bits. To retrieve the file from your AWS storage bucket, you need to download and install the AWS PowerShell module on your Hyper-V host server, as you did on your AWS server:
- Download the AWS PowerShell cmdlets from http://aws.amazon.com/powershell.
- Open Windows PowerShell as an Administrator, and set the execution policy to RemoteSigned. Then import the AWS module and set your AWS credential in a variable with the following cmdlets, again using your own keys in place of what is shown in the example:
Set-ExecutionPolicy RemoteSigned
Import-Module AWSPowerShell
Set-AWSCredentials -AccessKey AKIAIDQHZBB4FPPB7EAA -SecretKey NIJBKJAZvQ+LoYMqFHdbHwWZOu2jwwIpxxGuxzr5 - Within the PowerShell environment, set your credentials (the Access Key and Secret Key, as you did in step 3 in the previous section), download the VHD using the following sample cmdlets:
$vhdPath = "C:AWS VHDWin2008R2SQLIIS.VHD"
Copy-S3Object -BucketName d2dupload -Key Win2008R2SQLIIS -LocalFile $vhdPath
The VHD downloads to your local Hyper-V host, as shown in Figure 12-8. This could take a while, depending on your Internet download speed and bandwidth.

Figure 12-8. Downloading the VHD onto your Hyper-V host
PREPARING THE VHD FOR AZURE
You need to convert the downloaded VHD from a dynamic disk to a fixed disk. This is necessary because Azure only supports fixed VHDs at this time. Use the following sample cmdlet to convert the disk, as shown in Figure 12-9.
Convert-VHD -Path $vhdPath -DestinationPath $vhdConvertPath -VHDType Fixed

Figure 12-9. Converting the downloaded VHD from a dynamic disk to a fixed disk
Next you need to install the Hyper-V integration services so that Hyper-V drivers are installed. Use the cmdlets in the following steps to do this:
- Store the location of the integration services ISO file in a PowerShell variable:
$HVCabPath = "C:Windowsvmguestsupportamd64Windows6.x-HyperVIntegrationServices-x64.cab" - Mount the VHD, and store the disk number in a PowerShell variable:
$diskNumb = (Mount-VHD -Path $vhdConvertPath -PassThru).DiskNumber - Verify that the VHD is mounted:
Get-Disk $diskNumb).OperationalStatus - Store the VHD mounted drive letter in a PowerShell variable:
$vhdDriveLetter = (Get-Disk $diskNumb | Get-Partition | Get-Volume).DriveLetter - Make sure the disk isn’t read-only, so you can write the integration services files to it:
Set-Disk $diskNumb -IsReadOnly $False - Install the integration services on the VHD. You can see the results of the preceding steps in Figure 12-10 and the final output of the Add-WindowsPackage cmdlet in Figure 12-11.
Add-WindowsPackage -PackagePath $HVCabPath -Path ($vhdDriveLetter+":" )

Figure 12-10. The integration disk installing

Figure 12-11. The integration disk has been added
With the integration services installed on the VHD, dismount the disk so that it can be copied into your Azure storage account:
Dismount-VHD -Path $vhdConvertPath
UPLOADING THE VHD TO WINDOWS AZURE STORAGE
Now that the VHD is ready for use in Azure, it’s time to upload it. To do so, you need to set a few variables so that the file will be uploaded into the correct Azure storage container:
- Select your Azure subscription, if you have more than one:
Select-AzureSubscription "Your Azure Subscription" - Create and set a storage account. The storage account is a container in Azure Storage. You need to assign a name, label, and location for your account:
New-AzureStorageAccount -StorageAccountName "awsvmstorage" -Label "AWSVmStorage" -Location "East US"
$StorageAcct = "awsvmstorage" - Set the VHD file source and destination variables so that PowerShell can retrieve the file and copy it to your storage account:
$SourceVHD = "C:VHD ConvertWin2008R2SQLIIS.VHD"
$DestVHD = "https://" + $StorageAcct + ".blob.core.windows.net/vhds/Win2008R2SQLIIS.vhd" - Upload the VHD to Azure:
Add-AzureVHD -LocalFilePath $SourceVHD -Destination $DestVHD
As you can see in Figure 12-12, the first thing that happens is that Azure PowerShell calculates the hash for the file you are uploading.

Figure 12-12. PowerShell calculates the file hash
Next, as shown in Figure 12-13, Azure PowerShell finds the empty blocks in the file. This is done so that only blocks that contain data are uploaded. This makes uploading very efficient.

Figure 12-13. PowerShell detects the empty blocks in the file
Once the empty blocks are detected, the upload begins. As you can see in Figure 12-14, it can take a while for the upload to complete, depending on the size of the file and your Internet upload speed. In this example, the upload will take more than 5 hours. If you have an Express Route connection to Azure, your uploads will go a lot faster. (If you need a refresher on Azure Express Route, see Chapter 8.)

Figure 12-14. The file upload begins
After 5-1/2 hours, in the case of this example, the VHD has been uploaded to Azure, as shown in Figure 12-15. You need to complete just a few more steps before the file can be used to provision a VM.
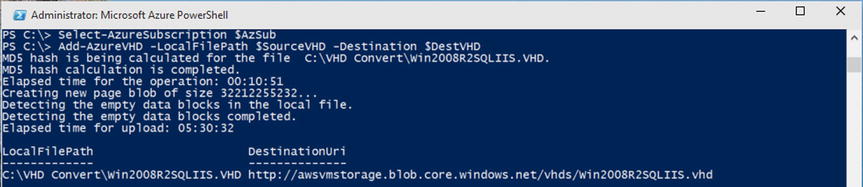
Figure 12-15. The file upload is complete
ADDING THE DISK TO AZURE SO IT CAN BE USED WHEN PROVISIONING A VM
Before you can create a new VM in Azure from the VHD file you just uploaded, you need to assign the disk as available for the VM in your subscription. Because this disk contains an OS and needs to be bootable, you need to use the -OS switch. If you don’t use this switch, then the disk is stored as a data disk in Azure.
Use the following cmdlet to add the disk to your subscription. The results of the cmdlet are shown in Figure 12-16:
Add-AzureDisk –OS Windows –MediaLocation $DestVHD –DiskName $DiskName
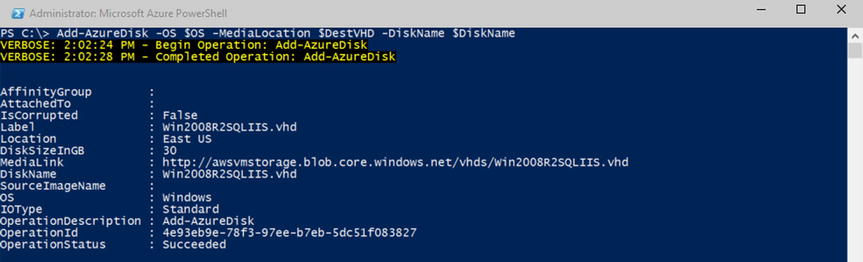
Figure 12-16. Adding the disk to your Azure subscription
With the disk added to your Azure subscription, you can now provision an Azure VM from it. The following cmdlet creates an Azure VM using the VHD you just uploaded, with configuration information from the New-AzureVMConfig parameters, and creates an endpoint of port 3389 on the VM so you can connect to it using Remote Desktop. You can see in Figure 12-17 that the cmdlet successfully creates the VM:
New-AzureVMConfig –Name $vmName –InstanceSize $instanceSize –DiskName $DiskName | Add-AzureEndpoint –Protocol tcp –LocalPort 3389 –PublicPort 56290 –Name "Remote Desktop" | New-AzureVM –ServiceName $serviceName –Location $location

Figure 12-17. The new VM is created in Azure
Log in to your tenant, and look at your VMs. You see the new VM in a running or starting state, as shown in Figure 12-18. Once it’s running, you can connect to it and log in to it using the credentials you used when the VM was in AWS.

Figure 12-18. The new VM has been provisioned and is running
![]() Note If your computer was joined to a domain in AWS, and you haven’t migrated your domain controller, you need to log on to the computer with a local administrator account to remove the computer from your old domain and join it to a new domain.
Note If your computer was joined to a domain in AWS, and you haven’t migrated your domain controller, you need to log on to the computer with a local administrator account to remove the computer from your old domain and join it to a new domain.
Working with PowerShell
As you saw in the previous section, Windows PowerShell is a great tool for working with Azure. Listing 12-1 contains all the cmdlets used in the previous example. You can save this code to your local machine for future use.
By changing the variables to match your systems, you can quickly download VHDs from AWS, prepare them to be usable in Azure, and then upload them into your Azure Storage account. Once the files are uploaded, the script adds the VHD to your Azure Storage account and registers it as a usable disk in your subscription. Finally, it provisions a VM for you to begin using.
MICROSOFT VIRTUAL MACHINE CONVERTER
Another good tool for preparing VHDs for uploading into Azure is the Microsoft Virtual Machine Converter (MVMC). The MVMC is used to convert VMware-based VMs or VHDs into the VHD format used by Azure. It’s also used to convert physical machines to VHDs or Windows Server 2012 VHDX format disks into VHD disks so that they can be uploaded into Azure.
The MVMC not only converts the disks that are running on VMware, but also migrates the rest of the VMware VM’s configuration, including memory, the number of virtual processors, and network interface cards. In addition, it removes the VMware tools from the source VM and installs the Hyper-V integration tools on the destination VM. This allows for a complete migration from one platform to the other.
The MVMC is available for download at https://www.microsoft.com/en-us/download/details.aspx?id=42497.
There isn’t enough space in this chapter to go through a step-by-step example of using the MVMC. Instead, review the TechNet article “Use Microsoft Virtual Machine Converter” at https://technet.microsoft.com/en-us/library/dn874008.aspx to walk through how to use it.
AZURE SITE RECOVERY
The final tool we’ll introduce is the Azure Site Recovery tool. This tool is currently available in preview only for VMware and physical servers, but it is fully available to Hyper-V workloads.
The new features that are in development include the following:
- New heterogeneous workload support for various Windows and Linux editions with replication to and recovery in Azure
- New automated discovery of VMware vCenter Server managed VMs for replication to and recovery in Azure
- New continuous data protection with software-based replication to provide near-zero recovery point objectives (RPOs)
- New on-the-fly conversion of source VMware virtual machine disk (VMDK) files to bootable target Azure VHD files, ensuring low recovery time objectives (RTOs)
- New multi-VM consistency using ASR protection groups to ensure that all tiers in an n-tier application replicate consistently and fail over at the same time
- New failback to VMware infrastructure from Azure when an on-premises datacenter comes back up post disaster
- Enhanced active-passive replication that does not require running target Azure VMs at the time of replication, thereby reducing the total cost of ownership (TCO)
- Enhanced single-click failovers with ASR recovery plans to provide end-to-end workload-aware disaster recovery and orchestration at low RTOs
- Enhanced rich health monitoring for replication, failover, and failback with events and e-mail notifications
Because this feature is in preview mode and will likely go through many changes, we don’t review how to set it up. Instead, see the Microsoft Azure Preview features web site at http://azure.microsoft.com/en-us/services/preview, where you can sign up to try it for yourself.
Once you sign up, you can follow the article “Set Up Protection Between On-Premises VMware Virtual Machines or Physical Servers and Azure” at http://azure.microsoft.com/en-us/documentation/articles/site-recovery-vmware-to-azure to begin using the recovery or migration capabilities.
Summary
As you learned in this chapter, migrating VMs into Azure is quite simple. Whether you use PowerShell, the free Microsoft Virtual Machine Converter, or one of the other migration methods, Microsoft has worked to make extending your datacenter beyond its current constraints a smooth a process.
The next chapter introduces to Azure monitoring and reporting. You learn how to monitor your web sites and VMs so that you can proactively prepare for potential problems. The reporting functionality allows you to keep an eye on your system’s performance and access so that you can plan your needs according to the load on your applications or VMs.