![]()
Working with Intune and RMS
Enterprise Management Suite
In Chapter 9, you were introduced to Azure Active Directory Premium (AADP). It is part of an Azure SKU called the Enterprise Management Suite. This suite also includes Microsoft Intune and Rights Management Services (RMS). These technologies can also be purchased individually, but you get a better value when purchasing the entire suite.
This chapter introduces you to Microsoft Intune and RMS. These technologies give you a greater level of control over your company’s data, and they help prevent accidental leakage of your sensitive data.
Managing Mobile Devices with Microsoft Intune
Microsoft Intune is designed to help you protect and manage devices while, at the same time, allowing users to access company e-mail, data, and apps remotely. Because it is cloud-based, you can administer devices from any supported web browser. You can use Intune to manage many devices, including phones and tablets running the Android, iOS, Windows Phone, and Windows RT operating systems. Computers running Windows 8.1 can be managed as mobile devices or as computers using the Intune client software. To manage devices with Intune, open a web browser and browse to https://manage.microsoft.com.
Intune can manage mobile devices a number of ways:
- Intune on its own
- Intune with Configuration Manager 2012
- Intune with Exchange ActiveSync
![]() Important This chapter assumes that Intune is managing devices alone, without System Center Configuration Manager (SCCM) integration or Exchange ActiveSync.
Important This chapter assumes that Intune is managing devices alone, without System Center Configuration Manager (SCCM) integration or Exchange ActiveSync.
Supported Devices and Features
Intune mobile device management supports the following OSs:
- Apple iOS 7 and later
- Google Android 2.3.4 and later (includes Samsung KNOX)
- Windows Phone 8.0 and later
- Windows RT and later
- Windows 8.1 computers
For a list of features, see https://technet.microsoft.com/en-us/library/dn600287.aspx.
Preparing for Mobile Device Management
Before you can enroll mobile devices in Microsoft Intune, you need to prepare the Intune service by selecting the appropriate Mobile Device Management Authority setting on the Mobile Device Management page of the Administration workspace. The Mobile Device Management Authority setting determines whether you manage the devices with Intune or SCCM with Intune integration. This chapter assumes that Intune is used without SCCM, so the option should be set to Microsoft Intune, as shown in the example in Figure 16-1.
![]() Important Consider carefully whether you want to manage mobile devices using Intune only or by using SCCM with Intune integration. After you set Mobile Device Management Authority to either of these options, it cannot be changed.
Important Consider carefully whether you want to manage mobile devices using Intune only or by using SCCM with Intune integration. After you set Mobile Device Management Authority to either of these options, it cannot be changed.
SETTING THE MOBILE DEVICE MANAGEMENT AUTHORITY OPTION
- In the Microsoft Intune administration console, shown in Figure 16-1, click Admin and then click Mobile Device Management.
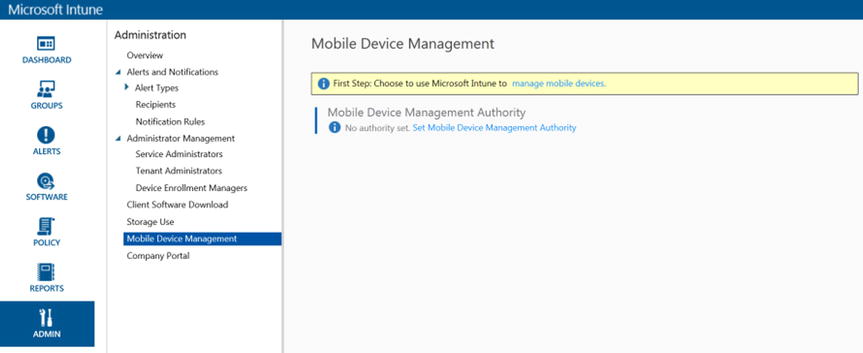
Figure 16-1. Setting the Mobile Device Management Authority
- In the Tasks list, click Set Mobile Device Management Authority. The Manage Mobile Devices dialog box opens, as shown in Figure 16-2.
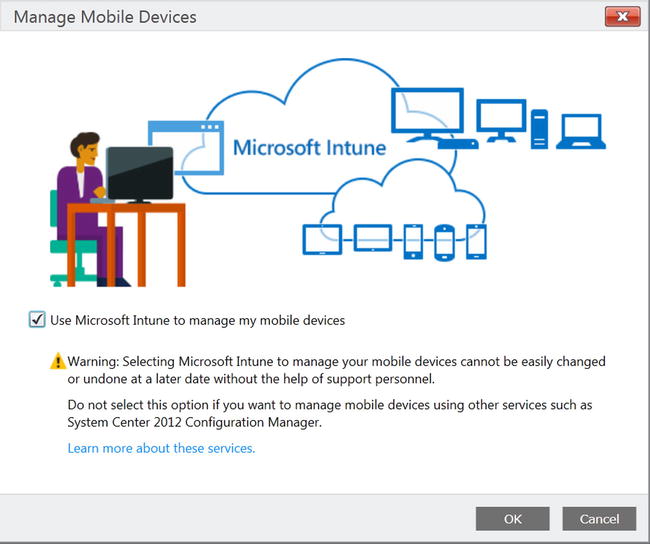
Figure 16-2. Confirming the mobile device management authority
- Select the Use Intune To Manage My Mobile Devices check box, and then click OK.
![]() Important Pay careful attention to the warning. Once the Mobile Device Management Authority option is set, it cannot easily be changed.
Important Pay careful attention to the warning. Once the Mobile Device Management Authority option is set, it cannot easily be changed.
Configuring the Mobile Device Management Infrastructure
After setting the Mobile Device Management Authority, you are ready to start managing devices. As shown in Figure 16-3, some devices can be managed right away without requiring additional configuration. Windows, Windows Phone 8.1, and Android devices don’t require additional configuration. iOS and Windows Phone 8 devices, however, require additional configuration before they can be managed.
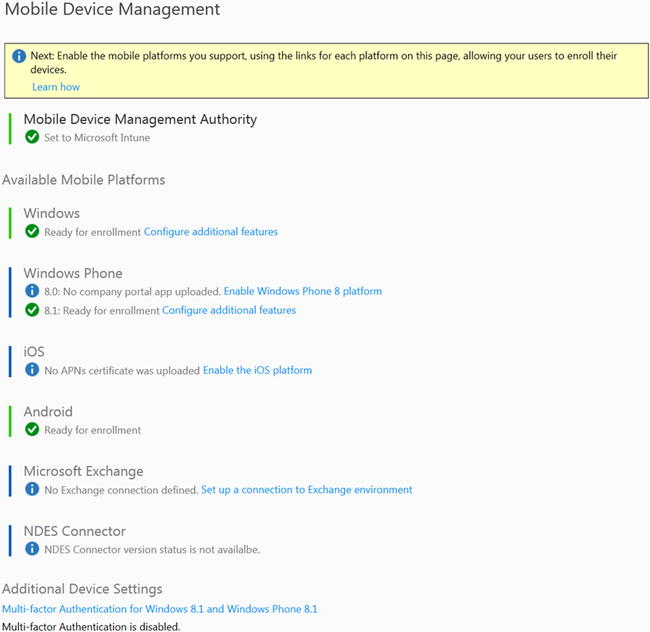
Figure 16-3. Managing mobile devices
Enabling iOS Mobile Devices Management
Each mobile device OS requires its own setup procedure. For example, to manage iOS devices, such as iPhones or iPads, you first need to install an Apple Push Notification service certificate from the Apple Push Certificate portal to connect iOS devices with your Intune account. Similarly, to manage apps for a Windows RT 8.1 device, you need to obtain side-loading keys and a code-signing certificate.
![]() Note The Apple Push Notification certificate requires an Apple ID in order to complete the installation. If you don’t have an Apple ID, create one before proceeding with the steps in the following exercise. This same Apple ID must also be used to renew the certificates. It is recommended that you create a corporate Apple ID for managing these certificates, rather than a personal ID.
Note The Apple Push Notification certificate requires an Apple ID in order to complete the installation. If you don’t have an Apple ID, create one before proceeding with the steps in the following exercise. This same Apple ID must also be used to renew the certificates. It is recommended that you create a corporate Apple ID for managing these certificates, rather than a personal ID.
ENABLING IOS MANAGEMENT
To enable iOS management, follow these steps:
- On the Mobile Device Management page, click the Enable The iOS Platform link, as shown in Figure 16-4.

Figure 16-4. Enable The iOS Platform link
- When the Enable page opens, click the Download The APNs Certificate Request button, as shown in Figure 16-5.

Figure 16-5. Downloading Apple Network certificate requests
- A Save As dialog box opens, as shown in Figure 16-6, which allows you to save the certificate request file. Choose a location to save the file, give the file a meaningful name, and click Save.
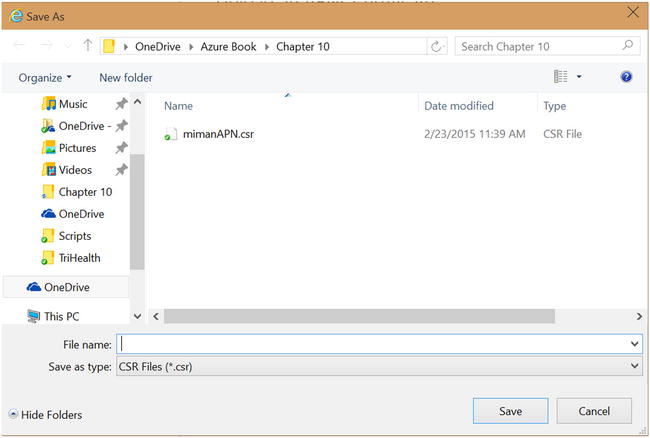
Figure 16-6. Saving the certificate request file
- To create a new push certificate, click the Apple Push Certificates Portal link, as shown in Figure 16-7.

Figure 16-7. Uploading an APNs Certificate
- The Apple Push Certificates Portal web site opens. Use your Apple ID to sign in to the portal, as shown in Figure 16-8.

Figure 16-8. Logging in to the Apple certificates portal
- On the Get Started page, click the Create A Certificate button, as shown in Figure 16-9.
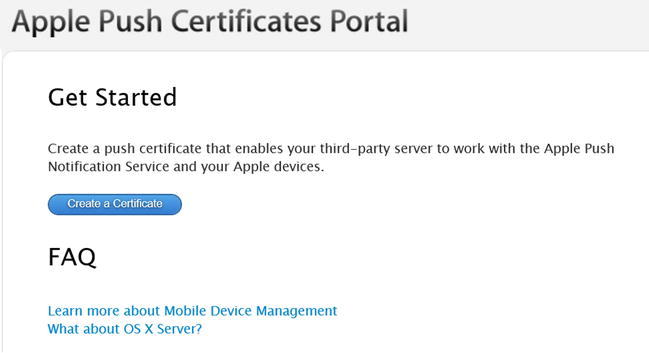
Figure 16-9. Creating the certificate
- You are asked to accept the license agreement. Select the check box to indicate that you accept the terms of the agreement, and click Accept, as shown in Figure 16-10.
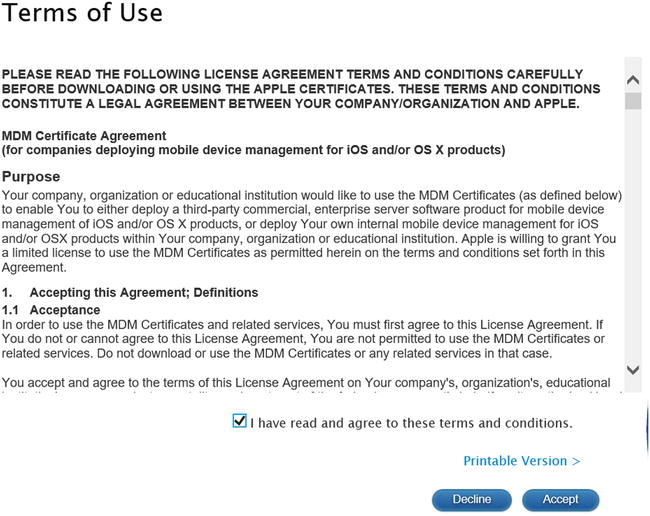
Figure 16-10. Accepting the terms of use
- The Create A New Push Certificate page opens, as shown in Figure 16-11. In the Notes field, enter a comment that describes the use of the certificate. Click the Browse button to go to the location where you saved the certificate request file in step 1, and click Upload.
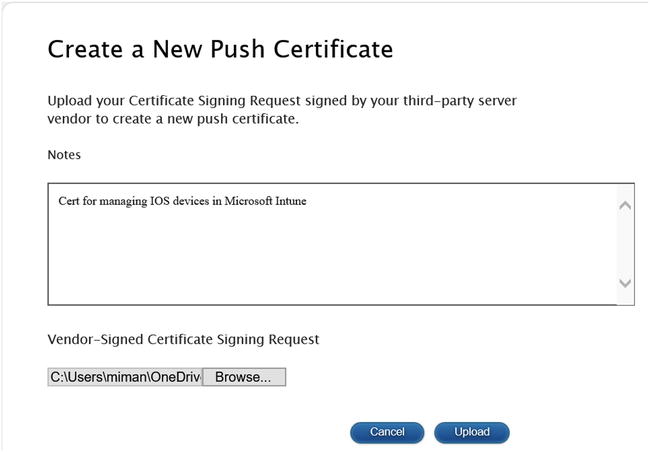
Figure 16-11. Uploading the certificate request file
- You are asked to open or save the file. Choose to save the file to a secure location
- To upload the certificate to the Apple Push Certificate portal network, click the Upload The APNs Certificate button, shown in Figure 16-12. The Upload The APNs Certificate dialog box opens.
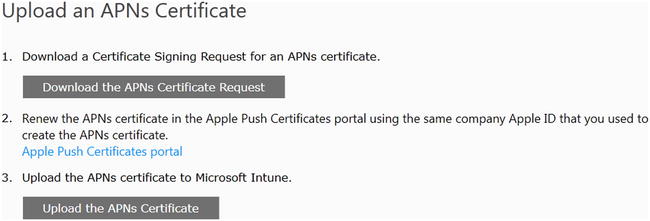
Figure 16-12. Uploading the certificate
- Click the Browse button, as shown in Figure 16-13, to locate the file you saved in step 9. Enter your Apple ID, and click Upload.
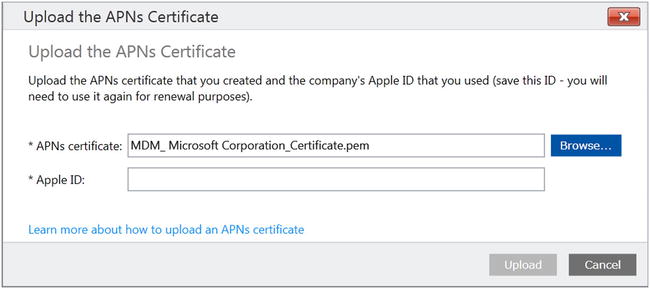
Figure 16-13. Completing the certificate upload
- After the upload completes, you can manage iOS devices using Microsoft Intune, as shown in Figure 16-14.
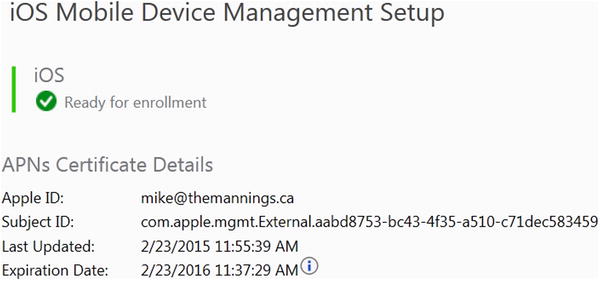
Figure 16-14. iOS mobile devices are now ready to be managed using Microsoft Intune
Enrolling Mobile Devices in Intune
When the Intune device-management infrastructure is in place, devices must be enrolled to enable device management and access to company resources. There are multiple options for device enrollment, as detailed next and in Table 16-1:
- Bring your own device (BYOD): Users enroll their personal devices using a Company Portal app or setting. An administrator must license users for Intune, which is included in the Enterprise Management Suite SKU or as a separate license, to allow device management. Each user can have up to five devices managed by Intune.
- Corporate-owned, choose your own device (CYOD) (iOS only): The company provides one or more devices from which employees may choose, while retaining administrative control of the device. These devices are owned and managed by the company and can be preconfigured to conform to company policies from their initial setup.
- Corporate-owned shared devices: These devices meet the need for equipment such as point-of-sale machines, kiosks, or tablets shared by multiple students in a classroom. Shared devices can be assigned to a device enrollment manager or can be userless:
- Device enrollment manager devices: A special user account allows the administrator or their designee to enroll more than five devices. The administrator or manager takes ownership and can manage the device, its policies, and its apps.
- Userless devices (iOS only): The administrator enrolls the device with a device certificate, which restricts day-to-day users from modifying the device.
Table 16-1. Mobile device management

Now that the Intune management environment is set up, you can begin enrolling devices. However, to do so, you first need to perform a few tasks.
The first task you need to complete is to add your user accounts. Microsoft Intune can use an existing Azure Active Directory (AAD) tenant domain for user accounts, making adding accounts to Intune a simple process. To get your user accounts to appear in Intune when using directory synchronization, as in this chapter, you only need to assign an AAD Premium license to your users. Once they are licensed, they will show up in Intune, and you can begin to enroll devices.
Creating Enrollment Profiles
The next step is to create enrollment profiles. Profiles specify whether devices have user affinity (a user and device association) and assign a group for device management. At least one profile must be specified before company-owned devices can be enrolled in Intune.
CREATING ENROLLMENT PROFILES
- In the Microsoft Intune administration console, choose Policy
 Corporate Device Enrollment, and then complete the following fields:
- Name: The profile name listed in the Intune administration console.
- Description: A brief summary of the purpose of the policy.
- Enrollment Details: Specifies whether to prompt the device user for credentials when enrolling the new device.
- Assign devices to the following group: Specifies a mobile device group for devices assigned this profile.
- Click Save Profile.
Specifying Company Portal Settings
You can customize the Intune Company Portal for your company.
CUSTOMIZING THE INTUNE COMPANY PROFILE
- In the Microsoft Intune administration console, choose Admin Company Portal and configure the following fields:
- Company Name
- IT Department Contact Name
- IT Department Phone Number
- IT Department Email Address
- Additional Information
- Company Privacy Statement URL
- Support Website URL (not displayed)
- Website Name (displayed to user)
- You can also customize the Company Portal with your company logo, company name, company color, and background.
Optionally, you can publish terms and conditions that users see the first time they use the company portal. Once enrollment is set up, inform your users that device enrollment is now available. Instruct them to go to the device store and install the Company Portal, or go to Company Apps (Windows Phone 8.0 only). Users can enroll and manage their mobile devices with the Company Portal app. They can also use a Company Portal web site. Each device OS has its own Company Portal app:
- Android: Users install the Company Portal app from Microsoft on Google Play.
- iOS: Users install the Company Portal app from Microsoft from the App Store. Users can then view their devices to enroll their phones.
- Windows Phone 8.1: Users install the Company Portal app from Microsoft from the Windows Phone store.
- Windows Phone 8: Users choose System Settings Company Apps, and sign in using their user ID. The Company Portal app is deployed to users’ phones.
- Windows 8.1 and Windows RT 8.1: Users install the Company Portal app from the Windows Store. The enrollment process is as follows:
- Choose PC Settings Network Workplace.
- Enter the User ID, and click Turn On.
- Select the Allow Apps And Services From IT Admin check box, and click Turn On.
- Choose PC Settings
When users open the Company Portal, they are asked for their credentials. The first time in the portal, users are asked to accept the terms—it doesn’t matter whether the device is enrolled. The user either accepts or declines the terms. Upon accepting, they continue to the portal. If they decline, they are asked to confirm that they want to decline and are then given a link that instructs them on how to unenroll. Users are not automatically unenrolled, and until they unenroll, you can still manage the device.
At this point, the process is different for devices that have not yet been enrolled, depending on the OS of the device:
- For Windows and Windows Phone 8.1 devices, the Company Portal reminds the user to enroll. Windows Phone 8.1 has a link to enrollment settings, and Windows provides a link to Help content that describes how to enroll.
- For iOS and Android devices, the user is led through the enrollment process. Users still see a message from Microsoft about the impact of enrolling.
Getting Started with Azure Rights Management
Azure Rights Management Services (Azure RMS) is the security-control feature in Microsoft Azure that is used to protect company information, whether on a corporate device or a personal device. Azure RMS uses a combination of encryption, identity, and authorization policies to secure files and e-mail. When users share documents or e-mails that are protected with Azure RMS, the protection stays with the protected item.
In Figure 16-15, you can see how Azure RMS works as a rights-management solution for Office 365 as well as for your on-premises servers and services. You can also see that it supports most devices that run Windows, Mac OS, iOS, Android, and Windows Phone.

Figure 16-15. Azure RMS
Configuring Azure Rights Management
By default, RMS is disabled when you first sign up for Office 365 or AAD. To enable RMS for your tenant, you first need to activate it.
ACTIVATING RMS
To activate RMS from the Azure Management Portal, follow these steps:
- Sign in to the Azure Management Portal.
- In the left pane, click Active Directory.
- On the Active Directory page, click the Rights Management tab.
- Select the directory to manage, and click Activate, as shown in Figure 16-16, to turn on RMS.
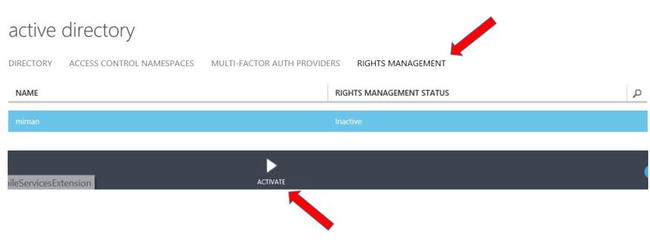
Figure 16-16. Activating Azure RMS
The Rights Management Status now displays as Active, and the Activate option is replaced with Deactivate.
After activating Azure RMS, you can begin using the two default templates to apply policies to sensitive files that restrict access to authorized users in the organization. These two templates have the following rights policy restrictions:
- Read-only viewing for the protected content:
- Display name: <organization name>: Confidential View Only
- Specific permission: View Content
- Read or Modify permissions for the protected content:
- Display name: <organization name>: Confidential
- Specific permissions: View Content, Save File, Edit Content, View Assigned Rights, Allow Macros, Forward, Reply, and Reply All
The default templates may be sufficient for most users, but if you want to create your own custom rights-policy templates, you can do that as well. Some of the reasons for creating custom templates are as follows:
- You need a template to grant rights to only some of your users instead of all users.
- You need only some of your users to be able to see and select a template (departmental template) from applications, instead of all users.
- You want to define a custom right for a template, such as View and Edit but not Copy and Print.
- You want to configure additional options in a template that include an expiration date or specify whether the content can be accessed without an Internet connection.
Before users can select a custom template that contains settings such as those listed here, you first need to create and configure it and then publish it to your tenant.
Creating, Configuring, and Publishing a Custom Template
You create and manage custom templates through the Azure Management Portal. You can sign in directly from the Azure Management Portal, or you can sign in to the Office 365 admin center and choose advanced features for Rights Management, which then redirects you to the Azure Management Portal.
CREATING A CUSTOM TEMPLATE
To create, configure, or publish custom templates for RMS, use the following procedures. Begin in the Azure Management Portal:
- In the left pane, click Active Directory.
- On the Active Directory page, click Rights Management.
- Select the directory to manage.
- Click Create A New Rights Policy Template.
- On the Add A New Rights Policy Template page, choose a language, add a name and a description, and click the check mark.
After the template has been created, on the Get Started With Rights Management quick-start page, click Manage Your Rights Policy Templates. The template you just created is in the list of available templates, showing a status of Archived. At this point, the template is created but not configured, and it is not yet visible to users. The next step is to configure the template.
CONFIGURING AND PUBLISHING A CUSTOM TEMPLATE
On the Templates page, select the newly created template:
- From the Your Template Has Been Added quick-start page, click the Get Started link, Configure Rights For Users And Groups, and then click Get Started Now.
- Select the users and or groups who will have rights to use the content that is protected by the new template.
 Note As a best practice, use groups rather than users, which simplifies management of templates.
 - Click the arrow in the lower-right corner to assign one of the listed rights to your selected users and groups.
- When you have chosen all the rights that you want to apply to the template, click the check mark in the lower-right corner to complete configuring the rights to your template.
![]() Note You don’t have to select one of the default rights to grant to your users or groups. Selecting Custom allows you to choose from the any of the following rights:
Note You don’t have to select one of the default rights to grant to your users or groups. Selecting Custom allows you to choose from the any of the following rights:
- View Content
- Save File
- Edit Content
- Copy and Extract Content
- View Assigned Rights
- Change Rights
- Allow Macros
- Export Content (Save As)
- Forward
- Reply
- Reply All
- Full Control
![]() Tip You can make templates visible to a subset of users when they see a list of templates in applications. To do so, click Scope, which is currently in Preview, to configure a template as a departmental template, and follow the same steps as in the “Configuring and Publishing a Custom Template” exercise to add a group or groups.
Tip You can make templates visible to a subset of users when they see a list of templates in applications. To do so, click Scope, which is currently in Preview, to configure a template as a departmental template, and follow the same steps as in the “Configuring and Publishing a Custom Template” exercise to add a group or groups.
If you wish to configure additional options with your template, click the Configure link. On this page, you can add languages and the name and description of this template in that language. When you have users who speak multiple language, it’s important to add each language they use and supply a name and description in that language. Users then see the name and description of the template in the same language as their client OS, which ensures that they understand the policy applied to a document or e-mail message. If there is no match with their client OS, the name and description they see falls back to the language and description that you defined when you first created the template.
Additionally, you can set the template expiration to one of the following options:
- Content never expires.
- Content expires. You can define for your templates when files that are protected can no longer be opened. You specify a date, or a number of days, starting from the time that the protection is applied to the file.
You can also configure offline access to the files protected by your templates. The configurable offline settings are as follows:
- Content is available only with an Internet connection.
- Content is always available.
- Content is available for a specified number of days without an Internet connection.
This setting can be used to control how users can access protected files. For example, if you specify that content is not available without an Internet connection, or that content is only available for a specified number of days, then when that threshold is reached, users must be re-authenticated, and their access is logged. When this happens, if their credentials are not cached, users are prompted to sign in before they can open the file.
In addition to re-authenticating, the policy and the user group membership are reevaluated. This means users could experience different access results for the same file if there are changes in the policy or group membership from when they last accessed the file.
Updating Templates
When RMS templates are updated, the updates first need to be downloaded before they can be used. Template updates must be downloaded for Exchange Online (EOL) and for Microsoft Office.
Forcing Exchange Online to Download Changed Custom Templates
If you’ve already configured Information Rights Management (IRM) for Exchange Online, custom templates will not download for users until you make the following changes with Windows PowerShell in Exchange Online.
![]() Note You must perform this procedure each time you change a template.
Note You must perform this procedure each time you change a template.
UPDATING TEMPLATES FOR EXCHANGE ONLINE
To update templates for Exchange Online, follow these steps:
- Connect to Exchange Online using Microsoft Azure PowerShell. For detailed information on connecting to EOL, see this TechNet article: https://technet.microsoft.com/en-us/library/jj984289(v=exchg.150).aspx.
Use the Import-RMSTrustedPublishingDomain cmdlet to reimport your trusted publishing domain (TPD) from Azure RMS. For example, if your TPD name is Cloud Protection, enter
Import-RMSTrustedPublishingDomain -Name "Cloud Protection" -RefreshTemplates –RMSOnline - To confirm that the templates have imported successfully, wait a few minutes and then run the Get-RMSTemplate cmdlet and set Type to All. For example:
Get-RMSTemplate -TrustedPublishingDomain "Cloud Protection" -Type All - For each imported template that you want to be available in the Outlook Web App, you must use the Set-RMSTemplate cmdlet and set Type to Distributed:
Set-RMSTemplate -Identity "Cloud Protection" -Type Distributed
After you archive a template when using Exchange Online with Office 365, users will continue to see the archived templates when using the Outlook Web App or mobile devices that use the Exchange ActiveSync Protocol. To stop users from seeing these templates, connect to EOL with Microsoft Azure PowerShell and then use the Set-RMSTemplate cmdlet as follows:
Set-RMSTemplate -Identity "RMS Online: 1" -Type Archived
Forcing Microsoft Office to Refresh Updated RMS Custom Templates
By default, RMS templates are refreshed by Microsoft Office every seven days. By editing the local computer’s Registry, you can change the automatic schedule so that changed RMS templates are refreshed more frequently. You can also force an immediate refresh by deleting the templates folder on a computer.
CHANGING THE AUTOMATIC RMS TEMPLATE REFRESH SCHEDULE
To change the automatic refresh schedule, follow these steps:
- On the local computer, open Regedit.exe.
- Expand the registry to the following key:
HKEY_CURRENT_USERSoftwareClassesLocal SettingsSoftwareMicrosoftMSIPC - Change the TemplateUpdateFrequency value to the number of days that you want the updates to download. For example, if template updates happen frequently, set the value to 3 to have the updated templates downloaded every three days.
You can also force the RMS templates to update immediately by deleting the templates folder in the registry.
- Delete the following folder: %localappdata%MicrosoftMSIPC Templates.
Summary
In this chapter, you stepped through the process of preparing Microsoft Intune without integration with Systems Center Configuration Manager or with Exchange Active Sync, and of setting up the rest of the Intune device-management environment for your Intune subscription. You also worked through the process of enrolling mobile devices. After completing these steps, you should be able to begin managing your users’ devices.
You also navigated the process of activating and configuring Azure RMS. With these two technologies activated and configured, you can confidently deploy mobile devices to your users with the knowledge that your corporate information is protected.