![]()
Making a 3D Model
Once you have downloaded, installed, and configured MatterControl, your next step in using a 3D printer will be to find or create a 3D computer model. MatterControl has fairly limited ability to do this itself (see Chapter 11’s discussion of plugins), but fortunately there are lots of programs out there, many of which are free. Depending on your needs, you may want to start simple (this chapter describes some options) or you may be entering the field as an animator or engineer who is an expert modeler already. We try to touch on some of the differences between modeling for display on a screen and creating something that will exist in the real world subject to gravity and other similarly inconvenient things!
3D-printable models can be obtained in various ways: by scanning an existing object, by downloading a model from the web, or by creating a model yourself. In each case, you have a lot of options to choose from. There is more to design than picking a software package, though, and there are design decisions you can make that can simplify the printing process later on.
Chapter 2 covers the basic input file requirements for MatterControl. This chapter talks about how you can get those STL or AMF files by scanning, downloading, or creating the models from scratch. For those who choose the last option, this chapter looks at 3D computer-aided design (CAD) and CAD-related programs that you can use to make a 3D model. By the end of the chapter, one way or another you should know how you can have a computer model that is ready to go on to the next stage of processing.
Where to Get 3D Models
Models can be made from scratch using a 3D-modeling program. However, if starting from zero seems daunting, you might consider scanning a model or downloading a pre-existing model from a database. Once you have it, you can print it as is or modify it in one of the design programs we discuss. Regardless of the source of the model, the file has to be in a format usable by the MatterControl slice engines, which convert the model into commands for the 3D printing, as you will see in Chapter 5. As discussed in Chapter 2, those formats are STL and AMF.
Scanning a Model
One way to get a model of something that already exists is to 3D scan it. Scanners at the consumer level are still a bit too complex to use easily. Most of them, in one way or another, scan a large number of images of an object from many angles and create a point cloud representing the object. The images have to be taken in a particular way to be able to re-create the third dimension of the image.
A point cloud is what it sounds like: a large number of unconnected points that represent the shape of the object to some degree of precision. Low-cost scanners capture images from many angles to generate this point cloud using smartphone or video game cameras. Then, either the user has to manually stitch together the point clouds or the software does it. More expensive systems use lasers to illuminate the object and create the point cloud.
Stray reflections, interference from objects in the background, and internal or concave surface features are challenging for the current crop of low-cost scanners. Resolution is a tricky thing to define accurately in these circumstances. Selection of a scanner for a given application will depend on the need for speed of capture, the accuracy required, the amount of time that can be devoted to manual cleanup, and the types of materials being scanned. Shiny and floppy things pose particular challenges.
After the stray reflections and other artifacts are removed, a scanner’s software will create triangles covering the surface of the point cloud. This generates a model of the surface in the form of an STL or other file format. This process is typically referred to as creating a mesh, or meshing. For a complex model, meshing can take a very long time. Typically, the output of a scan needs some cleanup, as mentioned, to make it watertight and manifold.
Consumer-Level 3D Scanners
If you are considering purchasing a scanner and your budget is limited, there are a few different ways to go:
- Check out crowdfunding sites like www.kickstarter.com (search for “3d scanner”) to see the latest developments as well as progress of previously funded systems.
- If you are a do-it-yourselfer, check out www.instructables.com to see some DIY scanning systems. The print back in Chapter 1 of a scan of Rich (Figure 1-1) is from one of these.
- To try using your smartphone as a scanner, download Autodesk 123D Catch at www.123dapp.com/catch.
Scanners for Biological Applications
Scientific users of 3D scanning and printing may need detailed, high-resolution information about biological structures. Medical professionals and those with access to computerized tomography (CT) scanners have been using CT scans as a starting point for 3D printing. CT scans can capture internal and complex, concave structures. CT scanners are not consumer items, but if you are a scientist or researcher, you might see whether a local hospital or research center offers scans on a fee-for-service basis. Different CT scanners can handle different densities and sizes of objects.
There are also “micro-CT” scanners with smaller beam sizes. University imaging centers and labs buy these smaller scanners for research projects, but often they’re not used full-time, and facilities might provide scans on some sort of fee-for-service basis. Facilities with micro-CT scanners are not cheap, and thus neither are these scans. But if you are solving a real problem, micro-CT scanning may be a powerful way to get the information you need to create 3D models of structures of interest. CT scanners usually output a DICOM file. A web search will reveal various free and proprietary tools to convert DICOM files to STL files, depending on the specific application at hand.
![]() Tip The National Institutes of Health (NIH) has a site for sharing of methodologies and results using 3D printing (http://3dprint.nih.gov). This site says that in time it will be a repository of tools and tutorials for setting up various biology-oriented workflows, so be sure to check it now and again for new capability.
Tip The National Institutes of Health (NIH) has a site for sharing of methodologies and results using 3D printing (http://3dprint.nih.gov). This site says that in time it will be a repository of tools and tutorials for setting up various biology-oriented workflows, so be sure to check it now and again for new capability.
Downloading and Modifying Existing Models
Sometimes a model of something that you would like to print already exists. In that case, you may be able to download it from one of a growing number of model databases. Some databases contain fun items and household objects. Some of the existing models in databases are of complex, specialized objects that might be very useful to you professionally.
Many databases of 3D-printable objects are available online. The Thingiverse (www.thingiverse.com) and Youmagine (www.youmagine.com) websites both feature a wide range of objects, from sci-fi figurines to parts for enhancing 3D printers. These models have been contributed by users and as such vary widely in the quality of their design both for printing and for their intended purposes.
![]() Note Sometimes model creators will upload both the STL file for printing and the file in the original format of the software that created the model. That means if you happen to be conversant in the original program, you can start with an object and modify it. For example, in Thingiverse, when you click the Download This Thing! button, you get both a list of the available files and the type of license under which it is being made available. Sometimes the developer just wants you to credit them if you use it. Sometimes commercial use is not allowed. If you obtain something from one of these databases, be sure to look carefully at the requirements, particularly if you are going to modify the object or sell something based on it.
Note Sometimes model creators will upload both the STL file for printing and the file in the original format of the software that created the model. That means if you happen to be conversant in the original program, you can start with an object and modify it. For example, in Thingiverse, when you click the Download This Thing! button, you get both a list of the available files and the type of license under which it is being made available. Sometimes the developer just wants you to credit them if you use it. Sometimes commercial use is not allowed. If you obtain something from one of these databases, be sure to look carefully at the requirements, particularly if you are going to modify the object or sell something based on it.
The Instructables website (www.instructables.com) often includes instructions for the entire workflow to create and print a 3D model. Although not a 3D-model specific site, Instructables is a good place to start because many models include fabrication instructions in addition to an STL file. Sometimes the instructions even extend to how to use the object. Instructables is a community website with all content contributed by its users. As of mid-2015, the site stated that it had over 100,000 different sets of instructions covering everything from cooking to lab equipment.
Just as there are stock image sites where you can buy the rights to 2D images, there is now a market for stock 3D models, including Flat Pyramid (www.flatpyramid.com) and TurboSquid (www.turbosquid.com). At the moment the models on these sites are more oriented to the animation and virtual reality industries. You will need to exercise some care in buying a 3D-printable model (looking for one in STL format is a first step), but as these sites become more aware of the 3D-printing consumer market, there will likely be more of them.
There is now a search engine that looks at other 3D-printing model sites: www.yeggi.com. You can use this site to see if there is a free or for-purchase 3D-printable file available somewhere. This site aggregates from a lot of other sites, so the cautions noted earlier apply.
If you want to modify a file that you have downloaded beyond scaling it bigger or smaller, you will need to import it into one of the programs described in the next section and essentially make a new model based on the one you have. Depending on the power of the program you use, you may be a bit limited in what sorts of things you can change.
![]() Caution Do not assume that an STL file you download from a site is perfect or that it will work on your printer. On download sites that allow comments or that have an “I made one!” contribution area, see whether anyone besides the author has made one. If not, that might be a bad sign. If in doubt, you can run files through MeshLab (see Tip in Chapter 2) or a similar program to see if they have errors. Also be careful about scaling objects up or down—you may wind up with features that are too small to print (typically, about 1 mm is a minimum feature size—a lot bigger if the feature is embedded in support material).
Caution Do not assume that an STL file you download from a site is perfect or that it will work on your printer. On download sites that allow comments or that have an “I made one!” contribution area, see whether anyone besides the author has made one. If not, that might be a bad sign. If in doubt, you can run files through MeshLab (see Tip in Chapter 2) or a similar program to see if they have errors. Also be careful about scaling objects up or down—you may wind up with features that are too small to print (typically, about 1 mm is a minimum feature size—a lot bigger if the feature is embedded in support material).
Creating a 3D Model from Scratch
If you want to print something that does not exist anywhere, you will need to use software yourself to develop a new model. Fortunately, many software packages are available that make developing particular types of models as simple as possible. The next section helps you think about what software package you might want to learn about, if you do not already use one.
Using a 3D-Modeling Program
Most 3D-modeling programs will either save a file as STL or OBJ directly or offer an option to “export to” STL. Which program is the right one for the job? This section describes commonly used programs that range in price from open source and/or free to quite expensive. The programs also vary in the steepness of their learning curves. In general, the more powerful the program, the longer it takes to be reasonably proficient in its use.
Some programs have the user write computer-code–like instructions, whereas others require a lot of mouse use and more of an artistic bent. This is a quick overview of the available options; for the most part, the open source programs offer extensive documentation available for free download. The proprietary software programs typically offer training or have help available.
The descriptions here assume that the development of a model is separate from the preparation of that model for 3D printing in a slicing program. Some 3D-printer companies are beginning to develop integrated programs that combine all these steps; those programs are beyond the scope of this book. Most of these proprietary integrated systems also allow importing STL files created by other programs or from databases.
Types of 3D-Modeling Software
Table 4-1 lists some common types of 3D-modeling software. Each category represents one particular way of representing the 3D shape. Several of them actually have some capability to use more than one of these methods or may even blend these approaches, but we’ve tried to place each in the most appropriate category.
Table 4-1. Types of 3D-Modeling Software
|
Type of Model |
Examples |
|---|---|
|
Voxel |
3D Coat, Minecraft |
|
Constructive Solid Geometry (CSG) |
OpenSCAD, TinkerCAD |
|
Mesh/Non-Uniform Rational B-Splines (NURBS) |
Blender, Maya, Rhinoceros 3D, 3ds Max |
|
Feature-based parametric modeling |
FreeCAD, Autodesk Inventor, SolidWorks, Solid Edge |
|
Digital sculpting |
Zbrush, Meshmixer, Leopoly, Sculptris |
For example, one way of representing a 3D shape that some modeling programs use is in voxels. A 2D image meant to be displayed on a screen is broken up into tiny squares called pixels, each of which is a single color. When you extend this approach to three dimensions, you get voxels (volume + pixel). A 3D space is divided up into these tiny cubes, each one representing either a material or empty space, and the overall shape makes up an object. Some games, notably Minecraft, use this approach, but it is otherwise pretty uncommon.
The more common approach is to define the surface of an object, the boundary between the inside and the outside. Many 3D-modeling programs, especially those designed for 3D graphics for games or movies, let you alter the 2D polygons that make up this 3D surface, known as a mesh. Mesh editors may work directly on the points where multiple polygons converge, but most also offer higher-level tools that allow you to modify many points at once. One way to do this is by using Non-Uniform Rational B-Splines (NURBS) to create a smooth surface out of relatively few control points by mathematically interpolating the space between them. A problem with mesh-based editors is that they are only trying to represent surfaces, and they don’t care if there are holes in the surface (places where there is no separation between the inside and outside) or self-intersections (places where the surface crosses itself). These models may look fine on the screen, which is all these programs are intended to accomplish, but they can become big problems when you try to 3D print your creation (objects that have these types of problems are called non-manifold). Some programs use a similar but more abstract method called digital sculpting. In these programs, you generally start with a plain sphere and then use tools with names like “push,” “pull,” and “pinch” to work the surface like clay into the desired shape, and if this is all that you do to your object, it should remain manifold.
CAD programs, on the other hand, are specifically designed to only represent shapes that can physically exist. One way to do this is by using a method known as Constructive Solid Geometry (CSG). In CSG, you start with solid objects—usually primitives like cuboids, spheroids, and cylinders—and then add and subtract them from one another to create features. If you want a block with a round hole though it, you create the block without the hole, then create a cylinder representing the hole, and then subtract the cylinder from the block.
Another approach common among CAD programs is feature-based parametric modeling. In this method, you generally start with a 2D drawing of one side of an object, including what all the features look like from that side. You add dimensions and relations to specify where those features belong in relation to one another and then either extrude that 2D drawing into three-dimensional features or map it to the surface of an existing 3D primitive. Some features are added after this, such as modifying the newly created edges with fillets or chamfers (two types of rounded edges), but most of the editing is done in the 2D drawings.
We have picked out a few to discuss in this chapter, primarily programs that are free or in very common professional use. With the boom in 3D printing, many new programs have entered the market, and longtime players have added offerings; if you outgrow some of the simple programs here, you might inquire at a local hackerspace or makerspace about the next logical step up for your particular need. Autodesk has a pretty full suite of tools for 3D applications and might be a good place to browse (www.autodesk.com) starting with the free Tinkercad, about which more in a moment.
![]() Caution Some software packages are geared toward creating models meant to be viewed on a computer or theater screen (called 3D rendering). A “3D” movie normally does not contain the parts of the model that you do not see on the screen at that moment. Various tricks exploit the way your eyes perceive 3D and fool you into thinking you are seeing a 3D image when really all you are seeing is two versions of a 2D image from slightly different perspectives. If you are at a 3D movie looking at a 3D stereo image of the north side of a tree, that side was generated in a computer. The south side of the tree, the underside of the trunk, and some of the top, east, and west sides are not needed for the movie viewer to see the tree in 3D. However, all of that would be needed to print the tree. Be sure the software you are looking into can export an STL file or a format that can be converted into STL.
Caution Some software packages are geared toward creating models meant to be viewed on a computer or theater screen (called 3D rendering). A “3D” movie normally does not contain the parts of the model that you do not see on the screen at that moment. Various tricks exploit the way your eyes perceive 3D and fool you into thinking you are seeing a 3D image when really all you are seeing is two versions of a 2D image from slightly different perspectives. If you are at a 3D movie looking at a 3D stereo image of the north side of a tree, that side was generated in a computer. The south side of the tree, the underside of the trunk, and some of the top, east, and west sides are not needed for the movie viewer to see the tree in 3D. However, all of that would be needed to print the tree. Be sure the software you are looking into can export an STL file or a format that can be converted into STL.
Options for Getting Started Quickly
If you want to go from “zero to plastic” as soon as possible, you might try Tinkercad (www.tinkercad.com) and OpenSCAD (www.openscad.org), both of which are free. Tinkercad requires registration; OpenSCAD is open source. Both have example files available that you can play with and use as guidelines for your own first project.
Tinkercad: Drag and Drop
If you want to use something simple that requires no programming knowledge at all, you will like Tinkercad. Tinkercad is a member of Autodesk’s suite of 3D-printing productivity tools. The program is free as of this writing, although it requires the user to register. Tinkercad is a purely drag-and-drop program that supplies a lot of simple shapes such as rectangular solids, spheres, cylinders, three-dimensional letters of the alphabet, numbers, and so on. Printable objects are created by assembling them out of these standard virtual pieces.
Tinkercad requires a good Internet connection because the program is entirely cloud-based and frequently saves incrementally. If several people are using it on one wifi node, the results can be frozen screens and frustration. However, it is a great way to develop something quickly just to test the end-to-end process of creating a model, slicing it, and printing it.
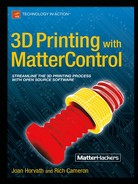
Tinkercad has extensive tutorials that are arranged into bite-sized brief walkthroughs of the key features, and there are a lot of examples that others have designed and put out there for you to play with and build upon. The classic project to try first on a 3D printer is a small keychain fob decorated with 3D initials or a few hearts. Most people can do a project of that scale in an hour or so starting from zero with Tinkercad. Figure 4-1 shows a design from Tinkercad (displayed in MatterControl), and Figure 4-2 shows the resulting object.
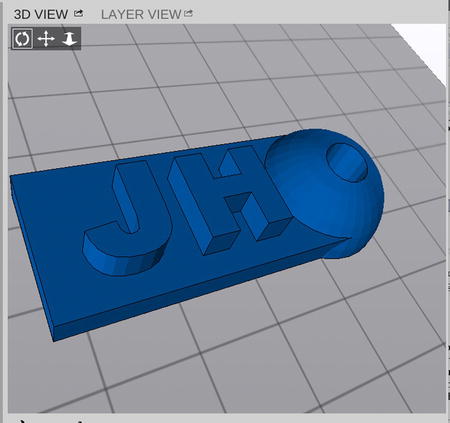
Figure 4-1. An object designed in Tinkercad and displayed in MatterControl
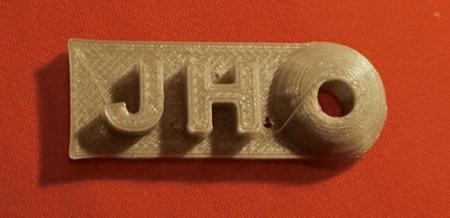
Figure 4-2. The resulting 3D-printed keychain fob
To get started in Tinkercad, do the following:
- Register as a user.
- Open one of the public models, or drag and drop basic shapes from the menus on the right.
- Shapes (say, a cube and a cylinder) can be merged by selecting them both and then click the Group Button. See the tutorials in Tinkercad for lots of ideas.
- Save your model it to STL by selecting Design
 Download for 3D Printing STL.
 - You should now have an STL file in your downloads folder that you can import into MatterControl, slice (see Chapter 5 for more), and ultimately print.
Alternatively, you can take one of the public Tinkercad models and alter it a bit, if the model creator allows that, and then save it to STL. If you are more ambitious, sketch out something you want to build. Remember to start small and simple—see the discussions in later chapters to see what makes a model “simple.” Try some of the tutorials available on the Tinkercad site in the “Learn” section and then give it a shot.
Be sure to save the object before you log out. By default, Tinkercad names things in a strange pidgin-Swedish way; you can change that by going to Design ![]() Properties and then giving it a new name. You can also change the default license for others in that same area.
Properties and then giving it a new name. You can also change the default license for others in that same area.
OpenSCAD: A CAD Programming Environment
OpenSCAD follows the opposite philosophy from Tinkercad in that it is not drag and drop at all, and the only mouse interaction is for adjusting how you view the model you have developed. OpenSCAD uses a programming language very similar to C to define geometrical shapes, translations, rotations, and so on. The program has built-in functions for most common shapes, although the names can be a little misleading. For example, cuboids are referred to simply as “cubes,” even if the lengths of their sides are not equal. Quite complex shapes can be built up easily. Figures 4-3 and 4-4 show what we will call “the spiral horn” in OpenSCAD and after it prints. We use the spiral horn in Chapter 5 to talk about support; it is a very easy piece to design in OpenSCAD, but pretty challenging to print well!
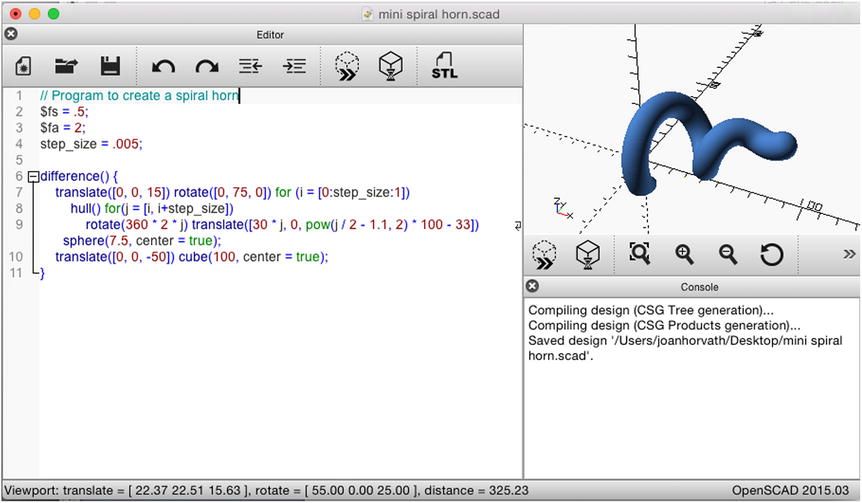
Figure 4-3. Spiral horn in OpenSCAD

Figure 4-4. OpenSCAD object 3D-printed from the code in Figure 4-3
To try out a simple model in OpenSCAD, do the following:
- Click the File menu.
- Pick an example from the Examples submenu (or click File New and then type in the little example shown in Figure 4-3 — what is shown is all you need).
- Click Design Render (if it is a complex object, you might want to Preview first).
- Assuming this still looks good, save it with File Save. This saves the program in OpenSCAD format, not STL.
- Click File Export Export as STL.
You can then take the STL file and run it through a slicing program (see Chapter 5), and you will be ready to print (see Chapter 6). OpenSCAD is particularly suited to modeling objects that can be built up out of geometric shapes. Complex objects are possible by starting with these basic shapes and rotating them. You can make impressive geometries with a little programming experience and the OpenSCAD manual.
If you want to build something simple quickly and you like writing code better than using a mouse, OpenSCAD may be for you. If you have never done any programming, though, it is probably not the best choice. Typically we suggest that beginning users try both Tinkercad and OpenSCAD, as two very different options for getting started, and then migrate into other more sophisticated or expensive programs after getting their feet wet.
Programs for Specific Applications
Tinkercad and OpenSCAD are great for beginners. If you are using your printer mostly as a hobbyist, in a classroom, or to make fun objects around the house, you can probably be happy for a long time with these programs. However, if you need to create professional-level sculptural models, or if you need dimensioned drawings (drawings meant to be read by a person with numbers for dimensions, angles and so on printed on them), then these programs probably are not enough. Many, many design programs can either produce an STL file or a file that can be translated into STL. Most of these programs deserve (and in some cases have) their own book-length tutorials.
Generally speaking, you need to consider a few key attributes when selecting a design program. First, consider your own strengths: are you good at programming, or are you better at using a mouse? Do you have decent hand-eye coordination and drawing skills? How much time do you have to devote to becoming proficient, and how much design are you really going to do? A program with a short learning curve but limited capability might be okay if you are only going to make a few complicated objects, but learning a more-capable program may be worth it if those extra features will vastly enhance your productivity.
Some software only runs on either Mac or Windows, not both. If you only have access to one or the other operating system, that may force a choice. Functionality can be different between Mac and Windows versions of a particular package, particularly in the open source world.
Next, consider budget. Free and open source software varies in its quality; documentation can be uneven or incomplete for open source software. However, it is free. For pricey software, research whether demonstration versions of the software are available and, if so, try before you buy. If you are a student, check with your school or the software publisher to see whether any discounts are available to you.
With all that said, programs to create models for 3D printing need to serve two broad categories of users. Engineers, architects, industrial designers, mathematicians, and similar professionals need to create 2D drawings with labeled, numerical dimensions and great precision so that teams of people can make things together. Often they need to integrate 3D-printed parts with traditionally manufactured ones and thus will need both the ability to create a file for printing and a traditionally dimensioned, human-readable drawing. Artists may want good drawing tools that allow them to sketch freely but not require as much precision. Different tools have evolved for these respective communities, as we will see next.
Engineering and Architecture Programs
Engineers, industrial designers, and architects use 3D-modeling programs oriented toward applications that require precision. The open source program FreeCAD (www.freecadweb.org) is a parametric modeling engineering-oriented program with many features that used to be available only in very expensive programs. FreeCAD runs on Mac, Windows, and Linux machines.
A common (but expensive) engineering tool is the Solidworks program from Dassault Systèmes. Solidworks is designed to create real engineering projects and as such is a good end-to-end program to go from concept to final dimensioned parts. It does take a while to become proficient in Solidworks, however, and cost can be a barrier. Solidworks is only available for Windows.
Google’s Sketchup program is focused on making it easy to lay out an architectural project, including a large library of many common home fixtures from various manufacturers. Sketchup can be used more broadly, but it focuses mostly on assembling geometrical and precise models, and the resulting models may require format conversion and have problems with 3D printing (Sketchup is notorious for creating non-manifold models).
Mathematica (www.wolfram.com/mathematica/) is a programming system that allows users to model complicated mathematical functions. Mathematica creates STL files based on user-generated mathematical models. That means it is possible to develop sophisticated mathematical models and then visualize them in physical form. This possibility has many implications, particularly for people who teach courses that use Mathematica. A natural spectrum of mathematics visualization options starts with OpenSCAD and moves up to Mathematica.
Visual-Effects and Sculptural Programs
Visual-effects developers, animators, and similar artists develop 3D models in computer programs that are good for complex, curved, organic objects such as characters in animated films. Most of these either can export an STL file directly or employ translation utilities and procedures to take their output and turn it into STL. The commercial program Rhino, for example, exports directly into STL.
The Maya animation program (www.autodesk.com/products/maya) exports OBJ files, which MatterControl can read once you translate them to STL. However, Maya is a mesh-based modeler. That means that when you draw something, you are creating an infinitely thin “mesh” that defines the surface. For example, if you model a ball and cut it in half, you are creating a cup-shaped thing with zero thickness. The software later in the 3D-printing workflow will do unpredictable things with this. You need to use the extrude functions of the modeling software to give your mesh some thickness. Once you are sure your mesh has finite thickness everywhere, you can safely export it as an OBJ file. As of this writing, Maya comes with a plugin that generates OBJ files, but the plugin by default is not enabled. Use Maya’s Plugin Manager to enable the OBJexport plugin so you can then export Maya’s native format to OBJ files.
If budget is an issue, Blender is an open source visual-effects development program, available from www.blender.org. Like many 3D graphics programs, Blender can export to STL format. It is extremely powerful—you can make an entire animated film with it—but has a correspondingly steep learning curve. If you are very fast with a mouse, this may be the program for you, but the program is notorious for “thinking” differently from all other programs.
![]() Caution Because programs like Maya or Blender are intended only for creating models that will look right when rendered as 2D images, the user has to do some extra work to ensure that the models that it produces will be manifold. You will have to make sure that your meshes are all closed and have no unnecessary internal geometry or self-intersections, or your slicing program and printer might both do unpredictable things. If you want to turn a 2D surface into a printable mesh, you will need to extrude or “solidify” it so that it has a thickness of at least a millimeter or two. Be sure you are working in millimeters first or you might make inch- or centimeter-thick walls!
Caution Because programs like Maya or Blender are intended only for creating models that will look right when rendered as 2D images, the user has to do some extra work to ensure that the models that it produces will be manifold. You will have to make sure that your meshes are all closed and have no unnecessary internal geometry or self-intersections, or your slicing program and printer might both do unpredictable things. If you want to turn a 2D surface into a printable mesh, you will need to extrude or “solidify” it so that it has a thickness of at least a millimeter or two. Be sure you are working in millimeters first or you might make inch- or centimeter-thick walls!
![]() Tip If you are interested in creating 3D models with Blender, you might try to locate a class or, even better, a local Blender community or Meetup group. For example, the online learning site CGCookie (www.cgcookie.com) has an extensive Blender community. (Thanks to Metalnat Hayes for this tip.)
Tip If you are interested in creating 3D models with Blender, you might try to locate a class or, even better, a local Blender community or Meetup group. For example, the online learning site CGCookie (www.cgcookie.com) has an extensive Blender community. (Thanks to Metalnat Hayes for this tip.)
Zbrush (www.zbrush.com) is another commercial program for artists. It is a complex but very capable program that allows the user to sculpt in virtual clay. Users often abandon the mouse and draw instead on a tablet with a stylus to create very sophisticated, realistic designs of animated characters and the like.
Design Considerations
Chapter 5 covers the details you need to think about when preparing a 3D printer model for upload onto a printer. But before getting into that, let’s take a step back and ask why use a 3D printer at all? What are some of the big advantages, and how can you avoid “fighting the printer” (asking it to do things it is just not meant to do)? And on the flip side, when is it a bad idea to use a 3D printer?
Complexity Is Free (but Simplicity May Not Be)
One of the mantras of the 3D-printer community is that complexity is free. Because 3D-printed parts are built up one layer at a time, it really does not matter whether that layer is one unbroken sheet or an intricate design. Consumer-level printers have one more strong advantage: the opportunity to iteratively design something, see how it came out, and then change the design if necessary. When that became possible in in the 1980s for computing in general (versus overnight batch jobs), there was a fundamental change to the process of creating software.
We all hope the same thing is about to happen for making physical things. Business models based on the ability to rapidly iterate hardware design are starting to be called hardware as a service (an analogy to software as a service). How these business models will play out in the marketplace remains to be seen. With that said, though, sometimes a print that looks simple actually is challenging to print. We talk about this some in Chapter 5 and 6, and show some examples in Chapters 8 and 10. Experience and knowing some design rules (given in Chapter 5) must be your guide.
Speed vs. Customization
The counterargument to complexity is free is that complexity may matter less in 3D printing than in conventional fabrication, but complex prints may take a long time. Consumer 3D printers take a while to print anything out—it is rare for a print of any size to take less than a few hours, and prints that take a day are routine.
If you are making one of something or a prototype for a mold, such a length of time may be competitive with that of a machinist or other professional making a prototype in a way that involves a lot of labor. But if the part is simple or you want a lot of them, a 3D-printed part is probably not the way to go. If you are happily creating injection-molded parts for something now, then a 3D-printed part is definitely not the way to go.
To narrow it down a bit more, consumer 3D printers may not be the best fit for your project if everything you do will require a lot of hand-finishing after the fact. You might consider using a service bureau to do one of the more industrial processes. To put it another way, only the right kind of complexity is free.
3D printing has a role in creating items that are by their nature one-of-a-kind (or a-few-of-a-kind) and that work well with the technology. Time will tell what the best applications are. Our sense is that one key role for 3D printing is that it makes the front of the product-development process faster. People who would have made a computer model and then created a foam-core physical mockup as two separate chores are obviously better off with a 3D printer.
Other promising markets exist in industries that make custom parts for one-of-a-kind applications (or, even better, industries that should operate that way but cannot do so economically at the moment). The biggest market now, though, is a somewhat intangible one: allowing people to make stuff again just because they want to and can. With the ready availability of small and midsized 3D printers, manufacturing may become more and more distributed—when you buy something, you may get a file to print your purchase, rather than having a piece of plastic created elsewhere and flown to you. The long-term business implications of this are just beginning to become apparent.
Summary
In this chapter you learned about the beginning of the 3D-printing process. The first step is creating or finding a 3D digital model of your object, which requires you to visit a website with objects available for download, 3D-scan something that already exists, or learn one of the many available 3D-modeling software packages. The chapter went over the various types of software packages available for the engineer versus the artist to generate a standard (STL) 3D-printing file. Chapter 5 takes that STL file through the next steps.