
![]()
Photo Editing Software
When you think of photo editing, Adobe Photoshop probably springs to mind. It is the industry standard and the ultimate in photo editing software. There are many professionals who use Adobe products because they are involved with very high-end print production, photography, or just locked into an Adobe work flow. However, for many small business owners, freelance photographers, and designers, Photoshop is either too expensive (even at $19.99 per month for the subscription service), people don’t like the idea of “renting” software, or it’s just overkill.
Since digital photography has become mainstream, the ability to work with digital images is an important aspect for most businesses. Fortunately, there are many no-cost photo editing programs to help you get best out of your digital photos. This chapter looks at several photo editing programs, ranging from simple (applying effects automatically) to professional level (with a wide range of editing capabilities).
Here’s a quick look at the programs we’ll cover in this chapter:
- PhotoScape: An entry-level photo editing tool that offers minor, easy photo corrections and a wealth of special effects filters
- Paint.NET: A lightweight yet powerful photo editor for Windows with graphics creation capability
- GIMP: A professional photo editing and graphics creation program almost in the same league as Adobe Photoshop
- Autodesk Pixlr: A family of cloud-based and mobile applications for photo editing and adding special effects
- UFRaw: A program for processing RAW images (RAW is the uncompressed format used by many higher-end cameras)
- FotoSketcher: A program that automatically creates art from photographic images
![]() Note Two helpful websites worth checking out are www.opensourcephotography.org and www.opensourcealternative.org.
Note Two helpful websites worth checking out are www.opensourcephotography.org and www.opensourcealternative.org.
PhotoScape: An Easy-to-Use Photo Editor for Beginners
If you use Windows or Mac OS and require a program to perform basic photo editing functions such as cropping, red-eye removal, adjusting contrast, etc., then PhotoScape is really worth trying out, particularity for those with little or no previous photo editing experience.
Here are a few facts about PhotoScape at a glance:
- Alternative to: Adobe Photoshop, Photoshop Elements
- Website: www.photoscape.org
- License: Proprietary Freeware
- Current Version: 3.7
- Operating Systems: Windows, Mac OS
- Potential Savings: $19.99 per month (Photoshop subscription)
Upon launching the program, you’ll be greeted with a menu that makes it easy to navigate to the desired function (Figure 4-1).

Figure 4-1. PhotoScape makes is easy to navigate to the desired function upon launching. (Used with permission © Mooiitech 2015)
Feature Highlights
Even though PhotoScape could be considered an entry-level editing application (it only has a few editing tools compared to other programs), it does offer many useful functions.
Here are PhotoScape’s features as listed on the software provider’s website:
- Viewer: View photos in your folder, create a slideshow
- Editor: Resizing, brightness and color adjustment, white balance, backlight correction, frames, balloons, mosaic mode, adding text, drawing pictures, cropping, filters, red eye removal, blooming, paint brush, clone stamp, effect brush
- Batch editor: Batch edit multiple photos
- Page: Merge multiple photos on the page frame to create one final photo
- Combine: Attach multiple photos vertically or horizontally to create one final photo
- Animated GIF: Use multiple photos to create a final animated photo
- Print: Print portrait shots, carte de visites (CDV), passport photos
- Splitter: Slice a photo into several pieces
- Screen Capture: Capture your screenshot and save it
- Color Picker: Zoom in on images, search and pick a color
- Rename: Change photo file names in batch mode
- Raw Converter: Convert RAW to JPG
- Paper Print: Print lined, graph, music, and calendar paper
- Face Search: Find similar faces on the Internet
Tools
PhotoScape has a basic toolset for performing minor retouching tasks and applying effects. One of the more useful tools is the Clone Stamp tool. It is used for removing defects and unwanted objects, or for duplicating certain parts of the image. I used it to remove the plastic pail behind the dog (Figure 4-2).

Figure 4-2. Using the Clone Stamp tool to remove the plastic pail behind the dog (Used with permission © Mooiitech 2015)
The Effect Brush is another useful tool. It can lighten or darken portions of an image (much like the dodge and burn tools in Photoshop), soften and blur areas of an image, and apply a few fun effects as well. The other tools are the Paint Brush, Color Picker, Mosaic, Mole Removal, and Screen Scroll.
![]() Note If you are reading the print edition of this book and would like to see the color versions of these figures, the PDF color plates can be downloaded from the book’s source code section on the Apress website.
Note If you are reading the print edition of this book and would like to see the color versions of these figures, the PDF color plates can be downloaded from the book’s source code section on the Apress website.
While PhotoScape just has a basic toolset, it has a rich assortment of filters, which are functions that modify the appearance of an image. There are many effects that can be created using PhotoScape’s filters. There are filters that can modify images to look like paintings or drawings, or you can apply various tones, just to name a few. Filters can give images a certain look and feel. To give the image of the cowboy a look more consistent with the Old West, I first applied a sepia tone and then one of the Vintage Effect filters (Figure 4-3).

Figure 4-3. Before and after comparison
PhotoScape lets you have fun with your images by allowing you to add Objects to your images. The Objects in the Office category (Figure 4-4) are useful for enhancing images that will be used in business communications, such as newsletters or marketing pieces. The Christmas-themed Objects come in handy when making Christmas cards, holiday-themed images, etc.

Figure 4-4. Have fun with your images using PhotoScape Objects. (Used with permission © Mooiitech 2015)
PhotoScape Support
A great starting point for learning PhotoScape is the documentation on the Help page of the website. The Intro video gives a quick tour of the functions of PhotoScape (Figure 4-5). You can access even more helpful videos under the software’s Help tab. There are also a number of PhotoScape tutorials on YouTube.

Figure 4-5. The Intro video on the Help page of PhotoScape’s website (Used with permission © Mooiitech 2015)
Paint.NET: Basic Image Editing for Windows
Paint.NET is a popular, no-cost editing program for Windows. Although still easy enough for beginners to jump into and master with a little practice, it’s a step up from PhotoScape. Anyone with experience using commercial image editing software will have a very low learning curve using this program and will pick it up in no time.
Here are a few facts about Paint.NET at a glance:
- Alternative to: Adobe Photoshop, Photoshop Elements
- Website: www.getpaint.net
- License: Proprietary Freeware
- Current Version: 4.0.5
- Operating Systems: Windows
- Potential Savings: $19.99 per month (Photoshop subscription)
Paint.NET has an interface that is somewhat reminiscent of Photoshop, but its unique focus is on being intuitive and easy to learn (Figure 4-6). Many of the functions use keyboard shortcuts that will make work faster and more efficient.

Figure 4-6. The Paint.NET interface is designed to be intuitive and easy to learn. (Used with permission © Rick Brewster 2015)
Feature Highlights
Paint.NET offers an impressive array of features and functionality for a free program. The website states that “It is one of the fastest free photo editors for Windows, with a capable feature set that stops just short of some of the professional manipulation tools.”
These are the features as described on the software provider’s website:
- Simple, intuitive, and innovative user interface: Every feature and user interface element was designed to be immediately intuitive and quickly learnable without assistance. In order to handle multiple images easily, Paint.NET uses a tabbed document interface. The tabs display a live thumbnail of the image instead of a text description. This makes navigation very simple and fast. The interface is also enhanced for Aero Glass if you are using Windows 7 or Vista.
- Performance: Extensive work has gone into making Paint.NET the fastest image editor available. Whether you have a netbook with a power-conscious Atom CPU or a Dual Intel Xeon workstation with eight blazingly fast processing cores, you can expect Paint.NET to start up quickly and be responsive to every mouse click.
- Layers: Usually only found on expensive or complicated professional software, layers form the basis for a rich image composition experience. You may think of them as a stack of transparency slides that, when viewed together at the same time, form one image.
- Active online community: Paint.NET has an online forum with a friendly, passionate, and ever-expanding community. Be sure to check out the constantly growing list of tutorials and plug-ins.
- Automatically updated: Updates are free, and they contain new features, performance improvements, and bug fixes. Upgrading to the latest version is very simple, requiring only two clicks of the mouse.
- Special effects: Many special effects are included for enhancing and perfecting your images. Everything from blurring, sharpening, red-eye removal, distortion, noise, and embossing are included. Also included is a unique 3D Rotate/Zoom effect that makes it very easy to add perspective and tilting. Adjustments are also included, which help you tweak an image’s brightness, contrast, hue, saturation, curves, and levels. You can also convert an image to black-and-white or sepia-toned.
- Powerful tools: Paint.NET includes simple tools for drawing shapes, including an easy-to-use Curve tool for drawing splines or Bezier curves. The Gradient tool, new for 3.0, has been cited as an innovative improvement over similar tools provided by other software. The facilities for creating and working with selections are powerful, yet still simple enough to be picked up quickly. Other powerful tools include the Magic Wand for selecting regions of similar color, and the Clone Stamp for copying or erasing portions of an image. There is also a simple text editor, a tool for zooming, and a Recolor tool.
- Unlimited History: Everybody makes mistakes, and everybody changes their mind. To accommodate this, every action you perform on an image is recorded in the History window and may be undone. Once you’ve undone an action, you can also redo it. The length of the history is only limited by available disk space.
- Free: Paint.NET doesn’t cost a dime!
Paint.NET can handle a number of editing tasks ranging from simple to fairly complex. It’s great for touching up images, making composite images, and correcting color and exposure, to name a few. It offers several tools for correcting exposure and color, but the most advanced is the Curves dialog, which is used to correct tonal quality and color with precision (Figure 4-7). Curves is a high-end tool usually found only in more complex image editors.

Figure 4-7. Correcting exposure using Curves (Used with permission © Rick Brewster 2015)
Paint.NET has a decent assortment of editing tools (although it lacks a few, such as the Dodge and Burn tools). Among them is a Clone Stamp tool that is essential in many image editing tasks. Figure 4-8 demonstrates its usefulness by digitally removing the date stamp from the upper right portion of the image.

Figure 4-8. Removing the date stamp using the Clone Stamp tool(Used with permission © Rick Brewster 2015)
Paint.NET employs the use of layers, which allows for the placement of graphical elements without directly affecting the original image. The layers in Paint.NET have several blending modes to choose from. Blending modes determine how the layer’s pixels interact with those of the image below. Additionally, the opacity/transparency of each layer can be controlled. This allows the use of advanced editing techniques, such as adding color to a monochrome image (Figure 4-9).

Figure 4-9. Using layers to add a hand-tinted look to a monochrome image (Used with permission © Rick Brewster 2015)
By using a dedicated layer for each element colorized, there is a greater degree of editing control. The end result is a monochrome image with a reasonably natural, hand-tinted look added (Figure 4-10).

Figure 4-10. Before and after comparison
![]() Note There are quite a few useful plug-ins that are available to extend Paint.NET’s capabilities. Plug-ins are software add-ons written by the Paint.NET community, and information about them is available on the Forum section of the software provider’s website.
Note There are quite a few useful plug-ins that are available to extend Paint.NET’s capabilities. Plug-ins are software add-ons written by the Paint.NET community, and information about them is available on the Forum section of the software provider’s website.
Graphics Creation
In addition to editing digital photos, Paint.NET is capable of creating useful graphics from the ground up. While it’s not in the league of more full-featured programs, it’s still powerful enough to render eye-catching art (Figure 4-11). There are several predesigned drawing shapes (arrows, polygons, etc.) that will aid in creating graphics.

Figure 4-11. Paint.NET is capable of creating original graphics. (Used with permission © Rick Brewster 2015)
Paint.NET Support
Paint.NET’s ease of use makes it a popular program, and based on what I’ve read while perusing the forums, users of this program seem quite passionate about it. There is a great deal of information in the Forums section, including a Discussions and Questions page. YouTube also has a number of tutorials aimed at the beginner. You can probably learn everything you want to about this program from the information available on the Web. For those who want to dig even deeper, there are several books about Paint.NET available on Amazon.
GIMP: The Premier Open Source Image Editor
GIMP (which stands for GNU Image Manipulation Program) is arguably the most powerful, full-featured, no-cost image editing program. Currently in version 2.8, it has been around since the mid-1990s. It’s very popular and enjoys a huge amount of support from the open source community. It’s still not in the same strata as Adobe Photoshop, but it comes close enough for many users.
Here are a few facts about GIMP at a glance:
- Alternative to: Adobe Photoshop, Photoshop Elements
- Website: www.gimp.org
- License: GPL
- Current Version: 2.8
- Operating Systems: Windows, Mac OX, Linux, and Unix derivatives
- Potential Savings: $19.99 per month (Photoshop subscription)
GIMP is an extremely capable image editor loaded with many high-end features normally only seen in expensive commercial editors. It’s used by enthusiasts and professionals worldwide. Figure 4-12 shows the GIMP interface on Windows 7.

Figure 4-12. The GIMP interface on Windows 7
Feature Highlights
GIMP offers a dazzling array of high-end features. Being the powerful program that it is, it isn’t as user friendly to the beginner as PhotoScape or Paint.NET. However, if you are willing to invest the time it takes to gain proficiency, it will handle just about any image editing task. Here are the features as described on the official GIMP website:
- Customizable Interface: Each task requires a different environment, and GIMP allows you to customize the view and behavior the way you like it. The widget theme allows you to change colors, widget spacings, and icon sizes, and there are custom tool sets in the toolbox. The interface is modulized into so-called docks, allowing you to stack them into tabs or keep them open in their own window. Pressing the Tab key will toggle them hidden. GIMP features a great fullscreen mode that allows you to not only preview your artwork but also to do editing work while using the most of your screen estate.
- Photo Enhancement: Numerous digital photo imperfections can be easily compensated for via GIMP. Fix perspective distortion caused by lens tilt simply by choosing the corrective mode in the transform tools. Eliminate lens barrel distortion and vignetting with a powerful filter but a simple interface. The included channel mixer gives you the flexibility and power to get your B/W photography to stand out the way you need.
- Digital Retouching: GIMP is ideal for advanced photo retouching techniques. Get rid of unneeded details using the Clone tool, or touch up minor details easily with the new Healing tool. With the Perspective Clone tool, it’s not difficult to clone objects with perspective in mind just as easily as with the Orthogonal clone.
- Hardware Support: GIMP includes very unique support for various input devices out of the box, including pressure and tilt sensitive tablets, and a wide range of USB or MIDI controllers. You can bind often-used actions to device events such as rotating a USB wheel or moving a MIDI controller’s slider. Change the size, angle, or opacity of a brush while you paint, or bind your favorite scripts to buttons. Speed up your workflow!
- File Formats: The file format support ranges from the common likes of JPEG (JFIF), GIF, PNG, and TIFF to special-use formats such as the multi-resolution and multi-color-depth Windows icon files. The architecture allows you to extend GIMP’s format capabilities with a plug-in. You can find some rare format support in the GIMP plug-in registry. Thanks to the transparent virtual file system, it is possible to load and save files to from remote locations using protocols such as FTP, HTTP, or even SMB (MS Windows shares) and SFTP/SSH.To save disk space, any format can be saved with an archive extension such as ZIP, GZ, or BZ2, and GIMP will transparently compress the file without you needing to do any extra steps.
![]() Tip There are many plug-ins available for GIMP to expand its capability. Just check out the Plug-in Registry page of the official GIMP website for a look at what’s available.
Tip There are many plug-ins available for GIMP to expand its capability. Just check out the Plug-in Registry page of the official GIMP website for a look at what’s available.
Editing Capabilities
GIMP can handle just about any kind of image editing task, from minor retouching to major image editing. GIMP has an extensive toolset, including the ones you’d expect to find, such as the Clone Stamp tool. It also includes a Healing tool, which is very helpful for touching up blemishes, lines, creases, and other flaws in portraits (Figure 4-13). GIMP can support the CMYK color model (the Separate + plug-in must be installed, however).

Figure 4-13. The Healing tool is useful for removing blemishes and other imperfections in portraits
The Perspective tool is a handy for correcting images with lens distortion, or correcting the perspective of buildings or other structures (Figure 4-14).

Figure 4-14. The Perspective tool is useful for correcting images with lens distortions or perspective problems
The image of the belfry was shot from the ground, creating a slanted look. Using the Perspective tool in GIMP corrects the problem, resulting in a much better looking image (Figure 4-15).
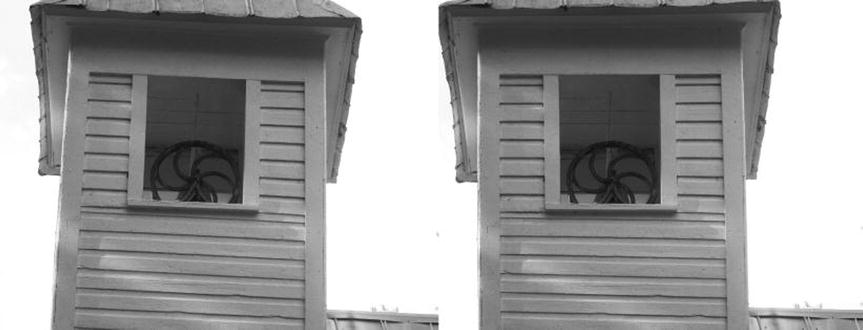
Figure 4-15. The Perspective tool corrects the slanted look of the image
GIMP is a very capable tool for creating graphics from the ground up. It hosts a wide assortment of brush styles, effects, and other functions to create impressive designs. Figure 4-16 is an example of a design I created entirely in GIMP. In the hands of good designers (and there are many designers who are better than me), GIMP can help in the creation of stunning images.

Figure 4-16. A graphic design I created entirely using GIMP
GIMP Support
GIMP is a complex application, maybe not to the degree of Adobe Photoshop, but it is complex nonetheless. Beginners who first jump into this program can be overwhelmed with the wide array of functions and features. A great starting point (aside from becoming familiar with the User Manual in the Documentation section of the website) is visiting the tutorial section. There are tutorials for beginning, intermediate, and expert users. (Figure 4-17).

Figure 4-17. The tutorials section in the GIMP website is a great place for beginners to learn some GIMP basics
YouTube is also an excellent resource for learning GIMP. There are many video tutorials posted that will help the beginner come to grips with this powerful program. There are also a number of books about GIMP. Two great beginner’s guides are GIMP for Absolute Beginners by Jan Smith with Roman Joost, and my previous book, Beginning Photo Retouching and Restoration Using GIMP (both published by Apress).
Yet another excellent resource to check out is GIMP Magazine, a free online publication. This magazine can be obtained for free either as downloaded PDF file or read online. It’s a useful publication for photographers, graphics designers, or anyone wanting to learn more about GIMP. GIMP Magazine is available at www.gimpmagazine.org.
Autodesk Pixlr: Web-Based and Mobile Device Photo Editing
Pixlr is a family of photo editors that work in your computer’s web browser or on mobile devices. There are three applications we’ll look at: Pixlr Editor, Pixlr Express, and Pixlr O-Matic.
- Alternative to: Adobe Photoshop, Photoshop Elements
- Website: www.pixlr.com
- License: Proprietary Freeware
- Current Version: Unspecified
- Operating Systems: Cross-platform (used in web browser or mobile devices)
- Potential Savings: $19.99 per month (Photoshop subscription)
Pixlr Editor
Pixlr Editor is a robust image editing tool that works in your web browser instead of downloading the software to your computer. It is similar to Paint.NET and GIMP in many respects. It offers a clone stamp and spot healing tool, drawing and painting brushes, layers, etc. Figure 4-18 shows the Clone Stamp tool being used to remove the plastic pail.

Figure 4-18. Using the Clone Stamp tool to remove the plastic pail
Feature Highlights
Pixlr Editor offers many of the features one would expect from an editor as capable as this one:
- Plenty of editing tools such as Clone Stamp, Spot Healing, Blur and Sharpen, Dodge and Burn, etc.
- Layers, layer mask, and layer styles
- Red-eye removal tool
- History (for undoing edits performed several steps previously)
Pixlr Express is a fun photo editor that works from your web browser or mobile device. This editor can handle minor photo fixes, and can add effects, overlays, borders, and text. The image in Figure 4-19 shows a photo with a film frame added to it.

Figure 4-19. A film frame added using Pixlr Express
Feature Highlights
Here’s a quick look at some of the features offered in Pixlr Express:
- Adjustments including cropping, correcting brightness and contrast, and a quick-fix feature
- Effects for giving your photos stylized looks, such as vintage, soft, etc.
- Overlays including Bokeh, Fireworks, and Grunge
- Borders including Film, Ink, and Grunge
- Stickers
- Type (text)
Pixlr O-Matic is another fun editor, and ostensibly the simplest of the Pixlr family. Like Pixlr Express, it works from your web browser or mobile device. This editor is used to add vintage and retro effects to your images. Like Pixlr Express, it also offers an assortment of overlays and borders. Figure 4-20 shows a photo with an overlay applied.

Figure 4-20. An overlay effect added to the image
Pixlr Support
The Tutorials page on the Pixlr website will probably provide you with enough support to get up to speed using Pixlr Express and Pixlr O-Matic. Both are very easy to use since most of the functions involve clicking a thumbnail to apply the edit to your image. Pixlr Editor, on the other hand, is a powerful image editor and might require additional learning resources. There are quite a few tutorial videos on YouTube that cover all three offerings of Pixlr.
UFRaw: Open Source RAW Image Editing
UFRaw is a free, open source utility for reading and working with RAW images. RAW images are largely uncompressed, “pure” image data. RAW images are also known as digital negatives. UFRaw allows non-destructive editing of your images. UFRaw can be used as a stand-alone program or as a plug-in for GIMP. Figure 4-21 shows the program as a stand-alone application.

Figure 4-21. UFRaw shown as a stand-alone application (Used with permission © Udi Fuchs 2015)
Here are a few facts about UFRaw at a glance:
- Alternative to: Adobe Lightroom
- Website: ufraw.sourceforge.net
- License: GPL
- Current Version: 0.19.2
- Operating Systems: Windows, Mac OX, Linux
- Potential Savings: $9.99 per month (Lightroom subscription)
Feature Highlights
UFRaw supports a wide variety of digital cameras, and offers a number of features that allow the processing of raw images:
- Exposure compensation
- Restore details for negative EV
- Clip highlights for positive EV
- Auto adjust exposure
- Denoise
- Grayscale mode
- Lens correction
- Base curve (imitates the functionality of Nikon’s tone curve)
- Color matrix
- Correct (curve) luminosity/saturation
- Lightness adjustments
- Crop and rotate
- EXIF data information
- Live histogram
The live histogram can show you areas of overexposure or underexposure. The image in Figure 4-22 shows that the blue color channel is overexposed by 2.9 %. By checking the Indicate box, black areas will flash on intermittently, showing which areas in the image are overexposed.

Figure 4-22. The overexposed parts of the image are indicated in the black areas. (Used with permission © Udi Fuchs 2015)
By using the Correct Luminosity/Saturation curve tool, the image is brightened up just a bit, with improved contrast (Figure 4-23). After editing your image, you can save it in the PPM, JPEG, PNG, or TIFF file format. You can also send it to GIMP (if you have it installed) to edit further by clicking the button on the bottom right (it will have Wilbur, the GIMP mascot, pictured as a small icon).

Figure 4-23. The Correct Luminosity/Saturation curve tool brightens the image and adds contrast. (Used with permission © Udi Fuchs 2015)
UFRaw Support
Most of the information you need about UFRaw is in the User Manual on the website. There are several tutorial videos on YouTube as well. The discussion forum is also a helpful avenue to seek assistance if you encounter problems.
FotoSketcher: Automatically Turn Photos into Digital Art
FotoSketcher is an easy-to-use program for the Windows platform that gives your photos an artistic look in just a few clicks of the mouse. You don’t need much image editing knowledge; just open the image and apply the filter style you want. I’ve been using it for several years, and it comes in very handy for my work from time to time.
Here are a few facts about FotoSketcher at a glance:
- Alternative to: Corel Painter Essentials
- Website: www.fotosketcher.com
- License: Proprietary Freeware
- Current Version: 3.0
- Operating Systems: Windows
- Potential Savings: $49.99
FotoSketcher offers a variety of artistic filter styles such as oil painting, color pencils, watercolors, etc. Figure 4-24 shows a close-up of an oil painting style being applied to an image.

Figure 4-24. Close-up view of an oil paint filter being applied to an image (Used with permission © David Thoiron 2015)
Rather than performing a wide range of functions , FotoSketcher’s primary purpose is converting photographic images into various types of digital art, so the list of highlights is rather short. Here’s how they read on the software provider’s website:
- 100% free
- More than 25 effects
- No artistic skill needed
- Over 6 million downloads
- Available in 23 different languages
Editing Capabilities
FotoSketcher has a rudimentary editor to adjust certain aspects of the source image, such as luminosity (brightness), contrast, saturation, blur/sharpen, and median filter (Figure 4-25). After adjusting the source image the way you want, the program applies the filter you choose to create the desired outcome on a new target image, which you can save in the JPEG, PNG, or BMP format (the source image reverts to its original state after closing the program).

Figure 4-25. Close-up view of an oil paint filter being applied to an image (Used with permission © David Thoiron 2015)
The parameters of each artistic filter can be fine-tuned, and the results appear in the preview window (Figure 4-26). You’ll be able to add a canvas-like texture, soften the image edges, and a frame if you like. After applying the Draw command, you can undo the command to reset the image if you don’t like the results.
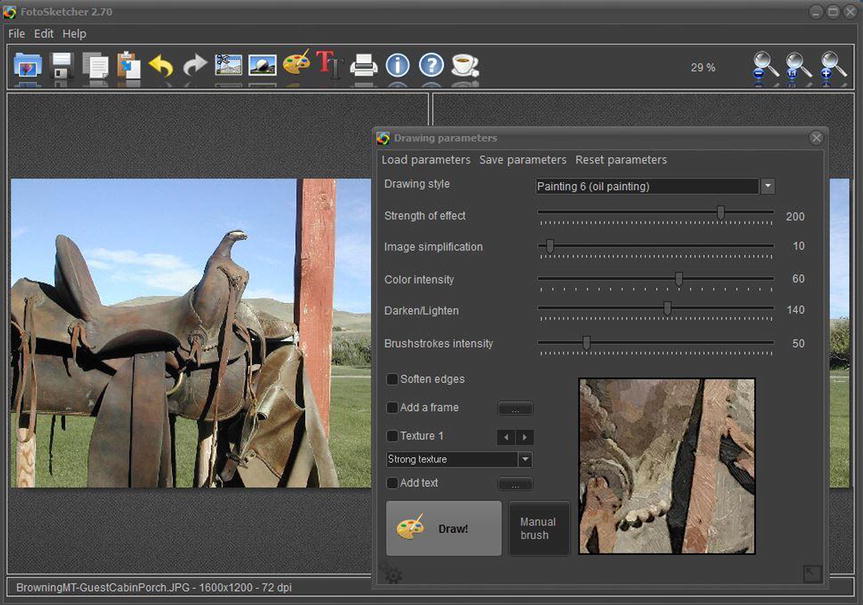
Figure 4-26. The parameters of each artistic filter can be fine tuned. (Used with permission © David Thoiron 2015)
FotoSketcher also has a text editor, which can be used to create and customize images for marketing materials.Figure 4-27 shows the image of the saddle with the Vintage filter applied and text added.

Figure 4-27. FotoSketcher includes a Text editor. (Used with permission © David Thoiron 2015)
FotoSketcher Support
This program is really easy to use. However, you’ll probably need to spend a little time experimenting with the filter parameters to achieve the results you want. The Help section of the website consists of two instructional videos (and there are numerous tutorials on YouTube as well).
![]() Note FotoSketcher should not be confused with PhotoSketcher, a paid Mac OS application. Although they are similar, the latter specializes in turning photos into digital pencil sketches. Along with FotoSketcher, there are several video tutorials about PhotoSketcher on YouTube, so it’s a good idea to pay attention to the spelling when using the keyword search box.
Note FotoSketcher should not be confused with PhotoSketcher, a paid Mac OS application. Although they are similar, the latter specializes in turning photos into digital pencil sketches. Along with FotoSketcher, there are several video tutorials about PhotoSketcher on YouTube, so it’s a good idea to pay attention to the spelling when using the keyword search box.
Summary
In this chapter, you looked at some useful free and free open source solutions for photo editing. PhotoScape is an easy-to-use editor with plenty of features. Paint.NET is a step up in functionality, reminiscent of Photoshop but far less complex. GIMP is arguably the most powerful and full-featured open source image editing program, and it is used by enthusiasts and professionals worldwide. Autodesk offers the Pixlr family of web-based and mobile device solutions for editing images and adding effects. UFRaw is an open source utility for reading and working with RAW digital images. It works as a stand-alone program or as a plug-in for GIMP. FotoSketcher is a great tool for converting digital photos into various types of art.