![]()
Getting Comfortable
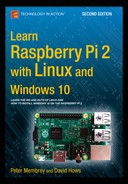
Normally we don’t start a chapter with a figure (and technically speaking we suppose we haven’t this time either) but we’re going for some good old-fashioned shock and awe. Take a look at Figure 3-1 (courtesy of Wikipedia).
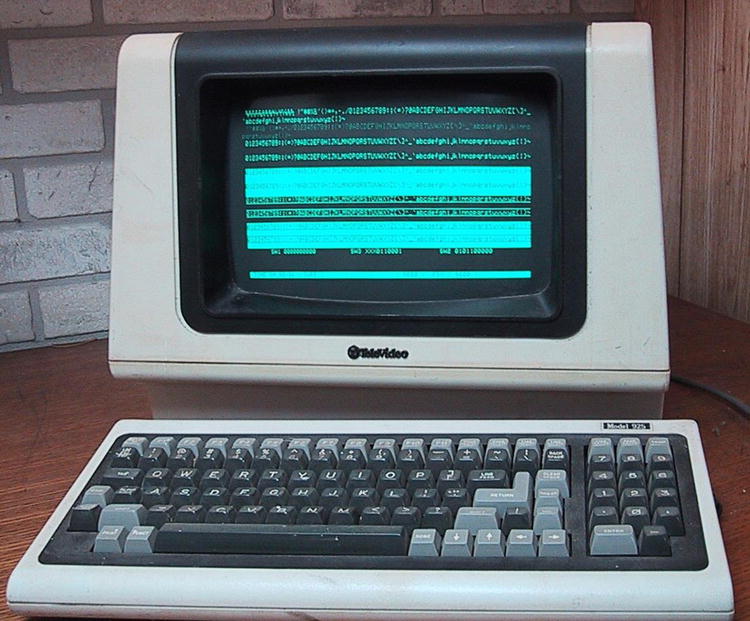
Figure 3-1. TeleVideo 925 computer terminal
You might be wondering why we thought it necessary to show you some technology from the early 80’s (late 1982 in this particular case). Well the majority of the second section of this book is all about the command line and getting you comfortable using it. Although things have improved somewhat in the intervening decades, the technology is basically the same.
In this chapter we’re going to take a really quick look at the history of computer interfaces and why the terminal has survived as well as it has. We’ll then look at the various terminals available to you and how you go about getting to them. We’ll then quickly explain the command prompt and let you in on a little known secret about the different shells that are available.
Although you can now quite literally buy a computer for $25, in the 70’s you could expect to pay at least 100,000 times that amount for a computer with any serious amount of processing power. Such machines would take up entire rooms (if not entire floors), require incredible amounts of power and generally look very impressive to passers by. A key problem that owners of these things had to deal with was one of scale.
When your computer is worth more than the building it is sitting in, you want to make sure you that you get the most out of it. One approach to solving the challenge was to use time-sharing. The idea was that compared to a human interacting with the computer, the computer was incredibly fast. In fact even though they were puny by today’s standards, they could still run rings around the people who were actually trying to use them. So this begs the question, if the computer is spending most of its time waiting for the operator to enter commands and data, could it be doing other things whilst it is waiting?
It wasn’t long before someone figured out that if the computer is sat waiting for input, it could be better utilized if there was more than one person entering data. That way, we could have multiple people entering data at the same time and then we’d no longer be limited to the speed of a single person.
Great idea, but how can we carry it out? To make it work we’d really want to put a screen in front of everyone who needs to talk to the computer and with the available computer technology even a very basic computer would be impractical. Then again, we didn’t really need a computer on their desk, we just needed a way for them to communicate with the big computer downstairs. In effect we just want a keyboard and a screen with very long cables.
Say Hello to the Dumb Terminal
That’s where the dumb terminal came in. It was called a dumb terminal because it was quite literally just a screen and keyboard. Using instructions relayed from the computer itself, it would draw the text on to the screen. Whenever a key was pressed, this would be sent to the server which would then reply with more updates for the screen. The dumb terminal didn’t have any real processing capability, it just worked as an interface and that made them relatively cheap and easy to install and maintain.
The technology did improve over the years and the dumb terminal became well, less dumb. Support for different colors and brightness was added as were fancier features for redrawing and managing the screen. However the basic concept, that of the dumb terminal just being an interface to a remote machine never really changed all that much. In fact although dumb terminals started to be replaced when more modern networks became available (not to mention computing power became much cheaper), the approach itself continued to be used in the newer systems. This wasn’t just because there was a lot of legacy systems that people had to keep using (ever see the old green on black screens in some big department stores?) but it actually had some very useful properties that continue to be useful even today.
GUIS AND TUIS
You’ll often hear people referring to GUIs (pronounced gooeys) and TUIs (pronounced tooeys) and we’ll be referring to them throughout the book as well. Fortunately this pair of acronyms is pretty straight forward and you’ll be using them yourself in no time (assuming you’d actually want to of course).
GUI is short for Graphical User Interface. Almost all modern computer systems use one in some shape or another. It used to be really easy to spot a GUI because it was pretty much any device that used a mouse. The lines have blurred somewhat in recent years as thanks to devices such as the iPad and Android smart phones, you can have a GUI that just uses your fingers. It’s now much easier to know what a TUI is as generally anything that isn’t a TUI is considered a GUI.
TUI is short for Text-based User Interface and is often used interchangeably with CLI or Command Line Interface. A TUI can present basic menu systems but those systems are navigated via keyboard control rather than a mouse.
In short, if you drive it from the keyboard and there’s no mouse pointer, it’s a TUI. If you can click, point at it with a finger or see pretty pictures, it’s a GUI.
Modern Terminals
There’s quite a bit of evolutionary history between the dumb terminals we just talked about and what we use on modern Linux systems today. In the interests of preserving your sanity (not to mention crossing the boredom threshold) we’re going to leap ahead to the modern day and show what a remote terminal looks like on your Pi (Figure 3-2):
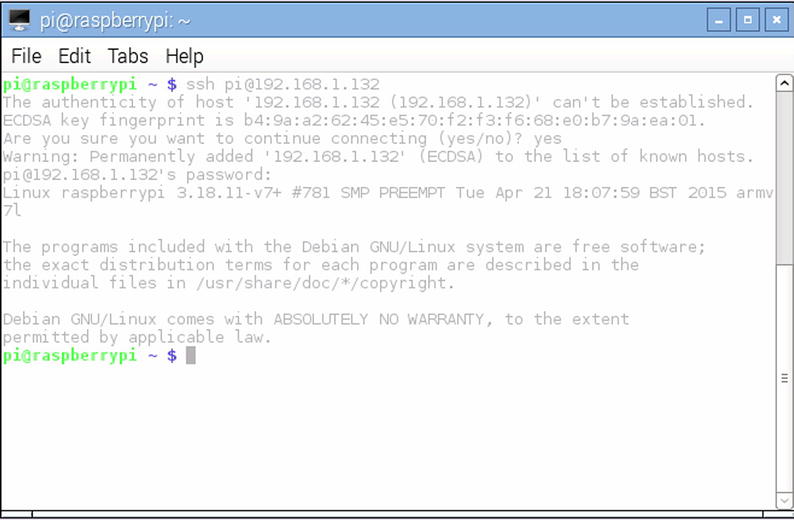
Figure 3-2. SSH connection to a Raspberry Pi
As you can see we still have a text based interface and the programs we run are all going to happen on the remote server. We do have some nicer features (we have color for a start) and we can make the terminal as big as our screen can hold (traditional terminals tended to be fixed size). In this particular case we are connected to the Pi via SSH (Secure Shell – more on this later) over TCP/IP.
So Why do We Still Care About these Things?
Good question! In the modern era of iPads, iPhones and Androids, why would we ever want to use a text based interface? For most people, especially if they have never used one before, a text based interface really sounds like something of a backward step and not a skill that they’d be especially interested in acquiring. Needless to say we are most fond of the venerable command line and here are some of the reasons why we think you should invest your time and effort in getting to grips with it.
Simple
One of the key reasons is simplicity. A text based interface is pretty hard to beat when it comes to being simple. Literally all it does is send and receive text. You won’t be using a terminal to look at your holiday snaps but it does give you a clean crisp interface to issue commands to your Pi.
Fast
You probably won’t believe us right now when we say this but using the command line interface will allow you to complete many of your tasks much faster. The reason for this is that you can be very precise and express a lot of work in a single line of text, the sort of thing that would require multiple clicks or a strange convoluted process to express using a mouse.
Lightweight
Anyone who has had the misfortune of trying to remote control a desktop PC over a slow Internet connection will appreciate exactly what we mean here. Sending screen updates across the Internet (especially for high resolution screens with lots of colors) by its nature simply takes up a lot bandwidth. It can also take a while for the data to arrive at its destination which is what gives remote sessions that unresponsive and blocky feel to them.
Text based sessions don’t suffer from this problem because they only send text. They were designed for systems where the maximum speeds were a mere fraction of what is available to us today. So even on a very slow dial-up link a remote terminal session tends to perform extremely well.
It also puts less strain on the server. Maintaining a graphical interface means the computer has to do quite a bit of work. Having a mouse pointer means the computer has to track that pointer and make sure that it reacts properly when it touches an applications window or when the user clicks a button. A surprising amount of work goes on behind the scenes and this is why Linux servers rarely have a graphical interface installed much less running.
Powerful
The command line gives you an awful lot of power. You can express complex thoughts and you can issue commands in a way that just wouldn’t be possible via a graphical interface. For example, you can string commands together to make more complex chains. You can take the output of one command and use that as input for another. This technique uses something called pipes and we cover this more thoroughly in the next chapter.
It’s Always Available
Although things have gotten better in recent years, one of the most fickle pieces of software on a Linux box tends to be the graphical interface. It always seems to be the first thing to go, and when your server stops booting and you need a rescue environment, it’s unlikely that a graphical interface will be available to you.
A terminal however is the native way to talk to Linux (and basically most other Unix like operating systems) and as such, it’s the one tool that will always be available to you in some form or another. Knowing how to use the terminal will let you get out of scrapes and deal with situations that would completely stump you if you weren’t comfortable with the command line.
Convinced Yet?
Hopefully these highlights have at least convinced you that there might be something to the command line after all. If you’re not totally convinced, that’s okay, it’s hard to really get a feel for the benefits until you’ve actually spent some time experiencing them for yourself. In the next section we’re going to cover how to actually get yourself to a command line, explain what the stuff you’re looking at means and cover some basic commands to get you started on your journey.
TERMINAL OR VIRTUAL TERMINAL?
For the most part you won’t have to worry about the differences between the two. You will almost always use a virtual terminal that is, either a terminal window inside the Linux GUI itself or connecting via SSH. The only real difference between a terminal and a virtual terminal is that a terminal is a single physical device such as a serial port or sitting at the screen directly connected to the computer (without a GUI). A virtual terminal has a device assigned to it, but there is no corresponding physical device. In fact under Linux, a new device is created and assigned to each new virtual terminal.
We’ve brought up the distinction here because some documentation (generally speaking old documentation) might refer specifically to one or the other. These days though most of your time will be spent on a virtual terminal and you won’t need to worry about the difference.
The Three Terminals
There are three main ways to get to the command line. The first is to sit physically in front of the machine and use what is often referred to as the console, the second is to open a virtual terminal inside the GUI and the third is to connect over the network using SSH.
The Console
Although the console is simply just another terminal, it is a term that has gained a somewhat mythical status over the years. When you’re working on the console you are directly working on the machine itself as it is literally a keyboard and monitor plugged directly into it.
It used to be very common for administrators to restrict certain users (such as the root user) to be able to login only when sat directly in front of the machine. As the computer was likely in a locked server room, this provided an additional level of security.
Most distributions do not come with this sort of security enabled and now that remote access over the network is the norm (and sometimes an administrator doesn’t even have physical access or the machine is on the other side of the planet), this feature is far less useful.
Still, if you are sitting in front of your Pi you can access the console by holding down the control (ctrl) and alt keys and then pressing F1 through to F6. F7 by default is where the GUI lives so once you have finished with the console you can flip back to your GUI.
When would you need to do this? Well, if you are unable to connect to your Pi via the network and you’re having trouble with the GUI, the console will be your new best friend. But generally speaking? You won’t be using the console very often if at all. Getting a command line through the other two methods is easier and more flexible as often at least one of those options will be available to you.
Opening a Virtual Terminal in the GUI
Raspbian uses LXDE, the “Lightweight Desktop Environment”. As its name suggests it focuses on being lightweight which is just want you want when your computer sits squarely in the feather weight category!
The native terminal for LXDE is called LXTerminal and fortunately for us it not only comes preinstalled but it also features on the taskbar as per the following screenshot (Figure 3-3):

Figure 3-3. Finding LXTermianl
We took the liberty of double clicking the icon and you can see that we have what can only be described as a working terminal. Of course there’s really not too much to show in this case as a terminal is by definition pretty simple. You will probably find yourself using the terminal a fair bit if you’re planning to sit in front of the Pi and use it as a more traditional computer. If you’re thinking more about working remotely, then you need the next section which is quite honestly a lot more interesting…
Connecting via SSH
SSH is a great way to connect securely to your Pi over the network (see “What’s so special about SSH?”). It gives you all the benefits of a virtual terminal but you can access it from any machine on the network. Potentially this means you could connect to your Pi at home from your work PC and fiddle about with it in complete security. We find that SSH is by far the most common way we interact with servers in general and as most people will use the Pi as a headless device (i.e. no keyboard or mouse attached to it – maybe not even a monitor), we think SSH will be the primary candidate for you as well.
There are two parts to the SSH equation. You need an SSH server and you will need an SSH client. Fortunately both are freely available and easy to set up.
Setting up an SSH Server on the Pi
This one is actually very straight forward because unless you specifically disabled it when you installed Raspbian, the SSH server will already be running (Raspbian enables it by default). In fact all you actually need at this stage is to find out what the IP address of your Pi is.
One of the nice things about covering the Pi’s virtual terminal first is that we can now use that to figure out what our IP address is. The Pi takes advantage of DHCP (Dynamic Host Configuration Protocol) which means that on the vast majority of networks it will be able to sort out an IP address for itself. This not only saves us time but also means you don’t need to figure out how to choose an appropriate address and then configure it. The marvels of modern technology!
To find out the address we’re going to use the ‘sudo ifconfig’ command. This command (short for “interface configuration”) will (perhaps unsurprisingly) show you the configuration of your network interfaces. Here’s what it looks like on our Pi (Figure 3-4):
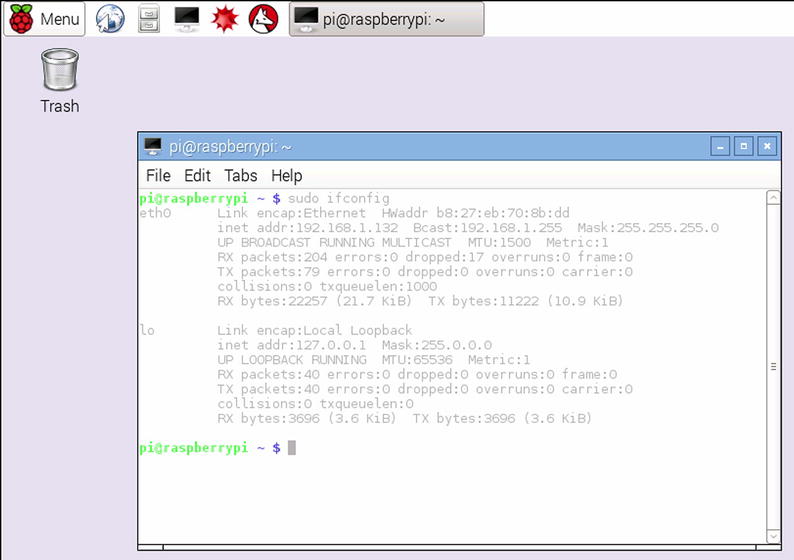
Figure 3-4. Running ifconfig on our pi
Here you can see that we have two network interfaces. The local loopback device (or ‘lo’ to its friends) is a virtual interface that network applications can use to talk to each other on the same machine. As no hardware is involved, it’s more efficient to use the lo interface as well as it being always available and configured in the same way. Under Linux most system services (such as printing and even the GUI) operate as client/server applications and make extensive use of this interface.
Right now though we’re not all that interested in the lo device, we’re far more interested in the network interface that connects the Pi to our physical network. eth0 (short for Ethernet device number 0 – remember computers tend to start counting at zero) represents our link to the real world. At this stage we won’t bore you with what all the information means and it’s not really something you would look at on a regular basis. The most common reason for running ifconfig is to find out the IP address and that is of course why we are here. From the screenshot above you can see the line:
inet addr: 192.168.1.132 Bcast: 192.168.1.255 Mask: 255.255.255.0
We’re really only interested in the IP or inet address which in this case is 192.168.1.132. Armed with this piece of information, we should be able to connect to the Pi from anywhere on your network.
Sorting out an SSH Client
We are making the assumption that you’re either connecting from a Windows PC or from a Mac. If you are using a different operating system, then don’t panic, there is probably a suitable client for you to download. You can still follow along with the other two tutorials as regardless of which client you use (or on which platform) the general process is the same.
Putty for Windows
Putty is pretty much the standard that all other SSH clients are compared against and for good reason. Not only is it full of features but it also happens to be free. You can download Putty from this address:
http://www.chiark.greenend.org.uk/~sgtatham/putty/download.html
As it is a little long for typing, you can get a similar result by searching Google for “Download Putty”. Once you get to the download page, you will want to get the first link on the page, putty.exe (Figure 3-5):
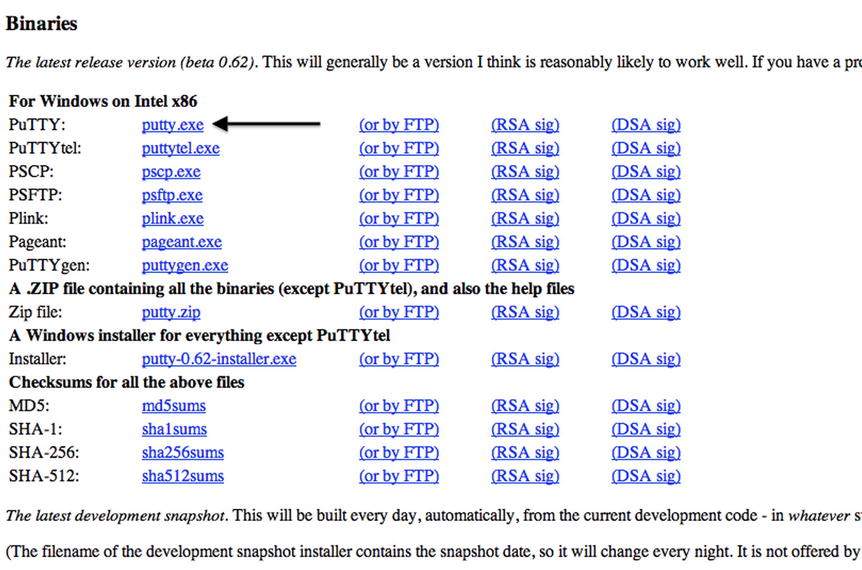
Figure 3-5. Downloading Putty
Putty is a standalone tool, so you can run it as soon as you’ve downloaded it, you don’t have to install anything on your machine. This is generally pretty useful because it means you can stick it on a USB stick and carry it around with you and you can generally run it on other machines without needing Administrator privileges (i.e. there’s nothing to install). However if you keep losing track of Putty (it’s amazing how easy it is to do) you might want to download the “Installer” version which will install it on your machine and set up the Start Menu and Desktop shortcut icons for you.
Now that we have Putty, it’s time to fire it up. Double click on the icon and you will probably see something that looks a lot like this (Figure 3-6):
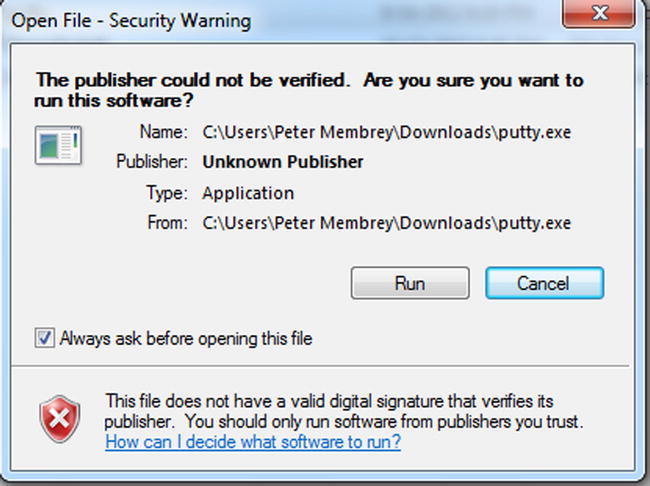
Figure 3-6. Windows getting excited
Windows is just warning you that the program hasn’t been digitally signed. You’ve probably come across this one before but when you’re installing some supposedly security enhancing software, the last thing you want to do is install something unpleasant instead. In this case, the official version of Putty isn’t signed and you can ignore this error. If you plan to use Putty a lot, you should probably untick the “Always ask before opening this file”. Trust us, if you don’t do it now, you will after ten or eleventh time you run it.
After you’ve convinced Windows to stand down, you’ll get a connection box that looks like this (Figure 3-7):
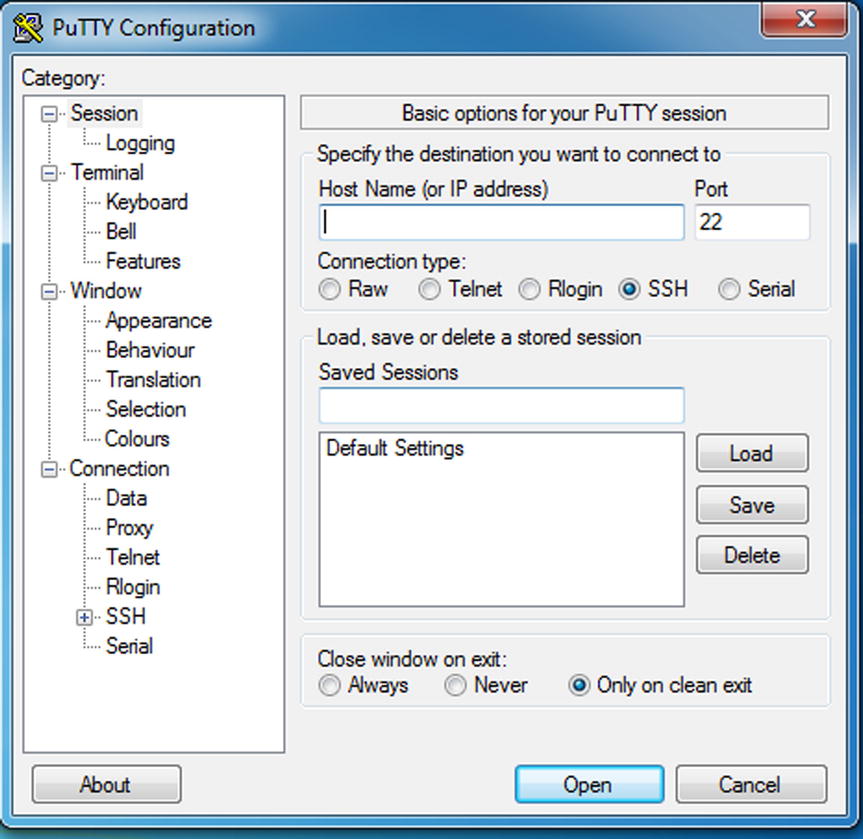
Figure 3-7. Starting up Putty
The default settings are fine for connecting to your Pi, you just need to supply the IP address we discovered earlier. Punch this into the “Host Name (or IP address) box and then click on Open. As this will be the first time this particular machine has connected to your Pi you will get a warning similar to the one below (Figure 3-8):
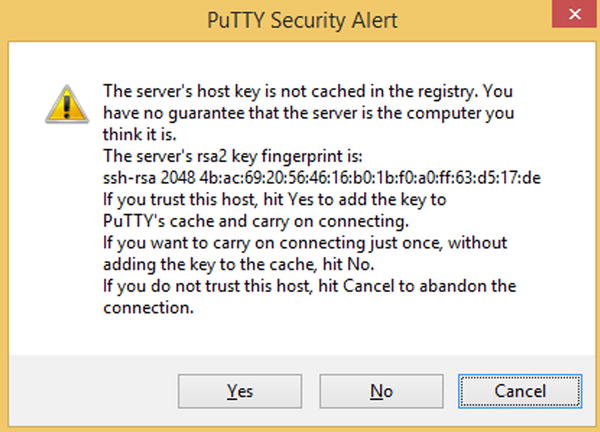
Figure 3-8. Security warning when connecting for the first time
Don’t worry, this is part of SSH’s security system. It is letting you know that it hasn’t seen this particular server before (well it wouldn’t have would it?) and is showing you the key for confirmation. We don’t know anyone who has memorized their SSH fingerprint (although remembering the first four and last four digits goes a long way to making sure you have the right one) and in any case we were expecting to see this warning. Once Putty has remembered the key, it will check it against the IP address and hostname each time you connect in future. If the remote server ever sends back a different fingerprint, Putty will warn you that there could be a problem. More often than not, this occurs when you rebuild or buy a new server and so you know why the key has changed. If you see a warning and you can’t think of a good reason for it, then think very carefully before logging into that machine. In our particular case, we know the key will be new so we can simply select “Yes, Save Key”.
Now you will be back to a somewhat familiar black screen with some text. So far it will only be:
Username:
As we haven’t gotten around to setting up different user accounts we’re going to login as the ‘pi’ user so just enter pi and press Enter. So far so good. Now we just need to provide it with the password you set when you did the initial install. Now we know that you changed the password like we suggested (you did right?) but just in case you didn’t, the default password is raspberry. Punch the password in, press Enter and at long last we should have what we’re looking for, the command prompt:
pi@raspberrypi ~ $
If you don’t have a Mac (or aren’t particularly interested in using SSH from one), jump ahead to the next section – the command prompt.
LOOK BEFORE YOU LEAP
This falls under the “obvious until proven otherwise” category but when you’re working with remote terminals, it is disturbingly easy to get disorientated and start running commands on the wrong machine. If you are trying to reboot the Pi on your desk you don’t want to accidentally reboot something else such as a corporate server (you never know where you new Linux skills will take you!).
SSH on the Mac
If you’re using a Mac rather than a PC, you won’t be able to use Putty. That’s not a problem because thanks to its Unix roots, the Mac comes with a good SSH client built in. All we need to do is open a Terminal window and run the SSH command.
First, let’s get Terminal up and running. You can find it in the “Utilities” directory inside “Applications”. You can also find it by using Spotlight (the magnifying glass at the top right of the menu bar and typing in “Terminal”.
You’ll find that it’s not too different from the terminal you were using on the Pi and there’s a good reason for that. As we mentioned earlier, the Mac is actually based on Unix just as Linux (and hence Raspbian) is. Although the Mac does a good job of keeping its Unix side well hidden (you can use a Mac for years and never come across it) you might want to dig into it a bit more if you find Linux and the command line to your liking.
Now that we have Terminal open, let’s connect it to your Pi. We’re going to use the ssh command and because there is no GUI, we’re going to have to specify the relevant options on the command line itself. Based on our previous example, your Terminal should look something like this (Figure 3-9):

Figure 3-9. Connecting to your Pi over ssh
To save space, the screenshot above shows the whole process rather than just an empty terminal window. The bit we’re interested in right now is at the very top:
$ ssh [email protected]
The command itself is ssh but we have provided some additional information; the user and IP address that we want to connect to. You can read the options as “user pi on server 192.168.1.132”. A bit like an email address, it is a nice succinct way to show who we want to connect as and where we want to connect to. You should of course replace our IP address with the one of your Pi.
The first block of text is something you’ll see whenever you connect to a new machine:
The authenticity of host '192.168.1.132' can’t be established.
ECDSA key fingerprint is b4:9a:a2:62:45:e5:70:f2:f3:f6:68:e0:b7:9a:ea:01.
Are you sure you want to continue connecting (yes/no)? yes
Warning: Permanently added '192.168.1.132' to the list of known hosts
[email protected]'s password
This is just ssh’s way of warning that you it can’t determine whether you’re connecting to the server you think you’re connecting to and shows you the key that the server used to identify itself. In this case you can ignore the warning and say yes. If you want to know a bit more about what it all means, we covered it briefly in the SSH on Windows section. After you enter your password (raspberry is the default) you should end up at the following prompt:
pi@raspberrypi ~ $
Now that you have your command prompt, we’re going to look at what it actually means.
WHAT’S SO SPECIAL ABOUT SSH?
SSH or Secure Shell is the defacto standard for accessing any Unix like machine remotely. It is even supported by many network enabled devices such as printers and high-end switches. The reason why it is so popular is because it encrypts all the data between your computer and your server. If someone is listening to your connection, all they will get is garbage. It also allows you to authenticate the server is the server you think it is.
Before we had SSH, everyone used telnet. This is a very simple protocol and doesn’t have any sort of encryption. This meant that if anyone could see your traffic (think public machines or WIFI access points), it would be possible to simply read your password off the network in clear text. Telnet also had no way to confirm the identity of the machine you were connecting to which meant you could never be sure that you weren’t accidentally providing your username and password to somebody else.
It is still possible to install a telnet server on Linux but this is highly discouraged. There really is no good reason to prefer telnet over SSH and so you should always use SSH when working on your server remotely.
Welcome to the Command Line
Whichever route you take to get to a terminal, the end result will ultimately always be the same, that is, you’ll end up sitting at a command prompt (or simply prompt) that will look something like this:
pi@raspberrypi ~ $
There is actually quite a bit of information here but what does it all mean? You can probably figure most of it out from what we’ve been doing so far in the book, but for completeness, here is how it breaks down.
The first part (pi in the example) is the username. This isn’t especially useful (or awe inspiring) when you only have a single Pi and a single user. It is however quite useful when you end up having to manage many users or when you have a variety of accounts of different machines. This is where the second part comes in (raspberrypi in the example) as it tells us the hostname of the machine we’re connected to. Together, this let’s us know who we are and where we are. Again, not terribly useful with one Pi, but this information will come in handy some day.
![]() Caution We’ve highlighted this elsewhere, but it’s so important we’re going to say it again. When you have more than one terminal open, it is all too easy to run a command on the wrong server. Sometimes you end up running more than one command before you realize your mistake. Often no harm is done, but if you accidentally reboot a critical server at work when you actually meant to reboot your Pi, you’re going right to the top of your IT department’s revenge pending list.
Caution We’ve highlighted this elsewhere, but it’s so important we’re going to say it again. When you have more than one terminal open, it is all too easy to run a command on the wrong server. Sometimes you end up running more than one command before you realize your mistake. Often no harm is done, but if you accidentally reboot a critical server at work when you actually meant to reboot your Pi, you’re going right to the top of your IT department’s revenge pending list.
The next item on the prompt (the ~ or tilde) actually tells us which directory we’re currently in. The tilde is a special case as it refers to the home area of the current user. You can think of it as short hand because really that’s all it is. Any time you refer to your home directory (which in this case is /home/pi) we can simply replace it with the tilde. Time for a quick example:
pi@raspberrypi ~ $ pwd
/home/pi
pi@raspberrypi ~ $ cd ~
pi@raspberrypi ~ $ pwd
/home/pi
pi@raspberrypi ~ $
Here we used the ‘pwd’(short for “print working directory”) which prints out the full path of the directory we’re currently in. In our example, it printed out /home/pi as that’s the pi user’s home directory. We then used the ‘cd’ command (short for “change directory”) to go to the ~ directory. We used ‘pwd’ again and were able to verify that after changing directory we were back where we started. We’ll be explaining these commands more thoroughly in the next chapter, but isn’t this command line stuff at least a little bit interesting?
When referring to the ‘~’ in general speech, you refer to it as “home directory”. So if you were sat at the prompt in our example and someone asked you what directory you were in, you would say you were in your home directory or if you wanted to be explicit you would say that you were in the pi user’s home directory. If you wanted to get really specific you could even mention the hostname as well. You wouldn’t say that you are in the tilde or “wiggly line” directory.
However when you are giving someone a path to enter you would say tilde. For example if you wanted the user to go to “~/test/” you would say “type cd space tilde slash test slash and then press Enter”. This is because tilde in this case refers to something specific which you are using as a convenience to get to a location, rather than actually telling someone what that location is. It also helps prevent confusion with relative paths, but again, that’s something for the next chapter.
![]() Note We’ve heard tilde pronounced as both “tilled” and as “till-duh” so you should expect to hear both of these in the wild. Interestingly though, you might find that whichever one you use, people might have trouble understanding you and this applies even to experienced administrators. It’s not because you’re pronouncing it wrong, it’s just they don’t know that the “wiggly line to the left of the 1 key” is actually called tilde. If you find yourself in that situation, referring to it as “the wiggly line one” seems to be a fairly safe bet.
Note We’ve heard tilde pronounced as both “tilled” and as “till-duh” so you should expect to hear both of these in the wild. Interestingly though, you might find that whichever one you use, people might have trouble understanding you and this applies even to experienced administrators. It’s not because you’re pronouncing it wrong, it’s just they don’t know that the “wiggly line to the left of the 1 key” is actually called tilde. If you find yourself in that situation, referring to it as “the wiggly line one” seems to be a fairly safe bet.
The last part of the command prompt shows you what your access level is. Linux systems are pretty basic when it comes to system privileges. It can generally be summed up as you are either the root user or you’re not. If you are root, then you can do pretty much anything you please without let or hindrance. If you are any other user, expect to find your abilities drastically curtailed. This isn’t as true today as it once was because there are tools such as `sudo’which allow an administrator to grant the ability to run certain commands with root privileges without that user having access to the root account. Of course ultimately, sudo runs as root and it just decides whether or not it will run the command that you asked it to, so really it still obeys the all or nothing rule.
From the prompt’s perspective, if you are a normal user, you get a dollar sign as a prompt. We’re logged in as the pi user (which obviously isn’t the root user) and so we too have the $. If we were logged in as root, we would be a privileged user and so we would get the hash symbol (or pound sign if you’re not from the UK). A root prompt looks like this:
root@raspberrypi ~ #
The hash symbol is a sign (and a warning) that you are running with elevated privileges and that you should therefore be very careful about what you type. The prompt also shows the username as root which provides an added indication. However, these subtle hints are easy to miss (people don’t tend to study the prompt before each command) and so again, always check who and where you are before press the Enter key.
That’s really all there is to the prompt. Most shells allow you to customize it to show different information and occasionally some administrators do change this. In our experience, most people don’t bother and we rarely feel the need to change it ourselves. The reason we’re bringing it up here is because if you ever do login to another Linux machine and the prompt is wildly different, it’s not a cause for concern. The terminal works in exactly the same way, just the prompt has been customized.
Different Shells
Okay, maybe we over simplified things when we said that all terminals work alike. In truth there are some minor differences, especially in what features they support, but more often than not you won’t notice. In fact, what will likely catch you out is when the remote machine is using a different shell. A shell is a program like any other but rather than being a tool for browsing the web or reading email, it provides a command line for you to interact with the operating system. It operates like a wrapper around the kernel and that’s how it got its name – by being the shell around the kernel just like a peanut.
So far we’ve been making use of the BASH or Bourne Again Shell. It is by far the most popular shell in use today and it’s available on every Linux distribution. It’s also usually the default which is why you’ll never have to worry too much about which shell your system is running.
The reason we’re bringing this up here is because like everything else in the Open Source world, opinions vary on what makes the best shell. Some take a bare bones approach and only support the most basic features while shells like BASH come with batteries included and have more features than you can shake a stick at. Despite BASH’s popularity it is conceivable that at some point in your illustrious Linux career you might come across something else and forewarned is forearmed.
We’re not going to spend any more time looking at the different shells because quite honestly you’ll probably never need to worry about it. Even if a machine is using a different shell, you can probably start BASH to replace it (most systems have BASH installed even if you get a different shell when you login). As system commands are the same regardless of which shell you use, even if you can’t get to BASH you’ll probably find you can do everything you would normally do. In fact, most shells are interchangeable for the most part and chances are even if you were using another shell, you probably won’t even know it!
Summary
This chapter introduced you to the terminal and its rich (if not exactly fascinating) history. We then discussed how the terminal is still used today and how it has been adapted to suit our modern needs. We then looked at the three main ways that you can get to a terminal on your Pi, mainly the console, a virtual terminal and over the network via SSH. Next we had a quick description of the command prompt and touched on some interesting commands to highlight a point (which we absolutely promise will be explained when you turn the page) and finally we wrapped up the chapter by giving you a heads up about the different shells out there and how they may (but probably won’t) trip you up.
Coming up in the next chapter is all you need to know to happily navigate around your Pi, create files, modify files, delete files and much more. This is where we start to get really serious about the command line and where you’ll start picking up some real hands on skills.