
![]()
TOR
Over the course of this book we have discussed a number of different ways in which you can tailor the Raspberry to be solve problems in your every day life. Many of these projects were about finding ways to use your Raspberry Pi around the home to provide solutions to little problems. In this chapter we are going to talk about the use of Tor software, which can not only be used at home but also while out and about to protect your privacy.
With the aim of protecting your privacy in mind, its probably best to go over what TOR is and how it works. TOR is short for The Onion Router, which is a piece of software designed to allow anonymous internet communications to protect your privacy. Now, many of you will ask “why would I need this at home” and the truth is that under normal circumstances people should not need a privacy protections in the home. Sadly, there are certain circumstances when you may wish to ensure anonymity and privacy. There have recently been a number of publicised cases where ISP’s have been using spy software and injecting permenant tracking cookies into their customers internet traffic. This is done as the browsing habbits of users can be sold to advertising companies who are able to use this data to create more targeted avertising profiles.
Outside of the doom and gloom of ISP’s spying on you, the next major use of the TOR software would be while traveling. This is really where the Raspberry Pi shines due to its size, portability and low power requirements. Imagine you are traveling and need to connect to your bank to quickly transfer some money to continue your life of enjoyment on the road. Currently, you are staying at a little hotel that has a pair of public computers available for any member of the hotel to use. As you can imagine, these may not be the best computers to use as you cannot know what virsues or other nasties are installed on this PC. Moreover, you cannot know what other things are lurking on the network to capture your banking details for malicious purposes. This is where TOR and your Raspberry Pi come in to save the day, you can quietly connect your Pi in place of the PC, using its USB for power, monitor, ethernet, mouse and keyboard to gain connectivity to your known safe environment. You can then use the TOR system that we will go over installing and configuring within this chapter to browse with anonymity and security.
If the hotel provided WiFi and had a HDMI enabled TV you could connect your Pi to the TV and to the greater internet using a wireless adapter (like the one we covered in Chapter 9: WiPi) and a small portable mouse and keyboard set. This way you can browse from the comfort of your hotel room while still remaining safe and secure.
What is TOR
Up to this point, I can imagine you are all saying “Wow. What is this magical wonderful piece of software and how does it actually work to protect my privacy?”. The Onion Router is more than a funny Shrek reference, it gives an insight into how the software works (see Figures 13-1 and 13-2).
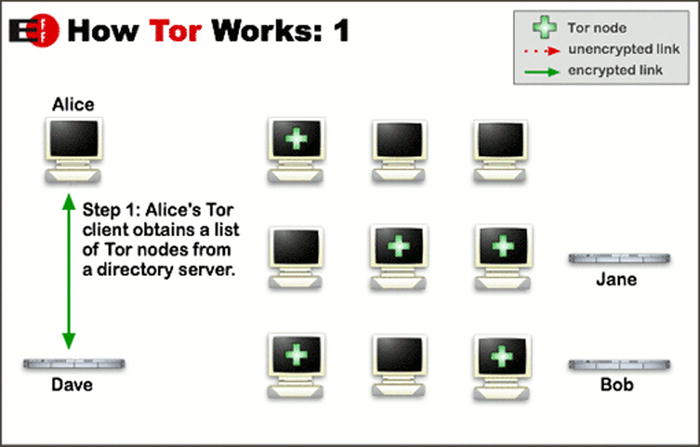
Figure 13-1. How Tor Works, part 1
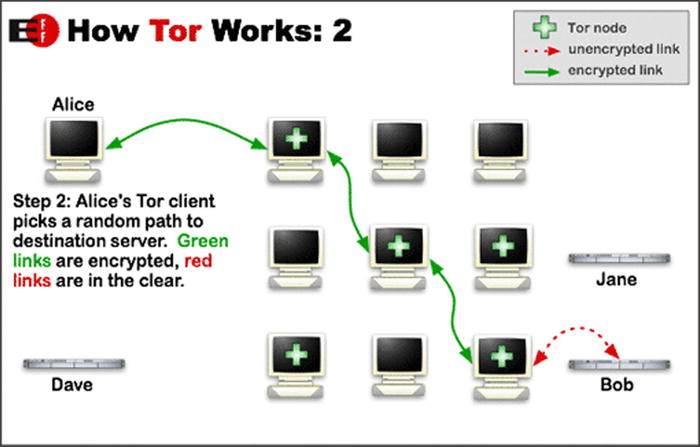
Figure 13-2. How Tor Works, part 2
TOR works by there being a number of specialised user run servers (called relays) spread over the internet that you can connect to and a directory server which knows about all of the various relay servers. You (the end user) connect to the directory server, downloads a list of all relays and create a “virtual circuit” of a number of different relays.
The software then takes an internet request and wraps it in a number of layers of encryption (see the onion metaphore coming into play here!). This big blob (onion) of layered encrypted data is then sent on to the first relay in the virtual circuit which removes the top layer of encryption revealing to it the second relay in the circuit. The first relay forwards the now slighly smaller onion onto the second relay and the process repeats until it gets to the last relay in the circuit.
The last relay in the circuit can then send the original unencrypted internet traffic off to the end destination. The traffic can then follow backwards along the same path using the same encryption methods as before. As each node will only ever know the next node in the sequence there is no way for any one relay in the circuit to determine where both the origin and destination are. As all of the traffic between individual relays is encrypted the contents of the communication is safe from eavesdropping.
As you can see, the onion like TOR system provides quite a good solution to granting anonymous and secure internet connectivity. It does have a weakness however; TOR provides adequate security only when there are a number of users on the TOR network at any given time. Unless there are a number of users using the various relays at a given time it is theoretically possible for someone at the end node or destination site to potentially discern the original user. If you think back over the previous examples of how TOR works, imagine if there was only one user in amongst all of those nodes. With knowledge of who is on the network it would be quite easy to see where that one and only person is sending traffic. Thankfully for everyone using TOR there are estimated to be about 2 million people directly connecting to TOR from various countries around the world at any given time of the day.
As with any piece of software that you wish to use, we first need to install it. And before installing any new package we should look to update your system software to the latest version, so you can go ahead and run the following commands to get your system up to date. Of course, you may not need to run these commands if you have updated recently. Remember that if you have to run rpi-update you may need to reboot following.
sudo apt-get update
sudo apt-get upgrade
sudo rpi-update
With your system updated we can look to get TOR installed and working. There are a number of ways you can go about getting TOR installed for your use, and by far the easiest way (according to the TOR Projects webpage) is to install the TOR Browser Bundle. This bundle comes with the TOR application installed and a specialised browser that’s configured to work with the TOR application. Unfortunately for us, this package is not setup to work with the Raspberry Pi yet, so we have to take a slighly different approach.
To start with, lets install the core TOR application which does all the routing and relay discovery that we disucssed earlier. To do this run the following commands:
sudo apt-get install tor
Reading package lists... Done
Building dependency tree
Reading state information... Done
The following extra packages will be installed:
  tor-geoipdb torsocks
Suggested packages:
  mixmaster xul-ext-torbutton socat tor-arm polipo privoxy apparmor-utils
The following NEW packages will be installed:
  tor tor-geoipdb torsocks
0 upgraded, 3 newly installed, 0 to remove and 4 not upgraded.
Need to get 2,589 kB of archives.
After this operation, 7,024 kB of additional disk space will be used.
Do you want to continue [Y/n]? y
Once the install process is finished the TOR application will automatically be booted up and running. The first thing we should do is check that the process is running, so run the following command to list all running processes and search specifically for the to process
ps –ef | grep /usr/bin/tor
You should see something like the following in your console:
109 14591 1 1 22:01 ? 00:00:09 /usr/bin/tor --defaults-torrc /usr/share/tor/tor-service-defaults-torrc --hush
This shows that the TOR application is up and running. Now that we have confirmed that the application is running we should go and investigate the log. You can use the command below to open the log (remember, press q to quit the less application)
less /var/log/tor/log
When looking over the log you want to see something like this at the bottom of the file. These lines state that TOR has been able to get enough directory information to build a circuit, it was able to connect to the TOR network and successfully open a circuit. These are the basic functions that the TOR application needs to perform and indicate that everything is up and ready for use.
Jul 08 22:02:10.000 [notice] We now have enough directory information to build circuits.
Jul 08 22:02:10.000 [notice] Bootstrapped 80%: Connecting to the Tor network.
Jul 08 22:02:10.000 [notice] Bootstrapped 90%: Establishing a Tor circuit.
Jul 08 22:02:12.000 [notice] Tor has successfully opened a circuit. Looks like client functionality is working.
Jul 08 22:02:12.000 [notice] Bootstrapped 100%: Done.
Using TOR
So, now that we have TOR installed we need to start using it. As we discussed earlier we cannot get the pre-installed and configured browser to use. As such we need to go and manually configure our browser to use TOR. We will be configuring the default browser that is included with the Raspberry Pi called Epiphany to use TOR with the method suggested by the TOR Project; setting your Linux system up to use TOR as a transparent proxy.
So, the first step to getting this process going is to change the TOR applications settings slighly. We want to setup TOR to be a “Transparent Proxy”, which basically means a passthrough to the wider internet. We also want TOR to be doing DNS Resolution, which effectively means allowing TOR to work out how to get to www.apress.com. To do this we add the following 4 lines to /etc/tor/torrc
VirtualAddrNetworkIPv4 10.192.0.0/10
AutomapHostsOnResolve 1
TransPort 9040
DNSPort 53
After making these changes we need to restart the TOR application with the following command:
sudo /etc/init.d/tor restart
Once the TOR daemon has restarted it’s a good idea to go back and check the log to confirm all is well. So go back and check /var/log/tor/log for the same messages about successfully bootstrapping that we looked for in the Installing TOR section of this chapter. The next step is to setup the systems DNS to use the TOR proxy, however before we go ahead and change things we need to make a backup of our current settings – for when we want to go back. We create the backup with:
sudo cp /etc/resolv.conf /etc/resolv.conf.bkp
To go back you can simply replace the resolv file with your original
sudo cp /etc/resolv.conf.bkp /etc/resolv.conf
Now that the backup is made we can go ahead and change the nameserver entry to be 127.0.0.1 as below:
nameserver 127.0.0.1
This is a special address in computing and is called a loopback addres – which is effectively a self-reference. The upshot of using this address is that when any DNS resolution is performed it will go to TOR and be routed out. With the loopback address in place we need to setup a method for routing all outbound network connections over TOR. To do this we will use an application called iptables to setup some local firewall rules to route data over TOR. Below is a small script written by the TOR Project designed to rout all outgoing connections over TOR. Before getting going we need to ensure that we exclude any local network addresses from being routed over TOR. This is exceptionally necessary if you are connecting over SSH, as you may end up sending all data intended for your local network out via TOR – where it will fail to work.
This change is only temporary and will vanish upon reboot. If you want to make this change permanent then you need to edit /etc/resolvconf.conf and uncomment the line reading name_servers=127.0.0.1. This will tell your system to read from local name servers upon boot.
To make this change we simply add extra variables to the _non_tor variable in the script below to include your local IP ranges. The script below includes 3 of the most common IP ranges. These are IP’s that match 192.168.0.X 192.168.1.X and 10.0.0.X. You can add others if needed.
#!/bin/sh

### set variables
#destinations you don't want routed through Tor
_non_tor="192.168.1.0/24 192.168.0.0/24 10.0.0.0/24"
#the UID that Tor runs as (varies from system to system)
_tor_uid=`id –u tor`
#Tor's TransPort
_trans_port="9040"
### flush iptables
iptables -F
iptables -t nat -F
### set iptables *nat
iptables -t nat -A OUTPUT -m owner --uid-owner $_tor_uid -j RETURN
iptables -t nat -A OUTPUT -p udp --dport 53 -j REDIRECT --to-ports 53

#allow clearnet access for hosts in $_non_tor
for _clearnet in $_non_tor 127.0.0.0/9 127.128.0.0/10; do
   iptables -t nat -A OUTPUT -d $_clearnet -j RETURN
done

#redirect all other output to Tor's TransPort
iptables -t nat -A OUTPUT -p tcp --syn -j REDIRECT --to-ports $_trans_port

### set iptables *filter
iptables -A OUTPUT -m state --state ESTABLISHED,RELATED -j ACCEPT

#allow clearnet access for hosts in $_non_tor
for _clearnet in $_non_tor 127.0.0.0/8; do
   iptables -A OUTPUT -d $_clearnet -j ACCEPT
done

#allow only Tor output
iptables -A OUTPUT -m owner --uid-owner $_tor_uid -j ACCEPT
iptables -A OUTPUT -j REJECT
Once you have confirmed that all the needed excluded addresses are in the _non_tor variable we can go ahead and run the script to setup TOR. So go ahead and write that script out to a file tor.sh, then execute the script with the following command
sudo sh tor.sh
Now that TOR has been setup we sould go ahead and check that we are correctly using TOR (Figure 13-3). Again, the TOR Project comes to the rescue, they have provided a great website to visit that you can visit to confirm you are connected to TOR correctly. So go ahead and direct your browser to https://check.torproject.org/ and confirm that your output matches Figure 13-3.
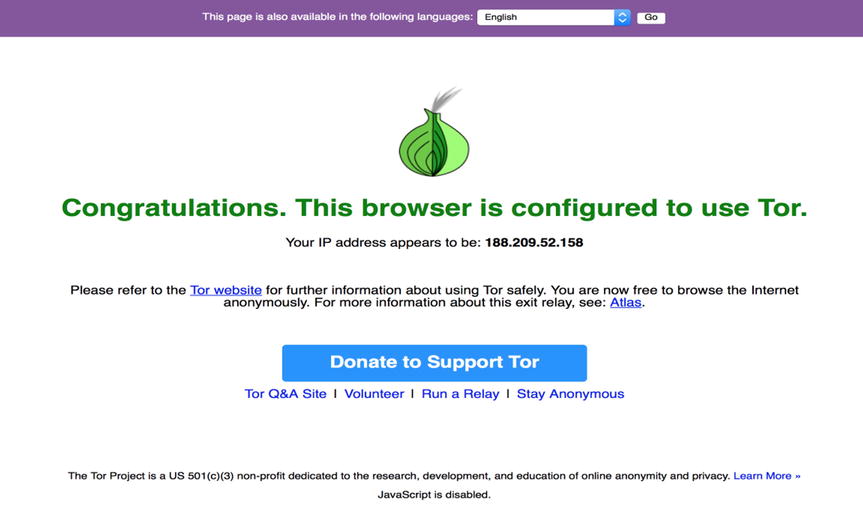
Figure 13-3. TOR Browser Check
With this, you should now be up and running in privacy enabled TOR. Congratulations!
Disabling TOR is quite a straightforward thing to do. You simply need to reset iptables to remove everything that the script we ran before setup. To do this we simply run the folloing command which will flush everything from iptables:
sudo iptables -F
This will disable the bulk of the changes made, but will still leave the tor daemon running in background and will also leave the name server changes in tact. You should run the command below to stop the tor daemon.
sudo /etc/init.d/tor stop
You will also need to reverse the changes made to the resolv.conf file by restoring the backup we took earlier. The command below accomplishes this:
sudo cp /etc/resolv.conf.bkp /etc/resolv.conf
Errors and Troubleshooting
Over the process of this setup, you may run into a few problems. Here are some of the common problems you may encounter and how to solve them. The first is an issue you may is the following:
libkmod: ERROR ../libkmod/libkmod.c:554 kmod_search_moddep: could not open moddep file '/lib/modules/3.18.7-v7+/modules.dep.bin'
This issue is to do with your system being slighlty out of date compared with iptables. The fix here is pretty straightforward, you need to update your Pi’s internal system with the following command then retsart:
rpi-update
Another error you may encouter may be the following:
iptables v1.4.14: can't initialize iptables table `filter': Table does not exist (do you need to insmod?)
This is to do with the iptables command being unable to interface correctly with your Pi’s Linux Kernel. There are two solution here, the first is to run the following commands to install the kernel module for iptables.
sudo modprobe ip_tables
sudo -i
echo 'ip_tables' >> /etc/modules
Under newer versions of raspbian this may not work so you should look to run the raspberry pi update and upgrade commands:
sudo apt-get update
sudo apt-get upgrade
sudo rpi-update
Summary
Over the course of this chapter, you will have learnt what TOR is and how it is a utility for privacy in situations where you may not fully trust the devices you are connecting via. You will have learnt how to setup TOR and how you can configure your raspberry Pi to use it. Lastly you will have learnt how to disable the TOR system from your Pi. Armed with these skills and the portability of your Pi, you should be able to browse in safety regardless of where you are.