
Learning the Basics: A Whistle-Stop Tour of React
“The journey of a thousand miles begins with one step.”
—Lao Tzu
Before you embark on your React Native journey, you must know a little bit about React(also known as ReactJS or React.js). In this chapter, you will quickly look at the core concepts of React, which will help you to work on React Native. React is different from most popular web technologies, and you will learn why as you move forward in this chapter. Its core concepts will really open up your mind to a new way of thinking if you have spent a considerable amount of time with traditional frameworks; this new way of thinking is sometimes called the React way of thinking. You may have heard the phrase “write once, run everywhere” but dismissed it as nearly impossible due to the proliferation of form factors (web, mobile, tablets). React has a different guiding principle: “learn once, write anywhere.” Wow, that seems quite different, and liberating. So you’ll begin this first chapter with a quick tour of React, which will help you get ready for React Native. If you have an elementary knowledge of React, you may skip this chapter and move on to Chapter 2.
React is a JavaScript library for creating user interfaces. It was built in a combined effort by Facebook and Instagram teams. React was first introduced to the world in 2013, and has taken it by storm, with community-wide acceptance and the benefit of being the technology at the heart of Facebook. According to official documentation, some consider React Native as the V in MVC because React Native makes no assumptions about rest of the technology stack used. You may use whatever technology you wish and you can create a single section of your app with React Native; you may also conveniently make changes in an already created application.
Why React?
But do we need another JavaScript library in a world full of js libraries and frameworks? There is hardly a month that goes by without a new js framework introduced.
React came into existence because its creators were faced with a significant problem: how to build large applications where data changes frequently. This problem occurs in almost any real-world application and React was created from the ground up to solve it. As you know, many popular frameworks are MVC or MV* but here’s a point to be noted and re-iterated: React is not an MV* framework. It’s a just a library for building composable user interfaces for UI components whose data changes over time. Unlike popular js frameworks, React does not use templates or HTML directives. React builds user interfaces by breaking the UI into many components. That’s it–nothing else. This means that React uses the full features of programming languages to build and render views.
The following are some of the advantages of choosing React for your next project:
- React uses JavaScript extensively: Traditionally the views in HTML are separated from the functionality in JavaScript. With React, components are created and there is one monolithic section where JavaScript has intimate knowledge of your HTML.
- Extendable and maintainable: Components are formed by a unified markup with its view logic, which actually makes the UI easy to extend and maintain.
- Virtual DOM: React applications are blazing fast. The credit for this goes to the virtual DOM and its diffing algorithm.
- One-way data flow: Two-way data binding is a great idea, but in real-world applications it produces more pain than benefits. One of the common drawbacks with two-way data binding is that you have no idea how your data gets updated. With one-way data flow, things are simple: you know exactly where data is mutating, which makes it easier to maintain and test your app.
In order to have a strong foundation of a new technology, it’s necessary to understand its core concepts. In the next section, you will explore a few unique concepts of React, which will takes you one step closer to understanding this amazing technology.
Virtual DOM
In all web applications one of the most expensive operations from which an app suffers is mutating the DOM. To solve this problem, React maintains a virtual representation of the DOM (as shown in Figure 1-1), which is called Virtual DOM or VDOM. Along with a diffing algorithm, React Native is able to compute the delta against the actual DOM and only update the part of the DOM that is changed. The amount of change is therefore less, which leads to a blazing fast application. In the beginning of your application you might not see it, but as your project balloons to insane complexity (which usually happens in real-world apps) you will begin to see the benefits of a snappy experience for users.

Figure 1-1. Virtual DOM and diffing algorithm operations
Manual DOM manipulation is messy, and keeping track of the previous state of the DOM is very hard. As shown in Figure 1-1, React solves this problem by keeping two copies of a virtual DOM. Next, a diffing algorithm is applied on these two virtual DOMs, which essentially checks for the changes that occurred and returns a stream of DOM operations. These DOM operations are then applied to the actual browser DOM.
Let’s now understand in terms of components how a virtual DOM works. In React, every component has a state; this state is likely observable. Whenever there is a change in state, React essentially knows that this change requires a re-render. So when the application state changes, it generates a new VTree; once again the diff algorithm shared the DOM paths for required changes, as shown in Figure 1-2. This results in keeping manual DOM manipulation to the minimum.

Figure 1-2. Components with virtual DOM
This feature of virtual DOM is not just important but a killer feature of React. DOM access is super slow, and humbly speaking, the world has made it worse by hitting the DOM again and again in most of the applications. To make your application fast, you should touch the DOM as little as possible, and this is beautifully handled by the implementation of virtual DOM. You won’t notice this with a small and trivial application, but once your app grows to having thousands of DOM elements all trying to get updated, React will not let your performance feel the impact.
One-Way Data Flow
React is primarily the V in a MVC pattern but before you dive into the idea of one-way data flow in React, you must understand the challenges of MVC frameworks. One of the biggest challenges of a MVC framework is managing the view. As you know, the view component of the MVC framework is mainly the DOM representation. It is simple when you write code that interacts with the DOM, but it is very complicated for the framework to handle various DOM manipulations.
Traditional MVC views generally encompass a lot of heavy UI, and as the data changes even for a tiny element, it eventually re-renders the app again, and the cycle continues. The reason for this is that typically most of these MVC frameworks follow two-way data binding (see Figure 1-3).

Figure 1-3. Two-way data binding
In JavaScript, data changes in memory and it is bound to a view in the UI, which means that when data is modified in JavaScript, which is in memory, the data will be changed in the UI as well. In return, when data changes in the UI (that is, the DOM) by clicking a button or any other event, it gets updated in memory also, keeping the two in sync. In theory, this works flawlessly and the idea is romantically perfect. However, in real-world applications, problems arise when you have a fairly complex and large application with multiple views representing data in one of your models. As you add more models and more views this two-way data binding ends up as spaghetti with every change in data added to the pot, which sometimes even ends up in an infinite event loop where one view updates a model, which in turn updates a view, and so on, as shown in Figure 1-4.

Figure 1-4. Unwanted spaghetti relationship
Another issue with this system is that making changes comes at a very high cost. When you introduce a new developer to an application that is this complex, it’s tough to understand the impact one change might cause in this abyss of spaghetti relationships.
React follows one-way data flow to keep things simple, as shown in Figure 1-5. It is based on the concept of separation of concerns (SoC). This is a design principle in computer science in which an application or program is divided into distinct sections, each addressing a single or specific concern. The value of this design principle is that it simplifies development to create a maintainable and scalable application. This leads to modularized code where an individual section can be reused, developed, and modified independently. This makes so much sense and is indeed an example of intelligent thinking.
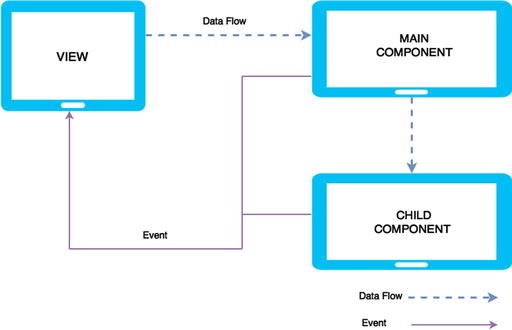
Figure 1-5. React Native’s one-way data flow
Installation and Setup
In order to understand practical examples, you must first set up your environment to run your React examples. The easiest way to start working with React is using JSFiddle examples.
- React JSFiddle with JSX (you will learn about JSX shortly): https://jsfiddle.net/reactjs/69z2wepo/
- React JSFiddle: https://jsfiddle.net/reactjs/5vjqabv3/
Another way is to download the complete starter kit to even work offline: http://facebook.github.io/react/downloads/react-0.13.3.zip
You may also install react-tools using npm: npm install -g react-tools.
Another useful instrument to boost your productivity with React Native is React Developer Tools, which is a very useful Chrome extension that allows you to inspect React component hierarchy in the Chrome browser:
https://chrome.google.com/webstore/detail/react-developer-tools/fmkadmapgofadopljbjfkapdkoienihi
For convenience, you will be using the following setup for your examples in this chapter: Facebook cdn for both React Native and JSX transformer.
react.js: http://fb.me/react-0.13.3.js
JSX transformer: http://fb.me/JSXTransformer-0.13.3.js
Simply refer to them in your code. Next, you will install the node packages browserify, watchify, and babelify, which will help you transform and keep your JSX in appropriate js files:
$ npm install react browserify watchify babelify --save-dev
$ watchify –t babelify ./your-jsx-file.jsx –o ./final-js-file.js –v
That’s great! To serve the application, you will be using the simple python server (SimpleHTTPServer) in the root of the project folder via the following command:
$ python -m SimpleHTTPServer
Simple python server will serve your examples by default on the 8000 port.
Now that you are done with your setup, you can quickly start to understand the concepts of React.
Introduction to Components
React is all about components. Anything and everything you do in React is based on reusable components. In other words, with React you only do one thing, and that is build components. In previous sections, we discussed separation of concerns. The whole concept of these components is that they are totally encapsulated, making them easy to test and reuse.
Creating reusable components is a work of art and React Native provides many features for you. You will do a deep dive into them soon, but first let’s create a simple “Hello World” component.
Create a hello_world.html file and paste the following code into it:
<!DOCTYPE html>
<html>
  <head>
    <script src="http://fb.me/react-0.13.3.js"></script>
     <script src="http://fb.me/JSXTransformer-0.13.3.js"></script>
  </head>
  <body>
    <div id="intro"></div>
  <script type="text/jsx">
      React.render(
        <h1>Hello, world </h1>, document.getElementById('intro')
      );
    </script>
  </body>
</html>
That was simple. Your code is residing in HTML tags. JavaScriptresides in script tags. We do see something different here in type ‘text/jsx’; this is JSX which we will explain in detail in upcoming sections. We also see a keyword ‘React’ which is the entry point into the React library. Inside of which there are H1 tags with the required text, along with the target where the text appears (in this case, document.getElementById(intro)). Also, this React code can live in a separate file and can be referenced in the HTML. Let’s create a separate file named src/helloworld.js.
React.render(
    <h1>Hello, world </h1>,
    document.getElementById(“intro”)
  );
And now let’s reference it in your hello_world.html file:
<script type="text/jsx" src="src/hello-world.js"></script>
That was simple. But what is JSX? Let’s look into JSX before we go full throttle into different aspects of components.
JSX
React does not require you to use JSX. However, JSX does make life simpler. Its XML-like syntax helps define tree structures with attributes very easily. XML has benefits like balancing open and closed tags. This makes a large tree easier to read than function calls or object literals.
Let’s look at a simple example, first without JSX to see how things get simplified as we gradually include JSX.
<!DOCTYPE HTML>
<html lang='en'>
 <head>
  <meta charset="UTF-8">
  <title>Example without JSX</title>
  <script src=" http://fb.me/react-0.13.3.js"></script>
 </head>
 <body>

 <script >

  var Appo = React.createClass({
   render:function(){
    return React.createElement("h1",null, "Hello Dear")
   }
  });

  React.render(React.createElement(Appo), document.body);
 </script>
  </body>
</html>
In this example you use React.createElement. You first pass a string representing the HTML tag, the second is your property, and the third is the child, which is inner HTML in this case.
Next, you want to render your component in React.render so you pass the App component and target where it has to be loaded as document.body. The output is similar to Figure 1-6.

Figure 1-6. Output in React.render
Next, let’s look at one more method, which is deprecated and no longer used. (The React ecosystem is developing so fast that things are already getting deprecated; however, having a look at the past shows how far they have come in making things easier in such a short period of time.)
<!DOCTYPE HTML>
<html lang='en'>
 <head>
  <meta charset="UTF-8">
  <title>Old world example</title>
  <script src="http://fb.me/react-0.13.3.js"></script>
 </head>
 <body>
 <script>
  var Appo = React.createClass({
   render:function(){
    return React.DOM.h1(null, "Hello Past")
   }
  });

  React.render(Appo(), document.body);
 </script>
 </body>
</html>
This example uses the React.DOM pattern where you specify the tag to be used (in this case, h1); the first parameter is the property and the second is a string, which is used as your inner HTML. When rendering with React.render you pass your component function and target where it is to be loaded (in this case, the document body). If you have latest version of React, you will get the warning and error shown in Figure 1-7 in your console.

Figure 1-7. DevTools will show this warning
Visit http://fb.me/react-legacyfactory to find another way besides JSX called factory to wrap your component before calling it. This also reminds you that it is time to use JSX.
Let’s now see how the same example looks when using JSX (see also Figure 1-8):
<!DOCTYPE HTML>
<html lang='en'>
 <head>
  <meta charset="UTF-8">
  <title>JSX me like !</title>
  <script src="http://fb.me/react-0.13.3.js"></script>
     <script src="http://fb.me/JSXTransformer-0.13.3.js"></script>
 </head>
 <body>
  <!-- with JSX -->
   <script type="text/jsx">
   var App = React.createClass({
    render:function(){
     return <h1>Hi from JSX</h1>
    }
   });
   React.render(<App />, document.body);
   </script>
 </body>
</html>

Figure 1-8. Output using JSX
Here, we have included JSX transformer, the in-browser transformer. Your component App has h1 tags. Next, you render it using React.render, passing your component in JSX syntax and the second argument as the target, which is document.body. That’s it.
Now separate your JSX code into a separate JSX file and convert it into pure JavaScript to see what’s happening. For that, let’s create a folder named src and place your JSX code into the hello.jsx file:
var Appo = React.createClass({
   render:function(){
    return React.DOM.h1(null, "Hello Past")
   }
  });
 React.render(Appo(), document.body);
Next, let’s add a dist folder where you can keep your converted js file example, bundle.js. After this, reference your bundle.js file in your HTML file (in this case, jsx_example.html).
As discussed earlier, you should install the node packages browserify, babelify, and watchify in order to use them to convert your JSX into js. This can be done using the following command:
$ npm install react browserify watchify babelify --save-dev
Now, convert your hello.jsx into bundle.js with the following command:
$ watchify –t babelify ./src/hello.jsx –o ./dist/bundle.js –v
The result is the following bundle.js file:
var Appo = React.createClass({
  displayName: "Appo",
  render: function render() {
    return React.DOM.h1(null, "Hello Past");
  }
});
React.render(Appo(), document.body);
Although JSX is not required explicitly with React, it is preferred. It lets you create JavaScript objects using HTML syntax. Components serve two purposes: templates and display logic. Therefore, markup and code are tied intimately together. Display logic often is quite complex and to express it using template languages does become difficult. The best way to solve this problem is to generate HTML and components from JavaScript itself. JSX solves these problems with its HTML-type syntax by creating React tree nodes.
You can keep the JSX source code intact for better maintainability; just keep it in a separate folder of JSX files. To convert JSX code to normal JavaScript, use the JSX compiler (http://facebook.github.io/react/jsx-compiler.html) either manually or via a build script. It is possible to serve JSX files in your production environment, but React will give you console notices about reduced performance.
Deep-Dive Into Components
In next section, you will explore the vital concepts of components, which will help you work with them easily.
Properties
React has something similar to attributes in HTML: properties. You can use them to initialize your component, like so:
React.render(<App myProp="Hi from prop" />, document.getElementById('container'))
Here you are initializing the App component with a prop named myProp, which is targeted for the id of 'container'. You can access this prop in JSX via interpolation in the following way. Let’s create a component App:
var App = React.createClass({
        render: function(){
                var txt = this.props.txt
                return (
                        <div>
                                <h1> {myProp} </h1>
                        </div>
                        );
        }
});
React.render(<App myProp="Hi from prop" />, document.getElementById('container'))
If you refresh your browser, you will see a message from the property for your inner HTML. Please use the following code for your HTML file (the results are shown in Figure 1-9):
<!DOCTYPE html>
<html>
  <head>
  </head>
  <body>
    <div id="container"></div>
  </body>
    <script src="http://fb.me/react-0.13.3.js"></script>
    <script src="http://fb.me/JSXTransformer-0.13.3.js"></script>
    <script src="dist/bundle.js"></script>
</html>

Figure 1-9. Refreshing your browser produces this message
As your application grows, you need to make sure your components are correctly created in the first place. In the case of a property, you can specify a kind of property with a range of validators. This ensures and validates the kind of data received. Let’s look at some of them with an example:
var App = React.createClass({
        propTypes: {
                message: React.PropTypes.string,
                age: React.PropTypes.number

        },
        render: function(){
               // keeping props in a variable to use to often
                var message = this.props.message,
                        age = this.props.age
                return (
                        <div>
                                <h1> {message} </h1>
                                <p> My age is {age}</p>
                        </div>
                        );
        }
});

React.render(<App age={5} message="Hi from prop" />, document.getElementById('container'))
Here, the propType keyword signifies a hash of prop names and their types. There are two propTypes in your example: string and number for the message and age properties, respectively.
There are many other property types. Note that you can add isRequired to the end of any propType to make it required:
propTypes: {
//some specific JS primitive
        arrayType: React.PropTypes.array,
        boolType: React.PropTypes.bool,
        funcType: React.PropTypes.func,
        objectType: React.PropTypes.object,
//if a value of a prop is necessary
        numberType: React.PropTypes.number.isRequired
}
There is also a default type in properties via the keyword getDefaultProps. For example, in your same component, you can mention default types for your message and age properties:
getDefaultProps: function(){
                return {
                        message: 'Default value of message',
                        age: 0
                }
        },
State
In the last section, you learned about properties, which are static values that are passed into your component. State, on the other hand, is maintained and updated by the component. Let’s understand this concept with an example:
var App = React.createClass({
        getInitialState: function(){
                return {
                        message: 'this is a default message from state',
                }
        },
        render: function(){
                return (
                        <div>
                                <h1> {this.state.message} </h1>
                        </div>
                        );
        }
});
React.render(<App />, document.getElementById('container'))
If you run this snippet, you will the result shown in Figure 1-10 in your browser.

Figure 1-10. Resulting message using state
Let’s look at the code. In your same component, you initialize the state using the getInitialState keyword, in which you set up the initial state of the message:
getInitialState: function(){
                return {
                        message: 'this is a default message from state',
                }
        },
Next, unlike the last example, you access this state using this.state.message, which prints the initial text of the message state:
<div>
        <h1> {this.state.message} </h1>
</div>
Now let’s add some functionality to your component. You add a text box above your message statement. As you type in the text box, the message gets updated in real time using the concept of state:
var App = React.createClass({
        getInitialState: function(){
                return {
                        message: 'this is a default message from state',
                }
        },
        updateState: function(e){
                this.setState({message: e.target.value})
        },
        render: function(){
                return (
                        <div>
                                <input type="text" onChange={this.updateState} />
                                <h1> {this.state.message} </h1>

                        </div>
                        );
        }
});

React.render(<App />, document.getElementById('container'))
If you execute this code in your browser, you will see the result shown in Figure 1-11.

Figure 1-11. Adding a text box above your message statement
Let’s see what you added to your component. First, you introduced a function named updateState:
updateState: function(e){
                this.setState({message: e.target.value})
        }
This new function, updateState, takes an event called (e) and updates the value of message state. Also, you added an input field:
<div>
        <input type="text" onChange={this.updateState} />
        <h1> {this.state.message} </h1>
</div>
The input box has an onChange event, which calls your custom method updateState whenever the state gets updated. As you type in your textbox, your printed message gets updated instantaneously.
Summary
This chapter provided a quick tour of React. Before you begin with the next chapter, let’s recap what you have learned so far. You were introduced to the React library and the reasons behind its invention. Then you learned how to install and set up React. You studied the fundamentals of this technology, such as virtual DOM, one-way data flow, and JSX. You also got an introduction to components, and using states and props with components.
Now that you are equipped to code and work in the React ecosystem, the interesting path of your journey begins in the next chapter. You’ll start working with React Native.