
React Native Supplements
“A good way to stay flexible is to write less code.”
—Pragmatic Programmer
By now, you should be comfortable building apps using React Native and have become accustomed to all the basics as well as many advanced features of the React Native framework. In this final chapter, we will learn about a few supplements, which may not be necessary but are very useful in certain situations and reduce our work significantly. In this chapter we will cover the following topics:
- Reflux
- Redux
- Debugging on a device
- Popular node modules
- Where to go from here
We learned about Flux architecture in Chapter 4. We have some other ways to implement unidirectional data flow, including a lean approach to flux called Reflux. It’s a simple library for unidirectional data flow inspired by React’s Flux. As shown in Figure 7-1, a Reflux pattern has actions and stores. Actions initiate new data, which is passed through data stores, which are then passed to view components and in turn passed back to actions. If a view component has an event that makes changes to data stores, it needs to send a signal to the stores via the actions available.

Figure 7-1. Reflux unidirectional flow
Differences from Flux
Reflux has actually refactored Flux to be closer to Functional Reactive Programming (FRP). The following are a few differences between Reflux and Flux:
- The singleton dispatcher is not present, letting every action act like a dispatcher instead.
- Because actions are listenable, the stores listen to them. Stores don’t need to have big switch statements that do static type checking (of action types) with strings.
- Stores can listen to other stores; it is possible to create stores that can aggregate data further, similar to a map/reduce.
- Action creators are not needed, because Reflux actions are functions that will pass on the payload they receive to anyone listening to them.
- waitFor is replaced to handle serial and parallel data flows. Aggregate data stores may listen to other stores in serial and to joins for joining listeners in parallel.
In order to understand Reflux better, let’s create a simple ToDo application just like we did earlier in Chapter 4. Let’s generate a React Native application:
$ react-native init RefluxTodo
Our basic project structure is now ready. Let’s add a Reflux node module to our project:
$ cd RefluxTodo
$ npm install reflux --save-dev
Now that we have Reflux added to our project, let’s create a structure that we can use with Reflux. First, create a root folder named Apps that contains the subfolders Actions, Components, and Stores, which hold the files shown in Figure 7-2.

Figure 7-2. Root folder Apps with subfolders and files
Unlike in Flux patterns, with Reflux we only have actions and stores, as we dropped dispatcher altogether. We will keep various components in our Component folder so as to keep our index.ios.js file lean. These files are empty for now, so let’s add the requried code in each of them via the following steps.
- Start with Actions. Open Apps/Actions/TodoActions.js and add the following code:
'use strict';

var Reflux = require('reflux');

module.exports = Reflux.createActions([
  'todoCreate',
  'todoUpdate',
  'todoComplete',
  'todoUndoComplete',
  'todoDestroy',

]); - Add the following code to Stores, which resides in Apps/Stores/Todostore.js:
'use strict';

var Reflux = require('reflux');
var _ = require("underscore");

module.exports = Reflux.createStore({
  listenables: [require('../Actions/TodoActions')],

  todos: {},

  onTodoCreate: function(text) {
    var id = (+new Date() + Math.floor(Math.random() * 999999)).toString(36);
    this.todos[id] = {
      id: id,
      complete: false,
      text: text,
    };
    this.trigger(null);
  },
  onTodoUpdate: function(id, updates) {
    this.todos[id] = _.extend({}, this.todos[id], updates);
    this.trigger(null);
  },
  onTodoComplete: function(id) {
    this.onTodoUpdate(id, {complete: true});
  },
  onTodoUndoComplete: function(id) {
    this.onTodoUpdate(id, {complete: false});
  },
  onTodoDestroy: function(id) {
    delete this.todos[id];
    this.trigger(null);
  },

  getAll: function() {
    return _.values(this.todos);
  },
}); - Create the components that will interact with Actions, which in turn interacts with Stores. Let’s add the following code to Apps/Components/TodoForm.js:
TodoForm.js
'use strict';

var React = require('react-native');
var {
  StyleSheet,
  TextInput,
  View,
} = React;

var TodoActions = require('../Actions/TodoActions');
var TodoStore = require('../Stores/TodoStore');

module.exports = React.createClass({
  propTypes: {
    value: React.PropTypes.string,
  },

  getInitialState: function() {
    return {

 value: '',
    };
  },

  render: function() {
    return (
      <View style={styles.header}>
        <TextInput
          style={styles.textInput}
          onChangeText={(text) => this.setState({value: text})}
          onBlur={this._save}
          placeholder={'What needs to be done?'}
          value={this.state.value}
        />
      </View>
    );
  },

  _save: function() {
    var text = this.state.value;
    if (text) {
      TodoActions.todoCreate(text);

this.setState({

value: ''
      });
    }
  },
});

var styles = StyleSheet.create({
  header: {
    marginTop: 21,
  },
  textInput: {
    height: 40,
    backgroundColor: '#EEEEEE',
    padding: 10,
    fontSize: 16
  },
}); - Add the following code to the TodoItem component in Apps/Components/TodoItem.js:
TodoItem.js
'use strict';

var React = require('react-native');
var {
  StyleSheet,
  Text,
  View,
} = React;
var Reflux = require('reflux');

var TodoActions = require('../Actions/TodoActions');

module.exports = React.createClass({
  render: function() {
    var todo = this.props.todo;
    var styleTodoItemComplete = (todo.complete) ? styles.todoItemComplete : null;
    return (
      <View>
        <View style={[styles.todoItem, styleTodoItemComplete]}>
          <Text style={styles.text}>{todo.text}</Text>
          <Text style={styles.text}>{todo.complete}</Text>
          <Text onPress={() => this._onToggleComplete(todo)}>|Mark as done|</Text>
          <Text onPress={() => this._onDestroy(todo)}> Delete|</Text>
        </View>
        <View style={styles.separator} />
      </View>
    );
  },

  _onToggleComplete: function(todo) {
    if (todo.complete) {
      TodoActions.todoUndoComplete(todo.id);
    } else {
      TodoActions.todoComplete(todo.id);
    }
  },
  _onDestroy: function(todo) {
    TodoActions.todoDestroy(todo.id);
  }
});

var styles = StyleSheet.create({

todoItem: {
    flex: 1,
    flexDirection: 'row',
    justifyContent: 'center',

alignItems: 'center',
    backgroundColor: '#FFFFFF',
    padding: 10,
    height: 58,
  },
  todoItemComplete: {
    opacity: 0.3,
  },
  text: {
    flex: 1,
    textAlign: 'left',
    fontSize: 16,
  },
  separator: {
    height: 1,
    backgroundColor: '#CCCCCC',
  },
}); - Add the following code to TodoList.js, which is found in Apps/Components/TodoList.js:
Todolist.js
'use strict';

var React = require('react-native');
var {
  ListView,
  StyleSheet,
} = React;
var Reflux = require('reflux');

var TodoStore = require('../Stores/TodoStore');
var TodoItem = require('./TodoItem');

module.exports = React.createClass({
  mixins: [Reflux.listenTo(TodoStore, 'handlerTodoUpdate')],

  getInitialState: function() {
    var ds = new ListView.DataSource({rowHasChanged: (r1, r2) => r1 !== r2});
    return {
      todoDataSource: ds.cloneWithRows(TodoStore.getAll()),
    };
  },

  handlerTodoUpdate: function(err) {
    if (err) {
        return
    }
    this.setState({
      todoDataSource: this.state.todoDataSource.cloneWithRows(TodoStore.getAll()),
    });
  },

  render: function() {
    return (
      <ListView
        dataSource={this.state.todoDataSource}
        renderRow={(rowData) => <TodoItem todo={rowData} />}
      />
    );
  },
});

var styles = StyleSheet.create({
  list: {
    flex: 1,
    backgroundColor: '#0FF',
  },
});

index.ios.js
'use strict';

var React = require('react-native');
var {
  AppRegistry,
} = React;

var TodoApp = require('./Apps/Components/TodoApp');

AppRegistry.registerComponent('TodoProject', () => TodoApp); - Add the following code to TodoApp.js, found in Apps/Components/TodoApp.js:
TodoApp.js
'use strict';

var React = require('react-native');
var {
  StyleSheet,
  View,
} = React;

var TodoForm = require('./TodoForm');
var TodoList= require('./TodoList');

module.exports = React.createClass({
  render: function() {
    return (
      <View style={styles.container}>
        <TodoForm />
        <TodoList />
      </View>
    );
  },
});

var styles = StyleSheet.create({
  container: {
    flex: 1,
  },

}); - In order to use the components just created, update index.ios.js with the following code:
'use strict';

var React = require('react-native');
var {
  AppRegistry,
} = React;

var TodoApp = require('./Apps/Components/TodoApp');

AppRegistry.registerComponent('RefluxTodoProject', () => TodoApp);
With these steps complete, we can now build our application in Xcode in order to run through our application. Once the application gets loaded, the home screen in Figure 7-3 appears. Here we can add any item to the To Do list (“What needs to be done?”).

Figure 7-3. To do list is ready to be populated with user input
Once added, the items are listed one after another with options “Mark as done” or “Delete” displayed on the right side of each row, as shown in Figure 7-4.

Figure 7-4. Each item in the populated list now has two options
When ”Mark as done” is clicked, the row becomes faded, indicating this item is done. Clicking this option again will unfade the row. Click on “Delete” to remove items from the list entirely (see Figure 7-5).

Figure 7-5. Two items have been marked as done
Redux is a predictable-state container for JavaScript apps, and it has become very popular, especially in the React community. Though you can use the Redux concept in React, AngularJS, or any framework. Redux is open source, with Dan Abramov as its lead developer. Redux makes state mutations predictable by imposing certain controls on how and when updates can be made to state.
Until now, we have seen that state is used a lot in React Native apps, and the state value is always changing. When our actual app grows, handling these state changes can become unpredictable. Utilizing React with Flux is a good method by which to solve issues using mutation and synchronicity, as React has removed asynchrony from the view-layer and direct-DOM manipulation. However, managing the state of data is left up to the developer. Redux has solved the problem of managing state using three principles:
- Single source of truth
- State is read-only
- Mutations are written as pure functions
The store of your application is stored in an object tree within a single store. A single-state tree has all the state changes done. This makes it easy to create universal apps, since we know all actions the client app has performed are done. It also makes debugging easier, since we can track all of the state changes.
The only way to change the state is to emit an action—an object describing what happened. Thus, we can’t directly update state; it can only be updated though actions. View and network calls can’t update the state directly.
Mutations Are Written as Pure Functions
To specify how the state tree is transformed by actions, you write pure reducers. Reducers will take old state and actions and return a new state. Reducers are normal JavaScript functions. It is important to understand that reducers do not update the state, they just return the new state.
Debug on Device
So far we have been debugging and testing our application on an iOS simulator, which works pretty well most of the times, but in real-world projects we would need to load our application time and again on an iOS device to test and debug.
To debug your application iOS device, simply plug in your device (in our case it’s an iPad). Open up Xcode and select your device instead of the simulator (see Figure 7-6).
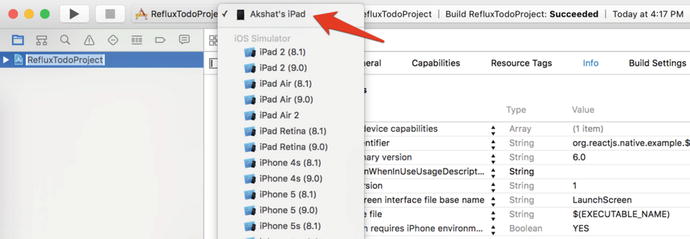
Figure 7-6. Selecting an iPad as your device
We are using our RefluxTodo application for this section, but you can use any React Native project you have built so far. Build the application to load it on the device. The application icon should appear, but we will get the error shown in Figure 7-7.
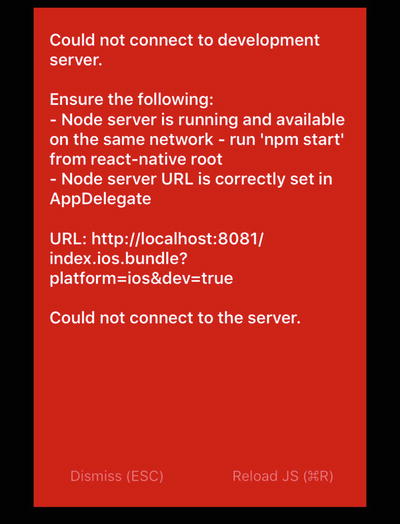
Figure 7-7. “Unable to connect” error message
The reason for this error is that our application is not able to connect to the development server. Let’s fix this by getting into our application code. Go to the AppDelegate.m file, which is usually placed in project-name/ios/project-name/AppDelegate.m, and change the following lines:
jsCodeLocation = [NSURL URLWithString:@"http://localhost:8081/index.ios.bundle?platform=ios&dev=true"];
to:
jsCodeLocation = [NSURL URLWithString:@"http://machine-ip-address:8081/index.ios.bundle?platform=ios&dev=true"];
Here, we have to replace localhost with our machine’s IP address. Doing so allows our application to load and run properly on the device (see Figure 7-8).

Figure 7-8. Application is now running properly
In order to access the developer menu, simply shake your device—the menu appears from the bottom of the view (see Figure 7-9).

Figure 7-9. Developer menu is now visible
We can enable live reload, and just like in the iOS simulator, all changes will automatically be reflected on the device too. Click Debug in Chrome to see the result shown in Figure 7-10.

Figure 7-10. WebSocket error message
However, we get another error. In order to solve this one, we have to get back to our code and make a few changes. For this, we need to go to RCTWebSocketExecuter.m, which is placed in the ReactNative node module, traverse to /your-project-name/node_module/react-native/Libraries/WebSocket/ RCTWebSocketExecuter.m, and again we need to change our localhost to the machine’s IP address in the following section of code:
From
- (instancetype)init
{
  return [self initWithURL:[RCTConvert NSURL:@"http://localhost:8081/debugger-proxy"]];
}

to
- (instancetype)init
{

return [self initWithURL:[RCTConvert NSURL:@"http://your-machine-ip-address:8081/debugger-proxy"]];
}
With this change, we can debug our application just like we have so far using the simulator.
Popular Modules for React Native
The React Native community may be young, but it has already started to flourish. Like any other popular framework, lots of open-source projects have been created, which helps developers to avoid re-inventing features already developed. You can find hundreds of such node modules on GitHub; we are listing a few that can help you quickly build and deliver your next React Native application.
react-native-fbsdk
React Native FBSDK is a wrapper for iOS Facebook SDK that helps Facebook integration with React Native apps. Documented JavaScript modules help access native components like login, sharing, and share using three npm modules. You have to include three npm packages: react-native-fbsdkcore, react-native-fbsdkshare, and react-native-fbsdklogin—that’s it.
For complete documentation or to make a contribution to this project, you may visit the following: https://github.com/facebook/react-native-fbsdk.
react-native-scrollable-tab-view
Fluid animations really add meaning to any feature in your application. React Native animations API are getting robust very rapidly; creating smooth animations for scrolling within tabs is a problem solved by the react-native-scrollable-tab-view npm package. It’s a very simple JavaScript-only implementation for React Native.
For complete documentation or to make a contribution to this project, you may visit the following: https://github.com/brentvatne/react-native-scrollable-tab-view.
react-native-webpack-server
react-native-webpack-server allows you to use the webpack ecosystem with React Native. It is a development server that uses Webpack Dev Server and the React Packager to enable building React Native JavaScript bundles with webpack.
For complete documentation or to make a contribution to this project, you may visit the following: https://github.com/mjohnston/react-native-webpack-server.
react-native-side-menu
A very simple implementation of an expandable side menu, this package helps you add a side menu that scrolls from either the left or right side with an easy swipe gesture.
For complete documentation or to make a contribution to this project, you may visit the following: https://github.com/react-native-fellowship/react-native-side-menu#component-props.
Here are some other notable mentions:
- react-native-vector-icons
- react-native-facebook-login
- react-native-google-places-autocomplete
- react-native-sqlite-storage
- react-native-tableview
- react-native-background-geolocation
Where to Go from Here
Congratulations. You have learned a lot about the React Native framework. But it’s just the beginning, as the React Native community and ecosystem is expanding rapidly every day. New development, innovative changes, and cutting-edge features are getting added into the framework all the time—in short, there is something new to learn every day. For the bold, it’s an opportunity to embrace. So the obvious question that comes to mind is, What’s next? The answer is, Plenty.
If you are looking for React Native components that are already built and are available to be used, you can visit react.parts, which has an exhaustive list of all available reusable modules; see https://react.parts/native.
For any questions or queries, you can always use stackoverflow with tag react-native. For really quick responses from fellow developers, you can always hop on the IRC channel for React Native at #reactnative on IRC: chat.freenode.net. You can also chat with the React Native community using discord channel Reactiflux at https://discordapp.com/invite/0ZcbPKXt5bWJVmUY (yep, the React Native community is cool enough to use chat platforms used by gamers).
React Native is a very young framework, and while working on it you might come up with suggestions that could help the framework, or maybe some stuff that is overkill for the framework. The React Native community is very open to suggestions; if you have any you can start a thread at https://discuss.reactjs.org/. This discussion page is also a wonderful place for learning about best practices from others and to learn from old threads. Also, it’s a great place to get your question resolved by the experts. Better yet, you might just get some job offers too.
Finally, to be a master in React Native there is no better way than to simply build apps. There is no faster way to become a master of a technology than by getting a little dirty with real-world projects, solving real-life problems. Since the React Native community is still in its infancy, there is a wonderful opportunity to learn and share by creating your own modules, which can help the rest of the community, an added benefit. We hope you enjoyed reading and learning with this book and have now evolved into a React Native developer building iOS apps. Just like you, we are very excited about React Native and look forward to seeing your work make a mark in the world of iOS and React Native. Adios.