In this chapter we’re going to have a look at some of the more advanced things you might want to do when provisioning resources in Azure via Chef Provisioning. We’ll start by looking at how to ensure your secrets can be stored securely using Azure’s Key Vault PaaS service, use that service to securely configure WinRM on a VM running in Azure, and then look at some ways in which you can leverage some of the newest PaaS services in Azure.
Explaining VM Image Naming within Azure Resource Manager JSON
In the previous chapter we saw how we could use an Azure Resource Manager template to create a Windows Server compute resource, but how did we know which version of Windows Server to deploy? The basic answer is that the image used was baked into the template. But what if we want to use a different version of Windows Server? That’s what we’ll explain shortly.
We saw in the template we were using, downloaded from https://github.com/Azure/azure-quickstart-templates/tree/master/101-vm-with-rdp-port , that the Virtual Machine is a type of Compute resource that has some internal variables that include publisher, offer, sku, and version. Here’s the fragment of template that defines the Virtual Machine:
{"apiVersion": "[variables('apiVersion')]","type": "Microsoft.Compute/virtualMachines","name": "vm","location": "[variables('location')]","dependsOn": ["[resourceId('Microsoft.Storage/storageAccounts',variables('storageAccountName'))]","[concat('Microsoft.Network/networkInterfaces/',parameters('vmName'),'-nic')]"],"properties": {"hardwareProfile": {"vmSize": "Standard_D2"},"osProfile": {"computerName": "[parameters('vmName')]","adminUsername": "[parameters('adminUserName')]","adminPassword": "[parameters('adminPassword')]"},"storageProfile": {"imageReference": {"publisher": "[variables('imagePublisher')]","offer": "[variables('imageOffer')]","sku": "[variables('imageSku')]","version": "latest"},"osDisk": {"name": "osdisk","vhd": {"uri": "[concat('http://',variables('storageAccountName'),'.blob.core.windows.net/vhds/',parameters('vmName'),'-osdisk.vhd')]"},"caching": "ReadWrite","createOption": "FromImage"}},"networkProfile": {"networkInterfaces": [{"id": "[resourceId('Microsoft.Network/networkInterfaces',concat(parameters('vmName'),'-nic'))]"}]},"diagnosticsProfile": {"bootDiagnostics": {"enabled": "true","storageUri": "[concat('http://',variables('storageAccountName'),'.blob.core.windows.net')]"}}}}
The template above expects these properties to be provided to it, so how do we discover the correct values for the template? Let’s have a look at how to retrieve the publishers, offers, and skus for any public VM image.
Identifying and Retrieving VM Images
There’s a particular sequence of events you must go through in order to list the publicly available VM images :
To get a list of the Publishers you need to execute azure vm image list-publishers (Azure-cli) or Get-AzureRmVMImagePublisher (PowerShell).
Then you can retrieve the Offers with azure vm image list-offers (Azure-cli) or Get-AzureRmVMImageOffer (PowerShell).
Only then can you retrieve the Sku with azure vm image list-skus (Azure-cli) or Get-AzureRmVMImageSku (PowerShell).
As the specific images available can possibly vary by region, the datacenter location must be passed in as a parameter to each command or cmdlet too. Let’s step through the process of ’discovering’ the Windows 2012 R2 Datacenter image in both Azure-cli and PowerShell, noting that I am using West Europe as my region (as it is my nearest datacenter).
Azure-cli
To discover images using Azure-cli we use the following commands:
PS C:UsersStuartPreston> azure vm image list-publishers "West Europe"info: Executing command vm image list-publishers+ Getting virtual machine and/or extension image publishers (Location: "westeurope")data: Publisher Locationdata: ---------------------------------------------------- ----------[...]data: MicrosoftWindowsServer westeurope[...]info: vm image list-publishers command OK
Now we can use the azure vm image list-offers command and specify the publisher:
PS C:UsersStuartPreston> azure vm image list-offers "West Europe" MicrosoftWindowsServerinfo: Executing command vm image list-offers+ Getting virtual machine image offers (Publisher: "MicrosoftWindowsServer" Location:"westeurope")data: Publisher Offer Locationdata: ---------------------- ------------- ----------data: MicrosoftWindowsServer WindowsServer westeuropeinfo: vm image list-offers command OK
Now armed with the Publisher and the Offer we can retrieve the Skus:
PS C:UsersStuartPreston> azure vm image list-skus "West Europe" MicrosoftWindowsServer WindowsServerinfo: Executing command vm image list-skus+ Getting virtual machine image skus (Publisher:"MicrosoftWindowsServer" Offer:"WindowsServer" Location:"westeurope")data: Publisher Offer sku data: ---------------------- ------------- ---------------------------------------- data: MicrosoftWindowsServer WindowsServer 2008-R2-SP1data: MicrosoftWindowsServer WindowsServer 2012-Datacenter data: MicrosoftWindowsServer WindowsServer 2012-R2-Datacenter data: MicrosoftWindowsServer WindowsServer 2016-Technical-Preview-3-with-Containers data: MicrosoftWindowsServer WindowsServer 2016-Technical-Preview-4-Nano-Server data: MicrosoftWindowsServer WindowsServer 2016-Technical-Preview-Nano-Server data: MicrosoftWindowsServer WindowsServer Windows-Server-Technical-Preview info: vm image list-skus command OK
Let’s see how to do the same using PowerShell.
PowerShell
To discover images using PowerShell we use the following commands:
PS C:UsersStuartPreston> Get-AzureRmVMImageOffer -Location "West Europe"PublisherName-------------[...]MicrosoftWindowsServer
Now we can use the Get-AzureRmVMImageOffer command and specify the publisher:
PS C:UsersStuartPreston> Get-AzureRmVMImageOffer -Location "West Europe" -PublisherName "MicrosoftWindowsServer" | Select OfferOffer-----WindowsServer
Armed with the Publisher and the Offer we can retrieve the list of available Skus:
PS C:UsersStuartPreston> Get-AzureRMImageSku -Location "West Europe" -PublisherName "MicrosoftWindowsServer" -Offer "WindowsServer" | Select PublisherName, Offer, SkusPublisherName Offer Skus------------- ----- ----MicrosoftWindowsServer WindowsServer 2008-R2-SP1MicrosoftWindowsServer WindowsServer 2012-DatacenterMicrosoftWindowsServer WindowsServer 2012-R2-DatacenterMicrosoftWindowsServer WindowsServer 2016-Technical-Preview-3-with-ContainersMicrosoftWindowsServer WindowsServer 2016-Technical-Preview-4-Nano-ServerMicrosoftWindowsServer WindowsServer 2016-Technical-Preview-Nano-ServerMicrosoftWindowsServer WindowsServer Windows-Server-Technical-Preview
Now we have all the constituent values, these can be passed in as parameters in your provisioning recipes or used for other purposes, such as with Test Kitchen (you can read more about this in chapter 6).
Using Azure Key Vault to Store Secrets
As we know, it’s not just VMs that you can create with Azure Resource Manager. We can also provision PaaS resources too. One of the PaaS solutions within Azure is KeyVault (see https://azure.microsoft.com/en-us/services/key-vault/ ), which is best described as a scalable Key Management solution that allows the storage of cryptographic keys without the cost normally associated with the implementation of HSMs (Hardware Security Modules) on premises.
The retrieval of a certificate from Key Vault is currently required if you wish to enable WinRM in a secure configuration on a Windows Server at provisioning time. So let’s cover how to provision the Key Vault itself, along with the command-line tools used to manage it. Later examples in this chapter will show you how to provision machines that rely on secrets stored in the Key Vault.
You may create many Key Vault per subscription if you wish. Let’s go through the process of provisioning a Key Vault. Azure Key Vault is quite simple to provision using Azure-cli, PowerShell, or Chef Provisioning, so you may be asking yourself why you would want to use Chef. The main reason to do so is for consistency, so that we can keep all our provisioned resources in the same repo. Now let’s go through the process of provisioning a Key Vault using Chef.
As this is the first example in this chapter, we’ll need a repo in which to work in:
PS C:UsersStuartPreston> chef generate app chefazure-ch05Compiling Cookbooks...Recipe: code_generator::app[output truncated]
You’ll now want to copy in the .chef folder from our chef-starter repo (as created in chapter 1), so that our keys and knife.rb configuration are available in our new repo.
Now we can enter our repo and open the folder in our code editor:
PS C:UsersStuartPreston> cd chefazure-ch05PS C:UsersStuartPrestonchefazure-ch05> code .
Azure Key Vault ARM Template
We need to create a file cookbooks/chefazure-ch05/files/keyvault/deploy.json within our repository representing the ARM template that creates a Key Vault so that we can refer to it from a provisioning recipe.
Note
This ARM template can be downloaded from https://raw.githubusercontent.com/Azure/azure-quickstart-templates/master/101-key-vault-create/azuredeploy.json , and you can find this and the associated recipes in the book's accompanying download.
Here’s the template reproduced in its entirety. We can see there are nine parameters that I have highlighted in bold that we will need to supply in our Chef Provisioning recipe and finally the resource contained within it:
{"$schema": "https://schema.management.azure.com/schemas/2015-01-01/deploymentTemplate.json#","contentVersion": "1.0.0.0","parameters": {"keyVaultName": {"type": "string","metadata": {"description": "Name of the Vault"}},"location": {"type": "string","allowedValues": ["Central US","East US","East US 2","North Central US","South Central US","West US","North Europe","West Europe","East Asia","Southeast Asia","Japan East","Japan West","Brazil South","Australia East","Australia Southeast"],"metadata": {"description": "Key Vault location"}},"tenantId": {"type": "string","metadata": {"description": "Tenant Id of the subscription. Get using Get-AzureSubscription cmdlet or Get Subscription API"}},"objectId": {"type": "string","metadata": {"description": "Object Id of the AD user. Get using Get-AzureADUser or Get-AzureADServicePrincipal cmdlets"}},"keysPermissions": {"type": "array","defaultValue": [ ],"metadata": {"description": "Permissions to keys in the vault. Valid values are: all, create, import, update, get, list, delete, backup, restore, encrypt, decrypt, wrapkey, unwrapkey, sign, and verify."}},"secretsPermissions": {"type": "array","defaultValue": [ ],"metadata": {"description": "Permissions to secrets in the vault. Valid values are: all, get, set, list, and delete."}},"skuName": {"type": "string","defaultValue": "Standard","allowedValues": ["Standard","Premium"],"metadata": {"description": "SKU for the vault"}},"enableVaultForDeployment": {"type": "bool","defaultValue": false,"allowedValues": [true,false],"metadata": {"description": "Specifies if the vault is enabled for a VM deployment"}},"enableVaultForDiskEncryption": {"type": "bool","defaultValue": false,"allowedValues": [true,false],"metadata": {"description": "Specifies if the azure platform has access to the vault for enabling disk encryption scenarios."}}},"resources": [{"type": "Microsoft.KeyVault/vaults","name": "[parameters('keyVaultName')]","apiVersion": "2015-06-01","location": "[parameters('location')]","properties": {"enabledForDeployment": "[parameters('enableVaultForDeployment')]","enabledForDiskEncryption": "[parameters('enableVaultForDiskEncryption')]","tenantId": "[parameters('tenantId')]","accessPolicies": [{"tenantId": "[parameters('tenantId')]","objectId": "[parameters('objectId')]","permissions": {"keys": "[parameters('keysPermissions')]","secrets": "[parameters('secretsPermissions')]"}}],"sku": {"name": "[parameters('skuName')]","family": "A"}}}]}
Retrieving the Object ID for an Azure Active Directory User
When we create the Key Vault, we will need to add permissions so that our normal user (not the application Service Principal) has access to be able to create keys. Luckily this is something that the Key Vault provider can do for us. To configure that, we need the Object Id of the Azure Active Directory user we want to grant access to, which can be retrieved using Azure-cli and PowerShell.
Azure-cli
In Azure-cli we can use the azure ad user show --upn command and pass in the UPN of the user we want to grant access to:
PS C:UsersStuartPrestonchefazure-ch05> azure ad user show --upn [email protected]info: Executing command ad user show+ Getting active directory userdata: Object Id: 38e8a50f-YOUR-GUID-HERE-a605e06e9695data: Principal Name: [email protected]data: Display Name: Stuart Prestondata: E-Mail: [email protected]data:
PowerShell
In PowerShell we can use the Get-AzureRmADUser -UserPrincipalName cmdlet and pass in the UPN of the user we want to grant access to:
PS C:UsersStuartPreston> Get-AzureRmADUser -UserPrincipalName [email protected]DisplayName ObjectId----------- --------Stuart Preston 38e8a50f-YOUR-GUID-HERE-a605e06e9695
Azure Key Vault Provisioning Recipe
To provision our Key Vault, we need to create a new file to contain our recipe in the following path: cookbooks/chefazure-ch05/recipes/keyvault.rb and add the below recipe to it. Now that we have the ObjectId for the user who should have permission to the Key Vault, this can be substituted into the objectId parameter.
Tip
If you cannot locate your TenantId, the quickest way might be to have a look in your credentials file located at ∼/.azure/credentials.
require 'chef/provisioning/azurerm'with_driver 'AzureRM:b6e7eee9-YOUR-GUID-HERE-03ab624df016'azure_resource_group 'chefazure-shared' dolocation 'West Europe'tags CreatedFor: 'Using Chef with Microsoft Azure book'endazure_resource_template 'keyvault-deployment' doresource_group 'chefazure-shared'template_source 'cookbooks/chefazure-ch05/files/keyvault/deploy.json'parameters keyVaultName: 'chefazure-keyvault',location: 'West Europe',tenantId: '48b9bba3-YOUR-GUID-HERE-90f0b68ce8ba',objectId: '38e8a50f-YOUR-GUID-HERE-a605e06e9695',keysPermissions: ['all'],secretsPermissions: ['all'],skuName: 'Standard',enableVaultForDeployment: true,enableVaultForDiskEncryption: falseend
Upload the cookbook using knife cookbook upload:
PS C:UsersStuartPrestonchefazure-ch05> knife cookbook upload chefazure-ch05Uploading chefazure-ch05 [0.1.0]Uploaded 1 cookbook.
Now let’s provision this recipe using our local chef-client:
PS C:UsersStuartPrestonchefazure-ch05> chef-client -o recipe[chefazure-ch05::keyvault]Starting Chef Client, version 12.5.1[2015-11-21T17:20:24+00:00] WARN: Run List override has been provided.[2015-11-21T17:20:24+00:00] WARN: Original Run List: [][2015-11-21T17:20:24+00:00] WARN: Overridden Run List: [recipe[chefazure-ch05::keyvault]]resolving cookbooks for run list: ["chefazure-ch05::keyvault"]Synchronizing Cookbooks:- chefazure-ch05 (0.1.0)Compiling Cookbooks...Converging 2 resourcesRecipe: chefazure-ch05::keyvault* azure_resource_group[chefazure-shared] action create- create or update Resource Group chefazure-shared* azure_resource_template[keyvault-deployment] action deploy- Result: Accepted- Resource Template deployment reached end state of 'Succeeded'.- deploy or re-deploy Resource Manager template 'keyvault-deployment'[2015-11-21T17:20:39+00:00] WARN: Skipping final node save because override_runlist wasgivenRunning handlers:Running handlers completeChef Client finished, 2/2 resources updated in 31 seconds
We have now successfully created a Key Vault and provided access to our Service Principal. Let’s have a look at how a Windows Server might use Key Vault in the process of enabling WinRM securely.
Creating a Windows Server with WinRM Securely Enabled via Key Vault
Now that we have uploaded our certificates into a Key Vault, we can refer to the Key Vault in an Azure Resource Manager template. This opens up certain scenarios such as this one where the WinRM endpoint is correctly configured on a new VM that we create in a Resource Group. There are three stages to the process:
1. Creating a self-signed certificate
2. Uploading the self-signed certificate to the Key Vault
3. Provisioning a WinRM-enabled Windows Server using the certificate in the Key Vault
Let’s go through the process in detail.
Creating a Self-signed Certificate
To get started we need to generate a self-signed certificate to upload to our Key Vault.
Mac OS X/Linux (Azure-cli)
If you are running on Mac or Linux, we can use the OpenSSL tools to generate a certificate in PFX format by following the commands below in bold:
$ openssl genrsa 2048 > private.pemGenerating RSA private key, 2048 bit long modulus.................................................+++..+++e is 65537 (0x10001)$ openssl req -x509 -new -key private.pem -out public.keyYou are about to be asked to enter information that will be incorporatedinto your certificate request.What you are about to enter is what is called a Distinguished Name or a DN.There are quite a few fields but you can leave some blankFor some fields there will be a default value,If you enter '.', the field will be left blank.-----Country Name (2 letter code) [AU]:GBState or Province Name (full name) [Some-State]:LondonLocality Name (eg, city) []:LondonOrganization Name (eg, company) [Internet Widgits Pty Ltd]:Pendrica LtdOrganizational Unit Name (eg, section) []:ITCommon Name (e.g. server FQDN or YOUR name) []:vmEmail Address []:[email protected]$ openssl pkcs12 -export -in public.key -inkey private.pem -out vm.pfxEnter Export Password:Verifying - Enter Export Password:
We how have a .pfx suitable for uploading to Key Vault.
Windows (PowerShell)
If you are running on Windows 8.1, Windows 2012 R2 or higher, the New-SelfSignedCertificate cmdlet can be used to generate a certificate that can then be exported to a .pfx suitable for uploading to the Key Vault:
PS C:UsersStuartPrestonchefazure-ch05> New-SelfSignedCertificate -DnsName vm.mydomain.localDirectory: Microsoft.PowerShell.SecurityCertificate::LocalMachineMYThumbprint Subject---------- -------434A322583F2903880B27FED0E6AA1E0AB68E000 CN=vm.mydomain.localC:UsersStuartPrestonchefazure-ch05> $certPassword = ConvertTo-SecureString -String "P2ssw0rd" -Force -AsPlainTextC:UsersStuartPrestonchefazure-ch05> $cert = Get-ChildItem -Path cert:localMachinemy | where { $_.Subject -eq 'CN=vm.mydomain.local' }C:UsersStuartPrestonchefazure-ch05> Export-PfxCertificate -Cert $cert -Password $certPassword -FilePath vm.pfxDirectory: C:UsersStuartPrestonchefazure-ch05Mode LastWriteTime Length Name---- ------------- ------ -----a---- 21/11/2015 23:20 2615 vm.pfx
Uploading the Certificate to Key Vault
To upload our certificate into the Key Vault so it is ready for use later, we can use the Azure-cli or PowerShell. Both paths follow the same approach - a temporary file is needed as our payload that we upload to Key Vault. The payload is a JSON document that contains our PFX data (which needs to be base64 encoded), and then the whole document needs to be base64 encoded before uploading it.
Mac OS X/Linux (Azure-cli)
To manually create the required payload, we’ll start by base64 encoding our PFX file:
$ base64 -i vm.pfxMIIKMwIBAzCCCe8GCSqGSIb3DQEHAaCCCeAEggncMIIJ2DCCBg8GCSqGSIb3DQEHAaCCBgAEggX8MIIF+DCCBfQGCyqGSIb3DQEMCgECoIIE/jCCBPowHAYKKoZIhvcNAQwBAzAOBAhFmO4v4OiE9wICB9AEggTYz4nFVhhVpiKqD6+DZ8TLd837[...] full output not shownRzEiBCBEAEUAUwBLAFQATwBQAC0AVABJAEQASgAzAFMAOAAAADA7MB8wBwYFKw4DAhoEFNZlC7N1gOrgUIuGWBuoSa31UbHcBBTtCIWsbWB/qgWl31zEK4kmwKQUbQICB9A=
Now we can create a temporary file called secret.json using the following as a template and pasting in your base64 encoded data and password if you set one:
{"data": "[paste your base64 encoded content from above]","dataType" :"pfx","password": "[pfx password]"}
Now we need to base64 encode this secret.json:
$ base64 -i secret.jsonewoiZGF0YSI6ICJNSUlLSVFJQkF6Q0NDZWNHQ1NxR1NJYjNEUUVIQWFDQ0NkZ0VnZ25VTUlJSjBEQ0NCSWNHQ1NxR1NJYjNEUUVIQnFDQ0JIZ3dnZ1IwQWdFQU1JSUViUVlKS29aSWh2Y05BUWNCTUJ3R0NpcUdTSWIzRFFFTUFRWXdEZ1FJVHIv[...] full output not shownYk1GaXpFTXBTWUUvODVnS0ZvSDk4T1BHc3dNVEFoTUFrR0JTc09Bd0lhQlFBRUZBdWFzdjlVM2gxRi8wL2NWK0EvSWx4eDdhMFhCQWdvc2NUbkpWMEZ4QUlDQ0FBPSIsCiJkYXRhVHlwZSI6ICJwZngiLAoicGFzc3dvcmQiOiAiIgp9Cg==
We can then use the azure keyvault secret set command to upload this secret:
$ azure keyvault secret set --vault-name "chefazure" --secret-name "vmselfcert" --value "ewoiZGF0YSI6ICJNSUlLSVFJQkF6Q0NDZWNHQ1NxR1NJYjNEUUVIQWFDQ0NkZ0VnZ25VTUlJSjBEQ0NCSWNHQ1NxR1NJYjNEUUVIQnFDQ0JIZ3dnZ1IwQWdFQU1JSUViUVlKS29aSWh2Y05BUWNCTUJ3R0NpcUdTSWIzRFFFTUFRWXdEZ1FJVHIvd0ppOE5QcHNDQWdnQWdJSUVRRHNldzZVaVM4SHg2eldOWHN2clE1WGFiMDJsNUZkOE5aZjhEeVFzOCtYOHB0VGlZNUJSOGFMaDd5UVJ[...] full input not shownGaXpFTXBTWUUvODVnS0ZvSDk4T1BHc3dNVEFoTUFrR0JTc09Bd0lhQlFBRUZBdWFzdjlVM2gxRi8wL2NWK0EvSWx4eDdhMFhCQWdvc2NUbkpWMEZ4QUlDQ0FBPSIsCiJkYXRhVHlwZSI6ICJwZngiLAoicGFzc3dvcmQiOiAiIgp9Cg=="info: Executing command keyvault secret set+ Creating secret https://chefazure.vault.azure.net/secrets/vmselfcertdata: value "ewoiZGF0YSI6ICJNSUlLSVFJQkF6Q0NDZWNHQ1NxR1NJYjNEUUVIQWFDQ0NkZ0VnZ25VTUlJSjBEQ0NCSWNHQ1NxR1NJYjNEUUVIQnFDQ0JIZ3dnZ1IwQWdFQU1JSUViUVlKS29aSWh2Y05BUWNCTUJ3R0NpcUdTSWIzRFFFTUFRWXdEZ1FJVHI[...] full output not shownaYk1GaXpFTXBTWUUvODVnS0ZvSDk4T1BHc3dNVEFoTUFrR0JTc09Bd0lhQlFBRUZBdWFzdjlVM2gxRi8wL2NWK0EvSWx4eDdhMFhCQWdvc2NUbkpWMEZ4QUlDQ0FBPSIsCiJkYXRhVHlwZSI6ICJwZngiLAoicGFzc3dvcmQiOiAiIgp9Cg=="data: id https://chefazure.vault.azure.net/secrets/vmselfcert/3772db676efd407b89f8fdd86bb545f5data: attributes enabled truedata: attributes created "2016-01-28T22:34:51.000Z"data: attributes updated "2016-01-28T22:34:51.000Z"info: keyvault secret set command OK
Windows (PowerShell)
Here’s a PowerShell script to create our temporary payload in the correct format and upload it:
$fileName = "vm_mydomain_com.pfx"
$certPassword = "your-cert-password"
$fileContentBytes = get-content $fileName -Encoding Byte
$fileContentEncoded = [System.Convert]::ToBase64String($fileContentBytes)
$jsonObject = @"
{
"data": "$filecontentencoded",
"dataType" :"pfx",
"password": "$certPassword"
}
"@
$jsonObjectBytes = [System.Text.Encoding]::UTF8.GetBytes($jsonObject)
$jsonEncoded = [System.Convert]::ToBase64String($jsonObjectBytes)
$secret = ConvertTo-SecureString -String $jsonEncoded -AsPlainText -Force
Save the file as encodeCertificate.ps1 and execute it. Now we can execute the Set-AzureKeyVaultSecret cmdlet to upload the secret to the Key Vault:
PS C:UsersStuartPrestonchefazure-ch05> Set-AzureKeyVaultSecret -VaultName "chefazure" -Name "vmselfcert" -SecretValue $secretVault Name : chefazureName : vmselfcertVersion : f4233e85f0c94bd987b337a7e329fa48Id : https://chefazure.vault.azure.net:443/secrets/vmselfcert/f4233e85f0c94bd987b337a7e329fa48Enabled : TrueExpires :Not Before :Created : 22/11/2015 00:20:23Updated : 22/11/2015 00:20:23Content Type :Tags :
We’ll need the URL to the secret (the Id field) for the next section.
Provisioning a WinRM-Enabled Windows Server
Here’s the deploy.json file you will need to provision a WinRM-enabled Windows Server. You can save this JSON in cookbooks/chefazure-ch05/files/winrm_winserver/deploy.json
{"$schema": "http://schema.management.azure.com/schemas/2014-04-01-preview/deploymentTemplate.json","contentVersion": "1.0.0.0","parameters": {"newStorageAccountName": {"type": "string","metadata": {"description": "This is the name of the storage account"}},"dnsNameForPublicIP": {"type": "string","metadata": {"description": "DNS Name for the Public IP. Must be lowercase."}},"adminUserName": {"type": "string","metadata": {"description": "Admin username"}},"adminPassword": {"type": "securestring","metadata": {"description": "Admin password"}},"imagePublisher": {"type": "string","defaultValue": "MicrosoftWindowsServer","metadata": {"description": "Image Publisher"}},"imageOffer": {"type": "string","defaultValue": "WindowsServer","metadata": {"description": "Image Offer"}},"imageSKU": {"type": "string","defaultValue": "2012-R2-Datacenter","metadata": {"description": "Image SKU"}},"location": {"type": "String","metadata": {"description": "Location where resources will be deployed"}},"vmSize": {"type": "string","metadata": {"description": "Size of the VM"}},"vmName": {"type": "string","metadata": {"description": "Name of the VM"}},"vaultName": {"type": "string","metadata": {"description": "Name of the KeyVault"}},"vaultResourceGroup": {"type": "string","metadata": {"description": "Resource Group of the KeyVault"}},"certificateUrl": {"type": "string","metadata": {"description": "Url of the certificate with version in KeyVault e.g. https://testault.vault.azure.net/secrets/testcert/b621es1db241e56a72d037479xab1r7"}}},"variables": {"addressPrefix": "10.0.0.0/16","subnet1Name": "Subnet-1","subnet1Prefix": "10.0.0.0/24","vmStorageAccountContainerName": "vhds","publicIPAddressName": "myPublicIP","publicIPAddressType": "Dynamic","storageAccountType": "Standard_LRS","virtualNetworkName": "myVNET","nicName": "myNIC","vnetID": "[resourceId('Microsoft.Network/virtualNetworks', variables('virtualNetworkName'))]","subnet1Ref": "[concat(variables('vnetID'),'/subnets/',variables('subnet1Name'))]"},"resources": [{"type": "Microsoft.Storage/storageAccounts","name": "[parameters('newStorageAccountName')]","apiVersion": "2015-05-01-preview","location": "[parameters('location')]","properties": {"accountType": "[variables('storageAccountType')]"}},{"apiVersion": "2015-05-01-preview","type": "Microsoft.Network/publicIPAddresses","name": "[variables('publicIPAddressName')]","location": "[parameters('location')]","properties": {"publicIPAllocationMethod": "[variables('publicIPAddressType')]","dnsSettings": {"domainNameLabel": "[parameters('dnsNameForPublicIP')]"}}},{"apiVersion": "2015-05-01-preview","type": "Microsoft.Network/virtualNetworks","name": "[variables('virtualNetworkName')]","location": "[parameters('location')]","properties": {"addressSpace": {"addressPrefixes": ["[variables('addressPrefix')]"]},"subnets": [{"name": "[variables('subnet1Name')]","properties": {"addressPrefix": "[variables('subnet1Prefix')]"}}]}},{"apiVersion": "2015-05-01-preview","type": "Microsoft.Network/networkInterfaces","name": "[variables('nicName')]","location": "[parameters('location')]","dependsOn": ["[concat('Microsoft.Network/publicIPAddresses/', variables('publicIPAddressName'))]","[concat('Microsoft.Network/virtualNetworks/', variables('virtualNetworkName'))]"],"properties": {"ipConfigurations": [{"name": "ipconfig1","properties": {"privateIPAllocationMethod": "Dynamic","publicIPAddress": {"id": "[resourceId('Microsoft.Network/publicIPAddresses',variables('publicIPAddressName'))]"},"subnet": {"id": "[variables('subnet1Ref')]"}}}]}},{"apiVersion": "2015-06-15","type": "Microsoft.Compute/virtualMachines","name": "[parameters('vmName')]","location": "[parameters('location')]","dependsOn": ["[concat('Microsoft.Storage/storageAccounts/', parameters('newStorageAccountName'))]","[concat('Microsoft.Network/networkInterfaces/', variables('nicName'))]"],"properties": {"hardwareProfile": {"vmSize": "[parameters('vmSize')]"},"osProfile": {"computername": "[parameters('vmName')]","adminUsername": "[parameters('adminUsername')]","adminPassword": "[parameters('adminPassword')]","secrets": [{"sourceVault": {"id": "[resourceId(parameters('vaultResourceGroup'), 'Microsoft.KeyVault/vaults', parameters('vaultName'))]"},"vaultCertificates": [{"certificateUrl": "[parameters('certificateUrl')]","certificateStore": "My"}]}],"windowsConfiguration": {"provisionVMAgent": "true","winRM": {"listeners": [{"protocol": "http"},{"protocol": "https","certificateUrl": "[parameters('certificateUrl')]"}]},"enableAutomaticUpdates": "true"}},"storageProfile": {"imageReference": {"publisher": "[parameters('imagePublisher')]","offer": "[parameters('imageOffer')]","sku": "[parameters('imageSKU')]","version": "latest"},"osDisk": {"name": "osdisk","vhd": {"uri": "[concat('http://',parameters('newStorageAccountName'),'.blob.core.windows.net/vhds/','osdisk.vhd')]"},"caching": "ReadWrite","createOption": "FromImage"}},"networkProfile": {"networkInterfaces": [{"id": "[resourceId('Microsoft.Network/networkInterfaces',variables('nicName'))]"}]},"diagnosticsProfile": {"bootDiagnostics": {"enabled": "true","storageUri": "[concat('http://',parameters('newStorageAccountName'),'.blob.core.windows.net')]"}}}}]}
Here’s an example recipe that would be required. You can tweak it as required for your environment and save it as cookbooks/chefazure-ch05/recipes/winrm_winserver.rb.
require 'chef/provisioning/azurerm'with_driver 'AzureRM:b6e7eee9-YOUR-GUID-HERE-03ab624df016'azure_resource_group 'chefazure-ch05' dolocation 'West Europe'tags CreatedFor: 'Using Chef with Microsoft Azure book'endazure_resource_template 'keyvault-deployment' doresource_group 'chefazure-ch05'template_source 'cookbooks/chefazure-ch05/files/winrm_winserver/deploy.json'parameters newStorageAccountName: 'chefazurech05',dnsNameForPublicIP: 'chefazure-ch05-vm',adminUsername: 'azure',adminPassword: 'P2ssw0rd',imagePublisher: 'MicrosoftWindowsServer',imageOffer: 'WindowsServer',imageSKU: '2012-R2-Datacenter',location: 'West Europe',vmName: 'ch05vm',vmSize: 'Standard_D2',vaultName: 'chefazure',vaultResourceGroup: 'chefazure-shared',certificateUrl: 'https://chefazure.vault.azure.net:443/secrets/vmselfcert/02a48bca5dbf42228a170c6ebab476af'end
We can see that this is a fairly standard ARM template that will produce a Windows 2012 R2 Datacenter server, but also configured to point at the Key Vault we created earlier. This allows the template to retrieve the certificate, store it in the VM's certificate store, and then configure WinRM securely.
Upload the cookbook using knife cookbook upload:
PS C:UsersStuartPrestonchefazure-ch05> knife cookbook upload chefazure-ch05Uploading chefazure-ch05 [0.1.0]Uploaded 1 cookbook.
We can now execute this by running chef-client -o recipe[chefazure-ch05::winrm_winserver]:
PS C:UsersStuartPrestonchefazure-ch05> chef-client -o recipe[chefazure-ch05::winrm_winserver]Starting Chef Client, version 12.5.1[2015-11-22T07:43:45+00:00] WARN: Run List override has been provided.[2015-11-22T07:43:45+00:00] WARN: Original Run List: [][2015-11-22T07:43:45+00:00] WARN: Overridden Run List: [recipe[chefazure-ch05::winrm_winserver]][2015-11-22T07:43:46+00:00] WARN: chef-client doesn't have administrator privileges on node DESKTOP-TIDJ3S8. This might cause unexpected resource failures.resolving cookbooks for run list: ["chefazure-ch05::winrm_winserver"]Synchronizing Cookbooks:- chefazure-ch05 (0.1.0)Compiling Cookbooks...Converging 2 resourcesRecipe: chefazure-ch05::winrm_winserver* azure_resource_group[chefazure-ch05] action create- create or update Resource Group chefazure-ch05* azure_resource_template[chefazure-ch05-vm-deployment] action deploy- Result: Accepted- Resource Microsoft.Network/virtualNetworks 'myVNET' provisioning status is Running- Resource Microsoft.Network/publicIPAddresses 'myPublicIP' provisioning status is Running- Resource Microsoft.Storage/storageAccounts 'chefazurech05' provisioning status is Running- Resource Microsoft.Network/virtualNetworks 'myVNET' provisioning status is Running- Resource Microsoft.Network/publicIPAddresses 'myPublicIP' provisioning status is Running- Resource Microsoft.Storage/storageAccounts 'chefazurech05' provisioning status is Running- Resource Microsoft.Storage/storageAccounts 'chefazurech05' provisioning status is Running- Resource Microsoft.Storage/storageAccounts 'chefazurech05' provisioning status is Running- Resource Microsoft.Storage/storageAccounts 'chefazurech05' provisioning status is Running- Resource Microsoft.Storage/storageAccounts 'chefazurech05' provisioning status is Running- Resource Microsoft.Storage/storageAccounts 'chefazurech05' provisioning status is Running- Resource Microsoft.Storage/storageAccounts 'chefazurech05' provisioning status is Running- Resource Microsoft.Storage/storageAccounts 'chefazurech05' provisioning status is Running- Resource Microsoft.Compute/virtualMachines 'ch05vm' provisioning status is Running- Resource Microsoft.Compute/virtualMachines 'ch05vm' provisioning status is Running- Resource Microsoft.Compute/virtualMachines 'ch05vm' provisioning status is Running- Resource Microsoft.Compute/virtualMachines 'ch05vm' provisioning status is Running- Resource Microsoft.Compute/virtualMachines 'ch05vm' provisioning status is Running- Resource Microsoft.Compute/virtualMachines 'ch05vm' provisioning status is Running- Resource Template deployment reached end state of 'Succeeded'.- deploy or re-deploy Resource Manager template 'chefazure-ch05-vm-deployment'[2015-11-22T07:59:37+00:00] WARN: Skipping final node save because override_runlist wasgivenRunning handlers:Running handlers completeChef Client finished, 2/2 resources updated in 6 minutes 13 seconds
Verifying WinRM Status
We can verify the status by using the Test-NetConnection cmdlet, which checks whether the specified port is open. When configured securely, WinRM runs on port 5986.
PS C:UsersStuartPrestonchefazure-ch05> Test-NetConnection chefazure-ch05-vm.westeurope.cloudapp.azure.com -Port 5986WARNING: Ping to chefazure-ch05-vm.westeurope.cloudapp.azure.com failed -- Status: TimedOutComputerName : chefazure-ch05-vm.westeurope.cloudapp.azure.comRemoteAddress : 23.97.185.157RemotePort : 5986InterfaceAlias : Ethernet 2SourceAddress : 192.168.1.13PingSucceeded : FalsePingReplyDetails (RTT) : 0 msTcpTestSucceeded : True
We can also RDP to the machine to verify that the WinRM server is configured correctly by typing the command winrm get winrm/config/service at an administrative command prompt as shown in Figure 5-1:

Figure 5-1. WinRM configuration on a Windows 2012 R2 server
That covers the server side, but what about the client side? First of all, depending on your operating system, you may find that the WinRM service is not started, so let’s start it. At an administrative PowerShell session, type Start-Service winrm:
PS C:UsersStuartPrestonchefazure-ch05> Start-Service winrm As the certificate we uploaded wasn’t signed by a trusted certificate authority, and neither does the name of the certificate match the hostname we are connecting to, we need to specify a couple of options so that we can skip this checking when WinRM connects:
PS C:UsersStuartPrestonchefazure-ch05> $PSSessionOptions = New-PSSessionOption -SkipCACheck -SkipCNCheckPS C:UsersStuartPrestonchefazure-ch05> Enter-PSSession -UseSSL -ComputerName chefazure-ch05-vm.westeurope.cloudapp.azure.com -Credential ch05vmazure -SessionOption $PSSessionOptions
After entering the password, you will be presented with a remote session:
[chefazure-ch05-vm.westeurope.cloudapp.azure.com]: PS C:UsersazureDocuments> hostnamech05vm
Note
Don’t forget to destroy your Resource Group after each exercise in the book!
We have now used Chef Provisioning and Azure to provision and Key Vault and used it to securely enable WinRM. Let’s have a look at the other types of resources that can be created in Azure.
Creating Other PaaS Resources via Chef Provisioning and Resource Explorer
Let’s imagine we wanted to use a brand new Azure PaaS resource that has just been announced publicly at a conference. We could wait until the API gets documented. Or we could use a tool called Resource Explorer to inspect and explore resources that have already been created in your subscription.
Let’s have a look at the process needed to automate the creation of any resource you can create through the Management Portal today.
Azure Data Factory describes itself as “a fully managed service for composing data storage, processing, and movement services into streamlined, scalable, and reliable data production pipelines.” (see https://azure.microsoft.com/en-us/documentation/videos/azure-data-factory-overview for more detail).
Immediately I can imagine hundreds of use cases for such a PaaS service as part of a larger architecture, so it sounds like a good candidate for our lesson in provisioning generic resources from Chef Provisioning. Azure has some useful tools for quickly creating provisioning templates for anything available in the gallery, if you know where to look. We’ll start from scratch, assuming no prior knowledge of this resource and work through the process for rapidly creating an Azure Resource Manager template and Chef Provisioning recipe.
Creating a Dummy Resource
The first thing I do when I want to have a play with new resources in Azure is to head to the Azure Management Portal ( https://portal.azure.com ). Every time I click New, I am overwhelmed with a list of new shiny things I can play with!
An example of this can be seen in Figure 5-2. The analytics space is clearly a fast-moving area with plenty of solutions already integrated into Azure and no doubt more to come. Let’s create a Data Factory.

Figure 5-2. Example services that can be deployed from the Azure Marketplace
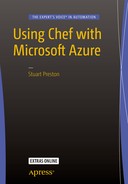
When we create a resource using the portal in Azure, there is a predictable process with a pattern to it. We select our resource, pick a subscription and resource group, add some settings/properties, and then press Create. Moments later we have a provisioned resource. Taking Data Factory as an example, Figure 5-3 shows the options that need to be supplied to provision a Data Factory.
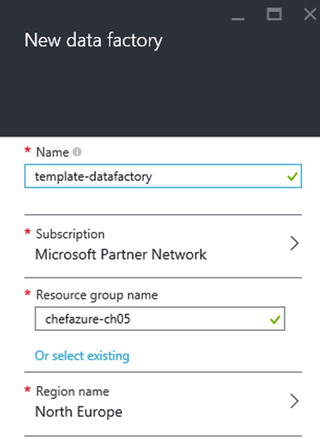
Figure 5-3. New Data Factory options
We simply need to supply the name, a Resource Group, and a Region to provision the resource. Once the resource has been provisioned we can view the Data Factory blade, as shown in Figure 5-4.

Figure 5-4. Viewing our template data factory that has been provisioned
Viewing the Resource in Resource Explorer
Now the resource has been provisioned we can use the Resource Explorer tool , which can be found from the Portal by pressing Browse, then navigating to Resource Explorer (as shown in Figure 5-5).

Figure 5-5. Finding the Resource Explorer in the Browse list in the Azure Management Portal
You are presented here with a tree-view containing all the Providers and importantly, Subscriptions available. Drilling into the Subscription we can see a list of all the available Resource Groups, from which we can further expand and see the Resources that have been provisioned in that Resource Group.
This can be seen in Figure 5-6, where we have expanded the chefazure-ch05 Resource Group to find a Resource of type Microsoft.DataFactory/dataFactories called template-datafactory.

Figure 5-6. Resource Explorer showing the tempate-datafactory resource
Extracting the Template
As before, we need an ARM template and a Recipe so that we can use Chef Provisioning to provision our Data Factory.
Let’s start with the Resource definition found in Resource Explorer, by navigating to Deployments/Microsoft.DataFactory-template-datafactory. In the output window (as shown in Figure 5-7), we can see a templateLink element, in our case the URL: https://gallery.azure.com/artifact/20151001/Microsoft.DataFactory.0.9.3-preview/DeploymentTemplates/DataFactory.json and we can use this to retrieve the complete template used, and the parameters.
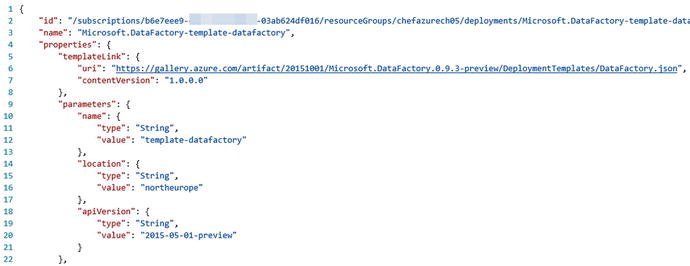
Figure 5-7. Viewing the deployment JSON within Resource Explorer
Now we can proceed to create the required files for our deployment; we’ll need to store the deploy.json and a data_factory.rb in our cookbook as follows:
cookbooks/chefazure-ch05/files/data_factory/deploy.json:{"$schema": "http://schema.management.azure.com/schemas/2014-04-01-preview/deploymentTemplate.json#","contentVersion": "1.0.0.0","parameters": {"name": {"type": "string"},"location": {"type": "string"},"apiVersion": {"type": "string","defaultValue": "2015-01-01-preview"}},"resources": [{"apiVersion": "[parameters('apiVersion')]","name": "[parameters('name')]","location": "[parameters('location')]","type": "Microsoft.DataFactory/dataFactories","properties": {}}]}cookbooks/chefazure-ch05/recipes/data_factory.rb:require 'chef/provisioning/azurerm'with_driver 'AzureRM:b6e7eee9-YOUR-GUID-HERE-03ab624df016'azure_resource_group 'chefazure-ch05-ne' dolocation 'North Europe'tags CreatedFor: 'Using Chef with Microsoft Azure book'endazure_resource_template 'chefazure-ch05-datafactory-deployment' doresource_group 'chefazure-ch05-ne'template_source 'cookbooks/chefazure-ch05/files/data_factory/deploy.json'parameters name: 'chefazure-ch05-datafactory',location: 'North Europe'end
Running a Custom Deployment
Now that we have retrieved our Resource Manager template, stored it in our cookbook, and created a recipe that uses it, we can execute it using the Chef Client as follows:
PS C:UsersStuartPrestonchefazure-ch05> knife cookbook upload chefazure-ch05Uploading chefazure-ch05 [0.1.0]Uploaded 1 cookbook.PS C:UsersStuartPrestonchefazure-ch05> chef-client -o recipe[chefazure-ch05::data_factory]Starting Chef Client, version 12.5.1[2015-11-22T17:16:51+00:00] WARN: Run List override has been provided.[2015-11-22T17:16:51+00:00] WARN: Original Run List: [][2015-11-22T17:16:51+00:00] WARN: Overridden Run List: [recipe[chefazure-ch05::data_factory]]resolving cookbooks for run list: ["chefazure-ch05::data_factory"]Synchronizing Cookbooks:- chefazure-ch05 (0.1.0)Compiling Cookbooks...Converging 2 resourcesRecipe: chefazure-ch05::data_factory* azure_resource_group[chefazure-ch05-ne] action create- create or update Resource Group chefazure-ch05-ne* azure_resource_template[chefazure-ch05-datafactory-deployment] action deploy- Result: Accepted- Resource Microsoft.DataFactory/dataFactories 'chefazure-ch05-datafactory' provisioning Status is Running- Resource Microsoft.DataFactory/dataFactories 'chefazure-ch05-datafactory' provisioning Status is Running- Resource Template deployment reached end state of 'Succeeded'.- deploy or re-deploy Resource Manager template 'chefazure-ch05-datafactory-deployment'[2015-11-22T17:17:27+00:00] WARN: Skipping final node save because override_runlist was givenRunning handlers:Running handlers completeChef Client finished, 2/2 resources updated in 01 minutes 16 seconds
Having converged, we can now view that our Resource was provisioned correctly, as seen in Figure 5-8.
Figure 5-8. A Data Factory created via Chef Provisioning and Azure Resource Manager
This was a very simple example, but we can now combine PaaS and IaaS resources when using Chef Provisioning and Azure, and this opens up many possibilities for the creation of hybrid environments.
Summary
In this chapter we explored Azure Resource Manager and demonstrated how to use it with all the features of Chef Provisioning. As we have been able to see - integrating Chef with Azure is not just about provisioning compute (VM) resources, and this enables Chef to be used to provision hybrid PaaS and IaaS environments in a reliable, repeatable way.
The number of services in Azure grows weekly, a pace far faster than this book can keep up with. So we demonstrated how to interpret Resource Explorer and create your own templates as and when new services become available.
In the next chapter we’re going to take a look how we can use Azure as part of our quest for quality when using the Chef toolset.