In this chapter, we’ll spend time investigating refactorings in the Compiler API. You’ll learn how they work and what you need to do to implement one. Because refactorings tend to use a fair amount of members in the Workspaces API, we’ll examine that as well.
Consistency in Structure
If there’s one term that is the most misused term in software development, it’s arguably “refactoring.” Most of the time when a developer talks about “refactoring code,” they’re making a number of changes to the code that break existing functionality. While that may be something that must be done to streamline the code base or make performance better, that’s really not what refactoring is. Here’s what I consider to be the official definition of refactoring:
Refactoring is the process of changing a software system in such a way that it does not alter the external behavior of the code yet improves its internal structure.
—Martin Fowler, “Refactoring,” 1999, pg, xvi
For example, consider the code in Listing 3-1.
Listing 3-1. Performing a simple arithmetic calculation
using System;using System.Collections.Generic;using System.Linq;using System.Text;using System.Threading.Tasks;namespace SimpleExamples{class Program{static void Main(string[] args){decimal value = 0;if(args.Length > 0 && decimal.TryParse(args[0], out value)){var initialValue = value * 2;var nextValue = initialValue + 3;var finalValue = (value * 3) - (nextValue / 2) + 2;Console.Out.WriteLine("Final value: ");Console.Out.WriteLine(finalValue.ToString());}}}}
It’s a small piece of code that does a simple calculation: 3*x - (2*x + 3) / 2 + 2. The code is based on what Visual Studio generates when you add a new class to a project. If I pass in 3 to the console app, it’ll print out 7 as the answer. Is there any way we can refactor the code so it’s a little cleaner?
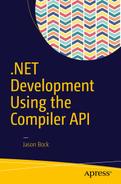
Visual Studio has some built-in refactorings that we can use in this code. If we highlight the first three lines in the if statement, we can press Ctrl + . (period), and access the “Extract Method” refactoring, as shown in Figure 3-1.
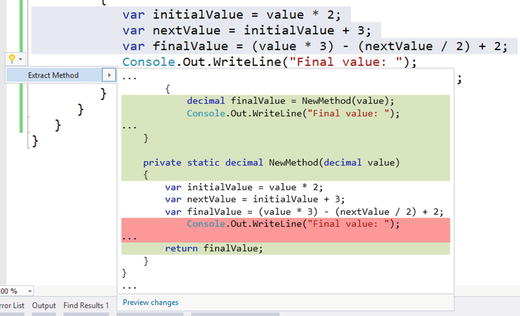
Figure 3-1. Using the Extract Method refactoring
If I accept this refactoring, the code change is made. Visual Studio then puts me into the Rename refactoring to give me the opportunity to change the default name of the generated method, “NewMethod”. This is the same mode you would get if you pressed F2 on a code member. The Rename refactor is shown in Figure 3-2.

Figure 3-2. Using the Rename refactoring
Then I rename the method to Calculate(). Now this calculation is isolated into its own method, so any updates can be made here rather than in the console’s Main() method. In fact, this calculation can be refactored to 2 * value + 0.5, so if I update the implementation of the method, any callers of Calculate() will automatically get that change.
We can also pull out the string "Final Value: ", which is passed into WriteLine(), and put it into a constant, as shown in Figure 3-3.

Figure 3-3. Creating a constant value via a refactoring
Finally, as Figure 3-4 shows, we can remove a bunch of using statements that have no value.
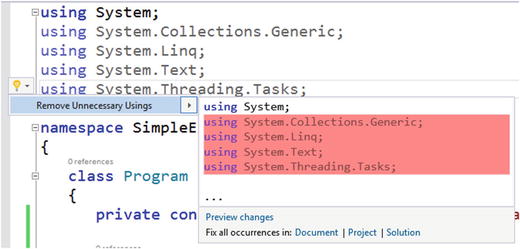
Figure 3-4. Removing unnecessary using statements
With all these updates in place, Listing 3-2 shows what the code looks like now.
Listing 3-2. Refactoring the simple arithmetic calculation
using System;namespace SimpleExamples{class Program{private const string FinalValueMessage = "Final value: ";static void Main(string[] args){decimal value = 0;if(args.Length > 0 && decimal.TryParse(args[0], out value)){decimal finalValue = Calculate(value);Console.Out.WriteLine(FinalValueMessage);Console.Out.WriteLine(finalValue.ToString());}}private static decimal Calculate(decimal value){return 2 * value + 0.5M;}}}
Compare the original implementation in Listing 3-1 with the modifications in Listing 3-2. We have nearly the same number of lines of code, but we have better organization and structure to the code, with less noise to boot. This is exactly what refactoring is, and having tools built into to a developer’s IDE makes running refactorings painless.
But a tool vendor can’t provide all the refactoring that the majority of developers would like to use. Although Visual Studio, as you just saw, has some refactorings in place, there may other refactorings that you’d love to introduce into its system without having to wait for Microsoft to create it or for third-party tool vendors to add more to their product, if they ever will. However, with the Compiler API and its integration into Visual Studio, you can define your own refactorings whenever you want. As you saw in Chapter 2, it’s fairly straightfoward to create an analyzer and code fix; the same is true of a refactoring. Let’s walk through creating a custom refactoring in Visual Studio that moves all the types from a file into their own files.
Developing a Refactoring
In this section, we’ll explore how a refactoring is made. We’ll examine its design first, and then go through the steps needed to implement the refactoring.
Understanding the Problem
The refactoring we’re going to make in this chapter is centered on the idea that every class should have its own file, that is, if I have code like this in a .cs file:
public class One { /* ... */ }public class Two { /* ... */ }public class Three { /* ... */ }
What I’d like to have is three separate files called One.cs, Two.cs, and Three.cs. If these classes had any nested classes, they’d just come along for the ride.
But consider this code scenario:
public class One { /* ... */ }public class Two { /* ... */ }namespace SubNamespace{public class Three { /* ... */ }}
What I’d do in this case is have a subfolder called SubNamespace and put Three.cs in that folder. In other words, if the following code structure exists, the resulting folder structure should look like Figure 3-5:

Figure 3-5. Folder structure for code files (assume that Three.cs exists in the SubNamespace folder)
namespace Company.Product.Core{public class One { /* ... */ }public class Two { /* ... */ }namespace SubNamespace{public class Three { /* ... */ }}}
Of course, the original file would be deleted unless it was already named One.cs or Two.cs. We’d have to be careful to only clean up the original file if it was no longer needed. But what about using directives? What if there were 5 using directives at the top, but only 3 were needed for the code in One.cs, 2 were needed for Two.cs, and all 5 were needed for Three.cs? What about developers who don’t follow this namespace to folder mapping convention for file storage? Perhaps our refactoring should provide an option to just create the new files in the current directory and let developers move them around wherever they want to after that. Also, what if the filesnames Two.cs and Three.cs already exist? We don’t want to overwrite what’s currently there.
With this scenario in mind, let’s create a refactoring that will provide two options to the user if there are more than 1 top-level classes in that file. One option is to create files with the folder convention shown in Figure 3-5. The other option is to simply create the files in the same directory as the current file. In both cases, we need to be careful not to create name collisions with new files and we’ll only include the necessary using statements in the new files. In the next section, we’ll set up all of the Visual Studio projects needed to create this refactoring.
Creating a Refactoring Solution
In the “Using the Template” section in Chapter 2, we used a template to create the analyzer projects. There’s a similar template for refactorings, as shown in Figure 3-6.
Figure 3-6. Using the refactoring project template
When you click OK, you’ll get the solution layout shown in Figure 3-7.
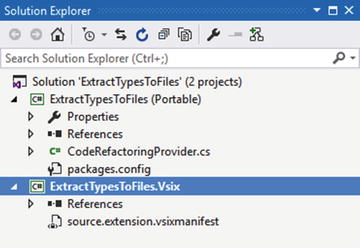
Figure 3-7. Refactoring projects that are generated by the template
As with the analyzer template, a somewhat silly example is generated that offers a refactoring for any class to reverse its name. For example, a class named “Customer” would be changed to “remotsuC” if this refactoring was used. But, as with the generated analyzer example, it’s worth perusing the code to get familiar with its setup and check out some of the methods you might want to use in the refactorings that you create (like Renamer.RenameSymbolAsync(), which does a symbol rename for you across a solution). Also, note that there is no test project made with the template. We’ll fix that problem in the “Unit Testing” section later in this chapter.
Note that I keep using the phrase “offer a refactoring.” Unlike an analyzer, which will immediately show a visual indicator in Visual Studio if an issue is present (e.g., a red squiggle under a method identifier), refactorings will not execute unless the developer is on a particular piece of code in the editor and presses Ctrl + . (period). Refactorings may end up doing a fair amount of work that will affect the entire solution, and doing that analysis as often as a diagnostic may slow down Visual Studio considerably. Also, refactorings by their defintion shouldn’t do anything to a code base that would break current behavior. They’re only there to improve the code’s structure.
With the projects in place, let’s work on the implementation of the refactoring.
Building the Refactoring
We have a good idea what we want to do with our refactoring. Now we need to implement it. First, we’ll define the refactoring class :
[ExportCodeRefactoringProvider(LanguageNames.CSharp,Name = nameof(ExtractTypesToFilesCodeRefactoringProvider))][Shared]internal class ExtractTypesToFilesCodeRefactoringProvider: CodeRefactoringProvider{public sealed override async Task ComputeRefactoringsAsync( CodeRefactoringContext context){/* ... */
Similar to analyzers, we adorn our class that inherits from CodeRefactoringProviderwith a couple of attributes so environments like Visual Studio can identify them and use them correctly. The only member that you can override is ComputeRefactoringsAsync(), which is where you’ll use the context to add refactorings if needed. Listing 3-3 contains the overridden method’s implementation.
Listing 3-3. Implementing ComputeRefactoringsAsync() in a refactoring class
public sealed override async Task ComputeRefactoringsAsync(CodeRefactoringContext context){var document = context.Document;var documentFileNameWithoutExtension =Path.GetFileNameWithoutExtension(document.FilePath);var root = await document.GetSyntaxRootAsync(context.CancellationToken).ConfigureAwait(false);var model = await document.GetSemanticModelAsync( context.CancellationToken).ConfigureAwait(false);var typesToRemove = root.GetTypesToRemove(model, documentFileNameWithoutExtension);if(typesToRemove.Length > 1){context.RegisterRefactoring(CodeAction.Create("Move types to files in folders",async token => await CreateFiles(document, root, model, typesToRemove,_ => _.Replace(".", "\"), token)));context.RegisterRefactoring(CodeAction.Create("Move types to files in current folder",async token => await CreateFiles(document, root, model, typesToRemove,_ => string.Empty, token)));}}
We’ll check the root node from the given Document object and see how many top level types exist in the document. That’s what’s done in GetTypesToRemove(), which is implemented in Listing 3-4.
Listing 3-4. Calculating the types to remove from the file
internal static ImmutableArray<TypeToRemove> GetTypesToRemove(this SyntaxNode @this, SemanticModel model,string documentFileNameWithoutExtension){var typesToRemove = new List<TypeToRemove>();TypeDeclarationSyntax typeToPreserve = null;var typeNodes = @this.DescendantNodes(_ => true).OfType<TypeDeclarationSyntax>();foreach(var typeNode in typeNodes){var type = model.GetDeclaredSymbol(typeNode) as ITypeSymbol;if(type.ContainingType == null){if(type.Name != documentFileNameWithoutExtension){typesToRemove.Add(new TypeToRemove(typeNode, type));}else{typeToPreserve = typeNode;}}}return typesToRemove.ToImmutableArray();}
We only want to move types to other files if they’re not nested types and they don’t have the same name as the current document’s file name. The TypeToRemove class is a simple, immutable object that contains the TypeDeclarationSyntaxand ITypeSymbol objects for a given type declaration:
internal sealed class TypeToRemove{public TypeToRemove(TypeDeclarationSyntax declaration,ITypeSymbol symbol){this.Declaration = declaration;this.Symbol = symbol;}public TypeDeclarationSyntax Declaration { get; }public ITypeSymbol Symbol { get; }}
If there’s more than one type, we provide two refactorings: one that puts files into separate folders if necessary, the other puts the files into the current directory. CreateFiles()is where we create new files and update the current one so it doesn’t contained the moved types. Listing 3-5 shows how it works.
Listing 3-5. Creating new files for types
private static async Task<Solution> CreateFiles(Document document,SyntaxNode root, SemanticModel model,ImmutableArray<TypeToRemove> typesToRemove,Func<string, string> typeFolderGenerator, CancellationToken token){var project = document.Project;var workspace = project.Solution.Workspace;project = MoveTypeNodes(model, typesToRemove, typeFolderGenerator, project, token);var newRoot = root.RemoveNodes(typesToRemove.Select(_ => _.Declaration),SyntaxRemoveOptions.AddElasticMarker);var newSolution = project.Solution;var projectId = project.Id;newSolution = newSolution.WithDocumentSyntaxRoot(document.Id, newRoot);var newDocument = newSolution.GetProject(project.Id).GetDocument(document.Id);newRoot = await newDocument.GetSyntaxRootAsync(token);var newModel = await newDocument.GetSemanticModelAsync(token);var newUsings = newRoot.GenerateUsingDirectives(newModel);newRoot = newRoot.RemoveNodes(newRoot.DescendantNodes(_ => true).OfType<UsingDirectiveSyntax>(),SyntaxRemoveOptions.AddElasticMarker);newRoot = (newRoot as CompilationUnitSyntax)?.WithUsings(newUsings);return newSolution.WithDocumentSyntaxRoot(document.Id, newRoot);}
Most of the implementation lies within MoveTypeNodes()—we’ll get back to that one in a moment. After we move the types to different files, we then remove all of the type declarations with RemoveNodes(). Then, we update the current document with our new SyntaxNode and subsequently the current Solution. Remember, whenever you think you’re changing an object within the Compiler API it usually doesn’t change that specific object reference because it’s probably immutable. The last thing we do is remove all of the existing using statements and add only the ones we need. This list is generated with GenerateUsingDirectives(), as shown in Listing 3-6.
Listing 3-6. Creating all the necessary using statements for a type
internal static SyntaxList<UsingDirectiveSyntax> GenerateUsingDirectives(this SyntaxNode @this, SemanticModel model){var namespacesForType = new SortedSet<string>();foreach (var childNode in @this.DescendantNodes(_ => true)){var symbol = model.GetSymbolInfo(childNode).Symbol;if (symbol != null && symbol.Kind != SymbolKind.Namespace &&symbol.ContainingNamespace != null){if ((symbol as ITypeSymbol)?.SpecialType ==SpecialType.System_Void){continue;}var containingNamespace = symbol.GetContainingNamespace();if (!string.IsNullOrWhiteSpace(containingNamespace)){namespacesForType.Add(containingNamespace);}}}return SyntaxFactory.List(namespacesForType.Select(_ => SyntaxFactory.UsingDirective(SyntaxFactory.IdentifierName(_))));}
We go through all of the descendant nodes in the given node, and if the given node has a symbol that isn’t void and has a containing namespace that doesn’t end up being an empty string (i.e., the global namespace), we add it to our list. This list is used to generate UsingDirectiveSyntax objects . By the way, most .NET developers don’t use or think about the global namespace. There’s always a “global” namespace: type “global” in Visual Studio and you’ll see all the top-level namespaces within it, as Figure 3-8 shows.

Figure 3-8. Using the global namespace in C#
In the Compiler API, that global namespace will have an empty string for its Name, so we have to ignore that one.
Let’s go back to MoveTypeNodes(), as this is really where the essence of the refactoring exists. This method’s implementation is shown in Listing 3-7.
Listing 3-7. Moving types into specific files
private static Project MoveTypeNodes(SemanticModel model,ImmutableArray<TypeToRemove> typesToRemove,Func<string, string> typeFolderGenerator, Project project,CancellationToken token){var projectDirectory = Path.GetDirectoryName(project.FilePath);var projectName = project.Name;foreach (var typeToRemove in typesToRemove){token.ThrowIfCancellationRequested();var fileName = $"{typeToRemove.Symbol.Name}.cs";var containingNamespace = typeToRemove.Symbol.GetContainingNamespace();var typeFolder = typeFolderGenerator(containingNamespace).Replace(projectName, string.Empty);if (typeFolder.StartsWith("\")){typeFolder = typeFolder.Remove(0, 1);}var fileLocation = Path.Combine(projectDirectory, typeFolder);project = project.AddDocument(fileName,typeToRemove.Declaration.GetCompilationUnitForType(model, containingNamespace),folders: !string.IsNullOrWhiteSpace(typeFolder) ?new[] { typeFolder } : null).Project;}return project;}
We create a new file for the project with the Project’s AddDocument() method . A new CompilationUnitSyntax object is created for that document, which will contain just that type and relevant using statements. The typeFolder variable is used to put the document into a subfolder depending on what the typeFolderGenerator Func returns .
Note
You shouldn’t pass in a blank value into the folders argument; you’ll get a COMException if you do. At least, this is the behavior that I saw. There’s no explicit documentation I found on what would happen if I did that; I found out by accident. The Compiler API doesn’t have a large volume of documentation on it unless you’re willing to spelunk through its code base, and that’s not always a trivial endeavor. That’s why unit and integration testing is essential to creating stable analyzers and diagnostics.
Here’s how the new CompilationUnitSyntaxis created:
internal static CompilationUnitSyntax GetCompilationUnitForType(this MemberDeclarationSyntax @this,SemanticModel model, string containingNamespace){var usingsForType = @this.GenerateUsingDirectives(model);return SyntaxFactory.CompilationUnit().WithUsings(usingsForType).WithMembers(SyntaxFactory.SingletonList<MemberDeclarationSyntax>(SyntaxFactory.NamespaceDeclaration(SyntaxFactory.IdentifierName(containingNamespace)).WithMembers(SyntaxFactory.List<MemberDeclarationSyntax>(new[] { @this })))).WithAdditionalAnnotations(Formatter.Annotation);}
We use GenerateUsingDirectives()to only get the using directives for this declaration. Then we create a CompilationUnitSyntax with those new using directives, a NamespaceDeclarationSyntaxfor the type, and the type itself.
Now that we have the code in place, let’s run it in Visual Studio and see what it does.
Executing the Refactoring
With the refactoring class finished, it’s time to see what it will do in Visual Studio . Just like the analzyer template you saw in the “Using the Template” section in Chapter 2, a VSIX project is created that will install your refactoring into a separate hive of Visual Studio. Make that VSIX project the startup project, run it, and create a new class library project in the new Visual Studio instance. Add this code to the Class1.cs file :
using System;using System.Collections.Generic;using System.IO;using System.Linq;using System.Text;using System.Threading.Tasks;namespace IntegrationTests{public class Class1{public void DoIt(Stream stream) { }public class Class4 { }}public class Class2{public Guid ProduceThis(Stream stream){return Guid.NewGuid();}}namespace SubNamespace{public class Class3{}}}
What the code does isn’t really important. We’re more interested in how our refactoring will move the type defintions around. This code allows us to test our refactoring scenarios.
To invoke the refactoring, place the cursor anywhere in the code file. Press Ctrl + . (period), and you should see options like those in Figure 3-9.

Figure 3-9. Getting the refactorings to show up in Visual Studio
You might see more options based on what member the cursor is on from other refactorings setup in Visual Studio, but the two refactoring options we create (“Move types to files in folders” and “Move types to files in current folder”) should be in the list.
The diff window now shows that we’ll be deleting a lot of code, but it doesn’t show where that code will go. That’s one minor disadvantage with what our refactorings do in that you don’t see a difference between the project and solution, and there will be! Figure 3-10 shows what the current folder structure looks like before we apply any refactorings.

Figure 3-10. The project before the refactoring
After we accept the changes, Figure 3-11 shows what happens to the project.

Figure 3-11. The project after the refactoring
Notice that the definition of Class1 stays in Class1.cs. Here’s what the contents of that file is now:
using System.IO;namespace IntegrationTests{public class Class1{public void DoIt(Stream stream) { }public class Class4 { }}namespace SubNamespace{}}
Irrelevant using directives are gone; only Class1 remains.
Visual Studio also uses the convention of adding a numeric value after a file name if you try to add a file with a name that already exists. For example, if a file called Class2.cs was in the root directory, Figure 3-12 shows what Visual Studio does with the file collision.

Figure 3-12. Visual Studio handles file name collisions for you
Because refactorings are in a PCL, there’s no “File.Exists()” call you can use to determine if you’d make a duplicate file. Fortunately, Visual Studio handles duplicates for you.
The other refactoring, “Move types to files in current folder”, doesn’t make any subdirectories. Figure 3-13 shows what happens when that option is selected.
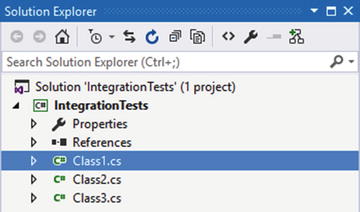
Figure 3-13. Files are made in the same directory as the project
We now have a refactoring that will move our types into different files for us. The next section explains how to test the refactoring to ensure that they work as expected.
Debugging Refactorings
In this section, you’ll use two different ways to test and debug your refactoring code: unit testing and VSIX projects.
Unit Testing
As discussed in Chapter 2, unit testing is important to ensure your code works as expected. Surprisingly, the refactoring template doesn’t create a unit test project for you, but it’s easy to add one to the solution. We’ll stick with an MSTest-based project to stay consistent with the analyzer examples, but NUnit or xUnit would work just fine. Right-click on the solution in the Solution Explorer, and select Add ➤ New Project. Select the Test node in the tree view on the left, and you should see a Unit Test Project option as shown in Figure 3-14.

Figure 3-14. Adding a testing project for the refactoring
Once the project is made, add a reference to the refactoring project so you can test your code.
Note
You’ll also need to add the right Compiler API packages. One way to make this slightly easier is to take the packages.config file from a test project created for a diagnostics project and put it into this test project. Also, you’ll need to update the assembly references so the test project is referencing the Compiler API assemblies. Again, a manual but reliable way to do this is to copy the appropriate <Reference> elements from the diagnostic test project into the test project for the refactorings.
There’s a lot of test cases to cover, and they’re all in the sample code, but we’ll just cover a couple in the book. One is when a document has classes to move that would cause a conflict; another is when there is only one class in the target document. Listing 3-8 has the test for the first scenario.
Listing 3-8. Testing for file collisions
[TestMethod]public async Task RefactorWhenFileCollisionOccurs(){ProjectId projectId = null;ImmutableArray<DocumentId> docIds;var folder = nameof(ExtractTypesToFilesCodeRefactoringProviderTests);var fileName = nameof(RefactorWhenFileCollisionOccurs);await TestHelpers.TestProvider($@"Targets{folder}{fileName}.cs", "Class1.cs",(solution, pid) =>{projectId = pid;var documentId = DocumentId.CreateNewId(projectId);solution = solution.AddDocument(documentId, "Class2.cs", string.Empty);docIds = solution.GetProject(pid).Documents.Select(_ => _.Id).ToImmutableArray();return solution;},async actions =>{Assert.AreEqual(2, actions.Length);foreach (var action in actions){var operations = await action.GetOperationsAsync(default(CancellationToken));Assert.AreEqual(1, operations.Length);var appliedOperation = (operations[0] as ApplyChangesOperation);var changedSolution = appliedOperation.ChangedSolution;var changedProject = changedSolution.GetProject(projectId);var changedDocuments = changedProject.Documents.Where(_ => !docIds.Any(id => id == _.Id)).ToImmutableArray();Assert.AreEqual(2, changedDocuments.Length);foreach (var document in changedDocuments){var text = await document.GetTextAsync();var textValue = new StringBuilder();using (var writer = new StringWriter(textValue)){text.Write(writer);}var resultFile = $@"Targets{folder}{fileName}{document.Name}";Assert.AreEqual(File.ReadAllText(resultFile), textValue.ToString());}}});}
There’s a lot of code in the test from Listing 3-8, so let’s start with the TestProvider():
internal static async Task TestProvider(string file, string fileName,Func<Solution, ProjectId, Solution> modifySolution,Func<ImmutableArray<CodeAction>, Task> handleActions){var code = File.ReadAllText(file);var document = TestHelpers.CreateDocument(code, fileName, modifySolution);var actions = new List<CodeAction>();var actionRegistration = new Action<CodeAction>(action => actions.Add(action));var context = new CodeRefactoringContext(document, new TextSpan(0, 1),actionRegistration, new CancellationToken(false));var provider = new ExtractTypesToFilesCodeRefactoringProvider();await provider.ComputeRefactoringsAsync(context);await handleActions(actions.ToImmutableArray());}
TestProvider() is very similar to the helper method that we made for the diagnostic test. It loads code from a file that is passed into an instance of our refactoring, capturing any actions that the refactoring reports in ComputeRefactoringsAsync()via the actionRegistration Action. A modifySolution Func is also passed in to modify the generated solution from CreateDocument(). CreateDocument() is similar to the Create() method shown in the “Unit Testing” section in Chapter 2, so I won’t cover that again. Just remember that it allows the tester to modify the solution if needed, and that’s exactly what we need to do in our first test.
In the first lambda passed into TestProvider(), we add a second empty Document called Class2.cs. We also capture the project’s identifier and a list of all document identifiers in the project. We use those in the second lambda, where we assert what the refactorings did. First, we check that we got two CodeAction values back. Then we check the operations associated with each CodeAction. We have to cast the operation to an ApplyChangesOperation. The base type, CodeActionOperation, doesn’t provide as much information as ApplyChangesOperation, and we need that so we can look at the documents that changed. To get those documents, we have to remove the documents that were there before the refactoring made changes, which is what Where() is doing. We then compare the contents of these new documents with expected values that are stored in files within the Targets directory.
Note
It took some time to figure out how to set up the test code so I could verify behaviors. For example, casting to ApplyChangesOperation wasn’t obvious at first. I had to debugging the test to see what the return value was providing, because if CodeActionOperation was all that was available, we wouldn’t be able to meaningfully assert anything in our tests.
Now, you may be wondering why there wasn’t a file named “Class21.cs” that was generated as we saw when we ran this code in Visual Studio. In “Interacting with a Workspace” I’ll clarify that in more detail. For now, remember that we’re using an AdHocWorksapceto generate our solution, project and documents; this is different than the one you use in Visual Studio. Therefore, behaviors can be different as our test shows: AdHocWorkspace doesn’t generate a new file with a different name. It just overwrites the file that exists. However, at least we can check that our refactoring moves code around as expected.
The second test—having only one class in the target document—is much smaller:
[TestMethod]public async Task RefactorWhenOnlyOneTypeIsDefined(){var folder = nameof(ExtractTypesToFilesCodeRefactoringProviderTests);var fileName = nameof(RefactorWhenOnlyOneTypeIsDefined);await TestHelpers.TestProvider($@"Targets{folder}{fileName}.cs", "Class1.cs",null,actions =>{Assert.AreEqual(0, actions.Length);return Task.CompletedTask;});}
In this test, we only have one type definition in the source file, so we don’t expect to get any CodeAction values generated from the refactoring.
We can also test our extension methods using the helper methods in TestHelpers. For example, here’s the test for GenerateUsingExtensions():
[TestMethod]public async Task GenerateUsingDirectives(){var folder = nameof(SyntaxNodeExtensionsTests);var fileName = nameof(GenerateUsingDirectives);var document = TestHelpers.CreateDocument(File.ReadAllText($@"TargetsExtensions{folder}{fileName}.cs"),"Class1.cs", null);var root = await document.GetSyntaxRootAsync();var model = await document.GetSemanticModelAsync();var directives = root.GenerateUsingDirectives(model);Assert.AreEqual(3, directives.Count);directives.Single(_ => _.Name.ToString() == "System");directives.Single(_ => _.Name.ToString() == "System.IO");directives.Single(_ => _.Name.ToString() == "System.Text");}
The target file has a method that requires the using directives that GenerateUsingDirectives()should generate.
Writing tests for refactorings is a good thing for the same reasons specified in the “Unit Testing” section in Chapter 2, but we still need to test it in Visual Studio. We’ll briefly explore that in the next section.
VSIX Installation
In the “Executing the Refactoring” section, you saw how you can launch Visual Studio with your refactoring installed. You can also run that separate instance of Visual Studio under the debugger. We won’t repeat that discussion again, just remember to run your refactoring in Visual Studio before you deploy it. As you saw in the previous section, the process by which you get a Document object can affect the results of the refactoring.
Also, the VSIX option is the only option you have to deploy and install your refactorings to other users. There is no NuGet option provided with the default template. This may change in the future, but for now extensions are the way to go to get your refactorings to other developers.
Note
For more information on adding NuGet support for refactorings, see http://stackoverflow.com/questions/33118238/ship-roslyn-code-refactoring-as-nuget-package .
We’ve covered testing your refactorings. Now it’s now time to go through the Workspaces API in more detail.
Interacting with a Workspace
With diagnostics and refactorings, we’ve touched upon the concept of a Workspace and its related objects. In this section, we’ll dive a little deeper and explore how they’re laid out and how you can use them to automatically update documents with projects and solutions.
What Is a Workspace ?
Ever since .NET developers have been using Visual Studio, they’ve been accustomed to a specific code layout. A simple example is any of the figures in this chapter that show the Solution Explorer (like Figure 3-7). Each solution can contain one or more projects, and each project can contain one or more documents. Solutions and projects can also have zero subelements, but then they’re kind of useless!
Given this typical structure, it was essential that the Compiler API have a similar object model in place. It’s pretty rare for code to live in isolation—that is, you only have one file in a project and that’s all you compile. Applications are complex combinations of projects, where changes in one piece of code can have significant ramifications. In the “Creating a Refactoring Solution” section earlier in this chapter, the Renamer.RenameSymbolAsync()was mentioned. That method needs a Solution object because it will look for the usage of a member (like a method) that has been renamed and change it for the developer wherever it’s referenced in a solution. The Workspace API gives you an abstraction over this solution structure. Figure 3-15 gives a simplistic view of the Workspace object model.

Figure 3-15. Workspace object model
A Workspace contains one Solution, referenced by the CurrentSolution property. Each Solution contains Project objects, and each Project has Document objects. The documents can be any file, whether it’s a code, resource, or text file.
This model doesn’t impose one specific implementation of the API. All of these classes are not sealed, so you can create your own version of a Workspace. There are three that you may see as you work with the Compiler API. Let’s briefly investigate each of them in the next section.
Note
The Workspace API may have members like the FilePath property on a Document, but that doesn’t mean that an implementation of the Workspace API has to be file-based. You could create a custom Workspace object model that just used memory or a database for its persistence mechansim.
Common Workspace Implementations
The AdhocWorkspace, as its name suggests, is useful when you want to quickly create a Workspace and related objects. We’ve used them in our unit tests in both this chapter and Chapter 2. As a refresher, here’s how you create a project from a Workspace’s current Solution:
var projectName = "Test";var projectId = ProjectId.CreateNewId(projectName);var solution = new AdhocWorkspace().CurrentSolution;var project = solution.AddProject(projectId, projectName, projectName, LanguageNames.CSharp);
Typically, AdhocWorkspace is only used in testing scenarios. You can find these types in the Microsoft.CodeAnalysis.Workspaces assembly.
The MSBuildWorkspace class is another implementation of the Workspace API. This workspace’s name also implies its target: MSBuild. You’ll use this workspace when you interact with an MSBuild process. You’ll see this class in action in the “Using a Custom MSBuild Task for Automatic Updates” section later in this chapter. You can find this workspace in the Microsoft.CodeAnalysis.Workspaces.Desktop assembly .
Finally, the VisualStudioWorkspace class is the workspace you use when your analyzer or refactoring is running within Visual Studio. We’ll use this workspace in the “Creating a Visual Studio Extension” section. This type exists in the Microsoft.VisualStudio.LanguageServices assembly .
Note
If you look carefully, the actual type for the workspace you see in Visual Studio is Microsoft.VisualStudio.LanguageServices.RoslynVisualStudioWorkspace. That’s a class that indirectly inherits from VisualStudioWorkspace, but it’s a small detail that you shouldn’t worry about.
You now know what Workspace implementations exist. In the next section, we’ll use the last two— MSBuildWorkspaceand VisualStudioWorkspace—to do some automation with our refactorings.
Updating Solutions and Projects
Refactorings are good to have because they assist a developer to create cleaner, more manageable code, but there’s an area with refactorings that needs to be addressed. There are cases where I want my code to be updated such that features like code formatting are done automatically, without me having to perform any manual intervention. For example, there’s an extension called Productivity Power Tools that executes some refactorings for you. Once you install it, you can configure it to remove and sort using directives along with formatting code when you save a file. Figure 3-16 shows that configuration screen.

Figure 3-16. Using Productivity Power Tools to automatically apply formatting and using directive cleanup
Note
To learn more about using Productivity Power Tools, see https://visualstudiogallery.msdn.microsoft.com/34ebc6a2-2777-421d-8914-e29c1dfa7f5d .
Unfortunately, the refactoring template gives developers a somewhat restricted view on Visual Studio integration. Thankfully, we’re not limited by that template. We’ll go through two techniques to allow your refactorings to be automatically applied in a solution. But before we do that, let’s come up with a simple refactoring that you may (or may not!) like: removing comments.
Note
In the upcoming Visual Studio 15 preview (the next version after Visual Studio 2015), there’s a prototype of a feature that may allow developers to create “styling” analyzers that will automatically be enforced by Visual Studio. It’s a work in progress; visit the following link (and check out the “Custom Code Style Enforcement” section) for more details: https://blogs.msdn.microsoft.com/dotnet/2016/04/02/whats-new-for-c-and-vb-in-visual-studio/ .
Creating the CommentRemover Refactoring
We’ll create a refactoring that removes any comments within a given syntax node. Keep in mind, this is just an example. It’s not a suggestion that comments are bad in any way. I try to keep comments to a bare minimum, but there are cases where a comment can help others figure out why code is the way it is. Use this refactoring carefully—if you force it upon your teammates, the response may not be positive! But it is a simple refactoring in the sense that comments do not affect a compilation result, so removing them is a fairly trivial endeavour.
We have to be careful of one thing, though, and that’s what comments we remove. Take a look at the following code:
public class Commentary{/// <summary>/// Adds commentary to a piece of text./// </summary>/// <param name="text">The text to process.</param>public void Process(string text){// Here's where the real work goes./*Maybe more work goes here.*/}}
We definitely want to keep XML comments. Those show up in Intellisense and can assist developers as they write their code. The single- and multiline comments like the ones within Process() are the ones that we want to get rid of. How are these represented in the Compiler API?
All of the comments are represented by a SyntaxTrivia struct. The multiline comment has the Kind property equal to SyntaxKind.MultiLineCommentTrivia. The single-line comment’s Kind property is SyntaxKind.SingleLineCommentTrivia. Finally, the XML comments have a Kind of SyntaxKind.SingleLineDocumentationCommentTrivia. Therefore, all we’ll need to do is find trivia elements with the right Kind value, and replace those with empty nodes. Let’s create an extension that will do just that to any SyntaxNode it gets.
For this solution, which we’ll call CommentRemover; we won’t use the refactoring template. We’ll create a class library that references the Compiler API, and then we’ll have one extension method that performs the necessary comment cleansing. In subsequent chapter sections we’ll reuse that extension method to provide automatic comment removal. Listing 3-9 shows how that extension method works.
Listing 3-9. Removing comments from a given SyntaxNode
public static class SyntaxNodeExtensions{public static T RemoveComments<T>(this T @this)where T : SyntaxNode{var triviaToRemove = new List<SyntaxTrivia>();var nodesWithComments = @this.DescendantNodesAndTokens(_ => true).Where(_ => _.HasLeadingTrivia &&_.GetLeadingTrivia().Any(__ =>__.IsKind(SyntaxKind.SingleLineCommentTrivia) ||__.IsKind(SyntaxKind.MultiLineCommentTrivia)));var commentCount = 0;foreach (var nodeWithComments in nodesWithComments){var leadingTrivia = nodeWithComments.GetLeadingTrivia();for (var i = 0; i < leadingTrivia.Count; i++){var trivia = leadingTrivia[i];if (trivia.IsKind(SyntaxKind.SingleLineCommentTrivia) ||trivia.IsKind(SyntaxKind.MultiLineCommentTrivia)){triviaToRemove.Add(trivia);commentCount++;if (i > 0){var precedingTrivia = leadingTrivia[i - 1];if (precedingTrivia.IsKind(SyntaxKind.WhitespaceTrivia)){triviaToRemove.Add(precedingTrivia);}}}}triviaToRemove.AddRange(leadingTrivia.Where(_ =>_.IsKind(SyntaxKind.EndOfLineTrivia)).Take(commentCount));}return triviaToRemove.Count > 0 ?@this.ReplaceTrivia(triviaToRemove, (_, __) => new SyntaxTrivia()).WithAdditionalAnnotations(Formatter.Annotation) :@this;}}
We find all of the nodes and tokens that have leading trivia that contains single- or multi-line comments. Then we go through the trivia list and add comment trivia to our list. If the comments begin with any whitespace, we add those to our list. We also remove any end of line trivia for the comment lines. Finally, we remove all the identified trivia from the current node if we found any trivia to remove. This code may seem a little awkward, but it’s done this way to keep the formatting of the developer’s code consistent—that is, we don’t want to leave empty lines in the code when we remove the comment trivia.
Now that we have an extension method to remove comments from a SytnaxNode instance , let’s see where we can use it such that it’s done automatically for the developer. Our first option is to use a console application, which we’ll implement in the next section.
Using the Command Line for Automatic Updates
One of the extension points in a project is to invoke pre- and post-build events. Figure 3-17 shows what this looks like in the project’s Properties tab.
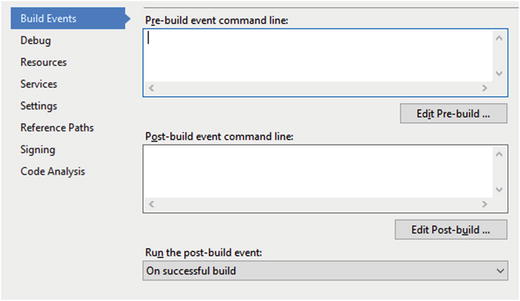
Figure 3-17. Project build event properties
Anything that can be run from the command line can be done in the two text boxes shown in Figure 3-17. Therefore, what we can do is create a console application that will get the file location of a project or solution, and then invoke RemoveComment()on every file’s CompilationUnitSytnax node .
To do this, we need to provide a couple of helper methods in CommentRemover—RemoveCommentsFromSolutionAsync()and RemoveCommentsFromProjectAsync()—to use the Workspace API. We’ll go through RemoveCommentsFromSolutionAsync() in the book. The other helper method, RemoveCommentsFromProjectAsync(),is virtually identical except it starts with a Project object, not a Solution:
public static async Task RemoveCommentsFromSolutionAsync(string solutionFile){var workspace = MSBuildWorkspace.Create();var solution = await workspace.OpenSolutionAsync(solutionFile);var newSolution = solution;foreach (var projectId in solution.ProjectIds){var project = newSolution.GetProject(projectId);foreach (var documentId in project.DocumentIds){var document = newSolution.GetDocument(documentId);if (Path.GetExtension(document.FilePath).ToLower() == ".cs"){var root = await document.GetSyntaxRootAsync();var newRoot = root.RemoveComments();if (root != newRoot){newSolution = newSolution.WithDocumentSyntaxRoot(documentId, newRoot);}}}}workspace.TryApplyChanges(newSolution);}
We call Create() on MSBuildWorkspaceto get a workspace, which we can use to open a solution file. From that solution, we go through each project and its documents. If we find a C# file, we update that document if RemoveComments()produced any changes. Once we’ve navigated each file, we call TryApplyChanges() to commit any changes to the solution and its members.
The other part of this solution is to create a console application project that references the CommentRemover class library project. It also needs the Compiler API assemblies from NuGet. Once those are in place, here’s what Main() does:
static void Main(string[] args){//System.Diagnostics.Debugger.Launch();if (args.Length == 0 || args[0] == string.Empty){Console.Out.WriteLine("Usage: CommentRemover.ConsoleApplication {solution or project file}");}var file = args[0];if (!File.Exists(file)){Console.Out.WriteLine($"File {file} does not exist.");}else{if (Path.GetExtension(file) == ".sln"){WorkspaceCommentRemover.RemoveCommentsFromSolutionAsync(file).Wait();}else if (Path.GetExtension(file) == ".csproj"){WorkspaceCommentRemover.RemoveCommentsFromProjectAsync(file).Wait();}else{Console.Out.WriteLine("Only .sln and .csproj files are supported.");}}}
Most of this code is just data validation to ensure that we have a file path in the args array that we can give to one of the WorkspaceCommentRemover helper methods .
With the console application in place, we now need to update its postbuild command so that it pushes its build content to a common directory:
xcopy "$(TargetDir)*.*" "$(SolutionDir)ConsoleApplicationOutput*.*" /Y /E /CNow we can create a test project that will execute this application on its prebuild event:
"$(SolutionDir)ConsoleApplicationOutputCommentRemover.ConsoleApplication.exe" "$(ProjectPath)"We need to make sure that this test integration project doesn’t build before the console application is built. To do this without having an explicit reference to the console application, we can tell the solution in Visual Studio about this build dependency. Right-click on the solution and select Project Dependencies. Figure 3-18 shows how to set this dependency correctly.
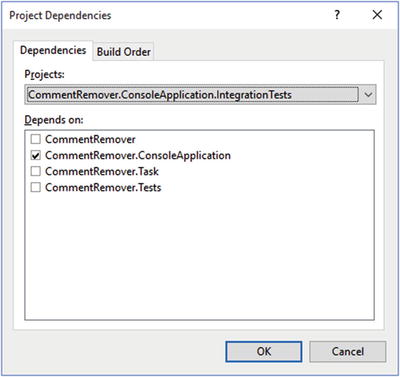
Figure 3-18. Setting explicit project dependencies in a solution
With this configuration in place, a project’s code (like CommentRemover.ConsoleApplication.IntegrationTests ) will get every comment removed when it’s built. That’s something that can’t be visualized in a picture, but Figure 3-19 shows the integration project with a C# file open when the console application is done with its comment removal.

Figure 3-19. Evidence that the console application has made changes
Because the file has been updated, Visual Studio will ask if you want to see those changes. When you click Yes, you’ll see the code with all the comments removed, except the XML comments.
Another way to automatically run code during a build process is to use a custom MSBuild task. Let’s look at that technique in the next section.
Using a Custom MSBuild Task for Automatic Updates
An MSBuild process is essentially a number of tasks executed to compile code, move files into other directories, and so on. You can customize this process by defining your own tasks and including them into a project file. To do this, you create a class library and reference the Microsoft.Build.Framework and Microsoft.Build.Utilities.Core assemblies (along with the Compiler API Nuget packages). Then you can create your custom task by defining a class that inherits from the Task class, as shown in Listing 3-10.
Listing 3-10. Defining a custom MSBuild task
public class CommentRemoverTask: MBU.Task{public override bool Execute(){WorkspaceCommentRemover.RemoveCommentsFromProjectAsync(this.ProjectFilePath).Wait();return true;}[Required]public string ProjectFilePath { get; set; }}
Because most of the work is done in RemoveCommentsFromProjectAsync(), the implementation of the custom Task is thin. The only member we need to add is ProjectFilePath, which we’ll use when we invoke this task in a project file. The following code snippet shows how that works:
<UsingTask TaskName="CommentRemoverTask" AssemblyFile="$(SolutionDir)CommentRemover.Task OutputCommentRemover.Task.dll" />Within a project file, you use the <UsingTask> element to give the task a name. The AssemblyFile attribute specifies where that custom task resides. The CommentRemover.Task project has a postbuild step similar to the console application, where it will copy all of its output to a directory. That directory is what AssemblyFile uses.
To invoke the task, you can include it within either the BeforeBuild or AfterBuild tasks; remember to set the ProjectFilePath property correctly:
<Target Name="AfterBuild"><CommentRemoverTask ProjectFilePath="$(ProjectPath)" /></Target>
The next time the project is built, all the comments in any C# file will be removed.
With both the console application and custom MSBuild Task approaches, we used the MSBuildWorkspaceto modify document content within projects. In the next section, we’ll create a Visual Studio extension that will use VisualStudioWorkspace.
Creating a Visual Studio Extension
Although both of the previous techniques worked (creating a command-line tool and a custom MSBuild task), they require manual intervention to ensure they were integrated correctly. When you’re updating project files and creating post-build steps, it’s not hard to do something wrong during the setup. Another option is creating extensions for Visual Studio. The advantage of this approach is the developer just double-clicks on a VSIX file or goes to the Visual Studio Gallery to find and install it. As an extension author, you have the ability to extend pretty much every aspect of Visual Studio. However, writing extensions is not a trivial endeavor. We won’t go through all of the options available to you when you create extensions, but let’s create a simple one that will provide that automatic comment removal behavior.
Note
If you want more information about extending Visual Studio, please check out the reference at https://msdn.microsoft.com/en-us/library/dn919654.aspx .
To create the project, you’ll go into the Extensibility node when you add a new project, and select “VSIX Project” as shown in Figure 3-20.
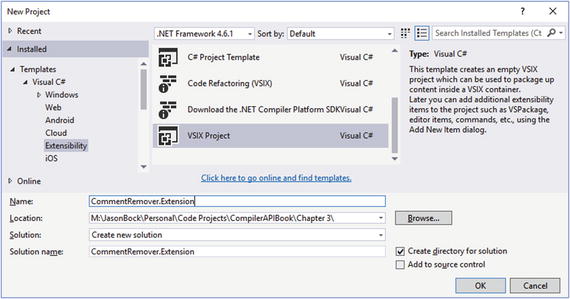
Figure 3-20. Creating an extension project
Note
If you don’t see the VSIX Project option, you’ll need to install the Visual Studio SDK. You can get more information about the SDK at https://msdn.microsoft.com/en-us/library/bb166441.aspx .
Next, we need to get a package class file in this project. Add a “Visual Studio Package” file to the project, as shown in Figure 3-21.

Figure 3-21. Adding a package file to the extension project
You can leave the file as-is; I modified it a bit to get rid of some noise and focus on what we need for our extension. Here’s the start of the class file definition:
[PackageRegistration(UseManagedResourcesOnly = true)][InstalledProductRegistration("#110", "#112", "1.0", IconResourceID = 400)][Guid(CommentRemoverPackage.PackageGuidString)][SuppressMessage("StyleCop.CSharp.DocumentationRules","SA1650:ElementDocumentationMustBeSpelledCorrectly",Justification = "pkgdef, VS and vsixmanifest are valid VS terms")][ProvideAutoLoad(VSConstants.UICONTEXT.NoSolution_string)][ProvideAutoLoad(VSConstants.UICONTEXT.SolutionExists_string)][ProvideAutoLoad(VSConstants.UICONTEXT.SolutionHasMultipleProjects_string)][ProvideAutoLoad(VSConstants.UICONTEXT.SolutionHasSingleProject_string)]public sealed class CommentRemoverPackage: Package{public const string PackageGuidString = "7e923ca1-8495-48f9-a429-0373e32500d1";private DTE dte;private DocumentEventsClass documentEvents;private VisualStudioWorkspace workspace;
The first four class attributes along with PackageGuidStringwere created by the file template. They’re important for Visual Studio to use our package correctly but we don’t need to be concerned about their details now. The ProvideAutoLoad attributes (which are not generated by default) are important, because our package needs to be loaded and ready to go as soon as Visual Studio starts. We don’t want to wait for a developer to open a tool window for our package’s implementation to be alive. These attributes inform Visual Studio to initilize our package when Visual Studio is launched. The private fields are needed so we can react to events that are happening when a developer saves a file. That event handling is set up in Initialize(), which looks like this:
protected override void Initialize(){var model = this.GetService(typeof(SComponentModel)) as IComponentModel;this.workspace = model.GetService<VisualStudioWorkspace>();this.dte = this.GetService(typeof(DTE)) as DTE;this.documentEvents = this.dte.Events.DocumentEvents as DocumentEventsClass;this.documentEvents.DocumentSaved += this.OnDocumentSaved;base.Initialize();}protected override void Dispose(bool disposing){this.documentEvents.DocumentSaved -= this.OnDocumentSaved;base.Dispose(disposing);}
We need to get a reference to the VisualStudioWorkspaceand DTE (design time enviroment) objects, which we can get via GetService(). Once we have them, we set up an event handler to listen for documents that are saved. We also override Dispose() to remove the event handler. Listing 3-11 shows what OnDocumentSaved()does.
Listing 3-11. Implementing the DocumentSaved event in a Visual Studio extension
private void OnDocumentSaved(EnvDTE.Document dteDocument){var documentIds = this.workspace.CurrentSolution .GetDocumentIdsWithFilePath(dteDocument.FullName);if(documentIds != null && documentIds.Length == 1){var documentId = documentIds[0];var document = this.workspace.CurrentSolution.GetDocument(documentId);if (Path.GetExtension(document.FilePath) == ".cs"){SyntaxNode root = null;if (document.TryGetSyntaxRoot(out root)){var newRoot = root.RemoveComments();if (newRoot != root){var newSolution = document.Project.Solution.WithDocumentSyntaxRoot(document.Id, newRoot);this.workspace.TryApplyChanges(newSolution);dteDocument.Save();}}}}}}
We need to bridge the DTE and VisualStudioWorkspaceworlds to figure out the document’s identifier. We can do this by using GetDocumentIdsWithFilePath(). If we find the identifier, we use it to get a Document instance via GetDocument(). If we end up changing the root node of the document by removing all the comments, we apply those changes to the solution. We also need to invoke Save() on the DTEDocument instance . If we don’t do this, the changes will show up in Visual Studio, but the document will be in an edited state again. Calling Save() ensures that the changes are saved to disk.
Just like the VSIX projects for analyzers and refactorings, if you make the project the startup project for the solution, Visual Studio will launch another instance of Visual Studio with your extension automatically installed. It’s hard to demonstrate in static text this package in action, so I encourage you to download the code and try it out yourself. Create a project, add a C# file and put comments in the code. As soon as you save the file, your comments will be removed.
One last point about the VSIX project that is generated. By default, the package is strong-named, so any assemblies that it uses must be strong-named as well. Our CommentRemover class library isn’t, so if we don’t make changes to the extension project, we’ll get exceptions like FileNotFoundException, informing us that strong-named code can’t call code from assemblies that aren’t strong names. You can turn strong-naming off in the extension project from the Signing tab of the project’s Properties view, as shown in Figure 3-22.

Figure 3-22. Turning off assembly strong-naming
Conclusion
In this chapter, you learned to create your own refactorings to help developers improve code using the Compiler API. You also used the Workspace API in a number of scenarios to implement automatic refactorings throughout a solution. In the next chapter, we’ll explore the Scripting API.