Although this is the last chapter in this book, the story of the Compiler API doesn’t end. What does the future hold for the Compiler API? To close out this book, we’ll look at tools and frameworks that are already taking advantage of the Compiler API in creative and versatile ways. We’ll also explore the upcoming possible transformation of C# with metaprogramming and code injection.
Current Usage
Throughout this book, you saw how the Compiler API is used to enable a developer to write diagnostics and refactorings, along with the Scripting API that makes C# into a scripting language. Although these are powerful capabilities that provide a developer with rich information about their code, there is no limitation in terms of where you can use these API sets in your C# code. You can include the Compiler API packages and tools that are taking advantage of the Compiler API into your own projects via NuGet. We’ll take a look at packages that user the Compiler API in this section, starting with a mocking framework I created called Rocks.
Generating Mocks
If you’ve ever done any unit testing in .NET, you’ve probably come across the need or desire to create “fake” versions of dependencies. Let’s use a very generic example to illustrate this. Let’s say you have a class that uses a dependency based on an interface called IService:
public interface IService{int GetId();}
There’s a class called ServiceUserthat uses an implementation of the service to get an ID value:
public sealed class ServiceUser{public ServiceUser(IService service){if(service == null){throw new ArgumentNullException(nameof(service));}this.Id = service.GetId();}public int Id { get; }}
This is an example of dependency injection. The ServiceUser class needs to use an object that implements IService, but it doesn’t care what that object does to get the ID value. It could be calling a REST service, it could be reading a file, or it could be accessing a database: the point is, ServiceUser doesn’t care. It only needs to call GetId().
Now, to test ServiceUser, we need an instance of IService. But we don’t necessarily want to talk to the object that will be used at runtime during the unit test due to concerns like performance and isolation. For example, if the implementation is talking to a service, latency time may creep into the test along with other tests that need to use the dependency. In addition, we’re testing ServiceUser; we’re not testing how the implementation of IService works. Focusing our testing responsibilities on the code we want to test is essential.
A typical approach during a test is to create a mock object. This is an object that implements a given abstraction (like an interface), but it also allows the developer to specify expectations. That is, the developer can state the behaviors and interactions that should occur with the mock during the test run. There are great frameworks that already exist in the .NET space that create mocks, such as Moq ( http://www.moqthis.com ) and NSubstitute ( http://nsubstitute.github.io ). Listing 5-1 shows how you can run code that will test ServiceUser’s interaction with a mock of IService.
Listing 5-1. Using Moq to create a mock object
using Moq;private static void MockUsingMoq(){var service = new Mock<IService>(MockBehavior.Strict);service.Setup(_ => _.GetId()).Returns(2);var user = new ServiceUser(service.Object);Debug.Assert(user.Id == 2);service.VerifyAll();}
The Mock class allows the developer to create an expectation that GetId()will be called via Setup(). Since this method returns a value, Returns() is used to specify that the value 2 will be returned. Debug.Assert()checks that the Id property is equal to 2, which should have been set from the GetId() call. Finally, VerifyAll()is called on the mock to ensure that all expectations were satisfied.
However, there’s one architecture issue with frameworks like Moq and NSubstitute. A mocking framework needs to synthesize a new class at runtime based on the abstraction that it’s given. To do this, the mocking framework typically use members from the System.Reflection.Emit namespace , which allows you to create a class on the fly. The issue with this namespace is that you have to know how IL works in .NET. IL is the language that any language that wants to run on .NET must compile to. While it’s not as difficult as pure x86 assembly language, as mentioned in the “What Do Compilers Do?” section in Chapter 1, it’s not trivial either. IL is not a language most .NET developers know, and even if they’ve spent time in it, it’s very easy to create code via IL that fails in ways that have never been seen before. What we need is a better way to create code on the fly in a language that most .NET developers know. And that’s exactly what the Compiler API gives us and the reason I created Rocks ( https://github.com/jasonbock/rocks ). Rocks is a mocking framework that’s similar to Moq and NSubstitute but has one key difference: it uses the Compiler API to create a class at runtime rather than IL. To a developer using Rocks, it doesn’t seem much different than other .NET mocking frameworks. Listing 5-2 shows how to create a mock object using the same code from Listing 5-1 except instead of using Moq it uses Rocks.
Listing 5-2. Using Rocks to create a mock object
using Rocks;using Rocks.Options;private static void MockUsingRocks(){var service = Rock.Create<IService>();service.Handle(_ => _.GetId()).Returns(2);var user = new ServiceUser(service.Make());Debug.Assert(user.Id == 2);service.Verify();}
But the mock generated when Make() is called is based on pure C# code. To see this, change the line of code with Rock.Create() from this:
var service = Rock.Create<IService>();to this:
var service = Rock.Create<IService>(new RockOptions(level: OptimizationSetting.Debug,codeFile: CodeFileOptions.Create));
Then, put a breakpoint on the line of code that creates a new instance of ServiceUser, and start Visual Studio in Debug mode. When the breakpoint is hit, press F11, which will step into the implementation of the mock. You should see a screen in Visual Studio similar to Figure 5-1.
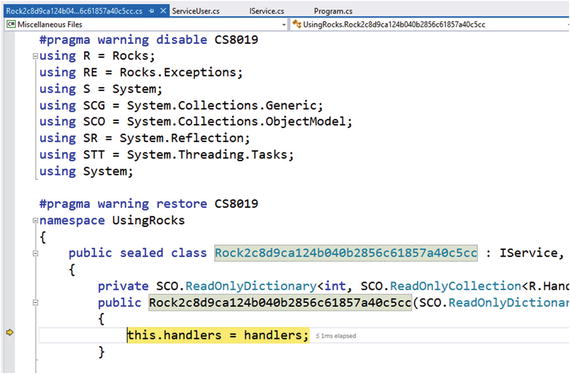
Figure 5-1. Stepping into generated mock code in Visual Studio
Note that the generated class uses a Guid in its name to prevent any kind of name collision with other types. The class also inherits from IService, so any code that needs to interact with an IService interface (like ServiceUser) can use this mock.
What’s amazing about creating mocks using the Compiler API is that the Compiler API makes it extremely simple to debug dynamic code generated at runtime based on how the Compiler API is supposed to work in the first place! Rocks takes advantage of the fact that you can compile code with debug symbols generated. There’s very little Rocks has to do to implement debugging capabilities. If you want to do this with types from System.Reflection.Emit, well, it’s a long story, but it’s difficult. You have to manually generate an .il file yourself and match up all the lines of code to debug symbols manually. A Rocks user will probably never step into the generated mock code, but for me as the implementor of Rocks, it’s been a great feature to take advantage of when I’m trying to diagnose issues with my mock code generation.
Creating mocks is one area where you can take advantage of the Compiler API’s ability to generate code. Let’s look at another innovate package that helps you target the Web with C#.
Building Code with Code
Ever since .NET’s inception, MSBuild has been the standard way to build code. MSBuild understands solutions and projects and can orchestrate their builds as well as provide customizations to the process, such as running tests and deploying binaries. However, MSBuild is not the only way to build code. A vast array of build tools and scripting languages are available to use for your building concerns. One tool is called Cake ( http://cakebuild.net/ ), which uses the Compiler API to execute build steps using a C#-like domain specific language (DSL) . Let’s create a solution that has two projects to see how we can use Cake to handle the build steps. One project is a class library called RandomGenerationthat uses a NuGet package to generate a random number, and the other project called RandomGeneration.Tests has tests for our class library. The RandomGeneration project will also have a .nuspec file that can be used to generate a NuGet package.
Here’s what the Randomness class looks like (which exists in RandomGeneration):
using Spackle;namespace RandomGeneration{public sealed class Randomness{public int GetValue(int start, int end){return new SecureRandom().Next(start, end);}}}
The SecureRandom class comes from a NuGet package I’ve created called Spackle ( https://www.nuget.org/packages/Spackle/ ). Speaking of NuGet, here’s what the RandomGeneration.nuspec file looks like for this project:
<?xml version="1.0" encoding="utf-8"?><package><metadata><id>RandomGeneration</id><version>1.0.0</version><authors>Jason Bock</authors><owners>Jason Bock</owners><description>Generate random numbers within a range.</description><tags>netframework</tags><language>en-US</language><dependencies><dependency id="Spackle" version="7.1.0" /></dependencies></metadata><files><file src="RandomGeneration.dll" target="lib et46" /></files></package>
Here’s the code that tests GetValue():
using Microsoft.VisualStudio.TestTools.UnitTesting;namespace RandomGeneration.Tests{[TestClass]public sealed class RandomnessTests{[TestMethod]public void GetValue(){var value = new Randomness().GetValue(2, 10);Assert.IsTrue(value >= 2);Assert.IsTrue(value <= 10);}}}
Now, let’s see how we can get Cake involved in the build process. Here are the steps we want to perform:
1. Build the RandomGeneration class library.
2. Run the tests in RandomGeneration.Tests.
3. Create a NuGet package file based on the RandomGeneration.nuspec definition.
The first action is to create a Cake bootstrapper file . This boostrapper file is a PowerShell script that will run our Cake build file. To make this file, open a PowerShell window, navigate to the directory that contains the RandomGeneration solution file, and run the following command:
Invoke-WebRequest http://cakebuild.net/bootstrapper/windows -OutFile build.ps1You should get a build.ps1 file in your solution directory when this is done. Now, you need to create a cake.build file in this directory. The cake.build file is just a text file so you can use any text editor you want to create it. Listing 5-3 shows what the build file looks like for our RandomGeneration solution .
Listing 5-3. Definition of the Cake build file
var target = Argument<string>("target", "Default");var configuration = Argument<string>("configuration", "Release");var solution = "RandomGeneration.sln";Task("Clean").Does(() =>{CleanDirectories("./**/bin/" + configuration);CleanDirectories("./**/obj/" + configuration);});Task("Restore").Does(() =>{NuGetRestore(solution);});Task("Build").IsDependentOn("Clean").IsDependentOn("Restore").Does(() =>{MSBuild(solution, settings =>settings.SetPlatformTarget(PlatformTarget.MSIL).WithTarget("Build").SetConfiguration(configuration));});Task("Tests").IsDependentOn("Build").Does(() =>{MSTest("./**/*.Tests.dll",new MSTestSettings{NoIsolation = true});});Task("NuGetPack").IsDependentOn("Tests").Does(() =>{CreateDirectory("./NuGet Pack");CopyFile("./RandomGeneration/RandomGeneration.nuspec","./NuGet Pack/RandomGeneration.nuspec");CopyDirectory("./RandomGeneration/bin/Release","./NuGet Pack");NuGetPack("./NuGet Pack/RandomGeneration.nuspec",new NuGetPackSettings{OutputDirectory = "./NuGet Pack"});});Task("Default").IsDependentOn("Build").IsDependentOn("Tests").IsDependentOn("NuGetPack");RunTarget(target);
Although it may look like a lot of code, it’s pretty easy to decipher a Cake script. You define tasks that should be run during a build with the Task() method . Tasks can have dependencies on other tasks—for example, in this script, the “Clean” and “Restore” tasks must execute before the “Build” task runs. Each task can execute code in the Does() action method . It’s completely up to you to do what you think is necessary for each task. For example, in the “Build” task, the MSBuild() method is used to build all the code in the solution. The “Tests” task runs all of the tests via the MSTest() method. Also, keep in mind that Cake is smart enough to run each task only once, even if tasks are declared as dependencies more than once.
Once you have the script file setup, you run “./build.ps1” in a PowerShell command window. This script will get the necessary Cake components if it can’t find them, and then the build.ps1 script will build your Cake script file. This is where the power of the Compiler API comes into play. Because your Cake script file is really C# code, you can write your build process in the language you code in. You can declare variables and use other .NET libraries—it’s completely up to you. Once the code is compiled, Cake runs the default task.
Note
You'll find a number of built-in Cake tasks and methods at http://cakebuild.net/dsl . Also, you can create your own aliases to extend the build process: you'll find the details at http://cakebuild.net/docs/fundamentals/aliases . Additionally, there are numerous add-ins you can use to control other tools, such as AppVeyor, Slack, and HockeyApp; this list is at http://cakebuild.net/api .
If you haven’t set up a build server or done automated deployments, I highly recommend you consider using a tool like Cake to do it. Automating manual steps leads to greater productivity, and the Compiler API can empower your continuous integration and deployment needs.
Other Compiler API-Based Tools and Frameworks
The Rocks and Cake packages you saw earlier are just a small sample of what’s already available in the .NET space that use the Compiler API. Here are some other packages you should check out:
DotNetAnalyzers ( https://github.com/DotNetAnalyzers/DotNetAnalyzers ) and StyleCopAnalyzers ( https://github.com/DotNetAnalyzers/StyleCopAnalyzers )—a suite of diagnostics that enforce rules partially based on the StyleCop tool ( http://stylecop.codeplex.com/ ).
ScriptCS ( http://scriptcs.net/ )—a C# scripting implementation
OmniSharp ( http://www.omnisharp.net/ )—a .NET editor written entirely in .NET
RefactoringEssentials ( http://vsrefactoringessentials.com/ )—a suite of refactorings and analyzers
ConfigR ( https://github.com/config-r/config-r )—a package that uses C# code to power configuration files
This list is not exhaustive by any means. .NET code is being infused with the power of the Compiler API. More and more tools and packages are using its capabilities to power their features. But, what about the C# language itself? In the next section, you’ll examine how the Compiler API may affect the fundamental way you write code in C#.
Looking into C#’s Future
It’s great to see open-source packages use the Compiler API in innovative and creative ways. But wouldn’t it be ideal to share pieces of code in .NET to greatly simplify applications? Can we change how C# works so code generation is an integral part of the language? There are strong hints that the next version of C# will have this capability. To close out this chapter, let’s take a theoretical look at how source generators will affect the way you code in C# in a deep, revolutionary way.
Note
Keep in mind that this source generator feature is still experimental at the time of this writing, so I won't go into any specifics on its implementation. It was demonstrated at //BUILD ( https://channel9.msdn.com/Events/Build/2016/B889 —start watching at the 54:00 mark), and two GitHub issues are related to this feature at https://github.com/dotnet/roslyn/issues/5561 and https://github.com/dotnet/roslyn/issues/5292 ; related issues are tagged with “New Language Feature—Replace/Original.” In addition, it’s in C#7's “strong interest” section for proposed features ( https://github.com/dotnet/roslyn/issues/2136 ). That said, there is no guarantee that source generators will be in the next version of C#, but it's a feature that C# developers should be watching because it has the potential to radically change how they design their applications.
A Quick Story About Property Change Notifications
One example of what .NET developers have been begging for in an automatic implementation of a specific scenario is property change notification. A property change notification happens when your class implements INotifyPropertyChanged. Here’s one way you can implement this interface. You create a base class that implements INotifyPropertyChanged, as shown in Listing 5-4.
Listing 5-4. Providing a reusable implementation of INotifyPropertyChanged
public abstract class Properties: INotifyPropertyChanged{public event PropertyChangedEventHandler PropertyChanged;protected Properties() { }protected virtual void OnPropertyChanged(string propertyName){this.PropertyChanged?.Invoke(this,new PropertyChangedEventArgs(propertyName));}protected void SetField<T>(ref T field,T value, string propertyName){if (!EqualityComparer<T>.Default.Equals(field, value)){field = value;this.OnPropertyChanged(propertyName);}}}
Then, you can inherit from the Properties class to publish property change events:
public class IntegerData: Properties{private int value;public int Value{get { return this.value; }set { this.SetField(ref this.value, value, nameof(Value)); }}}
If you use the code from Listing 5-4 and the IntegerData class in a console application like this, you change the Value property to different values:
private static void Main(){var properties = new IntegerData();properties.PropertyChanged +=(s, e) => Console.Out.WriteLine($"Property {e.PropertyName} changed.");Console.Out.WriteLine($"properties.Value is {properties.Value}");properties.Value = 2;Console.Out.WriteLine($"properties.Value is {properties.Value}");properties.Value = 3;Console.Out.WriteLine($"properties.Value is {properties.Value}");properties.Value = 3;Console.Out.WriteLine($"properties.Value is {properties.Value}");properties.Value = 4;Console.Out.WriteLine($"properties.Value is {properties.Value}");}
Figure 5-2 shows what happens.
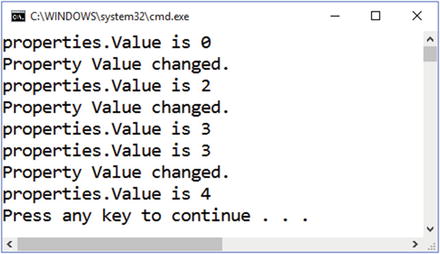
Figure 5-2. Receiving property change notifications
As expected, you only get property change notifications when the property value actually changes.
Although this code works as expected, the result isn’t ideal. One problem with this approach of using a base class is that a developer cannot use inheritance effectively. Because you can only inherit from one class, you can’t inherit from any other classes other than Properties. However, if you don’t provide a base class that handles INotifyPropertyChanged, you force every class that wants to do change notifications to implement INotifyPropertyChanged. There are ways to get around this issue of single class inheritance as well, but none of them solve the problem elegantly. The C# language could address this by adding a new keyword like “notify” that a developer could use on properties. The C# compiler would then be responsible for generating the property changed code machinery. But, this solution isn’t scalable. There are numerous cases where coding aspects like implementing INotifyPropertyChanged should be handled in a repeatable fashion. We can’t create keywords every time we run into conditions where we want to repeat an implementation of code in numerous places of an application.
In the next section, I’ll talk about how repeatable code generation scenarios may be improved in a future version of C#.
Reusing Common Implementations
A better approach to handling INotifyPropertyChanged is to provide a common, reusable approach independent of keywords and typical code reuse techniques. The following code snippet shows what a developer would want to do:
[PropertyChanged]public partial class IntegerData{public int Value { get; set;}}
The idea here is that the C# compiler would see the PropertyChangedAttribute and use the attribute’s implementation to generate code for the target class, correctly implementing INotifyPropertyChanged. These attributes would be different than the attributes that we currently create in that these compile-time attributes wouldn’t be passive. The compiler would look for their presence and inform them to generate code to augment the code that they are tied to. In the case of this hypothetical PropertyChangedAttribute, it would ensure the target class would implement INotifyPropertyChanged and implement the property changed logic within each property setter. This technique is a huge win for developers because they no longer have to manually write that code; the attribute will generate it for them!
But, let’s not stop with property changed notifications. Consider a scenario in which we have a class that implements IDisposable along with overriding ToString() and defining a method, which is shown in Listing 5-5.
Listing 5-5. Defining a class with embedded, reusable implementations
public class Person: IDisposable{private bool isDisposed;private int disposedCallCount;private int callTwiceCallCount;public Person(string name, uint age){this.Name = name;this.Age = age;}public string Name { get; }public uint Age { get; }public override string ToString(){if(this.isDisposed){throw new ObjectDisposedExcecption(nameof(Person));}return $"{this.Name}, {this.Age}";}public void Dispose(){if(this.isDisposed){throw new ObjectDisposedExcecption(nameof(Person));}if(Interlocked.Increment(ref this.disposedCallCount) > 1){throw new MaximumCallCountExceededException(nameof(Dispose));}// Do all the nasty gunk that you need// to do to support Dispose()...}public void CallTwice(){if(this.isDisposed){throw new ObjectDisposedExcecption(nameof(Person));}if(Interlocked.Increment(ref this.callTwiceCallCount) > 2){throw new MaximumCallCountExceededException(nameof(CallTwice));}// Do what CallTwice() does...}}
For a simple class, there’s a fair amount of code in place that isn’t specific to the Person class, such as:
Object disposal. The IDisposable interface requires a number of steps that developers should follow to implement the idiom correctly (see https://msdn.microsoft.com/en-us/library/ms244737.aspx for details). Also, each member on a disposable object should throw ObjectDisposedException if the object has been disposed.
Method call thresholds. Sometimes a method should only be called a certain number of times. A typical scenario is Dispose(), which should only be called once. In this class, CallTwice() should only be invoked twice.
ToString() patterns. You may want to have a consistent format for ToString() for all of your classes, like the property values concatenated together with a comma and space delimiter.
Now, compare the code in Listing 5-5 to the code in Listing 5-6.
Listing 5-6. Using generators in C# code
[Disposable][ToString]public partial class Person{public Person(string name, uint age){this.Name = name;this.Age = age;}public string Name { get; }public uint Age { get; }[Throttle(2)]public void CallTwice(){// Do what CallTwice() does...}}
The idea is that we’d use source generators to implement IDisposable on the class for us. We’d also implement ToString() for the developer based on a consistent, idiomatic pattern. Finally, we can throttle the number of times a method is called.
The ability to weave code into existing code via compile-time attributes will drastically reduce the amount of code a developer has to write in every class. Additionally, the implementation of a source generator would produce C# code that can be analyzed and debugged as easily as the code you wrote. The generator would use syntax trees and semantic information to determine the structure of the code and subseqently augment the tree so it contains the correct implementation. Now that you’ve read this book and have a solid understanding of the components of the Compiler API, you should be comfortable creating source generators for your applications.
Conclusion
This chapter showed you how tools and frameworks are already taking advantage of the Compiler API to build amazing products. Packages such as Rocks and Cake are empowered by the Compiler API to implement features that were difficult before it was introduced. You also got a glimpse into C#’s future where the Compiler API is used to allow developers to generate code so patterns and aspects can be exploited to simplify implementations.
And although you’ve come to the end of the book, the story of the Compiler API doesn’t stop here. .NET started a major transformation that was initialized in the late 2000s when hints and small demos were given by Microsoft employees of a new world with an accessible API to the internals of the compiler. This transformation was greatly accelerated when Roslyn was open-sourced in 2014. Now, the .NET community is thriving once again. The .NET Framework is being reimaged and rearchitected into .NET Core, a nimbler, performance-driven, open-source, cross-platform version of .NET that is evolving along with the compilation framework. Furthermore, there are even hints that .NET will target WebAssembly in the future, making C# work natively in the browser (see https://www.reddit.com/r/programmerchat/comments/4dxpcp/i_am_miguel_de_icaza_i_started_xamarin_mono_gnome/d1v9xyd ). The cool thing about all this work is that anyone can contribute to this effort. I hope that you not only consider writing your own diagnostics and refactorings along with using the Compiler and Scripting API to empower your applications, but also consider contributing to the continual evolution of the framework. Once again, it’s a great time to be a .NET developer!