In the previous chapters, you learned how to display data and how to manage user inputs, and made HTTP requests and managed routes. You can consider these skills the basic building blocks. But before you can actually start writing frameworkless code, you need to know how to manage the data (or the state) that links all of these elements together. In front-end applications or more generally, in all kinds of client applications (web, desktop, and mobile) effectively managing data is called state management.
State management doesn’t solve a new problem. Model-view-controller (the most famous state management pattern) was introduced in the 1970s. When React became a mainstream library, the term started to show up in blogs, conferences, and so on. Today, there are dedicated libraries for front-end state management. Some of them are tied to existing frameworks, such as Vuex (for Vue.js) and NgRx (for Angular), while other libraries are agnostic, like MobX and Redux.
Choosing the right architecture for your state management code is crucial in keeping the application healthy and maintainable. In this chapter, we will build three state management strategies, compare them, and analyze their pros and cons.
Let’s Review the TodoMVC Application
As a base for the examples in this chapter, we will use TodoMVC, which we developed in Chapter 3, with a functional rendering engine. In Listing 7-1, you can see the code of the controller with all the events to manipulate the todos and the filter.
The state management code is defined in the events object, which we pass to our View function to attach its methods to DOM handlers.
Model-View-Controller
To keep your state in the controllers is not a good way to manage it. The first step in enhancing our design is simply moving all that code to a separate file. Listing 7-2 is an updated version of the controller with an external model that manages the state of the application.
import modelFactory from './model/model.js'
const model = modelFactory()
const events = {
addItem: text => {
model.addItem(text)
render(model.getState())
},
updateItem: (index, text) => {
model.updateItem(index, text)
render(model.getState())
},
deleteItem: (index) => {
model.deleteItem(index)
render(model.getState())
},
toggleItemCompleted: (index) => {
model.toggleItemCompleted(index)
render(model.getState())
},
completeAll: () => {
model.completeAll()
render(model.getState())
},
clearCompleted: () => {
model.clearCompleted()
render(model.getState())
},
changeFilter: filter => {
model.changeFilter(filter)
render(model.getState())
}
}
const render = (state) => {
window.requestAnimationFrame(() => {
const main = document.querySelector('#root')
const newMain = registry.renderRoot(
main,
state,
events)
applyDiff(document.body, main, newMain)
})
}
render(model.getState())
Listing 7-2
Controller with Separated Model
Notice that the actual data used to render is returned from the getState method of the model object. You can see its code in Listing 7-3. For simplicity, I reported only the addItem and the updateItem methods (this is done in all the other listings regarding the model in this chapter). To check the complete code, you can visit the GitHub repository at https://github.com/Apress/frameworkless-front-end-development/blob/master/Chapter07/00/model/model.js.
const cloneDeep = x => {
return JSON.parse(JSON.stringify(x))
}
const INITIAL_STATE = {
todos: [],
currentFilter: 'All'
}
export default (initalState = INITIAL_STATE) => {
const state = cloneDeep(initalState)
const getState = () => {
return Object.freeze(cloneDeep(state))
}
const addItem = text => {
if (!text) {
return
}
state.todos.push({
text,
completed: false
})
}
const updateItem = (index, text) => {
if (!text) {
return
}
if (index < 0) {
return
}
if (!state.todos[index]) {
return
}
state.todos[index].text = text
}
//Other methods...
return {
addItem,
updateItem,
deleteItem,
toggleItemCompleted,
completeAll,
clearCompleted,
changeFilter,
getState
}
}
Listing 7-3
Simple Model Object for a TodoMVC Application
The values extracted from a model object should be immutable. You do that by generating a clone every time getState is invoked, and then by freezing it with Object.freeze (https://developer.mozilla.org/it/docs/Web/JavaScript/Reference/Global_Objects/Object/freeze). To clone the object, I used the parse and serialize methods of the JSON object. I first serialize the state to a string, and then I parse back the object from the JSON string, obtaining a deep clone of the original object. This approach can be slow, and I used it here for simplicity. In a real-world application, I usually rely on Lodash’s cloneDeep function (www.npmjs.com/package/lodash.clonedeep). I will use these two functions in most of the other listings in this chapter; but to keep the listings short, I will not show the definition.
Using an immutable state to transfer data forces the consumers of this API to use public methods to manipulate the state. This way, the business logic is completely contained in the Model object and not scattered in various parts of the application. This approach helps keep our state management code with a high level of testability during the lifespan of our codebase. Listing 7-4 shows part of the test suite for the Model object.
import stateFactory from './state.js'
describe('external state', () => {
test('data should be immutable', () => {
const state = stateFactory()
expect(() => {
state.get().currentFilter = 'WRONG'
}).toThrow()
})
test('should add an item', () => {
const state = stateFactory()
state.addItem('dummy')
const { todos } = state.get()
expect(todos.length).toBe(1)
expect(todos[0]).toEqual({
text: 'dummy',
completed: false
})
})
test('should not add an item when a falsy text is provided', () => {
const state = stateFactory()
state.addItem(")
state.addItem(undefined)
state.addItem(0)
state.addItem()
state.addItem(false)
const { todos } = state.get()
expect(todos.length).toBe(0)
})
test('should update an item', () => {
const state = stateFactory({
todos: [{
text: 'dummy',
completed: false
}]
})
state.updateItem(0, 'new-dummy')
const { todos } = state.get()
expect(todos[0].text).toBe('new-dummy')
})
test('should not update an item when an invalid index is provided', () => {
const state = stateFactory({
todos: [{
text: 'dummy',
completed: false
}]
})
state.updateItem(1, 'new-dummy')
const { todos } = state.get()
expect(todos[0].text).toBe('dummy')
})
})
Listing 7-4
Test Suite for TodoMVC State Object
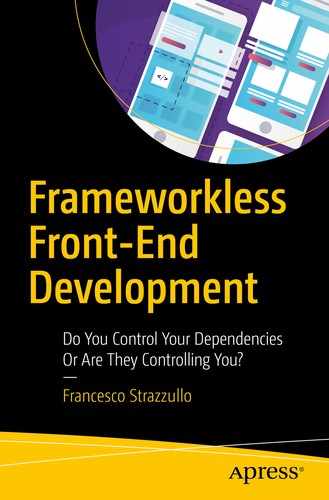
This first version of a state management library for a TodoMVC application is a classic model-view-controller (MVC) implementation. Historically, MVC is one of the first patterns dedicated to managing the state of a client application. You can see a schema of this pattern in Figure 7-1.
Figure 7-1
MVC pattern schema
This model object will be the base for all the other implementations. So, before continuing, let’s review the workflow of our application and the relationship between its parts.
1.
The controller gets the initial state from the model.
2.
The controller invokes the view to render the initial state.
3.
The system is ready to receive user inputs.
4.
The user does something (for example, they add an item).
5.
The controller maps the user action with the correct Model method (model.addItem).
6.
The model updates the state.
7.
The controller gets the new state form the model.
8.
The controller invokes the view to render the new state.
9.
The system is ready to receive user inputs.
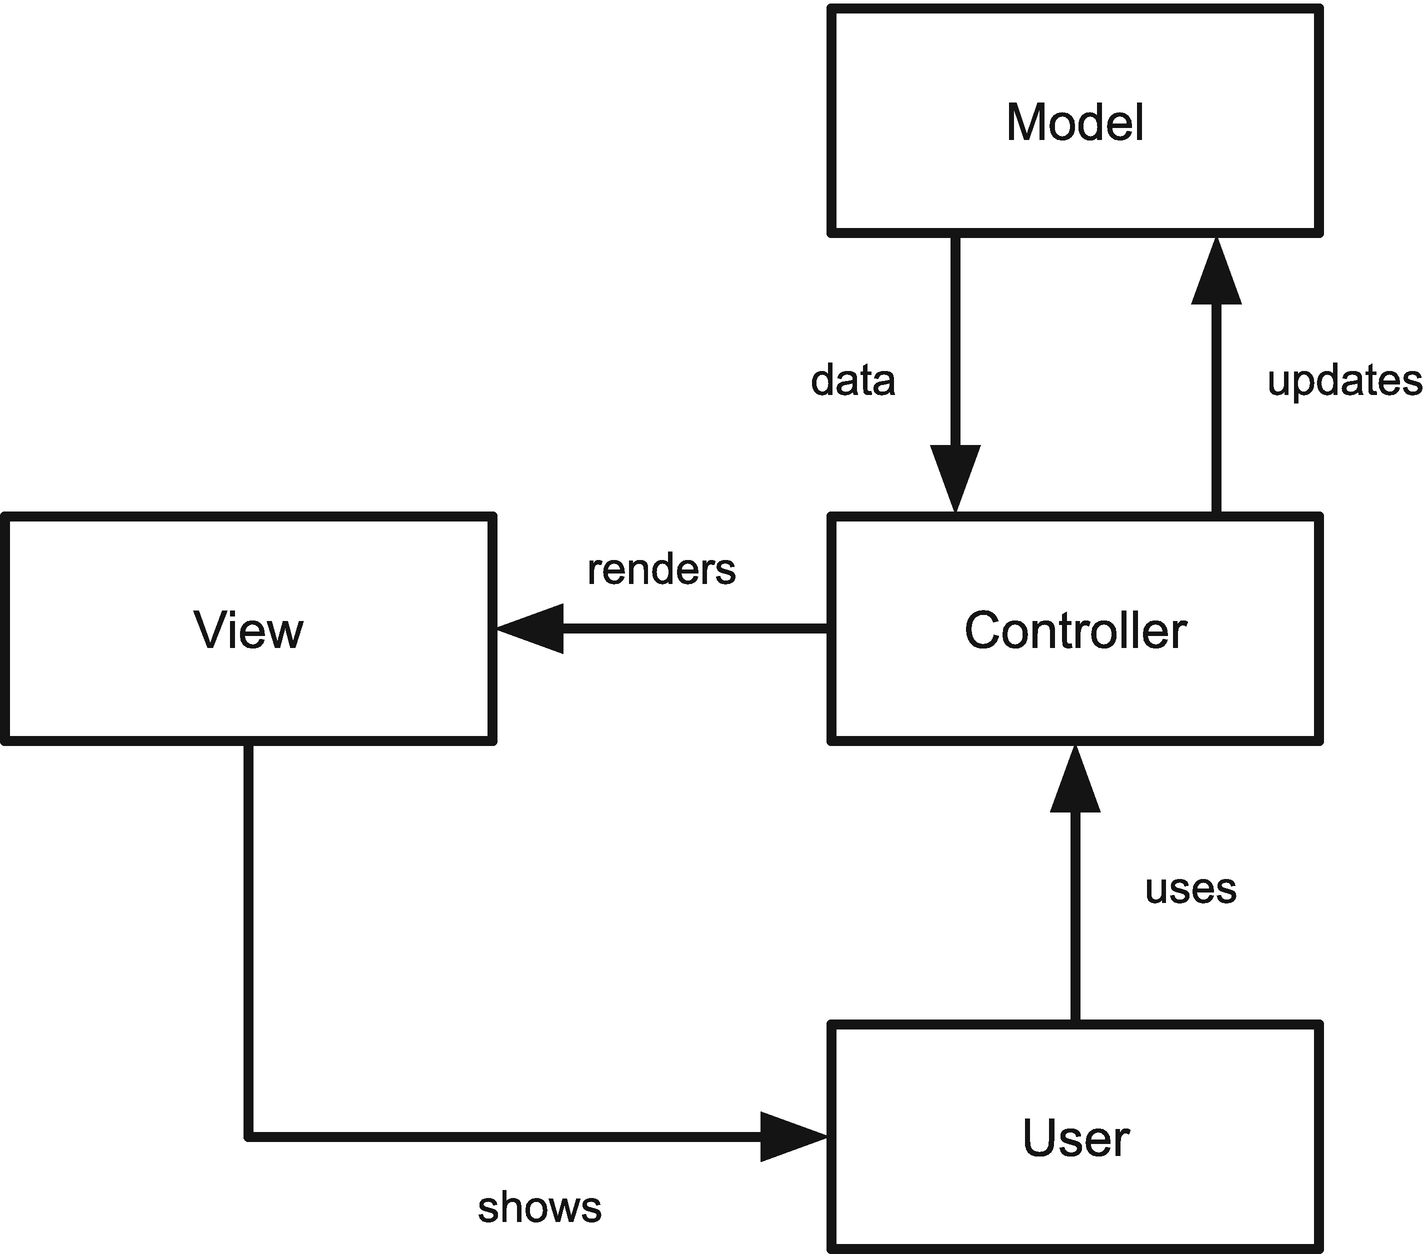
This workflow is quite generic for any front-end application. It is summarized in Figure 7-2. The loop between the render and the user action is called the render cycle.
Figure 7-2
Render cycle
Observable Model
This first version of the state management code based on MVC works well for our use case. Nevertheless, the integration between the model and the controller is quite clumsy because we need to manually invoke the render method every time that the user performs some kind of action. This is not an optimal solution for two significant reasons. First, manually invoking the render after every state change is a very error-proneapproach. Second, the render method is also invoked when the action does not modify the state; for example, adding an empty item to the list. Both of these issues are resolved in the next version of our model, which is based on the observer pattern (https://en.wikipedia.org/wiki/Observer_pattern).
To better understand the public API of the observable model, take a look at Listing 7-6, which shows a simple test suite for the new model.
import modelFactory from './model.js'
let model
describe('observable model', () => {
beforeEach(() => {
model = modelFactory()
})
test('listeners should be invoked immediatly', () => {
let counter = 0
model.addChangeListener(data => {
counter++
})
expect(counter).toBe(1)
})
test('listeners should be invoked when changing data', () => {
let counter = 0
model.addChangeListener(data => {
counter++
})
model.addItem('dummy')
expect(counter).toBe(2)
})
test('listeners should be removed when unsubscribing', () => {
let counter = 0
const unsubscribe = model
.addChangeListener(data => {
counter++
})
unsubscribe()
model.addItem('dummy')
expect(counter).toBe(1)
})
test('state should be immutable', () => {
model.addChangeListener(data => {
expect(() => {
data.currentFilter = 'WRONG'
}).toThrow()
})
})
})
Listing 7-6
Unit Tests for Observable Model
After reading the tests, it’s clear that the only way to get the state from the Model object is to add a listener callback. This callback will be invoked at the moment of subscription and every time that the internal state changes. This approach simplifies the controller, as you can see in Listing 7-7.
import modelFactory from './model/model.js'
const model = modelFactory()
const {
addChangeListener,
...events
} = model
const render = (state) => {
window.requestAnimationFrame(() => {
const main = document.querySelector('#root')
const newMain = registry.renderRoot(
main,
state,
events)
applyDiff(document.body, main, newMain)
})
}
addChangeListener(render)
Listing 7-7
Using the Observable Model in Controller
The code for the controller is simpler now. To bind the render method to the model is enough reason to use that method as a listener. Notice that we extract all methods (apart from addEventListener) from the model to use them as events that we pass to the view.
The observable model is useful for adding new features to the controller without modifying the public interface of the model. In Listing 7-8, you see a new version of the controller that creates two new change listeners. The first one is a simple logger on the console. The second one saves the state to window.localStorage. This way, the controller can load the initial data from the storage when the application starts.
import stateFactory from './model/state.js'
const loadState = () => {
const serializedState = window
.localStorage
.getItem('state')
if (!serializedState) {
return
}
return JSON.parse(serializedState)
}
const state = stateFactory(loadState())
const {
addChangeListener,
...events
} = state
const render = (state) => {
// Render Code
}
addChangeListener(render)
addChangeListener(state => {
Promise.resolve().then(() => {
window
.localStorage
.setItem('state', JSON.stringify(state))
})
})
addChangeListener(state => {
console.log(
`Current State (${(new Date()).getTime()})`,
state
)
})
Listing 7-8
More Listeners Used with the Observable Model
Implementing the same features without the observable model would have been difficult and not maintainable. Keep this pattern in mind when your controller becomes too coupled with the model.
In this section, I said that “the model” was a single object. This is true for a simple application like TodoMVC, but in a real scenario, “the model” is a collection of Model objects that manage all the different domains in your application.
Reactive Programming
Reactive programming has been a buzz phrase in the front-end community for quite a while. It became popular when the Angular team announced that their framework was heavily based on RxJS (React Extensions for JavaScript), a library built to create applications based on reactive programming. In my opinion, the best source for understanding reactive programming is a GitHub Gist titled “The Introduction to Reactive Programming You’ve Been Missing,” by André Staltz, one of the maintainers of RxJS. You can read it at https://gist.github.com/staltz/868e7e9bc2a7b8c1f754.
In a nutshell, to implement the reactive paradigm means to work in an application where everything is an observable that can emit events: model changes, HTTP requests, user actions, navigation, and so forth.
Tip
If you’re using a lot of observables in your code, you’re working in a reactive paradigm.
Reactive programming is a very interesting topic, and in this chapter, we will just scratch the surface by creating a reactive state management library in a couple of different ways. If you’d like to study this topic in depth, I suggest reading Front-End Reactive Architectures by Luca Mezzalira (Apress, 2018).
A Reactive Model
The model created in Listing 7-5 is an example of reactive state management because it’s an observable. But, in a non-trivial application, there should be a lot of different model objects, so we need an easy way to create observables. This way, we can focus on the domain logic and leave the architectural part in a separate library. In Listing 7-9, you see a new version of our model object based on an observable factory. Listing 7-10 shows the observable factory.
import observableFactory from './observable.js'
const INITIAL_STATE = {
todos: [],
currentFilter: 'All'
}
export default (initalState = INITIAL_STATE) => {
const state = cloneDeep(initalState)
const addItem = text => {
if (!text) {
return
}
state.todos.push({
text,
completed: false
})
}
const updateItem = (index, text) => {
if (!text) {
return
}
if (index < 0) {
return
}
if (!state.todos[index]) {
return
}
state.todos[index].text = text
}
...
const model = {
addItem,
updateItem,
deleteItem,
toggleItemCompleted,
completeAll,
clearCompleted,
changeFilter
}
return observableFactory(model, () => state)
}
Listing 7-9
An Observable TodoMVC Model Built with a Factory
export default (model, stateGetter) => {
let listeners = []
const addChangeListener = cb => {
listeners.push(cb)
cb(freeze(stateGetter()))
return () => {
listeners = listeners
.filter(element => element !== cb)
}
}
const invokeListeners = () => {
const data = freeze(stateGetter())
listeners.forEach(l => l(data))
}
const wrapAction = originalAction => {
return (...args) => {
const value = originalAction(...args)
invokeListeners()
return value
}
}
const baseProxy = {
addChangeListener
}
return Object
.keys(model)
.filter(key => {
return typeof model[key] === 'function'
})
.reduce((proxy, key) => {
const action = model[key]
return {
...proxy,
[key]: wrapAction(action)
}
}, baseProxy)
}
Listing 7-10
Observable Factory
The code of the observable factory may seem a little obscure, but its functioning is quite simple. It creates a proxy of the Model object, in which every method in the original model creates a new method with the same name that wraps the original one and invokes all the listeners. To pass the state to the proxy, a simple getter function is used to get the current state after every modification made by the model.
From an external point of view, the observable models in Listing 7-5 and Listing 7-9 have the same public interface. So a good way to design a reactive state management architecture is to create a simple observable model, and when you need more than one Model object, you can create the observable factory abstraction. This is another example of the YAGNI principle that I introduced in Chapter 3.
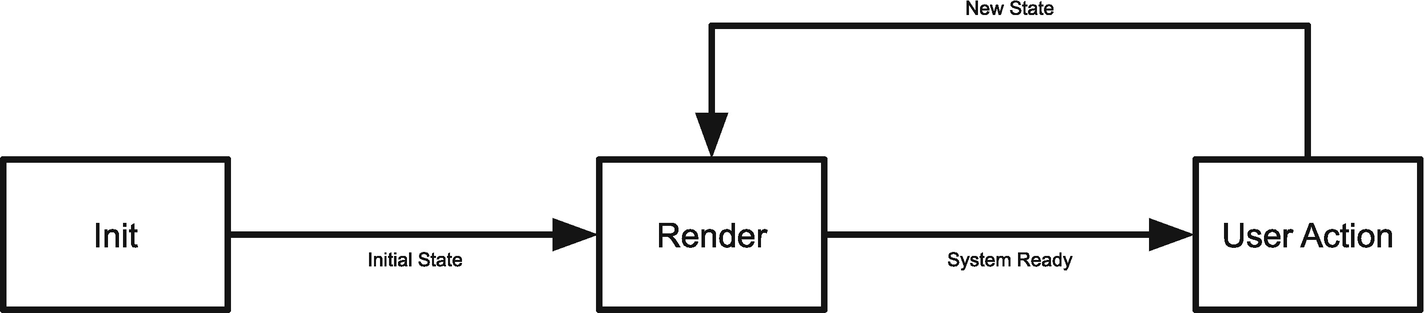
In Figure 7-3, you can see the relationship between the controller, the model, and the proxy.
Figure 7-3
Observable model with a proxy
Native Proxies
JavaScript has a native way to create proxies via the Proxy object (https://developer.mozilla.org/en-US/docs/Web/JavaScript/Reference/Global_Objects/Proxy). This new API makes it easy to wrap the default behavior of any object with custom code. Listing 7-11 creates a simple proxy that logs a message every time that we get or set a property of the base object. In Figure 7-4, you can see the result in the browser’s console.
const base = {
foo: 'bar'
}
const handler = {
get: (target, name) => {
console.log(`Getting ${name}`)
return target[name]
},
set: (target, name, value) => {
console.log(`Setting ${name} to ${value}`)
target[name] = value
return true
}
}
const proxy = new Proxy(base, handler)
proxy.foo = 'baz'
console.log(`Logging ${proxy.foo}`)
Listing 7-11
Basic Proxy Object Usage
Figure 7-4
Basic proxy result
To create a proxy that wraps a base object, you need to provide a handler that consists of a set of traps. A trap is a method that wraps a basic operation on the base object. In our simple case, we overwrote the setters and the getters of all the properties. Notice that the set handler should return a boolean value that represents the success of the operation. In Listing 7-12, the Proxy object creates an observable factory.
export default (initialState) => {
let listeners = []
const proxy = new Proxy(cloneDeep(initialState), {
set: (target, name, value) => {
target[name] = value
listeners.forEach(l => l(freeze(proxy)))
return true
}
})
proxy.addChangeListener = cb => {
listeners.push(cb)
cb(freeze(proxy))
return () => {
listeners = listeners.filter(l => l !== cb)
}
}
return proxy
}
Listing 7-12
Observable Factory with Proxy Object.freeze
Even if the signature is similar, the usage is slightly different, as in Listing 7-13, which shows the new version of the model created with this new observable factory.
An Observable TodoMVC Model Built with a Proxy Factory
There’s a very important difference between the two versions. In the one based on proxy, the todos array is overwritten every time. In the first one, the todos array is modified in place, which invokes the array’s push method or substitutes an element. When using a Proxy object, it’s mandatory to overwrite the properties to invoke the set trap.
Caution
When working with a Proxy object, always replace properties instead of modifying them in place.
Event Bus
In this section, I cover how to manage the state of an application using the event bus pattern. An event bus is one way to implement an event-driven architecture (EDA). When working with EDAs, every state change is represented by an event that is dispatched in the system. To learn more about the various kinds of EDA and their differences, I suggest reading Building Evolutionary Architectures: Support Constant Change by Neal Ford, Rebecca Parsons, and Patrick Kua (O’Reilly Media, 2017).
An event is defined by a name that identifies what happened and a payload that contains meaningful information to process the event. Listing 7-14 is an example event that should be dispatched when creating a new item in our TodoMVC domain.
const event = {
type: 'ITEM_ADDED',
payload: 'Buy Milk'
}
Listing 7-14
Add Item Event
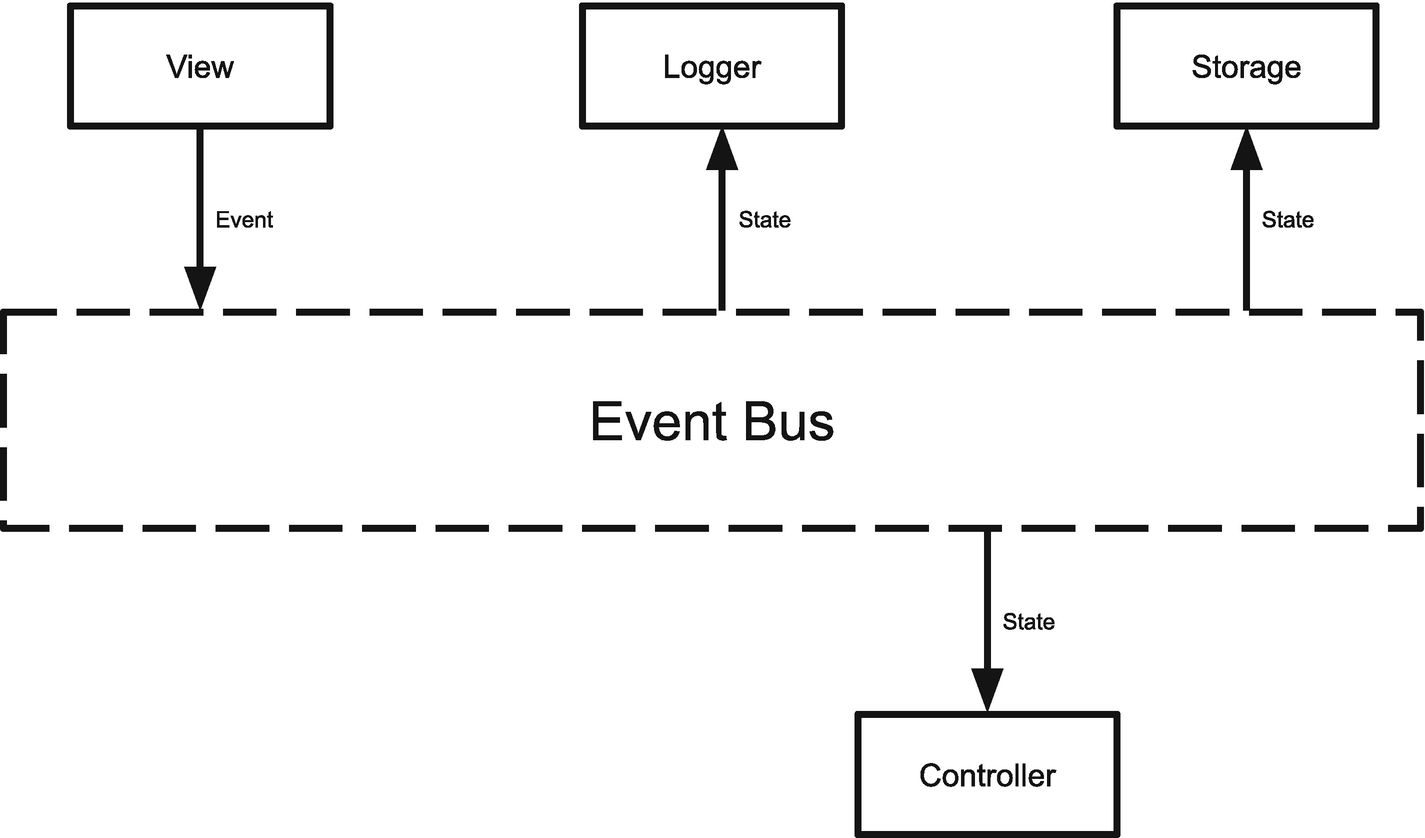
The main idea behind the event bus pattern is that every event is processed by a single object that connects all the “nodes” that make up the application. The event is then processed, and the result is sent to all the connected nodes. When using an event bus for state management, the result of any event processing is an updated version of the state of the application. Figure 7-5 is a diagram of the event bus pattern.
Figure 7-5
Event bus pattern
To better understand how an event bus works, let’s analyze the flow of an ITEM_ADDED event.
1.
The view renders the initial state.
2.
The user fills out the form and presses Enter.
3.
The DOM event is captured by the view.
4.
The view creates the ITEM_ADDED event and dispatches it to the bus.
5.
The bus processes the event generating a new state.
6.
The new state is sent to the controller.
7.
The controller invokes the view to render the new state.
8.
The system is ready to receive user inputs.
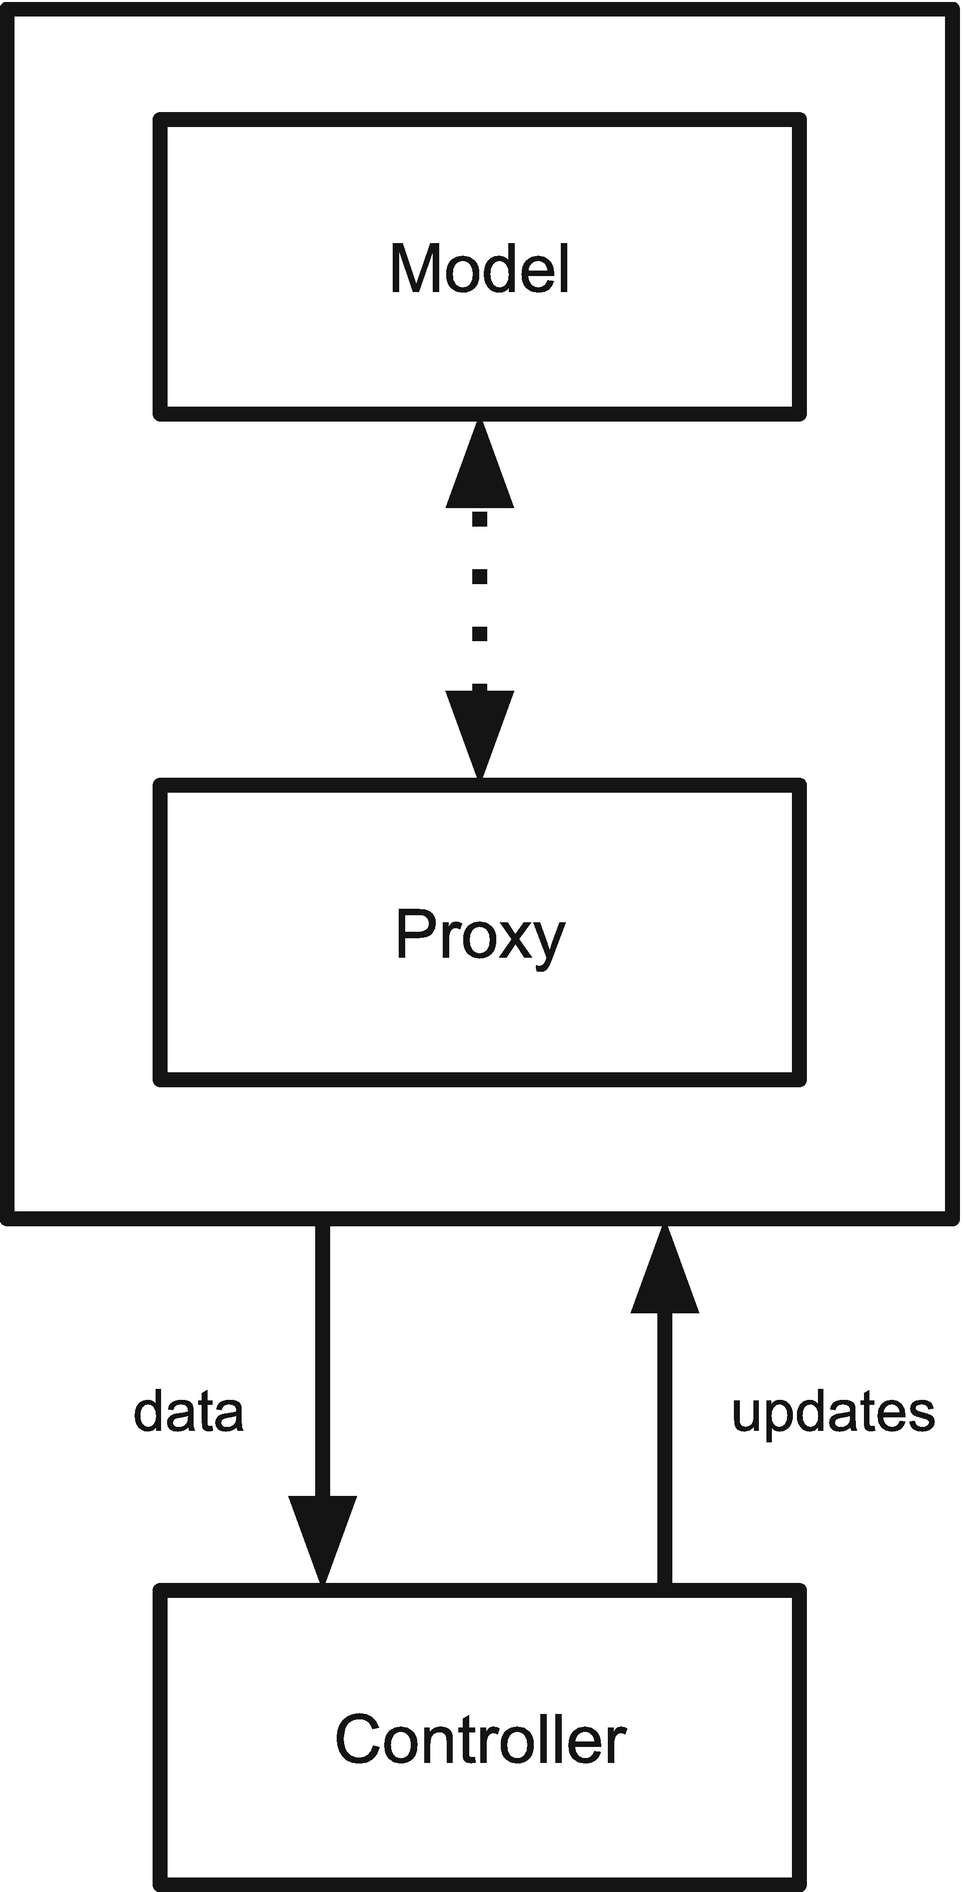
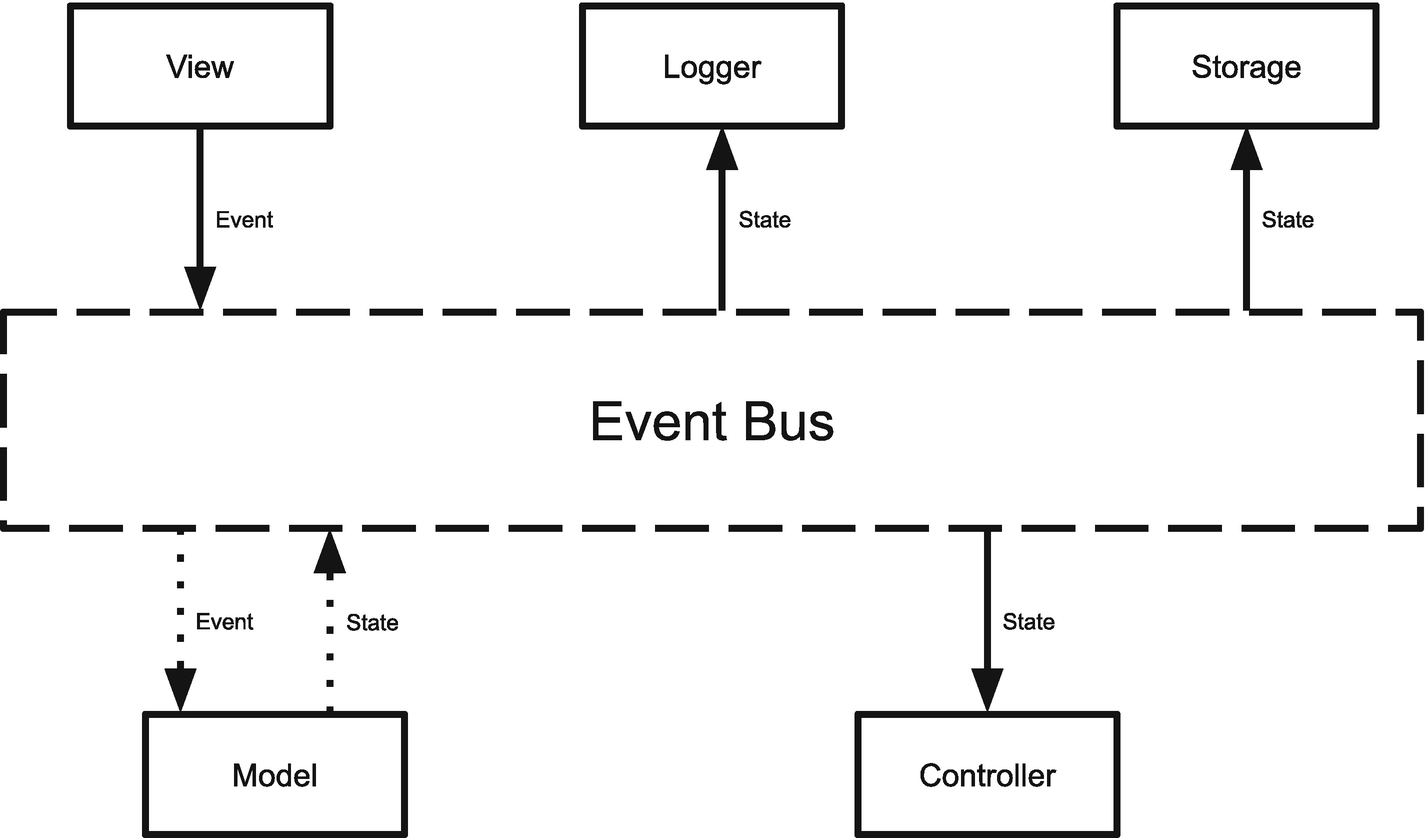
Step 5 states that the bus processes the event generating a new state. This is not correct because the event bus is an architectural element and should not contain any kind of domain-related code. We need to add the model to the mix to implement the event bus pattern. In this scenario, the model is a function that accepts the old state and an event and returns a new version of the state, as shown in Figure 7-6.
It’s important to notice that in this pattern, the state that travels from the model to the subscribers is a single object. This object contains all the data useful to our application. This does not mean that the model should be one big JavaScript function. Later, you see how it is possible to split this model into submodels that together build the State object.
Figure 7-6
Model structure in an event bus application
Figure 7-7 is an updated diagram of the event bus pattern with the addition of the model.
Figure 7-7
Event bus pattern with model
To complete this section, we will analyze two event bus implementations: the first is frameworkless and the second is based on Redux. Redux is a state management library born in the React ecosystem but usable in any kind of environment.
throw new Error('model should always return a value')
}
if (newState === state) {
return
}
state = newState
invokeSubscribers()
}
return {
subscribe,
dispatch,
getState: () => freeze(state)
}
}
Listing 7-15
Frameworkless Event Bus
In this scenario, the model is a function that gets the previous state and the event as inputs, and then returns a new state. There is another important characteristic of the model: a pure function. A pure function is where the return value is only determined by its input values—just like any standard mathematical function, such as Math.cos(x).
A model designed as a pure function offers a big boost to testability because the new state cannot depend on an internal status of the model itself. We can also use this aspect to optimize performances, because every time that the state is updated, it has to be a new object. So if the old state and new state are equal, it means that we can skip the subscribers. In this implementation, invoking the model without parameters will result in obtaining the initial state of the application.
To better understand the inner workings of the event bus, Listing 7-16 shows the related test suite.
import eventBusFactory from './eventBus'
let eventBus
const counterModel = (state, event) => {
if (!event) {
return {
counter: 0
}
}
if (event.type !== 'COUNTER') {
return state
}
return {
counter: state.counter++
}
}
describe('eventBus', () => {
beforeEach(() => {
eventBus = eventBusFactory(counterModel)
})
test('subscribers should be invoked when the model catch the event', () => {
let counter = 0
eventBus.subscribe(() => counter++)
eventBus.dispatch({ type: 'COUNTER' })
expect(counter).toBe(1)
})
test('subscribers should not be invoked when the model does not catch the event', () => {
let counter = 0
eventBus.subscribe(() => counter++)
eventBus.dispatch({ type: 'NOT_COUNTER' })
expect(counter).toBe(0)
})
test('subscribers should receive an immutable state', () => {
eventBus.dispatch({ type: 'COUNTER' })
eventBus.subscribe((state) => {
expect(() => {
state.counter = 0
}).toThrow()
})
})
test('should throw error if the model does not return a state', () => {
const eventBus = eventBusFactory(() => {
return undefined
})
expect(() => {
eventBus.dispatch({ type: 'EVENT' })
}).toThrow()
})
})
Listing 7-16
Test Suite for Event Bus
The counterModel object gives us a glimpse of how a model should work in an event bus architecture. When an event of the COUNTER type is dispatched a new state is created with an incremented counter property. For all the other events, nothing is changed and the old state is returned. Listing 7-17 shows part of the model of the TodoMVC application.
const INITIAL_STATE = {
todos: [],
currentFilter: 'All'
}
const addItem = (state, event) => {
const text = event.payload
if (!text) {
return state
}
return {
...state,
todos: [...state.todos, {
text,
completed: false
}]
}
}
const updateItem = (state, event) => {
const { text, index } = event.payload
if (!text) {
return state
}
if (index < 0) {
return state
}
if (!state.todos[index]) {
return state
}
return {
...state,
todos: state.todos.map((todo, i) => {
if (i === index) {
todo.text = text
}
return todo
})
}
}
const methods = {
ITEM_ADDED: addItem,
ITEM_UPDATED: updateItem
}
export default (initalState = INITIAL_STATE) => {
return (prevState, event) => {
if (!prevState) {
return cloneDeep(initalState)
}
const currentMethod = methods[event.type]
if (!currentMethod) {
return prevState
}
return currentMethod(prevState, event)
}
}
Listing 7-17
TodoMVC Model for Event Bus Architecture
To avoid a very long switch statement to choose the right method based on the event type, I used a simple object that maps the event type with a method. If no method is found, it means that the model does not manage that event, and so the previous state is returned.
In the previous section, I stated that in a real application, the model function should be separated into smaller submodules. Another version of the model in Listing 7-17 is on GitHub at https://github.com/Apress/frameworkless-front-end-development/blob/master/Chapter07/03.1/model/model.js. In that version of the model, there are two submodels. The first one manages the todos and the second one manages the filter. The main model function merges the results of the submodels into a single State object.
Tip
When working with an event bus, split the model into submodels to achieve good readability for your code.
Listing 7-18 shows the controller for the TodoMVC application based on the event bus.
import eventBusFactory from './model/eventBus.js'
import modelFactory from './model/model.js'
const model = modelFactory()
const eventBus = eventBusFactory(model)
const render = (state) => {
window.requestAnimationFrame(() => {
const main = document.querySelector('#root')
const newMain = registry.renderRoot(
main,
state,
eventBus.dispatch)
applyDiff(document.body, main, newMain)
})
}
eventBus.subscribe(render)
render(eventBus.getState())
Listing 7-18
Controller for an Event Bus–based TodoMVC Application
As you can see, the major difference between this version and previous versions is that we don’t provide the events to the render function; instead, we use the dispatch method of the event bus. This way, the view is able to dispatch events in the system, as you can see in Listing 7-19, which shows part of the view’s code.
import eventCreators from '../model/eventCreators.js'
Note the usage of eventCreators.addItem to create the Event object to dispatch. The eventCreators object is a simple collection of factories used to easily build consistent events. The code is shown in Listing 7-20.
const EVENT_TYPES = Object.freeze({
ITEM_ADDED: 'ITEM_ADDED',
ITEM_UPDATED: 'ITEM_UPDATED'
})
export default {
addItem: text => ({
type: EVENT_TYPES.ITEM_ADDED,
payload: text
}),
updateItem: (index, text) => ({
type: EVENT_TYPES.ITEM_UPDATED,
payload: {
text,
index
}
})
}
Listing 7-20
Event Creators
These functions help ensure that every event is in the canonical form seen in Listing 7-14.
Redux
Redux is a state management library that was first announced at the React-Europe conference in 2015 during a talk by Dan Abramov (www.youtube.com/watch?v=xsSnOQynTHs). After that, it rapidly became a mainstream approach to working with React applications. Redux is one (and surely the most successful) of the so-called Flux-like libraries, a group of tools that implemented Facebook’s Flux architecture. To learn more about Flux, consult its website at https://facebook.github.io/flux/.
Working with Redux is very similar to working with a frameworkless event bus. But, since it was created after the Flux pattern, the words used to define the components of the architecture are different, as you can see in Table 7-1.
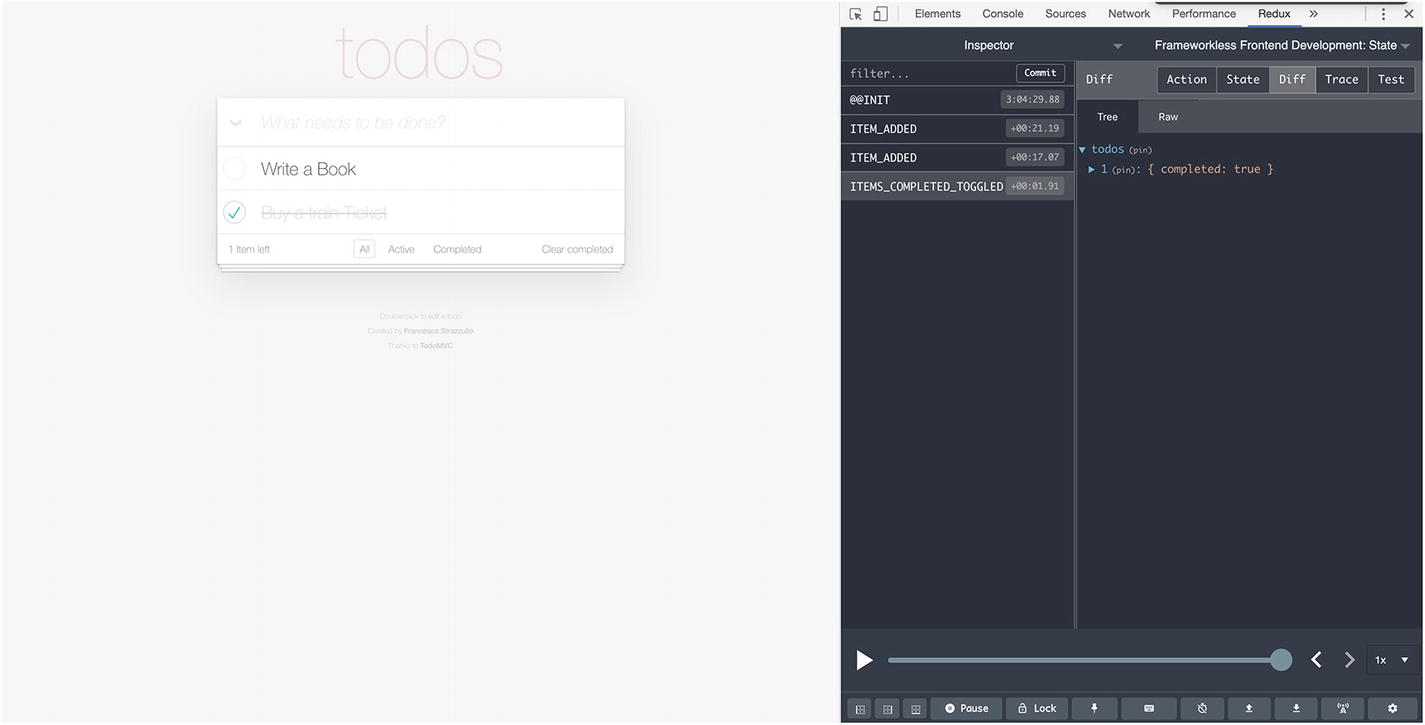
One of the main advantages of using Redux instead of a frameworkless event bus is the large number of tools and plugins that are readily available. One of the most popular tools is Redux DevTools. With this tool, developers can easily log all the actions that are dispatched in the system to see how they affect the state. Moreover, it is possible to import or export the state in JSON format. Figure 7-8 shows the Redux DevTools in action.
Figure 7-8
Redux DevTools
Comparing State Management Strategies
In this last section, I point out the characteristics of the three kinds of state management strategies from three different points of views: simplicity, consistency, and scalability.
Model-View-Controller
Model-view-controller is fairly simple to implement and offers developers a lot of advantages. For example, there is a good deal of separation of concerns and testability of your domain’s business logic.
The real problem with MVC is that it is not a strict pattern. The definition of the elements and the relations between them could be unclear. If you ask, What is the difference between the view and the controller?, you may get a lot of different answers. This happens because every MVC framework fills in the “gray areas” of the MVC pattern with their own ideas, so every framework implements a slightly different version of the MVC. To effectively work with a frameworkless MVC, the first task is to define your team’s MVC rules.
The same characteristic is also a scalability problem. As your application grows bigger, the number of “gray areas” may increase, and if consistency is not addressed, your code may become unreadable.
Reactive Programming
The main idea behind reactive programming is that everything in your application is an observable. We covered how to easily build observable models, but there are libraries (like RxJS) that transform every aspect of a front-end application in an observable, from user inputs to timers and HTTP requests. This approach guarantees good consistency because you work with objects of the “same type.”
Nevertheless, wrapping everything in an observable is not simple. It may become easy if you use a third-party library like RxJS, but that does not mean that it would be simple.
Caution
Implementing an easy architecture is not the same as building a simple one. Your goal should be to create the simplest architecture that matches your requirements, rather than the easiest one to build.
It may not be that simple because you’re working with a very big abstraction, but everything is an observable. Working with abstractions may become a problem as your application becomes bigger because it starts to “leak” (https://en.wikipedia.org/wiki/Leaky_abstraction). Leakiness is not a specific problem of reactive programming, but it is related to any pattern (or framework) based on a central abstraction. This is greatly explained by the Law of Leaky Abstractions, coined by Joel Spolsky, which states, “All non-trivial abstractions, to some degree, are leaky.”
As your application grows, there will be parts that are not suited for that abstraction, which may become a big problem for scalability.
Event Bus
An event bus (and event-driven architectures in general) is based on a single strict rule: Every state change is generated by an event. This rule helps keep the complexity of your application proportional to its size, while in other architectures, the complexity is exponential to the size of the application. That is one reason why a big application’s code is usually less readable than a small application’s code.
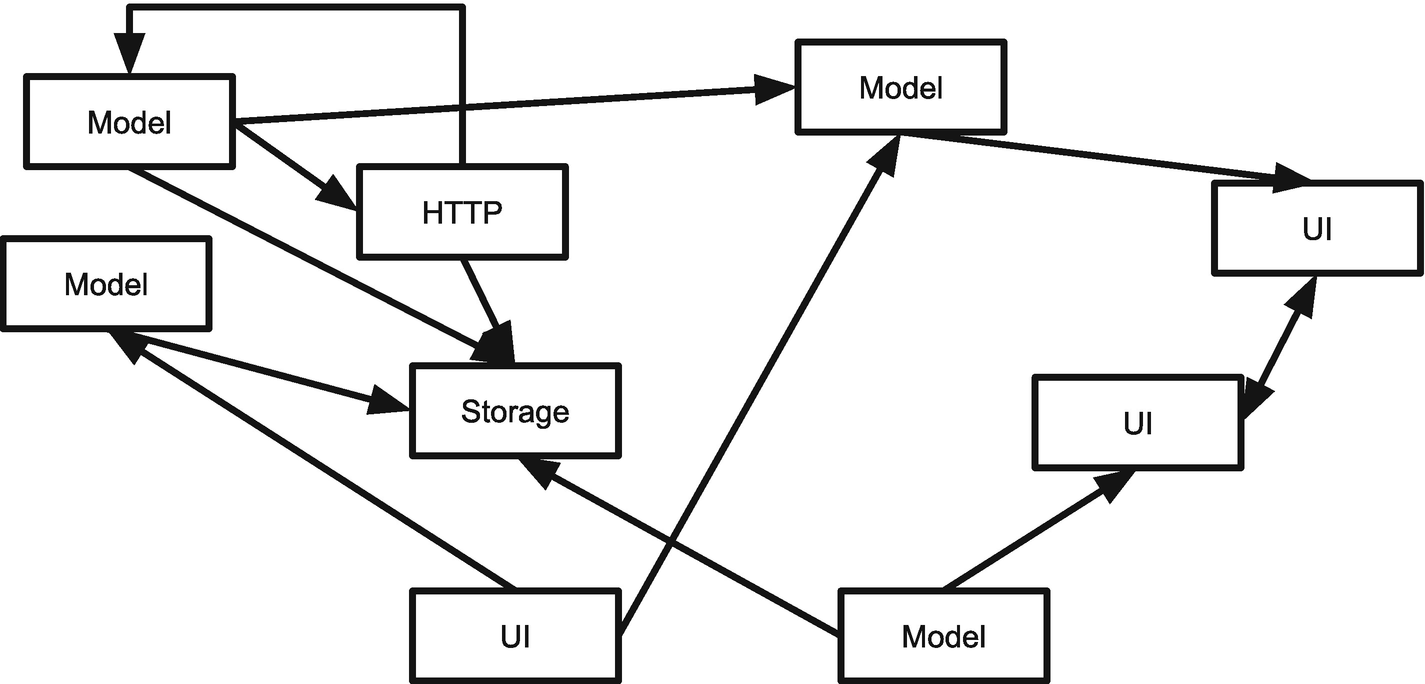
With the increase in the number of elements that make up your application, there more possibilities related to how to let them communicate, as shown in Figure 7-9.
Figure 7-9
Complexity in a big application
Strictly following the event bus pattern will remove this complexity, because the only way to communicate is through the bus itself (compare Figure 7-9 with Figure 7-7). This feature makes the event bus a very good approach if your first concern is the scalability of your codebase.
As you saw with frameworkless implementations of the event bus, it is easy to use and build. It’s also simple because the abstraction behind the pattern is not as strong as the one in reactive programming. The main problem with event bus is its verbosity. For every state update, the team needs to create the event, dispatch it through the bus, write the model that updated the state, and send the new state to the listeners. Because of the verbosity of this pattern, not all states of the application are managed with it. In the long run, developers tend to pair it with another state management strategy (MVC or reactive) to manage smaller or simpler domains, which results in a loss of consistency.
Table 7-2 is a summary of the comparisons made in this section.
Table 7-2
State Management Strategies Comparison
Simplicity
Consistency
Scalability
MVC
✓
✗
✗
Reactive
✗
✓
—
Event bus
—
✗
✓
As you may have noticed, none of these characteristics is really measurable; they are just my personal thoughts based on my studies and experiences. Using the different patterns covered in this chapter may lead you to completely different conclusions.
Summary
In this chapter, you learned about state management and why it is important in creating any kind of client application. You also analyzed and implemented three state management strategies: model-view-controller, reactive programming, and event bus.
In the last chapter, I introduce some decision-making techniques to help you choose the right tool for the right job.