
In the previous chapters, you learned to render DOM elements and to react to events from the system or users, but a front-end application feeds on asynchronous data from a server. The purpose of this chapter is to show you how to build an HTTP client in a frameworkless way.
A Bit of History: The Birth of AJAX
Before 1999, a complete page reload was required for every user action needing any kind of data from the server. For people that are approaching web development (or the web in general) today, it’s very hard to imagine web applications built in this way. In 1999, applications like Outlook, Gmail, and Google Maps started using a new technique: loading data from a server after the initial page load, without completely reloading the page. Jesse James Garrett, in his 2005 blog post ( https://adaptivepath.org/ideas/ajax-new-approach-web-applications/ ), named this technique AJAX, an acronym for Asynchronous JavaScript and XML.
The main part of any AJAX applications is the XMLHttpRequest object. As you will see later in this chapter, with this object, you can fetch data from a server with an HTTP request. The W3C made a first draft of the specification for this object in 2006.

AJAX vs. Non-AJAX architecture
A todo-list REST Server
A Dummy REST Server for Node.js
Representational State Transfer
In this section, I explain the meaning of REST, which is the architecture behind our dummy server. If you already know about REST, you can simply skip this section.
REST is an acronym for REpresentational State Transfer, which is a way to design and develop web services. The main abstraction of any REST API is its resources. You need to split your domain into resources. Each resource should be read or manipulated and accessed at a specific URI (Uniform Resource Identifier). For example, to see a list of the users in your domain, you should use this URI: https://api.example.com/users/ . To read the data for a specific user, the URI should have this form: https://api.example.com/users/id1 (where id1 is the ID of the user that you want to read).
REST API Cheat Sheet
Action | URI | HTTP Verb |
|---|---|---|
Read all users’ data | GET | |
Read data of user with ID “1” | GET | |
Create a new user | POST | |
Replace user data with ID “1” | PUT | |
Update user data with ID “1” | PATCH | |
Delete the user with ID “1” | DELETE |
The actions listed in this table are straightforward. The only topic that may need an explanation the difference between updating the data (with PATCH) and replacing the data (with PUT). When you use the verb PUT, you need to pass in the body of the HTTP requests the new user, complete in all its parts. When PATCH is used, the body should contain only the differences with the previous state. In this scenario, the new todo object is the result of the merging of the old todo with the request body.
We have only scratched the surface of REST APIs. If you want to go deeper, I suggest reading RESTful Web APIs: Services for a Changing World by Leonard Richardson and Mike Amundsen (O’Reilly Media, 2013).
Code Examples
We are going to create three different HTTP clients with three different technologies: XMLHttpRequest, Fetch, and axios. We will analyze each client’s strengths and weaknesses.
The Basic Structure

The application used to test the HTTP clients
HTML for HTTP Client Application
Main Controller for HTTP Client Application
In this controller, I didn’t use the HTTP client directly; instead, I wrapped the HTTP request in a todos model object. This kind of encapsulation is useful for a lot of reasons.
One of the reasons is testability. It’s possible to replace the todos object with a mock that returns a static set of data (also called a fixture) . In this way, I can test my controller in isolation.
Another reason is readability; model objects make your code more explicit.
Tip
Never directly use HTTP clients in controllers. Try to encapsulate these functions in model objects.
Todos Model Object
The signature of our HTTP client is http[verb](url, config) for verbs that don’t need a body, like GET or DELETE. For the other verbs, we can add the request body as a parameter, with this signature: http[verb](url, body, config).
There is no rule that forces your team to use this kind of public API for an HTTP client. Another option is to use http as a function and not as an object, adding the verb as a parameter: http(url, verb, body, config). Whatever you decide, try to keep it consistent.
Now that we have defined our HTTP client’s public contract, it’s time to look at the implementations.
XMLHttpRequest
HTTP Client with XMLHttpRequest
The core part of our HTTP client is the request method . XMLHttpRequest is an API defined in 2006, so it’s based on callbacks. We have the onload callback for a completed request, the onerror callback for any HTTP that ends with an error, and the ontimeout callback for a request that times out. There is no timeout by default, but you can change it by modifying the timeout property of the xhr object.
The HTTP client’s public API is based on promises ( https://developer.mozilla.org/en-US/docs/Web/JavaScript/Reference/Global_Objects/Promise ). So the request method encloses the standard XMLHttpRequest request with a new Promise object. The public methods get, post, put, patch, and delete are wrappers around the request method (passing the appropriate parameters) to make the code more readable.
- 1.
Create a new XMLHttpRequest object (new XMLHttpRequest()).
- 2.
Initialize the request to a specific URL (xhr.open(method, url)).
- 3.
Configure the request (setting headers, timeout, etc.).
- 4.
Send the request (xhr.send(JSON.stringify(body))).
- 5.Wait for the end of the request.
- a.
If the request ends successfully, the onload callback is invoked.
- b.
If the request ends with an error, the onerror callback is invoked.
- c.
If the request times out, the ontimeout callback is invoked.
- a.
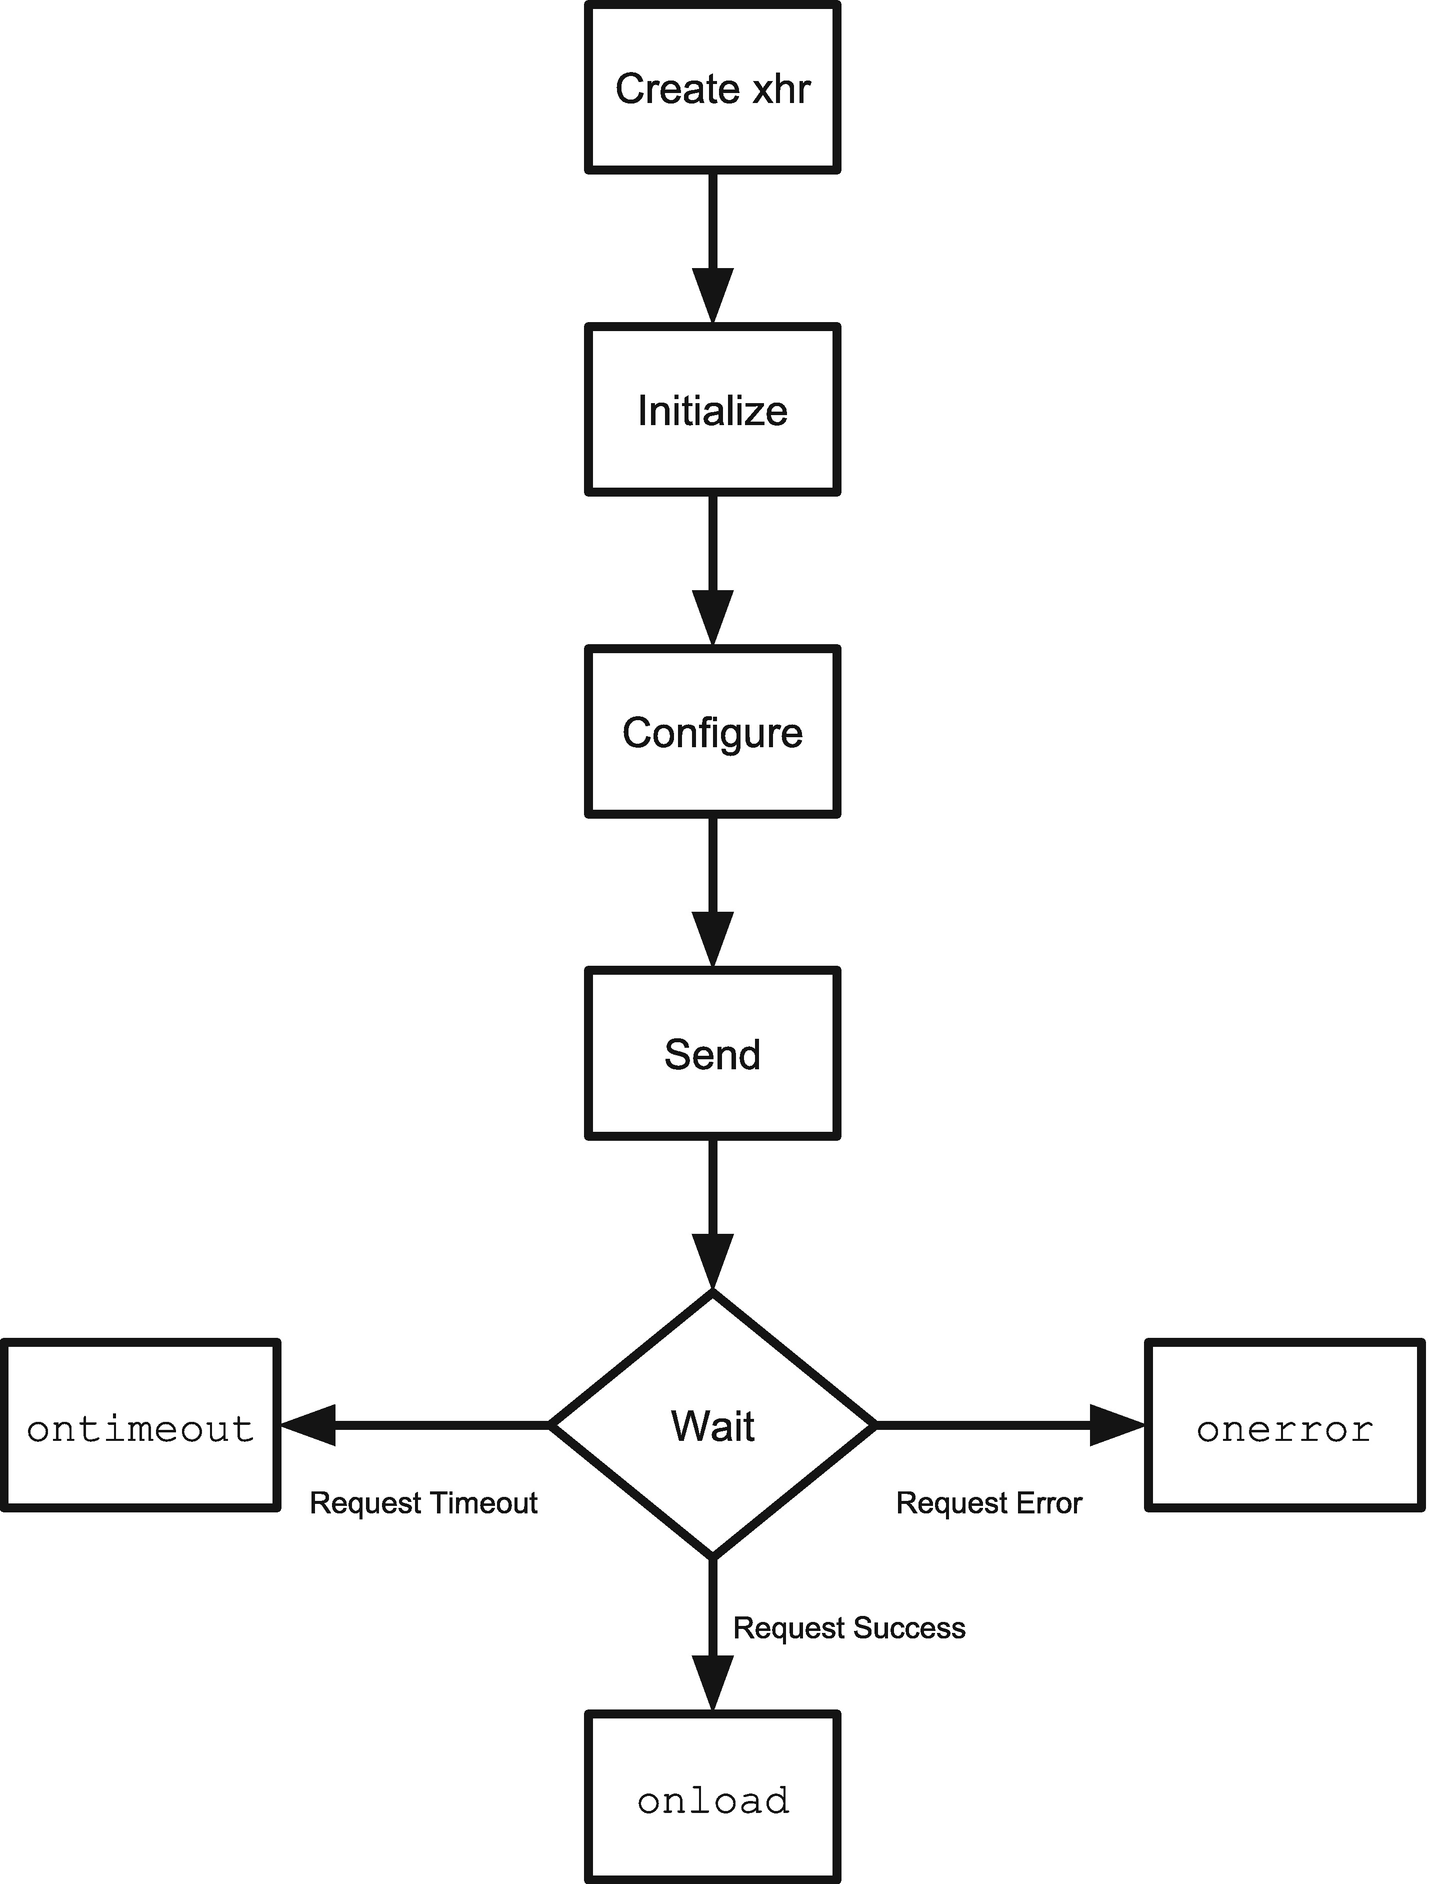
Flow of an HTTP request with XMLHttpRequest
Fetch
Fetch is a new API created for access to remote resources. Its purpose is to provide a standard definition for many network objects, such as Request or Response. This way, these objects are interoperable with other APIs, such as ServiceWorker ( https://developer.mozilla.org/en-US/docs/Web/API/ServiceWorker ) and Cache ( https://developer.mozilla.org/en-US/docs/Web/API/Cache ).
HTTP Client Based on the Fetch API
This HTTP client has the same public API as the one built with XMLHttpRequest: a request function wrapped with a method for each HTTP verb that we want to use. The code of this second client is much more readable because of window.fetch returning a Promise object, so we don’t need a lot of boilerplate code to transform the classic callback-based approach of XMLHttpRequest in a more modern promise-based one.
The promise returned by window.fetch resolves a Response object . We can use this object to extract the body of the response sent by the server. Depending on the format of the data received, there are different methods available; for example, text(), blob(), or json(). In our scenario, we always have JSON data, so it’s safe to use json().
Nevertheless, in a real-world application, you should use the right method accordingly with the Content-Type header. You can read the complete reference of all the objects of the Fetch API on the Mozilla Developer Network at https://developer.mozilla.org/en-US/docs/Web/API/Fetch_API/Using_Fetch .
Axios
The last HTTP client that we are going to analyze is built with axios, a small open source library. The documentation and the source code is on GitHub ( https://github.com/axios/axios ).
HTTP Client Based on Axios
Among the three versions of the HTTP client, this is the easiest to read. The request method in this case rearranges the parameter to match the axios signature with the public contract.
Let’s Review Our Architecture
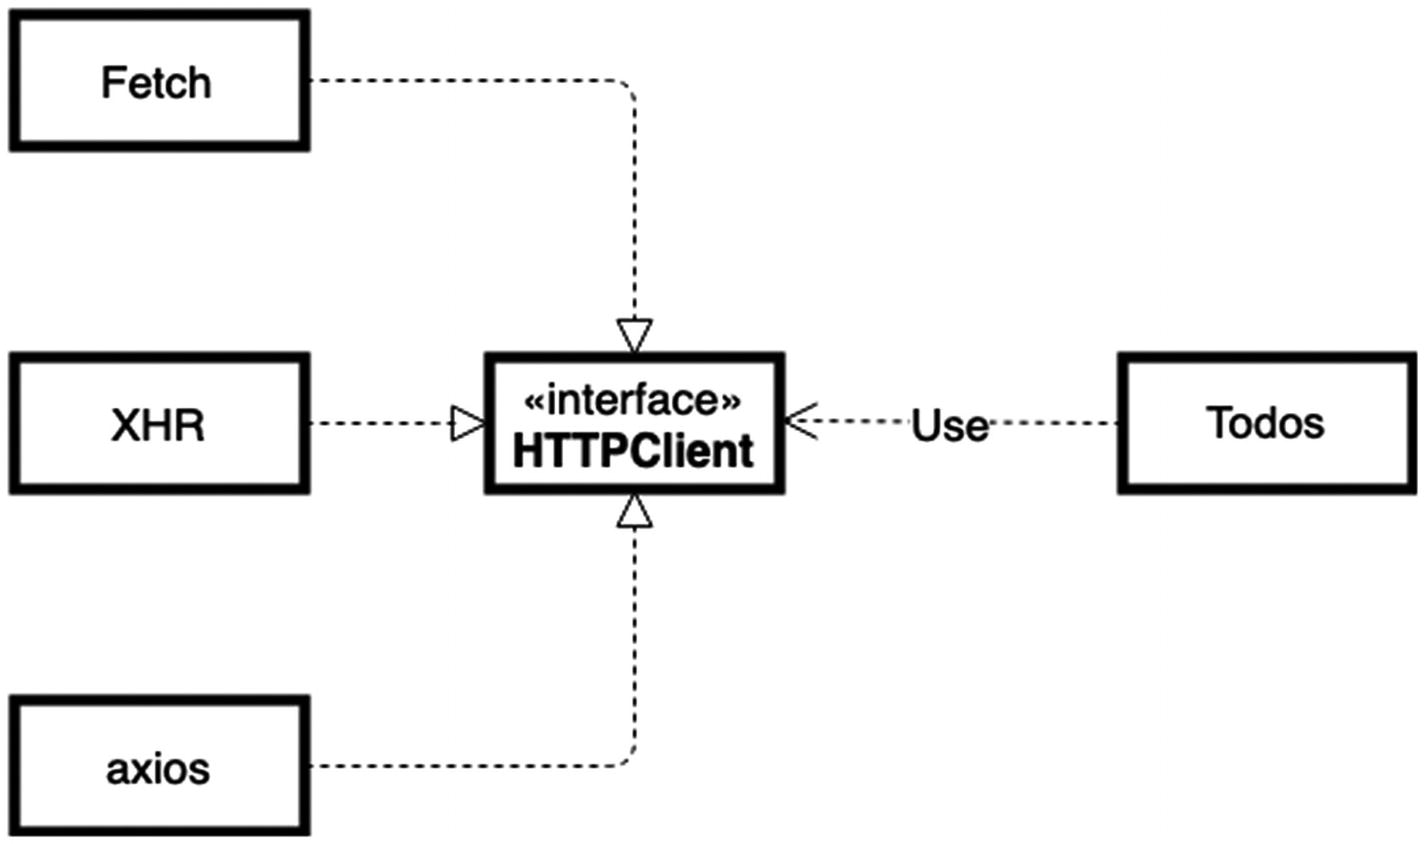
UML diagram of HTTP client
Program to an interface, not an implementation.
—Gang of Four
This principle, found in the Gang of Four’s book Design Patterns: Elements of Reusable Object-Oriented Software (Addison-Wesley Professional, 1994), is very important when working with libraries.
Imagine having a very large application with dozens of model objects that need to access network resources. If we use axios directly, without using our HTTP client, changing the implementation to the Fetch API would be a very expensive (and tedious) task. Using axios in our model objects means programming to an implementation (the library) and not to an interface (the HTTP client).
Caution
When using a library, always create an interface around it. It will be easier to change the library to a new one if you need to.
How to Choose the Right HTTP API
I talk about how to choose the “right” framework in the last chapter of this book. As I will explain more, there is no “right” framework. You can pick the “right” framework, but only for a “right” context.
So, for now, I will just point out the characteristics of XMLHttpRequest, the Fetch API, and axios from different perspectives.
Compatibility
If supporting Internet Explorer is important for your business, you have to rely on axios or XMLHttpRequest because the Fetch API works only on modern browsers.
Axios supports Internet Explorer 11, but if you need to work with older versions of Internet Explorer, you probably need to use XMLHttpRequest. Another option is to use a polyfill for the Fetch API ( https://github.github.io/fetch/ ), but I suggest this approach only if your team plans to remove support for Internet Explorer very soon.
Portability
Both the Fetch API and XMLHttpRequest work only on browsers. If you need to run your code in other JavaScript environments, such as Node.js or React Native, axios is a very good solution.
Evolvability
One of the most important features of the Fetch API is to provide a standard definition of network-related objects like Request or Response. This characteristic makes the Fetch API a very useful library if you want to evolve your codebase quickly, because it fits seamlessly with new APIs like the ServiceWorker API or the Cache API.
Security
Axios has a built-in protection system against cross-site request forgery, or XSRF ( https://en.wikipedia.org/wiki/Cross-site_request_forgery ). If you stick with XMLHttpRequest or the Fetch API, and you need to implement this kind of security system, I suggest that you examine axios unit tests about this topic ( https://github.com/axios/axios/blob/master/test/specs/xsrf.spec.js ).
Learning Curve
If your code is based on axios or the Fetch API, it will be easier for newcomers to grasp the bulk of its meaning. XMLHttpRequest may look a bit strange to junior developers because they may not be used to working with callbacks. In that scenario, be sure to wrap the internal API with a promise, as I did in my example.
Summary
In this chapter, you learned about the rise of AJAX and how it changed web development. Then you looked at three distinct ways to implement an HTTP client. The first two were completely frameworkless and based on standard libraries (XMLHttpRequest and the Fetch API). The third one was based on an open source project called axios. Finally, you saw the differences between them from different points of view.
In the next chapter, you learn how to create a frameworkless routing system, an essential element in a single-page application.