In the last chapter, we talked about rendering, or more generally, how to draw DOM elements that match with our data. But a web application is not a painting; its contents change over time. The cause of these changes is events.
Events, regardless that they are created by the user or by the system, are a very important aspect of the DOM API. The purpose of this chapter is to understand how to manage these events in a frameworkless application.
The first part of the chapter is an introduction to the DOM Events API. You will learn what an event handler is and how to properly attach it to DOM elements. In the second part of the chapter, you will add some interactivity managing events to the TodoMVC application.
The YAGNI Principle
In this chapter, you will modify the rendering engine from the previous chapter to add DOM events management. So, why did I decide to start showing you an engine that is incomplete—completely ignoring the events? Two reasons are readability and simplicity. But I would use the same approach for a real-world project. I would focus on the most important feature, and then I would iterate—evolving my architecture around new needs. This is one of the principles of extreme programming (XP), which is called YAGNI (You aren’t gonna need it.). To better explain the YAGNI principle, I often use this quote from Ron Jeffries, one of the founders of XP.
Always implement things when you actually need them. Never when you just foresee that you need them.
This is a good principle to follow in any use case, but it’s crucial for a frameworkless project. When I talk about the frameworkless approach, one of the criticisms that I often hear is, “You will just write another framework that no one will maintain.” This is actually a risk if you overengineer your architecture. When you’re creating your own architecture, you should apply YAGNI, and solve only the problems that you have at that moment. Don’t try to foresee the future.
Look at the way I wrote the code from the last chapter as a reference for the YAGNI principle. I (tried to) write the best code possible for rendering, and only later did I add the events to the mix.
The DOM Events API
Events are actions that happen in a web application, which the browser tells you about so that you can react to them in some way. There is a wide variety of event types, and you can consult the Mozilla Developer Network for a comprehensive list (https://developer.mozilla.org/en-US/docs/Web/Events).
You can react to events triggered by the user, including mouse events (click, double click, etc.), keyboard events (keydown, keyup, etc.), and view events (resize, scroll, etc.). Furthermore, the system itself can emit events; or example, you can react to changes in your network status or when the DOM content is loaded (see Figure 3-1).
Figure 3-1
Basic click event lifecycle
To react to an event, you need to attach to the DOM element that triggered the event, which is a callback called an event handler.
Tip
For view or system events, you need to attach the event handler to the window object.
Attach Handlers with Properties
A quick-and-dirty way to attach an event handler to a DOM element is to use the on* properties. For every event type, there is a corresponding property on the DOM elements. A button has an onclick property, but also ondblclick, onmouseover, onblur, and onfocus properties as well. Properties make attaching a handler to a click event straightforward, as shown in Listing 3-1. The result of this listing is visible in Figure 3-2.
const button = document.querySelector('button')
button.onclick = () => {
console.log('Click managed using onclick property')
}
Listing 3-1
Click Handler with onclick Property
Figure 3-2
Example of onclick property handler
I just said that this is a “quick and dirty” solution. It’s easy to grasp why it’s quick, but why is it also dirty? This kind of solution, even if it works, is usually considered a bad practice. The main reason is because with properties, you can attach only one handler at a time. So if a piece of code overwrites your onclick handler, your original handler is lost forever. In the next section, you learn a better, approach: the addEventListener method.
Attach Handlers with addEventListener
Every DOM node that handles events implements the EventTarget interface. Its addEventListener method adds event handlers to a DOM node. Listing 3-2 shows you how to add a simple button-click event handler by using this technique.
const button = document.querySelector('button')
button.addEventListener('click', () => {
console.log('Clicked using addEventListener')
})
Listing 3-2
Click Handler with addEventListener
The first parameter is the event type. In the last example, we managed the click, but you can add listeners that handle any supported event type. The second parameter is the callback, which is invoked when the event is triggered.
In contrast to the property method, addEventListener can attach all the handlers that you need, as shown in Listing 3-3.
const button = document.querySelector('button')
button.addEventListener('click', () => {
console.log('First handler')
})
button.addEventListener('click', () => {
console.log('Second handler')
})
Listing 3-3
Multiple Click Event Handlers
Keep in mind that when an element is no longer present in the DOM, you should remove its event listeners as well, in order to prevent memory leaks. To do that, you use the removeEventListener method. Listing 3-4 is an example.
The most important thing to notice in the previous snippet is that to remove an event handler, you should keep a reference to it in order to pass it as a parameter in the removeEventListener method.
The Event Object
In all the code that we have analyzed so far, event handlers were created without parameters. But the signature of an event handler can contain a parameter that represents the event emitted by the DOM node or the system. In Listing 3-5, we simply print this event in the console.
As you can see in Figure 3-3, the event contains a lot of useful information, such as the coordinates of the pointer, the type of event, and the element that triggered the event.
const button = document.querySelector('button')
button.addEventListener('click', e => {
console.log('event', e)
})
Listing 3-5
Printing the Event Object to the Console
Figure 3-3
Printing the event object to the console
Any event dispatched in a web application implements the Event interface. Based on its type, the event object can implement a more specific interface that extends the Event interface.
A click event (but also dblclick, mouseup, and mousedown) implements the MouseEvent interface. This interface contains information about the coordinates or the movement of the pointer during the event, and other useful data. The MouseEvent interface hierarchy is shown in Figure 3-4.
When you read code that uses the addEventListener method to add a handler, you usually see something like this:
button.addEventListener('click', handler, false)
The third parameter is called useCapture, and its default value is false. This parameter has not always been optional. Ideally, you should include it to get the widest possible browser compatibility. But what does it mean to capture an event? And what happens if we set useCapture to true? Let’s try to figure it out with an example. Consider the HTML structure in Listing 3-6.
<body>
<div>
This is a container
<button>Click Here</button>
</div>
</body>
Listing 3-6
A Simple, Nested HTML Structure
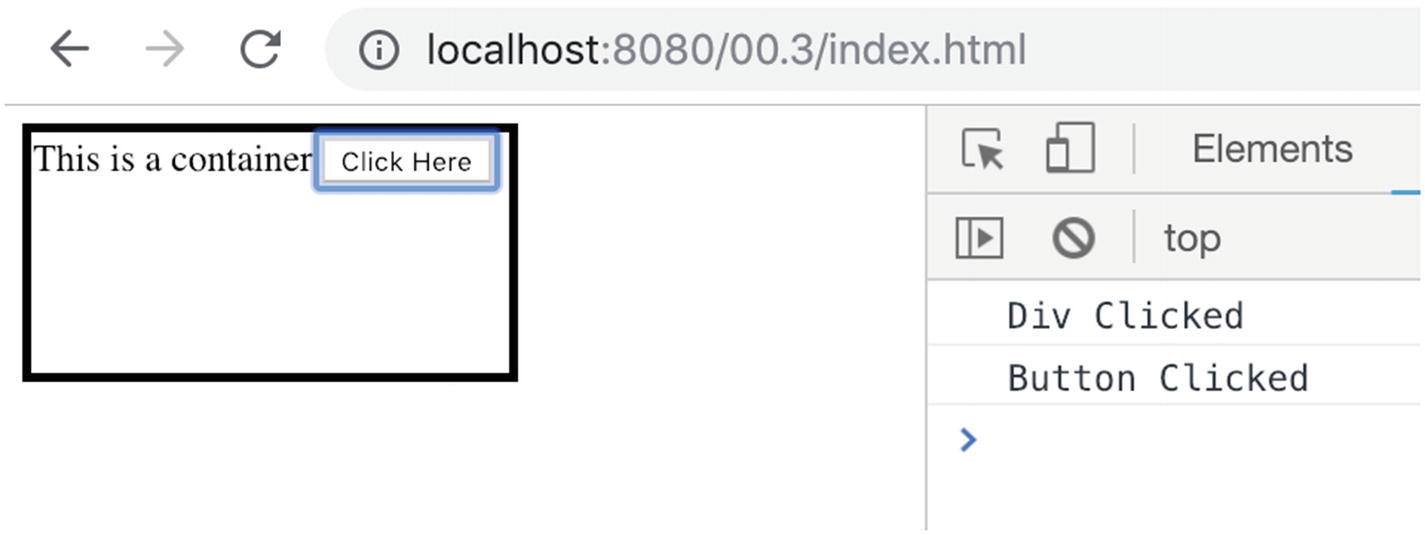
In Listing 3-7, event handlers are attached to both DOM elements: div and button.
const button = document.querySelector('button')
const div = document.querySelector('div')
div.addEventListener('click', () => {
console.log('Div Clicked')
}, false)
button.addEventListener('click', () => {
console.log('Button Clicked')
}, false)
Listing 3-7
Showing the Bubble Phase Mechanism
What happens if we click the button? Given that button is inside div, both handlers are invoked, starting with button. So the event object starts from the DOM node that triggered it (in this case, button) and goes up to all its ancestors. This mechanism it’s called bubble phase or event bubbling. We can stop the bubble chain with the stopPropagation method from the Event interface. In Listing 3-8, this method is used in the button handler to stop the div handler.
const button = document.querySelector('button')
const div = document.querySelector('div')
div.addEventListener('click', () => {
console.log('Div Clicked')
}, false)
button.addEventListener('click', e => {
e.stopPropagation()
console.log('Button Clicked')
}, false)
Listing 3-8
Stopping the Bubble Chain
In this case, the div handler is not invoked. This technique could be useful when you have a complex layout, but if you often rely on the order of the handlers, your code could become very hard to maintain. In these cases, the event delegation pattern could be useful. I talk about event delegation in greater detail at the end of the chapter.
You can use the useCapture parameter to reverse the handlers’ order of execution. In Listing 3-9, the div handler is invoked before the button handler, as you can see in Figure 3-5.
const button = document.querySelector('button')
const div = document.querySelector('div')
div.addEventListener('click', e => {
console.log('Div Clicked')
}, true)
button.addEventListener('click', e => {
console.log('Button Clicked')
}, true)
Listing 3-9
Using useCapture to Reverse the Order of the Events Handlers
Figure 3-5
Using capture phase
In other words, using true for the useCapture parameter during the invocation of addEventListener means that we want to add the event handler to the capture phase instead of the bubble phase. While in the bubble phase, the handlers with a bottom-up process, in the capture phase it’s the opposite. The system starts managing handlers from the <html> tag and goes deeper until the element that triggered the event is managed. It’s important to remember that, for every DOM event that is generated, browsers run the capture phase (top-down) and then the bubble phase (bottom-up). There is also a third phase, called the target phase. This special phase occurs when the event reaches the target element—button in our case. The following summarizes most DOM events’ lifecycle.
1.
Capture phase: The event travels from html to target element.
2.
Target phase: The event reaches the target element.
3.
Bubble phase: The event travels from target element to html.
A more detailed version of this lifecycle is shown in Figure 3-6.
Figure 3-6
Event lifecycle
These phases exist for historical reasons. In the dark days, some browsers only managed the capture phase, while others only managed the bubble phase. Generally, it’s OK to only use bubble phase handlers, but it’s important to know about the capture phase to manage complex situations.
Using Custom Events
The only event that we have handled so far is a button click. In a similar way, we can handle a lot of different kind of events, like the one that we talked about at the beginning of the chapter. But the DOM event API is far more powerful. We can define custom event types and handle them like any other event.
This is a really important part of the DOM Events API because we can create DOM events that are bounded to our domain and only on what happened in the system itself. We can create an event handler for login or logout, or for something that happened to our dataset, such as the creation of a new record in a list.
As you can see in Listing 3-10, to create a custom event, you have to use the CustomEvent constructor function.
const EVENT_NAME = 'FiveCharInputValue'
const input = document.querySelector('input')
input.addEventListener('input', () => {
const { length } = input.value
console.log('input length', length)
if (length === 5) {
const time = (new Date()).getTime()
const event = new CustomEvent(EVENT_NAME, {
detail: {
time
}
})
input.dispatchEvent(event)
}
})
input.addEventListener(EVENT_NAME, e => {
console.log('handling custom event...', e.detail)
})
Listing 3-10
Firing Custom Events
While managing the input event, we check for the length of the value itself. If the length is exactly five, we fire a special event called FiveCharInputValue. We add a standard event listener with the usual addEventListener method to handle the custom event. Notice how we can use the same API for both a standard (input) and a custom event. We can also pass additional data to the handlers with the detail object that we used in the constructor (in this case, a timestamp). The result of Listing 3-10 is shown in Figure 3-7.
Figure 3-7
Using custom events
In Chapter 4, I show you how to use custom events to let components communicate with each other.
Adding Events to TodoMVC
Now that you have learned the basic concepts of the DOM Events API, let’s add event handling to our TodoMVC application. Let’s take another look at a complete TodoMVC application (a screenshot is shown in Figure 3-8) to learn which events need to be handled.
Figure 3-8
Complete TodoMVC application
The following are the events that we need to manage.
Delete an item. Click the cross to the right of every row.
Toggle an item as complete or not. Click the circle to the left of every row.
Change the filter. Click the filter name on the bottom.
Create a new item. Input a value in the top input text and press Enter on the keyboard.
Remove all completed items. Click the “Clear completed” label.
Toggle all items as completed or not. Click the chevron in the top-left corner.
Edit an item. Double-click the row, change the value, and press Enter on the keyboard.
Let’s Review Our Rendering Engine
Before adding event handlers to the TodoMVC application, we need to change some parts of our rendering engine. The problem with the last implementation that we developed in Chapter 2 is that some parts worked with strings instead of DOM elements. In Listing 3-11, you can see the “todos” component from Chapter 2. You can find the complete code for this example at https://github.com/Apress/frameworkless-front-end-development/tree/master/Chapter02/05.
const getTodoElement = todo => {
const {
text,
completed
} = todo
return `
<li ${completed ? 'class="completed"' : "}>
<div class="view">
<input
${completed ? 'checked' : "}
class="toggle"
type="checkbox">
<label>${text}</label>
<button class="destroy"></button>
</div>
<input class="edit" value="${text}">
</li>`
}
export default (targetElement, { todos }) => {
const newTodoList = targetElement.cloneNode(true)
const todosElements = todos
.map(getTodoElement)
.join(")
newTodoList.innerHTML = todosElements
return newTodoList
}
Listing 3-11
The Todos Component
Every todo element in our list is created with a string, joined together, and then added to the parent list with innerHTML. But we cannot add event handlers to strings; we need DOM nodes to invoke addEventListener.
The Template Element
There are many different techniques for creating DOM nodes programmatically. One of them is to use document.createElement, an API that lets developers create new empty DOM nodes. You can see an example of the usage of this method in Listing 3-12.
const newDiv = document.createElement('div')
if(!condition){
newDiv.classList.add('disabled')
}
const newSpan = document.createElement('span')
newSpan.textContent = 'Hello World!'
newDiv.appendChild(newSpan)
Listing 3-12
document.createElement Examples
We could use this API to create an empty li, and then add the various div handlers, input handlers, and so on. But our code would be very hard to read and maintain. Another (better) option is to keep the markup of the todo element inside a template tag in the index.html file. A template tag is just what its name suggests: an invisible tag that you can use as a “stamp” for our rendering engine. Listing 3-13 has a template example of the todo-item.
<template id="todo-item">
<li>
<div class="view">
<input class="toggle" type="checkbox">
<label></label>
<button class="destroy"></button>
</div>
<input class="edit">
</li>
</template>
Listing 3-13
todo-item template Element
In Listing 3-14, this template is used in the todos component as a “stamp” to create a new li DOM node.
let template
const createNewTodoNode = () => {
if (!template) {
template = document.getElementById('todo-item')
}
return template
.content
.firstElementChild
.cloneNode(true)
}
const getTodoElement = todo => {
const {
text,
completed
} = todo
const element = createNewTodoNode()
element.querySelector('input.edit').value = text
element.querySelector('label').textContent = text
if (completed) {
element
.classList
.add('completed')
element
.querySelector('input.toggle')
.checked = true
}
return element
}
export default (targetElement, { todos }) => {
const newTodoList = targetElement.cloneNode(true)
newTodoList.innerHTML = "
todos
.map(getTodoElement)
.forEach(element => {
newTodoList.appendChild(element)
})
return newTodoList
}
Listing 3-14
Using template to Generate todo Items
We can then extend the template technique to all the applications by creating an app component. The first step is to wrap the markup of our todo-list in a template element, as shown in Listing 3-15.
<body>
<template id="todo-item">
<!-- Put here todo item content-->
</template>
<template id="todo-app">
<section class="todoapp">
<!-- Put here app content-->
</section>
</template>
<div id="root">
<div data-component="app"></div>
</div>
</body>
Listing 3-15
Using template for the Entire App
In Listing 3-16, a new component called app is created. This component utilizes the newly created template to generate its content. This is the last part of the template porting of the TodoMVC application. This new version of the application will be the base of our event handlers’ architecture. The application’s complete code is hosted at https://github.com/Apress/frameworkless-front-end-development/tree/master/Chapter03/01.1.
let template
const createAppElement = () => {
if (!template) {
template = document.getElementById('todo-app')
}
return template
.content
.firstElementChild
.cloneNode(true)
}
export default (targetElement) => {
const newApp = targetElement.cloneNode(true)
newApp.innerHTML = "
newApp.appendChild(createAppElement())
return newApp
}
Listing 3-16
App Component with Template
A Basic Event Handling Architecture
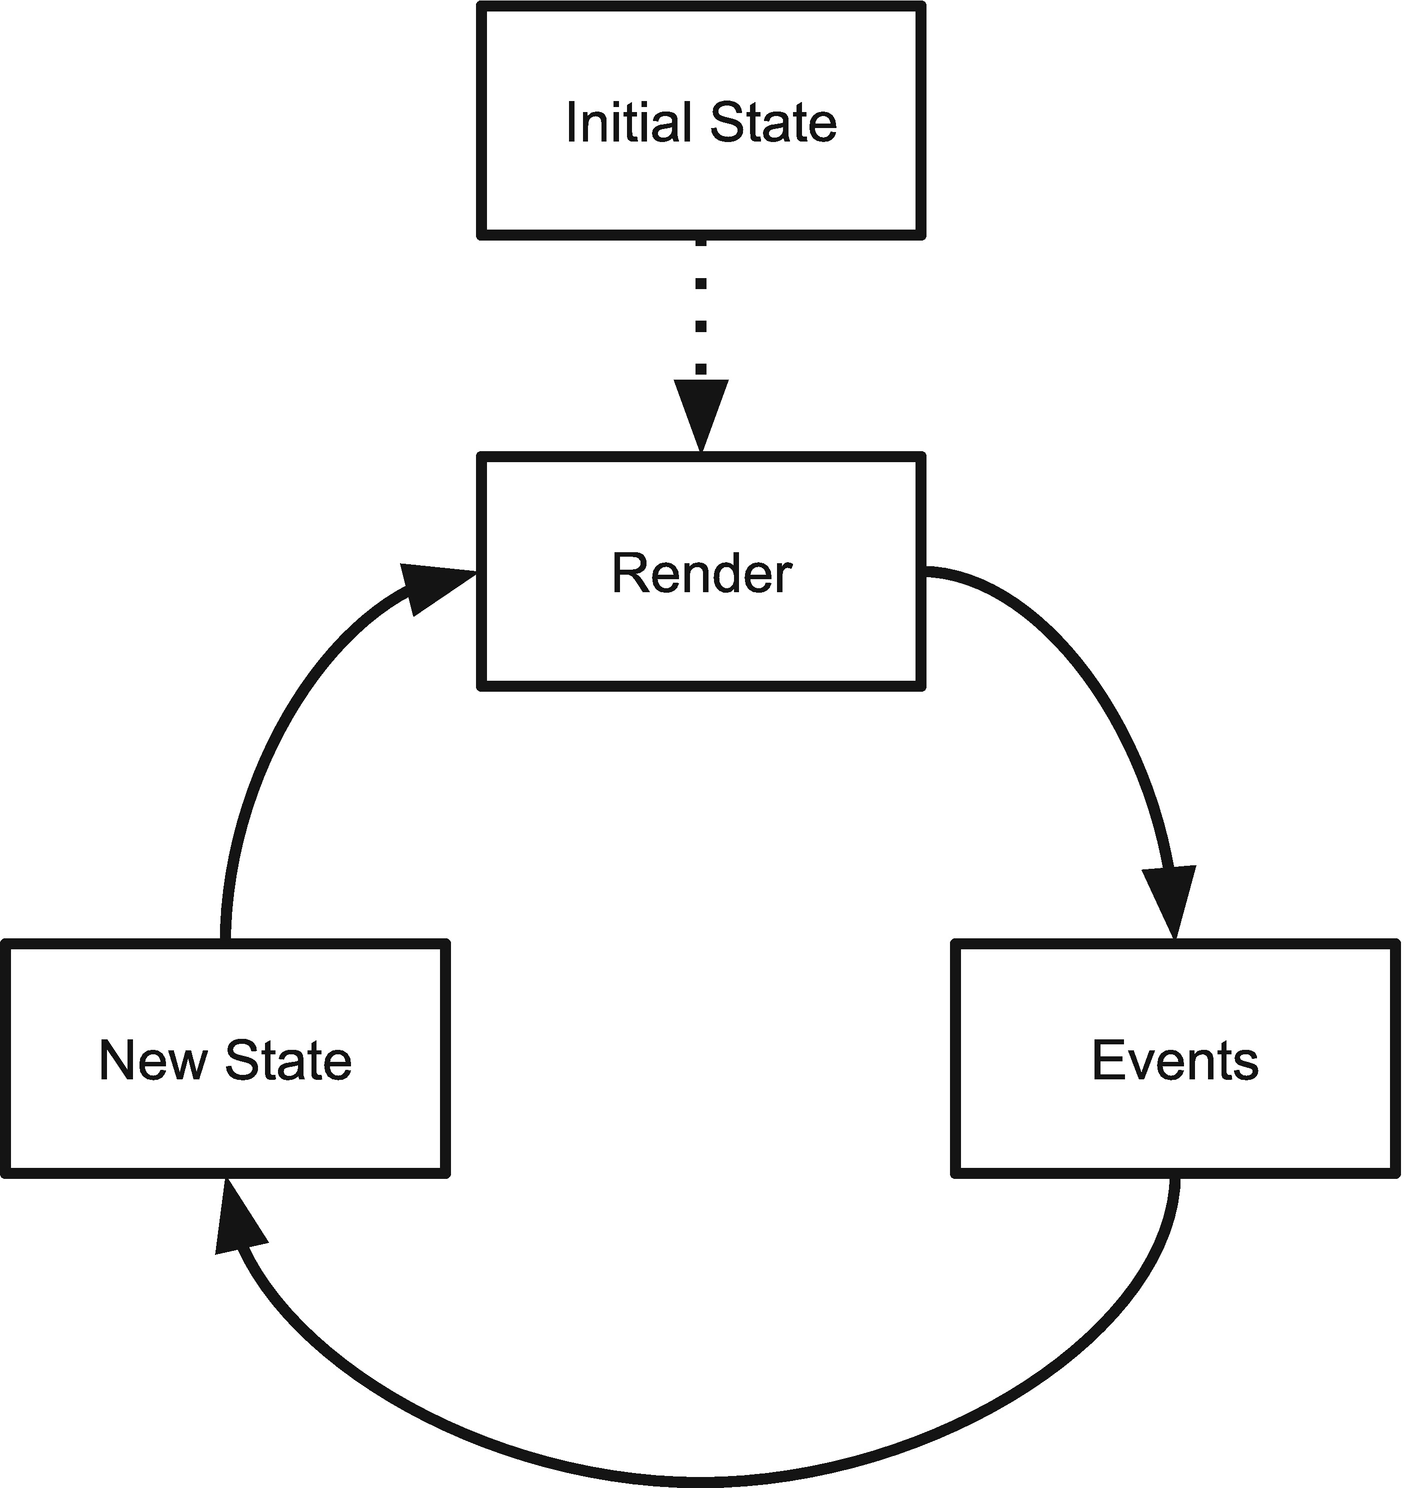
Now that we have a new rendering engine that works with DOM elements instead of strings, we are ready to attach event handlers to our application. Let’s start with a high-level overview and then look at a working example. Our rendering engine it’s based on pure functions that get a state and generate a DOM tree.
For every new state, we can generate a new DOM tree and apply a virtual DOM algorithm. In this scenario, we can easily inject our event handlers in this “loop.” After every event, we will manipulate the state and then invoke the main render function with this new state. Figure 3-9 is a schema of this state-render-eventloop.
Figure 3-9
Event handling high-level architecture
We can test our state-render-eventloop by enumerating the steps of a simple use case for our application. Let’s try to imagine a user that adds and deletes an item from the list.
Initial state: empty todo list
Render: shows the user an empty list
Event: the user creates a new item named “dummy item”
New state: todo list with one item
Render: shows the user a list with one item
Event: the user deletes the item
New state: empty todo list
Render: showing the user an empty list
Now that we defined our high-level architecture, it’s time to implement it. Listing 3-17 defines these events and the related state modification in our controller.
const state = {
todos: [],
currentFilter: 'All'
}
const events = {
deleteItem: (index) => {
state.todos.splice(index, 1)
render()
},
addItem: text => {
state.todos.push({
text,
completed: false
})
render()
}
}
const render = () => {
window.requestAnimationFrame(() => {
const main = document.querySelector('#root')
const newMain = registry.renderRoot(
main,
state,
events)
applyDiff(document.body, main, newMain)
})
}
render()
Listing 3-17
A Controller with Events
The entry point of our rendering engine, the renderRoot function, now takes a third parameter that contains the events. In a moment, you will see that this new parameter is accessible to all of our components. Our events are very simple functions that modify the state and manually invoke a new render. In a real-world application, I suggest creating some kind of “event registry” that helps developers quickly add handlers and automatically invoke a new render cycle. For now, this implementation is good enough.
In Listing 3-18, the addItem handler is used by the app component to add a new item to the list.
For every render cycle, we generate a new DOM element and attach an event handler to the input handler used to insert the value of the new item. When the user presses Enter, the addItem function is fired and then the input handler is cleared.
In Listing 3-18, something may have seemed out of place. We cleared the value of the input inside the event itself. Why the value of the input it’s not part of the state like the list of todos or the current filter? I address this topic in Chapter 7, so for now, we can ignore this problem.
The other action that the user can do in this example is delete an item. So, the component that needs access to events is todos, as you can see in Listing 3-19.
const getTodoElement = (todo, index, events) => {
const {
text,
completed
} = todo
const element = createNewTodoNode()
element.querySelector('input.edit').value = text
element.querySelector('label').textContent = text
if (completed) {
element.classList.add('completed')
element
.querySelector('input.toggle')
.checked = true
}
const handler = e => events.deleteItem(index)
element
.querySelector('button.destroy')
.addEventListener('click', handler)
return element
}
export default (targetElement, { todos }, events) => {
Event delegation is a feature provided with most front-end frameworks. It’s usually well-hidden under the hood. To better understand what event delegation is, let’s look at an example. Listing 3-20 is a revised version of Listing 3-19 and based on event delegation.
This is different from the previous component because here we have only one event handler, which is attached to the list itself. There is no separate event handler for every row. If you have a very long list, this approach could improve performance and memory usage.
Notice the usage of the matches API (https://developer.mozilla.org/en-US/docs/Web/API/Element/matches) to check if an element is our “real” event target. By using this approach on a larger scale, you can achieve only one event handler on the body of a web page. Building an event delegation library is beyond the scope of this book, but there are several libraries that you can use in your projects. One of these libraries is gator.js (https://craig.is/riding/gators), which is very easy to use. Listing 3-21 is a simple example of a handler attached to this library.
Gator(document).on('click', 'button.destroy', e => {
deleteItem(e.target.dataset.index)
})
Listing 3-21
gator.js Example
I want to share the same advice that I used to close the last chapter. Don’t add any kind of optimization, such as event delegation, until you really need it. Remember the YAGNI principle and that adding an event delegation library like gator.js to an existing project can be done in an iterative way for the most critical parts.
Summary
This chapter covered some basic concepts of the DOM Events API. You learned how to attach and remove event handlers, the difference between the bubble phase and the capture phase, and how to create custom events. We updated our TodoMVC application by adding events to add and remove an item.
Finally, I introduced the concept of event delegation, an important pattern to keep frameworkless applications performant enough for in nontrivial contexts.
In the next chapter, you learn how to work effectively with web components, particularly, a standard way to create components in web applications.